
- Instant Pot Duo Crisp
Ninja Foodi Turkey Breast is quick, easy, & delicious! It's so good, you're going to want turkey more than once or twice a year!
Would you like to save this recipe?
Possibly even more so than the chicken breast, the perfect turkey breast often eludes the best of cooks. Achieving that perfect balance of tender and juicy meat with a nice crisp skin is not always easy! Enter... the Ninja Foodi and all of a sudden, it's not only easy, it's QUICK!
This post may contain affiliate links. If you make a purchase after clicking a link, I may earn a small commission. As an Amazon Affiliate, I earn from qualifying purchases.
So quick, in fact, that I overcooked mine by a few minutes and I only pressure cooked for 10 minutes! 10 minutes! To say I was shocked is an understatement.
I had recently made several whole turkeys while creating a recipe and a video for cooking a whole turkey in the Ninja Foodi, so I thought I had things pretty well worked out as far as timing goes. I still overcooked my turkey breast by just a few degrees and, let me tell you, those few degrees do make a difference!
No worries though, I simply made some delicious and oh-so-easy Blender Gravy in my new (affiliate link)Ninja Foodi Hot Cold Blender and all was fine in the neighborhood. Jeff and I really enjoyed our pre-Thanksgiving dinner that consisted of Turkey Breast, easy bread stuffing, mashed sweet potatoes with a praline topping, scalloped potatoes, cranberry butter, and of course that delicious gravy!
You might notice we were missing veggies in our pre-Thanksgiving feast and that is because I royally screwed up my homemade green bean casserole and have to go back to the drawing board on that one. Oh well, that is life.
What size Turkey Breast should I get?
First, let me clarify that we are talking about a bone-in, skin-on turkey breast. These tips and instructions are not for the boneless, skinless turkey breasts that you can also get in the store.
Turkey breasts range in size, from a few pounds to 9 or 10 pounds and look like this picture below.
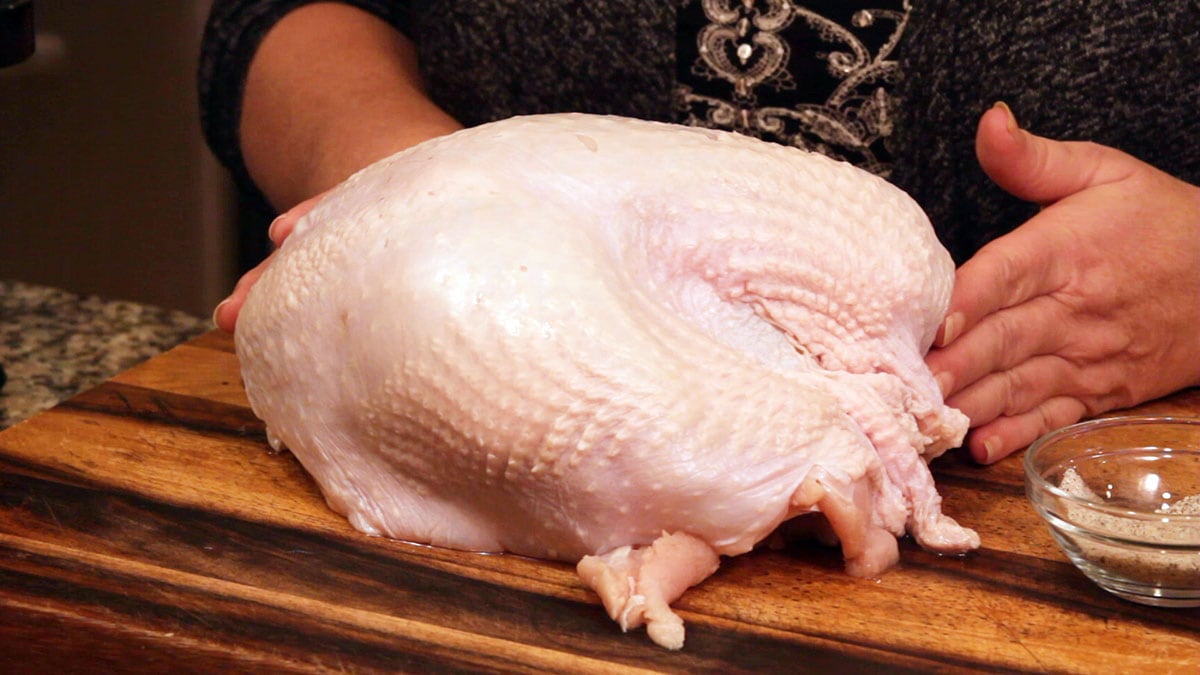
The one pictured here is 6 pounds and will easily feed 4 people with a healthy serving of turkey breast per person and some left overs. I would figure on 1 pound of turkey breast (including skin and bones) per person. So, if you are serving 8 people, look for an 8 pound turkey breast.
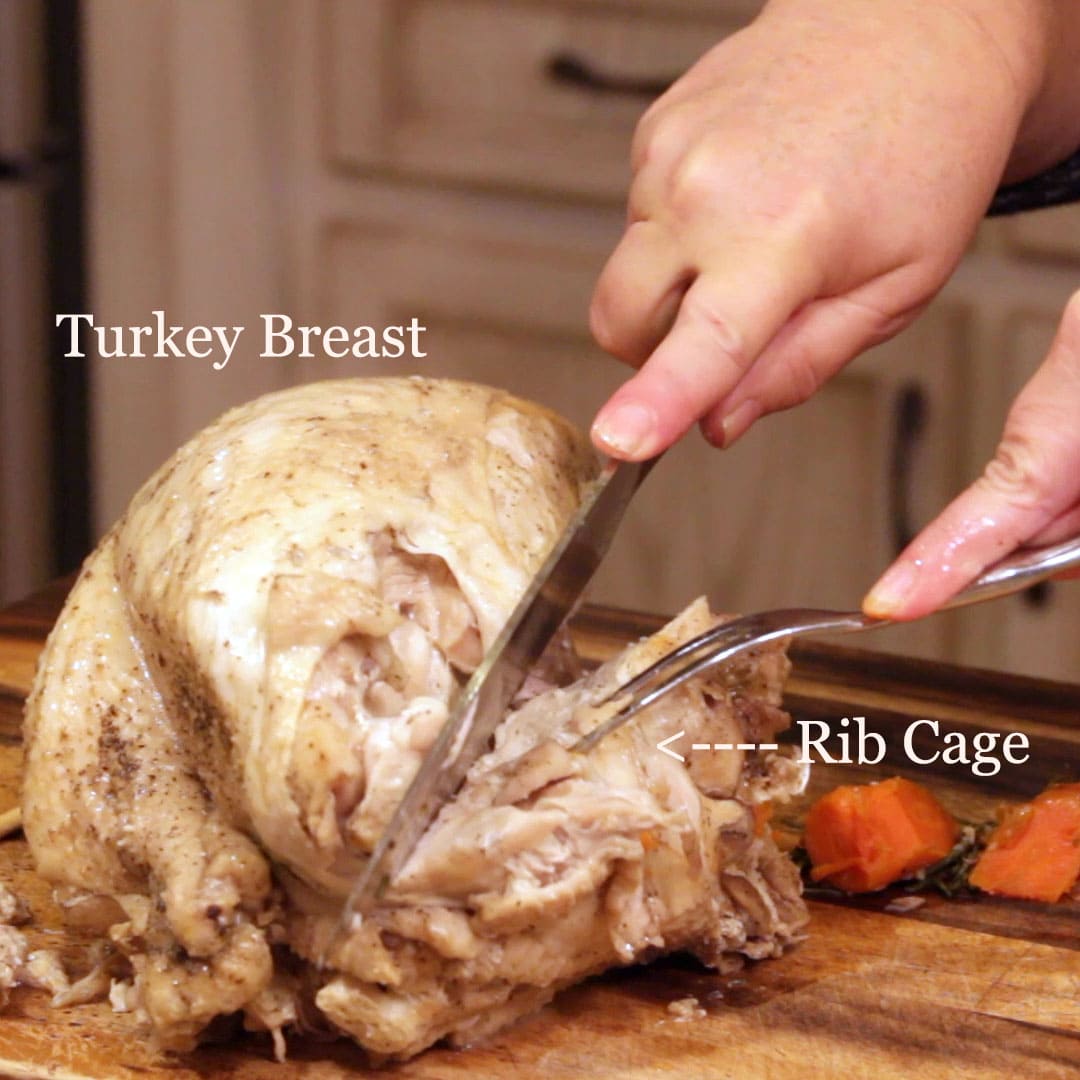
The 6 pound turkey breast fit perfectly in my 6.5 qt Ninja Foodi and I think an 8 pound turkey breast will fit just fine in the 8 qt Ninja Foodi. If you want to go bigger than 8 pounds, you can. You might have to cut the rib cage off, but that is not a huge deal. In fact, I did just that after pressure cooking, so my turkey breast sat flat and was further away from the crisping lid.
Do I have to thaw my Turkey Breast before cooking?
Technically, no. However, inside my turkey breast was a plastic packet of gravy concentrate. Had I not thawed my turkey breast and found that, I'm pretty sure that plastic would have melted inside the turkey during the pressure cook time. That would not be good.
If you are positive that there isn't anything stuffed inside your turkey breast, you can cook from frozen. Since I have not done this, I can't give you times for that and, honestly, I don't recommend it.
I have found that cooking lean meats from frozen results in a poor end quality. By the time the inside completely cooks, the outer meat is overdone and tough. Now, this is just my opinion and I know people have cooked their turkey breasts from frozen and said they were delicious. So, use your own judgement on that and I would definitely do a test run before you cook a frozen turkey breast for company or for a special occasion.
How do I thaw my Turkey Breast safely?
The safest way to thaw a turkey breast is in the refrigerator. If you have a frozen turkey breast, make sure to take it out of the freezer at least 3 days before you want to cook it and put it in the refrigerator to thaw.
You never want your turkey breast to reach a temp above 40° F for longer than 2 hours, so, thawing a turkey on the counter is not recommended. You can thaw a turkey breast in a sink (or bucket) full of ice water, but you need to be diligent about the temperature of the water and make sure it always stays below 40° F.
I always recommend thawing a turkey in the packaging it comes in. This holds in the juices and prevents cross-contamination.
When you remove the packaging from the turkey, do this over the sink or a container of some kind so the juices don't run all over your counter. If your turkey is not completely thawed, you can fill your sink (or a bucket) with very cold water and place the unwrapped turkey in the water for an hour or two to finish thawing.
I usually add about ½ cup of salt to the water and soak my turkey breast for an hour even if it is thawed. This is a quick brine and while it certainly doesn't impart any of the benefits of a longer brine, I do it because that is what my mom always did. You know what they say, Mom is always right. While I'm pretty sure that isn't always the case, my Mom sure knew how to cook a turkey!
Be sure to bleach out your sink afterwards to avoid cross-contamination.
Should I brine my Turkey Breast?
Yes, I would! I didn't brine my turkey breast for the video on YouTube and I think that had a lot to do with the lack of flavor and tenderness of the meat. So, from now on, I will be brining my turkey breasts just like I do when I make a whole turkey.
You can read about the brine I use and the process in my article on How to cook a turkey in the Ninja Foodi.
The process for brining a turkey breast is the same as brining a whole turkey. A 16-hour brine should be plenty for a turkey breast.
Next time I cook a turkey breast, I'm definitely brining it.
How long do I need to cook my Turkey Breast in the Ninja Foodi?
This is the million-dollar question and I bet if you look on the internet, you will get a million different answers. First of all, if you are cooking your turkey breast in the Ninja Foodi and want to use an Instant Pot recipe, you will want to decrease the time to allow for Air Crisping at the end or you will end up with a dry turkey breast.
I looked at a ton of recipes and was shocked at how long they pressure cooked their turkey breasts. It didn't match up to my experiences and, honestly, the times were so different that I questioned myself quite a bit about this.
Now, keep in mind, I have not cooked every size turkey breast. However, I have cooked several whole turkeys and turkey breasts in the past month and I feel like I have a pretty good handle on it. I had to keep decreasing the pressure cook time because my turkey was always coming out a little overdone.
Based on my experiences and the experiences of others that were kind enough to share their cooking times and outcomes with me, I have put together a formula that I think will work for any turkey breast that weighs 6 pounds or more.
*I also let my turkey naturally release a little longer than 15 minutes and that cooked it longer. I still think this formula will be the safest bet for not overcooking your turkey. Remember, you can always air crisp longer at the end to get your turkey up to 165° F.
It is similar to the formula I use to determine cook time for a whole turkey, but I shave off even more time because turkey breast cooks quicker than the thighs and legs.
If you have followed me or used my recipes before, you know I always err on the side of undercooking because you can always cook longer, but you can't un-cook.
The formula I use is: multiply the weight of your turkey breast by 2 and then subtract 4 to get the cook time in minutes.
So, for a 6 pound turkey breast, I multiply by 2 which gives me 12 and then I subtract 4, which gives me 8. 8 minutes is what I recommend for a 6 pound turkey breast.
If you are NOT going to air crisp the skin at the end, then you would only want to subtract 2 minutes instead of 4.
So, for a 6 pound turkey breast (pressure cooking only), I multiply the weight (6 pounds) by 2, which gives me 12 and subtract 2. That is a pressure cook time of 10 minutes.
No matter how big your turkey is, you will always want to allow a natural release of 15 minutes. This will prevent the sudden change in pressure from drawing out moisture from your turkey breast.
How to take a Temperature of a Turkey Breast
There a few things that I think are necessary in every kitchen. A good knife, I use one from Pampered Chef that I like a lot. It's an (affiliate link)8' Chef's knife.
The other necessity in my opinion, is a thermometer. Now, there are very expensive ones out there and trust me I want one. However, when I needed a new thermometer, I just didn't have an extra $100 to spend. So, I purchased a less expensive one and it has worked just fine. I have a (affiliate link)ThermoPro thermometer that I purchased on Amazon. It is around $20 and has worked just fine for me. I still want the expensive one but, until then, this one will do.
When taking a temperature of a turkey breast, you want to insert the thermometer into a thick part of the breast, but you do not want to hit the breast bone.
The bone will register a higher temp than the meat and will throw off your reading.
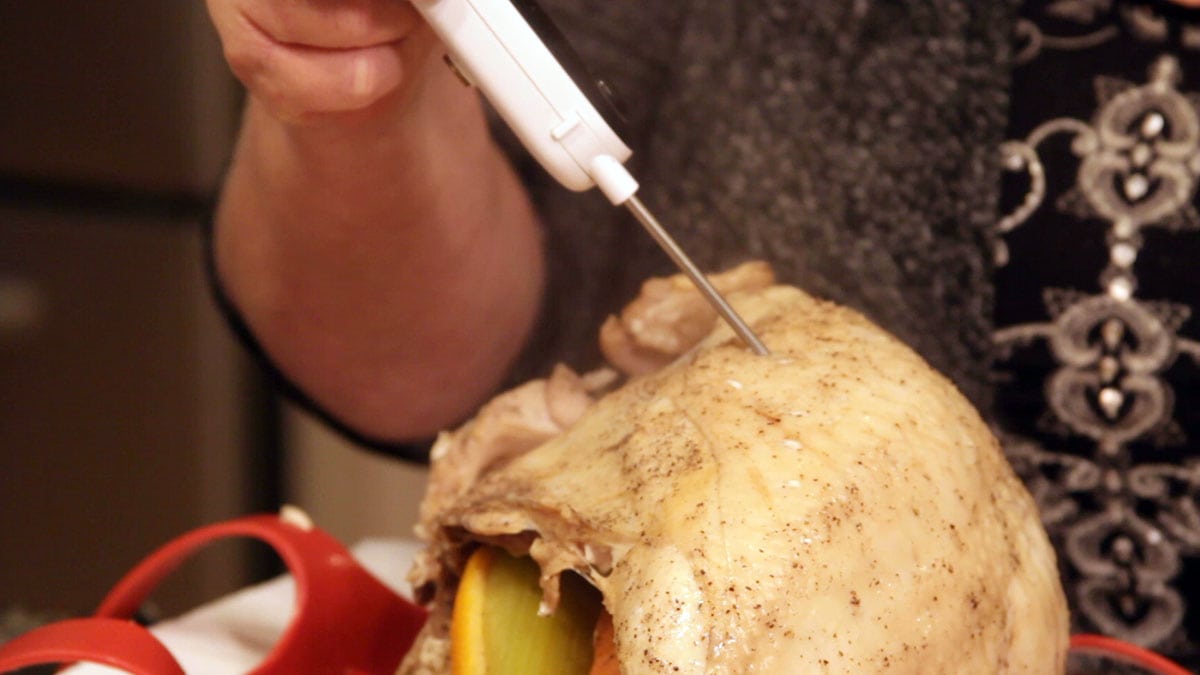
You also want to take into account that the temperature will continue to rise by 5-10 degrees as the turkey breast rests. Since we are also going to air crisp our turkey for 12-14 minutes, that will also continue to cook the turkey. So, I would aim for a temperature after pressure cooking of about 145-155° F.
Honestly, I wouldn't worry too much if it is a little less than 145° F because you can always air crisp longer to bring it up to the correct temperature.
Turkey breast needs to be cooked to an internal temp of 165° F, but remember, the temperature continues to rise even when you remove the turkey from the Ninja Foodi (or oven), so you want to remove it at about 160° F to avoid overcooking.
Okay, now that all of that is out of the way... let's get to cooking!
How to cook a turkey breast in the Ninja Foodi using the pressure cooking and air crisping functions
First, make sure your turkey is thawed. I really recommend this for the best outcome.
Next decide if you want to brine your turkey. You will want to decide this at least 24 hours before you want to cook your turkey. If you do, follow my steps in the recipe post for How to cook a Turkey in the Ninja Foodi. Or, if you prefer, you can watch the video: How to cook a Turkey in the Ninja Foodi
If I don't brine my turkey, I always rinse my turkey or turkey breast off in the sink and let it soak in cold water with ½ cup of salt for about an hour. This is optional, but something I have always done.
Once rinsed, you will want to pat it dry so the seasoning adheres better. For this recipe, I'm using a simple seasoning of 2 parts fine grind sea salt to 1 part black pepper. You can use whatever seasoning you want.
Sprinkle the seasoning over the skin and pat it in. Because I'm going to use a compound butter before air crisping, I'm not putting a thick coating of seasoning on right now. I also season the cavity with the salt and pepper blend.
I always stuff my turkey and chicken with aromatics, veggies, and a little citrus. This is completely optional, but I do think it helps flavor the turkey and the broth that we use to make gravy. You can certainly skip this step if you want.
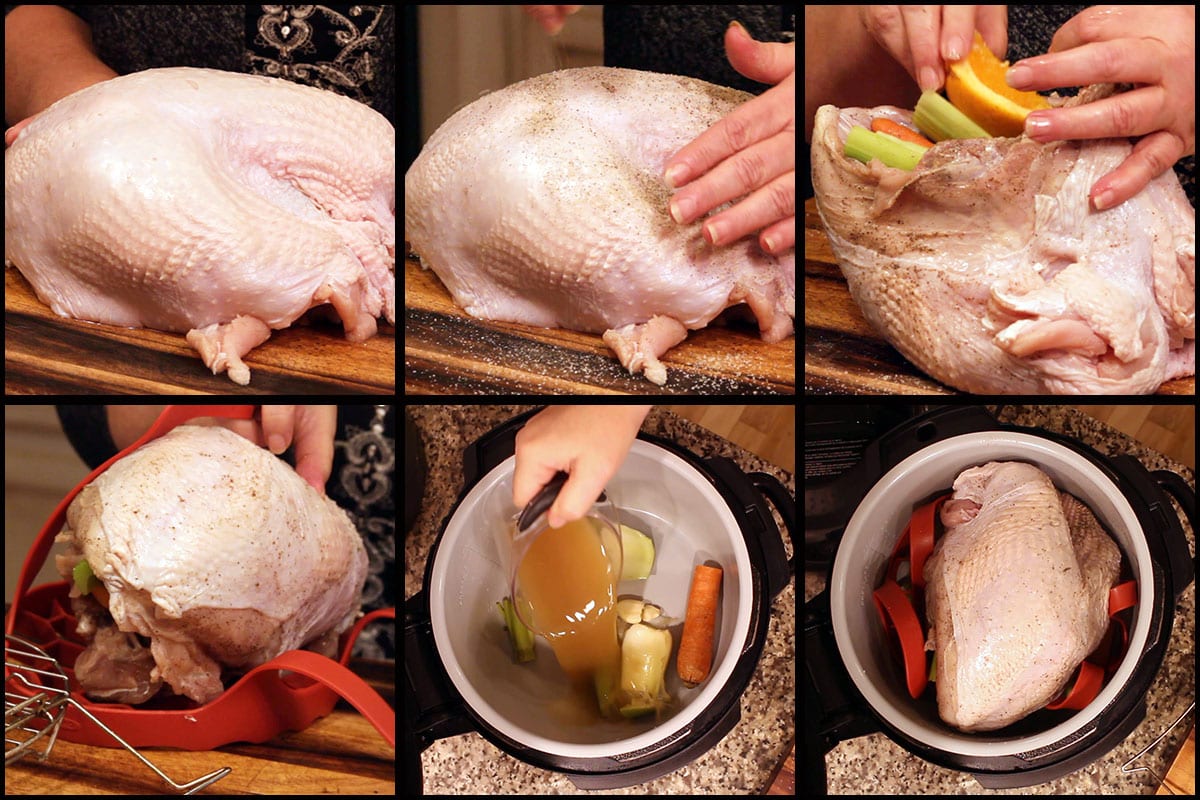
Place ½ carrot, 1 stalk of celery, 2 garlic cloves, 3 sprigs of rosemary, 4 stems of thyme, and 2 orange wedges into the cavity. I almost always use an onion, but forgot it this time!
Determine what you will sit your turkey breast on depending on size. While you can sit it directly in the inner pot, I find it's easier to remove after cooking if you use the rack or a (affiliate link)silicone sling or even make your own sling out of aluminum foil.
Add the remaining ½ carrot, celery stalk and ends, and clove of garlic to the inner pot and pour in one cup of chicken bone broth. I used bone broth because it has more depth of flavor and I wanted to make gravy with the juices. You can use chicken stock, chicken broth, or even water. Of course, you can also use turkey stock if you have any!
Put the pressure lid on and turn the valve to seal. Set the pressure time based on the size of your turkey breast. When the time counted down, allow the pressure to be released naturally for 15 minutes.
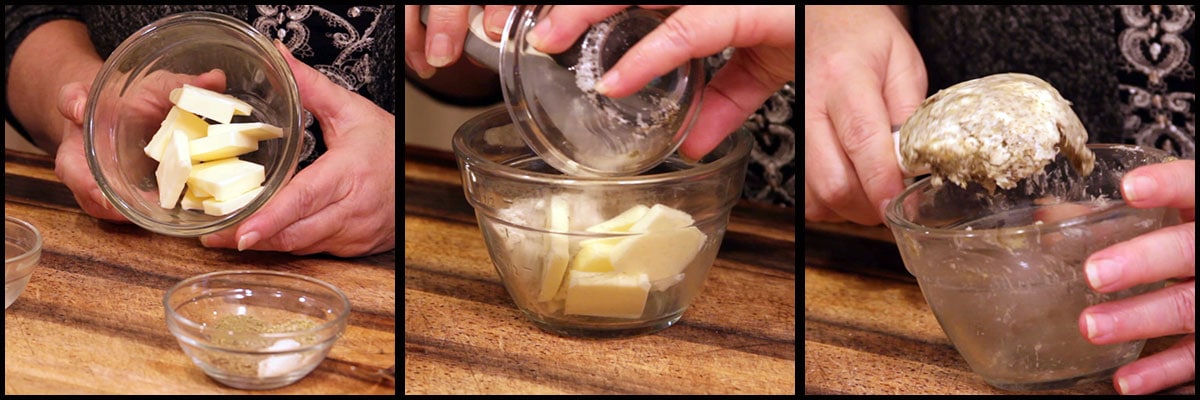
While the natural release is happening, mix up your compound butter. Now, this step is also optional. Instead, you can blot dry the skin and apply your favorite turkey rub. I decided to give this a try and was pleased with the results. The flavor of the skin was great and it looked beautiful.
Here is what I used to make my compound butter:
- 4 Tablespoons of salted butter, room temperature
- 2 minced garlic cloves
- 1 teaspoon sea salt
- ½ teaspoon pepper
- ½ teaspoon thyme leaves, dried
- ½ teaspoon rosemary leaves, dried & crushed
- ½ teaspoon onion powder
- ¼ teaspoon poultry seasoning
Mix the ingredients together until the spices are incorporated into the butter.
Remove the turkey from the Ninja Foodi and place on paper towels to absorb the excess moisture. Pat the skin dry with a clean towel or a paper towel and allow to cool for a few minutes.
Dump the stock from the inner pot into a mixing bowl. I used a strainer on top to catch the pieces of herbs and vegetable so I can use the stock to make some delicious blender gravy!
I decided to cut off the rib cage after pressure cooking the turkey breast because I wanted my turkey breast to sit flat. You can see how I did that in the video on YouTube.
Lift up the skin a little bit and place some of the compound butter under the skin and move it around under the skin. Repeat this until you use about ½ of the compound butter. Then rub the remaining butter on top of the turkey skin.
Here is a short video showing how I did this.
Preheat the Ninja Foodi on Air Crisp at 400° F for 10 minutes.
Place the turkey back into the inner pot using the rack, sling, or you can even sit it right on the bottom. Make this decision based on the size of your turkey breast. You want a few inches between the heating element and the highest part of the turkey breast.
Air Crisp on 400° F for 10-14 minutes, being sure to check on it every 2 minutes after the first 6 minutes to make sure it doesn't start to burn. Remove and allow to rest for 10 minutes. 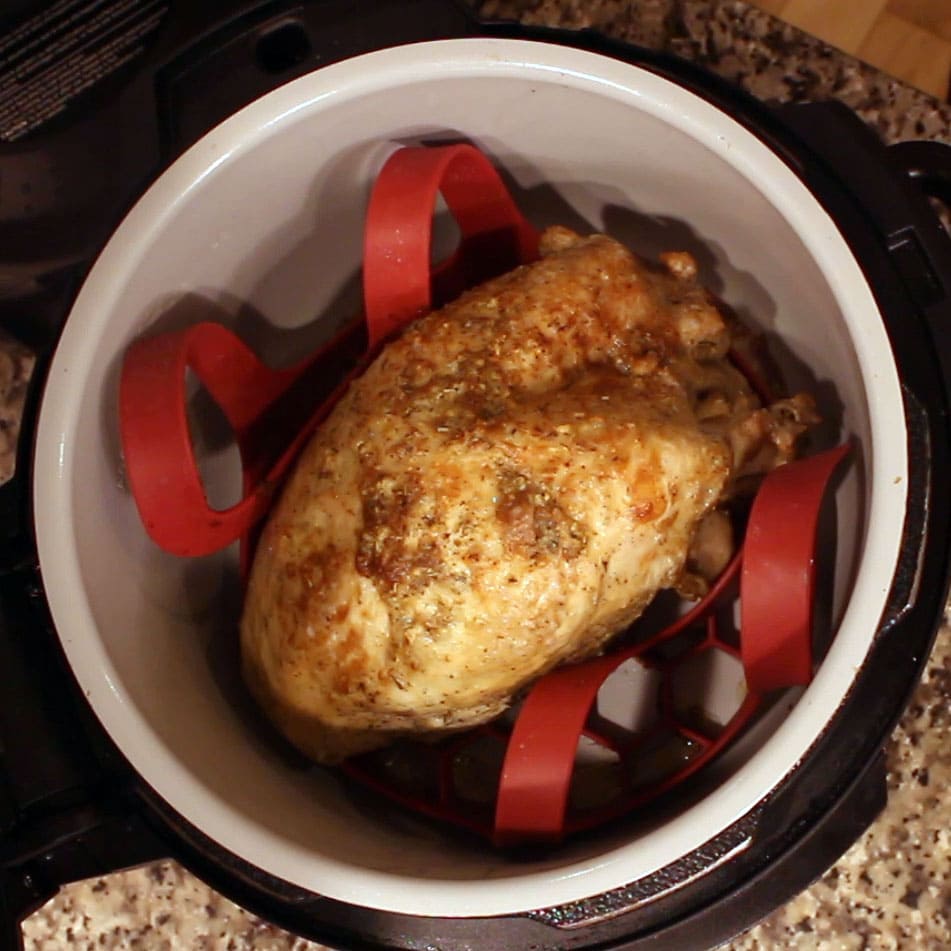
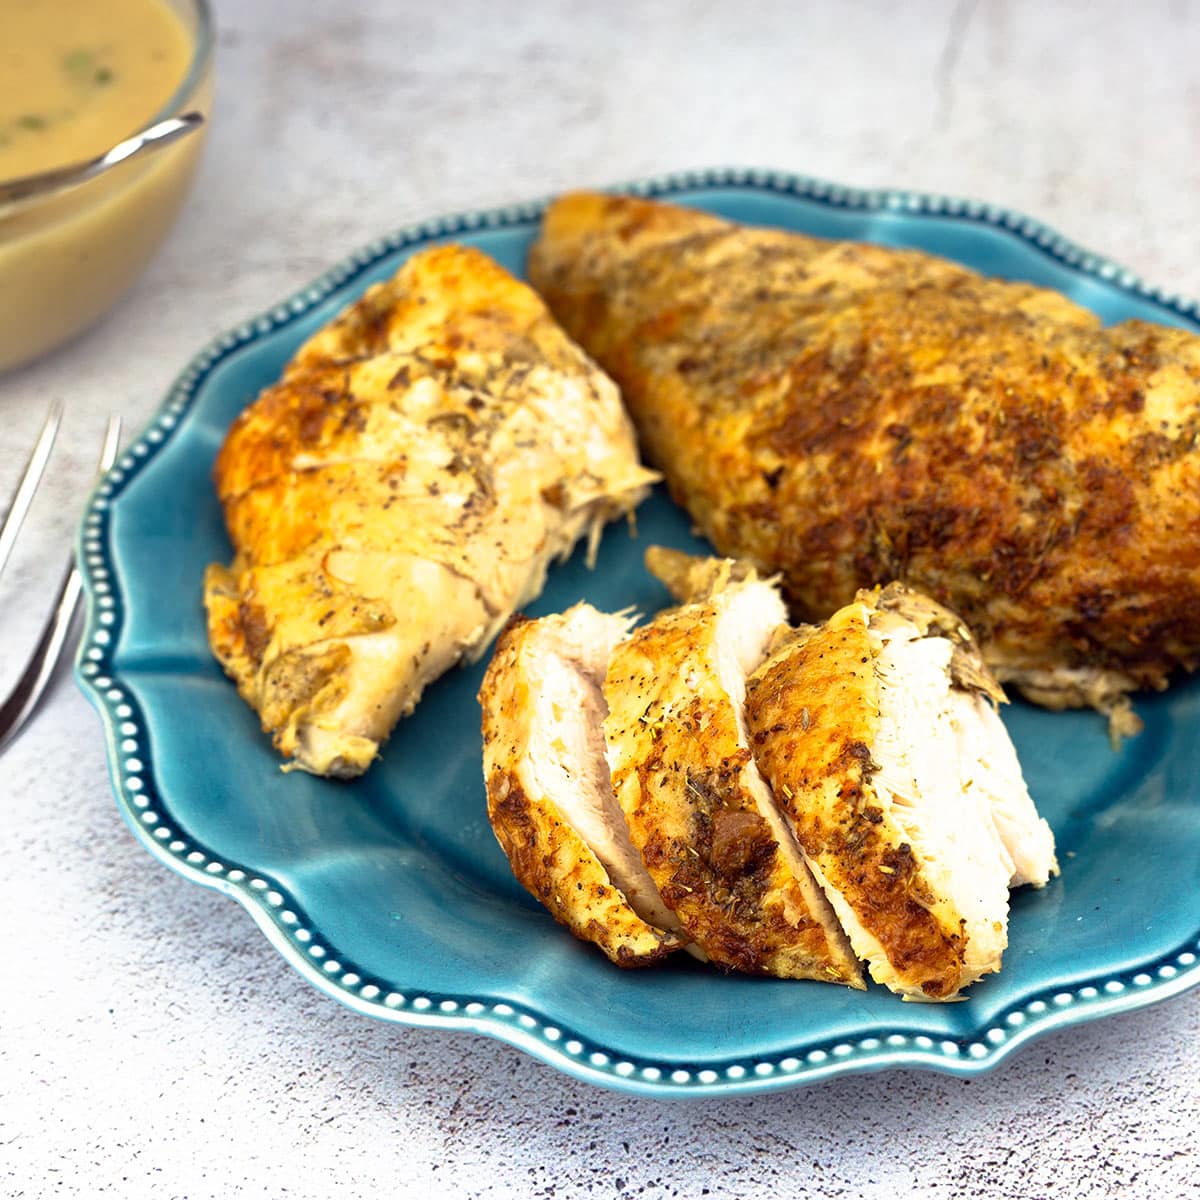
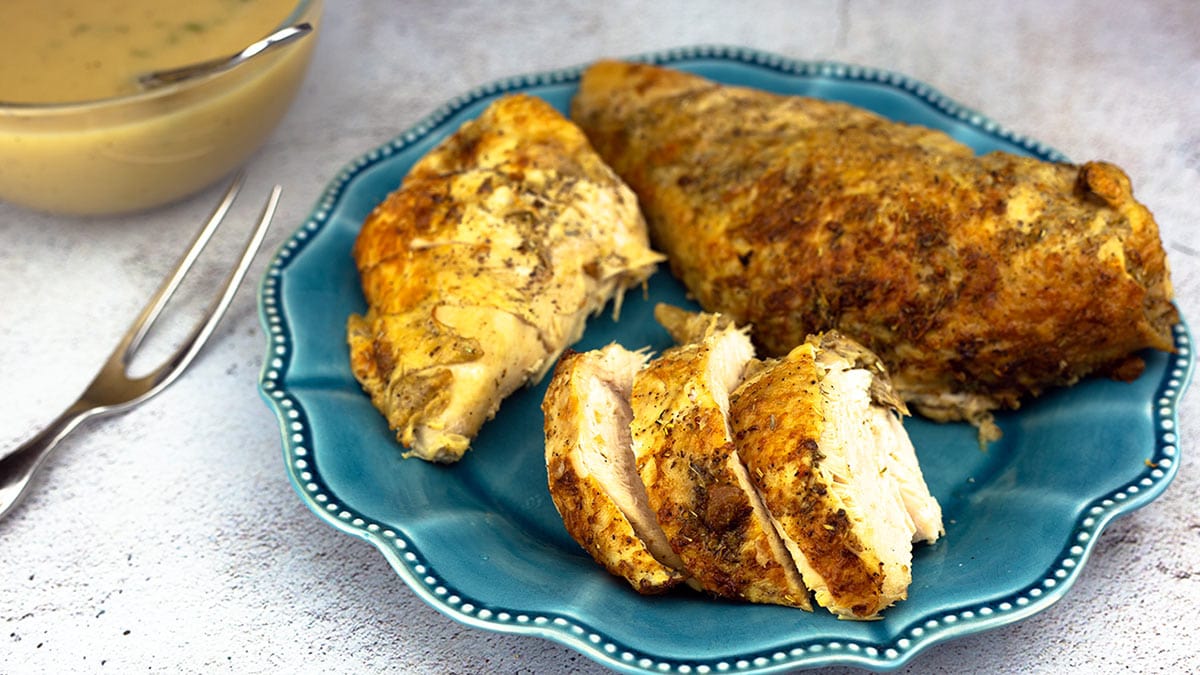
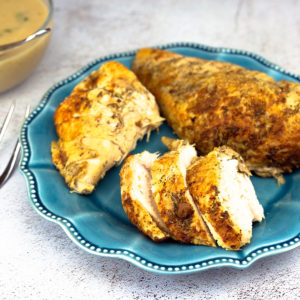
Carve and Serve!
I hope you enjoy your Ninja Foodi Turkey Breast!
Ninja Foodi Turkey Breast
Equipment
- Instant Pot Duo Crisp
Ingredients
Compound Butter
- 4 tablespoon butter salted
- 2 cloves minced garlic about 1 tsp
- 1 teaspoon sea salt fine grind
- ½ teaspoon black pepper
- ½ teaspoon thyme leaves dried
- ½ teaspoon rosemary dried and crushed
- ½ teaspoon onion powder
Would you like to save this recipe?
Instructions
- Thaw and rinse your turkey. Pat dry with paper towels.
- Mix the salt and pepper together in a small bowl. Sprinkle the seasoning over the skin and pat it in. Also sprinkle some of the seasoning into the turkey cavity.
- Place ½ carrot, 1 stalk of celery, ½ onion, 2 garlic cloves, 3 sprigs of rosemary, 4 stems of thyme, and 2 orange wedges into the cavity. Depending on the size of your turkey breast, you may have to reduce the quanity of these ingredient so they fit inside the cavity.
- Determine what you will sit your turkey breast on depending on size. While you can sit it directly in the inner pot, I find it's easier to remove after cooking if you use the rack or a silicone sling or even make your own sling out of aluminum foil.
- Add the remaining ½ carrot, celery stalk and ends, and clove of garlic to the inner pot and pour in one cup of chicken bone broth. I used bone broth because it has more depth of flavor and I wanted to make gravy with the juices. You can use chicken stock, chicken broth, or even water. Of course, you can also use turkey stock if you have any!
- Put the pressure lid on and turn the valve to seal. Set the pressure time to 8 minutes for a 6 pound turkey. When the time counted down, allow the pressure to be released naturally for 15 minutes.
- While the natural release is happening, mix up your compound butter. Combine room temperature butter, minced garlic, and seasonings until the seasonings are incorporated into the butter.
- Remove the turkey from the Ninja Foodi and place on paper towels to absorb the excess moisture. Pat the skin dry with a clean towel or a paper towel and allow to cool for a few minutes.
- Dump the stock from the inner pot into a mixing bowl. I used a strainer on top to catch the pieces of herbs and vegetable so I can use the stock to make some delicious blender gravy!
- I decided to cut off the rib cage after pressure cooking the turkey breast because I wanted my turkey breast to sit flat. See post for link to the video that shows me doing this.
- Preheat the Ninja Foodi on Air Crisp at 400° F for 10 minutes.
- Lift up the skin a little bit and place some of the compound butter under the skin and move it around under the skin. Repeat this until you use about ½ of the compound butter. Then rub the remaining butter on top of the turkey skin. See post for short video on how I did this.
- Place the turkey back into the inner pot using the rack, sling, or you can even sit it right on the bottom. Make this decision based on the size of your turkey breast. You want a few inches between the heating element and the highest part of the turkey breast.
- Air Crisp on 400° F for 10-14 minutes, make sure to check on it every 2 minutes after the first 6 minutes to make sure it doesn't start to burn. Remove and allow to rest for 10 minutes.
- Carve & Enjoy!
Notes
Nutrition
ABOUT THE RECIPE AUTHOR, LOUISE LONG
Louise is a full-time recipe creator and food blogger @ The Salted Pepper. She has over 30 years of  experience with cooking and recipe development. She owned a restaurant for several years and was a full-time RN until retiring to blog full-time.
Louise has several very active Facebook groups that help people with the basics of cooking and getting the most out of the Ninja Foodi.
Ninja Foodi Fresh & Healthy Meals
Seeing the need for easy, delicious, and high quality recipes, she is focusing all of her efforts creating recipes specifically for the Ninja Foodi. Her recipes are easy for the home cook to follow and provide step-by-step instructions.
Louise is also a YouTube creator and you can find most of her recipes in video format on The Salted Pepper YouTube channel.
She is very responsive to messages and eager to help in any way she can.
I WOULD LOVE TO SEE WHAT YOU ARE COOKING UP IN YOUR NINJA FOODI! TAG ME @THESALTEDPEPPER ON YOUR FAVORITE SOCIAL MEDIA PLATFORM WHEN YOU MAKE A DISH!
BE SURE TO FOLLOW THE SALTED PEPPER RIGHT HERE ⇓⇓⇓⇓⇓
Michael Press says
Hi, Louise. I just made this recipe using a store-bought boneless (but not cooked) turkey breast, like Mike Weiner mentioned. I used your guide for timing, it was a 3 pound breast, I pressure cooked it for 10 minutes and still did the 15 minute natural release following. It was actually at 170 at that point, so I decided to air fry it for only 5 minutes (I brushed some olive oil and a little extra seasoning on the skin first). It came out absolutely perfectly!
One thing I don’t know if Mike did, but this thing comes in a netting, and I decided to remove the netting before pressure cooking it, because one time when I had a stand-alone air fryer and cooked it in that appliance, the netting really stuck to the turkey breast and was quite difficult to remove. But when you remove the netting first, I just found it, it’s basically two pieces. At first I was going to tie them together with string, or use a little aluminum foil, but I decided to just leave it as is, the top piece mostly on the top, and if it falls, it falls, and it’s two pieces.
In the end, that didn’t matter one bit. There was only a 2 degree temperature different between the two pieces after pressure cooking, and no difference after air frying.
Bottom line, it was delicious! We can always count on you when we wonder if it can be done, and how ☺️
Dee says
Enjoyed the recipe, next time I plan on doing the brining for a day and making gravy. I cooked a 8.8lb turkey breast in 8qt Foodi. I rounded up to 9lbs and did yo math for cooking, 15 minutes. I think I'll also do the injection just before I air crisp it, I could not get the butter solution under the skin very well. Maybe I should've loosened the skin before I started the pressure cooking. I used the rack to pressure cook and had to remove it to crisp it, too tall. I would definitely do this method again, thank you.
Louise says
I'm so glad you enjoyed it!
Terri Vach says
Made this last night with an 8 pound turkey breast in the ninja foodie....what a success! Did an 8 hr. Brine in salt and light brown sugar. The turkey was tender and flavorful. Husband and 2 teenage kids LOVED every bite! Will definitely make again. Great video presentation and recipe. Thank you!!
Louise says
I'm so glad you and your family enjoyed it!
Kat says
how much salt and brown sugar did u use for the brine? how much water or broth did u use?
Louise says
I didn't brine the turkey breast, I brined the whole turkey. I would use 1/4-1/2 of the brine recipe in this post for a turkey breast: https://thesaltedpepper.com/how-to-cook-a-turkey-in-the-ninja-foodi/
Kat says
I was trying to reply to Terri and ask about the brine. =)
Louise says
Gotcha! I don't see comments in order like that so I never know when people are replying to other people. Sorry.
Betty says
The timing is completely wrong....I spent another 20-30 minutes trying to get my turkey breast done....never even got to the browning part because my kids were so hungry.
Louise says
I'm sorry you had a bad experience with the timing and I would love to get more information on the type of turkey breast you used. Many people have followed this timing and have had great results. If you would be so kind as to let me know if you used a boneless or bone-in turkey breast, how many pounds, and was it organic?
Shelly says
Have you made a turkey breast with stuffing? If yes, would directions be the same with PC or would there be change in temperature if using stuffing instead of just whole veggies? Cannot wait to attempt this!
Louise says
No change in temperature, but you need to make sure the stuffing reaches a temp of 165F