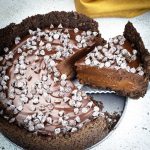
Triple Chocolate Cheesecake
Decadent cheesecake made right in the pressure cooker. This is a chocolate lovers dream!
Servings: 10
Calories: 526kcal
Equipment
- Instant Pot
Ingredients
Cheesecake Crust
- 6 ounces chocolate animal crackers 3 cups whole
- 7 tablespoon butter salted or unsalted
Chocolate Cheesecake Filling
- ⅔ cup dark chocolate chips Ghirardelli preferred
- 8 ounces cream cheese room temperature
- ½ cup white sugar
- 1 teaspoon instant espresso powder optional
- ½ teaspoon fine grind sea salt
- 1 teaspoon vanilla extract
- 2 large eggs room temperature
Ganache & Topping
- ¾ cup heavy whipping cream
- ¾ cup dark chocolate chips Ghirardelli preferred
- ½ cup mini chocolate chips any kind is fine
Instructions
Cheesecake Crust
- Melt the butter in the microwave or on the stove. Crush the 3 cups of chocolate animal crackers using a food processor or by hand until they are coarsely ground.
- Place the chocolate animal crackers in a medium size mixing bowl and add the butter. Stir to combine. The mixture should be moist and able to hold together when squeezed in your hand.
- You may want to place a round of parchment paper on the bottom of the pan before pressing in the crust if you want to transfer your cheesecake to a serving platter. This will make it easier.
- Press the cookie mixture onto the sides and the bottom of the 7¼" springform pan. If you are using a larger pan, you may need to mix up a little more of the cookie/butter mixture to get the entire pan covered. I take the cookies almost all the way up side of the springform pan in this recipe, but you will want to at least go ¾ of the way up the sides.
- Place the springform pan with the crust on the rack of the Ninja Foodi in low position and place into the inner pot. Close the crisping lid and bake at 325°F/160°C for 5 minutes. No need to preheat. Remove and allow to cool.
Cheesecake Filling
- Melt the chocolate using a double boiler or the microwave and stir until smooth. Set aside.
- Add the sugar and cream cheese to a medium size mixing bowl and beat with a stand or hand mixer on low or medium speed until the sugar is incorporated into the cream cheese.
- Add in the melted chocolate, espresso powder (if using) and beat on medium speed until the chocolate is incorporated. Add the salt and the vanilla extract and beat on medium speed just until incorporated. Don't over mix the batter or you can introduce too much air which can lead to cracking on the top of your cheesecake.
- Add in one egg at a time and beat on medium speed until incorporated. Add the second egg and beat on medium speed until incorporated.
Pressure Cooking the Cheesecake
- Pour the filling into the cooled crust and cover with foil or these silicone covers. Pour 1 cup of water into the inner pot. Place the covered cheesecake pan on the rack in low position and put the pressure lid on. Turn the valve to seal. Set the pressure to high for 25 minutes. When the time is up, allow the pot to natural release for 10 minutes.
- Blot any excess water off of the top of the cover with a paper towel and remove the cover. All the cheesecake to cool on the counter for about 30 minutes. Cover again and refrigerate for at least 4 hours. 8 hours or overnight will give the best results.
Chocolate Ganache & Topping
- Place ¾ cup of chocolate chips in a medium size mixing bowl.
- Heat the heavy cream in the bottom on the inner pot or a small saucepan on the stove. You do not want to boil the cream, but bring it to a simmer where you just start to see bubbles forming on the top.
- Pour the hot cream over the chocolate chips and let sit for 5 minutes.
- Whisk the cream and melting chocolate until it becomes a glossy pourable chocolate.
- Remove the sides from the cheesecake and place the cheesecake on the serving platter or plate. Pour the ganache into the center of the cheesecake and allow it to flow towards the outer edges. Use the back of a large spoon to smooth out the ganache and make sure it spreads to the edges.
- Sprinkle the mini chocolate chips on top of the ganache and refrigerate the cheesecake for about 30 minutes so the ganache sets up completely.
- Slice, Serve, & Enjoy!
Notes
The nutritional values are based on slicing the cheesecake into 10 slices. I usually get 12 small slices out of one cheesecake this size.
Nutritional values are provided as a courtesy and thesaltedpepper.com makes no guarantees of accuracy. We do our best to ensure they are accurate, but many factors influence nutritional values that are beyond our control. Different brands of items have different nutritional values, so it is always best to do your own independent nutritional analysis based on the items you are using in a recipe if you require a high level of accuracy. Thesaltedpepper.com will not be held accountable for any errors in the displayed nutritional information.
Nutrition
Serving: 1slice | Calories: 526kcal | Carbohydrates: 46g | Protein: 7g | Fat: 35g | Saturated Fat: 23g | Cholesterol: 110mg | Sodium: 315mg | Potassium: 223mg | Fiber: 1g | Sugar: 25g | Vitamin A: 890IU | Vitamin C: 1mg | Calcium: 130mg | Iron: 1mg