Ninja Foodi Recipe~ Apple Cake with Caramel Glaze
This Ninja Foodi Apple Cake with Caramel Glaze is simple perfection! It's not over-the-top sweet, extremely moist, and it's super simple to make!
Servings: 12
Calories: 774kcal
Ingredients
Apple Topping
- 2 granny smith apples You want enough to cover both cake pans with a single layer. If your apples are small, you may need 3.
- ½ cup brown sugar
- 2 teaspoons ground cinnamon
Cake Ingredients
- 3 Granny Smith Apples You want three cups of diced apples for the cake
- 1 cup white sugar
- 1 cup Brown Sugar
- ¾ cup butter salted
- 3 large eggs
- 1 Tablespoon vanilla extract
- 3 cups all purpose flour
- 1 Tablespoon ground cinnamon
- 1 teaspoon baking soda
- ½ teaspoon sea salt fine grind
- ¾ cup canola oil or vegetable oil
Glaze Ingredients
- ½ cup butter salted
- 1 cup brown sugar
- ⅓ cup heavy whipping cream
- 1 teaspoon vanilla extract
- 1 cup powdered sugar sifted
Instructions
Topping Instructions
- Grease two 8" flat walled cake pans (see post for more details). Combine ½ cup brown sugar and 2 teaspoon cinnamon in a medium size mixing bowl. Peel and slice apples and coat in sugar/cinnamon mixture. Place single layer of apple slices facing the same direction, around the pan to make an outer circle. Repeat to make an inner circle of apples. See post for details. Set pans aside.
Apple Cake Instructions
- In a stand mixer combine white and brown sugar & butter. Mix on low to medium speed until they are creamed together. Add eggs, one at a time mixing after each addition. Add vanilla and mix until incorporated.
- In a small bowl combine flour, cinnamon, salt and baking soda. Add ⅓ flour mixture to cake batter. Mix. Add ½ oil. Mix. Add another ⅓ flour mixture. Mix. Add remaining oil. Mix. Add remaining flour. Mix until incorporated. Scraping down the sides occasionally.
- Chop apples and add to the cake batter. Stir to combine. Divide Cake Batter between both cake pans and cover with aluminium foil. Poke a few holes in the foil of the bottom layer. Stack on top of each other. See post for details and tips for getting the cakes in and out of the Ninja Foodi.
- Add 2 cups of water to the inner pot. Place a pressure cooker safe dish about 1" high to raise the cakes out of the water. Set both cakes into the Ninja Foodi. Set on high pressure for 35 minutes. When done, allow the pressure to naturally release for 30 minutes. Then manually release the rest.
- Remove the cakes from the Ninja Foodi and allow to cool slightly. Remove the foil. Flip each one carefully onto a cooling rack and allow to cool completely. You can put them in the fridge to speed up this process.
Caramel Glaze
- Sift the powdered sugar. Empty water from the inner pot of the Ninja Foodi and wipe dry. Add butter, cream, brown sugar. Set the Saute function to high. Stir frequently until all ingredients are melted and starting to bubble on the edges. When bubbles form across the top of the glaze, turn the Ninja Foodi off and remove the inner pot. Add vanilla and stir.
- Using a silicone whisk, slowly add in the sifted powdered sugar. Whisking between each addition. Whisk until any clumps are removed and you have a smooth glaze.
- When the cakes are completely cool, pour about ⅓ of the glaze over the top of the bottom layer of the cake. Allow the glaze to drip over the edges. Let it set for about 10 minutes. You can put it in the fridge to hasten this process. Repeat this step so that you have two layers of glaze on the bottom cake layer.
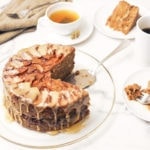
- When set. Place top cake layer on the bottom cake layer. Pour remaining ⅓ of the icing starting at the edges and only going in about an inch. Allow to drip down the sides. You can also use a small cake spreader or butter knife to pull the caramel glaze in towards the center of the cake to make the decoration shown in the picture. Serve and Enjoy!
Video
Nutrition
Serving: 1slice | Calories: 774kcal | Carbohydrates: 107g | Protein: 6g | Fat: 37g | Saturated Fat: 15g | Cholesterol: 113mg | Sodium: 394mg | Potassium: 203mg | Fiber: 3g | Sugar: 79g | Vitamin A: 806IU | Vitamin C: 3mg | Calcium: 75mg | Iron: 2mg