
Eating black-eyed peas at the start of the New Year is said to bring luck and prosperity, but it's sometimes hard to find a recipe that you love!
A few years ago I created a recipe for Hoppin' John that was simply amazing, but this year I wanted to add to my black-eyed pea recipes and decided that a chili would be perfect!
Would you like to save this recipe?
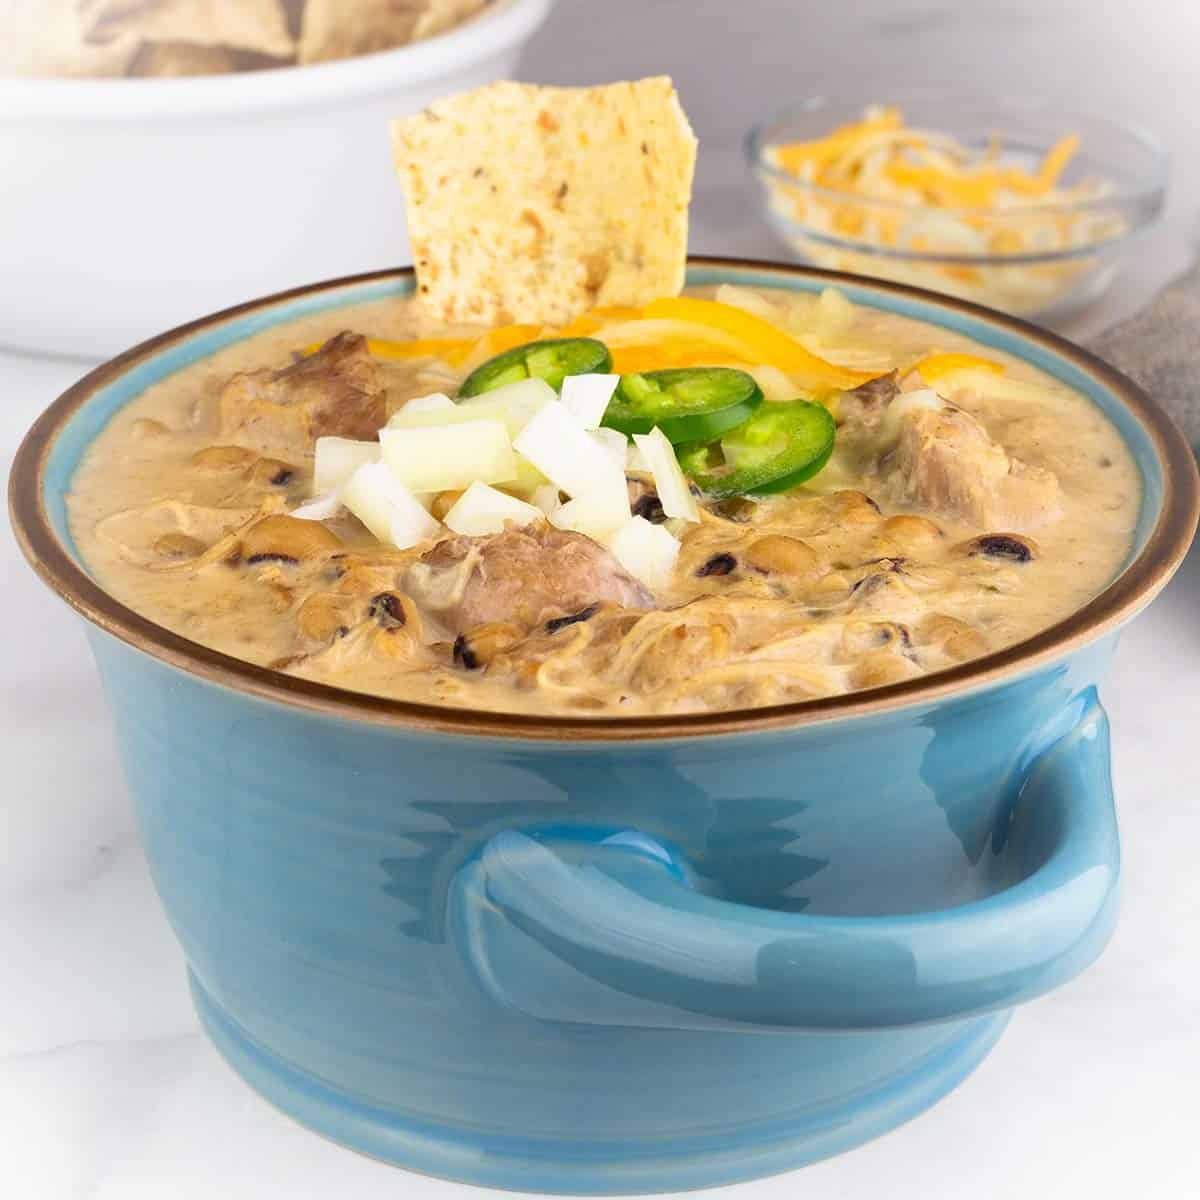
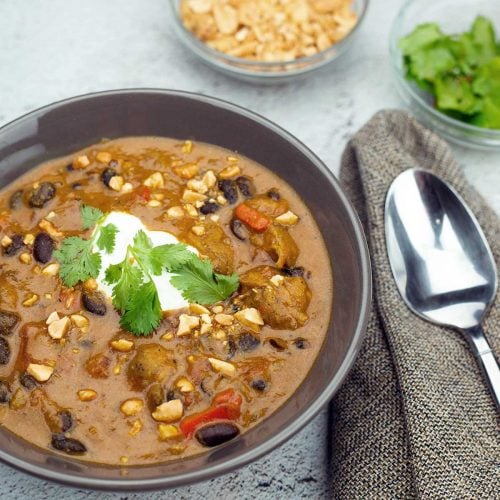
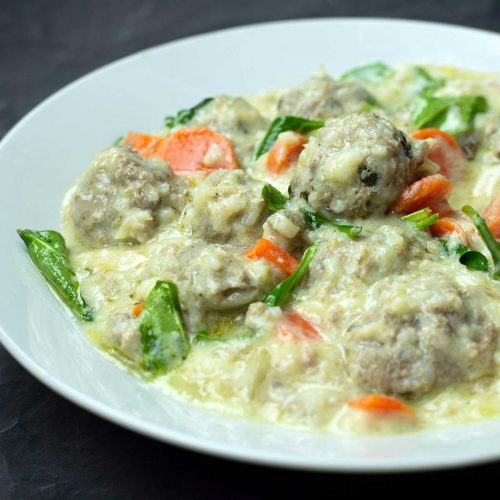
This black-eyed pea chili is made with chicken and is very much like a white chicken chili, but with black-eyed peas! It's easy to make and ready in under an hour when you use your pressure cooker. It's perfect for serving on New Year's Day or any time of the year!
You can even substitute the black-eyed peas for white kidney beans, also known as cannellini beans for a more traditional white chicken chili.
Serve it up with your favorite toppings and enjoy a delicious bowl of chili.
Suggested Kitchen Tools for Black Eyed Pea Chili
- Electric Pressure Cooker
- Tongs
- Large Scoop
Ingredients & Substitutions
Black Eyed Peas
Black-eyed peas are a dried bean (yes, they are a bean and not a pea) that have a slightly earthy flavor and I found they were delicious in this recipe.
Black-eyed peas do not need to be soaked before pressure cooking and if you did want to soak them, you would want to decrease your pressure cook time by 6-8 minutes. I have not tested the recipe with soaked beans so I do not have an exact pressure cook time. If you try 12 minutes and the beans aren't soft enough, you can go back under pressure if your liquid is still thin enough. Remember that you will have a short time to pressure each time you go back under pressure so I would only do 1 minute of pressure cook at a time.
If you don't want to use black-eyed peas, you can substitute them for any type of bean that you want to use in your white chili.
Some good choices are cannellini beans or great northern beans. I have not seen cannellini beans dried in my local grocery stores, but you can use the canned variety with just a few modifications to the recipe, which I will go into under the Variations of Black-Eyed Pea Chili section later in the article.
If you were to use navy beans or great northern beans, the liquid amounts will stay the same and you don't have to increase the pressure cook time unless you want really soft beans and then I would increase it to 20-25 minutes.
Pinto beans are another option, but they will make the chili a little darker.
Chicken
I recommend using boneless skinless chicken thighs in this recipe because they become so tender and shred perfectly in the chili.
You can add them from frozen or thawed and the time stays the same. If they are frozen in a clump, you may have to break them up after the pressure cook time and simmer for a few minutes if they aren't cooked all the way through. I tested the recipe using a solid block of chicken thighs, and they were completely cooked, so I don't think this will be an issue for you.
You can use chicken breasts and I recommend using frozen when possible so they don't overcook in the 18 minutes of pressure cook time. If you are using canned beans instead of dried, you can reduce your pressure cook time to about 10 minutes and use thawed chicken breasts. See the Variations section later in the article for more details.
If you don't want to use chicken, you can omit the meat for a vegetarian version or substitute it with ground chicken, ground turkey, or turkey sausage. You could even use ground beef or breakfast sausage if you want, but the color of the chili will be different. Ground pork is another meat option.
Liquids
The base of the soup is chicken broth or chicken stock, whichever you prefer. You can also use vegetable stock for a vegetarian version.
You can also use plain water, but the soup won't have quite as much flavor and you may need to increase your seasonings.
The other liquid in this recipe is heavy cream. You can substitute the cream with milk, but you may have to simmer your chili to get it to thicken up since the milk is much thinner than cream.
The purpose of the cream is to lighten the chili in color and add a creamy richness to the white chicken chili, but it is optional, and you can omit it without any other changes to the recipe.
I will include the cream cheese in this section because, although technically not a liquid, it does melt and help to finish off the chili and thicken it up.
When testing the recipe, I found the best flavor was when I used both cream and cream cheese in the chili. However, you can use all cream or all cream cheese or skip both if you prefer.
For a vegan version of the chili you can use a vegan cream cheese substitute and a vegan cream substitute.
With the cream and cream cheese you can use as little or as much as you want.
Seasonings
The seasonings are kind of important if you want to have a white chili and I found that the combination of onions, jalapeno peppers, dried ancho pepper, smashed garlic cloves, salt, white pepper, cumin, onion powder, garlic powder, and dried mustard worked perfectly to season the chili and keep the color as light as possible.
You can certainly omit the jalapeno and/or dried ancho pepper and include some chili powder and either cayenne pepper or chipotle pepper, but your chili may take on a pink hue.
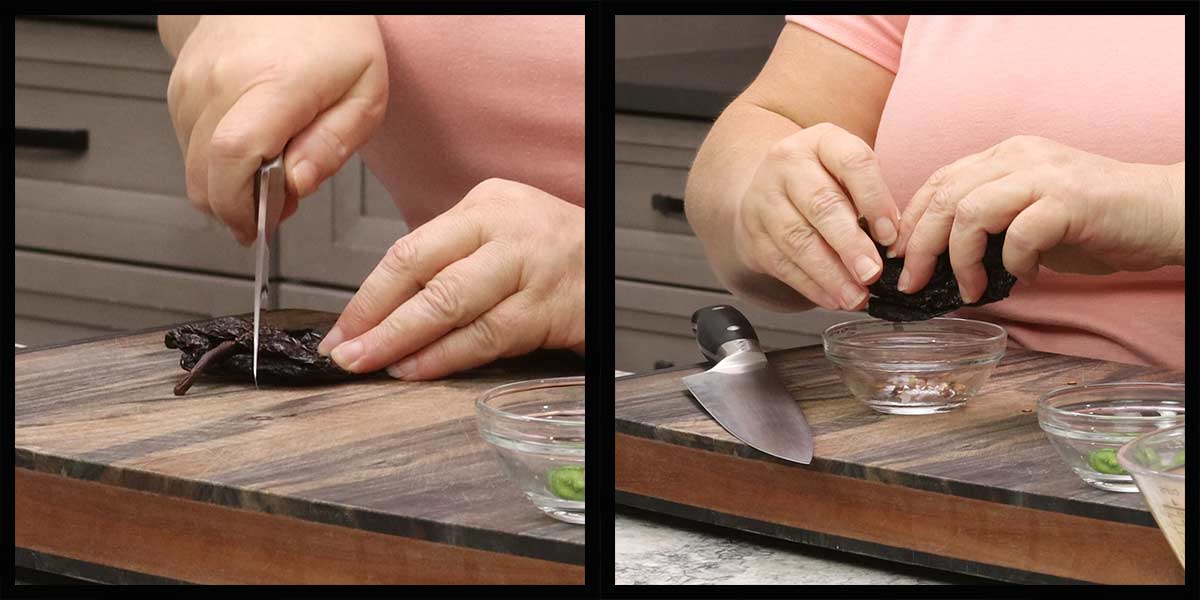
The ancho pepper does not add spiciness but does add a smoky flavor so try using smoked paprika if you don't have a dried ancho pepper handy. I would add the smoked paprika after pressure cooking and start with 1 teaspoon and go up as needed.
You can use black pepper instead of white pepper, and any of the other spices can be adjusted to what you like and have on hand.
Toppings
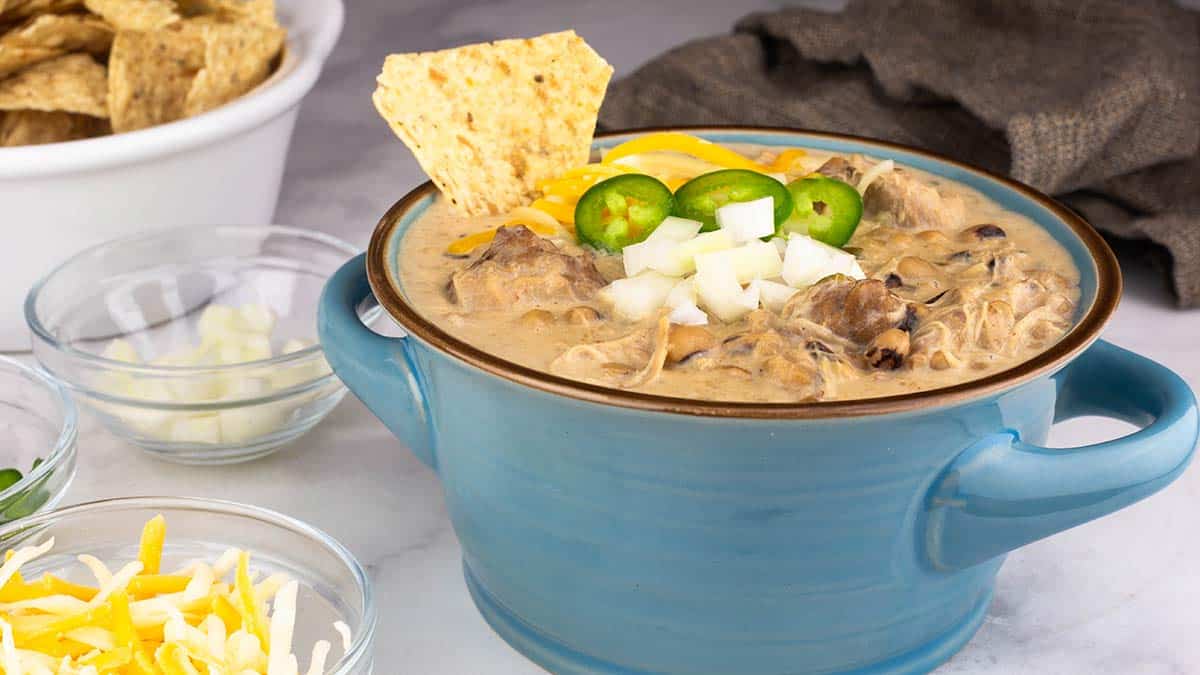
Just like with any other chili, this black-eyed pea white chicken chili can be topped with whatever you like.
I use thinly sliced jalapeno peppers, tortilla chips, and shredded cheese.
Fresh cilantro would also be a nice topping and give a boost of color and freshness.
How to Make Black Eyed Pea White Chicken Chili
What I love the most about this chili is that it is a dump-and-cook recipe. You don't even have to sauté anything! Of course, you can sauté the onions and chicken if you like, but it is definitely not necessary.
Mise En Place (Prep)
- Dice the onion into about ½" dice
- Slice the jalapeno into ¼" rounds. Remove the seeds if you want to reduce the spice level
- Peel and smash about 8 garlic cloves or use 1-2 teaspoons of minced garlic
- Mix up the seasoning blend
- Rinse and sort the black-eyed peas, removing any small stones or sticks you may find.
- Remove the stem and seeds from the dried ancho pepper
Pressure Cook
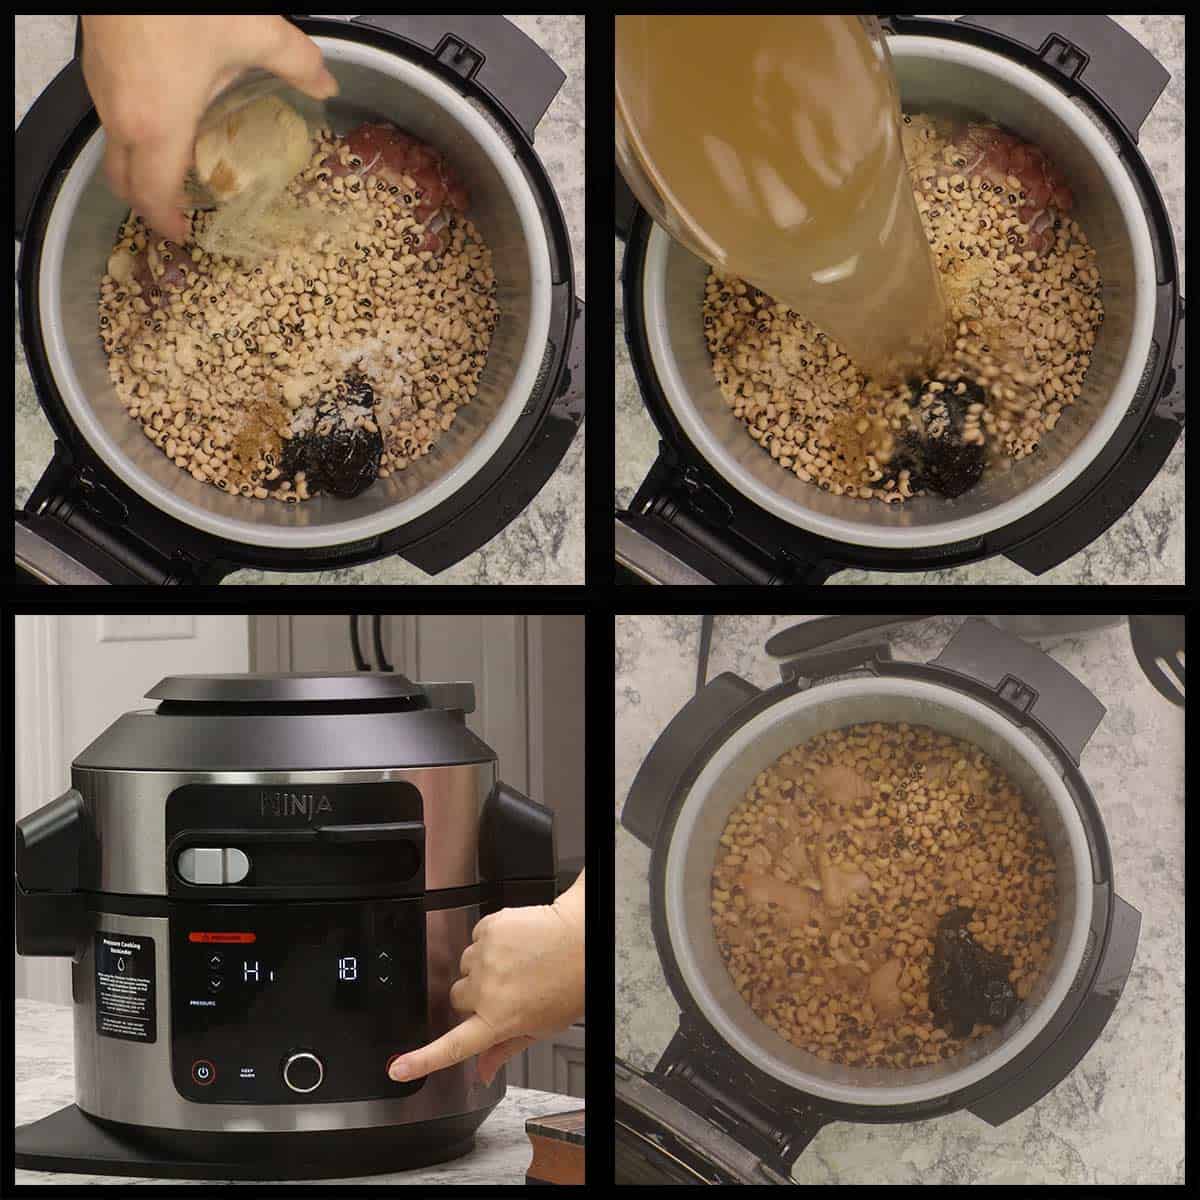
Add the onions, jalapeno pepper, chicken thighs (I don't both trimming them, but you can if you want to), dried ancho pepper, and black-eyed peas to the pot of your pressure cooker.
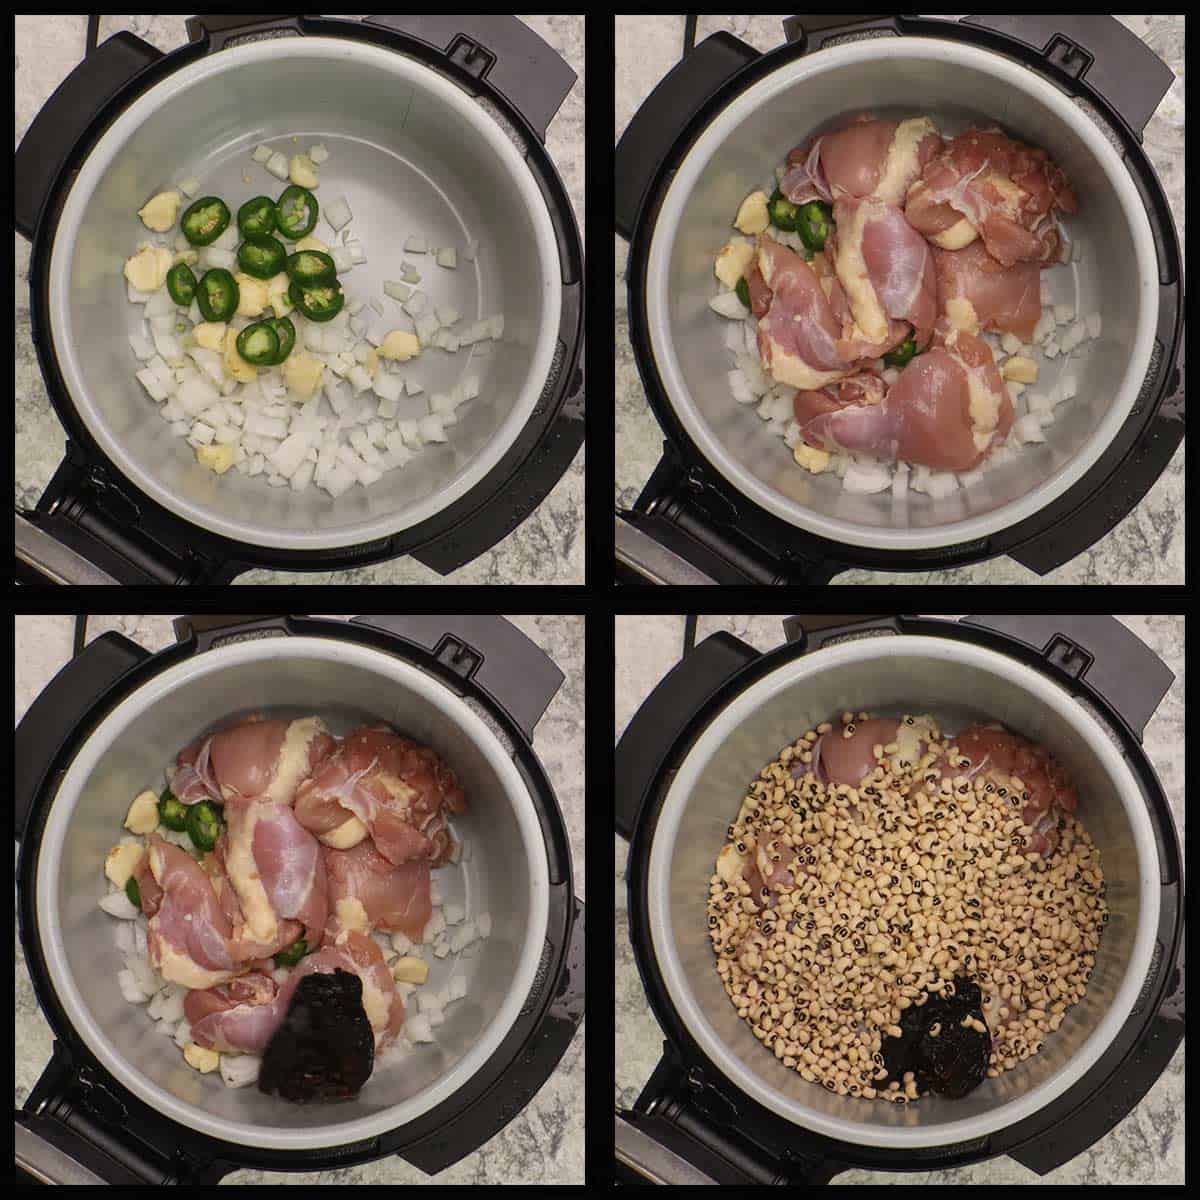
Sprinkle the seasoning mix over the ingredients and add the chicken broth or stock. Since we didn't sauté anything, there isn't any need to stir or scrape the bottom of the pot.
Put the pressure lid on and make sure the valve is set to the sealed position. Select high pressure and set the time for 18 minutes. When the time is up allow the pot to naturally release its pressure (this means do nothing for 10 minutes) and after 10 minutes turn the valve from the sealed position to the vent position to release any remaining pressure.
Finishing up the Black Eyed Pea Chili
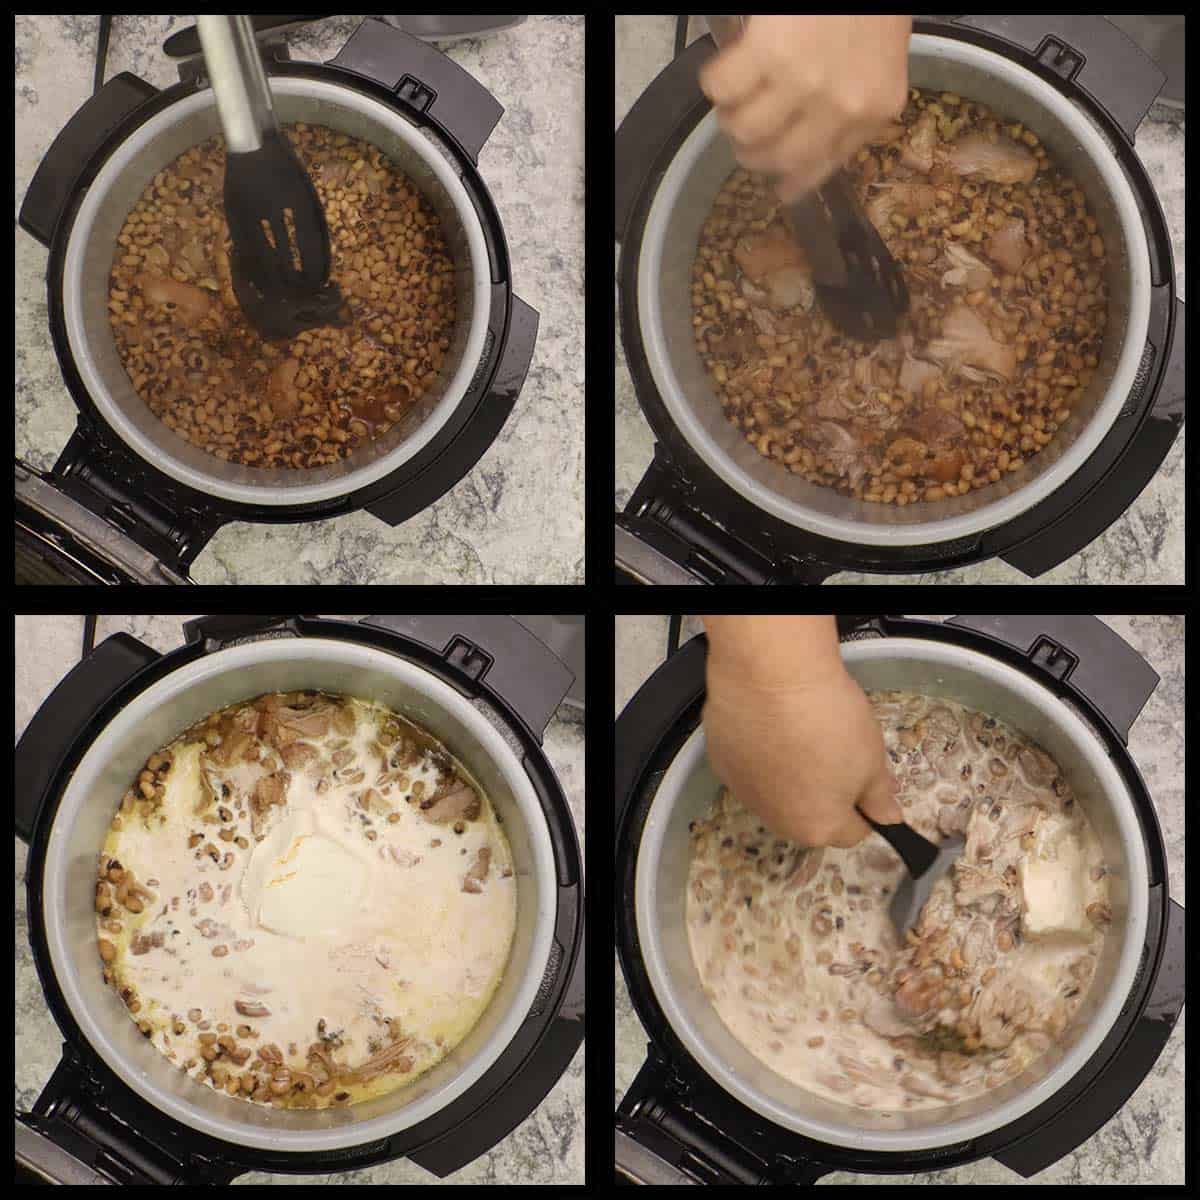
Open the pressure cooking lid and remove the ancho pepper. Using tongs, shred the chicken right in the pot. It will shred very easily.
Add in the cream and cream cheese. Stir and let sit for about 5 minutes so the cream cheese can melt.
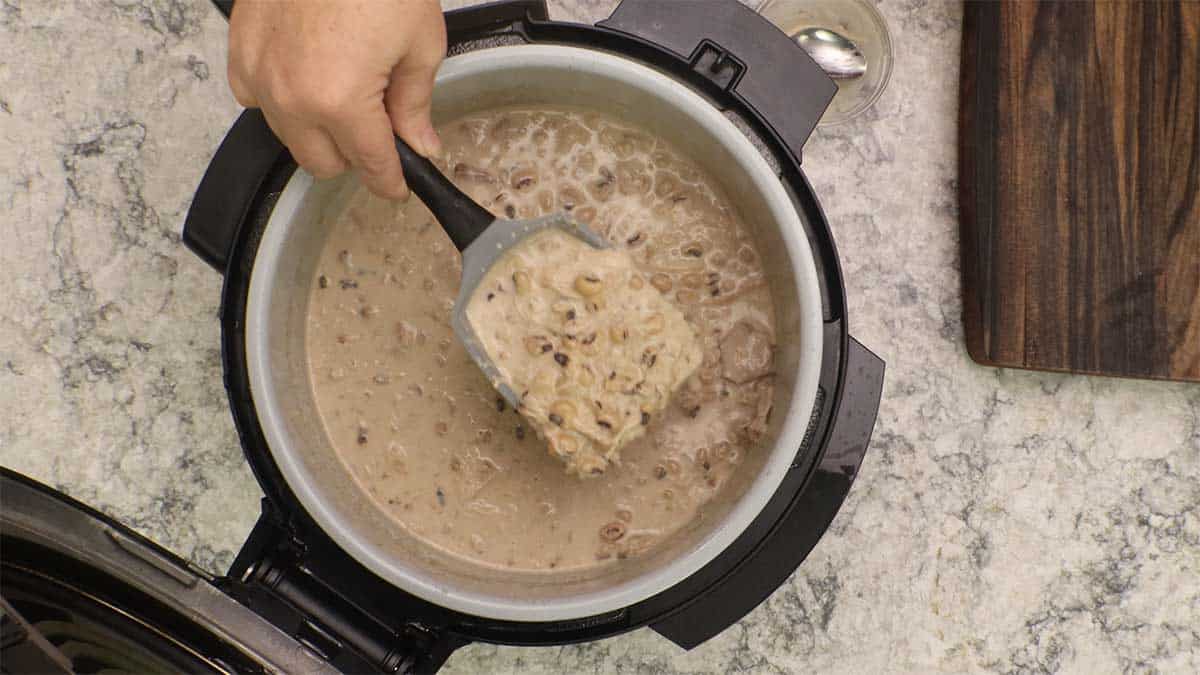
Taste for seasonings and adjust as desired.
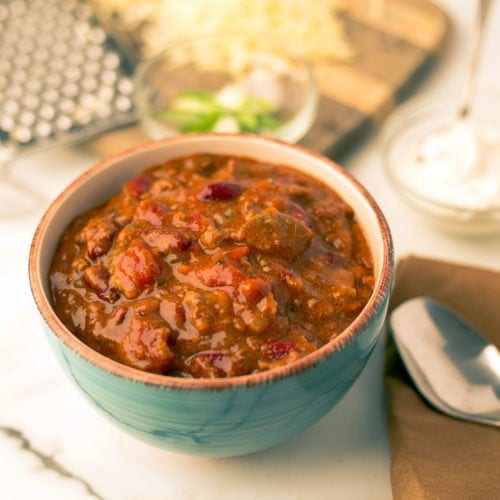
Scoop into bowls, garnish and serve!
Variations for White Chicken Chili
Using canned beans instead of dried
The cook time and liquid amounts used in this recipe are based on using dry beans so both will need to be adjusted if you want to use canned beans.
I recommend draining the liquid from the canned beans UNLESS the liquid is flavored like in the case of chili beans. You can add the canned beans before pressure cooking, and they will not disintegrate or soften too much, in my experience.
Canned beans are fully cooked, so they will not absorb liquid like the dry beans do. Decrease the chicken broth to 2 cups instead of 4 cups.
The cook time in the recipe is based on how long it takes for the dried beans to soften and cook through, when using the canned beans, the cook time is based on the chicken. Decrease your pressure cook time to 10 minutes which is enough time for the chicken to cook through (breast or thighs) if it is thawed. I would add 2 minutes to the PC time for frozen chicken.
If you are making a meatless version with canned beans, the pressure cook time can technically be reduced to 5 minutes, but that may not be enough time for all the flavors to meld together so personally I would stick with a 10-minute pressure cook time.
Slow Cooking White Chicken Chili
If you are using black eyed peas or dry beans you will increase your chicken broth to about 5 cups because there will be more evaporation during the slow cooking process. If at any time during the cooking process the chili becomes too thick, you can add more chicken broth.
The cook time will be based on the dry beans and I recommend slow cooking on high for 6-8 hours or until the beans are the texture you like.
I would still add the cream and cream cheese at the end of the cooking time because the beans will cook quicker with thin liquid, and on high, sometimes the cream can curdle.
If you are using canned beans and want to slow cook your white chicken chili, then the cooking time is based on the chicken and you can use low or high slow cook. I suggest cooking on low slow cook for about 4-6 hours and on high 2-3 hours should be plenty of time. You will also want to decrease the chicken broth to 2-3 cups. Start off with 2 cups and add more if needed. It's easier to thin the chili out then it is to thicken it up.
Storage & Reheating Instructions
How to Store Leftover Black Eyed Pea Chili
Refrigeration
Place your leftover chili in shallow containers and place in the refrigerator. The chili should be able to cool down within 2 hours so if it is really hot I leave it uncovered for 2 hours an then cover the container.
Your chili will last about 3 days in the refrigerator.
Freezer
Before freezing it is very important that the chili is cold, so I recommend refrigerating the leftovers overnight before freezing them.
If the food is warm when packaged for freezing, steam can be produced inside the container or freezer bag, resulting in ice crystals forming.
Air is another issue when freezing food, so make sure you choose a container that is the proper size for the amount of leftovers. You don't want a 3-cup container for 1 cup of chili or there will be too much air trapped in the container which can lead to decreased quality of the chili when you reheat it.
The chili will last for at least 6 months when properly stored in the freezer.
Quick Tip
When the chili is cold, it is usually thick enough to vacuum seal it, and that is the best way to store it in the freezer.
How to Reheat the Chili
Slow Cook
One of my favorite ways to reheat this chili from frozen or thawed is using the slow cooker. You can use high or low slow cook depending on how much time you have.
You may want to add ½-1 cup of chicken broth when reheating from frozen or thawed. The amount of liquid you add depends on how much chili you are reheating.
Stove Top (or Instant Pot or Ninja Foodi)
A more hands on method is using the sear/sauté function on your Ninja Foodi/Instant Pot and heating the chili over low to medium heat. I recommend adding a little liquid and you will need to keep an eye on the chili and stir occasionally until it is heated through. You can use this method with either frozen or thawed chili.
You can also use a pot on the stove over low to medium heat.
Frequently Asked Questions
If you follow the recipe as written, the chili has a moderate spice level. I would say it would be a 4 on a scale of 1-10.
You can always increase or decrease the spice level by adjusting the ingredients.
In this recipe, the only spiciness comes from the jalapeno pepper, so to reduce the spiciness, either remove the seeds for a mild spice or omit it for no spice.
If you want a spicier chili, double up on the jalapeno pepper.
You can absolutely cut the recipe in half by reducing the ingredients by 50% and the pressure cook time will remain the same.
You can double the recipe in 8 qt pressure cookers or larger, but I don't recommend doubling it in a 6.5 qt or smaller pressure cooker. I would reduce the pressure cook time to 15 minutes and increase the natural release to 15 minutes when doubling the recipe.
Absolutely! Even though I used black eye peas in the recipe, any bean can be used and it is essentially a recipe for white chicken chili. See the article for more details.
Hearty Soups, Stews, and Chili Recipes
Using a pressure cooker can really save a lot of time when making soups, stews, and chili. Everything cooks faster, but you don't lose out on any flavor! So, a chili that takes 8 hours to simmer on the stove can be just as flavorful in 10 minutes of pressure cook time!
These recipes are perfect examples of making delicious hearty soups, stews, or chili in a fraction of the time.
- Quick Chili in the Ninja Foodi
- Curry Chicken Chili ~ Pressure Cooker & Stovetop Instructions
- Pressure Cooked Beef Stew in the Ninja Foodi
- Mexican Pork Stew
- Pulled Pork Chili
- Pressure Cooker Split Pea Soup with Ham
- Greek Meatball Soup ~ Pressure Cooker or Stovetop Recipe
- Homemade Chicken Noodle Soup in the Ninja Foodi or Instant Pot


Black Eyed Pea White Chicken Chili Recipe
Equipment
- Pressure Cooker
Ingredients
Seasoning Blend
- 2 teaspoons fine grind sea salt or kosher salt
- 1 teaspoon cumin
- 1 teaspoon onion powder
- 1 teaspoon garlic powder
- ½ teaspoon white pepper
- ½ teaspoon ground mustard powder
Black Eyed Pea Chili
- 1 cup sweet or yellow onion ½" dice (about 1 medium onion)
- 1 medium jalapeno pepper
- 2 pounds boneless skinless chicken thighs
- 1 bulb garlic cloves peeled and smashed, about 8 cloves
- 1 dried ancho chili
- 2 cups black eyed peas dry
- 4 cups chicken broth
- 1¼ cups heavy cream
- 4 ounces cream cheese room temperature
Would you like to save this recipe?
Instructions
Prep for Recipe
- Dice the onion in about ½" dice. Slice the jalapeno into ¼" slices. Remove the stem and seeds from the Ancho pepper. Rinse the black eyed peas. You do not soak them for this recipe. Peel and smash the garlic cloves. Mix up the dry seasonings. Remove the cream cheese from the fridge.2 teaspoons fine grind sea salt, 1 teaspoon cumin, 1 teaspoon onion powder, 1 teaspoon garlic powder, ½ teaspoon white pepper, ½ teaspoon ground mustard powder
Pressure Cook the Chili
- To the inner pot of the Ninja Foodi or Instant Pot add the onions, garlic, jalapeno, chicken (left whole), dried ancho pepper, black-eyed peas. Sprinkle the seasoning blend over the ingredients and add the chicken broth.1 cup sweet or yellow onion, 1 medium jalapeno pepper, 2 pounds boneless skinless chicken thighs, 1 bulb garlic, 1 dried ancho chili, 2 cups black eyed peas, 4 cups chicken broth
- Put the pressure lid on and make sure the valve is set to seal. Pressure cook on high for 18 minutes with a 10-minute natural release. Turn the valve to vent to release any remaining steam.
- Open the lid and remove the ancho pepper. Shred the chicken while in the pot with tongs. It will shred very easily.1¼ cups heavy cream, 4 ounces cream cheese
- Add the cream and cream cheese. Stir and let sit for about 5 minutes for the cream cheese to melt. Stir again and taste for seasonings. Adjust as needed.
Garnish and Serve
- Scoop the chili into bowls and garnish as desired. Serve & Enjoy!
Nutrition
About the Recipe Author, Louise Long
Louise is a full-time recipe creator and food blogger @ The Salted Pepper. She has over 30 years of experience with cooking and recipe development. She owned a restaurant for several years and was a full-time RN until retiring to blog full-time.

She published her first cookbook in the Fall of 2018 and is very interested in writing several more.
Louise is also the creator of an online Ninja Foodi Pressure Cooking Course with over 100 instructional step-by-step videos. People absolutely rave about the course and all the value they have received from it.
Louise has several very active Facebook groups that help people with the basics of cooking and learning more about the appliances they love.
Ninja Foodi Pressure Cooker & Air Crisper 101
Ninja Woodfire Outdoor Grill & Smoker
Louise is also a YouTube creator and you can find most of her recipes in video format on The Salted Pepper YouTube channel.
She is very responsive to messages and eager to help in any way she can. Get more Information about Louise & contact information
I WOULD LOVE TO SEE WHAT YOU ARE COOKING UP IN YOUR KITCHEN! TAG ME @THESALTEDPEPPER ON YOUR FAVORITE SOCIAL MEDIA PLATFORM WHEN YOU MAKE A DISH!
BE SURE TO FOLLOW THE SALTED PEPPER RIGHT HERE ⇓⇓⇓⇓⇓
Judy L. Laquidara says
I am NOT a fan of black eyed peas and was dreading that I had to cook them and at least eat a few on New Year's Day and then I saw your video last night. I knew I had everything I needed to make. These are the best black eyed peas I've ever had. Even my husband said "This is so good. Don't lose this recipe!"
Thank you!
Louise says
That is so awesome! I'm thrilled you both enjoyed it!
Dallas London says
Can't wait to make it your way....not sure I have beans....I think I forgot to get a pkg. but I may have to heat up a can of beans today....lol they come in handy....I don't cook them as often as I do Pinto, Great Northern, & Navy Beans.....but I have always cooked them for New Years....Good Luck they say ,always heard that, so is just a tradition of mine....kids I don't think liked them like I did, but they would eat them....
Looking forward to your 5pm show today.....love the Q & A..... and I may have a few to ask also....
Louise says
Happy New Year!