- Ninja Foodi Pressure Cooker & Air Crisper
Chicken Adobo is a Filipino dish that uses very few ingredients and is absolutely delicious. If you haven't heard of it before, you aren't alone!
Would you like to save this recipe?
I had never heard of it until someone asked me to make it LIVE on Facebook in our group, Simply Cooking with Louise. The only Adobo I had ever heard of was Mexican, so what is the difference?
This post may contain affiliate links. If you make a purchase after clicking a link, I may earn a small commission. As an Amazon Associate, I earn from qualifying purchases.
I was petrified to make it. Honestly, the ingredients are super basic, but I couldn't begin to imagine how it would taste. So, I read a few basic recipes and true to my style of cooking, I just threw things into the pot and crossed my fingers.
What came out of the Ninja Foodi was simply amazing. If you want to try a simple dish with complex flavors, you have to give this one a try!
What is the Difference between Mexican Adobo and Filipino Adobo?
Mexican Adobo
You may be familiar with canned chipotle peppers in adobo sauce that you can find in many grocery stores. It's a spicy marinade with whole chipotle peppers. I love using it in dishes, but until writing this I never gave much thought to what goes in to making it.
I was surprised to read that a chipotle pepper is simply a ripened jalapeno pepper (red) that has been dried and smoked. WOW! That's a game changer for me and you can bet that I'll be making these as soon as I figure out which smoker I want to purchase.
So, basically, a Mexican Adobo is a marinade of sorts made from roasted tomatoes, onions, spices, sugar, and vinegar. It's delicious. It's spicy. Except for the delicious part, it's nothing like a Filipino Adobo.
Filipino Adobo
A Filipino Adobo actually refers to an entire dish and is usually made with chicken, but can be made with other cuts of meat, seafood, or even all vegetables.
Filipino Adobo uses vinegar, pepper, garlic, and soy sauce to marinate the meat or vegetables.
Nothing about a Filipino Adobo reminds me of a Mexican Adobe, but they are both delicious and this Filipino Chicken Adobo recipe is so easy to make 360 meal!
What is a 360 Meal?
I get this question a lot, so I thought I would answer it here. A 360 meal is any meal that is cooked at the same time in the same pot, but layered.
When you think of a plate as a 360 degree circle, that is the idea of it. All the components can be plated as a full meal. They differ from one-pot meals where usually all the ingredients are dumped into the pot and cooked.
360 meals usually contain a protein, a starch, and a vegetable. You can eliminate or change any layer of the recipe with a different ingredient as long as the cook times are about the same.
If you are low carb, you can skip the starch and double the vegetable.
They are designed to be fairly simple to throw together for a weeknight meal and fancy enough to serve for a special occassion or when you have company coming.
What Type of Chicken is Best for Filipino Chicken Adobo
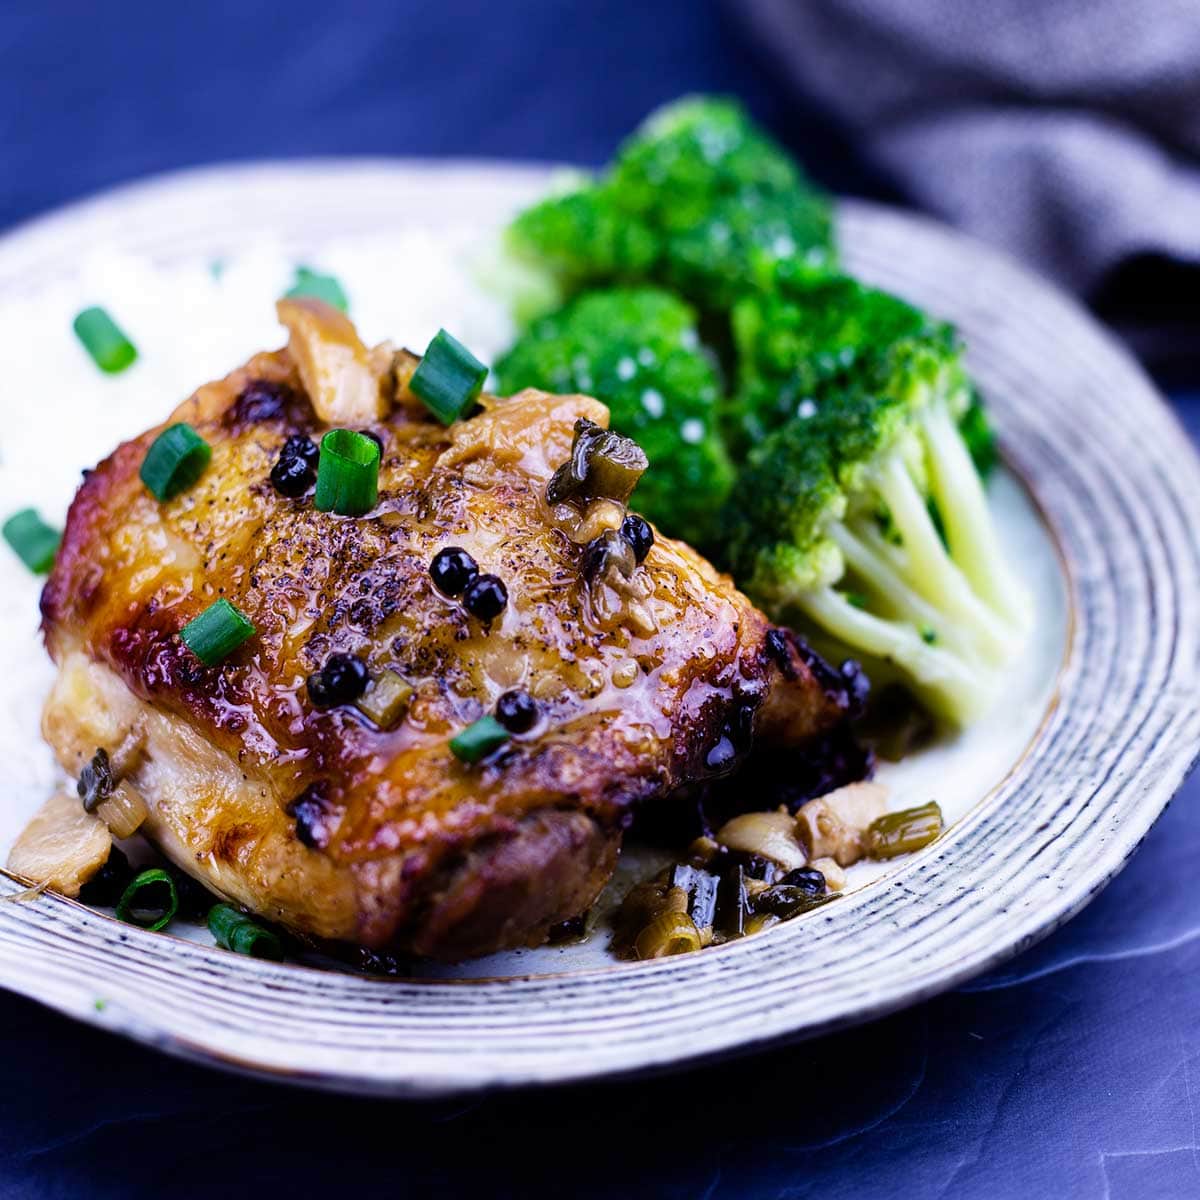
You can use any type of chicken you like, but bone-in, skin-on chicken thighs are my favorite. The chicken stays nice and juicy and the skin is so crispy and delicious.
I have made the recipe with boneless, skinless chicken thighs and it was good, but not quite as good!
If you want to use boneless, skinless chicken breasts or even chicken tenderloins, you certainly can. I would make a few changes to the recipe, though. Instead of Air Crisping on a rack at the end, I would leave the chicken breasts in the sauce while you AC the broccoli. There is no benefit to AC'ing the chicken if it doesn't have skin on it.
If you have skin-on chicken breasts, I would follow the recipe for chicken thighs and I'm sure it will be perfect!
You can even use chicken wings if you want. I would add them frozen so they don't overcook in the 3-minute PC time. Then crisp them up just like the chicken thighs.
Do I Have to Use the Whole Peppercorns?
You never have to use any ingredient in a recipe if you don't like it. The outcome will be different, though.
The peppercorns are traditional in a Filipino Chicken Adobe and I really suggest using them for flavor, if nothing else. You don't have to eat them, although you might be very surprised at how delicious they are.
The PC time softens them and they also take on a milder flavor. I absolutely LOVE them, but you can omit them if you wish. You might want to add a little ground pepper instead. I would only add about ¼-½ tsp, though. Ground spices are much stronger than whole.
Can I Use Another Vegetable?
Of course! You can use any vegetable you like as long as it will cook or steam in the 15 minutes of Air Crisping.
Any frozen vegetable should be just fine. I wouldn't try to use carrots or any other root vegetable because they won't get done in time. Unless you want to cook your rice separately and PC the root vegetable, that should work.
Can I Use a Different Type of Rice?
Yes, you can use a white rice or even basmati rice should work fine. Any rice that will cook pot-in-pot (PIP) in a 3-minute PC time will work fine.
You would not want to use brown rice because the cook time is much longer, but you can always cook it separately!
Do I Have to Make This as a 360 Meal?
Nope! You can make a larger batch of the Filipino Chicken Adobo and skip the rice and broccoli.
You can double or even triple the sauce and layer the chicken thighs in the pot and PC for 3 minutes. I would do a longer natural release, maybe 15 minutes to ensure the layered chicken is cooked enough and to prevent it from drying out.
Just keep in mind that you will have to AC in stages since more than 4 chicken thighs won't usually fit in one layer in the Ninja Foodi.
How to Make Filipino Chicken Adobo in the Ninja Foodi
Peel and smash the garlic cloves with the flat side of your knife. I know a whole bulb sounds like a lot, but trust me it isn't overpowering. The more surface area exposed on a garlic clove, the stronger the flavor. So, by smashing them, we are keeping the surface area much less than if we minced it.
Also the cooking process will bring out a milder garlic flavor than if it was raw, so don't worry... use the whole bulb!
If you want to use minced garlic instead, you will only want to use 1-2 teaspoon and don't add it to the pot until after the peppercorns and bay leaves are toasted. If you add it in too soon, it can burn and burnt garlic is horrid. It's so bad that if you do accidentally burn your garlic, start over. Seriously, you'll thank me!
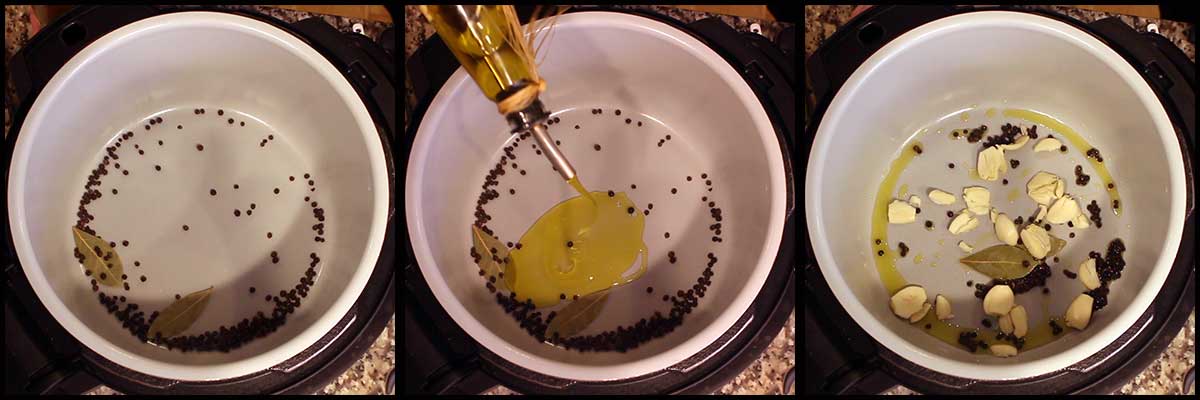
Add the bay leaves, peppercorns, and olive oil to the pot and turn on the sear/sauté on high. Allow the oil to heat up and toast the bay leaves and peppercorns for about 3-5 minutes. Add the garlic and sauté on high for another 2-3 minutes.
While the peppercorns, bay leaves, and garlic are cooking, season your chicken thighs. I like to remove my chicken thighs from the fridge about 30 minutes before I use them just to take the chill off.
Combine salt and pepper in a small bowl and sparingly sprinkle over chicken thighs on both sides. You don't want to over salt the chicken because there is quite a bit of saltiness in the sauce.
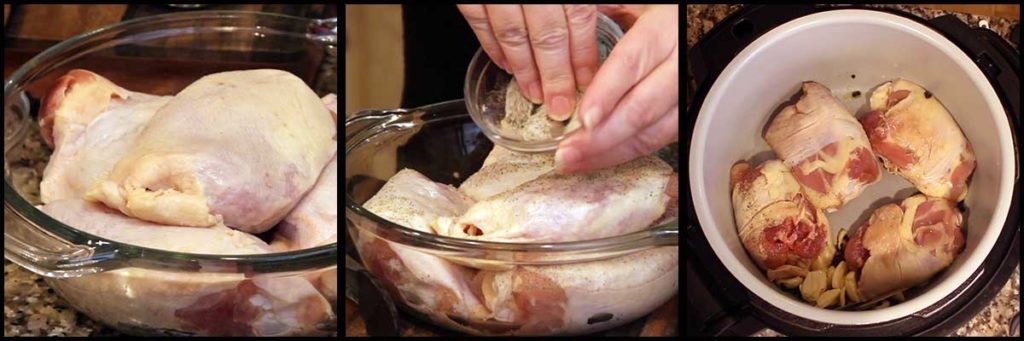
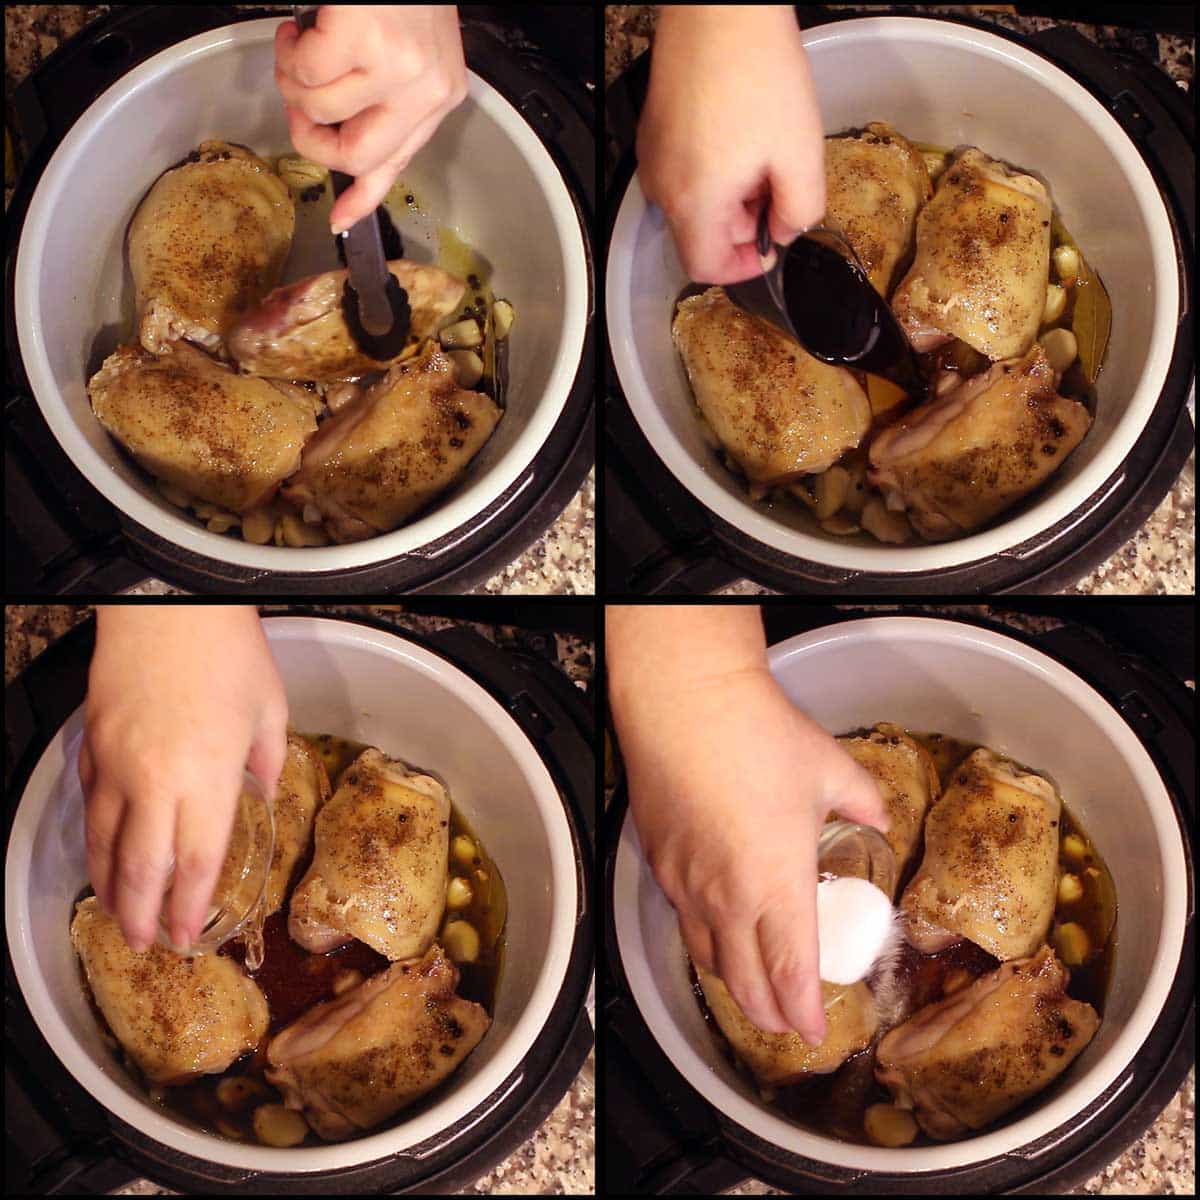
With the sear/sauté on high, place the chicken thighs skin side down on the bottom of the pot. Sear them for about 5 minutes or until there is nice browning on the skin. Flip them over and add the sauce. I added the ingredients for the sauce one at a time, but you can also mix up the ingredients in a bowl and pour it in.
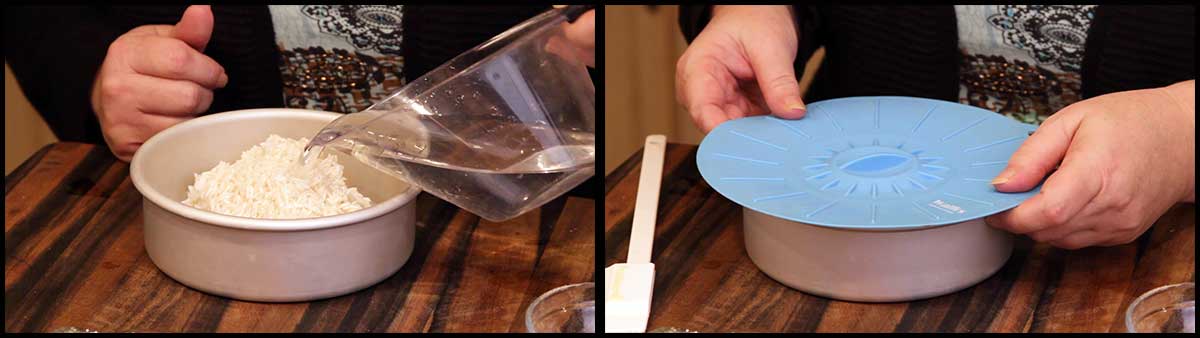
Rinse the rice really well until the water runs clear. This is important to avoid clumpy, sticky rice. Place the rice in a (affiliate link)6" Fat Daddio pan or equivalent and add 1 cup of water. Cover the rice with foil or a (affiliate link)silicone cover.
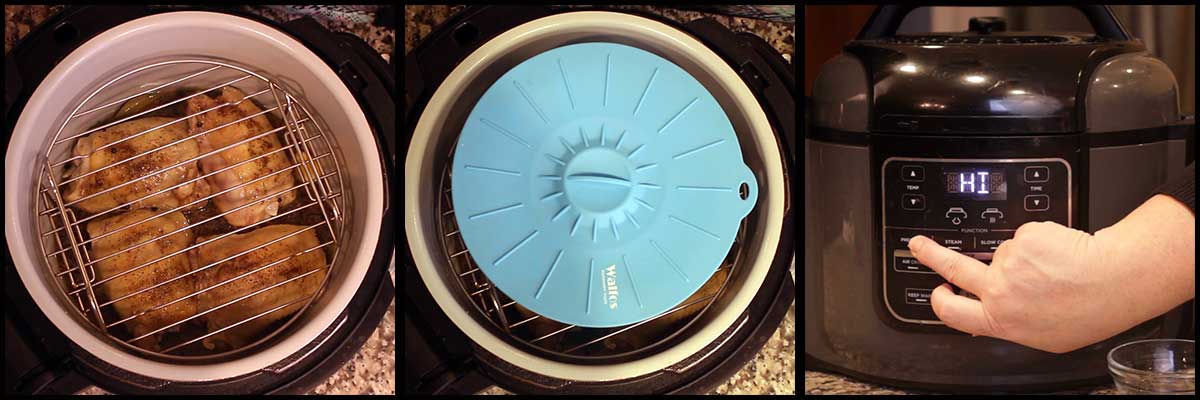
Nestle the rack in the high position over the chicken and place the pan of rice on top.
Put the pressure lid on and turn the valve to seal. Pressure cook on high for 3 minutes and allow the pot to natural release for 5 minutes. Manually release the remaining pressure and remove the lid.
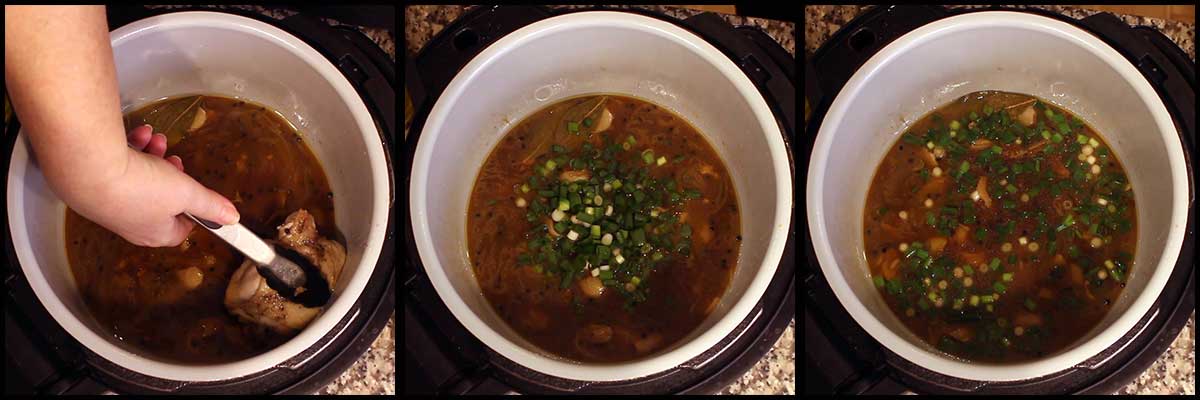
Remove the pan of rice and set aside. Leave it covered. Remove the rack and place the chicken on a plate. Add in the chopped green onions and stir.
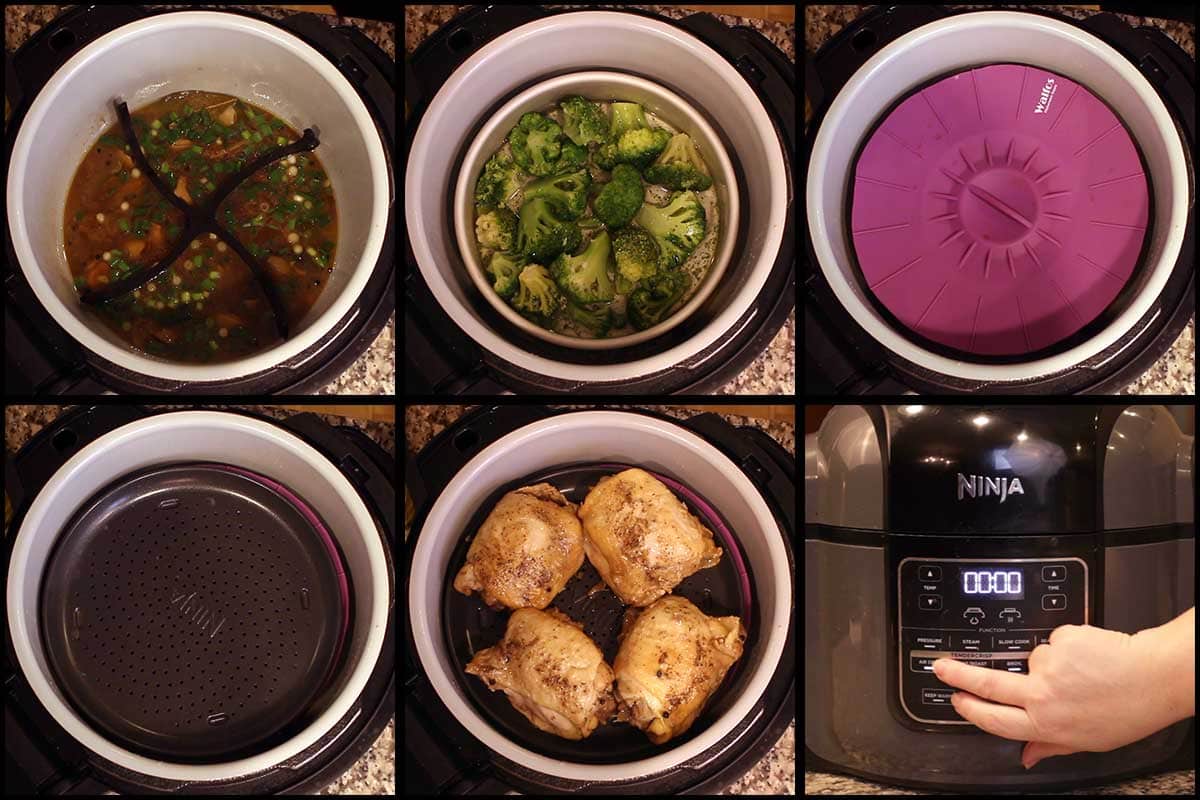
Place the diffuser legs from the air crisp basket into the inner pot with the points facing you. Put the broccoli into an (affiliate link)8" Fat Daddio pan and add 1 cup of water and cover. Place the pan in the middle of the diffuser legs.
Place a crisping tray or if you have the 8qt Ninja Foodi or smaller chicken thighs, use the (affiliate link)Sear 'N Sizzle grill grate! I used it before I turned this into a 360 meal and the results were fantastic!
While the chicken is Air Crisping, remove the lid from the rice and fluff it with a fork and let some steam out so it doesn't overcook. Cover to keep warm.

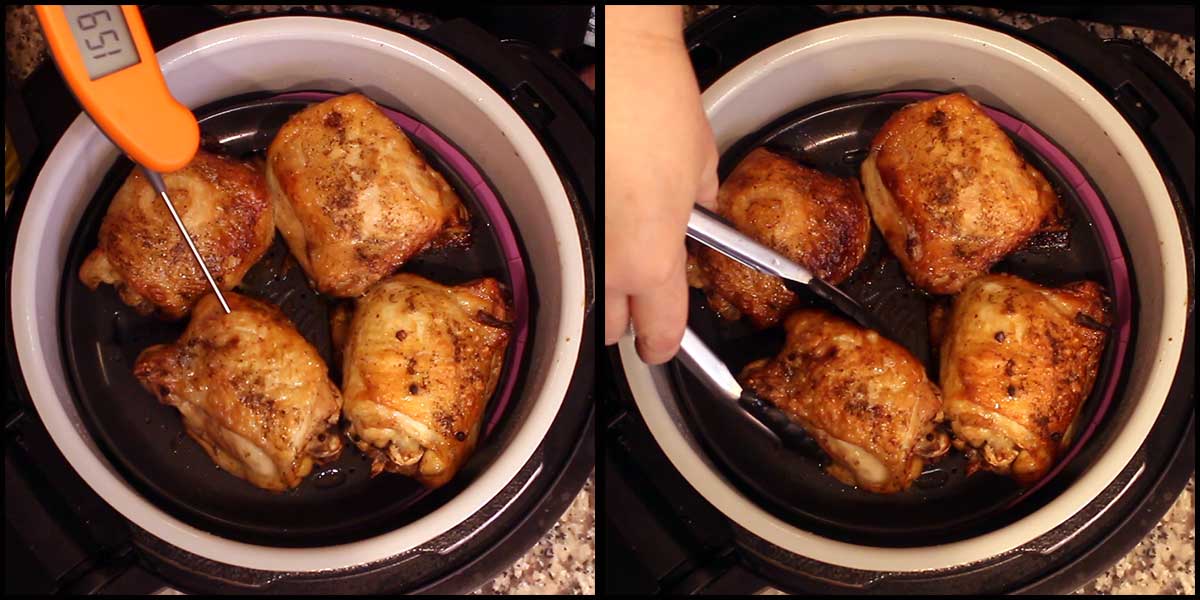
AC on 400℉/200℃ for 10-15 minutes. I usually check after 5-10 minutes, but go the whole 15 minutes to get the skin of the chicken really crispy. Make sure your chicken is at least 160℉/71℃ before removing. It will raise to 165℉ while it rests.
If you want your broccoli softer, continue to AC another 5-10 minutes while the chicken rests.
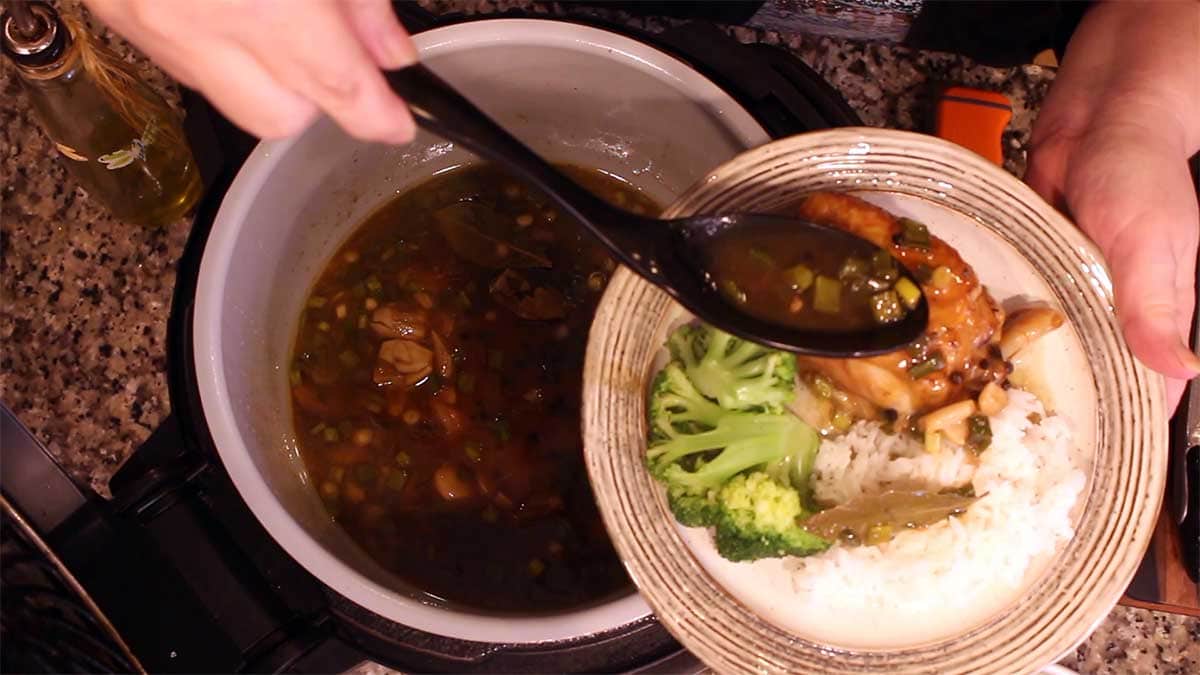
If you want your sauce thicker, you can add in a cornstarch slurry and bring it to a boil to thicken. 1-2 teaspoon cornstarch in 1 tablespoon of water should be fine.
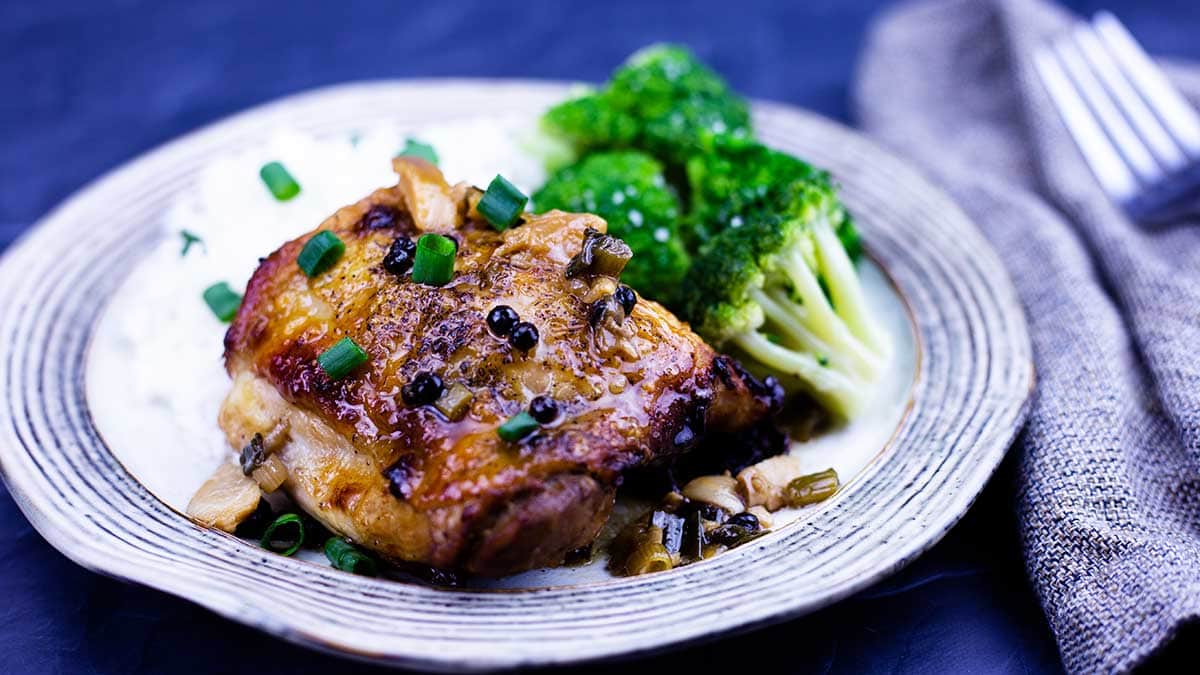
Plate and pour sauce over chicken. Enjoy!
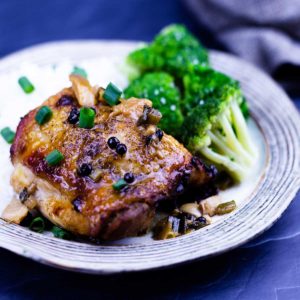
Filipino Chicken Adobo
Equipment
- Ninja Foodi Pressure Cooker & Air Crisper
Ingredients
Sauce ingredients
- ½ cup apple cider vinegar
- ¼ cup soy sauce
- ¼ cup water
- 2 tablespoon white vinegar
- 2 teaspoon sugar
Would you like to save this recipe?
Instructions
- Remove the broccoli from the freezer and the chicken from the fridge. Peel and smash the entire bulb of garlic. Sprinkle the chicken thighs on both sides with the salt and pepper. Don't go overboard with this because there is a lot of salt in the soy sauce.
- Turn the Ninja Foodi on high sear/sauté. Add the bay leaves, peppercorns, and oil. Allow the oil to heat up and toast the peppercorns and bay leaves for a few minutes. Add in the smashed garlic and allow to sauté for 2-3 minutes.
- Add the chicken thighs to the inner pot, skin side down. Continue to cook on high sear/sauté for about 5 minutes.
- Rinse the rice until the water runs clear and place into a 6" Fat Daddio Pan. Add 1 cup of water to the rice and cover with foil or a silicone cover.
- Flip the chicken over so the skin side is up. Mix the sauce ingredients in medium size bowl and pour into the inner pot.
- Put the rack in the high position into the inner pot. Set the pan of rice on top and put the pressure lid on. Turn the valve to seal and set the pressure on high for 3 minutes. Natural release for 5 minutes and then manually release the remaining pressure.
- Remove the rice and set it aside, leaving it covered. Remove the chicken and place on a plate. Add the chopped green onions to the sauce. Put the diffuser legs from the air fry basket in the bottom of the pot with the pointy ends up. Add broccoli and 1 cup of water to an 8" Fat Daddio pan and place the pan on the diffuser legs. Cover the broccoli with foil or a silicone cover.
- Place a crisping tray on top of the broccoli or just set the chicken on top of the covered broccoli. Close the TenderCrisp lid and turn the Air Crisp mode on 400°F/200°C and AC for about 15 minutes or until the temp of the chicken reaches at least 160°F/71°C.
- While the chicken is cooking, fluff the rice with a fork and cover to keep warm.
- Remove the chicken and let rest for about 5-10 minutes. Remove the broccoli. If the broccoli isn't soft enough for you, Air crisp while the chicken rests.
- Remove the bay leaf from the sauce and pour the sauce over the chicken. Season the broccoli to your liking. Serve & Enjoy!
Nutrition
About the Recipe Author, Louise Long
Louise is a full-time recipe creator and food blogger @ The Salted Pepper. She has over 30 years of experience with cooking and recipe development. She owned a restaurant for several years and was a full-time RN until retiring to blog full-time.

She published her first cookbook in the Fall of 2018 and is very interested in writing several more.
Louise is also the creator of an online Ninja Foodi Pressure Cooking Course with over 100 instructional step-by-step videos. People absolutely rave about the course and all the value they have received from it.
Louise has several very active Facebook groups that help people with the basics of cooking and learning more about the appliances they love.
Ninja Foodi Pressure Cooker & Air Crisper 101
Ninja Woodfire Outdoor Grill & Smoker
Louise is also a YouTube creator and you can find most of her recipes in video format on The Salted Pepper YouTube channel.
She is very responsive to messages and eager to help in any way she can. Get more Information about Louise & contact information
I WOULD LOVE TO SEE WHAT YOU ARE COOKING UP IN YOUR KITCHEN! TAG ME @THESALTEDPEPPER ON YOUR FAVORITE SOCIAL MEDIA PLATFORM WHEN YOU MAKE A DISH!
BE SURE TO FOLLOW THE SALTED PEPPER RIGHT HERE ⇓⇓⇓⇓⇓
Scott says
Hi Louise,
This looks like a delicious recipe that I want to try. Could I substitute cauliflower rice and cook it at the same time as the broccoli? Thanks
Melissa says
Hi can u use fresh broccoli in this recipe thats what I have and also I do not have yhe fat daddy pans yet they are on the way tho lol..... can I use a glass dish in the foodi? If I have to do the broccoli and rice on the stove would the cooking time change for the chicken?
Louise says
I haven't tried it with fresh broccoli, so I can't say exactly how it would cook. You don't want to use glass when pressure cooking. The times would not change if you made the rice and broccoli separately.
sara says
I don't have a crisping tray. In step #8 do I understand that I can just place chicken on top of the covered broccoli and air fry; with or without a crisping tray?
Louise says
Yes, you can set the chicken on top of the pan of broccoli as long as it's covered.