
- Instant Pot or Electric Pressure Cooker
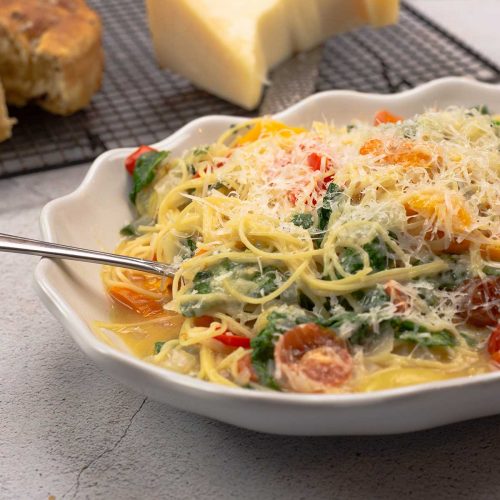
It doesn't get much easier than this one-pot baked ziti made right in the Ninja Foodi! It also doesn't get much better than this baked ziti with the added little twist of a bechamel sauce with cheese on top! If you love melted cheese on top of lasagna, spaghetti, or your baked Italian dishes, you are going to do flips over this cheesy cream sauce.
The first time I had this version of baked ziti was LIVE on Facebook during a Tasty Tuesday episode and, although I thought I made it too spicy (went too heavy on the nutmeg, and there wasn't enough of the cream sauce), it was still good enough for me to test the recipe again. With just a few adjustments, this has become one of the easiest and most delicious comfort foods on my website. It's sure to be a family favorite and easy enough for busy weeknights.
Would you like to save this recipe?
If you don't have a Ninja Foodi, no worries! You can make this recipe on the stove/oven or in your Instant Pot and then bake in the oven. It only requires a few basic ingredients, most of which you may already have in your fridge and pantry!
Frequently Asked Questions
Yes, absolutely! Reduce all of the ingredients for the baked ziti in half and pressure cook for the same time. I would keep the ingredients for the bechamel sauce with cheese (Mornay Sauce) the same if you are making it in the Ninja Foodi, because it will cover the entire top. If you are using a smaller baking dish, then you can reduce them by 50% as well. The bake time will be the same even if you cut the recipe in half.
Yes! I have frozen and reheated the baked ziti many times and it is delicious. You probably won't be able to keep it layered like when you first serve it, but, trust me, that doesn't affect the flavor at all. Make sure the ziti is completely cool before you place it in an airtight container for freezing. I would freeze in the size portions you want to reheat, but if you want to use the Foodi to reheat the baked ziti, make sure it will fit in a container covered that can fit into the Foodi.
I'm not a fan of reheating frozen food in the microwave, but that is one option. Make sure the frozen ziti is in a microwave-safe container and then microwave on high at 1-2 minute intervals until heated through. It is important to stir while reheating so it heats evenly in the microwave.
My favorite way to reheat the baked ziti from frozen is using the steam function on the Ninja Foodi. To do this, put 2 cups of water into the inner pot. Place the frozen ziti in a container that you can cover with foil or another type of covering like silicone lids. Put the pressure lid on and turn the valve to vent. Steam for about 15-20 minutes or until the ziti is heated through.
Another way I've reheated it from frozen is to use the slow cook option. I simply placed the frozen ziti in the inner pot, put the pressure lid on and vented the valve. Selected slow cook on high and in about an hour I had perfectly reheated ziti. The time it takes to reheat will directly depend on the portion size. I reheated about 3 cups each time.
More One-Pot Recipes
The type of recipes that are requested the most are the easy one-pot recipes that can be made in your instant pot or ninja Foodi. Here are few more like this one that are most popular on my website.
Ingredients & Substitutions
Pasta
While Baked Ziti traditionally uses Ziti pasta, you can certainly use other types of pasta. I've tested both Penne and ziti in this baked ziti recipe and I like both. I've also tested it with Gluten Free Penne and it worked great. I do recommend using a thicker, tube pasta instead of a thin long pasta like spaghetti noodles. Here are my recommended pressure cook times based on the type of pasta you want to use.
Ziti: 2-3 minutes on high pressure. I call for 3 minutes with a 5-minute natural release in this recipe and I think it's perfect, but the noodles are a little softer than al dente after baking. So, if you want firmer noodles, decrease to 2 minutes with a 5-minute natural release.
Penne: 3-4 minutes with a 5-minute natural release.
Rotini: 3-4 minutes with a 5-minute natural release.
Elbow Macaroni: 2 minutes with a 5-minute natural release.
Meat Sauce
This quick sauce is perfectly flavored with Italian sausage, ground beef, garlic, and your favorite marinara or pasta sauce. The sausage gives so much flavor, I really hope you use it, but you can certainly increase the seasonings and use all ground beef, ground turkey, or even cut up chicken breasts. You can also skip the meat and make it meatless.
I used mild Italian sausage in this recipe, but you can use any kind you like. Sometimes I will combine sweet and spicy sausage when I want a little sweet heat.
I used 80/20 ground beef and did not drain the grease. This adds to the flavor, but it also adds fat to the dish. You can absolutely drain the ground beef if you prefer or use a lean ground beef.
The garlic is put in whole instead of minced which gives the sauce a mild garlic flavor without being overpowering. If you want to use minced garlic instead, only use 1-2 teaspoons and sauté it towards the end of cooking the meat.
You can use your favorite marinara sauce or spaghetti sauce in this recipe, just make sure it's not too thick. I either make my own Marinara using this recipe or I have found that Rao's Marinara sauce is absolutely delicious. You can even use plain tomato sauce with some Italian seasoning to create a quick sauce.
I didn't add any vegetables to the sauce, but you certainly could add finely diced onions, green or red bell pepper, roasted red peppers, or anything else that you like in your pasta dishes.
Parmesan Cheese Sauce
To make this simple and flavorful sauce, we start out with equal amounts of flour and butter to make a roux. Then add in some milk and finely grated parmesan cheese. It's delicious and I encourage you to try it! It adds a creaminess to the pasta dish that you can't get with cheese alone. I also add a tiny bit of nutmeg to it and that sets it over the top delicious!
You can use half and half or heavy cream in place of the milk, but I found the sauce rich enough with whole milk.
You can also skip this part of the recipe and simply top your baked ziti with mozzarella cheese, parmesan cheese, and any other cheeses you like.
How to make Baked Ziti with Bechamel Sauce Stove Top and in the Oven
In a large skillet, melt the butter over medium heat. Add in the flour and the seasonings. When all the butter has been absorbed by the flour, stir with a wooden spoon or heat resistant spatula and cook the mixture for 2 minutes. Slowly add in the milk, stirring to combine after each addition. Add in the grated parmesan cheese and stir until you have a smooth cream sauce. Let sit and cool until you are ready to use it.
In a large pot or Dutch oven, sauté the sausage and ground beef, add in the seasonings and whole garlic cloves. Add in the marinara sauce, stir and simmer for about 30-60 minutes.
Boil the ziti noodles according to the package instructions. I recommend decreasing the time by 1-2 minutes since they will continue to cook as it bakes. Drain and add the pasta to the meat sauce. Toss to combine.
Transfer to a large casserole dish (at least 4 quarts). Top with the parmesan cream sauce. Place the casserole dish in a 375℉/190℃ preheated oven and bake for 15-20 minutes or until the top is browning and set. Add the remaining parmesan cheese and bake another 5 minutes. Let sit at least 15 minutes before serving.
Baked Ziti in the Ninja Foodi or Instant Pot
Whether you have the Instant Pot with a crisping lid or the Ninja Foodi, the instructions will be the same. If you don't have a crisping lid, then the only changes will be to transfer the pasta and meat sauce after pressure cooking to a casserole dish and then follow the oven instructions above to top it with the bechamel cheese sauce and bake it in the oven.
Making the Parmesan Cheese Sauce
This is a quick sauce to make and once you do it, I bet you will make it over and over again to use in different recipes. It's a fantastic basic cheese sauce and you can change up the cheeses to make different kinds of mac and cheese, broccoli in cheese sauce, or any kind of cheesy vegetables. It's also great as a topping for baked potatoes!
I recommend doing this first which allows the sauce to cool and thicken. It makes it easier to spread on top after you pressure cook the pasta and sauce. I do this in the inner pot of the Ninja Foodi and it works great. If you are using an Instant Pot or Foodi with a stainless steel inner pot, reduce your heat so you don't burn the roux.
Prep
Measure out all of your ingredients and grating the parmesan cheese prior to starting to make the sauce. Once you start, things move quickly and being prepared with what you need will make it much easier to go from start to finish in about 10 minutes.
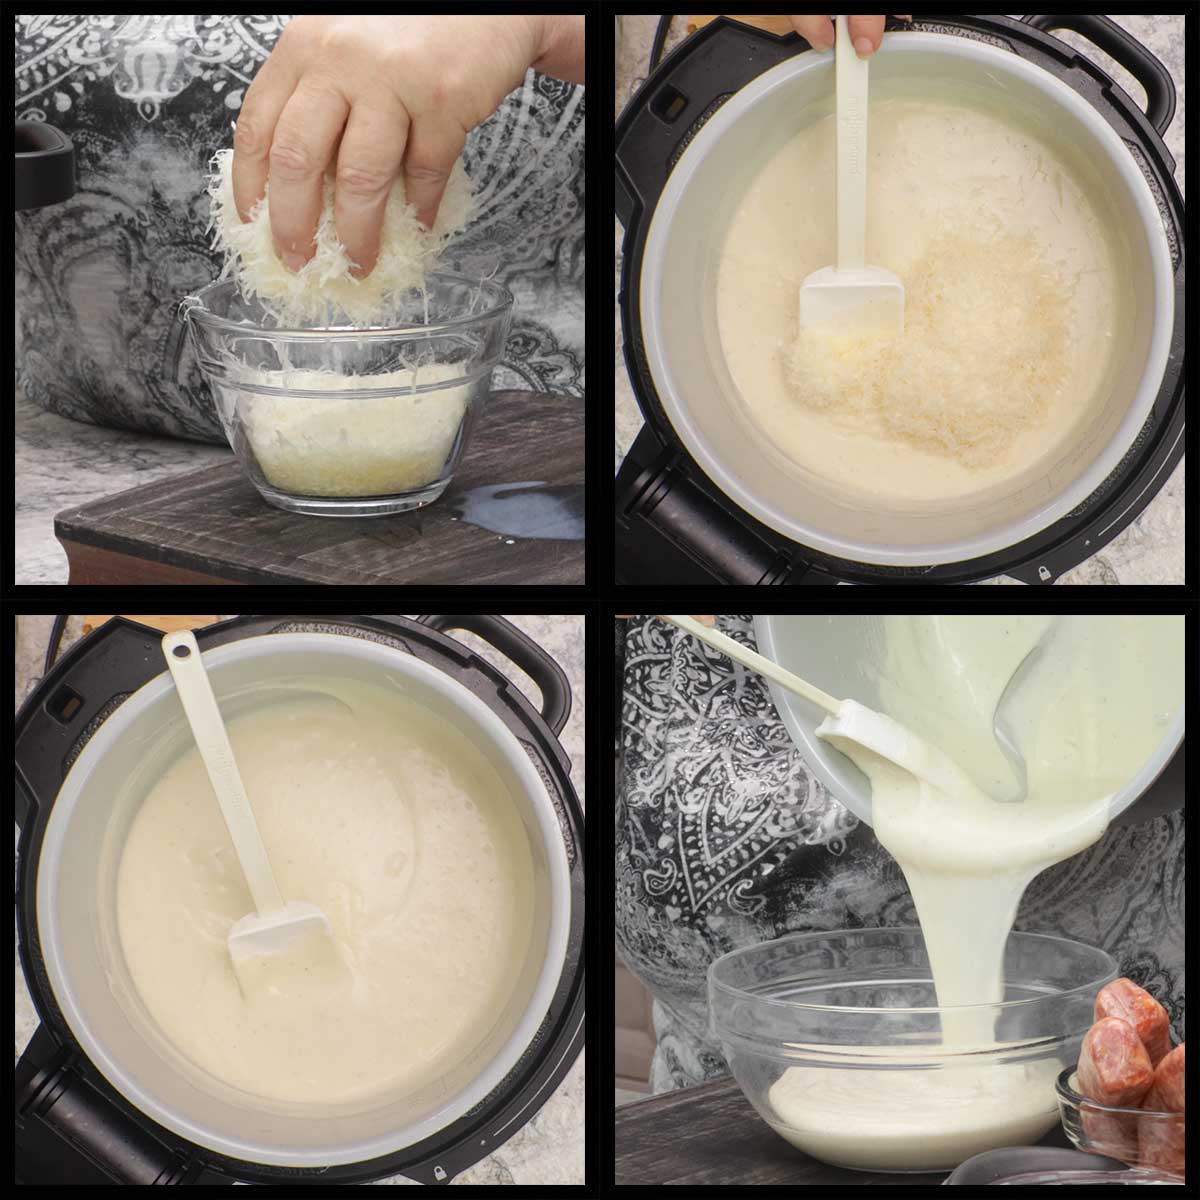
Grating the parmesan cheese is the most time consuming prep for this and I do suggest using a block of parmesan cheese versus the pre-shredded kind in a bag. Freshly grated parmesan will melt much easier and smoother. You also want to use a fine grater if you have one. 2 ounces of parmesan cheese will yield about 1½ cups finely grated. The grater I use is actually a zester from Pampered Chef and you can find it here ➡︎➡︎➡︎ (affiliate link)Pampered Chef Adjustable Zester
Making the Roux
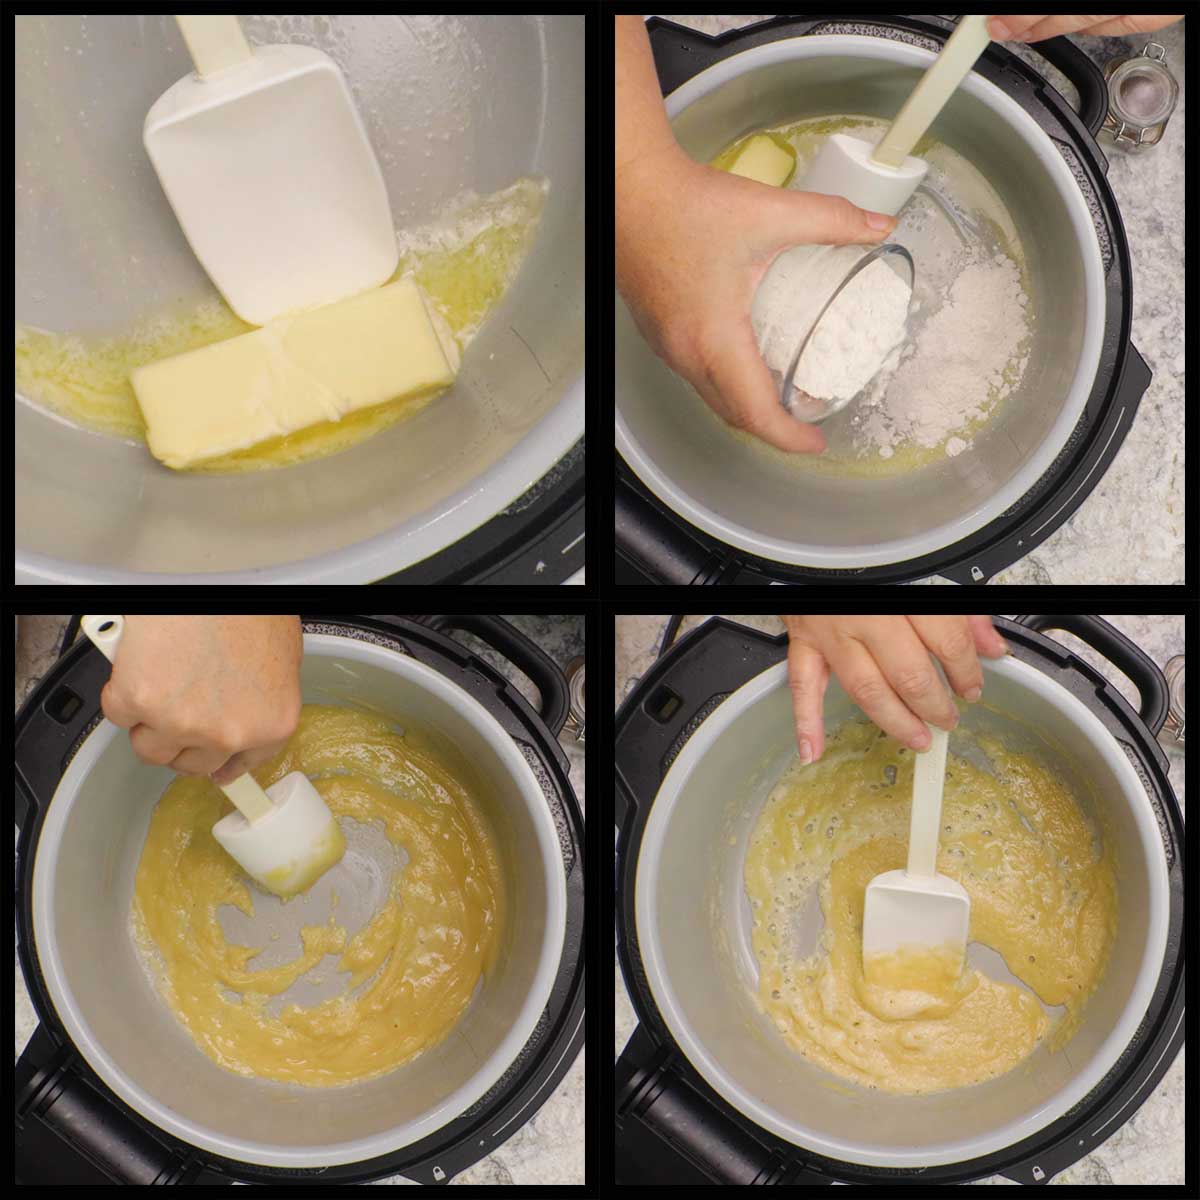
Turn the Ninja Foodi on high sear/sauté and add the 6 Tablespoons of butter. You want the butter to melt, but not brown, so if you see any browning reduce your heat down to medium.
Once the butter has melted, add in the 6 Tablespoons flour. You can do this all at once or in stages. Stir to combine the butter and flour and you will end up with a thin paste. If you still see flour, then you need to add a bit more butter. If your mixture is too runny, you may need a bit more flour.
Reduce the heat to low and cook another 2-3 minutes while stirring frequently. This will cook out the flour taste and it's very important. The roux should remain light in color.
Making the Bechamel Sauce
Bechamel Sauce is one of the mother sauces and it's basically just the roux combined with milk or cream to make a smooth white sauce. It is usually seasoned with salt and a little nutmeg, which is how I make it in the recipe. The salt is very important, but the nutmeg is optional. However, I urge you to try it because it adds a beautiful flavor in the finished baked ziti.
With the heat on low, slowly add in the milk about ½ cup at a time. Stir to incorporate. At first you will see the milk absorb quickly into the roux and look like a paste. Just keep adding the milk while the heat is on low and stir.
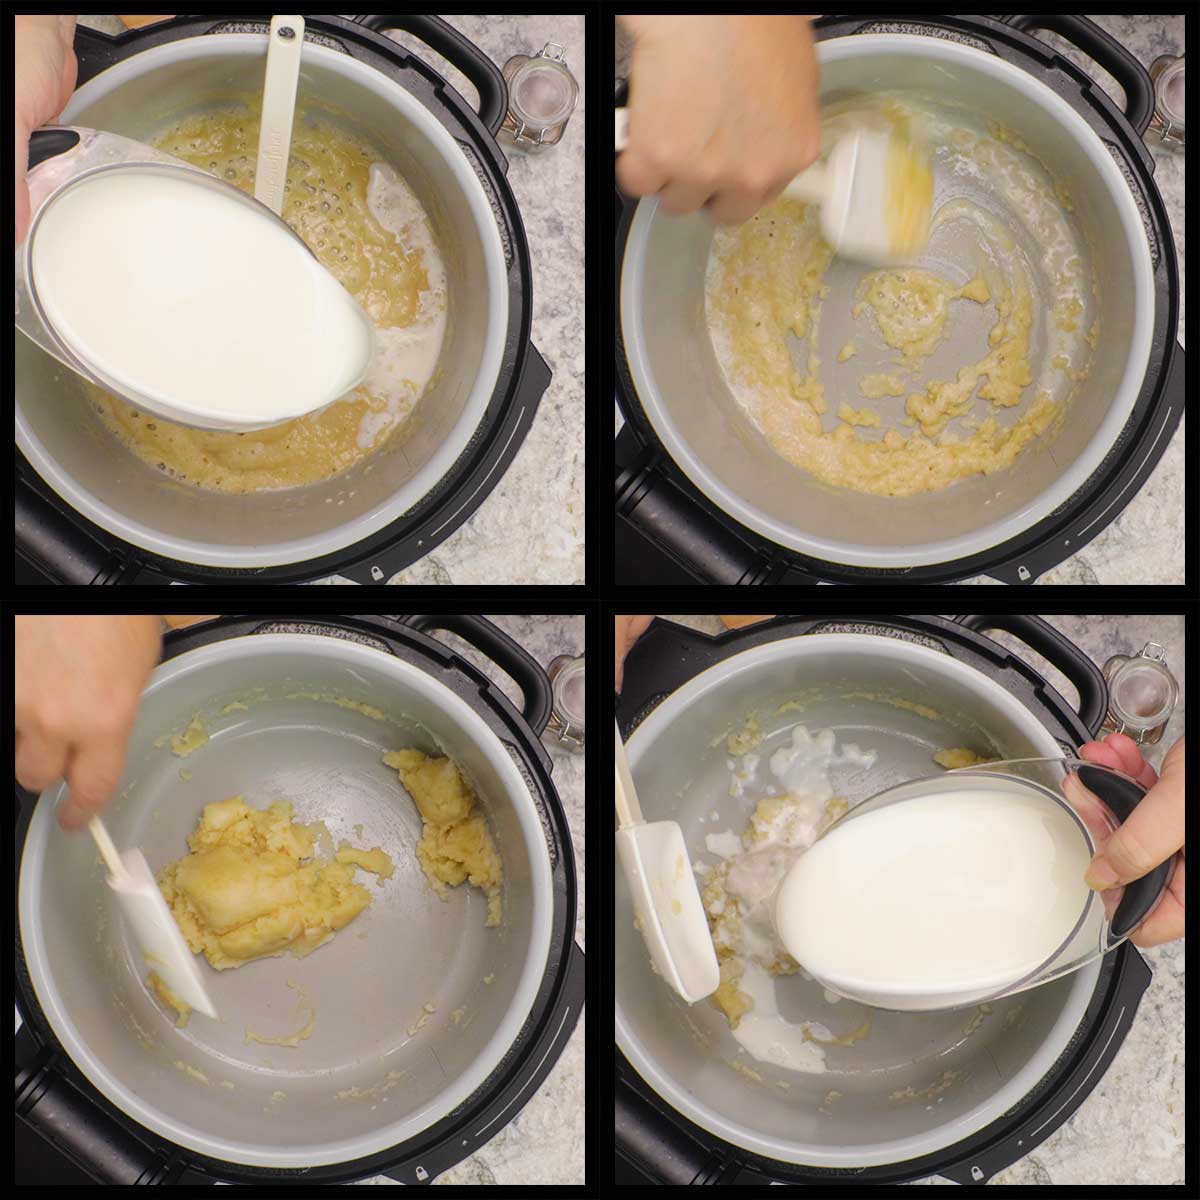
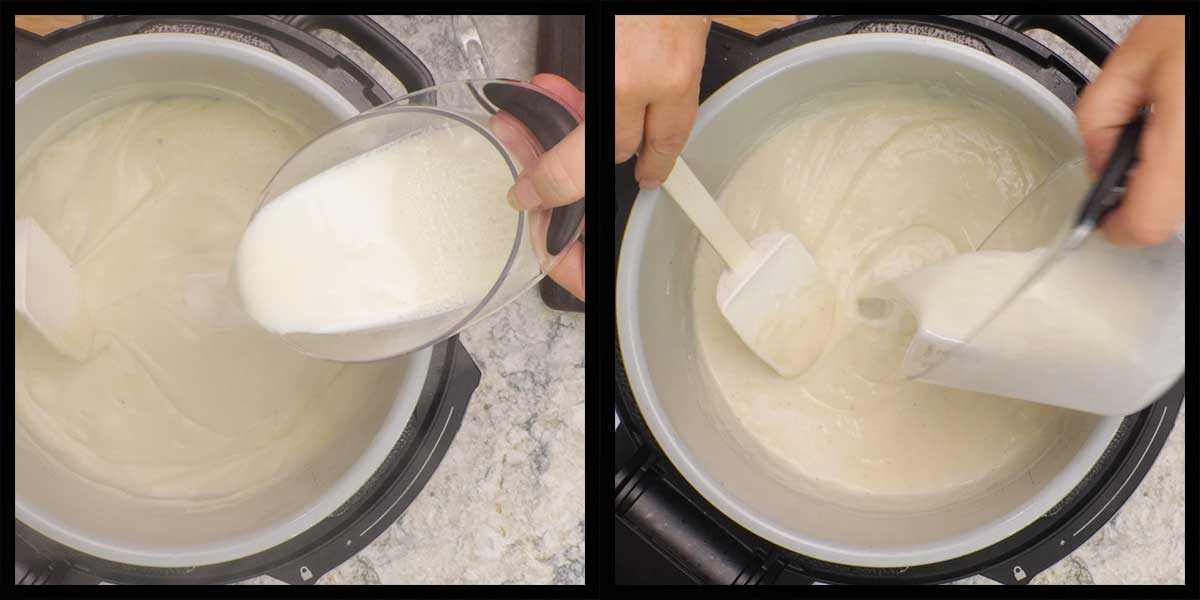
Continue adding in the milk until you have a smooth cream sauce. This will take between 2-2½ cups of whole milk. Once your sauce is about the consistency of a thin cream soup, add in the salt and the nutmeg. Stir in the nutmeg and scrape along the bottom of the pot. If the sauce separates for more than just a few seconds, the sauce is a little too thick and since we are going to add cheese to the sauce, you will want to add a bit more milk to loosen it up.
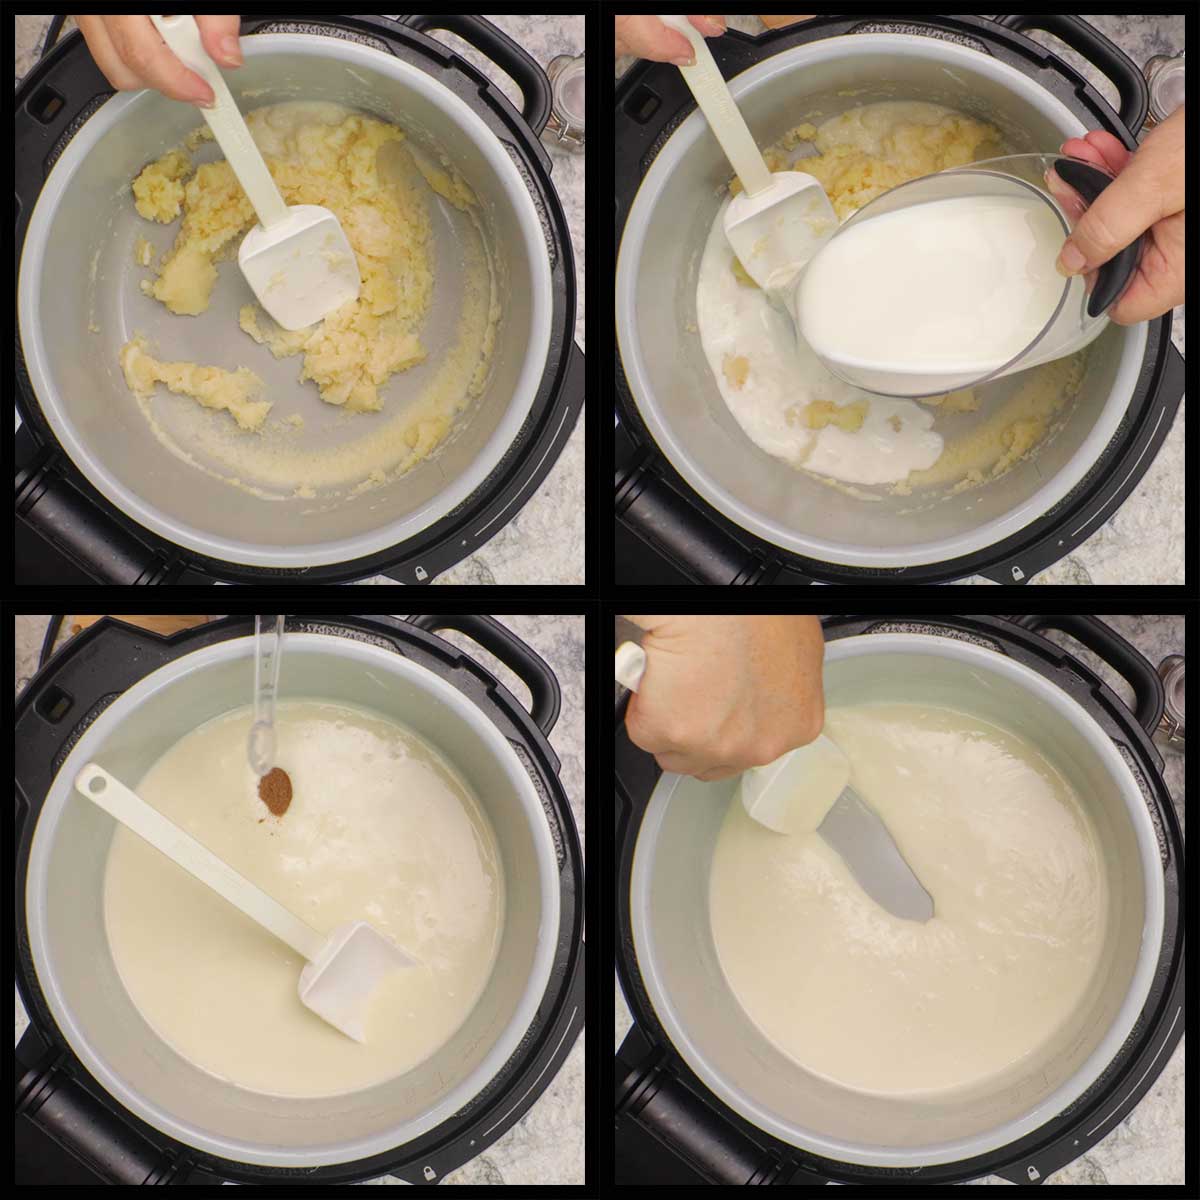
I have used between 2-2½ cups of milk while testing the recipe. This can vary depending on the flour and humidity, so go by looks more than volume of milk. You want the sauce to be the consistency of a thin cream soup or bisque. It will thicken more when we add in the cheese.
Making the Mornay Sauce
Mornay sauce is a basic cheese sauce that is usually made by adding either Swiss cheese or Parmesan cheese to a bechamel sauce. For this recipe we are using parmesan cheese, but if you want a delicious sauce for asparagus or a sauce to go over chicken cordon bleu, use Swiss cheese instead.
Add in 1 cup of the grated cheese, reserving the remaining ½ cup for the topping of the baked ziti. Stir until melted and you have a smooth cheese sauce.
Transfer the sauce to a medium size bowl and set aside for later. Clean the inner pot before proceeding to making the baked ziti.
Making the Baked Ziti
There are many ways you can make the baked ziti, so feel free to change the meats used, omit the meats and add in vegetables. The only important thing to remember is to put the marinara or pasta sauce on top and do not stir before pressure cooking.
Sautéing the Meats
I love the combination of mild Italian sausage and ground beef in this dish, but you can use all sausage or all ground beef or another type of ground meat if you prefer. Since the sausage gives a lot of flavor, you may want to increase your seasonings if you omit it.
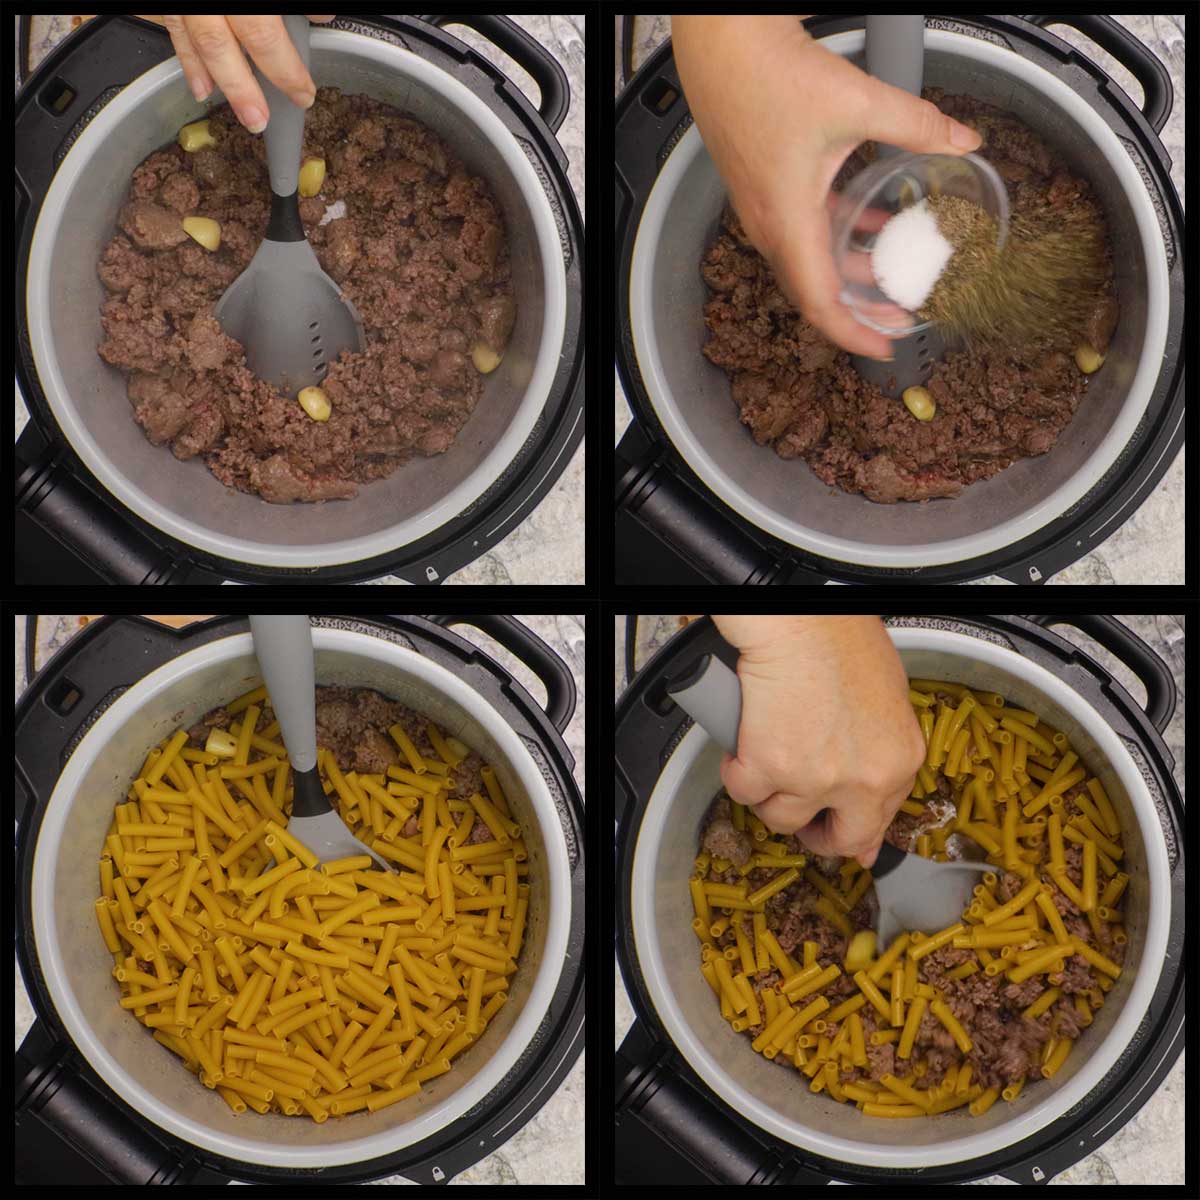
Remove the sausage from the casings and add to the inner pot along with the ground beef. Sauté on high sear/sauté and break up the meat. I like to keep it on the chunky side for texture in the finished dish, but that is completely up to you. until browned and about 75% cooked.
Adding the Garlic
I used whole cloves of garlic peeled and lightly smashed in this recipe. Leaving the cloves whole imparts a nice mild garlic flavor without being bitter and using the whole bulb of garlic will not overpower the sauce. If you prefer to use minced garlic, only use 1-2 teaspoons.
Cut the stem end off of the garlic bulb and remove the individual cloves. Cut the end off of the garlic clove where it attached to the root end of the bulb. With the flat side of a Chef's Knife, smash down on the clove of garlic and the papery skin will fall off.
Add the whole garlic cloves to the pot.

Adding the Pasta
Continue cooking the meat and the garlic until the meat is at least 75% cooked. Add in the seasonings and the ziti noodles and stir. You can certainly add the seasonings as the meat is cooking, which is what I often do. If you are skipping the sausage, I would definitely season the meat as you are sautéing it.
This recipe is a little different from my spaghetti recipe because you do want to stir in the noodles. We will be adding beef stock and by stirring the pasta into the meat mixture it helps to get more of the pasta covered with the liquid.
If you are skipping the meats in the recipe, then you would add in the beef stock followed by the pasta and press the pasta down into the liquid as much as possible before adding the pasta sauce on top.
Adding Liquid and Marinara before Pressure Cooking
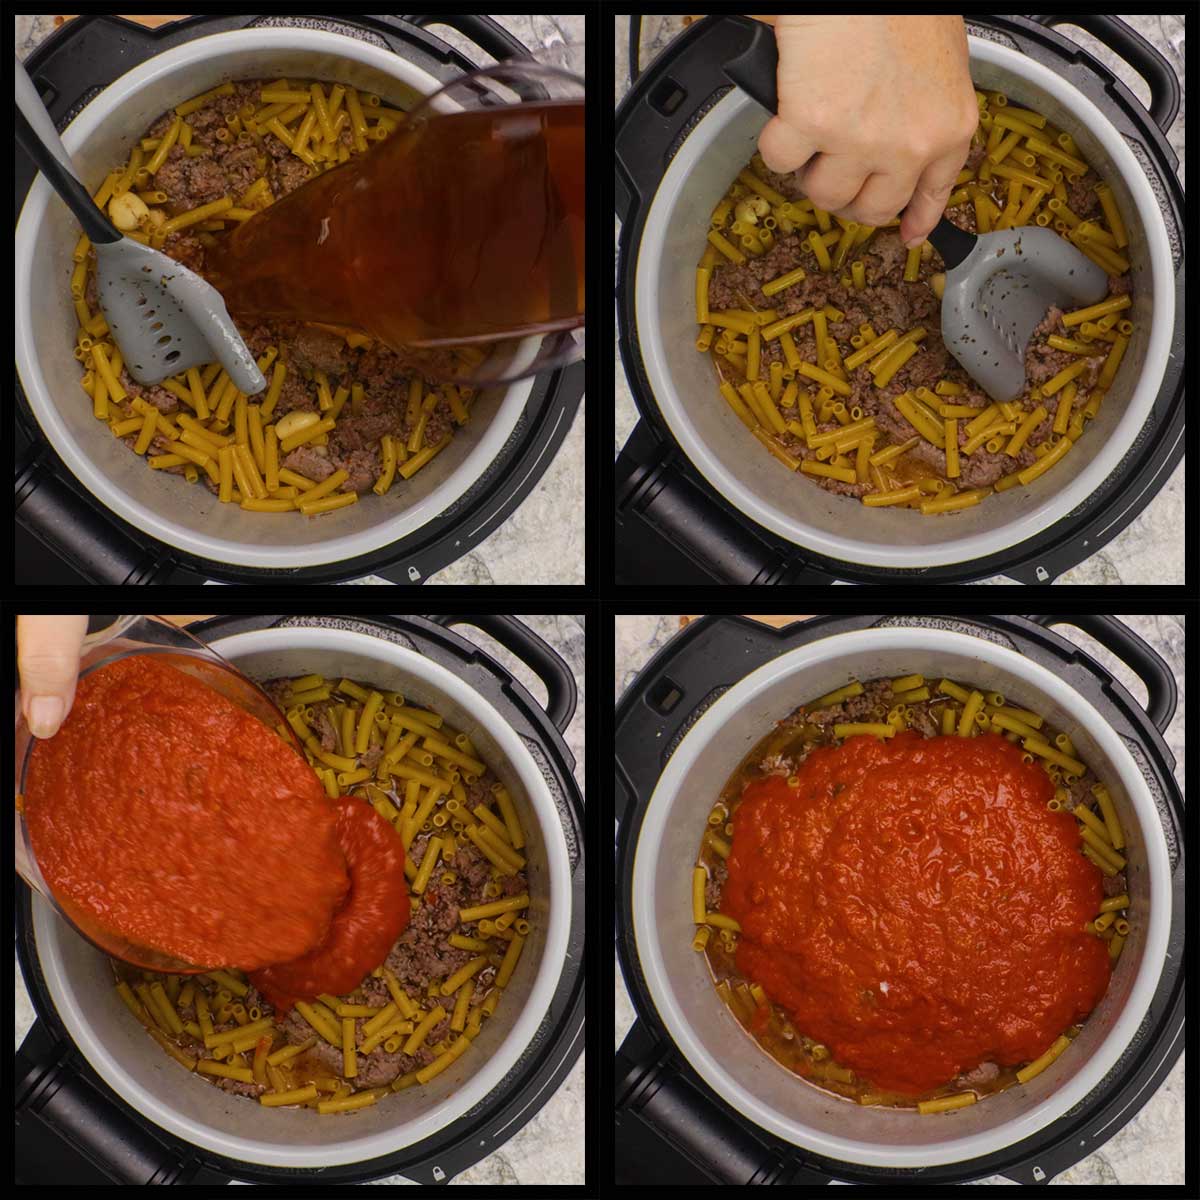
Add in 3 cups of beef stock or you can use water or chicken stock if you prefer. Vegetable stock will work just fine if you are making this vegetarian. Stir the contents of the inner pot and try to get the pasta under the liquid as much as possible.
The pasta won't be completely submerged and that is okay.
Pour the marinara or pasta sauce on top and DO NOT STIR. This is the most important step. If you stir, you will most likely get the "burn" or "water notice" because the liquid will be too thick to pressure cook with. If you want to make your own marinara sauce for this recipe, you can make a double batch of this recipe: Homemade Marinara Sauce Otherwise, just use your favorite marinara sauce (Rao's is very good) or pasta sauce. Just make sure it isn't too thick. If it is on the thicker side, you can thin it out a bit with water or stock.
Pressure Cooking
Put the lid on the electric pressure cooker, turn the valve to seal and set the temperature to high for 3 minutes. Hit start. It will take about 11 minutes for the pot to build the steam needed for pressure cooking, then it will pressure cook for 3 minutes.
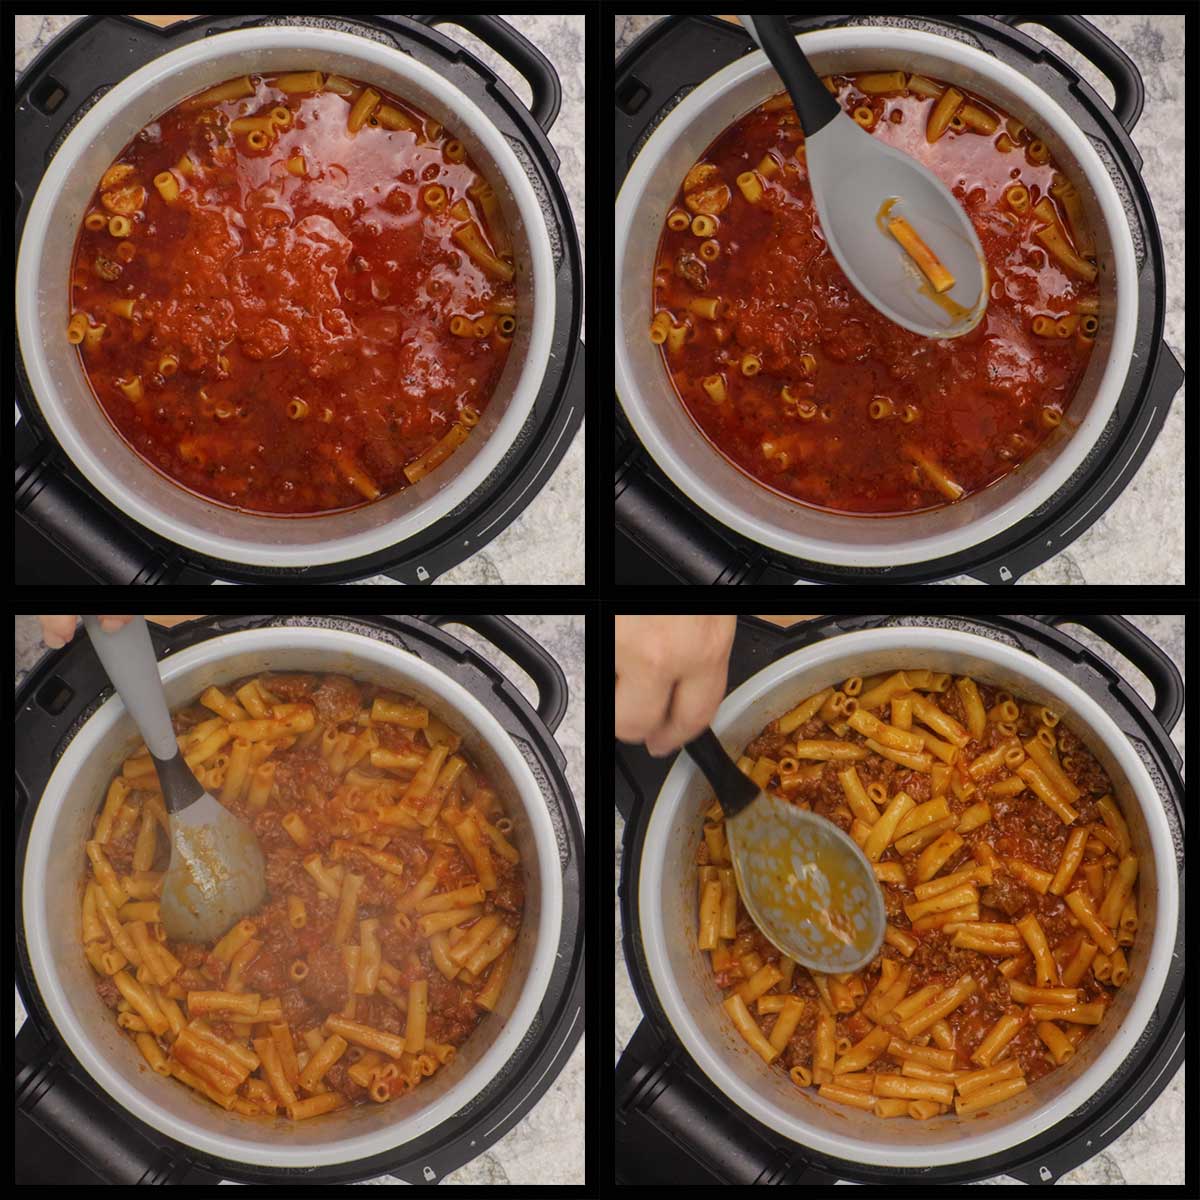
When the time is up, allow the pot to natural release the release the pressure for 5 minutes, then manually release the remaining pressure.
Open the lid away from you. Do not freak out if you see that some of the pasta is not fully cooked. This is OKAY! Once you stir the pasta and bake the baked ziti it will fully cook. Please do not second guess this, I have tested the recipe many times and have never ended up with undercooked pasta. In fact, the pasta is on the soft side when finished. This is how I like it in this dish, but if you want firmer pasta then decrease the pressure cook time to 2 minutes.
Before you stir everything together, you may also think that you have way too much liquid. This will incorporate and everything will thicken up nicely once you stir it. It's important to stir and break up any ziti noodles that are clumped together. It's amazing how it transforms into a thick and delicious pasta dish.
Once stirred together, you can top with cheese and bake if you decided not to use the bechamel sauce (I really hope you didn't though!). I like to level out the noodles and sometimes clean the sides of the pot before adding the bechamel sauce, but that is optional.
Adding the Cheese Sauce and Baking
If you are making this in an Instant Pot that doesn't have a crisping lid, then you will want to transfer the contents of the pot into a large casserole dish that holds at least 4 quarts and has high enough sides to accomodate all of the pasta as well as the cheese sauce. It is perfectly fine to divide it up between two smaller casserole dishes.
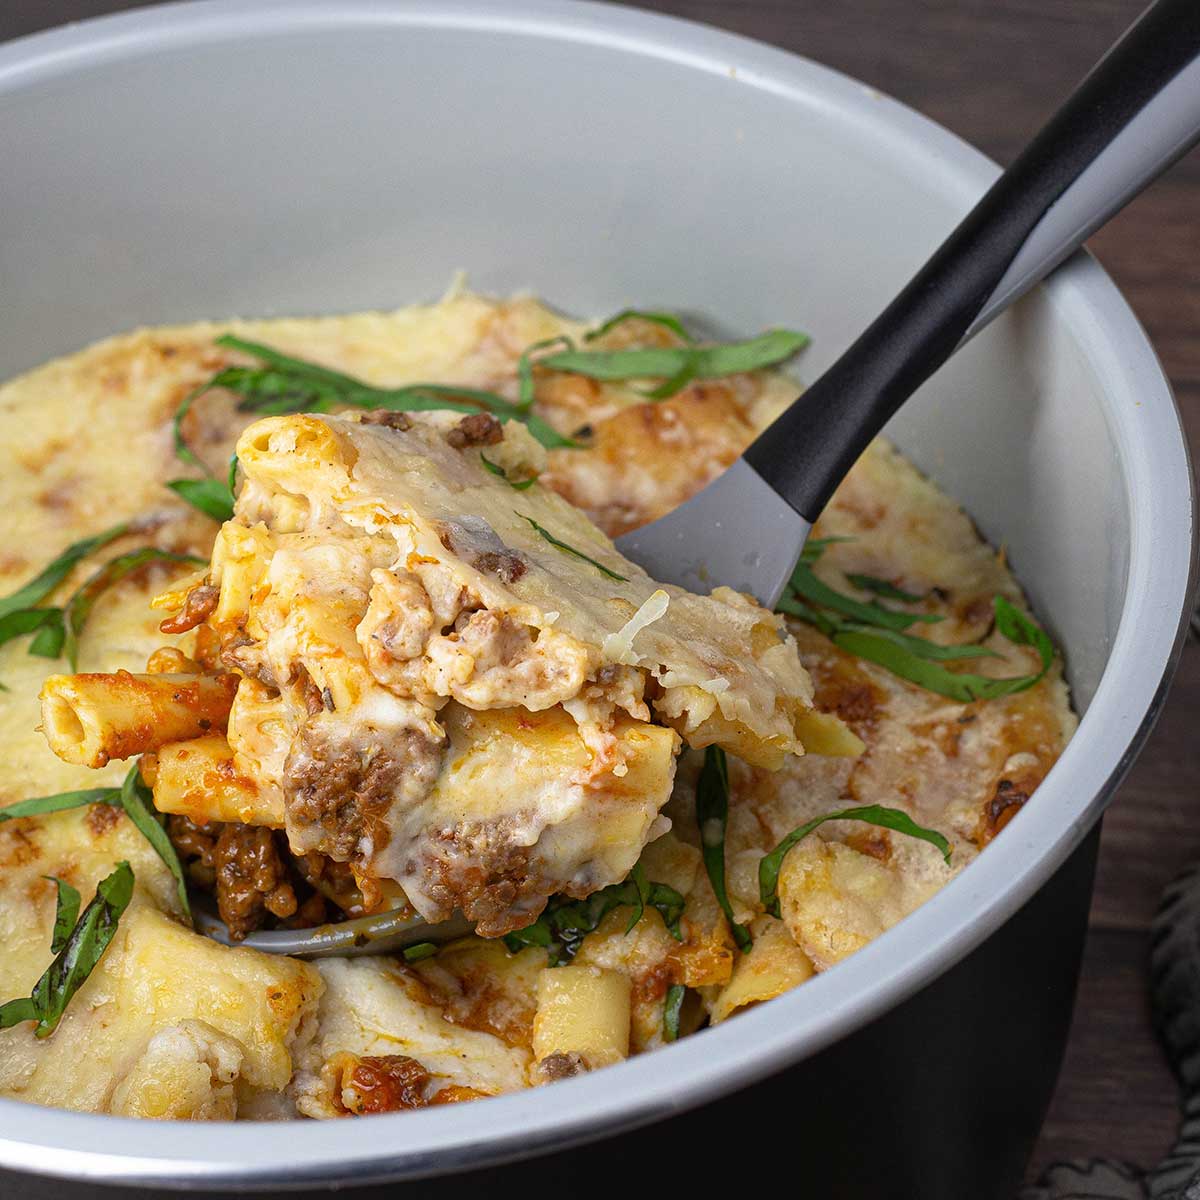
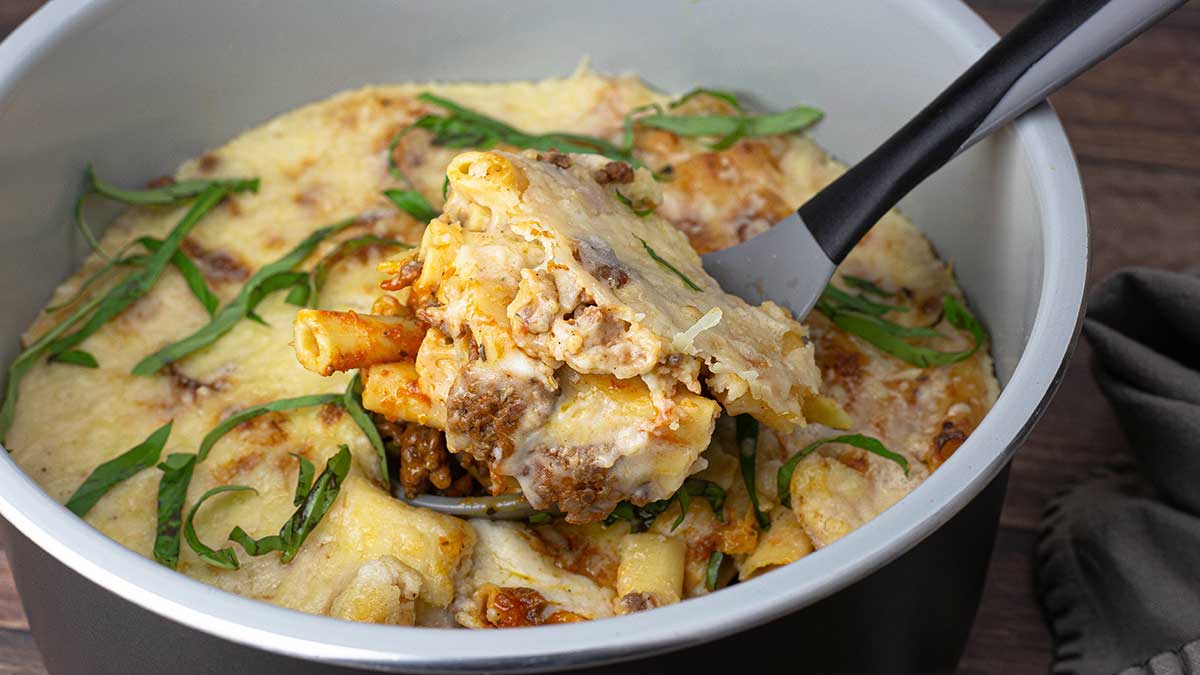
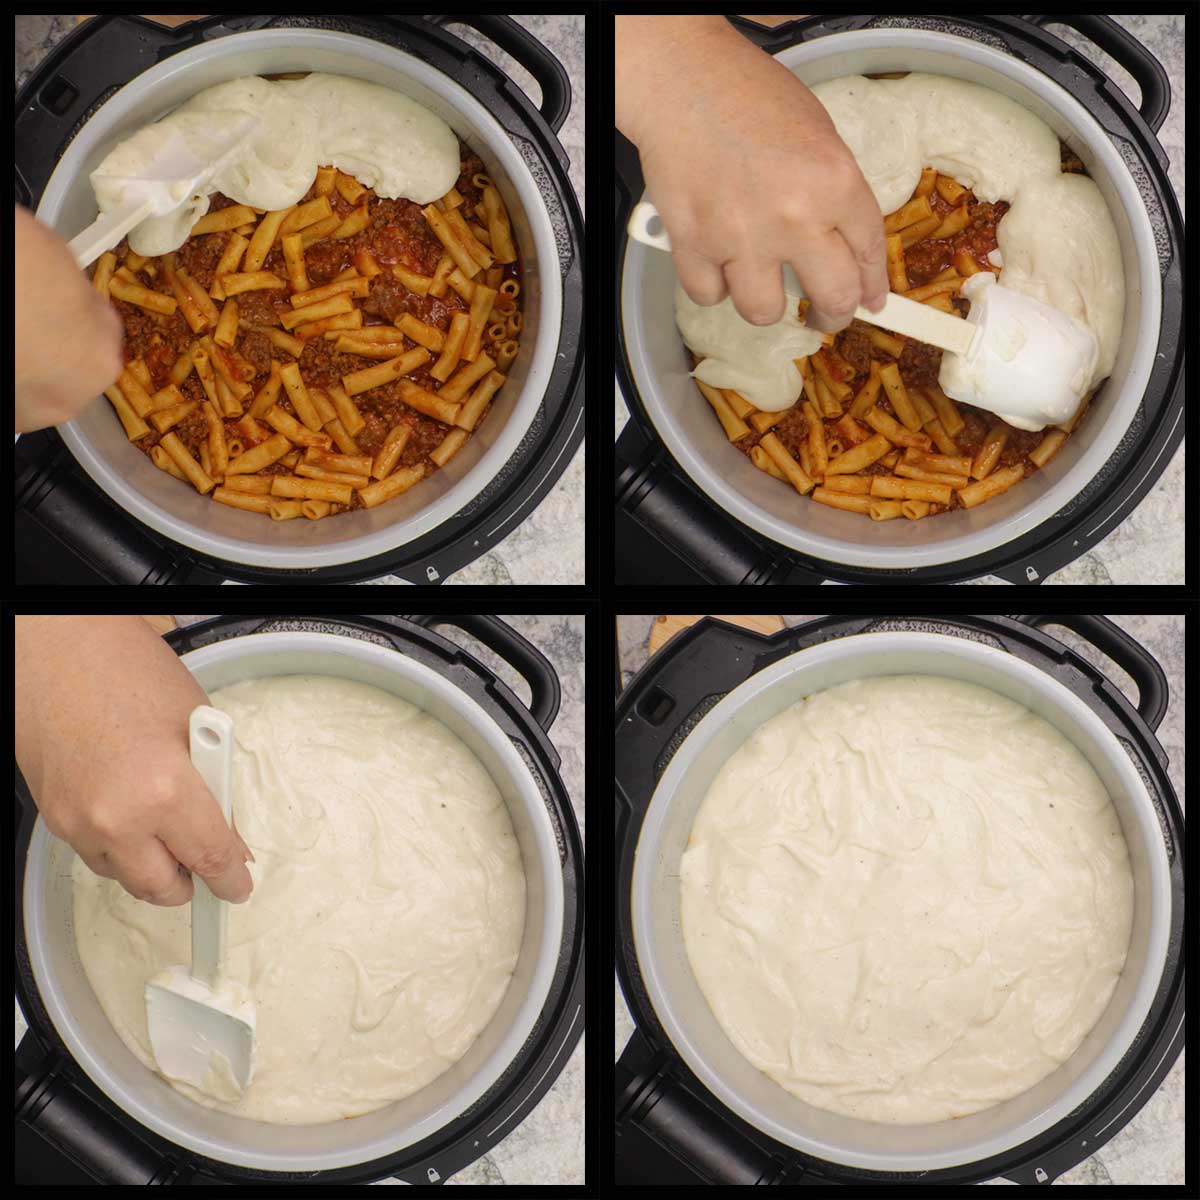
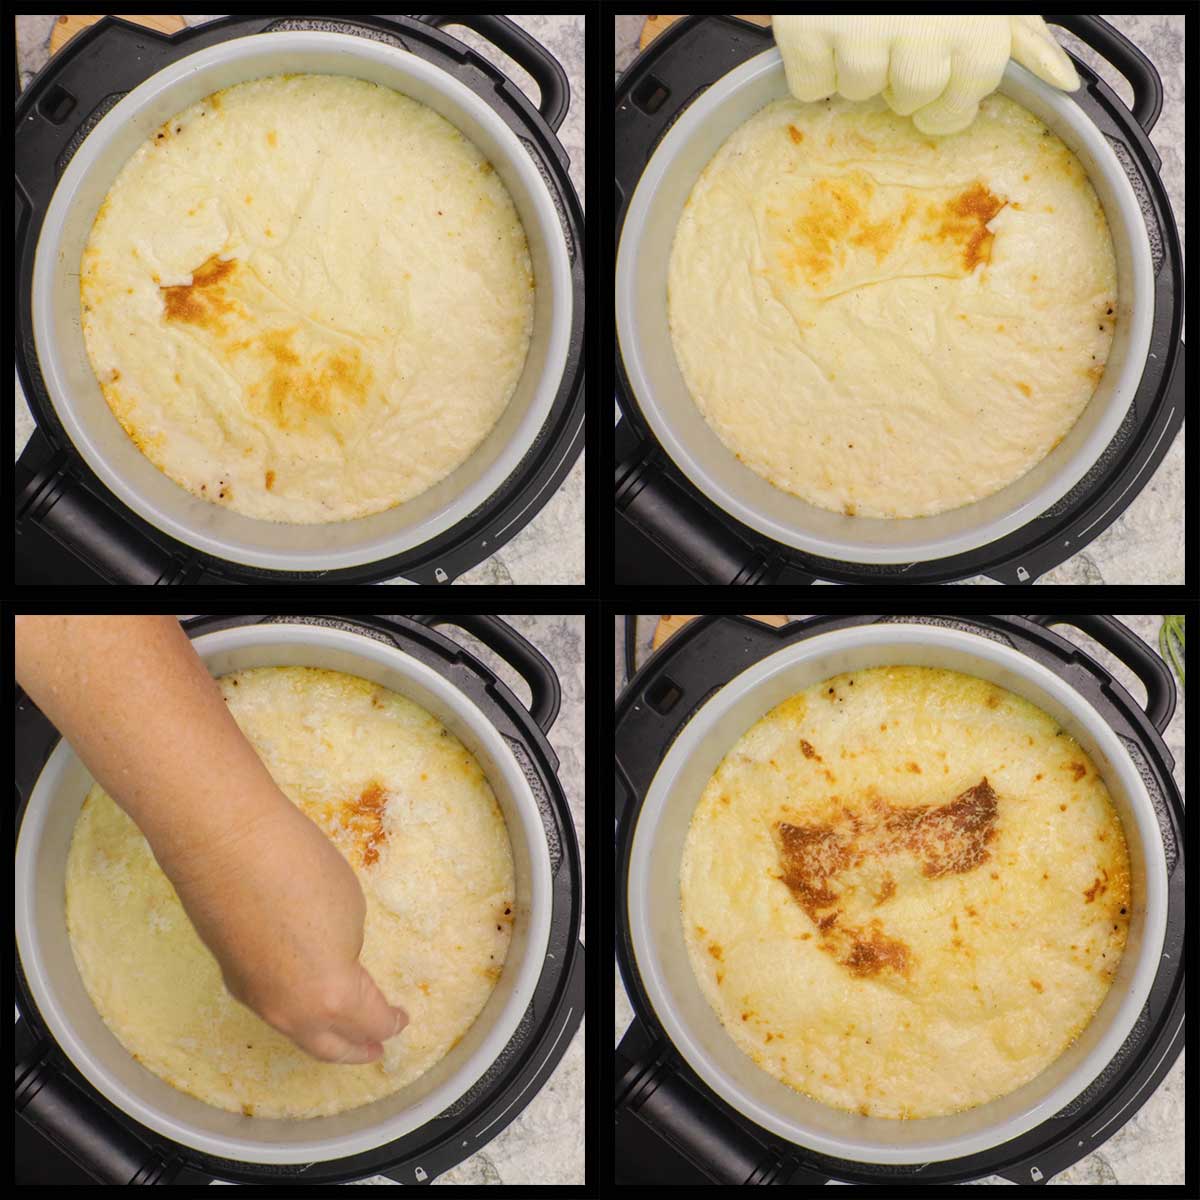
Spoon the cheese sauce over the top of the pasta. I like to start at the edges and then gently smooth it all over the top, being careful not to mix the red sauce with the cheese sauce.
It's also important to cover any of the pasta or it will get crunchy during the baking time. Some people like this, but I prefer to have all of the pasta under the cheese sauce.
Baking
Close the crisper lid and set the function to bake/roast on 325℉/160℃ and bake for 10-15 minutes or until the top just begins to brown. Check on it after 10 minutes.
Sometimes you might see one area that is browning more than the others, you can rotate the pot if this happens.
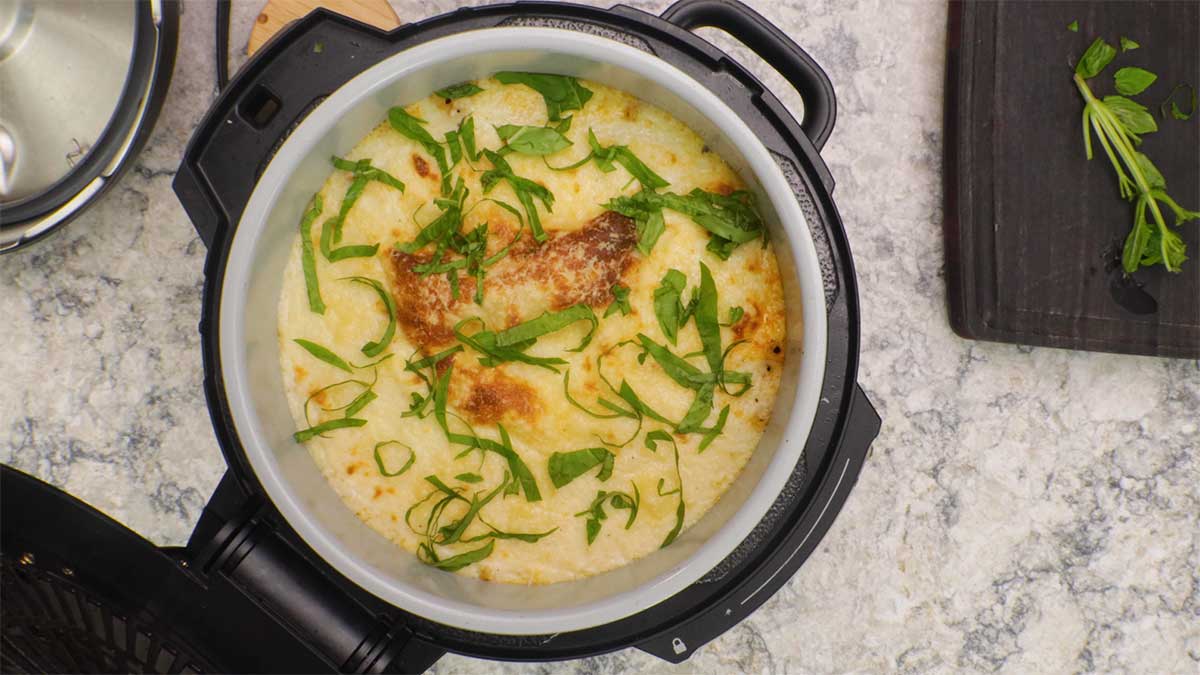
Add the remaining ½ cup of parmesan cheese and bake another 5 minutes or until it is melted.
Let sit for at least 15 minutes before serving so the baked ziti has time to set. This will make serving it much easier and keep the cheese sauce from mixing into the pasta.
Finishing Touches
Although not necessary, I love adding some fresh basil to the top. You can simply chop up a handful of basil or chiffonade it like I do in the video below.
It is best to cut your basil just before you want to garnish your dish and make sure to use a sharp knife so you can cut cleanly through the basil and not bruise it. Basil turns brown quickly when heated, so let the baked ziti sit for 15 minutes before adding the basil.
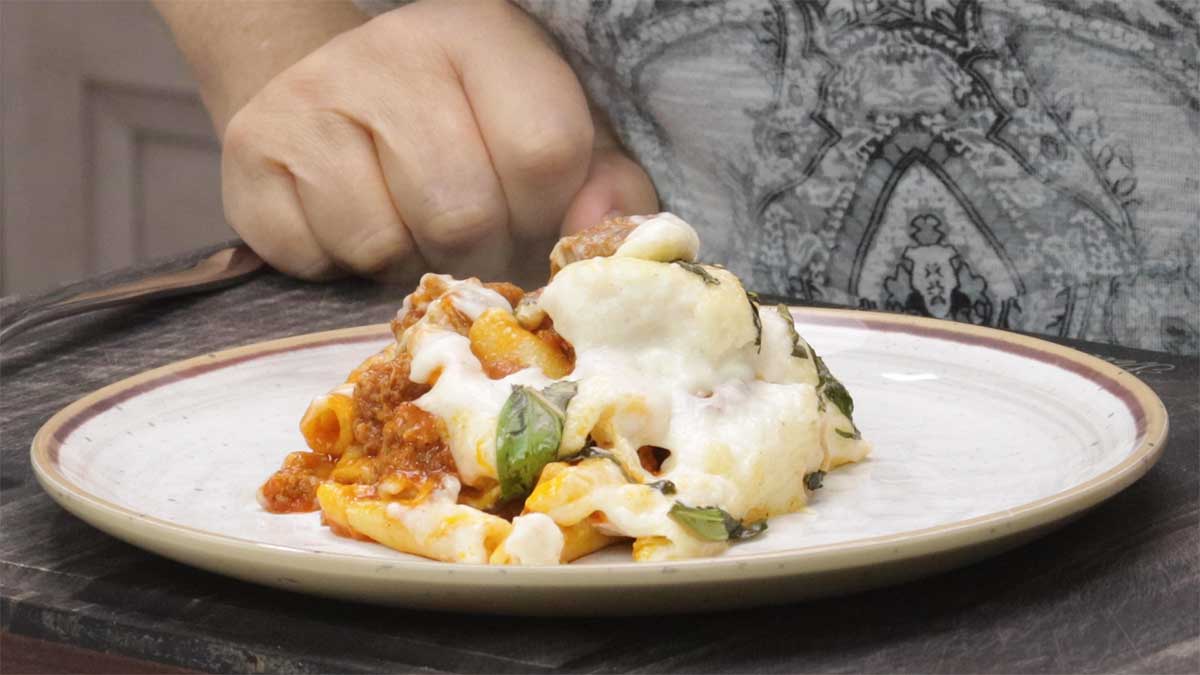
Serve & Enjoy!

Baked Ziti Recipe with Cheese Sauce
Equipment
- Instant Pot or Electric Pressure Cooker
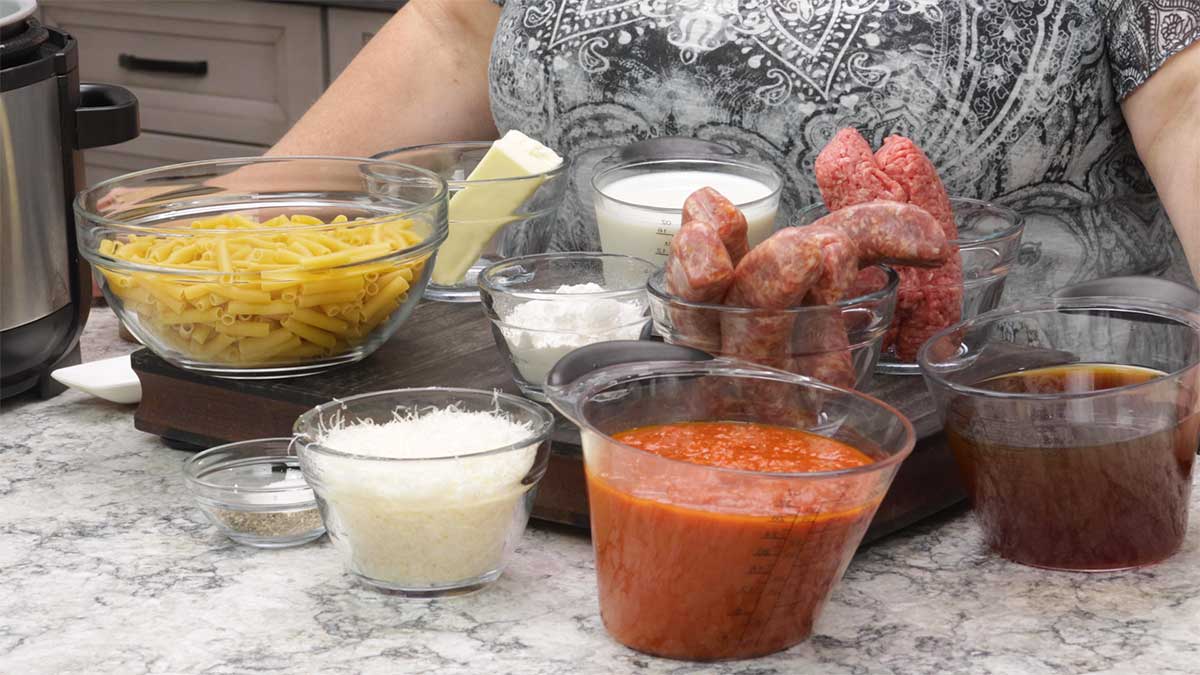
Ingredients
Parmesan Cheese Sauce
- 6 Tablespoons butter salted or unsalted
- 6 Tablespoons all purpose flour
- 2½ cups whole milk
- ½ teaspoon fine grind sea salt
- ¼ teaspoon nutmeg optional, but so good!
- 2 ounces parmesan cheese finely grated, about 1½ cups (divided in recipe)
Baked Ziti
- 1 pound ground beef 80/20 or leaner
- 1 pound Italian sausage any kind you like
- 1 bulb garlic
- 2 teaspoons fine grind sea salt
- 1 teaspoons dried basil
- ½ teaspoon black pepper
- 1 pound ziti noodles
- 3 cups beef stock
- 32 ounces marinara sauce or pasta sauce
- 6 large fresh basil leaves optional
Would you like to save this recipe?
Instructions
Parmesan Cheese Sauce
- Turn the NInja Foodi on high sear/sauté. Add the butter and allow it to melt. Don't let it brown, so if it is starting to brown reduce your heat to medium.
- Add in the flour and stir to combine. You should have a loose paste. Cook for 2 minutes. This is the roux and the base of the cream sauce. Reduce the heat to low.
- Slowly add in the milk, about ½ cup at a time and stir to combine with the roux. Add in enough milk to have a smooth, thin cream sauce. It will take between 2-2½ cups of the milk depending on how much the flour will absorb. You can test the sauce by scraping along the bottom of the pot and if it separates for more than a few seconds, you want to add a bit more milk.
- Add in the salt and nutmeg and stir.
- Add in 1 cup of the grated parmesan cheese and reserve the remaining ½ cup for the topping. Stir until the cheese has completely melted and you have a smooth cheese sauce.
- Transfer the cheese sauce to a medium size bowl and set aside for later. Clean the inner pot.
Baked Ziti
- Turn the Ninja Foodi on high sear/sauté. Remove the sausage from the casing and add to the pot. Add in the ground beef and break the beat up into small chunks.
- Cut the stem end off of the bulb of garlic and remove the individual cloves. Cut the harder end of each clove that was attached to the root end and then smash the clove with the flat side of chef's knife to remove the paper. Add all the garlic cloves to the pot.
- Sauté the meat and garlic until the meat is about 75% done. This will take 5-10 minutes.
- Add in the 2 teaspoons salt, 1 teaspoon of basil, and ½ teaspoon of black pepper. Stir to combine.
- Stir in the ziti noodles into the meat mixture. Add in the beef stock and stir. Press the noodles under the liquid as much as possible.
- Pour the marinara sauce on top and DO NOT STIR. This is very important to prevent the water/burn notice.
- Place the pressure lid on and turn the valve to seal. Pressure cook on high for 3 minutes. When the time is up, allow the pot to natural release the pressure for 5 minutes and then manually release the remaining pressure.
- Remove the lid and don't freak out! Yes, it looks soupy. Yes, it looks like some of the noodles aren't fully cooked. Trust me, it will be just fine.
- Stir the pasta mixture to break up any clumps and like magic everything will thicken up and look beautiful. Any underdone pasta will finish cooking with the residual heat and the baking time.
- Smooth out the top so that pasta is as flat as possible and spoon on the cheese sauce. I start at the edges and then smooth it all over the top. You want all the pasta covered with the cheese sauce and not have the cheese sauce mix with the red sauce if possible.
- Lower the crisping lid and select the bake/roast function on 325°f/160°C and bake for 10-15 minutes. Check at 10 minutes and if you see one area browning more than others, you can rotate the pot. If it looks like it's getting too brown, lower the heat. Sometimes 10 minutes is all you need for the cheese sauce to lightly brown and set. (see notes below if you don't have a crisping lid)
- Sprinkle on the remaining ½ cup shredded parmesan cheese and bake at the same temperature for 3-5 minutes. Let sit for at least 15 minutes before serving.
- Garnish with fresh basil strips or chopped fresh basil. Serve & Enjoy!
Notes
Nutrition
About the Recipe Author, Louise Long
Louise is a full-time recipe creator and food blogger @ The Salted Pepper. She has over 30 years of experience with cooking and recipe development. She owned a restaurant for several years and was a full-time RN until retiring to blog full-time.

She published her first cookbook in the Fall of 2018 and is very interested in writing several more.
Louise is also the creator of an online Ninja Foodi Pressure Cooking Course with over 100 instructional step-by-step videos. People absolutely rave about the course and all the value they have received from it.
Louise has several very active Facebook groups that help people with the basics of cooking and learning more about the appliances they love.
Ninja Foodi Pressure Cooker & Air Crisper 101
Ninja Woodfire Outdoor Grill & Smoker
Louise is also a YouTube creator and you can find most of her recipes in video format on The Salted Pepper YouTube channel.
She is very responsive to messages and eager to help in any way she can. Get more Information about Louise & contact information
I WOULD LOVE TO SEE WHAT YOU ARE COOKING UP IN YOUR KITCHEN! TAG ME @THESALTEDPEPPER ON YOUR FAVORITE SOCIAL MEDIA PLATFORM WHEN YOU MAKE A DISH!
BE SURE TO FOLLOW THE SALTED PEPPER RIGHT HERE ⇓⇓⇓⇓⇓
Nia says
Amazing recipe…making it for the third time today. I’m wondering, would doubling the cheese sauce cause any issues or require additional time?
Louise says
No, that shouldn't change anything.
IC says
I did not receive an email about this, or any new recipes for the summer. 🥲
Louise says
I would have to check to see if you are still subscribed to the email list. Send me an email at louise@thesaltedpepper.com and I can look into it.
Melanie Thompson says
I added a little mozzarella cheese in with the parmesan on the top, and it is absolutely delicious. I made this this evening for dinner and loved it!!
Louise says
That is so awesome!
Katherine Johnstone says
Hi could you tell me which size ninja you are using for this recipe please? I want to use my new NINJA Foodi 11-in-1 SmartLid Multi-Cooker 6L [OL550UK] but it says serves 10 so I need to know if I would have to halve the recipe.
Louise says
I used the 6.5qt Ninja, so you will be fine! I hope you enjoy the recipe!
Kim Goodall says
This looks delicious and I plan to try it. Any idea how cutting the recipe in half would would work or if this would freeze okay? Cooking for only 2 and some leftovers is okay but I'm a strong believer in leftovers only being in the frig 3-4 days.
Louise says
I hope you enjoy it! The answer to your question about cutting it in half is in the Frequently Asked Questions section. It also freezes well. Enjoy!