
- Ninja Possible Cooker Pro (or multi-cooker with Sear/Sauté and Bake functions)
- Small mixing bowl
- Medium mixing bowl
- 4-cup liquid measuring cup
- Silicone spatula
- Fork or small whisk
- Cake tester or thin skewer
- Parchment Paper
- Aluminum foil
- Serving platter or large plate
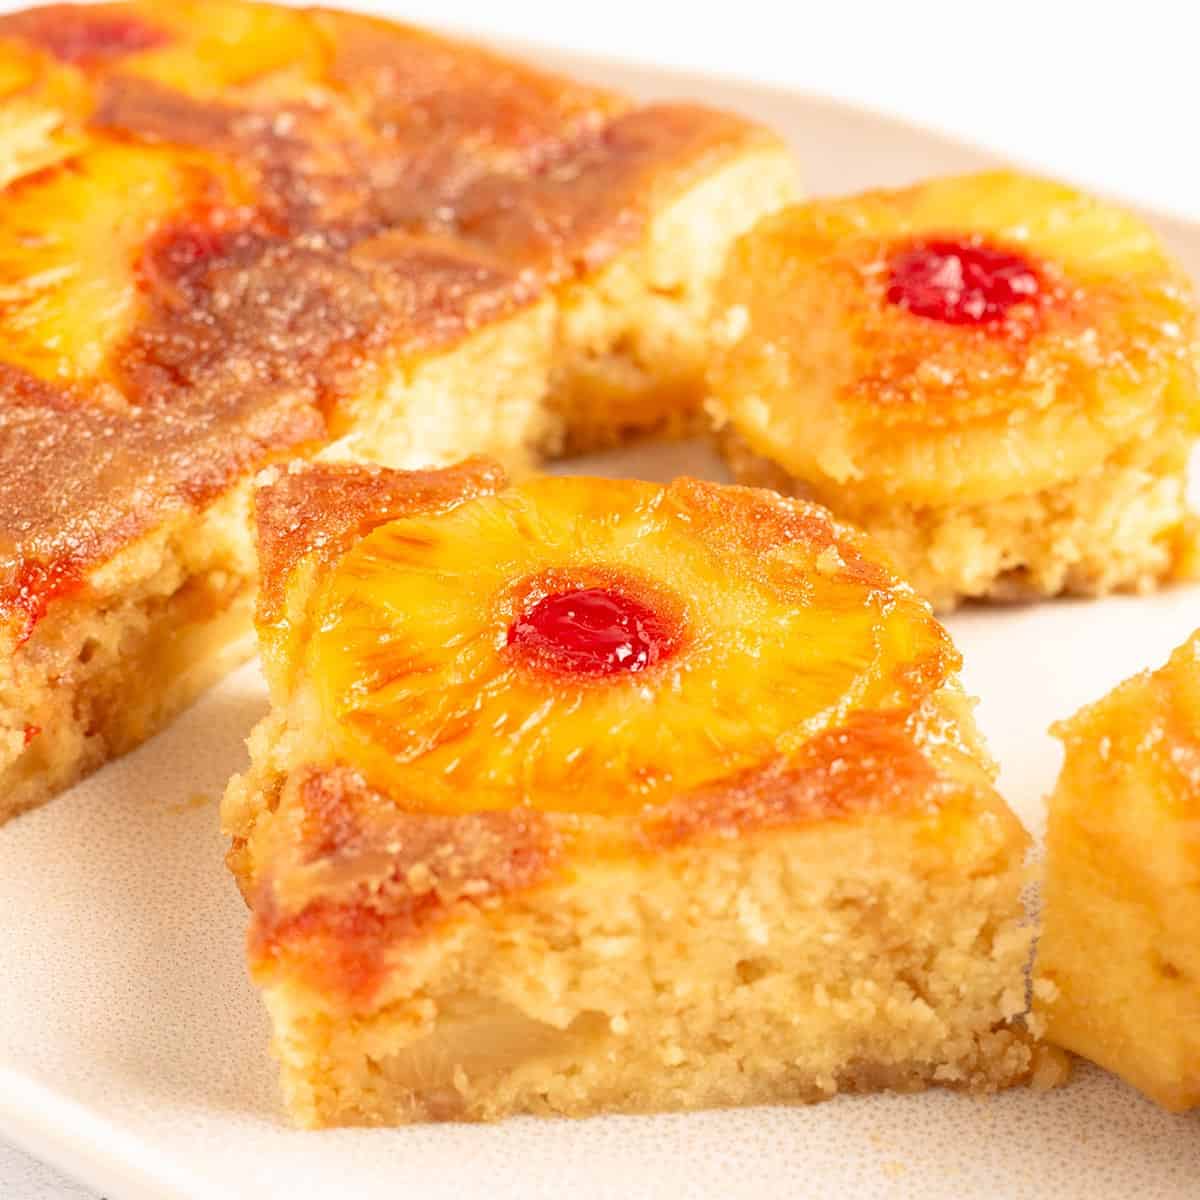
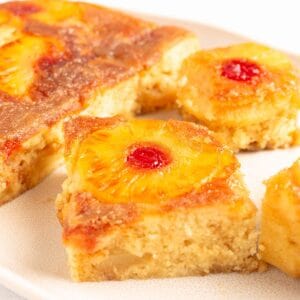
If you love a really delicious pineapple upside down cake but don't want to turn on the oven, this easy pineapple upside down cake recipe is for you. Made entirely in the Ninja Possible Cooker Pro, this classic dessert comes together with pantry staples, a can of pineapple slices, and a few maraschino cherries. The result is a tender cake with caramelized pineapple and a glossy brown sugar topping that tastes exactly like the classic recipe grandma used to make.
This is what I would call a dump cake. We dump in the ingredients, throw it on bake, and end up with a perfect, delicious pineapple upside down cake without ever turning on the oven. The homemade vanilla cake batter takes just minutes to mix by hand, the caramelized topping comes together right in the pot, and the bake time is just 30 minutes. It's perfect for special occasions or any time you're craving something nostalgic and comforting.
If you love how easy the Possible Cooker Pro makes baking, take a look at my Ninja Possible Cooker Bread next. It is another no-oven-needed recipe that comes out perfect every time.
Would you like to save this recipe?
I've tested this recipe in multiple ways to get the cake tender, the pineapple caramelized, and that signature brown sugar topping thick and glossy. The secret is all in the technique, and once you see how easy it is, this will quickly become one of your favorite pineapple upside down cakes to make any time the craving hits.
Suggested Kitchen Tools for Pineapple Upside Down Cake
- Ninja Possible Cooker Pro (or any multi-cooker with Sear/Sauté and Bake functions)
- Small mixing bowl for dry ingredients
- Medium mixing bowl for wet ingredients
- 4-cup liquid measuring cup
- Silicone spatula
- Fork (for combining wet ingredients)
- Cake tester, thin skewer, or toothpick (for positioning cherries)
- Parchment paper and aluminum foil (for flipping)
- Serving platter or large plate
Ingredients & Substitutions
This classic pineapple upside down cake uses simple pantry staples and a can of pineapple slices to deliver all the flavor of the classic recipe. Let's take a closer look at each ingredient.
All-Purpose Flour
Used in Recipe: All-purpose flour forms the base of the homemade cake batter.
What it Does: Flour gives the cake its structure and tender crumb. A standard all-purpose flour like Gold Medal works beautifully here and doesn't require any special technique to produce a soft, tender cake.
Substitutions: A measure-for-measure gluten-free flour blend can be used as a direct swap. Cake flour can also be used for an even more tender crumb, though the cake will be slightly more delicate when flipped.
Baking Powder
Used in Recipe: Baking powder is the leavening for the cake batter.
What it Does: Baking powder gives the cake its rise and light, fluffy texture. Because this recipe uses no buttermilk or acidic ingredients, baking powder (not baking soda) is exactly what we want.
Substitutions: There is no good substitute for baking powder in this recipe. Make sure yours is fresh. If it's been sitting in the pantry for a long time, pick up a new container for best results.
Granulated Sugar
Used in Recipe: Granulated sugar sweetens the vanilla cake batter.
What it Does: Sugar adds sweetness and also contributes to a tender, moist cake crumb by slowing gluten development in the flour.
Substitutions: Cane sugar works exactly the same as granulated white sugar. A 1:1 granulated sugar alternative like monk fruit blend can be used for a lower-sugar option, though the texture and browning may vary slightly.
Salt
Used in Recipe: Fine grain sea salt balances the sweetness of the cake batter.
What it Does: A little salt enhances all the other flavors and keeps the cake from tasting flat or one-note sweet.
Substitutions: Kosher salt works at the same measurement as fine grain sea salt. If you're using table salt, cut the amount in half since it's finer and packs more salt per teaspoon.
Neutral Oil
Used in Recipe: A neutral oil is used as the fat in the cake batter.
What it Does: Oil keeps the cake incredibly moist even after it's fully cooled. Because oil stays liquid at room temperature, it gives you a tender cake that doesn't dry out the way butter-based cakes sometimes do.
Substitutions: Avocado oil, canola oil, vegetable oil, or light refined coconut oil all work well. Avoid olive oil and sesame oil as their flavors are too strong for a classic vanilla cake.
Eggs
Used in Recipe: Large eggs add richness and structure to the cake batter.
What it Does: Eggs bind everything together, add richness, and help give the cake its tender, bouncy structure. Room temperature eggs mix in more easily and produce a smoother batter.
Substitutions: Stick with whole large eggs for best results in this recipe. Egg substitutes tend to give a denser cake that doesn't rise as nicely.
Vanilla Extract
Used in Recipe: Pure vanilla extract adds warmth and flavor to the cake batter.
What it Does: Vanilla rounds out the flavor of the cake and pairs beautifully with both the caramelized brown sugar and the sweet pineapple.
Substitutions: Imitation vanilla extract works in a pinch. Vanilla bean paste can be used for extra flavor and those gorgeous vanilla bean flecks.
Canned Pineapple Slices (with Reserved Juice)
Used in Recipe: A can of pineapple slices in juice (not syrup) serves double duty. The pineapple rings go on the bottom of the pan to caramelize, and the reserved pineapple juice goes into the cake batter for extra flavor.
What it Does: The pineapple slices caramelize in the brown sugar topping and become the iconic top of the cake after flipping. The reserved juice replaces plain water or milk in the batter, giving every bite that unmistakable pineapple flavor. A standard 20-ounce can has about 10 pineapple slices and typically yields about 1 cup of juice.
Substitutions: Fresh pineapple rings can be used, though you'll need to supplement with water or additional pineapple juice in the batter since you won't have any to reserve. Avoid pineapple slices packed in heavy syrup as they will make the cake overly sweet and we want to make our own sweet syrup from brown sugar and butter.
Maraschino Cherries
Used in Recipe: A maraschino cherry sits in the center of each pineapple slice for that classic look.
What it Does: The cherries add little pops of color and sweet, bright flavor right in the center of each pineapple ring. They're what make a pineapple upside down cake look like a pineapple upside down cake!
Substitutions: Fresh pitted cherries or frozen cherries (thawed and patted dry with paper towels) can be used. Dried cranberries are another fun option for a slightly tart pop of color.
Salted Butter
Used in Recipe: Salted butter starts the caramelized brown sugar topping on the bottom of the pan.
What it Does: Melted butter combines with the brown sugar and water to create that signature glossy caramel topping that defines a classic pineapple upside down cake. The butter also helps the topping release cleanly from the bottom of the pan when the cake is flipped.
Substitutions: Unsalted butter works just as well. Add a small pinch of salt to the brown sugar mixture to balance the sweetness. Do not use margarine, it simply does not deliver the same flavor or texture in the caramel topping.
Light Brown Sugar
Used in Recipe: Packed light brown sugar is the base of the caramelized topping.
What it Does: When cooked with butter and a little water, brown sugar melts down into a thick, glossy caramel that coats the pineapple slices and becomes the stunning top of the flipped cake. This brown sugar topping is what gives the cake its signature look and rich caramel flavor.
Substitutions: Dark brown sugar can be used for a deeper molasses flavor and slightly darker caramel topping. If you'd like less topping, reduce to 1 cup of brown sugar and 6 tablespoons of butter. The cake will still be delicious with a thinner, but still gorgeous, caramelized topping.
How to Make Pineapple Upside Down Cake in the Possible Cooker Pro
From start to finish, this easy pineapple upside down cake takes about 15 minutes of prep, 30 minutes of baking, and another 20 to 30 minutes of room temperature cooling before the big flip. Here is everything you need to know!
Mise En Place
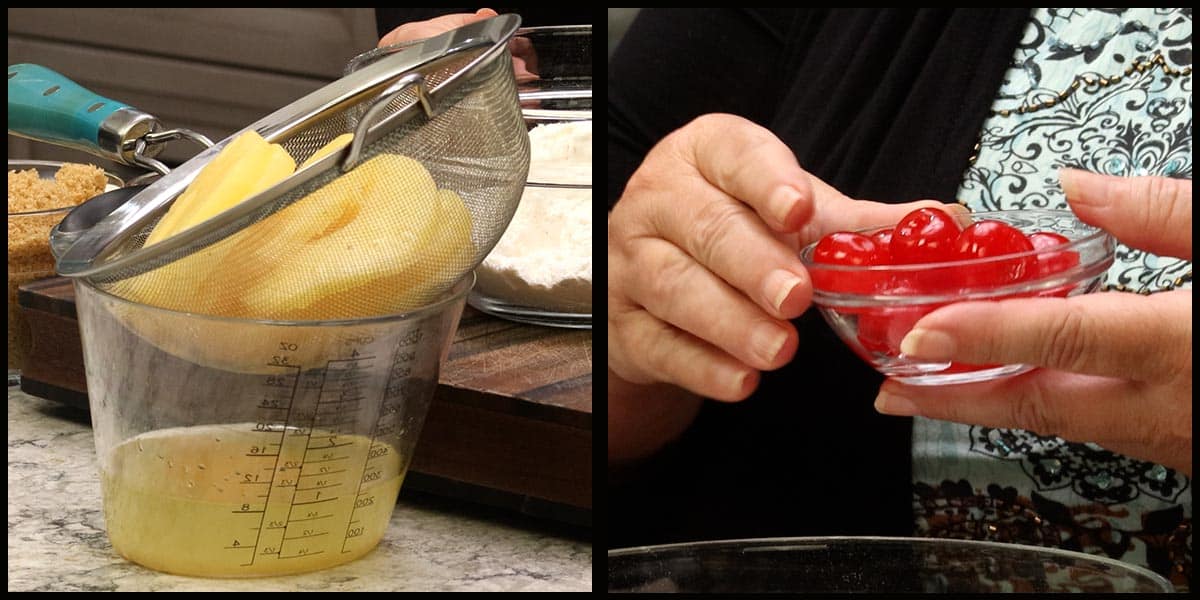
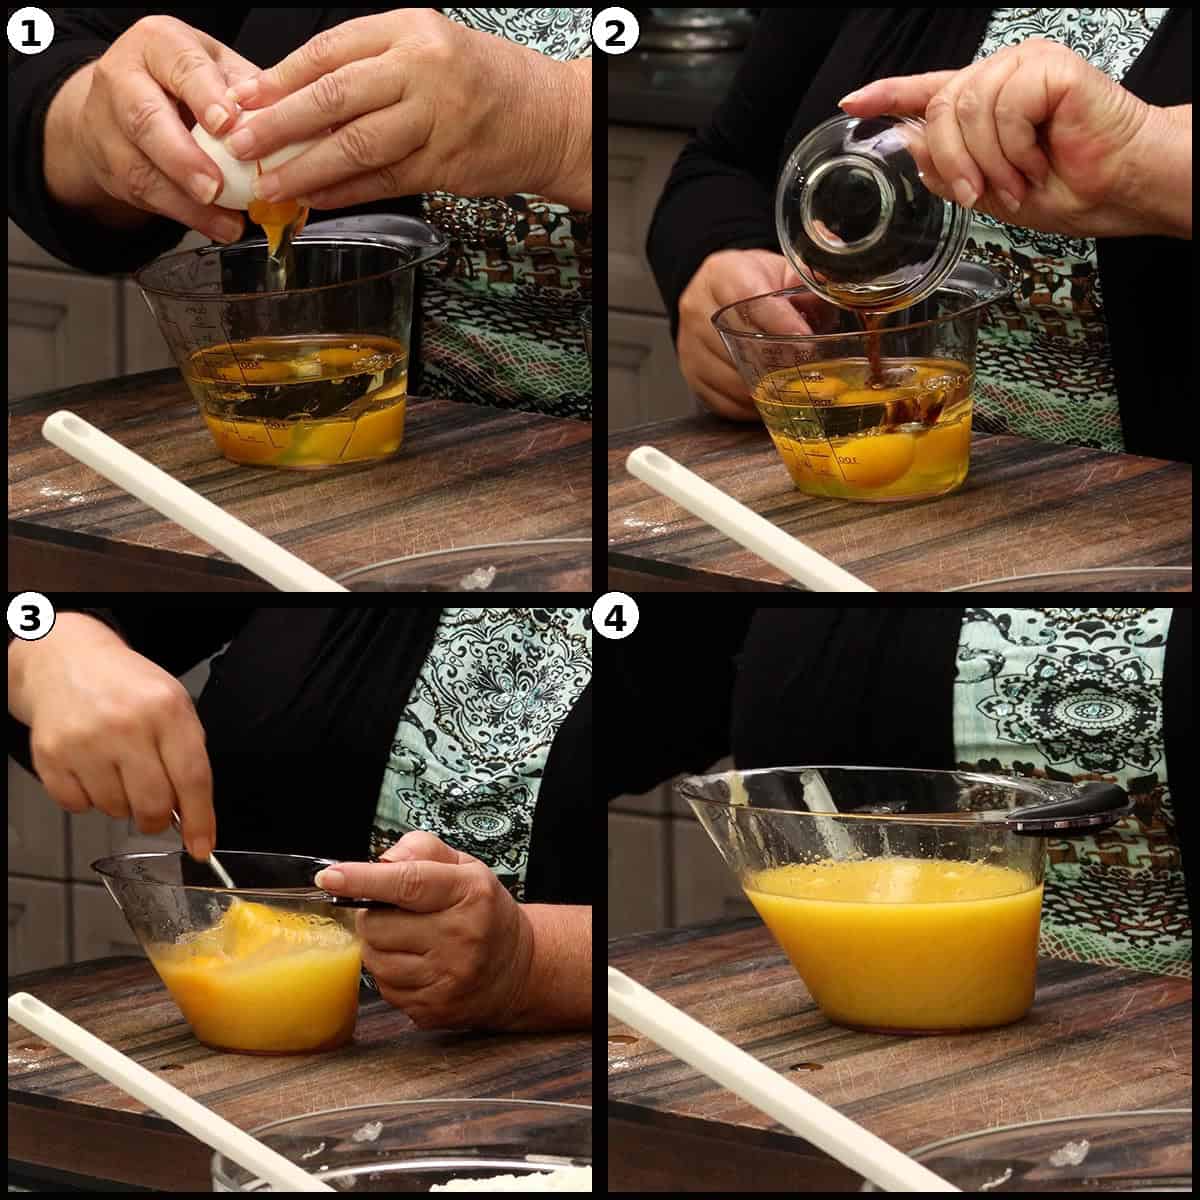
- Open the can of pineapple slices and drain them over a 4-cup liquid measuring cup or bowl. Reserve the pineapple juice, you need 1 full cup for the batter. If you come up short, add a little water to make up the difference.
- Remove the stems from 10 maraschino cherries. Have 1 or 2 extras ready in case one doesn't land where you want it.
- Measure out all of the dry ingredients: 2 cups of all-purpose flour, 1 tablespoon of baking powder, ½ teaspoon of fine grain sea salt, and ¾ cup of granulated sugar.
- Measure out the wet ingredients: ½ cup of neutral oil, 3 large eggs, and 1 teaspoon of vanilla extract.
- Measure out the brown sugar topping ingredients: ½ cup of salted butter, 1¼ cups of packed light brown sugar, and ¼ cup of water.
- Have a cake tester, thin skewer, or toothpick ready to position the cherries.
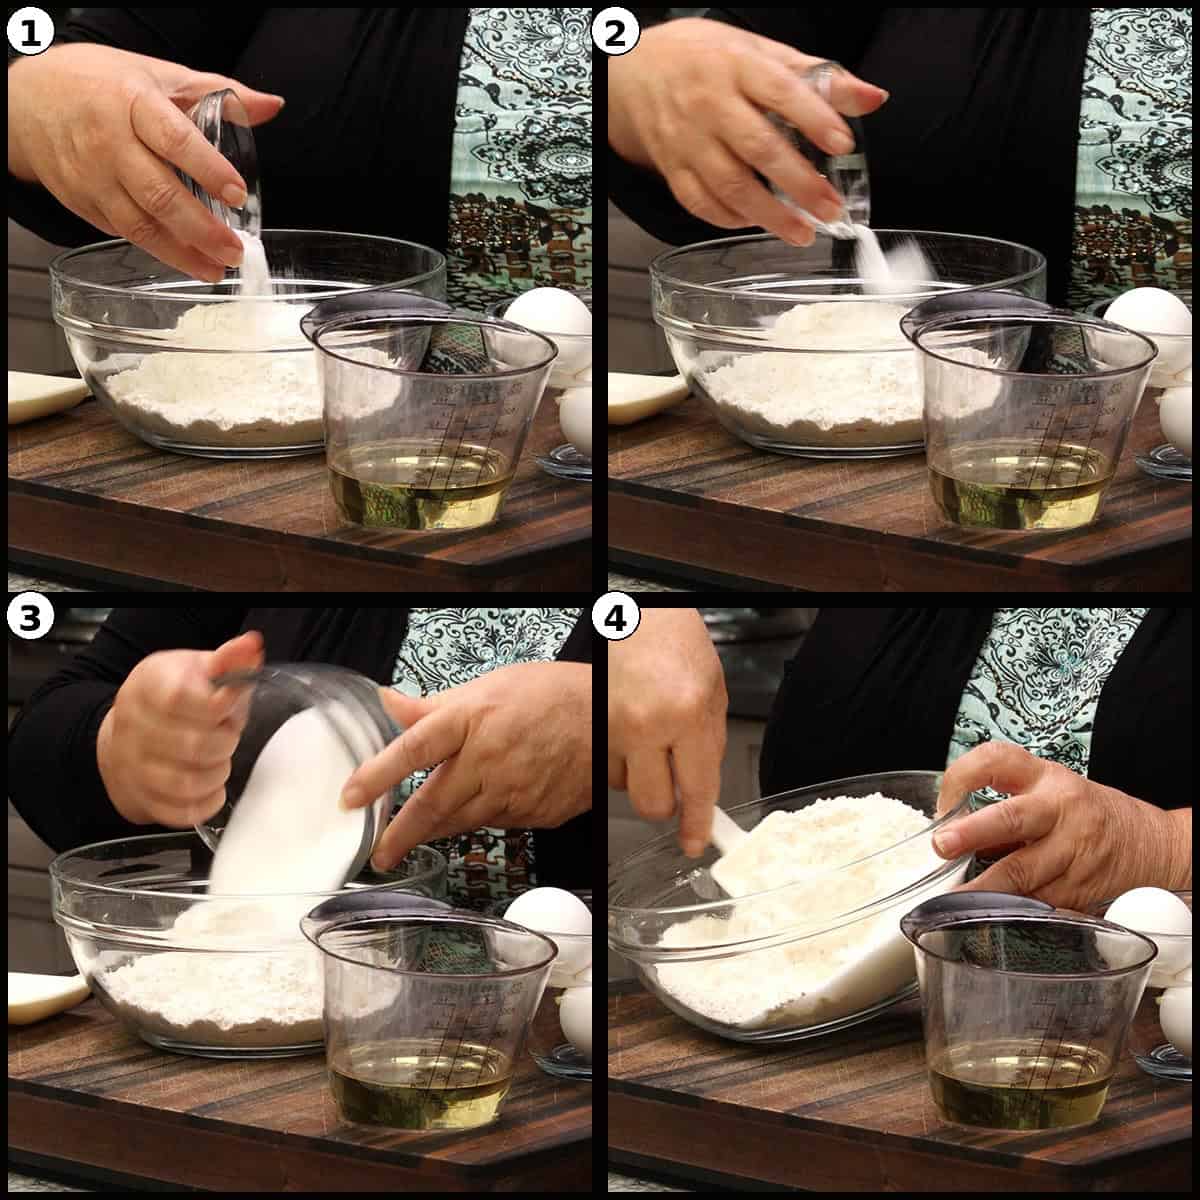
Mix the Dry Ingredients
In a small mixing bowl, combine the flour, baking powder, sea salt, and granulated sugar. Use a spatula to stir everything together so the baking powder and salt are evenly dispersed throughout the dry ingredients. Set aside.
Combine the Wet Ingredients
In a medium mixing bowl, add the neutral oil, 3 large eggs, and vanilla extract. Use a fork to gently break up the egg yolks and combine them with the oil. Don't whisk or beat, just a light mix with a fork is all you need.
Fold the Batter Together
Add about half of the egg and oil mixture to the dry ingredients and fold it in with the spatula. The fat will coat the flour, which is important because it helps prevent lumps when we add the pineapple juice. Stop folding as soon as all the flour is incorporated. A few small lumps are perfectly fine. Set the batter aside to rest.
Next, add about ⅓ of the reserved pineapple juice and fold to combine. Continue alternating the remaining wet ingredients and the remaining pineapple juice in small additions, folding gently between each addition.
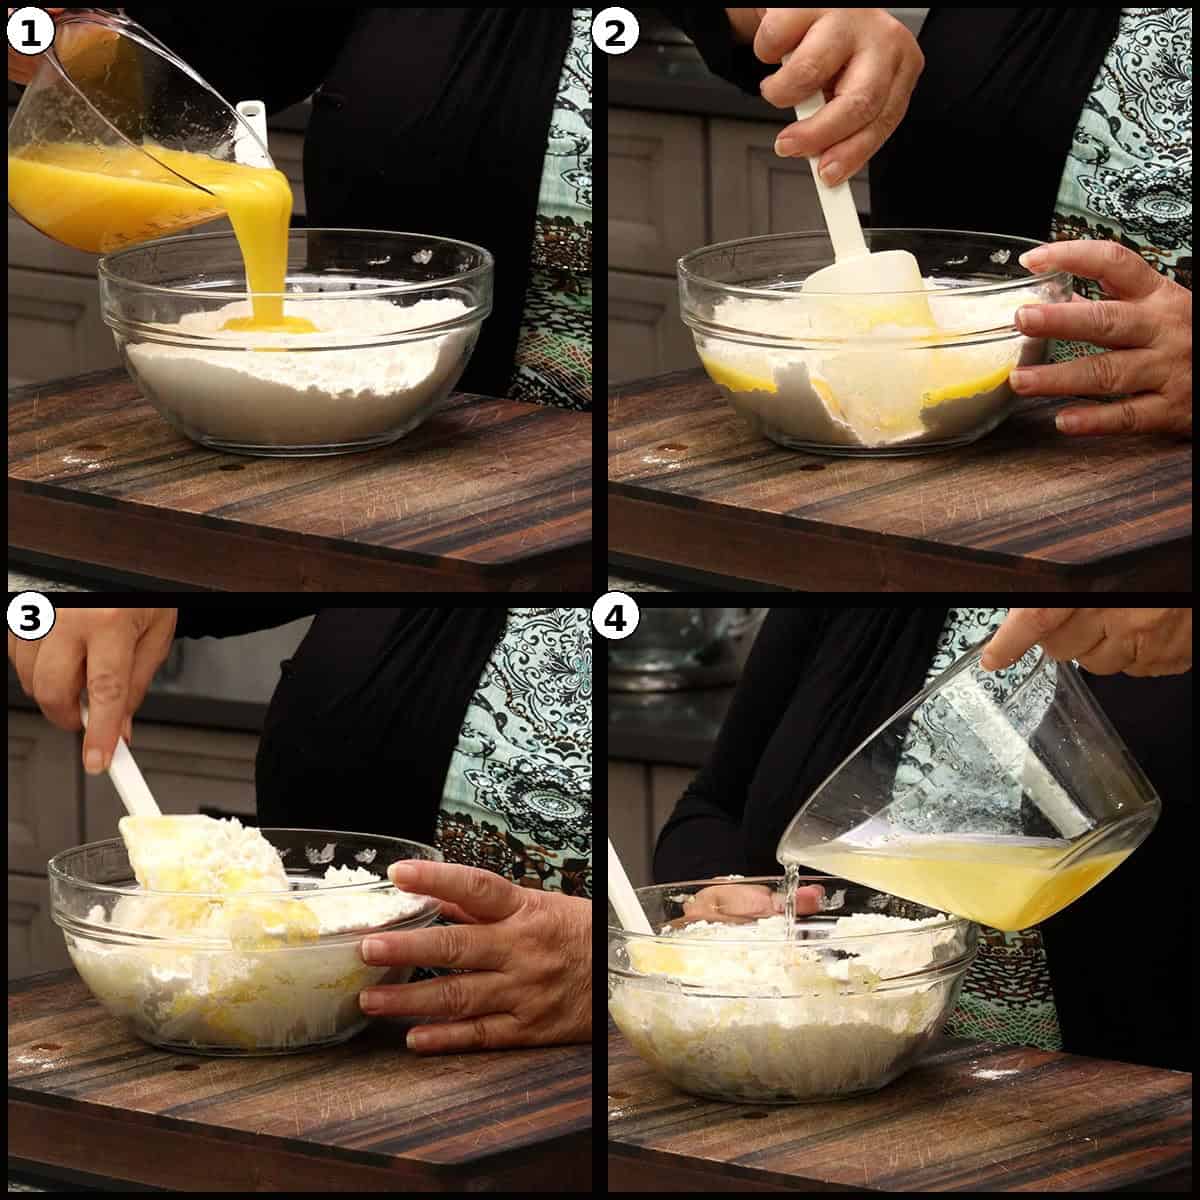
Continue adding the wet ingredients and folding between each addition.
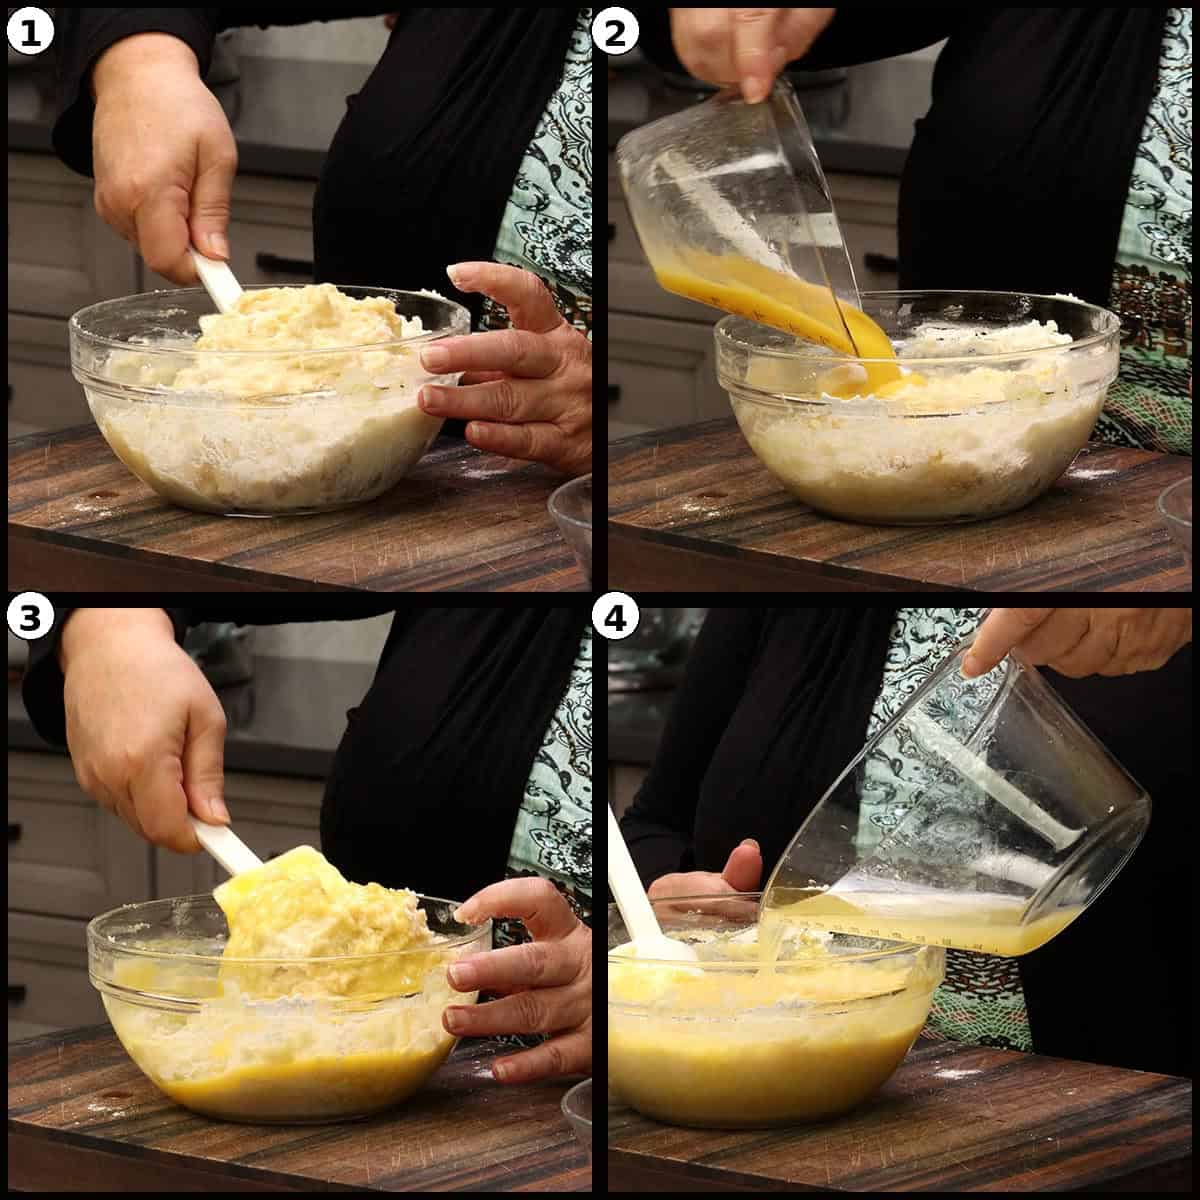
Gently fold the batter until it is the consistency of cake batter. Some lumps are fine. Set it aside to rest while you make the brown sugar topping.

Quick Tip
Fold, don't whisk. Overmixing develops gluten in the flour, which can make the cake tough and dense. Gentle folding with a spatula keeps the batter light and gives you that soft, tender cake crumb we're after.
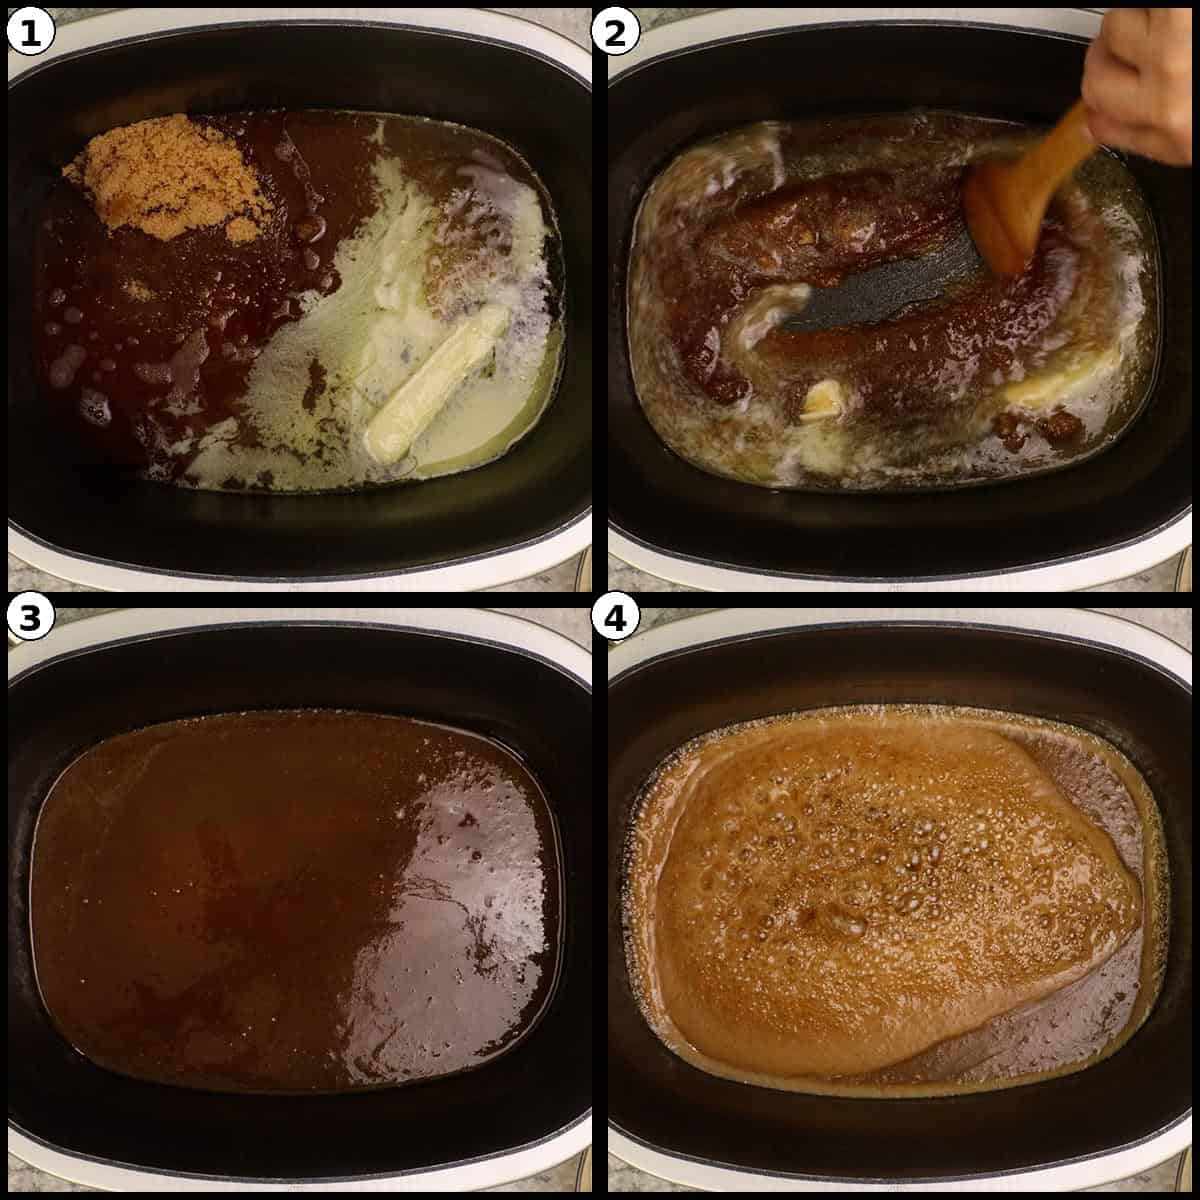
Make the Caramelized Brown Sugar Base
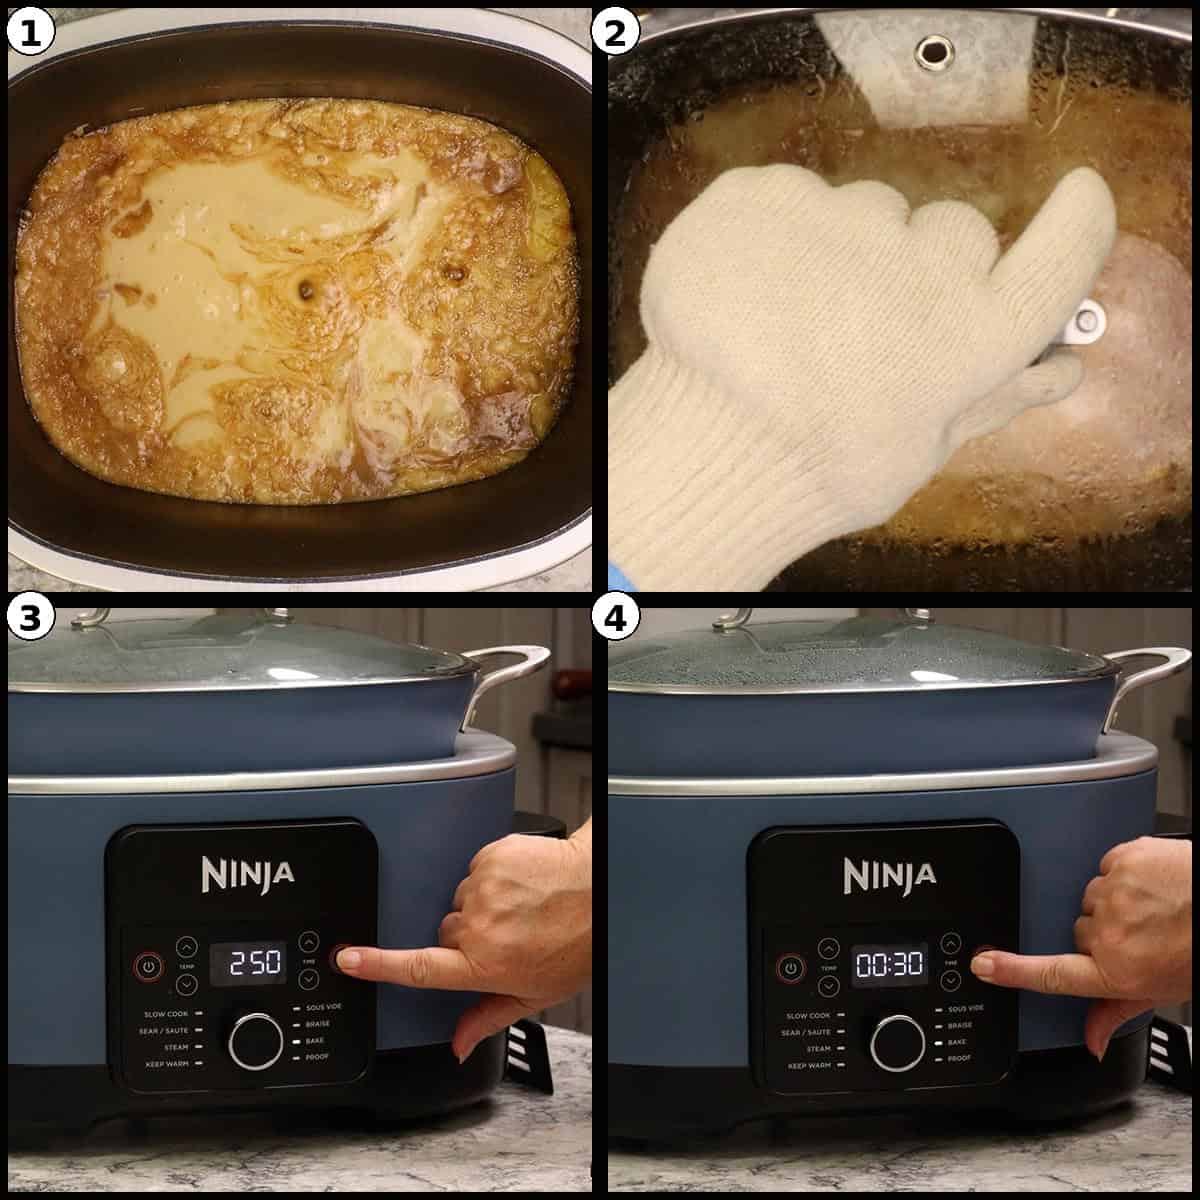
Set the Possible Cooker Pro to Sear/Sauté on High and press Start. If you have the Pro Plus model, set the temperature to 400℉/200℃. Add the salted butter to the pot and let it begin melting.
Add the packed light brown sugar and ¼ cup of water. Stir gently with a spatula to combine everything, then let the mixture come to a boil on its own.
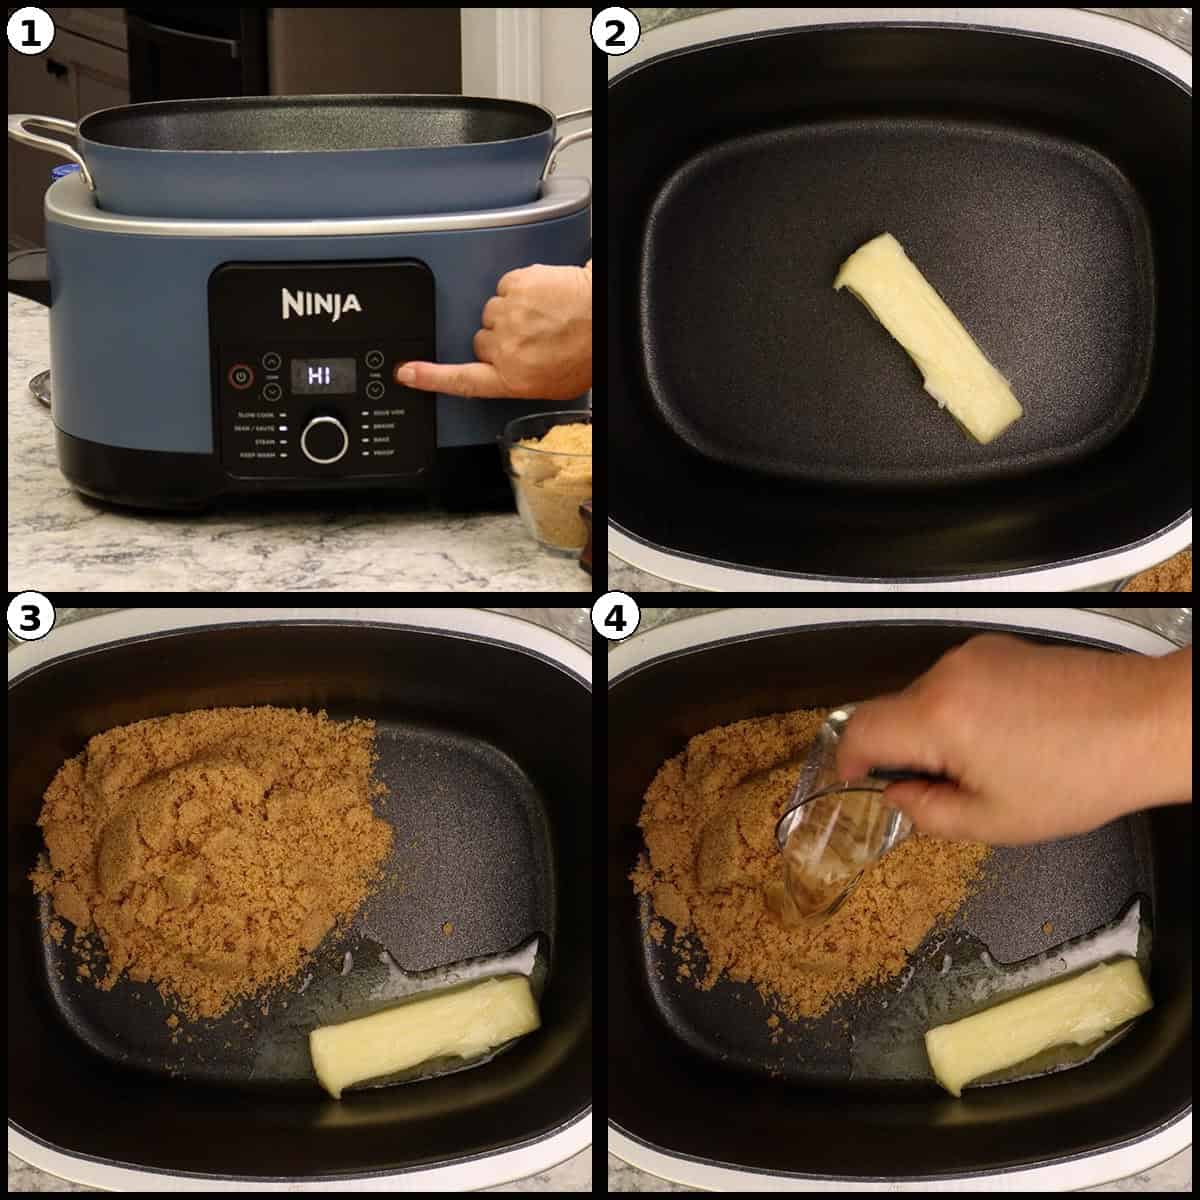
Once the butter has mostly melted, stir to combine all the ingredients.
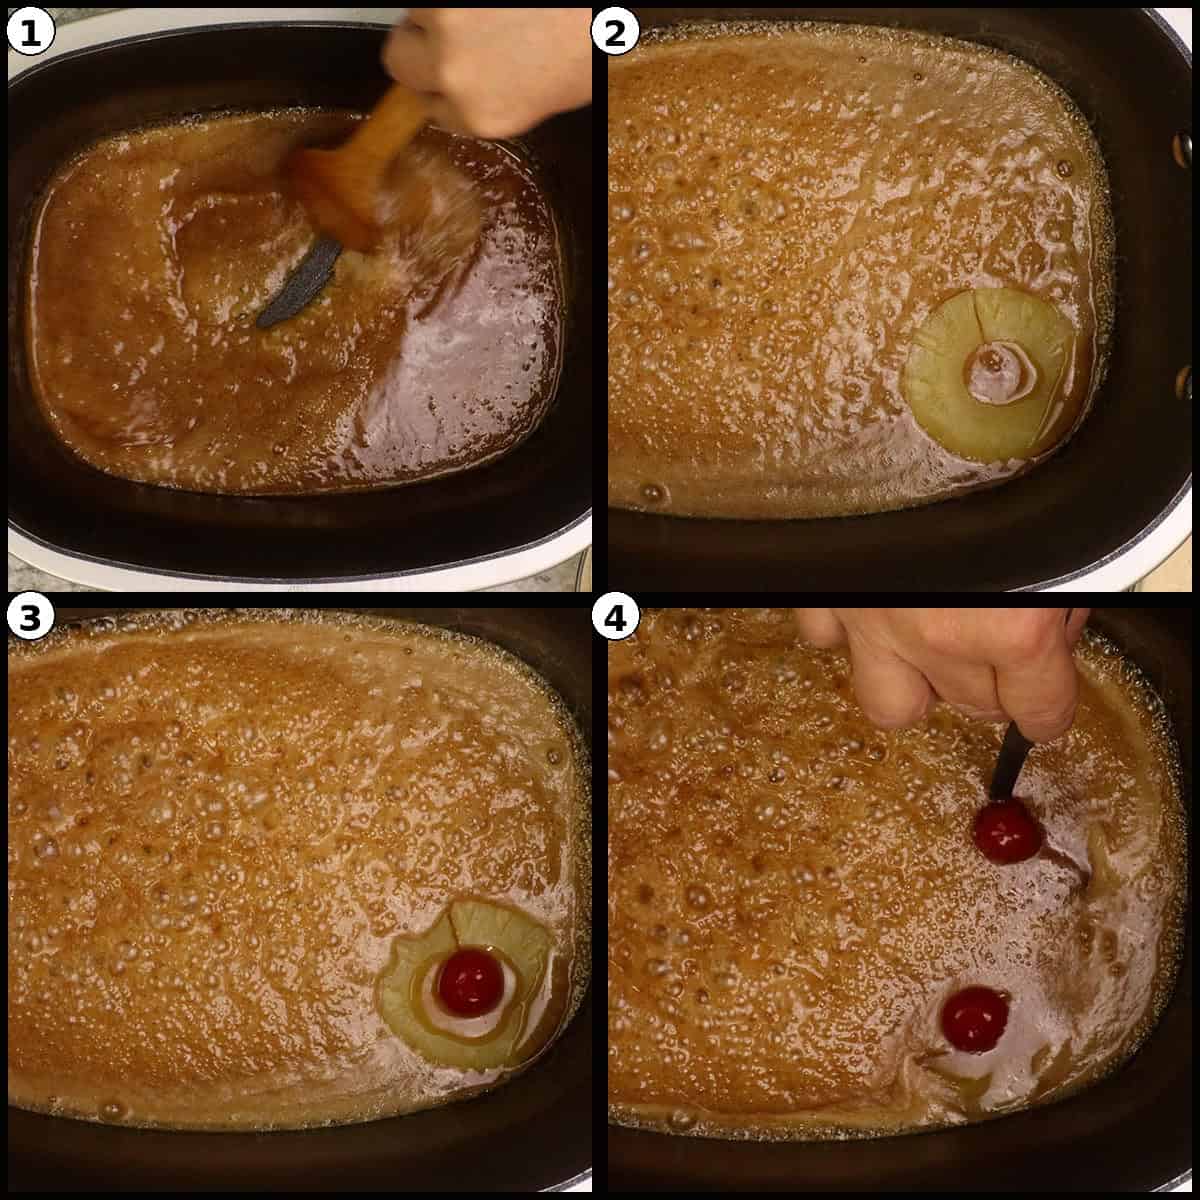
Arrange the Pineapple and Cherries
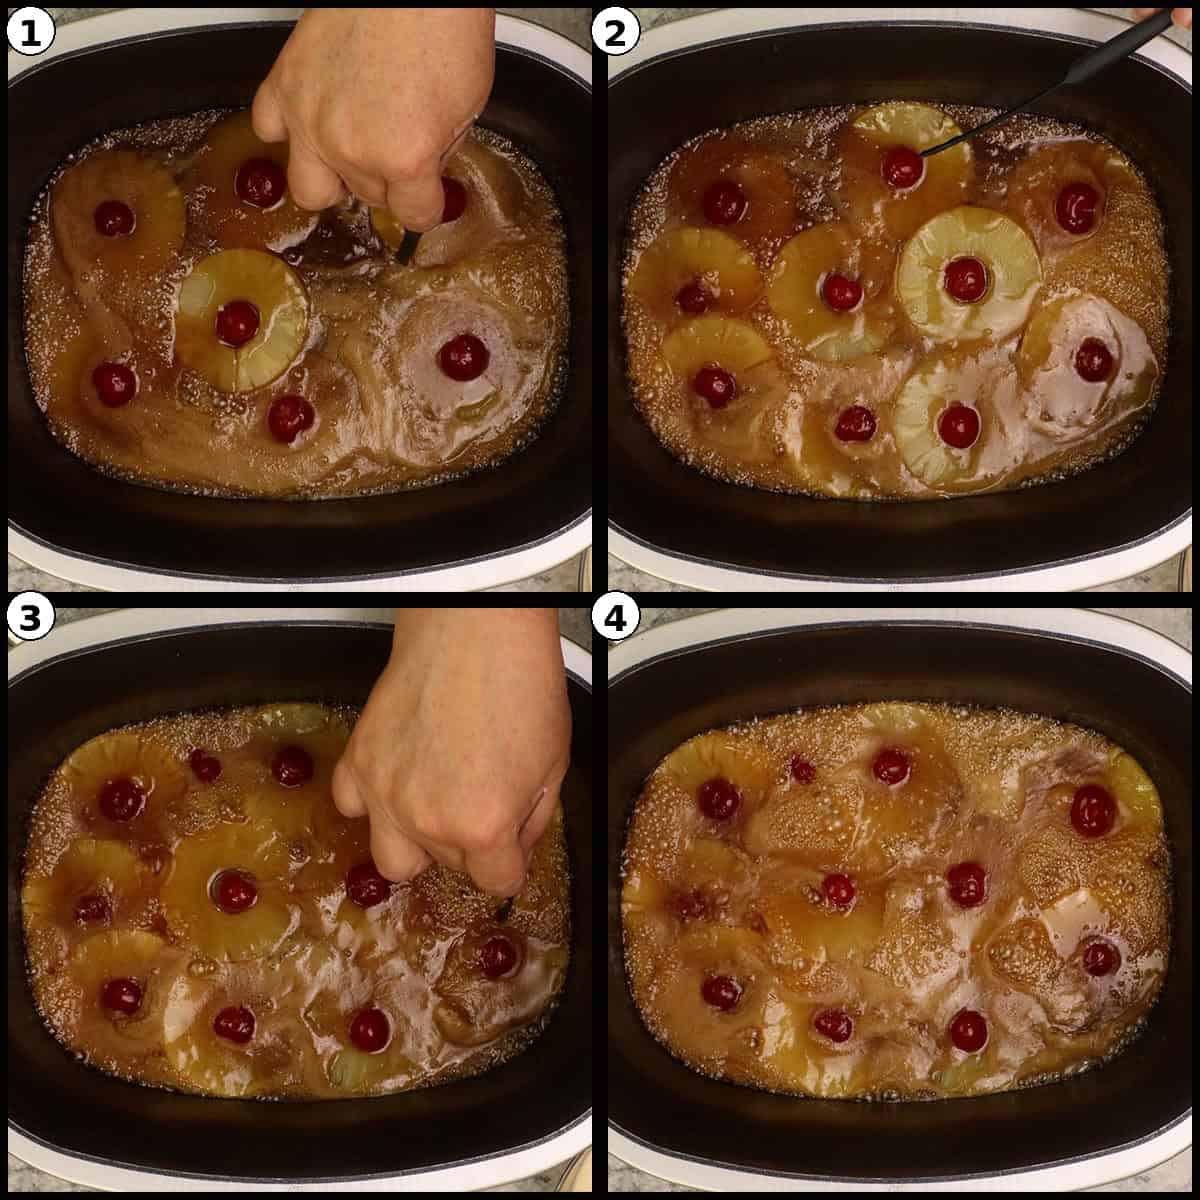
Once the brown sugar mixture is at a full boil, carefully drop a pineapple slice into the center of the pot. Immediately drop a maraschino cherry into the center of each pineapple slice. Use your cake tester or skewer to nudge the cherry into the center of each pineapple slice if it doesn't land perfectly. Continue with the remaining pineapple slices and cherries, arranging them in a pattern that will look pretty when flipped. Once all the pineapple and cherries are in place, use the back of the spatula to press each pineapple slice down so it's submerged in the syrup. Let the syrup bubble up over the top briefly to lock everything in place.
Quick Tip
Work quickly once you start placing the pineapple slices. The brown sugar mixture is boiling and the pineapple will start to shrink a little bit as soon as it hits the hot syrup. Don't stress if placement isn't perfect, you can reposition slices and cherries with your tool before adding the batter.
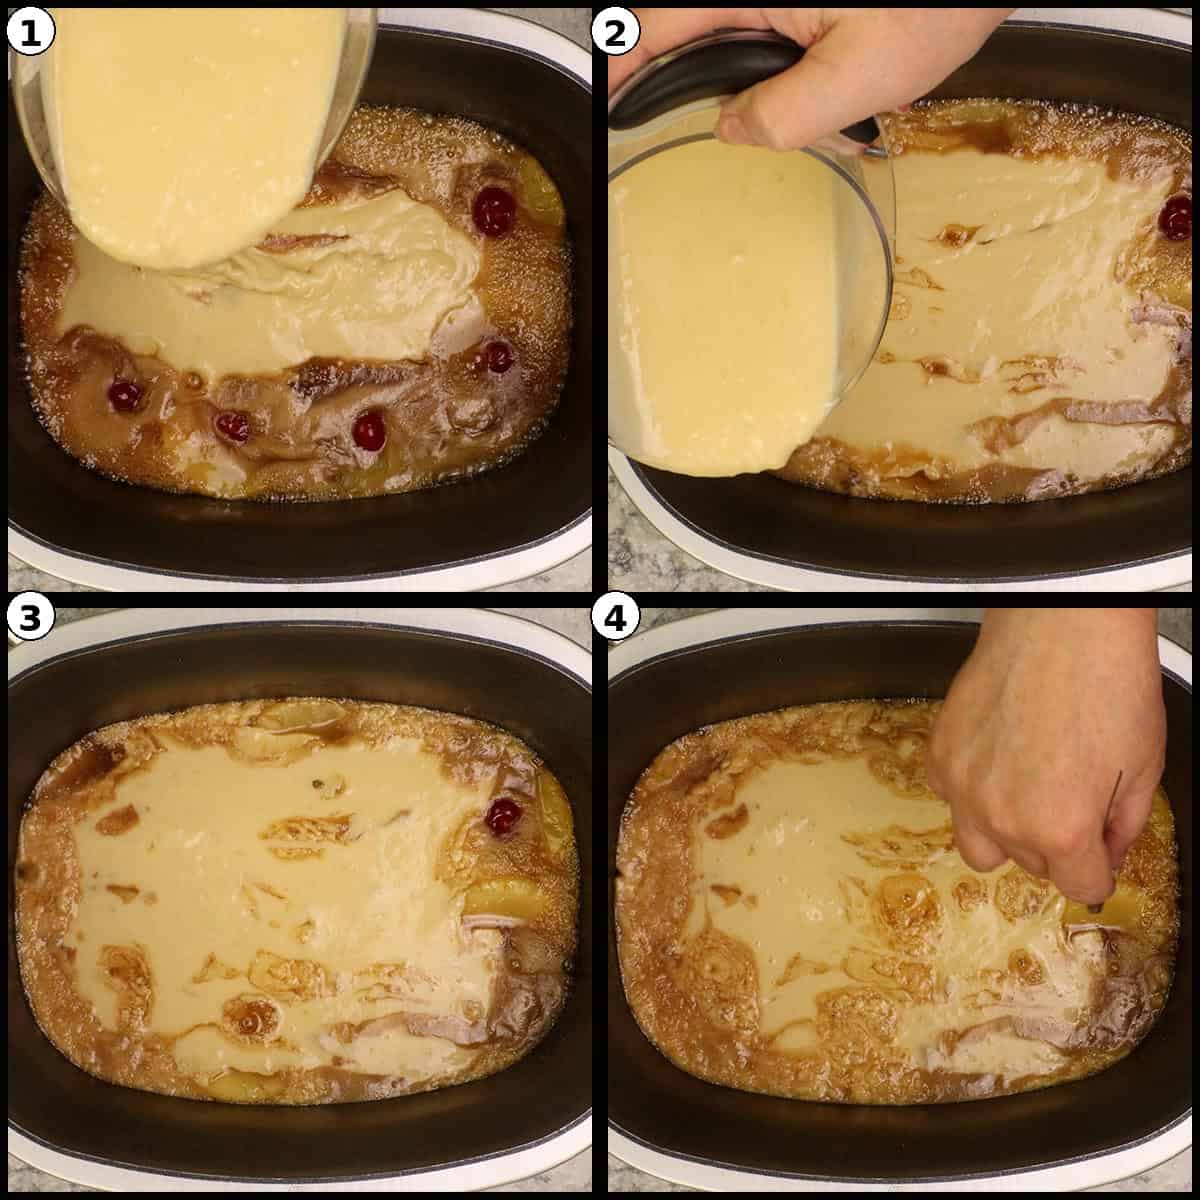
Pour the Batter and Bake
Starting in the center, slowly pour the prepared cake batter over the pineapple slices, working your way outward to create an even layer. If any pineapple slices float up, gently push them back down into the batter with your tool so they stay near the bottom of the pan.
Place the lid on the pot. Turn the Possible Cooker Pro off, then turn it back on and switch to the Bake function. Set the temperature to 250℉/120℃ and the time to 30 minutes. Press Start and walk away. Do not lift the lid during baking, the steam is part of what makes the cake tender.
Cool and Flip the Cake
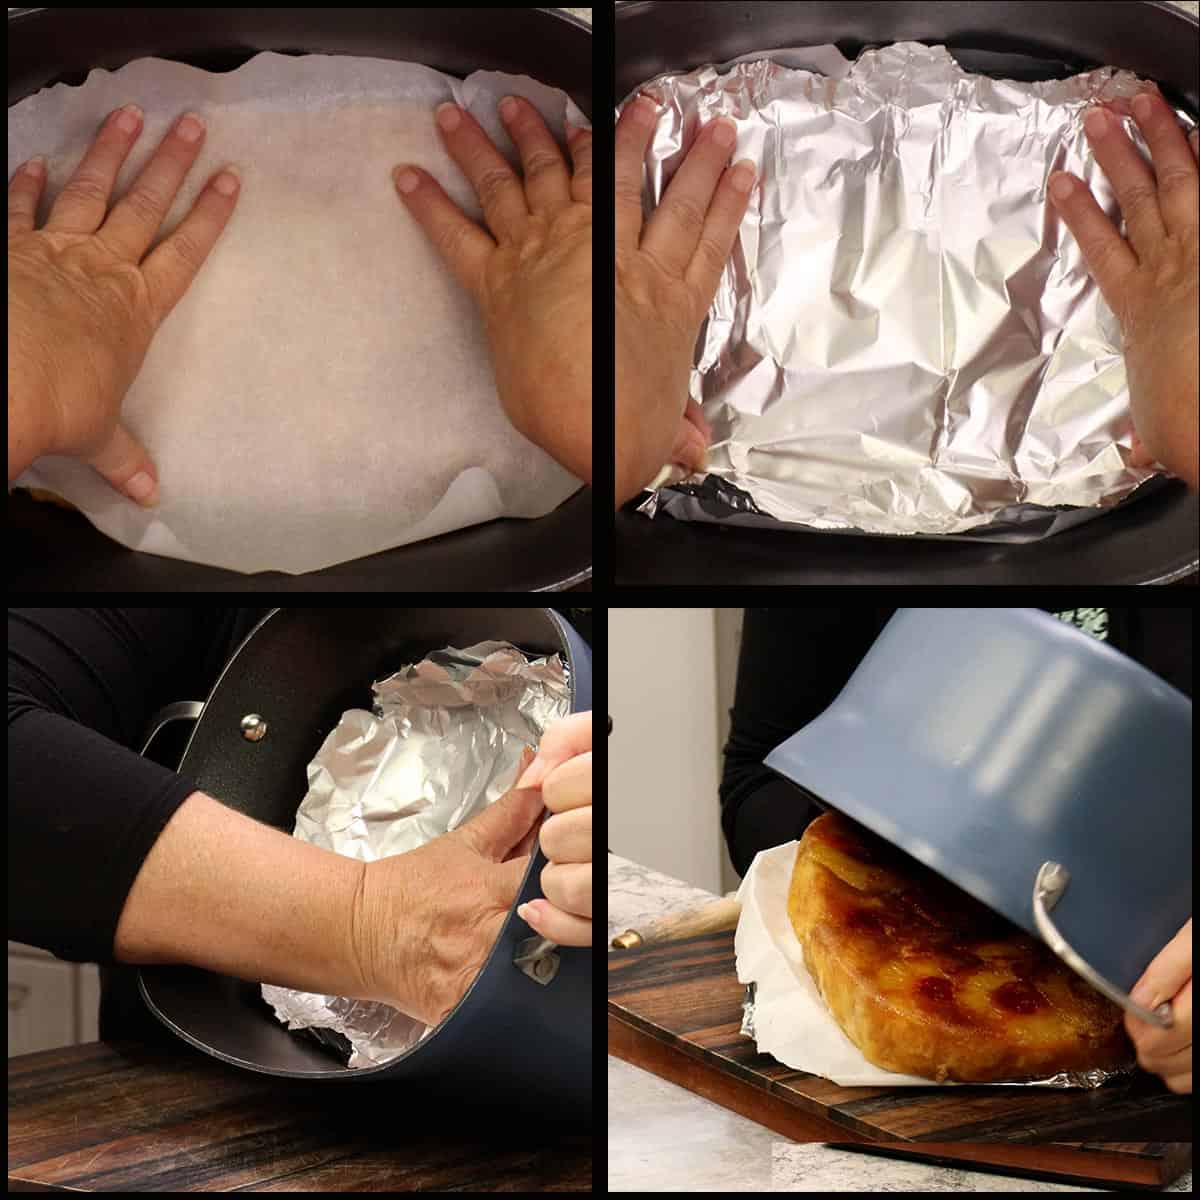
When the 30 minutes is up, remove the pot from the base and place it on a heat-resistant surface or a cooling rack. Take the lid off and let the cake rest for 5 minutes. The top may look a little bumpy at first but it will settle as the cake cools. After the 5-minute rest, run a silicone or heat-safe tool around the edge of the pot to release the cake from the sides. Let the cake cool at room temperature for 20 to 30 minutes. Don't let it cool much longer than that or the brown sugar topping can begin to stick to the bottom of the pan.
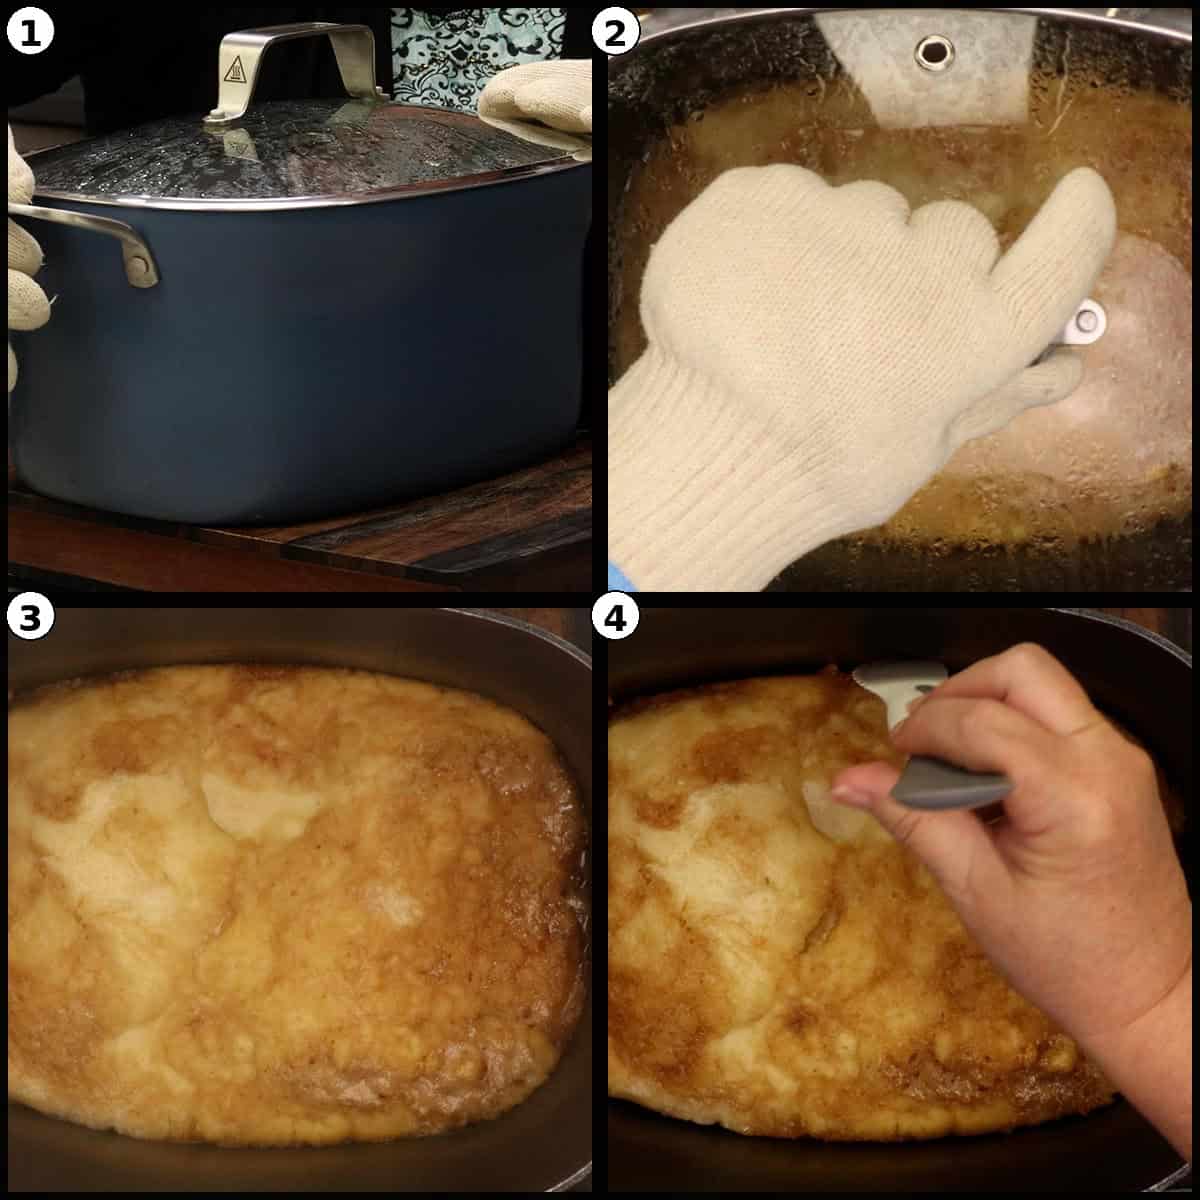
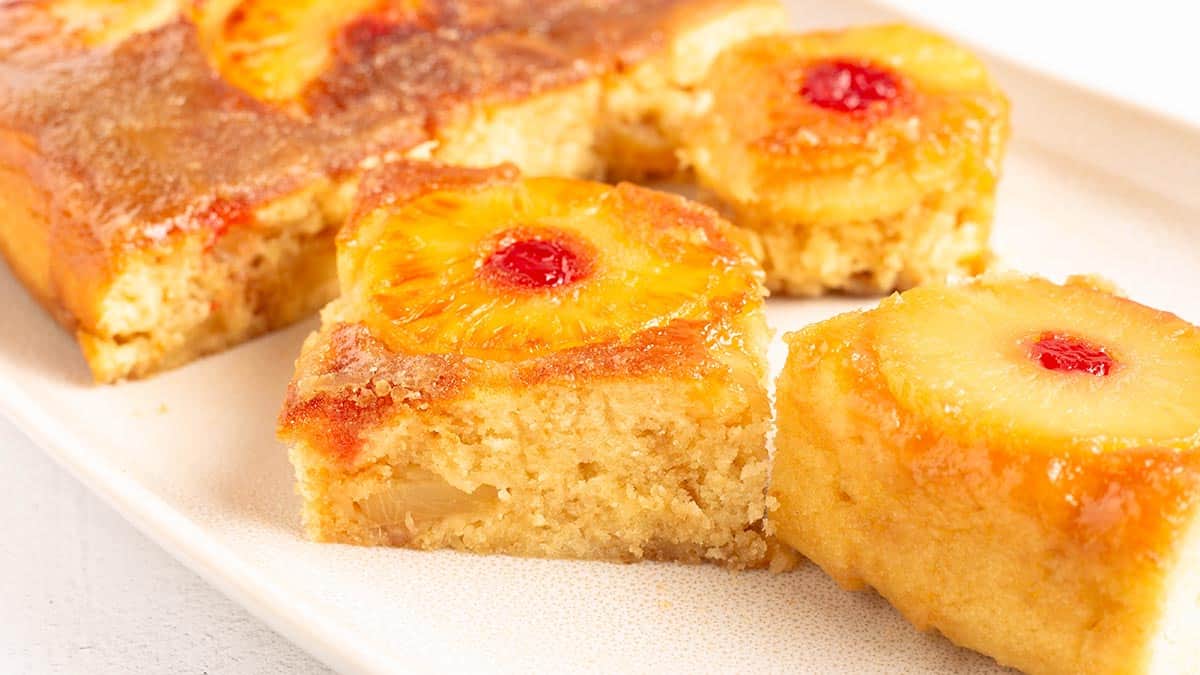
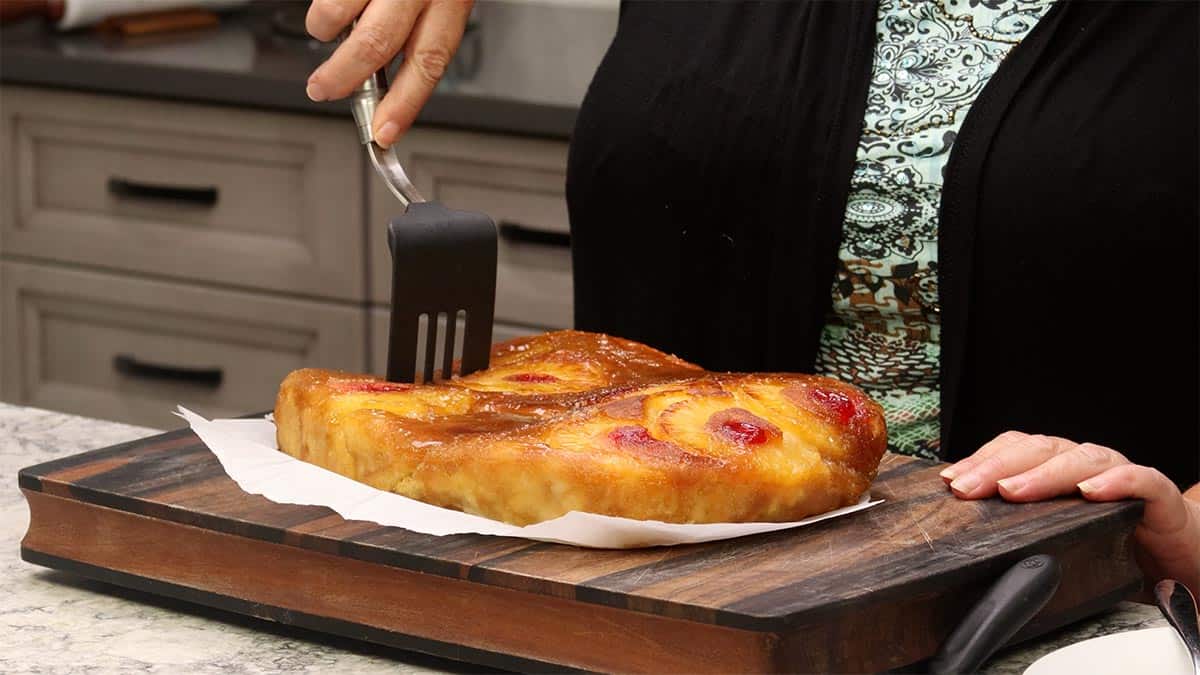
To flip, place a sheet of parchment paper over the top of the pot, followed by a sheet of aluminum foil for a little extra support. Gently shake the pot to confirm the cake has released. Place your hand flat on top of the parchment and foil, carefully invert the pot, and let the cake drop onto a serving platter or large plate. Remove the foil and parchment. Slice and serve warm or at room temperature for the best texture and flavor.
Cut. Serve. Enjoy!
Alternate Cooking Instructions
- Oven with a 9-inch cake pan: Make the brown sugar topping on the stovetop in a small saucepan, then pour it into a greased 9 x 13-inch cake pan. Arrange the pineapple slices and cherries on top of the topping. Pour the batter over the pineapple and bake at 350℉/175℃ for 35-40 minutes, or until a toothpick inserted in the center comes out clean. Let the cake cool for 20 minutes before flipping onto a serving plate.
- Oven with a cast iron skillet: Melt the butter in a 10-inch cast iron skillet over medium heat, stir in the brown sugar and water, and let the mixture come to a boil. Arrange pineapple and cherries, pour the batter on top, and bake at 350℉/175℃ for 35-40 minutes.
Storage & Reheating Instructions
How to Store Leftover Pineapple Upside Down Cake
Let the cake cool completely before storing so the caramel topping can set up a bit.
- Room Temperature: Cover the cake loosely with plastic wrap or place it in an airtight container. The cake will stay fresh at room temperature for up to 2 days.
- Refrigerator: Store in an airtight container in the refrigerator for up to 4 days. The caramel topping may firm up a little when cold, which is easily fixed when reheating.
- Freezer: Wrap individual slices tightly in plastic wrap and place them in an airtight container or freezer bag. Freeze for up to 2 months. Thaw overnight in the refrigerator before serving.
Quick Tip
This cake tastes amazing served warm with a scoop of vanilla ice cream melting on top of the cake. If you're serving it later, a few seconds in the microwave brings back that just-baked warmth and softens the caramel topping beautifully.
Frequently Asked Questions
You can, but it won't be as delicious as the homemade vanilla batter in this recipe. The from-scratch batter takes only a few minutes to mix, uses pantry staples, and gives you a much more tender cake with better flavor. If you do choose to use a box mix, follow the package directions and substitute the pineapple juice for any water called for in the recipe.
A standard 20 ounce can usually gives about 1 cup of juice, but amounts can vary. If you end up a little short, just add water to make up the difference so you have exactly 1 cup of liquid for the batter. For example, if you have ¾ cup of juice, add ¼ cup of water. The cake will still have plenty of pineapple flavor.
You absolutely do not have to flip it. If you don't want to bother with the flip, let the cake cool for a little bit and then scoop servings directly from the pot. It's a delicious, rustic way to serve the cake and still showcases the pineapple and caramel topping in every bite. Some people even prefer this method because you don't have to worry about any of it falling apart.
The Possible Cooker Pro cooks with a different heat distribution than a conventional oven. Baking at 250℉/120℃ for 30 minutes gives the cake enough time to bake through gently without scorching the bottom or drying out the top. Cranking up the temperature will give you an overcooked bottom and an underdone middle, so stick with 250°F for the best results in this appliance.
A slightly bumpy top is normal and will usually settle and even out as the cake cools. The bumps happen as steam works its way through the batter during baking. Once the cake is flipped, that top layer becomes the bottom of the cake and no one will ever know. If you want an extra smooth top, gently push down on any high spots with the back of the spatula right after removing the lid.
Yes, if you want a taller cake with more fruit you can add a few extra pineapple slices from another can. Just keep the cake batter amounts the same and arrange the additional slices to fill any gaps in the pan. Don't overdo it though, as too much liquid from extra pineapple can affect how the cake bakes up.
Pineapple Upside Down Cake in the Possible Cooker Pro
Equipment
- Ninja Possible Cooker Pro (or multi-cooker with Sear/Sauté and Bake functions)
- Small mixing bowl
- Medium mixing bowl
- 4-cup liquid measuring cup
- Silicone spatula
- Fork or small whisk
- Cake tester or thin skewer
- Parchment Paper
- Aluminum foil
- Serving platter or large plate
Ingredients
- 2 cups all-purpose flour
- 1 tablespoon baking powder not baking soda
- ½ teaspoon fine grain sea salt or kosher salt; use ¼ teaspoon if using table salt
- ¾ cup granulated sugar
- ½ cup neutral oil avocado or canola oil; do not use olive oil or sesame oil
- 3 large eggs room temperature is best
- 1 teaspoon vanilla extract
- 1 cup reserved pineapple juice from the canned pineapple slices; add water to make up the difference if you don't get a full cup
- ½ cup salted butter 1 stick or 8 tablespoons; unsalted butter can be substituted with a pinch of added salt
- 1¼ cups light brown sugar, packed dark brown sugar can be substituted
- ¼ cup water
- 1 (20 oz) can pineapple slices in juice approximately 10 slices; do not use pineapple in heavy syrup
- 10 maraschino cherries, stems removed have 1 or 2 extras on hand in case one is misplaced
Would you like to save this recipe?
Instructions
- Drain the can of pineapple slices over a 4-cup liquid measuring cup and reserve the juice. You need 1 full cup of juice for the cake batter; if you get less, add water to make up the difference. Remove the stems from 10 maraschino cherries and set aside. Have 1 or 2 extra cherries ready in case one falls in the wrong spot.
- In a small mixing bowl, combine 2 cups of all-purpose flour, 1 tablespoon baking powder, ½ teaspoon fine grain sea salt, and ¾ cup granulated sugar. Stir with a spatula to disperse the baking powder and salt evenly through the flour.
- In a medium mixing bowl, combine ½ cup of neutral oil, 3 large eggs, and 1 teaspoon vanilla extract. Use a fork to break up the egg yolks and lightly combine with the oil. Do not whisk or over-beat.
- Add about half of the egg and oil mixture to the dry ingredients and fold with a spatula. The fat will coat the flour, which helps prevent lumps. Next, add about ⅓ of the pineapple juice and fold to combine. Continue alternating the remaining egg/oil mixture and pineapple juice in small additions, folding gently between each. Stop folding as soon as the flour is incorporated. A few small lumps are fine. Do not overmix. Set the batter aside to rest while you make the caramel base.
- Set the Possible Cooker Pro to Sear/Sauté on High and press Start. If you have the Pro Plus model, set the temperature to 400℉/200℃ on the Sear/Sauté function. Add ½ cup of salted butter to the pot and let it begin melting.
- Once the butter is mostly melted, add 1¼ cups of packed light brown sugar and ¼ cup of water. Stir gently with a spatula to combine the butter, sugar, and water. Let the mixture come to a boil on its own while you prepare the pineapple.
- Have a cake tester, thin skewer, or similar heat-safe tool ready. Once the brown sugar mixture is boiling, carefully drop a pineapple slice into the center of the pot. Immediately drop a maraschino cherry into the center hole of the pineapple slice. Use the tool to nudge the cherry into the center if needed. Continue with the remaining pineapple slices and cherries, arranging them in the pot in a pattern that will look good when flipped.
- Press each pineapple slice down so it's submerged in the boiling brown sugar syrup. Let the syrup bubble up over the top of the pineapple for a few seconds to help lock everything in place.
- Starting in the center, slowly pour the prepared cake batter over the pineapple slices, working your way out to cover everything in an even layer. If any pineapple slices float up, gently press them back down into the batter so they stay near the bottom of the pan.
- Place the lid on the pot and seal it. Turn the Possible Cooker Pro off, then turn it back on and switch to the Bake function. Set the temperature to 250℉/120℃ and the time to 30 minutes. Press Start. Do not remove the lid during baking as the steam is needed for a tender cake.
- When the 30 minutes is up, remove the pot from the base and place it on a heat-resistant surface or cooling rack. Take the lid off and let the cake rest for 5 minutes. The top may look slightly uneven but will settle as it cools.
- After the 5-minute rest, run a silicone or heat-safe tool around the edge of the pot to release the cake from the sides. Let the cake cool at room temperature for 20 to 30 minutes. Do not let it cool much longer than 30 minutes or the brown sugar mixture can begin to stick to the bottom of the pot.
- Place a sheet of parchment paper over the top of the pot, followed by a sheet of aluminum foil for extra support. Gently shake the pot back and forth to make sure the cake has released. Place your hand flat on top of the parchment and foil, carefully invert the pot, and let the cake drop onto a serving platter or large plate. Remove the foil and parchment. Slice and serve warm or at room temperature.
Notes
• Drain the pineapple slices well and reserve every drop of juice. If you end up with less than 1 cup, top it off with water so the batter has the correct liquid ratio.
• Remove the cherry stems before you start cooking. Things move quickly once the brown sugar mixture is boiling, and you don't want to be fishing stems out of syrup.
• Mix the cake batter before you turn the Possible Cooker Pro on. This gives the baking powder time to activate and keeps the caramel base from boiling too long before the batter goes in. BATTER TIPS
• Use a spatula and fold the batter, do not whisk or beat it. Overmixing develops gluten and leads to a tough cake.
• Adding the fat (eggs and oil) to the flour first coats the flour and prevents clumps when the pineapple juice is added.
• Alternate the wet ingredients in small additions rather than dumping everything in at once. This helps the batter come together smoothly with minimal mixing.
• A few small lumps in the finished batter are fine. The batter will continue to hydrate as it rests while the caramel base cooks. CARAMEL BASE TIPS
• Let the butter start melting before adding the brown sugar and water. Adding everything at once can cause the sugar to seize up.
• Let the mixture come to a boil naturally. Stirring too often or cranking the heat too high can cause the sugar to crystallize.
• For a lighter topping, you can reduce the butter to 6 tablespoons and the brown sugar to 1 cup. You'll have less of the caramel goodness on top of the flipped cake but it will still be delicious.
• Dark brown sugar can be used in place of light brown sugar for a deeper molasses flavor. COOKING TIPS
• Arrange the pineapple and cherries quickly but have fun with the placement. Remember, what you see now will be on top of the finished cake.
• Press each pineapple slice down into the boiling syrup before adding the batter. This helps them stay in place.
• Always bake at 250℉/120℃ for exactly 30 minutes. Do not lift the lid during baking or you'll lose the steam the cake needs to bake evenly.
• The cake is done when the top springs back lightly to the touch and no wet batter is visible. VARIATIONS
• Use fresh pineapple slices in place of canned. You'll need to supplement with water or another liquid for the batter since you won't have reserved juice.
• Swap maraschino cherries for fresh or frozen cherries, halved and pitted.
• Add ½ teaspoon of cinnamon or a splash of rum to the brown sugar base for extra flavor.
• Add 2 tablespoons of crushed toasted pecans or walnuts to the top of the caramel base before adding the pineapple for a nutty twist. SERVING SUGGESTIONS
• Serve slices warm with a scoop of vanilla ice cream or a dollop of fresh whipped cream.
• Drizzle any extra caramel goop from the pot over the top of each slice.
• If you don't want to flip the cake, simply scoop servings directly from the pot. It's a delicious, rustic way to serve it. STORAGE
• Refrigerator: Store leftover cake in an airtight container in the refrigerator for up to 4 days.
• Freezer: Wrap individual slices in plastic wrap and place in an airtight container or freezer bag. Freeze for up to 2 months. Thaw overnight in the refrigerator.
• Reheating: Warm individual slices in the microwave for 15 to 20 seconds to bring back that just-baked tenderness. NUTRITIONAL DISCLAIMER
Nutritional information provided is an estimate based on typical ingredient values and standard portion sizes. Actual nutritional content may vary significantly depending on specific brands used, ingredient substitutions, preparation methods, portion sizes, and individual cooking techniques. For precise nutritional information tailored to your specific ingredients and preparation, please consult with a registered dietitian or use laboratory analysis. This information should not be used for medical nutrition therapy or to manage medical conditions without professional guidance.
Nutrition
Variations
- Pineapple chunks or tidbits: If you can't find pineapple rings, use pineapple chunks or tidbits instead. Scatter them across the caramel base in an even layer. You won't get the classic ring pattern on top, but the flavor will be just as delicious.
- Add warm spices: Stir ½ teaspoon of ground cinnamon or a pinch of nutmeg into the cake batter for a warm, spiced twist. You can also add a small pinch to the brown sugar topping for extra flavor in every bite.
- Splash of rum or bourbon: Add 1 tablespoon of dark rum or bourbon to the caramelized brown sugar topping for a boozy twist perfect for special occasions.
- Add toasted pecans: Sprinkle 2 tablespoons of toasted pecan pieces over the caramel base before adding the pineapple for extra crunch and a nutty flavor that pairs beautifully with the caramelized pineapple.
- Swap the fruit: Use canned peach slices or halved apricots in place of pineapple for a fun twist on the classic recipe. Skip the reserved juice and use a mix of water and vanilla extract in the batter instead.
- Dark brown sugar topping: Swap the light brown sugar for dark brown sugar for a richer, deeper molasses flavor in the caramelized topping.
Easy Fruit Desserts You Will Love
If you loved this pineapple upside down cake, you are going to want to try a few more of my favorite easy fruit desserts. My Easy Cherry Cobbler comes together with cherry pie filling and a buttery topping for the ultimate shortcut dessert, and my Easy Blueberry Slab Pie is the perfect recipe when you need to feed a crowd. For something a little more special, my Blueberry Basque Cheesecake has that signature burnt top with a wonderfully creamy center. And when fall rolls around, my Pumpkin Pie Crumble is the coziest dessert on the table.


About the Recipe Author, Louise Long
Louise is a full-time recipe creator and food blogger @ The Salted Pepper. She has over 30 years of experience with cooking and recipe development. She owned a restaurant for several years and was a full-time RN until retiring to blog full-time.

She published her first cookbook in the Fall of 2018 and is very interested in writing several more.
Louise is also the creator of an online Ninja Foodi Pressure Cooking Course with over 100 instructional step-by-step videos. People absolutely rave about the course and all the value they have received from it.
Louise has several very active Facebook groups that help people with the basics of cooking and learning more about the appliances they love.
Ninja Foodi Pressure Cooker & Air Crisper 101
Ninja Woodfire Outdoor Grill & Smoker
Louise is also a YouTube creator and you can find most of her recipes in video format on The Salted Pepper YouTube channel.
She is very responsive to messages and eager to help in any way she can. Get more Information about Louise & contact information
I WOULD LOVE TO SEE WHAT YOU ARE COOKING UP IN YOUR KITCHEN! TAG ME @THESALTEDPEPPER ON YOUR FAVORITE SOCIAL MEDIA PLATFORM WHEN YOU MAKE A DISH!
BE SURE TO FOLLOW THE SALTED PEPPER RIGHT HERE ⇓⇓⇓⇓⇓
Leave a Reply