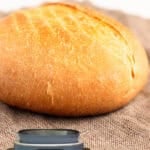

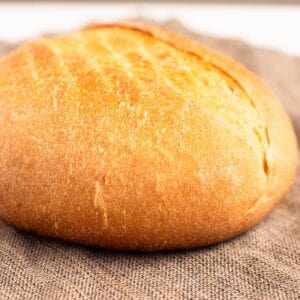
Did you know you can bake a beautiful loaf of crusty bread right in your Ninja Possible Cooker Pro — no oven required?
This simple lean dough recipe uses just four ingredients and the bake function on the Possible Cooker Pro to deliver a gorgeous, golden-brown loaf with a perfect crust and a soft, tender crumb. If you've been told it can't be done because there's no upper heating element, think again. This method absolutely works, and the results are stunning.
Would you like to save this recipe?
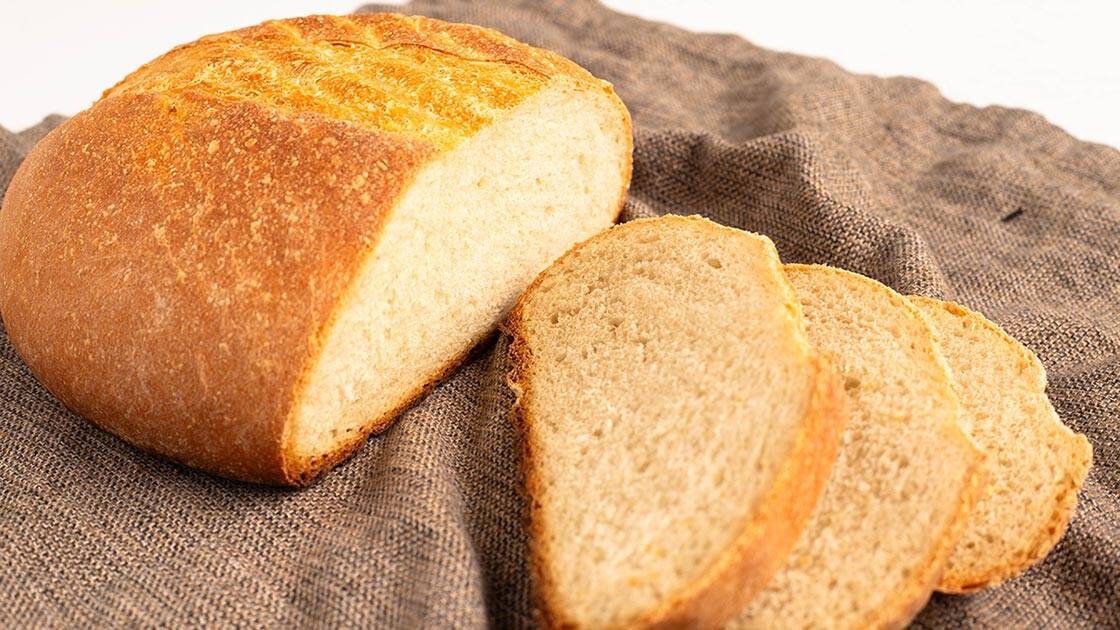
This is one of those fresh breads that makes your whole house smell incredible while it bakes. The recipe uses a simple French-style lean dough, just flour, salt, yeast, and water.
The Possible Cooker Pro handles both the proofing and the baking, so it truly is a one-appliance loaf of perfect bread. Whether you're new to bread making or you've been at it for years, this recipe is a winner!
I tested this recipe many times, adjusting the flour amount, bake time, and technique until I found the best way to get consistent, beautiful results every single time. And now I'm sharing all of those findings with you so you can skip the trial and error and go straight to bread-baking success.
Suggested Kitchen Tools for Possible Cooker Bread
- Ninja Possible Cooker Pro
- Rack (included with PCP or aftermarket)
- Stand Mixer with Dough Hook (optional — can knead by hand)
- Large Mixing Bowl
- Parchment Paper
- Bread Lame, Sharp Knife, or Scissors (for scoring)
- Instant-Read Thermometer (optional)
- Cooling Rack
- Serrated Bread Knife
Ingredients & Substitutions
One of the things I love about this perfect bread recipe is how few ingredients you need. This is a lean dough, which means there are no enrichments like butter, milk, or eggs. Just four simple pantry staples and you're on your way to a gorgeous loaf of crusty bread.
All-Purpose Flour
Used in Recipe: All-purpose flour is the base of this lean bread dough.
What it Does: Flour provides the structure of the bread through its gluten and protein content. The amount of flour you use directly determines the size of your loaf. For this recipe, it's important to stick with three cups maximum; any more and the dough will expand too close to the sides of the Possible Cooker Pro during baking, which can cause the edges to burn.
Substitutions: You can use bread flour instead of all-purpose. Bread flour has a higher protein content, which will give you a slightly chewier texture. If using bread flour, you may need a little extra water to reach the right hydration level.
Instant Yeast
Used in Recipe: Instant yeast is the leavening agent for this bread.
What it Does: Yeast is what makes the bread rise. It feeds on the starches in the flour and produces carbon dioxide gas, which creates the airy structure inside your loaf. Instant yeast can be added directly to the dry ingredients without blooming, which saves time and simplifies the process.
Substitutions: You can use active dry yeast instead. If using active dry yeast, dissolve it in a portion of the warm water and let it bloom for 5 to 10 minutes until it gets nice and frothy before adding it to the flour mixture.
Kosher or Fine Grain Sea Salt
Used in Recipe: Salt is added to the dry ingredients along with the flour and yeast.
What it Does: Salt is really important in bread. It provides flavor; without it, your bread will taste flat and bland. Salt also helps regulate yeast activity and strengthens the gluten structure, contributing to a better rise and a more uniform crumb.
Substitutions: Use kosher salt or fine grain sea salt. If you only have table salt, reduce the amount slightly since table salt is more concentrated by volume due to the smaller grain size.
Warm Water
Used in Recipe: Warm water is the liquid that brings the dough together.
What it Does: Water hydrates the flour and activates the yeast. Using warm water (below 120℉/49℃, ideally around 110℉/43℃) keeps the dough warm, which improves the proofing process and helps the yeast do its job efficiently. The exact amount of water you need can vary slightly depending on your humidity levels.
Substitutions: There is no substitution for water in a lean dough recipe. However, the amount may need to be adjusted slightly depending on your flour type and local humidity. Start with the amount called for and add more a tablespoon at a time if the dough feels too dry.
Olive Oil
Used in Recipe: A light spritz of olive oil is used to coat the ball of dough before proofing.
What it Does: The oil prevents the dough from drying out during the proofing stages and keeps it from sticking to the pot or your hands. It's not mixed into the dough.
Substitutions: Any neutral cooking oil or cooking spray will work in place of olive oil for coating the dough.
How to Make Possible Cooker Bread
This bread comes together in stages: mixing, proofing, shaping, proofing again, and baking. The bake function does an incredible job of producing a loaf that looks like it came straight out of a traditional oven or even a dutch oven. Here's the step-by-step process.
Mise En Place
Before you begin, gather all of your ingredients and equipment. Measure out your flour (fluff it first, then measure, no need to weigh it), salt, and instant yeast. Have your warm water ready at about 110℉/43℃. You'll also want your parchment paper, rack, and olive oil nearby for the later steps.
Step One: Mix and Knead the Dough
Add the flour, salt, and instant yeast to a large mixing bowl (or the bowl of your stand mixer fitted with a dough hook). Give the dry ingredients a quick stir to combine. Pour in the warm water and mix on low speed for about one minute, just until everything starts to come together into a shaggy dough.
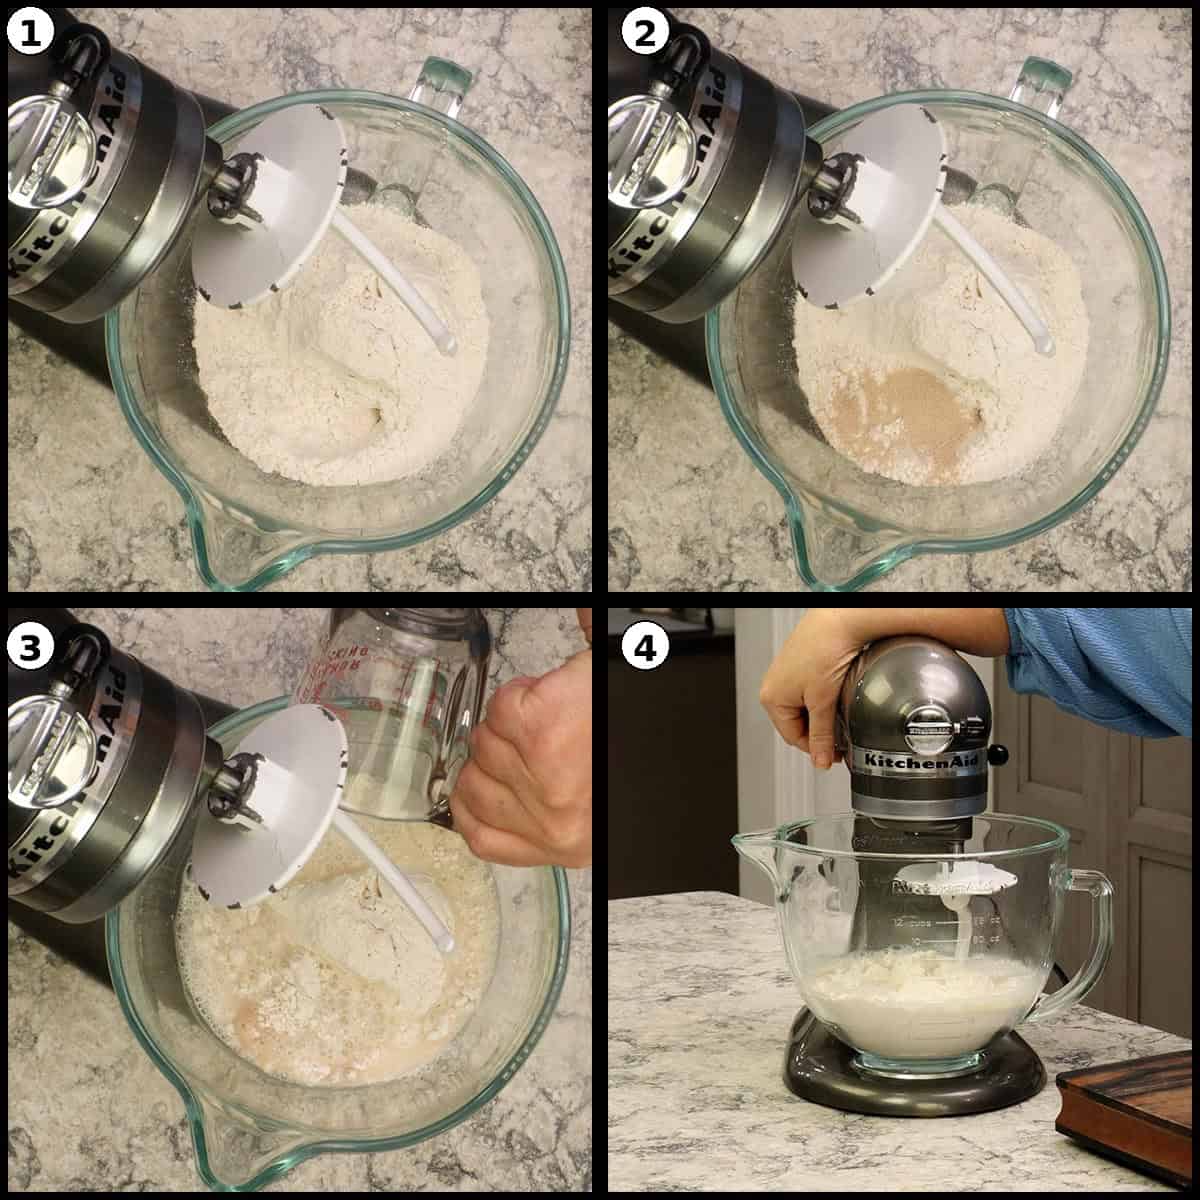
Stop the mixer and scrape down the sides. Now let the dough sit for ten minutes. This resting period allows the flour to fully absorb the liquid and hydrate, which makes kneading much easier and more effective.
After the ten-minute rest, turn the mixer back on to low speed. You'll see the dough ball start to form and pull in any remaining flour from the edges. Once it's all incorporated, continue kneading on low speed for ten minutes. If you're kneading by hand plan for about 15 minutes of steady work.
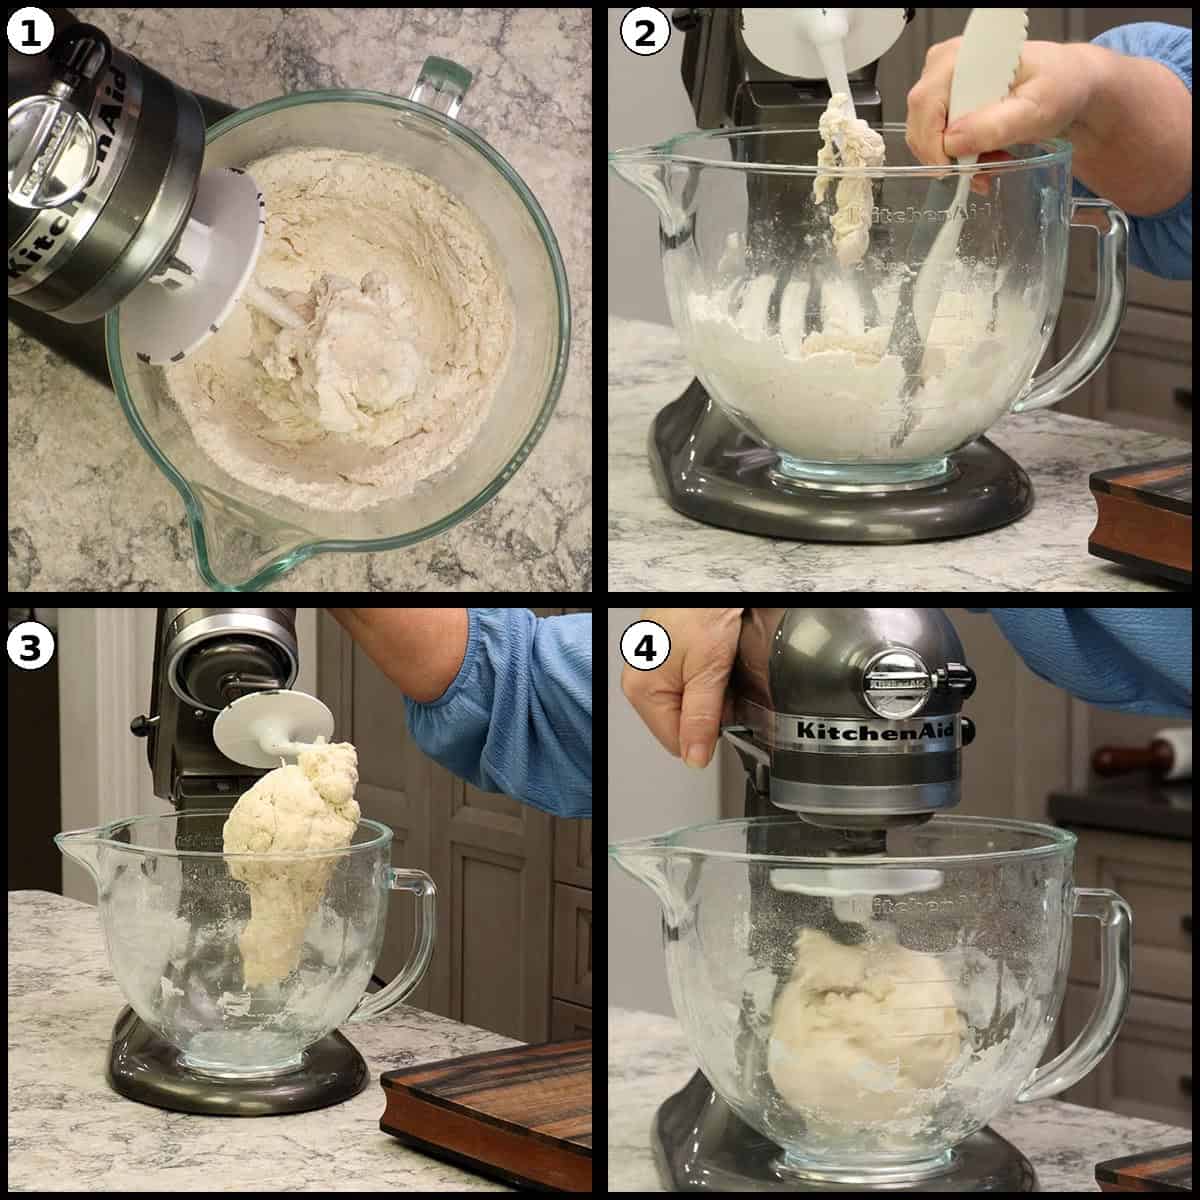
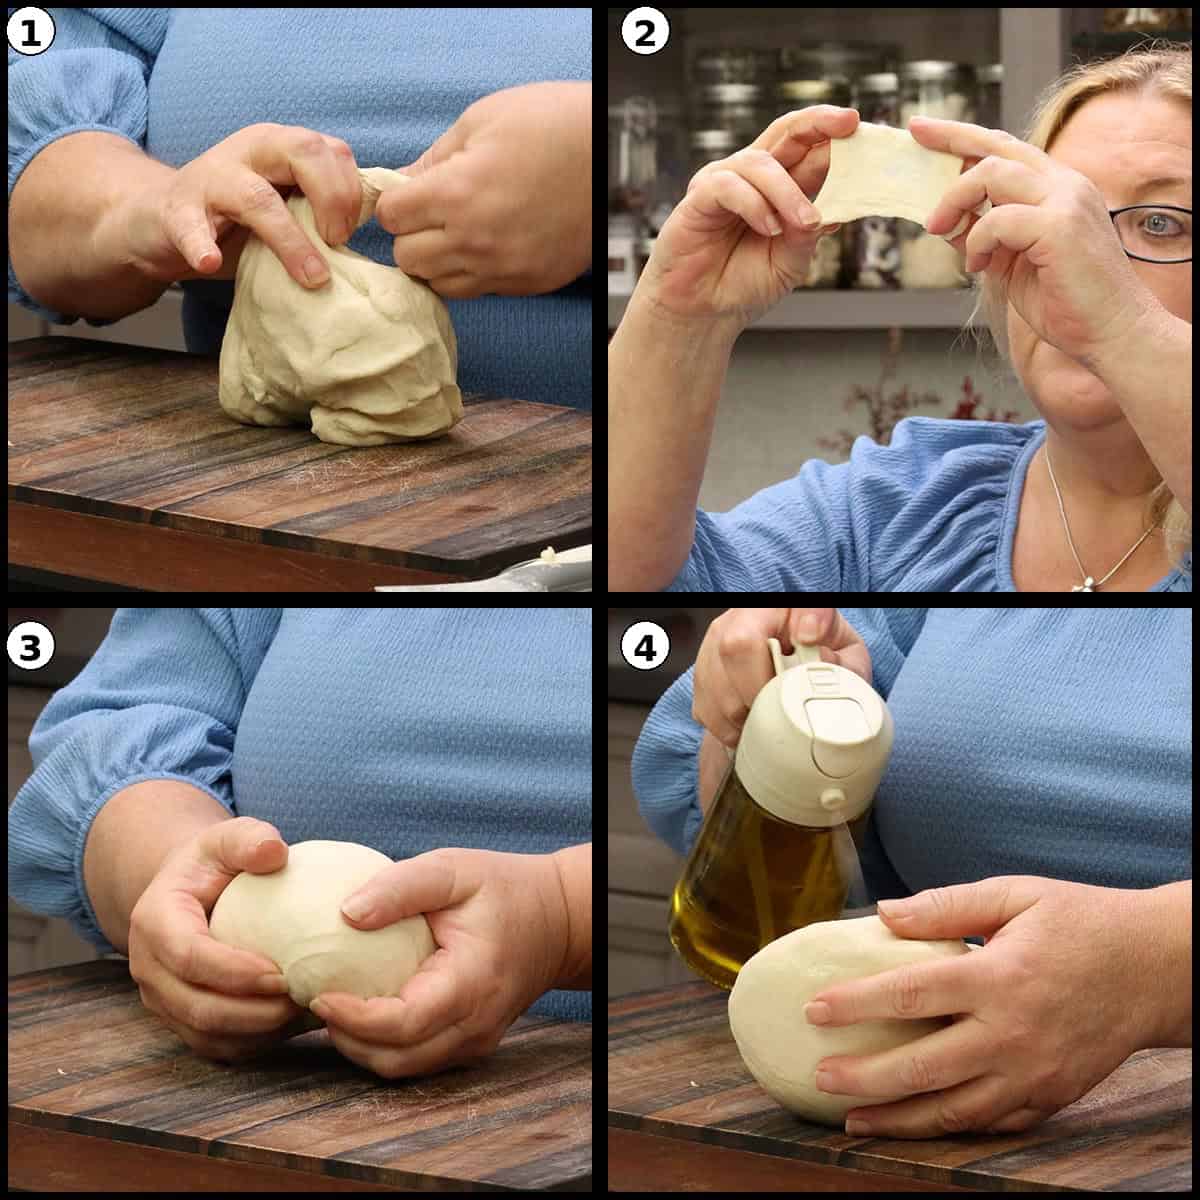
When the dough is properly kneaded, it will feel smooth, slightly stretchy, and no longer tacky. You can confirm this with the windowpane test: pinch off a small piece of dough and gently stretch it between your fingers. If you can see light coming through without it ripping apart, your gluten structure is well developed and you're ready for the next step.
Quick Tip: Don't use an electric mixer on high speed
Always knead on low speed. Over-mixing or using high speed can overdevelop the gluten, resulting in a tough, rubbery texture. Low and slow is the best way to build proper gluten structure for perfect bread.
Step Two: First Proof in the Possible Cooker Pro
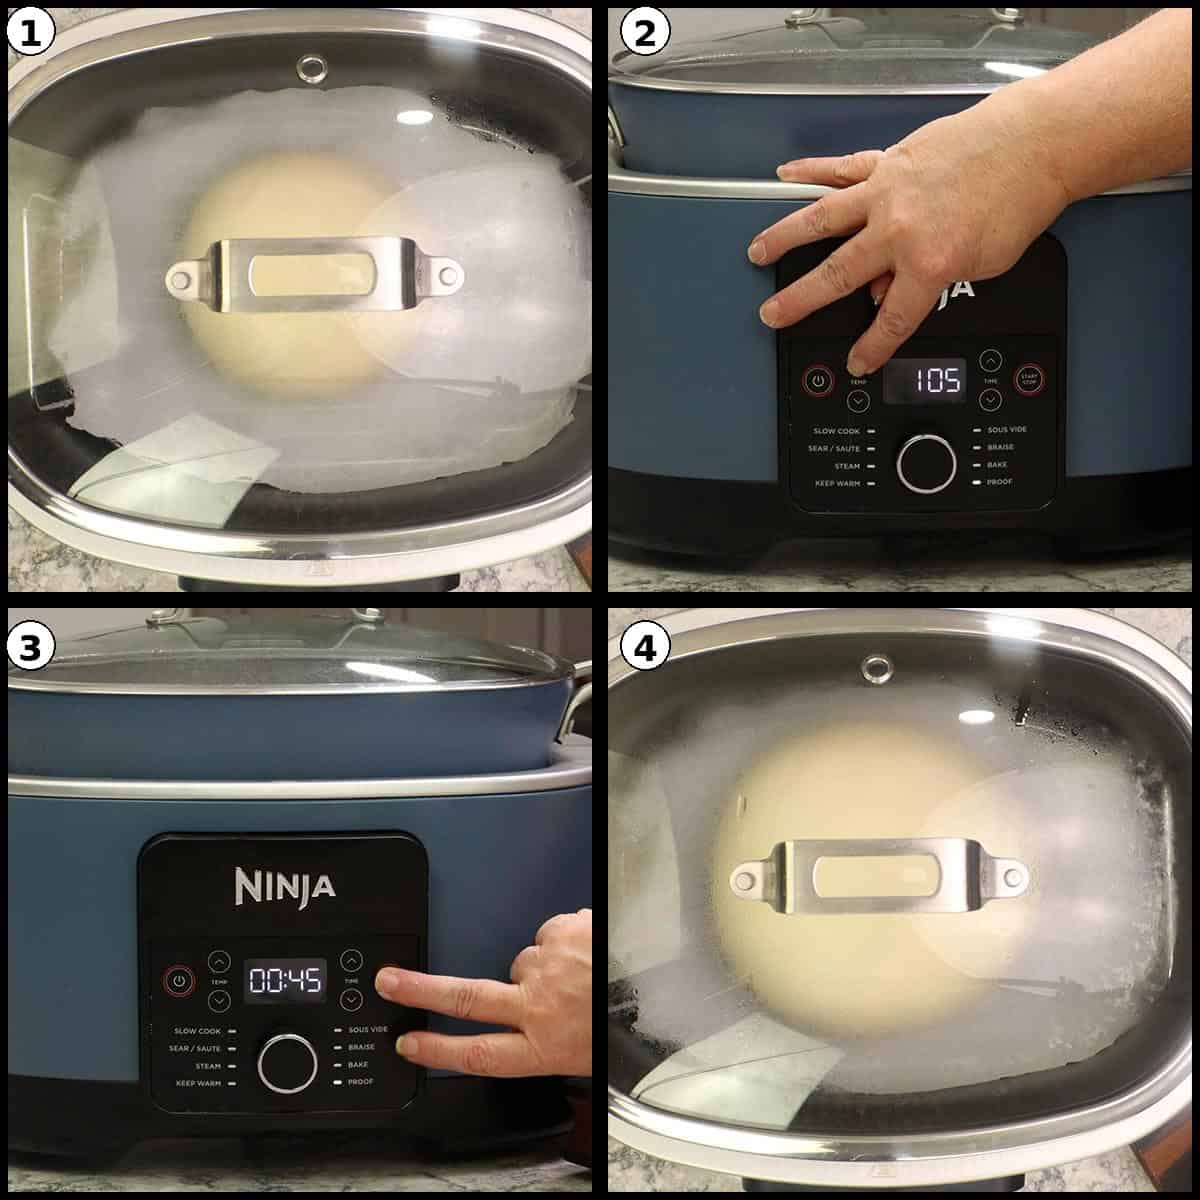
Form the dough into a ball of dough and give it a light spritz of olive oil. Place it directly in the bottom of the Possible Cooker Pro pot. Put the lid on and select the Proof function. Set the temperature to 90-95℉/30-35℃ and the time to one hour. The default is 45 minutes, which is a great time to check, but you're looking for the dough to double in size. If it hasn't doubled at 45 minutes, let it go the full hour.
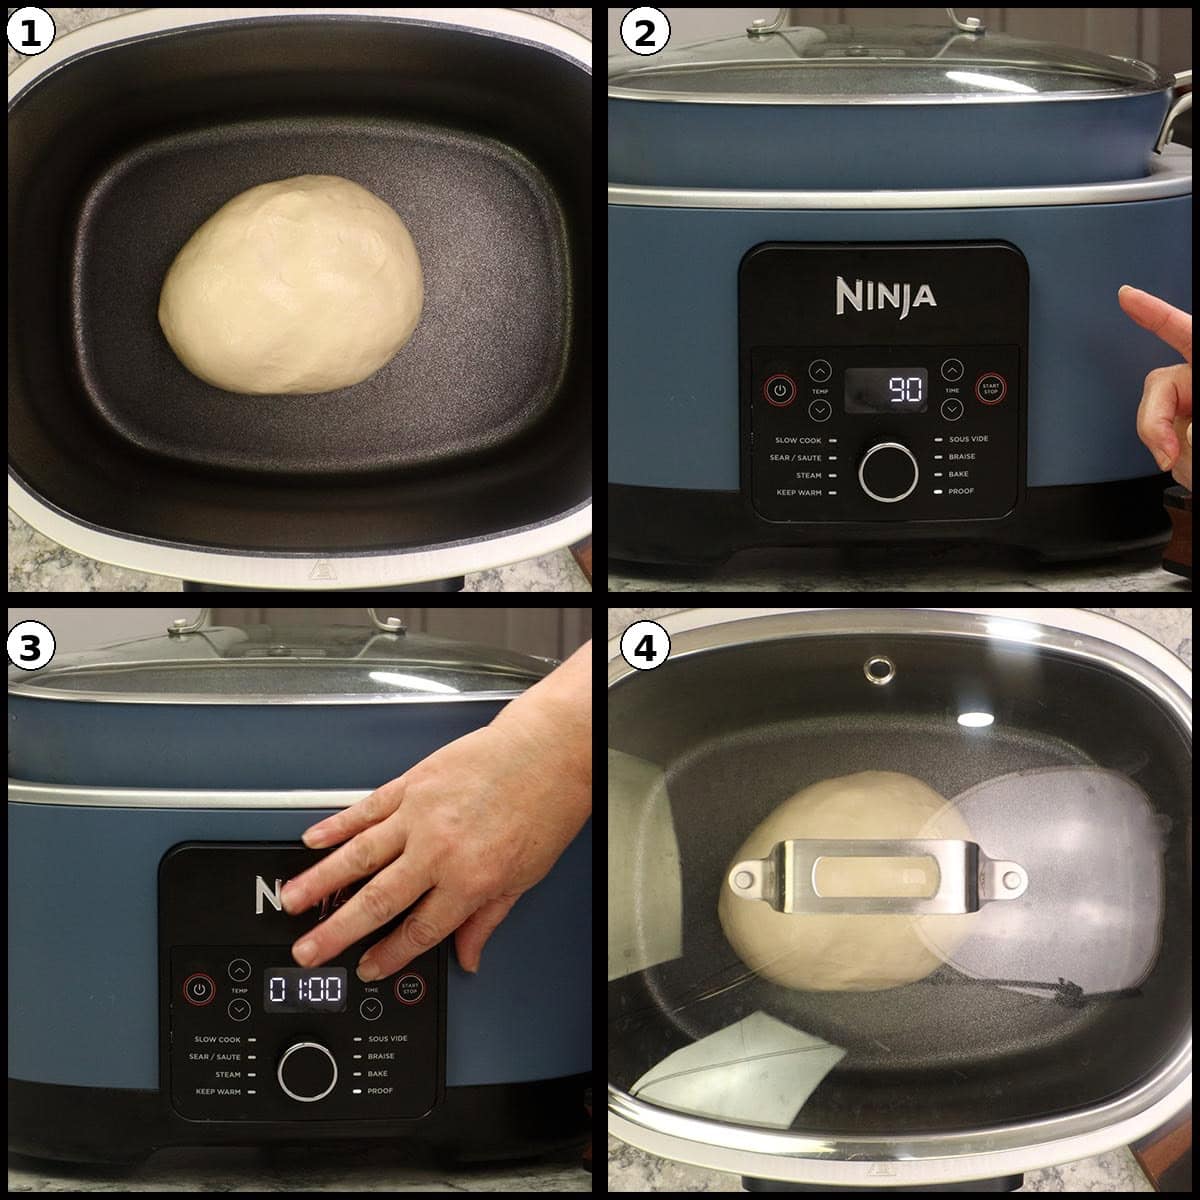
Quick Tip: Why Proof in the Possible Cooker Pro?
The Proof function maintains a consistent, warm temperature that's ideal for yeast activity. This takes all the guesswork out of finding a warm spot in your kitchen and gives you reliable, even proofing every time.
Step Three: Shape the Dough
Once the dough has doubled, gently pull it out of the pot and place it on a clean, unfloured surface. That's right, do not flour the surface. The slight tackiness between the dough and the work surface is what helps you create tension on the top of the loaf, which is key to getting a nicely shaped, smooth ball of dough.
Gently bring the edges of the dough into the center to deflate it slightly, then turn it over. Using the bottom edges of your hands, push the dough underneath itself while rotating it. Keep repeating this motion, push under, rotate, push under, rotate and you'll see the top of the dough get smoother and tighter with each turn. Continue until you have a nice, round ball of dough with a smooth, taut surface. Tuck the bottom seam in neatly and give the top a light spritz of olive oil to prevent drying.
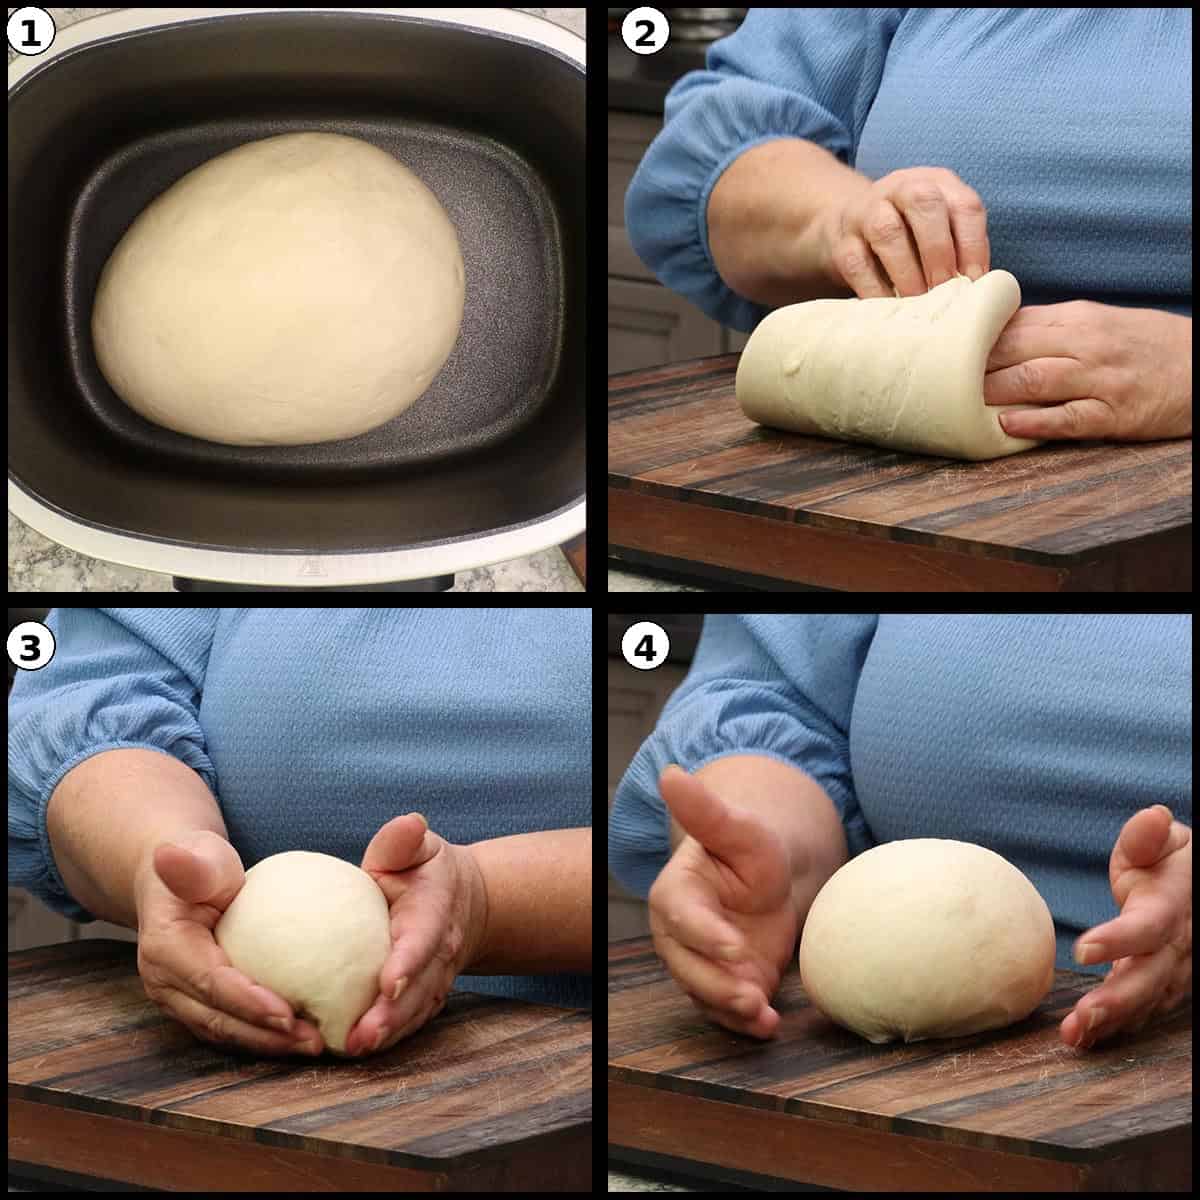
Quick Tip: Don't Flour Your Work Surface
A lot of recipes say to lightly flour your surface, but for shaping, you actually want a little bit of grip. The slight stickiness between the dough and the counter is what creates the surface tension that gives you a beautifully smooth, round loaf with a perfect crust.
Here is a quick video on how I shape my dough for a round loaf.
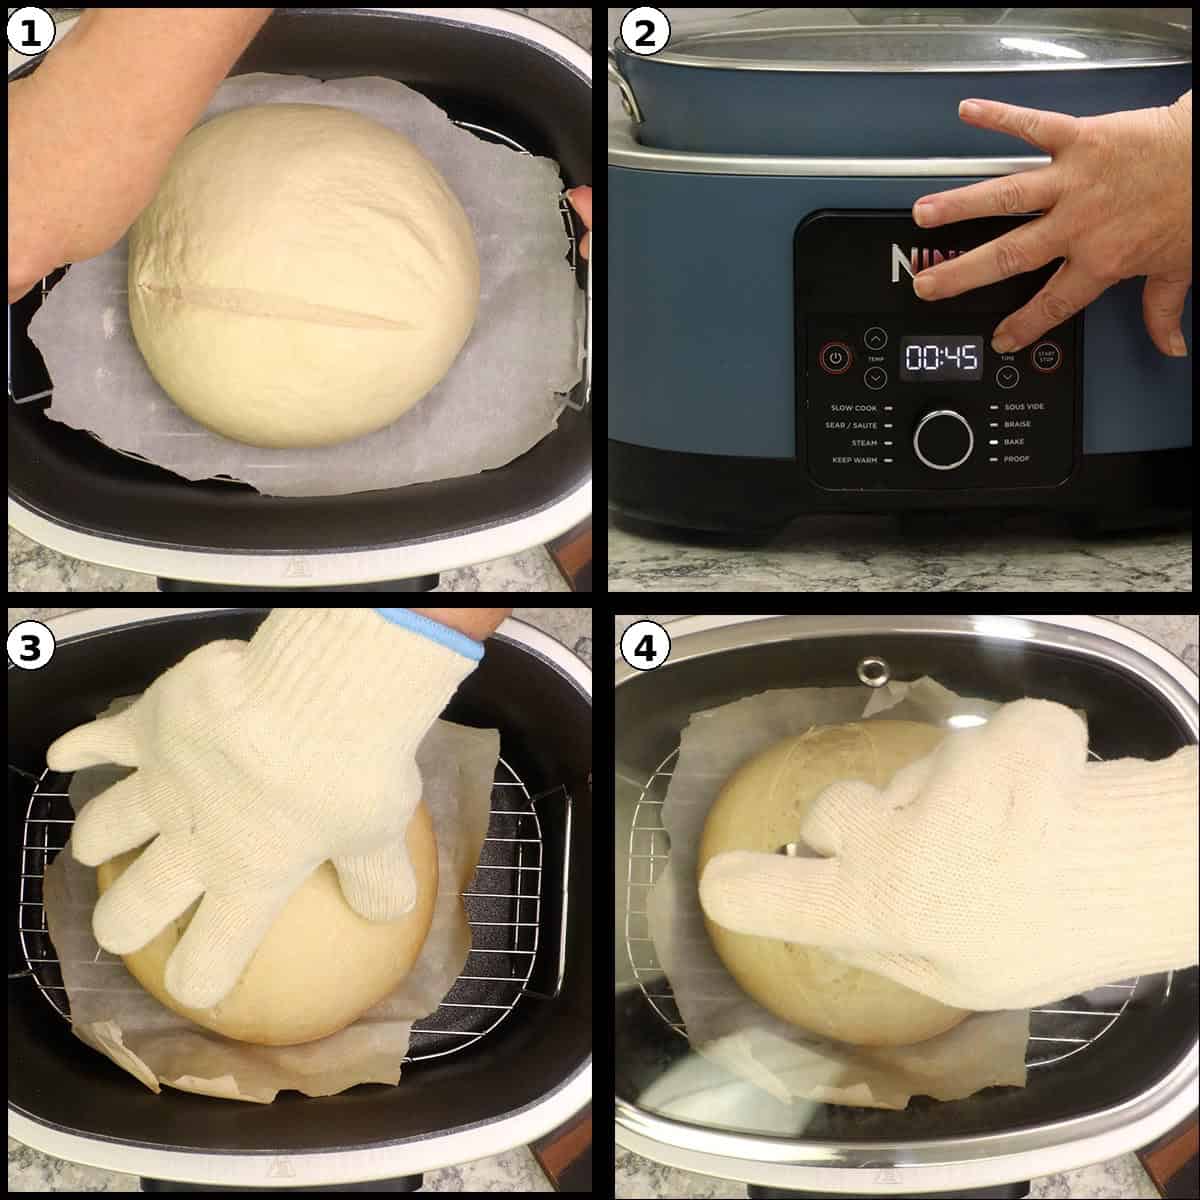
Step Four: Second Proof on the Rack
Now it's time to set up for the second proof. This is where the rack and parchment paper come in. Lightly wipe out the inside of the pot to remove any oil residue from the first proof. Place the rack in the bottom of the pot and center a piece of parchment paper on top, using the rack handles to secure the edges. Trim any excess parchment so it doesn't get in the way, but make sure the surface is fully covered. The parchment prevents the dough from sinking through the rack grooves as it warms and relaxes.
Dust a small amount of flour on the parchment paper to keep it from getting damp during the proof, then place your shaped ball of dough right in the center.
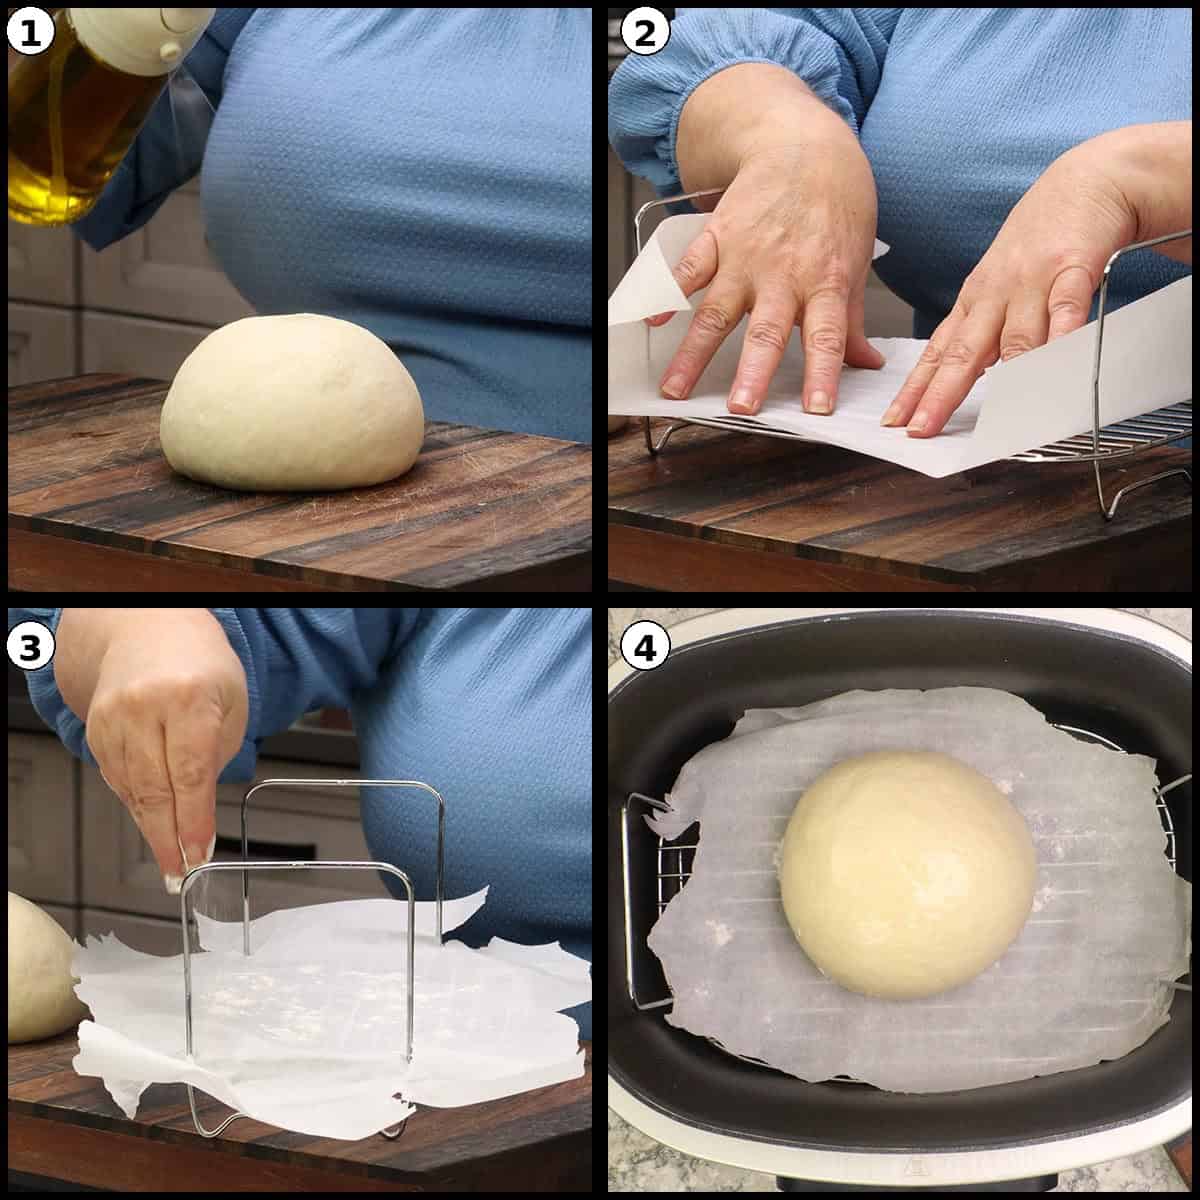
Put the lid on and select the Proof function again, but this time increase the temperature to 105℉/41℃. The second proof is done on the rack at a slightly higher temperature because the dough is elevated and not making direct contact with the heated pot. This proof usually takes about 30 minutes. You don't need it to double this time, just look for noticeable growth in the ball of dough.
Quick Tip: Spray the oil BEFORE placing in the pot
Don't spray olive oil on the dough while it's sitting in the pot. Since you'll go straight from proofing into baking, any oil that drips into the bottom of the pan will bake on during the bake function and can be difficult to clean off. Spray the dough before placing it on the rack.
Step Five: Preheat and Score
When the second proof is complete, carefully remove the dough (still on the rack and parchment) from the pot and set it aside. Put the lid back on the Possible Cooker Pro and switch to the Bake function. Set the temperature to 425℉/218℃ and preheat for 15 minutes. Your dough can sit out during this time, that's perfectly fine.
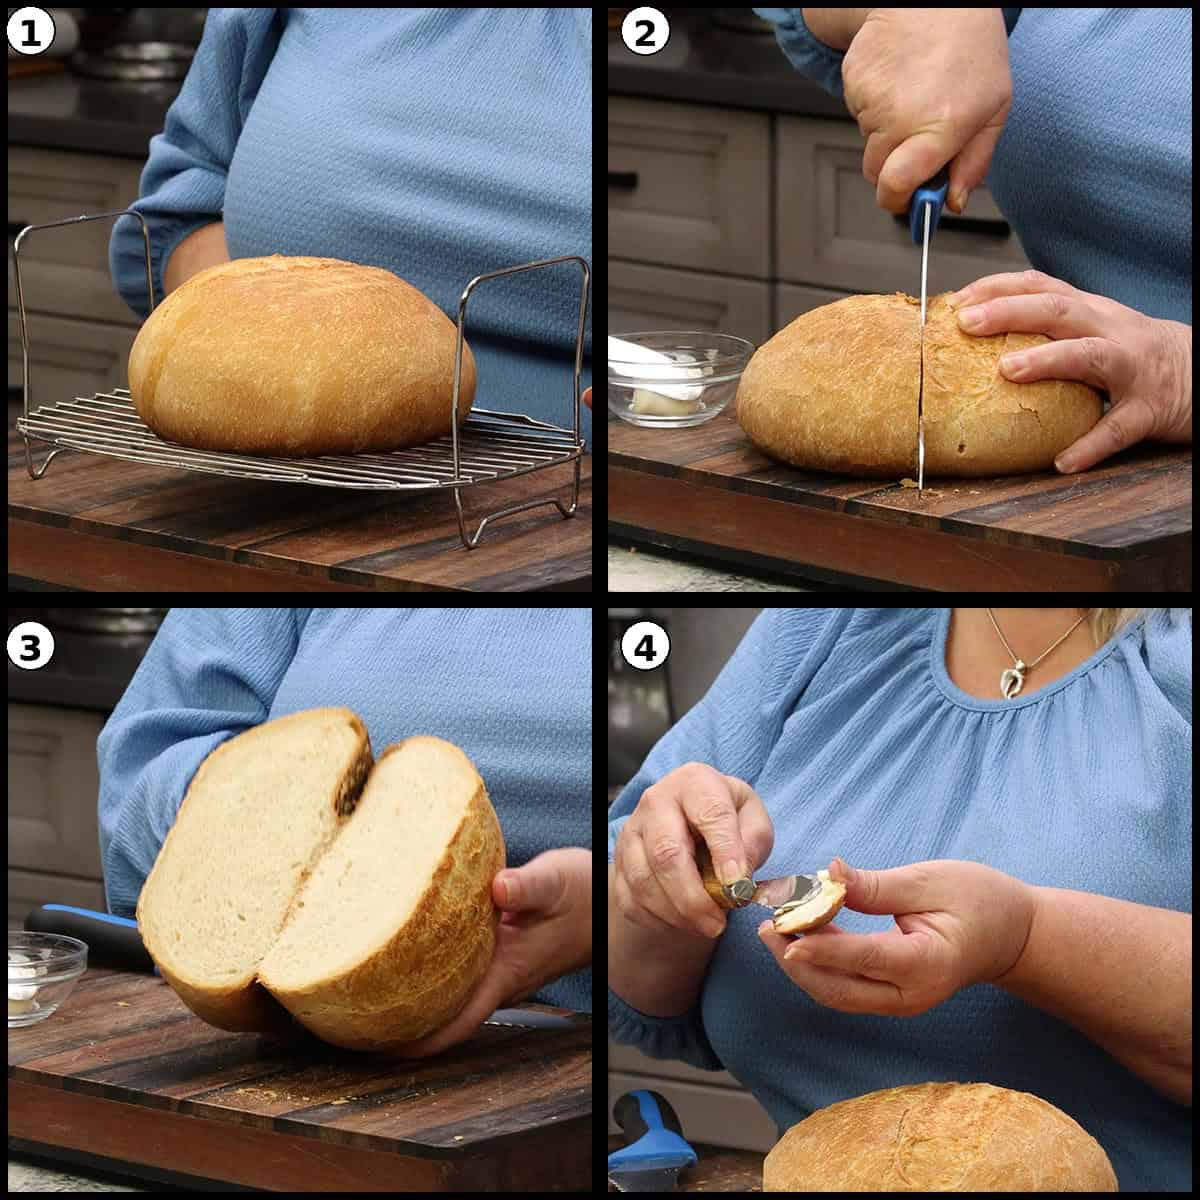
Just before the preheat finishes, it's time to score. Using a bread lame, sharp knife, or scissors, make a single slash down the center of the dough about half an inch deep. Don't be hesitant, just go for it. Scoring gives the bread a controlled place to expand during baking, which helps it rise up instead of spreading out. If you forget to score, which I do all the time, your bread will turn out just fine, but you may notice some uneven or even some blow outs where the steam inside the bread found its own way of escaping through the top or sides.

Quick Tip: Skip the Water
Unlike baking in a traditional oven or a dutch oven where you might add water for steam, skip the water in the Possible Cooker Pro. The enclosed environment with the lid on already creates enough steam. Adding water actually produces too much steam and prevents the bread from getting a proper "oven spring" before the outer crust sets.
Step Six: Bake with the Lid On
Once the Possible Cooker Pro has preheated, carefully lower the rack with the scored dough back into the pot. Use pot holders, it's hot in there! Put the lid on and bake at 425℉/218℃ for 45 minutes.
During this time, the bread will start browning from the bottom up. If you happen to check on it around the 30-minute mark and notice one side is browning faster than the other, you can briefly remove the lid and rotate the rack for more even browning. But don't worry if you skip this step, it's not required, just a nice touch if you're around.
Step Seven: Flip, Remove Lid, and Finish Baking
After the first 45 minutes, it's time for the final stage. Using oven mitts or gloves, carefully flip the bread over on the rack. You can remove the parchment paper at this point if you like. Give the bottom of the bread a knock, it should sound hollow, which means you've got a great rise and the interior structure is well set.
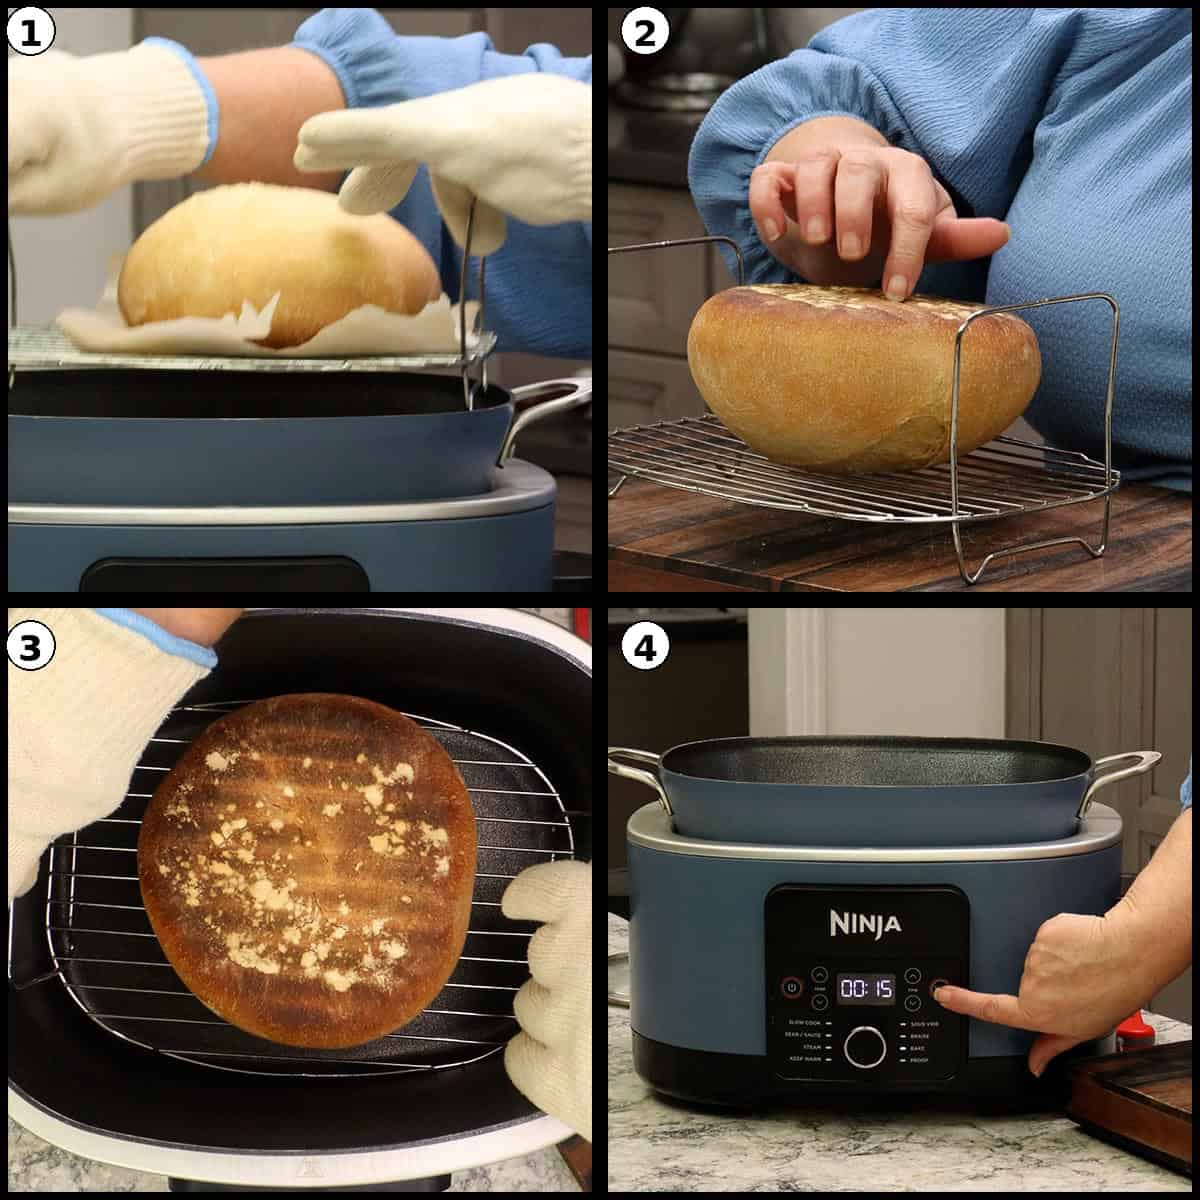
Place the flipped bread back into the Possible Cooker Pro, but this time leave the lid off. Set the bake function to 425℉/220℃ for 15 minutes. This final uncovered bake is what browns the top beautifully and gives you that perfect crust. Leaving the lid on for the entire bake works too, but as the bread cools it tends to shrink and get a slightly crinkled top. Taking the lid off for the last 15 minutes solves that and gives you a smooth, gorgeous finish. The total bake time is one hour.
Quick Tip: Why Preheat the Possible Cooker Pro?
Preheating before baking makes a real difference in the bottom crust. Without preheating, the bottom tends to get too thick and hard. With preheating, you get a much better bottom crust — nicely dark but not overly thick or crusty. It's the best way to get a balanced crust all around.
Step Eight: Cool Completely Before Slicing
When the bake is complete, remove the bread from the Possible Cooker Pro and set it on a cooling rack. Now here's the hardest part of this entire recipe — you have to let it cool completely before cutting. We're talking several hours. I know it's tempting, but if you cut into it while it's still warm, the inside will be gummy. The carryover cooking that happens during the cooling process is what finishes setting the crumb and gives you that perfect bread texture.
If you prefer a softer crust rather than a crunchier one, brush the top with butter right after it comes out of the pot and wrap it loosely in a tea towel while it cools. Personally, I love the crust a little crunchy, so I just let it cool as-is.
Variations
Bread Flour: Swap out the all-purpose flour for bread flour for a chewier, more structured crumb. You may need to add a little extra water since bread flour absorbs more liquid.
Softer Crust: For a softer crust on your fresh bread, brush the loaf with melted butter immediately after baking and wrap it in a clean tea towel while it cools.
Herbed Bread: Add dried herbs like rosemary, thyme, or Italian seasoning to the dry ingredients for a flavorful twist on this crusty bread.
Seeded Bread: Before baking, brush the top of the scored dough with a little water and sprinkle with sesame seeds, poppy seeds, or everything bagel seasoning for added texture and flavor.
Add a Touch of Sweetness: While this is a lean dough, you can add a teaspoon or two of sugar to the dry ingredients to lightly enhance the flavor and promote a slightly more golden crust.
Storage Instructions
How to Store Leftover Possible Cooker Bread
Homemade bread without preservatives won't last as long as store-bought, but stored properly it stays delicious for several days.
Room Temperature
Store in a bread bag, bread box, or wrapped in a clean tea towel at room temperature for up to 3 days. Avoid storing in a sealed plastic bag for the first day, as the trapped moisture can soften the crusty bread crust. After the first day, a zip-top bag works fine.
Freezer
This bread freezes beautifully for up to 3 months. Make sure the bread is completely cooled before freezing. Slice it first for easy individual servings, then wrap tightly in plastic wrap followed by a layer of aluminum foil or place in a freezer-safe zip-top bag. Remove as much air as possible before sealing. A vacuum sealer is ideal for this.
Quick Tip
Slice your bread before freezing so you can pull out individual slices as needed. No thawing the whole loaf for one piece of toast!
Ninja Possible Cooker Pro Bread
Ingredients
- 3 cups all-purpose flour, fluffed and measured Do not exceed 3 cups. Bread flour may be substituted but may require slightly more water.
- 1½ teaspoons instant yeast If using active dry yeast, dissolve in a portion of the warm water and let bloom for 5-10 minutes before adding.
- 1½ teaspoons kosher salt or fine grain sea salt Reduce slightly if using table salt due to smaller grain size.
- 1 cup warm water (approximately 110℉/43℃) Water must be below 120℉/49℃. You may need a little more or less depending on humidity.
- olive oil spray or light coating of olive oil For coating the dough before proofing. Any neutral oil or cooking spray works.
- parchment paper Used to line the rack for the second proof and baking. Foil can be used but may change the bottom crust.
- flour for dusting parchment A small amount to keep the parchment from getting damp during the second proof.
Would you like to save this recipe?
Instructions
- Add the flour, salt, and instant yeast to a large mixing bowl or the bowl of a stand mixer fitted with a dough hook. Stir to combine. Pour in approximately 1 cup of warm water (110℉/43℃) and mix on low speed for about 1 minute until a shaggy dough forms. Scrape down the sides and let the dough rest for 10 minutes to allow the flour to hydrate.3 cups all-purpose flour, fluffed and measured, 1½ teaspoons instant yeast, 1 cup warm water (approximately 110℉/43℃), 1½ teaspoons kosher salt or fine grain sea salt
- After the 10-minute rest, mix on low speed again. The dough ball will start to form and pull in the remaining flour from the edges. Once all the flour is incorporated, continue kneading on low speed for 10-15 minutes. If kneading by hand, work the dough on a clean surface for 10 minutes.
- The dough should feel smooth, slightly stretchy, and no longer tacky. To check, perform the windowpane test: pinch off a small piece of dough and gently stretch it. If you can see light coming through without it tearing, the gluten is properly developed.
- Form the dough into a ball and lightly coat with olive oil. Place the dough directly in the bottom of the Ninja Possible Cooker Pro pot. Put the lid on and select the Proof function. Set the temperature to 90-95℉/32-35℃ and the time to 1 hour. Check at 45 minutes. The dough should double in size. If it hasn't doubled, let it continue for the full hour.olive oil spray or light coating of olive oil
- Once doubled, gently remove the dough and place it on a clean, unfloured surface. Bring the edges into the center to lightly deflate, then flip it over. Using the bottom edges of your hands, push underneath and rotate the dough repeatedly to create tension on the surface. Continue shaping until you have a smooth, round ball of dough with a taut top. Tuck the bottom seam in neatly. Spritz the top lightly with olive oil.olive oil spray or light coating of olive oil
- Lightly wipe out the pot. Place the rack in the bottom of the pot and center a piece of parchment paper on top, securing the edges with the rack handles. Trim excess parchment. Dust a small amount of flour on the parchment, then place the shaped dough ball in the center.
- Put the lid on and select the Proof function again. Set the temperature to 105℉/41℃. The second proof takes approximately 30 minutes. The dough does not need to double this time, just show noticeable growth.
- Remove the dough (on the rack) from the pot and set aside. Put the lid back on the pot and select the Bake function. Set the temperature to 425℉/218℃ and preheat for 15 minutes. While preheating, score the dough down the center about ½ inch deep using a bread lame, sharp knife, or scissors.
- Once preheated, carefully lower the rack with the scored dough into the pot. Put the lid on and bake at 425℉/218℃ for 45 minutes. If you notice uneven browning around the 30-minute mark, briefly remove the lid and rotate the rack.
- After 45 minutes, carefully flip the bread on the rack using oven mitts. Remove the parchment paper. Place the bread back in the pot with the lid OFF. Bake at 425℉/218℃ for an additional 15 minutes to brown the top. The total bake time is 1 hour.
- Remove the bread from the pot and place on a cooling rack. Let it cool completely before slicing, which can take several hours. For a softer crust, brush with butter immediately after removing from the pot and wrap loosely in a tea towel while cooling.
Notes
• Do not exceed 3 cups of flour. More flour will cause the dough to expand too close to the sides of the pot and burn during baking.• If using active dry yeast instead of instant, dissolve it in the warm water and let it bloom for 5-10 minutes until frothy before adding to flour. KNEADING TIPS
• After the initial 1-minute mix, let the dough rest for 10 minutes before kneading. This hydration rest makes kneading much easier.
• Use the windowpane test to confirm proper gluten development. Properly kneaded dough will stretch thin enough to see light through without tearing. PROOFING TIPS
• Spray olive oil on the dough BEFORE placing it in the pot, not while it's inside. Oil that drips into the pot will bake on during the bake cycle. BAKING TIPS
• Preheat the Possible Cooker Pro on the Bake function at 425℉/218℃ for 15 minutes before adding the dough. This produces a better bottom crust.
• Do NOT add water to the pot for steam. The enclosed pot with the lid on creates enough moisture. Extra water prevents proper rise.
• If one side is browning faster than the other, briefly rotate the rack at the 30-minute mark. STORAGE
• Room Temperature: Store in a bread bag, bread box, or wrapped in a tea towel for up to 3 days. Avoid sealed plastic bags on the first day to preserve the crust.
• Freezer: Slice first, then wrap tightly in plastic wrap followed by foil or a freezer-safe bag. Remove as much air as possible. Freezes well for up to 3 months. Toast straight from frozen. NUTRITIONAL DISCLAIMER
Nutritional information provided is an estimate based on typical ingredient values and standard portion sizes. Actual nutritional content may vary significantly depending on specific brands used, ingredient substitutions, preparation methods, portion sizes, and individual cooking techniques. For precise nutritional information tailored to your specific ingredients and preparation, please consult with a registered dietitian or use laboratory analysis. This information should not be used for medical nutrition therapy or to manage medical conditions without professional guidance.
Nutrition
Frequently Asked Questions
I tested this recipe with up to four cups of flour and scaled back to three and a quarter cups, and neither worked as well. The dough expands during proofing and baking, and with more than three cups it gets too close to the sides of the Possible Cooker Pro, causing the edges to burn. Three cups is the sweet spot for the best results.
No, skip the water. Unlike a traditional oven or a dutch oven where adding water or steam can be beneficial, the enclosed Possible Cooker Pro with the lid on already creates plenty of moisture. Adding water actually produces too much steam and prevents the bread from getting a proper rise before the outer crust sets.
Absolutely! A stand mixer is convenient but not required. Knead the dough by hand on a clean surface for about 10 minutes until it passes the windowpane test and is smooth, stretchy, and not tacky. A large mixing bowl works great for the initial mixing stage.
When bread comes out of the oven (or the Possible Cooker Pro), it's still cooking on the inside through carryover heat. Cutting into it while it's warm releases all that steam and moisture, leaving you with a gummy, underdone interior. Letting it cool completely — which can take several hours — allows the crumb to fully set for the perfect bread texture.
Yes! If using active dry yeast, dissolve it in a portion of the warm water and let it bloom for 5 to 10 minutes until it gets nice and frothy before adding it to the flour and salt. Everything else stays the same.
Flipping the bread and removing the lid for the final 15 minutes serves two purposes. First, it prevents the bottom from getting too dark since it's been closest to the heat source the entire bake. Second, removing the lid allows the top to brown up nicely and prevents the crinkling that can happen when bread cools after being baked entirely with the lid on.
You need a rack, but it doesn't have to be anything special. The rack that comes with the Ninja Possible Cooker Pro works great, and aftermarket racks fit and work just as well. The key is using parchment paper on top of the rack to prevent the dough from sinking through the grooves during proofing and baking.
What to Serve with Possible Cooker Bread
This crusty bread is incredibly versatile and pairs with just about everything. Serve it lightly toasted with butter for breakfast or a simple snack. It's perfect alongside a hearty soup, stew, or chili. Use it for dipping in olive oil and balsamic vinegar, or slice it thick for bruschetta. This bread also makes amazing sandwiches and is wonderful served alongside a pasta dinner for soaking up all those delicious sauces.


About the Recipe Author, Louise Long
Louise is a full-time recipe creator and food blogger @ The Salted Pepper. She has over 30 years of experience with cooking and recipe development. She owned a restaurant for several years and was a full-time RN until retiring to blog full-time.

She published her first cookbook in the Fall of 2018 and is very interested in writing several more.
Louise is also the creator of an online Ninja Foodi Pressure Cooking Course with over 100 instructional step-by-step videos. People absolutely rave about the course and all the value they have received from it.
Louise has several very active Facebook groups that help people with the basics of cooking and learning more about the appliances they love.
Ninja Foodi Pressure Cooker & Air Crisper 101
Ninja Woodfire Outdoor Grill & Smoker
Louise is also a YouTube creator and you can find most of her recipes in video format on The Salted Pepper YouTube channel.
She is very responsive to messages and eager to help in any way she can. Get more Information about Louise & contact information
I WOULD LOVE TO SEE WHAT YOU ARE COOKING UP IN YOUR KITCHEN! TAG ME @THESALTEDPEPPER ON YOUR FAVORITE SOCIAL MEDIA PLATFORM WHEN YOU MAKE A DISH!
BE SURE TO FOLLOW THE SALTED PEPPER RIGHT HERE ⇓⇓⇓⇓⇓
Faith says
Can this be made in the Ninja Foodi pressure cooker/air fryer using the same directions?
Louise says
Yes, but not with the same cooking directions. I would need more information about which model you have to help with cooking instructions. Feel free to email me at louise@thesaltedpepper.com