

- Ninja Foodi Pressure Cooker & Air Crisper
- Immersion blender
There is a certain flavor of really good refried beans, but I was never able to put my finger on it or find a recipe that delivered fantastic flavor in an easy-to-make way until I lucked into this recipe!
Would you like to save this recipe?
So, just like with so many other recipes I make, I threw things into a pot and crossed my fingers. Jeff and I were testing a new recipe for Chicken Enchiladas and I wanted rice and beans with it. You know, like you get at a Mexican restaurant.
This post may contain affiliate links. If you make a purchase after clicking a link, I may earn a small commission. As an Amazon Associate, I earn from qualifying purchases.
I'm still working on the rice, but these Homemade Refried Beans were PERFECT! Seriously, perfect! They tasted like beans, but had incredible flavor. YAY!
They are so easy to make in your electric pressure cooker, so that is a double YAY!
So, I quickly finished up the triple testing and I'm excited to share the recipe with you. You won't believe how easy it is!
What Beans do I use for Refried Beans?
Traditionally, refried beans are made with pinto beans, but there are a number of different beans that can be used.
In fact, the first time I tried the recipe, I didn't have any pinto beans and I used Navy beans, I think. You can also use black beans if you prefer.
You can really use any type of beans you have on hand. Just make sure to adjust the timing for the type of bean you are using.
For most dried beans, 30 minutes is a good starting point. There are a few types of beans that will take longer, like small red beans. I would PC small red beans for 45-60 minutes.
You can even use drained canned beans if that is what you have on hand. Since the beans in a can are already cooked, decrease your pressure cooker time to 15 minutes with an immediate release of pressure. This will allow the flavors to come together. You also need to decrease the liquid amount since the beans are already cooked and will not absorb the liquid.
Although I have not tested the recipe with canned beans, I think ½ cup of liquid in the 5 or 6.5qt or ¾ cup of liquid in the 8 qt will be enough to bring the pot to pressure. If you have to much liquid after the PC time, you can either drain the excess (will result in some flavor loss) or just use the sear/sauté on medium until it reduces.
Safety Tips When Pressure Cooking Beans
There are some things that you should know BEFORE you pressure cook beans in order to prevent any problems.
Never fill your pressure cooker more than halfway full of dry Beans AND Liquid
Beans expand A LOT when cooked and you never want the bean/liquid to go past the max fill line. I am a lot more conservative than that when making beans and I don't fill my pot more than ¼ of the way full.
Beans also tend to create foam as they cook and if a pot is too full and the foam gets caught in the underside of the valve (that metal cap) it can impeded the pressure release.
Never Immediately Release the Pressure when Cooking Dry Beans
There are a few reasons why you shouldn't immediately release the pressure, but the most important reason is to prevent any foam from impeding the pressure release valve.
The other reason is because when the pressure is released immediately, your beans can break apart. While that isn't a big deal in this recipe, it might be in some others.
Follow Tested Recipes
If you are brand new to pressure cooking or new to pressure cooking beans, follow a recipe from a reputable food blogger who tests their recipes.
That way you know that the ratios of water to beans is correct and the cooking times are correct.
Storage of Refried Beans
I always get asked three questions for almost every recipe: Can I double it? How long will it last? How do I reheat it? So, let me go over all of those things in this section.
Can I make a double batch of these refried beans in my pressure cooker?
Yes, you can. If you have a 6.5qt or an 8qt pressure cooker, you can safely double the batch. For any size lower than a 6qt pressure cooker, I'd stick with a single batch.
How long will the Pressure Cooker Refried Beans last?
If stored in a sealed container in the fridge, they should last 2-3 days without any issues.
You can also freeze them for longer storage. Simply allow them to cool completely and put them in freezer containers and they will last 6-12 months in the freezer.
How do I Reheat the Refried Beans?
Refried beans heat up just fine and it can be done in a couple of ways using the Ninja Foodi or Pressure Cooker.
As the refried beans sit in the fridge, they do become very thick, so no matter how you choose to reheat them, I would add a few tablespoons of broth or water to them so they become nice and creamy when reheated.
My favorite way to reheat most things is using the steam function of the Ninja Foodi. To do this, put your beans in a pan and you don't even have to add any water if you leave the pan uncovered.
Place the pan on the rack in low position with 2 cups of water in the inner pot. Steam with the valve vented for 10-20 minutes, depending on how much volume you are reheating.
You can also put the beans in a covered pan with a little bit of water and pressure cook with 1 cup of water in the inner pot. A few minutes of pressure cooking should be just fine to warm them up.
Probably the easiest way to reheat them would be to use the sear/sauté function on medium and add some water to the beans in the inner pot and stir until warmed through.
What can I make or serve with Refried Beans?
In Mexican Restaurants, refried beans are standard on most plates as a side dish, but that isn't all they are good for!
You can replace the chicken in this recipe for Chicken Enchiladas with the refried beans and make bean enchiladas.
Make a super easy bean dip by sautéing a little longer so they thicken more and add a little hot sauce and some shredded cheese. Serve with tortilla chips.
How to Make Pressure Cooker Refried Beans
You will want to rinse your beans and pick out any stones, debris, or discolored beans. You do not need to soak them. If you prefer to soak your beans and soak them for an 8 hour period, you can reduce your PC time to 15 minutes. I don't worry with soaking them.
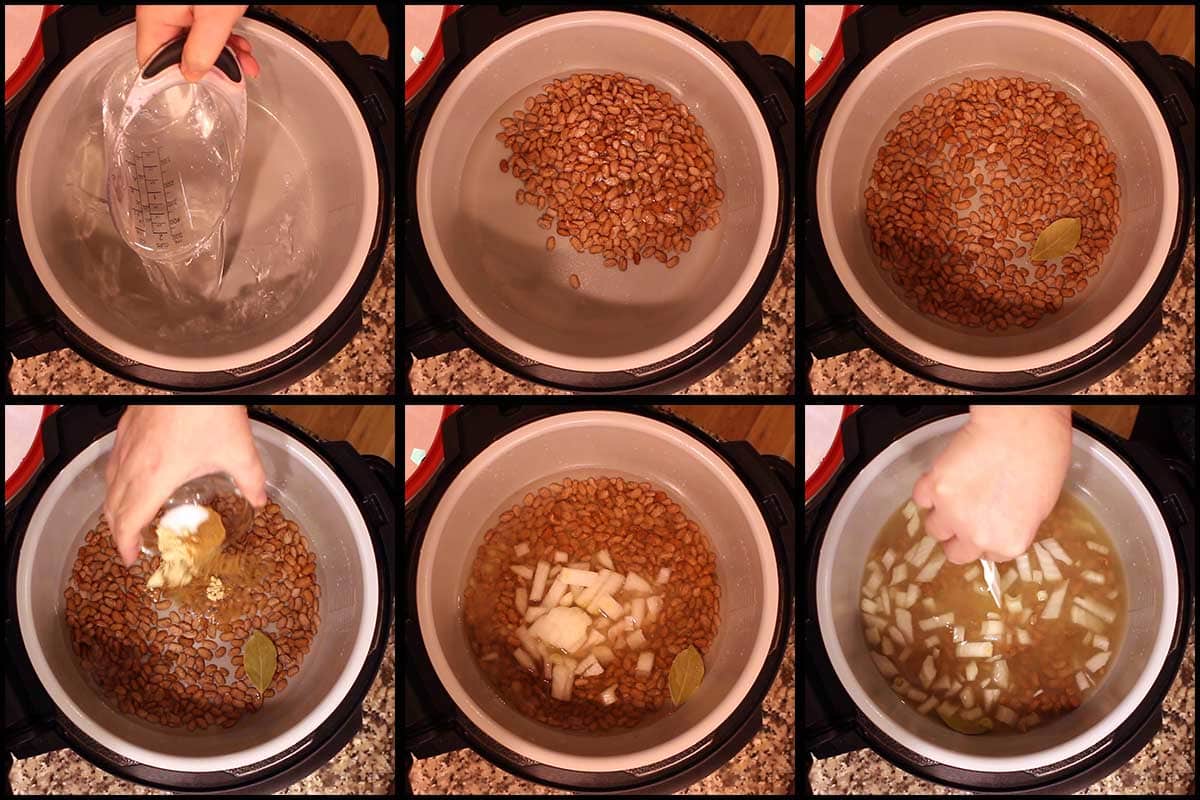
Next, dice up your onion into about ¼" dice. You do not need to be exact with this.
Add the 2 cups of water to the inner pot. You can also use broth if you like, but you may want to adjust the salt or add salt after they cook. Add the beans, bay leaf, ground mustard, ground cumin, salt, and diced onion. Stir and put the pressure lid on. Turn the valve to seal.
Select High pressure for 30 minutes. When the time is up, allow the beans to natural release for 15 minutes and then manually release the remaining pressure.
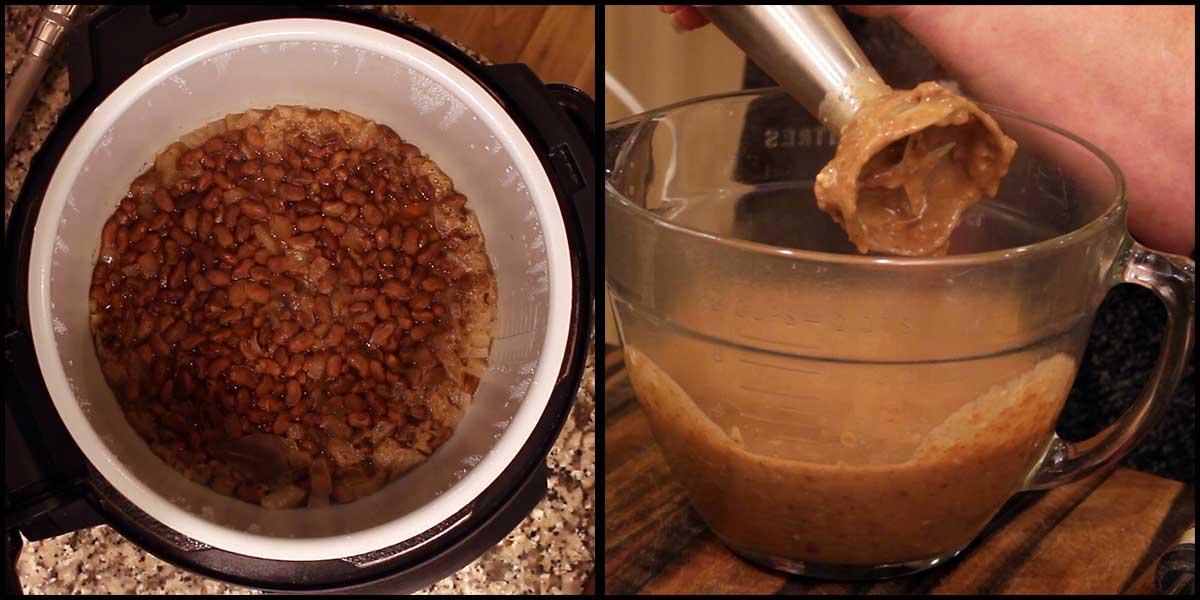
Remove the pressure cooker lid. You will see a lot liquid and beans that look a whole lot like they did when you put them in. Don't worry.
You can either mash the beans by hand using a hand masher or use an electric immersion blender or a regular blender. I like to use an immersion blender because I have full control on how much I mash the beans.
The immersion blender I use is awesome! I have had some that trap liquid and I could never get them clean and one even rusted and I had to throw it away. The one I use now comes apart and is so easy to clean. You can find it HERE➜➜➜ (affiliate link)Immersion Blender
Remove the beans and liquid from the inner pot (you don't have to wash the pot) and place them in a deep bowl if using an immersion blender. I used an 8 cup measuring bowl and it worked great.
Stick the immersion blender into the bean/liquid mixture and blend until it reaches your desired consistency. I like mine on the smooth side, but leave chunks of beans in there if that is how you prefer it.
Add 1 tablespoon of bacon grease or lard (you can use any fat/oil you like) to the inner pot of the Ninja Foodi and turn the sear/sauté on high. When the fat is heated, add the beans to the pot and continue to sauté until they thicken to your desired thickness. Keep in mind that they will thicken as they cool. Taste and season with salt if needed.
If they become too thick, just add a little water and they will thin out again.

Give them a taste and add salt as needed. Don't go overboard though because I found as they sit, they get saltier.
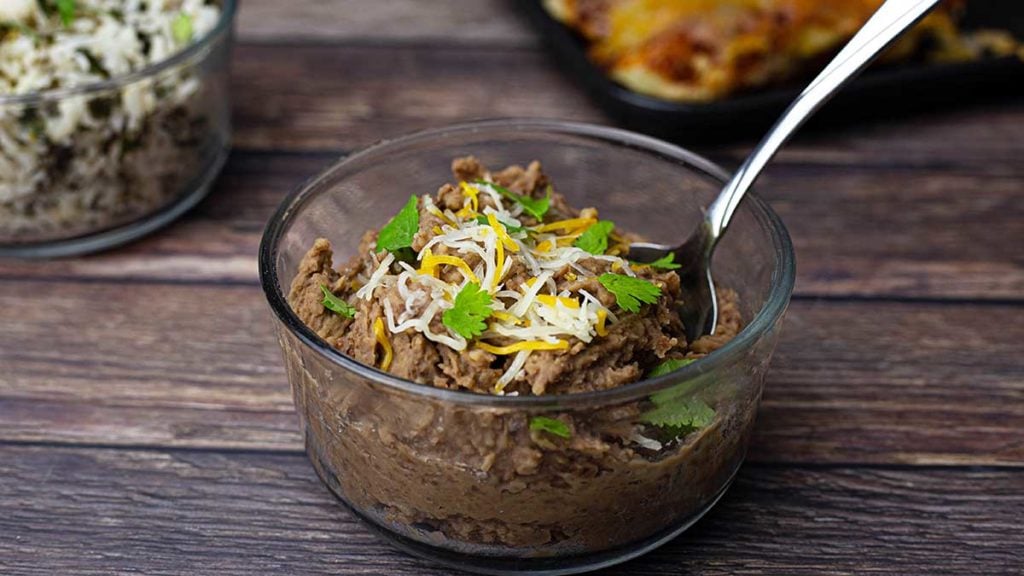
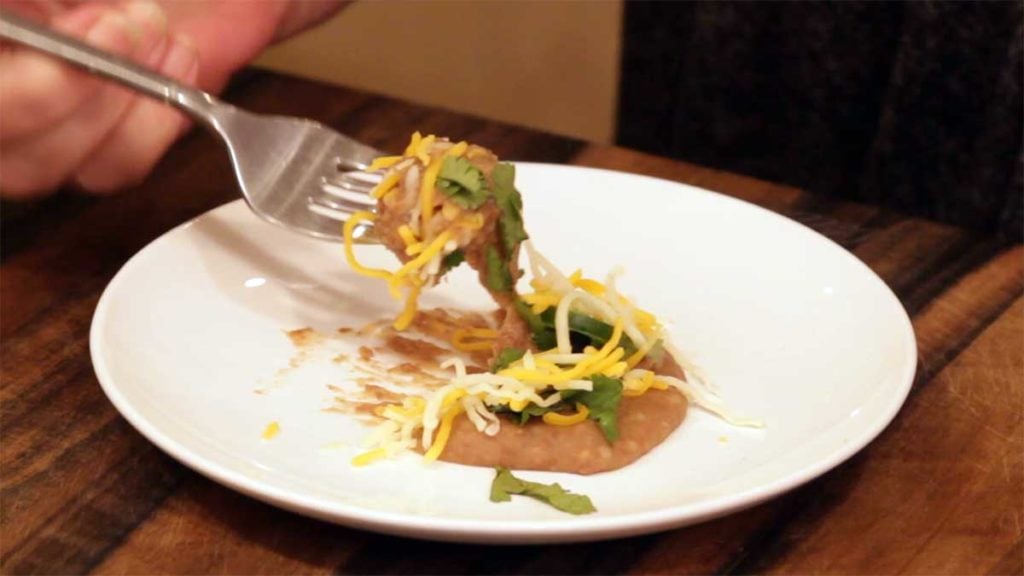
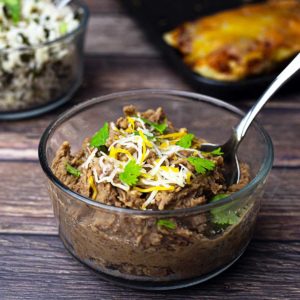
Top with your favorite toppings and serve as a side dish or use them in your favorite recipe!
Homemade Refried Beans ~ Pressure Cooker Recipe
Equipment
- Ninja Foodi Pressure Cooker & Air Crisper
- Immersion blender
Ingredients
- 2 cups water
- 1 cup pinto beans dried and rinsed
- 1 bay leaf
- 1 teaspoon cumin
- 1 teaspoon dry mustard
- ½ teaspoon sea salt
- 1 cup onion
- 1 tablespoon bacon grease or lard
Would you like to save this recipe?
Instructions
- Dice up the onion into ¼" dice. Rinse the beans and remove any stones, debris or any discolored beans.
- Add the water, beans, bay leaf, dry mustard, cumin, salt, and diced onion to the inner pot. Stir. Put the pressure lid on and turn the valve to seal. Select high pressure and set the time for 30 minutes. Allow the pot to naturally release the pressure for 15 minutes. If any pressure is left, manually release it.
- Remove the beans and liquid from the inner pot and place into a deep bowl. Use an immersion blender to blend to the consistency you like. Do not worry if they are runny, the next step will fix that.
- Turn the Ninja Foodi on high sear/sauté and add bacon fat or lard. When melted and hot, add in the bean mixture and sauté on high until it thickens to your desired consistency.
- Serve & add desired toppings!
Notes
Nutrition
About the Recipe Author, Louise Long
Louise is a full-time recipe creator and food blogger @ The Salted Pepper. She has over 30 years of experience with cooking and recipe development. She owned a restaurant for several years and was a full-time RN until retiring to blog full-time.

She published her first cookbook in the Fall of 2018 and is very interested in writing several more.
Louise is also the creator of an online Ninja Foodi Pressure Cooking Course with over 100 instructional step-by-step videos. People absolutely rave about the course and all the value they have received from it.
Louise has several very active Facebook groups that help people with the basics of cooking and learning more about the appliances they love.
Ninja Foodi Pressure Cooker & Air Crisper 101
Ninja Woodfire Outdoor Grill & Smoker
Louise is also a YouTube creator and you can find most of her recipes in video format on The Salted Pepper YouTube channel.
She is very responsive to messages and eager to help in any way she can. Get more Information about Louise & contact information
I WOULD LOVE TO SEE WHAT YOU ARE COOKING UP IN YOUR KITCHEN! TAG ME @THESALTEDPEPPER ON YOUR FAVORITE SOCIAL MEDIA PLATFORM WHEN YOU MAKE A DISH!
BE SURE TO FOLLOW THE SALTED PEPPER RIGHT HERE ⇓⇓⇓⇓⇓
Marie says
Louise I love your videos, I received a foodi for Christmas two years ago, only used it for precooked items, I have learned so much by watching your videos. Thank you so much. Marie
Louise says
Thank you so much!
Connie DeRoboam says
Love this recipe! I used canned beans, one cup f pinto and one of kidney beans. Basically doubled the recipe, using one cup of water. Absolutely delicious. I’ll never buy canned again. Making another batch tonight.
Louise says
I'm so glad you enjoyed it!
Lisa Ortiz says
Hi Louise!I gave this recipe a try today and I failed. After the pressure release my beans were still a little too hard. I did another 4 minutes on high pressure and then let it completely natural release(I didn't add anymore liquid) my beans still weren't soft enough. Flavor was wonderful just not the greatest consistency. Any suggestions?
Louise says
Unfortunately, sometimes beans are old and they stay hard no matter what you do and there is no way to really tell when you buy them if they are old or not. What type of beans did you use?
Lisa Ortiz says
I used dry pinto beans. I definitely want to try again
Amber Meyer says
These beans are great! I made the whole enchilada (pun intended) dinner accompanied by the beans and Mexican rice. Who needs to go out to dinner when you have authentic quality meals like this right here? Love it! Thanks again for your continued hard work! You are appreciated! 😀
Melissa says
Hi Louise! Can I use unsalted butter instead of lard for this recipe? Thank you!
Louise says
I'm sure that would be fine. It will add a different flavor though. I have even skipped the oil/lard/bacon grease altogether and they have been great.