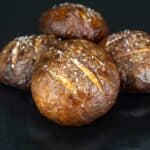
Pretzel Bun Recipe
Delicious rolls that are perfect for burgers, sandwiches, and soup!
Servings: 4
Calories: 286kcal
Ingredients
Pretzel Dough
- 2¼ teaspoons instant yeast 1 packet of rapid rise or instant yeast
- 1 Tablespoon white sugar or honey
- ¾ cup warm water about 105-115℉/40-46℃
- 2 cups all purpose flour
- ½ teaspoon fine grind sea salt or kosher salt
- oil for lightly coating dough before proofing
Baking Soda Bath
- 10-14 cups water
- ½ cup baking soda
Extras
- 1-2 Tablespoons melted butter
- pretzel salt
Instructions
Making the Dough
- In a large mixing bowl or the bowl of a stand mixer, combine the yeast, sugar and warm water. Whisk with a fork to combine.2¼ teaspoons instant yeast, 1 Tablespoon white sugar, ¾ cup warm water
- Add the flour and salt to the bowl. Hand Mixing: Use a spatula to stir the flour and salt into the wet ingredients until the flour absorbs all of the liquid. You should have a sticky and shaggy dough. Stand MIxer: Use the dough hook on low speed to combine all the ingredients until a sticky dough forms. This takes about 2 minutes or so.2 cups all purpose flour, ½ teaspoon fine grind sea salt or kosher salt
Kneading the Dough
- Hand kneading: Lightly flour a clean work surface and transfer the dough to the work surface. Dust with flour on top and begin kneading the dough by pressing the dough away from you, folding it back onto itself, turning it 90° and pressing it again. You can add flour so the dough doesn't stick to your hands or coat them in a bit of oil. You don't want to use too much flour or the dough will become too dry. Continue to knead the dough for 5-10 minutes or until it becomes smooth and slightly tacky but no longer sticks to your hands.
- Stand Mixer: Using the dough hook, turn the mixer up to medium speed and knead the dough for 3-5 minutes or until a smooth dough ball forms. It should be tacky, but not too sticky.
Proofing the Dough
- Lightly coat the dough with olive oil or another neutral oil and place in a bowl covered in plastic wrap. Let sit at room temp until it doubles in size. Usually 30-60 minutes.oil for lightly coating dough before proofing
- Using Proof Setting: If you have an appliance with a proof setting, you can speed up the process by using it. Lightly coat the dough in oil and place it into the pot of your appliance. Select the "proof" or "prove" function and set the temp to 95℉/35℃ and the time to 30 minutes. When the time is up the dough should be double the size. If it isn't, proof longer until it doubles in size.
Forming the Buns
- Once the Dough has doubled in size, transfer it to a clean work surface. Don't flour the work surface. Cut the dough into 4 equal pieces and form each piece into a bun.
- Place the dough piece on the un-floured work surface and shape the dough into a smooth ball by using the bottom edge of your hands to cup the dough at the base and tuck the dough underneath of itself as you rotate it in a circle. This creates tension on top of the bun. There is a short video in the written post so you can see exactly how this is done.
- Once you see a few bubbles on the top of the dough ball, you have tension and you can press the dough down into a 4" disc shape. Place the shaped bun onto a lightly floured surface and flour the top lightly. Cover with plastic wrap or a towel. Repeat for the remaining pieces of dough. Let the buns rest while you boil the water for the baking soda bath.
Baking Soda Bath
- Bring 10-14 cups of water to a boil. The amount of water you need depends on the size of your pot. It should be ½-⅔ full.10-14 cups water
- Once boiling, add the baking soda and stir. Let it come back up to a gentle boil.½ cup baking soda
- Add the formed buns into the baking soda bath and cook on each side for 1 minute. Use a slotted spoon to flip them over and when you remove them, make sure the smooth side is facing up.
- Place the buns on a clean plate or work surface. I usually set them back on the plastic wrap I used to cover them with.
Baking the Pretzel Buns
- Preheat the oven to 400℉/200℃. Line your tray with parchment paper.
- Brush the tops of each bun with butter and sprinkle some pretzel salt or coarse salt over the top. Using a sharp knife make 2-3 slices about ¼" deep into the top of the bun to score it.1-2 Tablespoons melted butter, pretzel salt
- Place the tray of buns into the oven and bake at 400℉/200℃ for 15-18 minutes. The buns should be nice and dark and the internal temp should be around 205℉/96℃.
- Remove from the oven. Brush with more butter if you want a shine. If you want a softer roll, cover them with a towel while they cool to trap in some steam.
- Allow to cool about 30 minutes. Serve & Enjoy!
Notes
Slider Size Buns
If you want to make smaller buns, separate the dough into 6 or 8 pieces. The only other change will be to reduce the bake time by about 3-5 minutes.
Ninja Combi Baking Instructions
Place ¼ cup of water into the Combi pan. Place the crisping tray in the pan and cover with parchment. Put the buns on the parchment in each corner and put the pan into the Combi. Make sure the lever is up and select Combi Bake. Set the temp to 350℉/175℃ and the time to 15 minutes. They are usually done after about 12-13 minutes. Remove when nicely brown.
Ninja Foodi OL Series or Ninja Speedi Baking Instructions
Add ½ cup of water to the inner pot. Line the basket or crisping plate with parchment. Fit 1-2 rolls on the parchment paper. Rack in low for the Speedi. Select Steam/Crisp. Set the temp to 350℃/175℃ and the time to 15 minutes. Open the lid after 12 minutes of the countdown and check on them. They are done when they are nicely brown on the outside and the internal temp is around 205℉/96℃.
Ninja Foodi Two Lid Models Baking Instructions
Prehate the food on the bake or air fry setting for about 10 minutes on 325℉/160℃. Set your bun(s) on the parchment lined crisping tray or basket. Close the lid and set the bake or air crisp (it really doesn't matter, but I would use air crisp if you want a crustier roll and bake for a softer one) to 325℉/160℃ and bake/air crisp for about 15 minutes.
Air Fryer Baking Instructions
Preheat the air fryer for 5-10 minutes on 325℉/160℃. Set your bun(s) on the parchment lined crisping tray or basket. Air Fry on 325℉/160℃ for about 15 minutes.
Nutrition
Serving: 1bun | Calories: 286kcal | Carbohydrates: 53g | Protein: 9g | Fat: 4g | Saturated Fat: 2g | Polyunsaturated Fat: 0.4g | Monounsaturated Fat: 1g | Trans Fat: 0.1g | Cholesterol: 8mg | Sodium: 4451mg | Potassium: 132mg | Fiber: 4g | Sugar: 3g | Vitamin A: 87IU | Vitamin C: 0.02mg | Calcium: 30mg | Iron: 3mg