
- Ninja Combi (or any air fryer with a large cooking surface)
- Shallow flat-bottomed container, such as a 9x13 food storage container
- 3-inch metal biscuit cutter
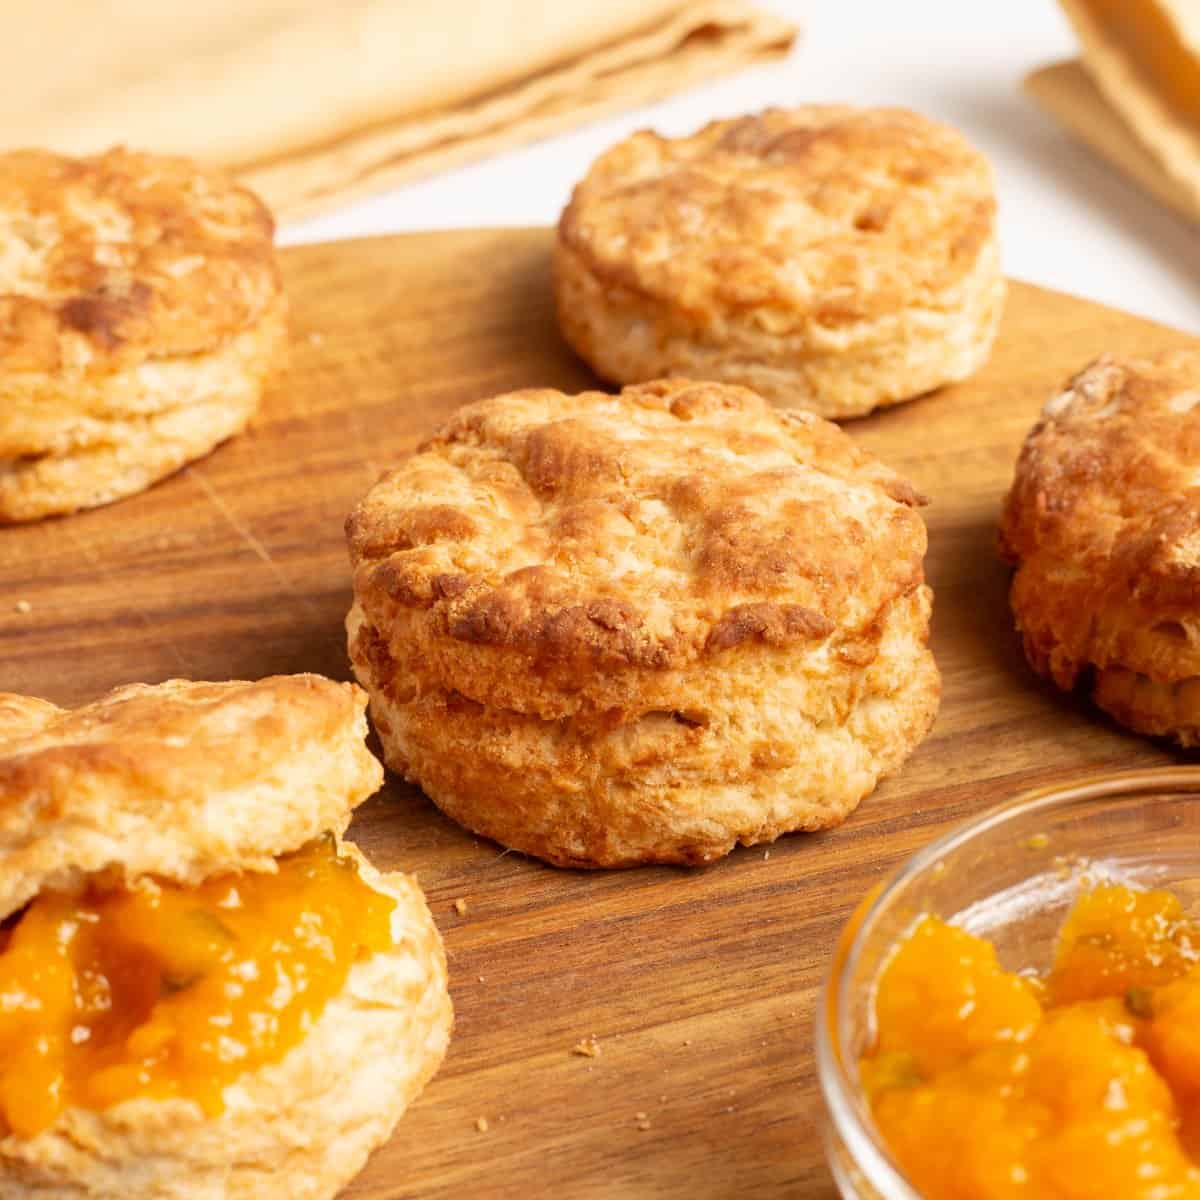
If you want to make the perfect homemade biscuits, skip the mixing bowl. These air fryer homemade biscuits are soft, fluffy, and absolutely delicious, and they come together with a handful of simple ingredients in about the same time it takes to bake the frozen kind. I make mine in the air fryer of the Ninja Combi, but this same recipe bakes beautifully in the oven too.
These are traditional buttermilk biscuits, and there are two things that make them work every single time. The first is grated cold butter tossed through the flour so every shred stays protected. The second is that shallow container instead of a mixing bowl, which sounds like a small thing but it completely changes how the dough hydrates. I will explain the reasoning behind both as we go.

Would you like to save this recipe?
I have made this recipe in a lot of test batches to get the rise, the browning, and those flaky layers right, and the combination that won was preheating hot and baking a little cooler. Ten minutes to make the dough, ten minutes to air fry, and you have the best homemade biscuits. If you have never made biscuits from scratch, or if you have tried and not had great success, this is the recipe to start with.
Suggested Kitchen Tools for Air Fryer Homemade Biscuits
- Ninja Combi, or any air fryer with a large cooking surface
- Wide, shallow flat-bottomed container, such as a 9x13 food storage container
- Box grater
- Liquid measuring cup
- Cutting board
- Rolling pin
- 3-inch metal biscuit cutter
- Bench scraper or flat spatula
- Cooling rack
- Parchment paper, for freezing unbaked biscuits
Ingredients & Substitutions
This is a classic buttermilk biscuit recipe built on simple ingredients you very likely have already. Let's take a closer look at what each one is doing.
All-Purpose Flour
Used in Recipe: 2¼ cups of all-purpose flour makes up the body of the biscuit dough, with a little extra for dusting the cutting board.
What it Does: Flour gives the biscuits their structure. All-purpose flour has enough protein to hold those layers up and not so much that the biscuits turn tough, which is exactly what we want here.
Substitutions: A measure-for-measure gluten-free flour blend can be used, but I have not tested the recipe that way. Self-rising flour can be used, but omit the baking powder and salt in the recipe.
Very Cold Butter
Used in Recipe: 8 tablespoons, or 1 stick, of very cold butter, grated on the large holes of a box grater.
What it Does: Cold butter is the whole reason biscuits have layers. Those little shreds stay solid in the dough and then steam as they hit the heat, pushing the dough apart into flaky sheets. Grating is the fastest way to get the butter into small, even pieces without warming it up in your hands. Use the large holes rather than the small ones for a nicer shred.
Substitutions: Salted and unsalted butter both work here. If you don't have a box grater, a vegetable peeler works well, or simply cut the butter into small cubes. Butter straight from the refrigerator is ideal. Frozen butter needs about 5 minutes on the counter first or it breaks apart on the grater instead of shredding.
Buttermilk
Used in Recipe: Up to ¾ cup of buttermilk brings the dough together. You may not need all of it, which is why we add it in stages.
What it Does: Buttermilk hydrates the flour and its acidity tenderizes the dough, which is what gives a traditional buttermilk biscuit that soft, tender crumb. It also reacts with the baking soda for extra lift and better browning.
Substitutions: Regular milk works, and so does milk with 1 tablespoon of lemon juice or white vinegar stirred in and left to sit for a few minutes. If you use a liquid that isn't acidic, leave out the baking soda and add another ¼ teaspoon of baking powder instead.
Baking Powder and Baking Soda
Used in Recipe: 2 teaspoons of baking powder and ½ teaspoon of baking soda go into the dry ingredients together.
What it Does: Baking powder does most of the lifting and gives the biscuits their rise. The baking soda is in this recipe specifically because we are using buttermilk. It neutralizes some of that acidity, adds a little extra lift, and helps the tops brown into that gorgeous golden color.
Substitutions: There is no real substitute for baking powder here, so make sure yours is fresh. If yours has been in the pantry a long while, pick up a new container. If you swap the buttermilk for a non-acidic liquid, omit the baking soda and use 2¼ teaspoons of baking powder instead.
Salt
Used in Recipe: ½ teaspoon of fine grind sea salt is stirred into the flour with the leavening.
What it Does: Salt is what keeps a biscuit from tasting flat. It brings out the flavor of the butter and the tang of the buttermilk, and a biscuit without it tastes like plain bread.
Substitutions: Kosher salt works at the same measurement. Table salt is finer and packs more salt per teaspoon, so use ¼ teaspoon if that is what you have.
How to Make Air Fryer Homemade Biscuits
Start to finish, these take about 10 minutes of hands-on time to make the dough and 10 minutes to air fry, with a 10 minute preheat running alongside. Here is everything you need to know.
Add the Baking Powder and Salt, Then Grate in the Butter
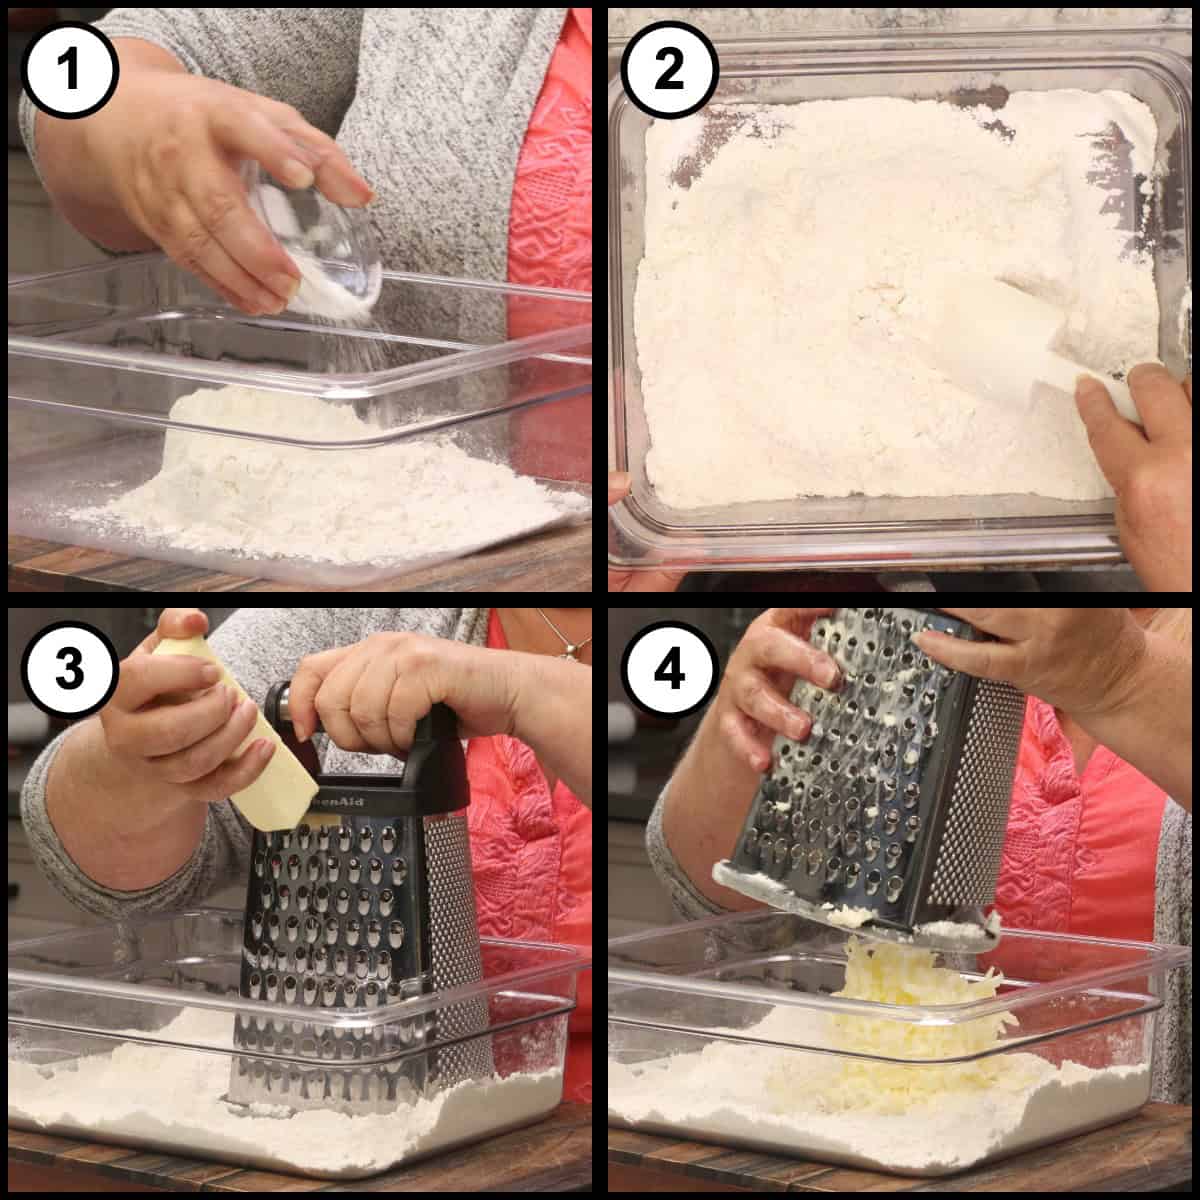
Find a wide, shallow container with a flat bottom, something like a 9x13 food storage container, which stands in for your mixing bowl here. Measure out 2¼ cups of all-purpose flour, ½ teaspoon of fine grind sea salt, ½ teaspoon of baking soda, and 2 teaspoons of baking powder, add them all to the container, and give it a quick stir to distribute everything evenly through the flour. Take your 8 tablespoons of butter out of the refrigerator (or off the counter for about 5 minutes if it's coming from the freezer) and grate it on the large holes of the box grater directly into the flour mixture.
Toss the Grated Butter Through the Flour
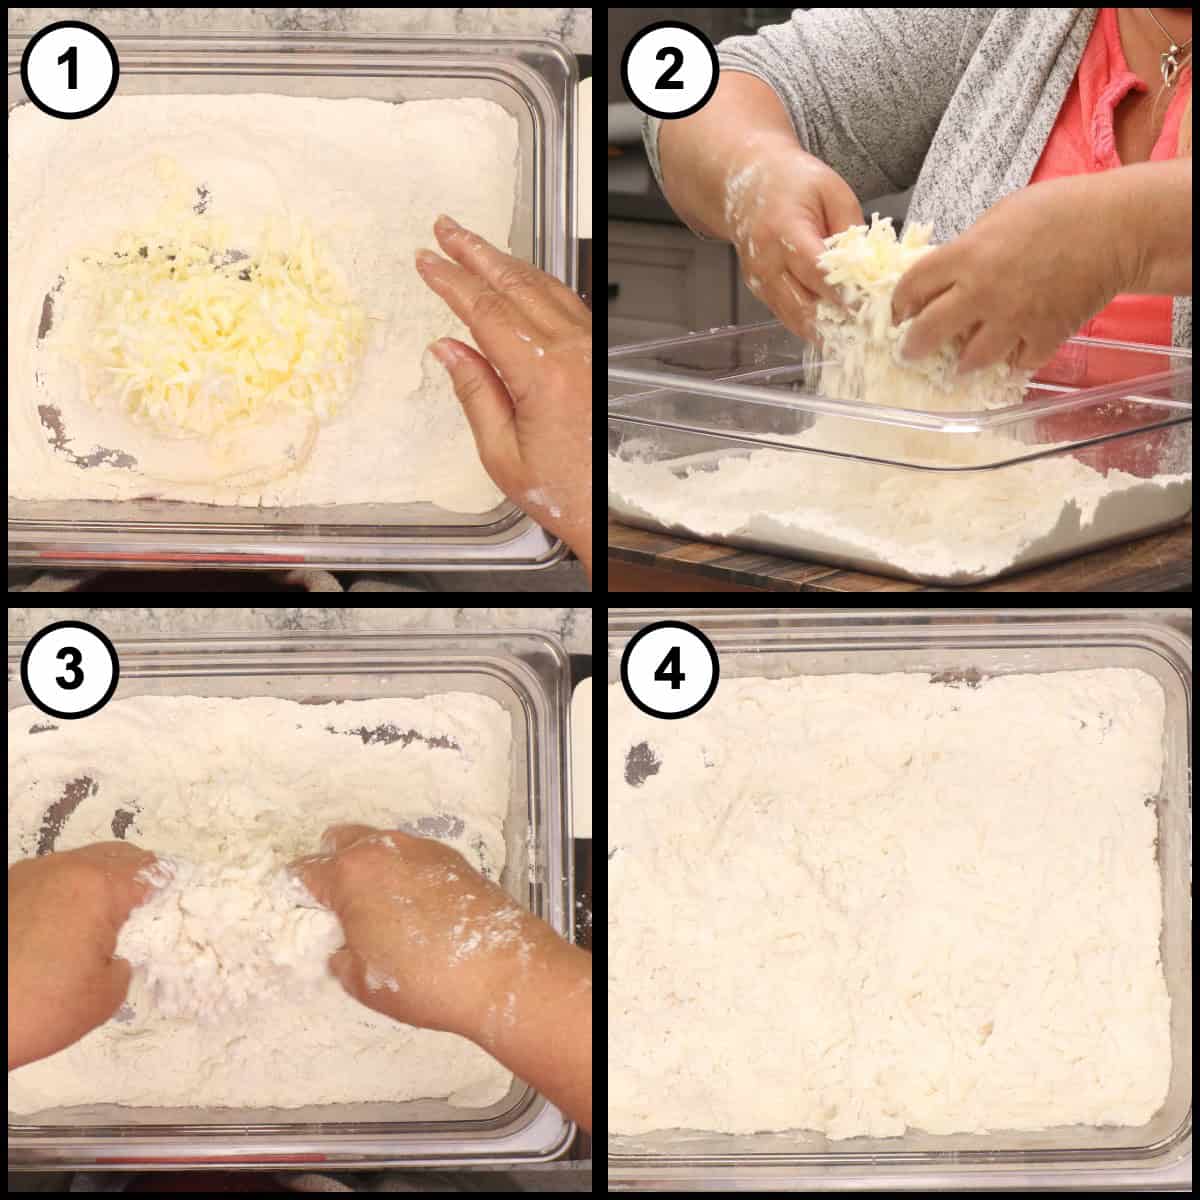
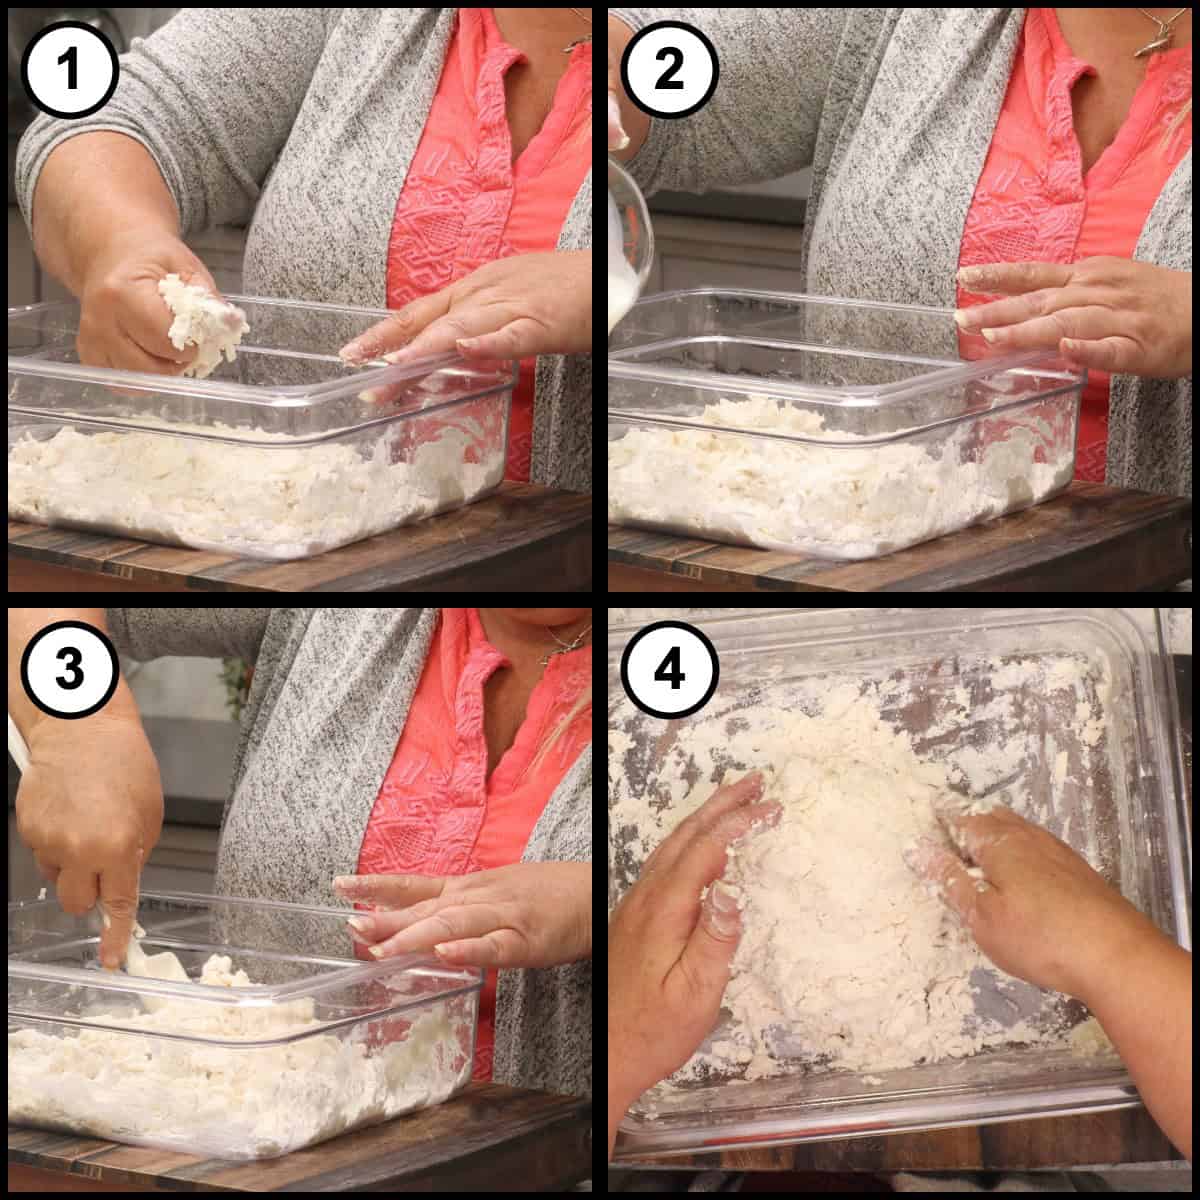
Very gently, toss the butter shreds through the flour with your fingers and break up any clumps. You want every single piece of butter coated in flour, and it helps to work quickly here so the butter doesn't soften. If you don't have a grater, a vegetable peeler works well, or you can simply cut the butter into small cubes.
Quick Tip
Coating each shred of butter in flour is what protects it once you start working the dough. Those protected pieces stay solid until they hit the heat, and then they steam and push the dough apart into layers. Skip this and the butter smears into the flour, which gives you a flat, dense biscuit.
Add the Buttermilk and Mix It In
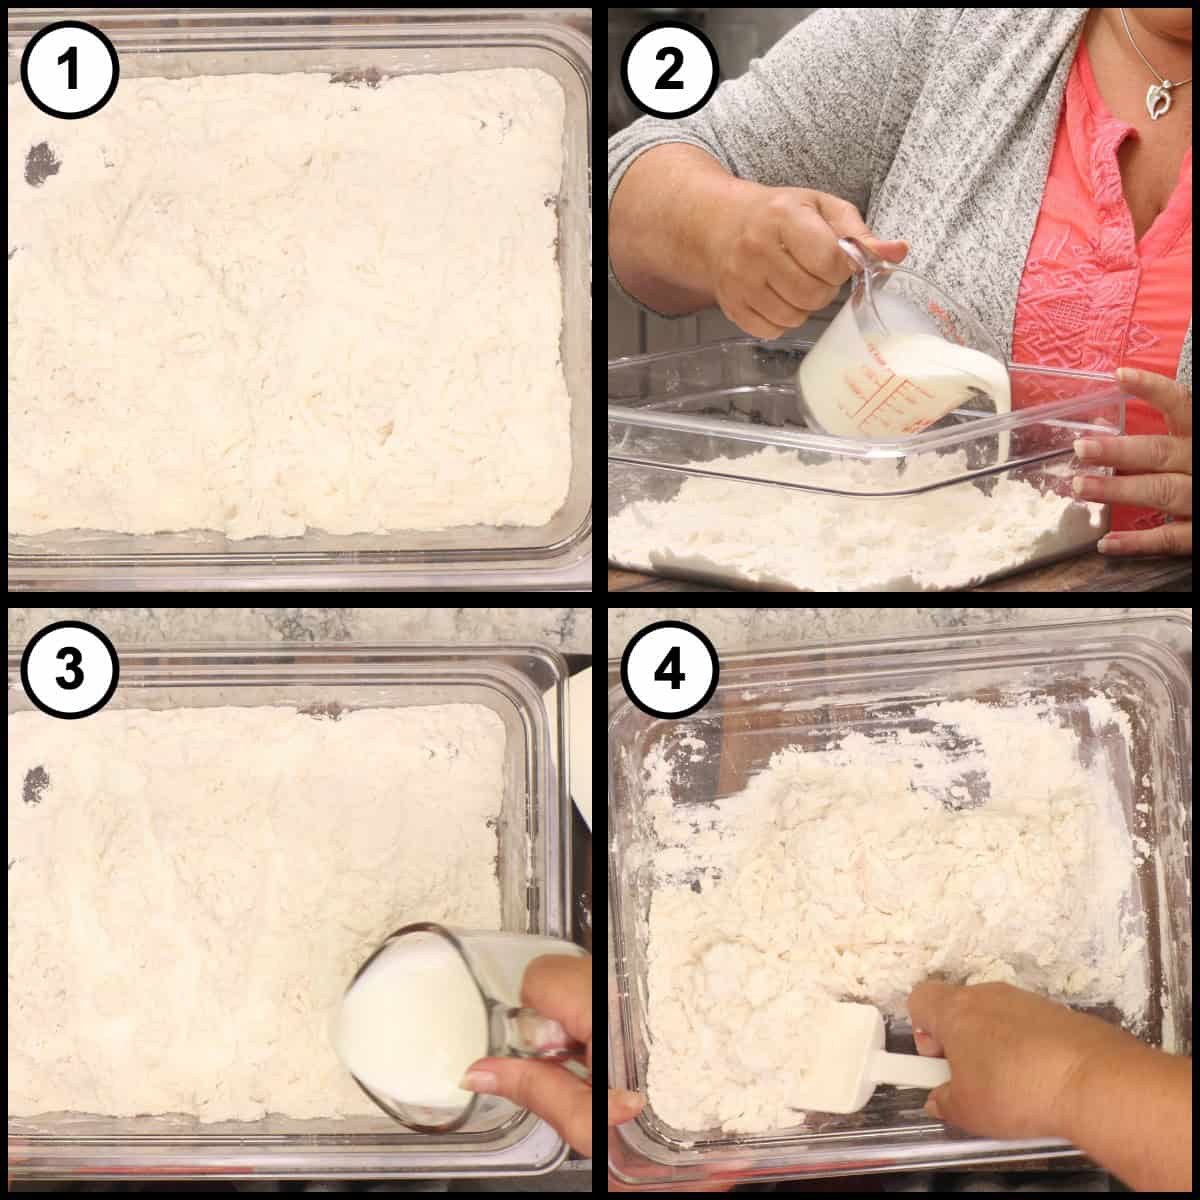
Measure up to ¾ cup of buttermilk into a liquid measuring cup. You won't necessarily need all of it. Pour about ½ cup right across the top of the flour rather than into one spot, keeping the remaining quarter cup back in the measuring cup for now. Mix it in by hand, working from the corners of the container in toward the center so all of that loose flour gets hydrated. This is exactly why we skipped the mixing bowl. In a deep bowl the flour at the bottom stays dry and you can't see what you're working with.
Check the Hydration and Add More Buttermilk if Needed
Squeeze a handful of the dough together to test it. If it crumbles apart, it needs more liquid, so add the remaining buttermilk 1 tablespoon at a time until it holds. Don't worry if you end up using all ¾ cup, that just means your flour needed a little more hydration, and it changes from batch to batch. If you can still see loose flour in the bottom of the container, add a little more. This is one of those recipes where you go by look and feel more than absolute measurements.
Bring the Dough Together
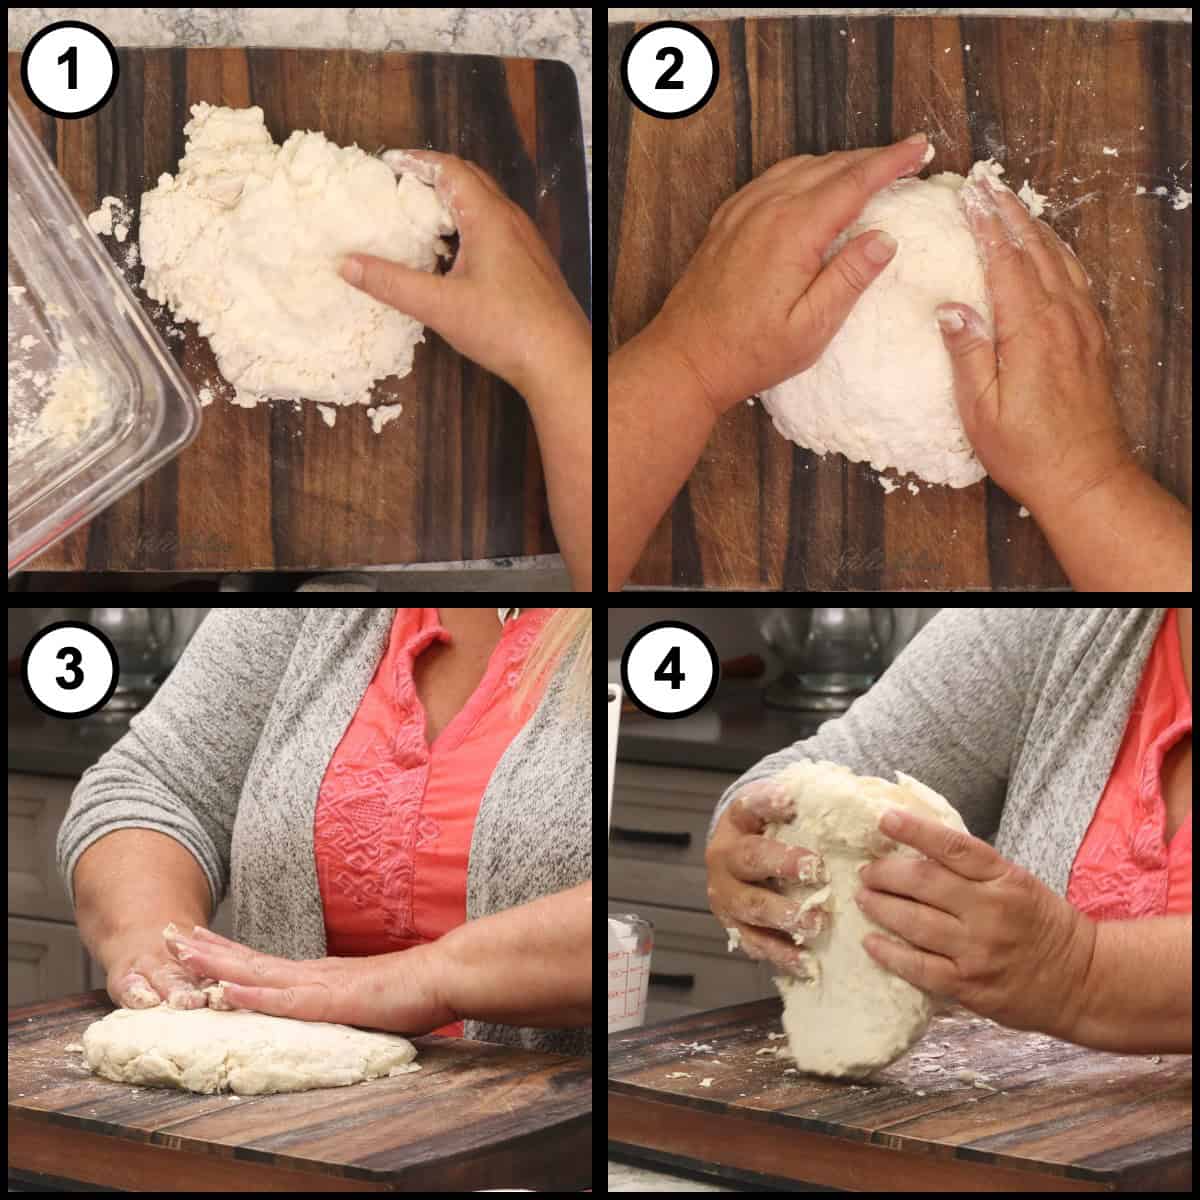
Lift the dough up from the bottom of the container and press it back down on itself a few times, a bit like kneading bread but far gentler and far shorter. Stop the moment it holds together. If you work it into a smooth, elastic ball the way you would with bread dough, the biscuits will be tough.
Turn the Dough Out and Roll It Into a Rectangle
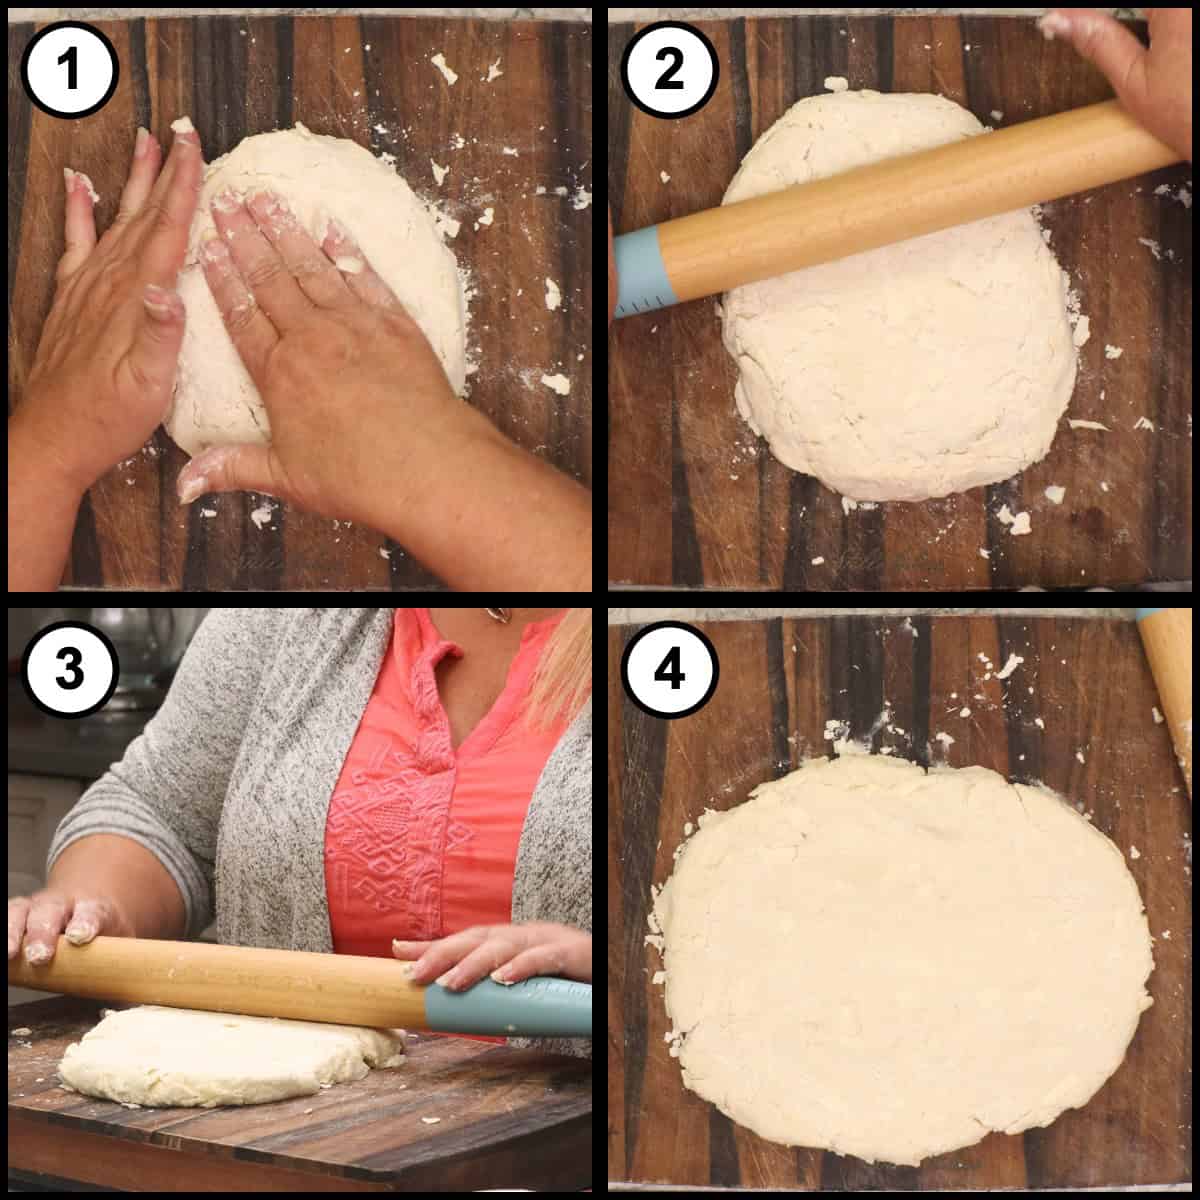
Turn the dough out onto a lightly floured cutting board and press it into a disc. It will look a little crackly on top, and that is completely normal. Gently flip the disc over; if it stays together, your dough is hydrated correctly. Roll it out into a rectangle, tidying up the corners as you go.
Preheat the Air Fryer and Pick Your Biscuit Height
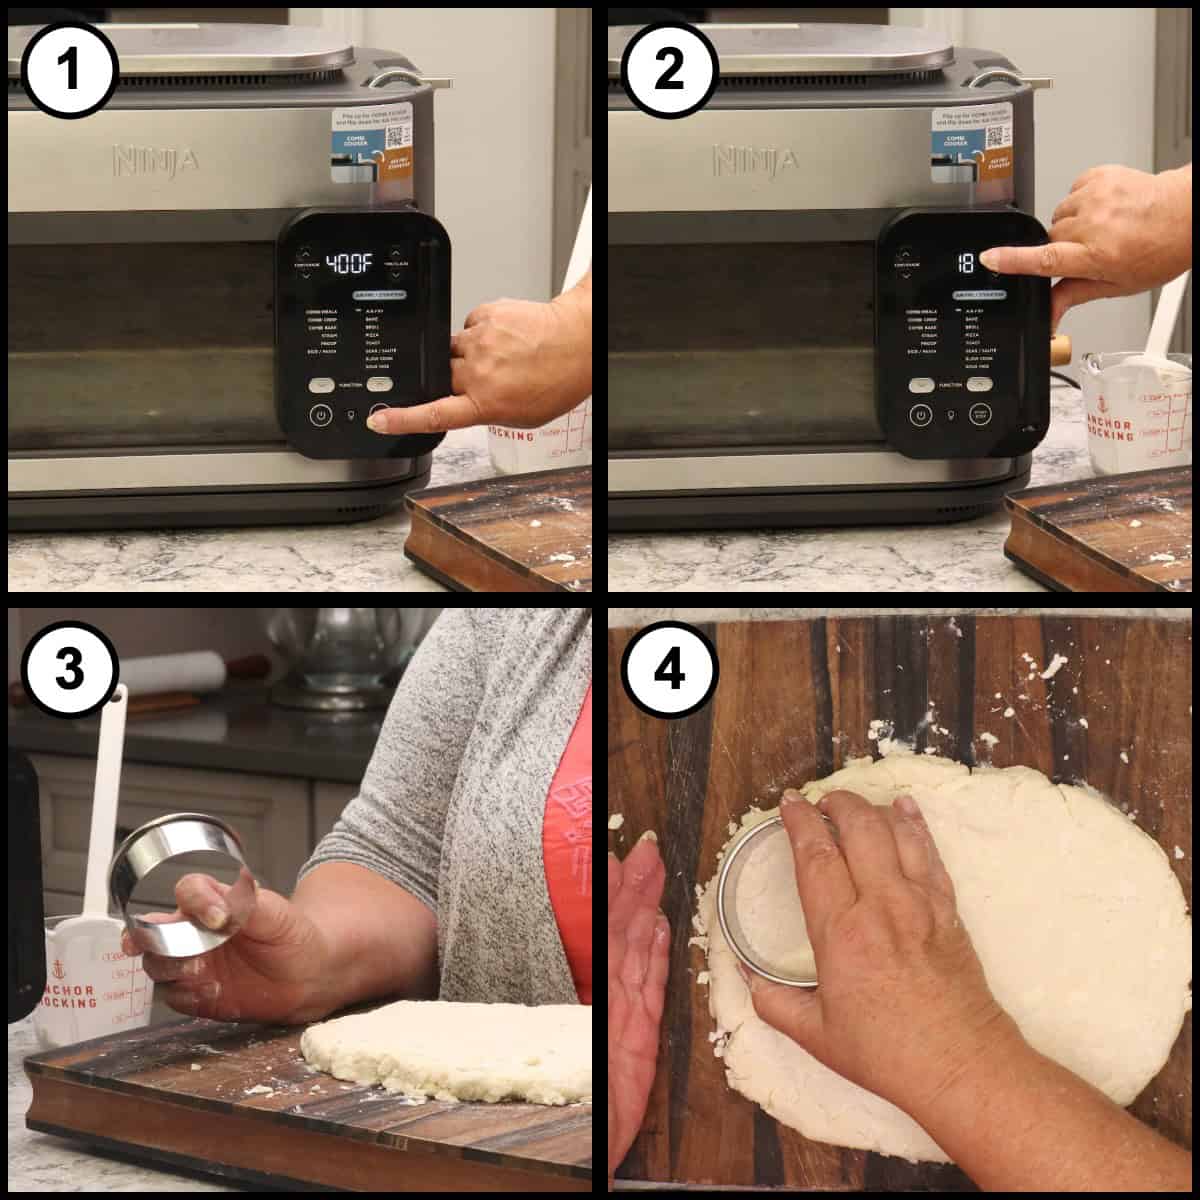
Now is a good time to start the preheat: set your air fryer or Ninja Combi to Air Fry at 400℉/200℃ for 10 minutes. The thickness you roll the dough to is the height of your finished biscuit, so go ½ inch for breakfast sandwiches and ¾ inch if you're serving them with butter and jam.
Cut the Biscuits and Bring the Scraps Back Together
Cut the biscuits with a 3-inch metal biscuit cutter, placing your cuts as close together as you can. Then gather the scraps, fold them over once, and pat them back down to the same thickness to cut the rest.
Quick Tip
Press the cutter straight down and lift it straight up. Do not twist and do not hesitate. Twisting seals the cut edge shut, and a sealed edge cannot rise into layers. This is also why a metal-edged biscuit cutter beats a drinking glass, since a thick glass rim drags the dough down as it cuts.
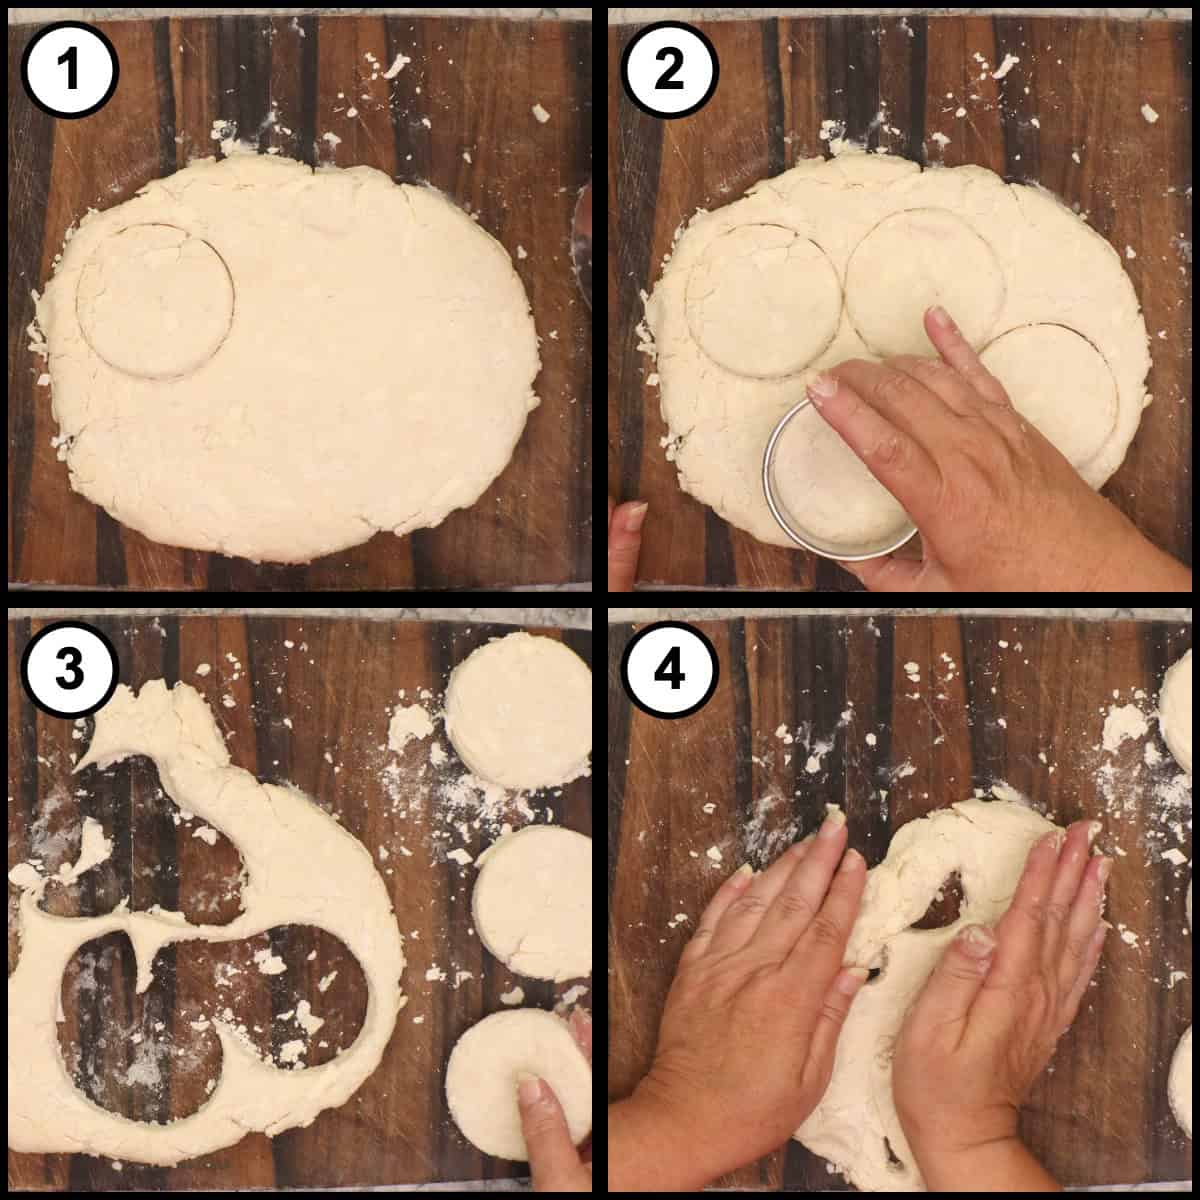
Cut the Rest of the Biscuits
Don't knead the scraps or smooth the top. The second-pass biscuits won't look quite as pretty and they will still be delicious. You can even cut one last small biscuit out of what is left; it will just be a little denser.
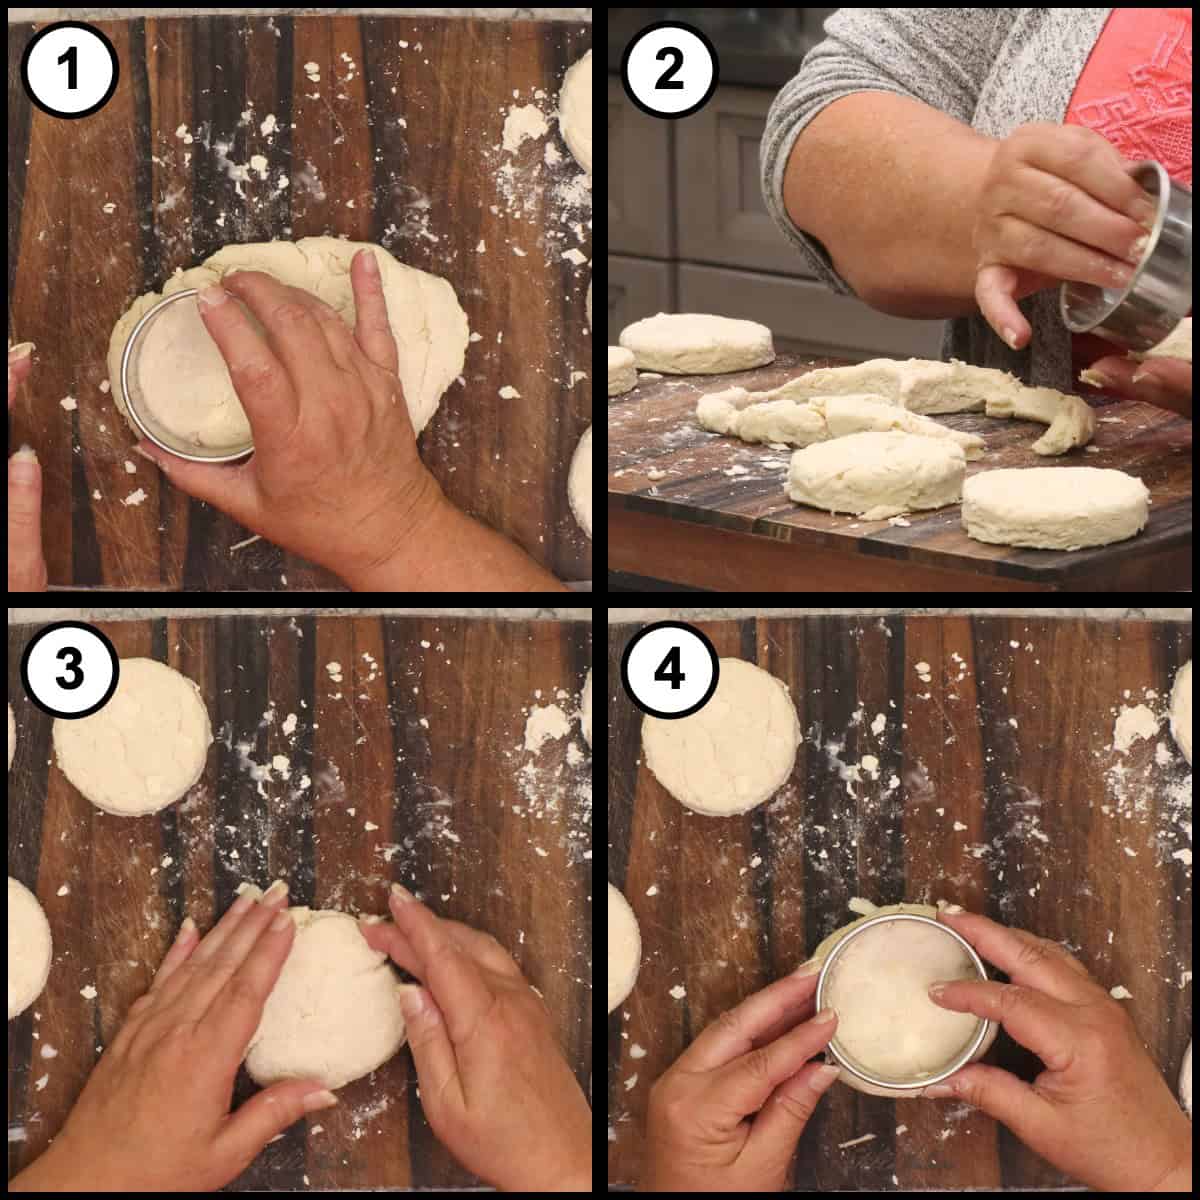
Air Fry the Biscuits
Place the biscuits into the preheated Combi pan set on the rack, or into your air fryer basket, in a single layer with a little space around each one. Parchment is optional, and I like them better without it because the bottoms cook a little nicer. About 6 biscuits fit comfortably in the Ninja Combi, so freeze any extras rather than crowding the pan. Now lower the temperature to 375℉/190℃ and air fry for 10 minutes. That temperature drop matters: the hot 400℉/200℃ start gets the rise going, and finishing at 375℉/190℃ keeps the tops from getting too dark before the middles are done.
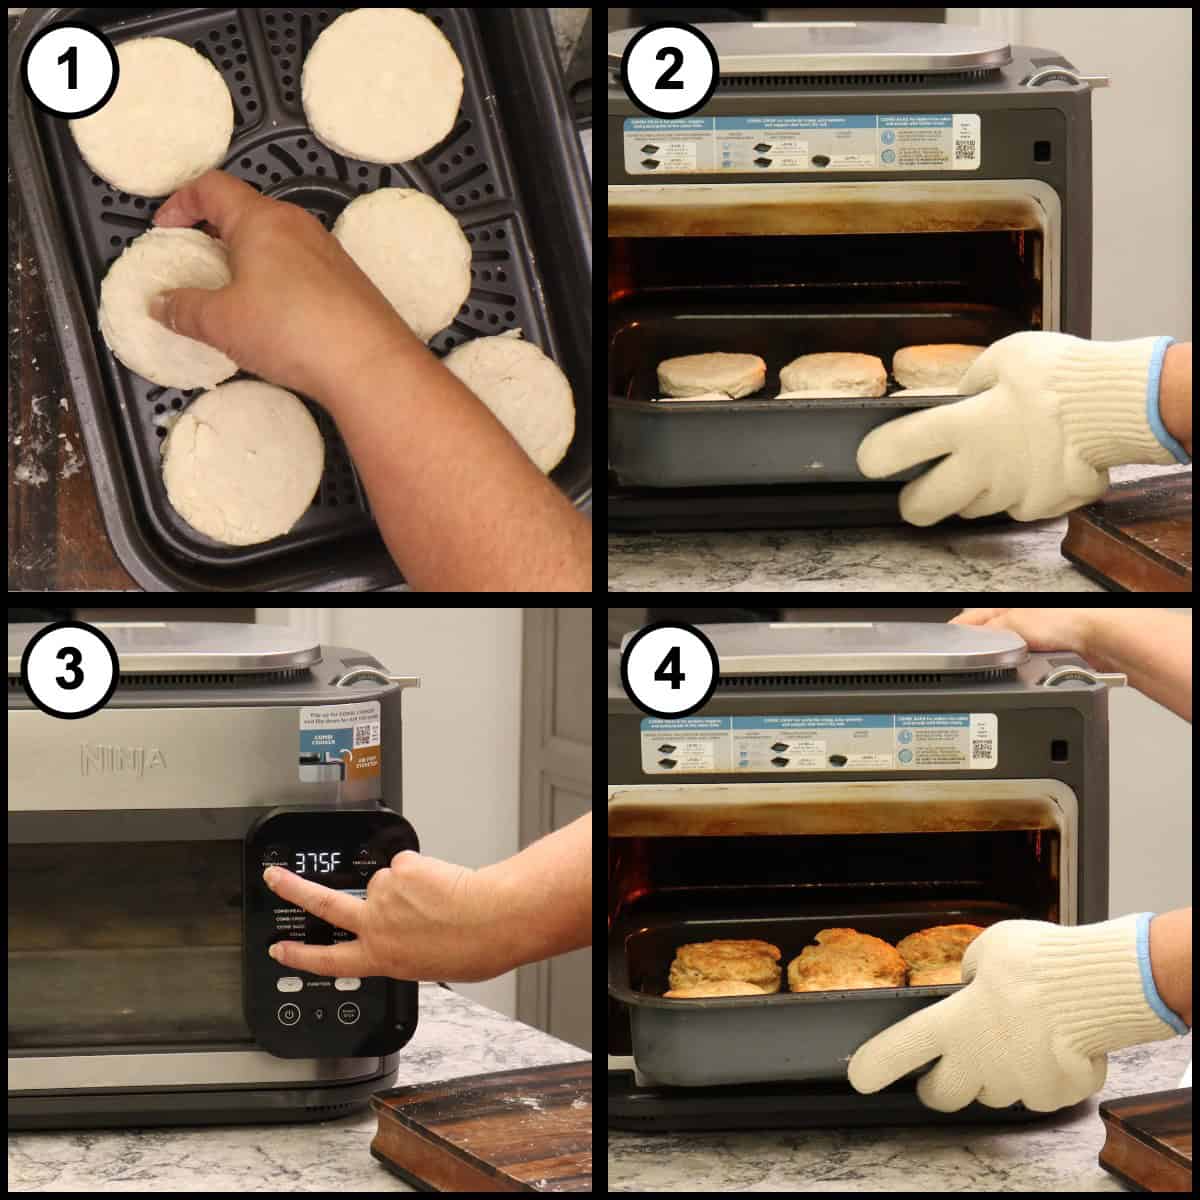
Cool the Biscuits and Check the Layers
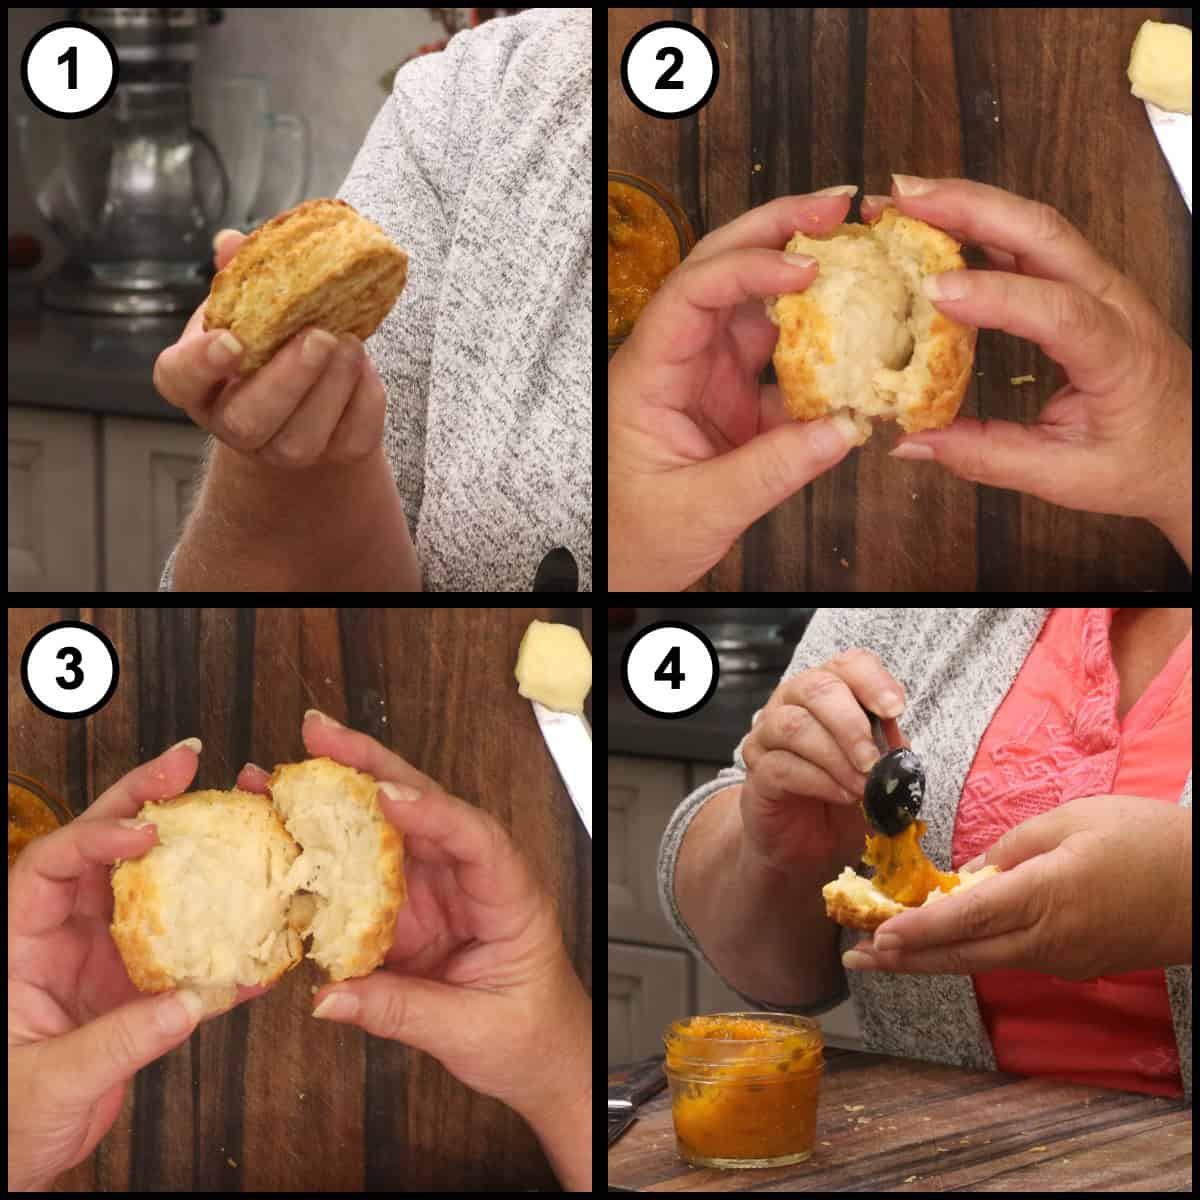
Move the finished biscuits to a cooling rack and give them at least a minute before you break one open. The taller ones benefit from a few extra minutes so the middle can finish setting up. Split one open and you'll see those flaky, buttery layers you worked for.
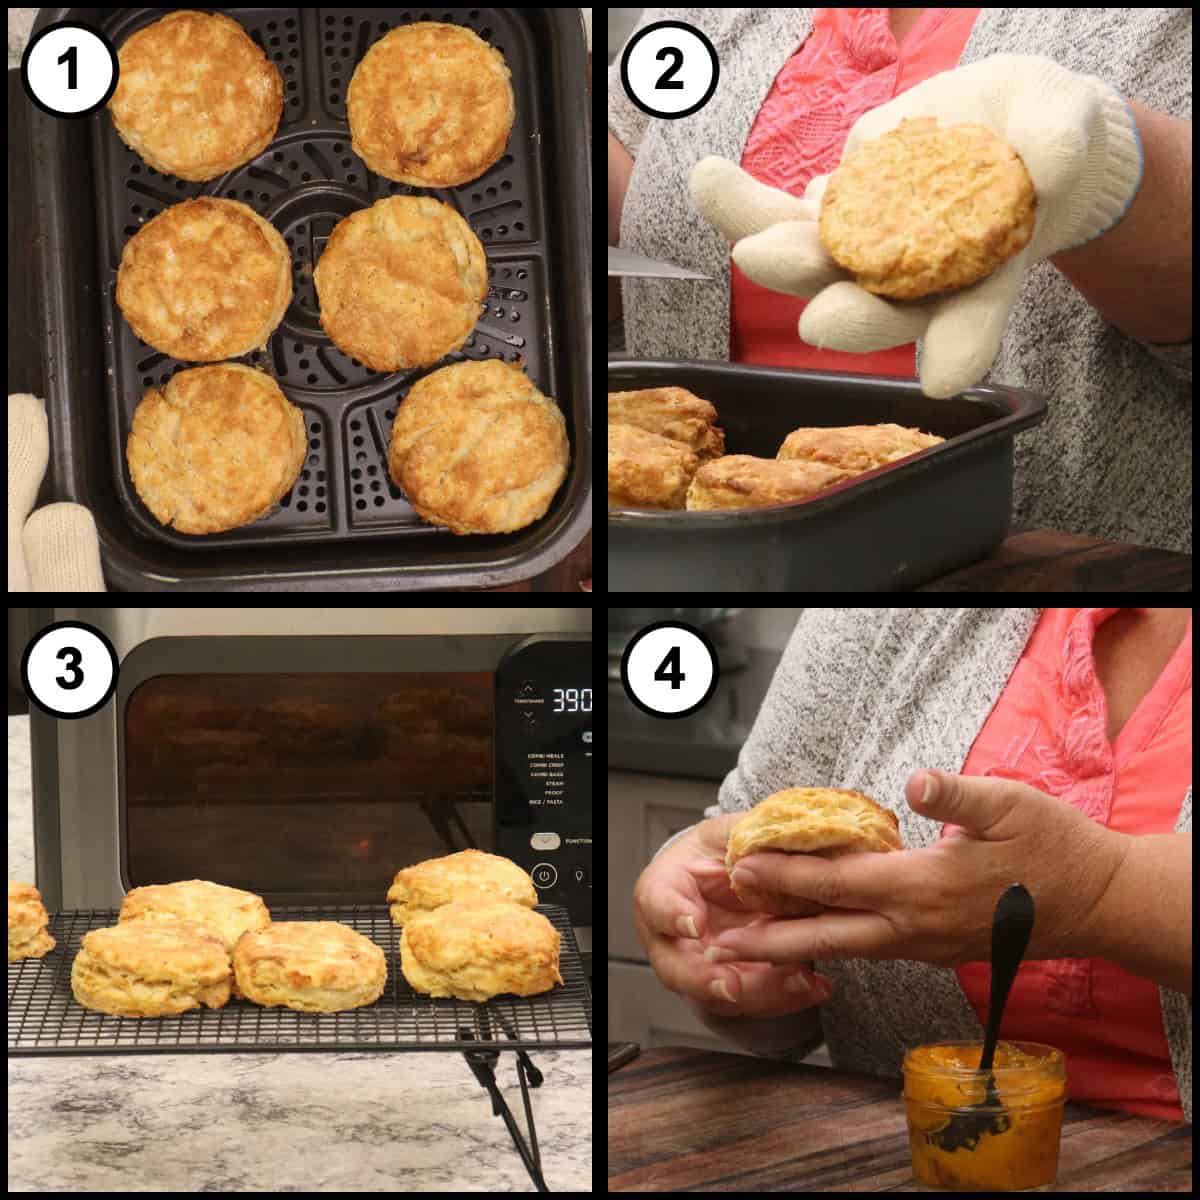
Serve Warm With Butter and Jam
Split a warm biscuit and add a pat of butter and a spoonful of jam. That is honestly hard to beat, and it's exactly how I like to serve mine fresh out of the air fryer.
Alternate Cooking Instructions
- Oven: Place the cut biscuits on a baking sheet and bake at 400-425℉/200-220℃ for 12 to 14 minutes, until risen and golden brown. The dough is exactly the same, only the bake changes.
- Basket style air fryer: The time and temperature are the same, preheat at 400℉/200℃ and air fry at 375℉/190℃ for about 10 minutes. You will only fit 3 or 4 biscuits at a time, so plan on batches and add a minute or two to the later ones since the basket is already hot.
- Ninja Foodi with the Air Crisp function: Use the crisping basket or the rack, preheat on Air Crisp at 400℉/200℃, then air crisp at 375℉/190℃ for 10 minutes. Check at 8 minutes, as the Foodi sits closer to the heating element than an oven style air fryer.
- Ninja Woodfire Outdoor Grill: Use the Bake function at 375℉/190℃ for 12 to 14 minutes on the grill grate with a baking pan underneath. Skip the smoke setting, since smoke flavor and buttermilk biscuits are not a great match.
- From frozen, Air Fryer; Do not thaw, but take them out of the freezer while you preheat your air fryer on 400F for 10 minutes. Set the frozen biscuits on the rack of your air fryer and reduce the them to 350/175 C and air fry for 15 minutes. Let them sit for about a minute before breaking them open.
Storage & Reheating Instructions
How to Store Leftover Air Fryer Homemade Biscuits
Let the biscuits cool completely before you store them so the steam doesn't soften the crust.
- Room Temperature: Store baked biscuits in an airtight container for up to 2 days.
- Refrigerator: An airtight container in the refrigerator keeps them for up to 4 days.
- Freezing unbaked biscuits: This is my preferred method. Set the cut, unbaked biscuits on a piece of parchment paper on a plate or small tray and freeze until completely solid. Then move them into a freezer bag and freeze for up to 3 months.
- Air frying from frozen: Don't thaw them. Preheat at 400℉/200℃ for 10 minutes, place the frozen biscuits in a single layer, drop the temperature to 350℉/175℃, and air fry for 13 to 15 minutes until risen and golden brown.
Quick Tip
Freshly baked biscuits taste so much better than day-old ones, so I usually bake just a couple and freeze the rest of the cut dough. Twenty minutes of work gives you homemade biscuits on demand for the next three months, and they bake straight from the freezer.
How to Reheat Air Fryer Homemade Biscuits
- Air Fryer: Warm whole biscuits at 300℉/150℃ for 2 to 3 minutes. This is the best way, since it brings back a little crispness on the outside.
- Skillet: Split the biscuit and toast the cut sides in a skillet with a little butter until golden. Wonderful for breakfast sandwiches.
- Oven: Wrap loosely in foil and warm at 300℉/150℃ for 8 to 10 minutes.
- Microwave: 10 to 15 seconds is enough. It is the fastest option, though the crust softens.
Frequently Asked Questions
The hot start is what drives the rise. Putting the biscuits into a 400℉/200℃ air fryer gives them a burst of heat that pushes those layers up fast. If you keep cooking at 400℉/200℃ though, the tops get too dark before the middles finish. Dropping to 375℉/190℃ for the bake gives you the best of both, a beautiful rise and an evenly golden top. This was the combination that worked best across all of my test batches.
This is the biggest change you can make to your biscuit routine. In a deep mixing bowl the liquid sits on top and the flour at the bottom stays dry, so you end up either adding too much buttermilk or not enough. A wide, shallow container with a flat bottom, something like a 9x13 food storage container, lets you see every bit of loose flour and work it in from the corners. You get even hydration and a dough that comes together without being overworked.
You absolutely can. Regular milk works, and so does milk with 1 tablespoon of lemon juice or vinegar stirred in and left to sit for a few minutes. Here is the part people miss though. The baking soda in this recipe is there because buttermilk is acidic. If you swap the buttermilk for a non-acidic liquid, omit the baking soda and add another ¼ teaspoon of baking powder instead. Buttermilk does give the best texture and the best browning, so it is worth using when you have it.
You can, but it will not give you the same results. A glass has a thick, rounded rim that presses and drags the edges of the dough down as it cuts, and those sealed edges cannot rise into layers. A metal-edged biscuit cutter gives you a clean cut. Press straight down, lift straight up, and do not twist. That clean edge is a big part of how you get those flaky layers.
Parchment paper is optional here. I have tested these both ways and I prefer them without, because the bottoms cook and brown a little better with direct contact. Either way works perfectly fine, so if parchment makes cleanup easier for you, go ahead and use it.
Yes, and this is how I usually make them. Cut the biscuits, place them on a piece of parchment paper on a plate or small tray, and freeze until they are completely solid. Then transfer them to a freezer bag and store for up to 3 months. To bake from frozen, do not thaw them. Preheat at 400℉/200℃ for 10 minutes, put the frozen biscuits in a single layer, drop the temperature to 375℉/190℃, and air fry for 13 to 15 minutes. Freshly baked biscuits taste so much better than day-old ones, so I like to bake just a couple and freeze the rest.

Air Fryer Homemade Biscuits
Equipment
- Ninja Combi (or any air fryer with a large cooking surface)
- Shallow flat-bottomed container, such as a 9x13 food storage container
- 3-inch metal biscuit cutter
Ingredients
Dry Ingredients
- 2¼ cups all-purpose flour plus a little extra for the cutting board
- ½ teaspoon fine grind sea salt kosher salt works at the same measurement; use ¼ teaspoon if using table salt
- ½ teaspoon baking soda omit if you are not using buttermilk and increase the baking powder by ¼ teaspoon
- 2 teaspoon baking powder
Butter and Buttermilk
- 8 tablespoon very cold butter 1 stick; salted or unsalted both work, grate it straight from the refrigerator
- ¾ cup buttermilk you may not need all of it, add it in stages
Would you like to save this recipe?
Instructions
- Add 2¼ cups of all-purpose flour to a wide, shallow container with a flat bottom. A 9x13 food storage container is perfect. Add ½ teaspoon of fine grind sea salt, ½ teaspoon of baking soda, and 2 teaspoons of baking powder, then give everything a quick stir to combine.2¼ cups all-purpose flour, ½ tsp fine grind sea salt, ½ tsp baking soda, 2 tsp baking powder
- Grate 8 tablespoons of very cold butter on the large holes of a box grater directly into the flour mixture. If the butter is coming out of the freezer, let it sit on the counter for about 5 minutes first or it will break apart on the grater.8 tbsp very cold butter
- Very gently toss the grated butter through the flour with your fingers, breaking up any clumps, until every shred is coated in flour. That flour coating is what protects the butter while you work with the dough. Work quickly so the butter stays cold.
- Measure out ¾ cup of buttermilk. Pour about ½ cup of it across the surface of the flour rather than into one spot, then mix by hand, working from the corners of the container in toward the center so all of the loose flour is hydrated.¾ cup buttermilk
- Squeeze a handful of the dough together to test the hydration. If it crumbles apart, add the remaining buttermilk 1 tablespoon at a time until the dough holds together and there is no dry flour left in the bottom of the container. Some batches take the full ¾ cup and some take less, so go by look and feel rather than the measurement.
- Bring the dough together by lifting it up from the bottom and pressing it back down on itself a few times. Stop as soon as it holds together. Do not knead it into a smooth ball or the biscuits will be tough.
- Preheat the air fryer or the Ninja Combi on the Air Fry function at 400℉/200℃ for 10 minutes. Start the preheat now so it is ready by the time the biscuits are cut.
- Turn the dough out onto a lightly floured cutting board and press it into a disc. Gently flip the disc over. If it stays together, the dough is hydrated correctly. Roll it out into a rectangle, ½ inch thick for breakfast sandwiches or ¾ inch thick for serving with butter and jam.
- Cut the biscuits with a 3-inch metal biscuit cutter. Press straight down and lift straight up. Do not twist and do not hesitate, because a clean cut is what lets the layers rise. Cut them as close together as you can.
- Gently gather the scraps, fold them over once, and pat them back down to the same thickness. Do not knead or smooth the top. Cut the remaining biscuits from this second pass.
- Place the biscuits in the preheated Combi pan on the rack, or in the air fryer basket, in a single layer with a little space between them. Parchment paper is optional and the bottoms brown better without it. About 6 biscuits fit comfortably in the Ninja Combi.
- Lower the temperature to 375℉/190℃ and air fry for 10 minutes, until the biscuits are risen and golden brown. Preheating at 400℉/200℃ and baking at 375℉/190℃ gives the best rise without the tops getting too dark.
- Move the biscuits to a cooling rack and let them rest for at least a minute before splitting them open. Thicker biscuits benefit from a few extra minutes so the middle finishes setting up.
Notes
• Use a wide, shallow container instead of a mixing bowl. A deep bowl traps dry flour in the bottom, which is what leads to adding too much or too little buttermilk. A 9x13 food storage container or even a cutting board works beautifully.
• Start the 10 minute preheat before you roll out the dough so nothing sits around warming up.
• Butter straight from the refrigerator grates perfectly. Frozen butter needs about 5 minutes on the counter first or it breaks apart on the grater.
• No box grater? A vegetable peeler works, or cut the butter into small cubes.
• Yield changes with thickness and cutter size. A 3-inch cutter at ½ inch thick gives about 8 biscuits, and a 4-inch cutter or ¾ inch thickness gives fewer, taller biscuits. DOUGH TIPS
• Toss the grated butter in the flour until every shred is coated. That coating protects the butter while you work the dough and is what creates the flaky layers.
• Add the buttermilk in stages, never all at once. Pour about ½ cup across the surface, mix, then add the rest 1 tablespoon at a time.
• Loose flour in the bottom of the container means the dough needs more liquid.
• Squeeze a handful of dough to test it. If it holds together, it is ready. If it crumbles, it needs another tablespoon.
• Bring the dough together by folding and pressing, never kneading. A smooth, elastic dough ball makes tough biscuits.
• Press straight down with the cutter and lift straight up. Twisting seals the edges and keeps the biscuits from rising into layers.
• Scraps can be gathered and cut again. Fold once, pat down, and cut. The second pass biscuits are slightly denser and still delicious. COOKING TIPS
• Preheat at 400℉/200℃ but bake at 375℉/190℃. The hot start drives the rise and the lower bake keeps the tops from getting too dark.
• Cook in a single layer. Biscuits need airflow around them to brown evenly, so work in batches if your air fryer is small.
• Parchment paper is optional. The bottoms brown better without it.
• Oven style air fryers with a large surface, like the Ninja Combi, fit about 6 biscuits at once. Basket style air fryers usually fit 3 or 4.
• Check at 8 minutes if your air fryer runs hot. They are done when the tops are golden and the sides look set and layered. VARIATIONS
• No buttermilk: Use regular milk, or milk with 1 tablespoon of lemon juice or vinegar stirred in. If you skip the buttermilk entirely, omit the baking soda and add another ¼ teaspoon of baking powder.
• Cheddar and chive: Toss ¾ cup of shredded sharp cheddar and 2 tablespoons of chopped chives into the flour with the butter.
• Breakfast sandwich biscuits: Roll to ½ inch so the finished biscuit is the right height for sausage and egg.
• Taller biscuits: Roll to ¾ inch for a taller biscuit that splits beautifully for butter and jam.
• Drop biscuits: Skip the rolling and cutting and pinch off pieces of dough instead. They will not have the same layers but they are quick and delicious. SERVING SUGGESTIONS
• Split warm and slather with salted butter and jam. Mango jalapeño jam is a little sweet, a little savory, and just a bit spicy, and it is wonderful with these.
• Build breakfast sandwiches with sausage patties, a fried egg, and cheese.
• Serve alongside sausage gravy for a Southern style biscuits and gravy breakfast.
• Serve as a side with soup, chili, or roast chicken. STORAGE
• Room Temperature: Store baked biscuits in an airtight container for up to 2 days. Freshly baked is always best, so bake what you need and freeze the rest of the dough.
• Refrigerator: Baked biscuits keep in an airtight container in the refrigerator for up to 4 days.
• Freezing Unbaked Biscuits: Place the cut, unbaked biscuits on a piece of parchment paper on a plate or small tray and freeze until completely solid. Transfer them to a freezer bag and freeze for up to 3 months.
• Air Frying from Frozen: Do not thaw. Preheat the air fryer at 400℉/200℃ for 10 minutes, place the frozen biscuits in a single layer, lower the temperature to 375℉/190℃, and air fry for 13 to 15 minutes, until risen and golden brown.
• Reheating: Warm baked biscuits in the air fryer at 320℉/160℃ for 2 to 3 minutes, or split them and toast the cut sides in a skillet with a little butter. NUTRITIONAL DISCLAIMER
Nutritional information provided is an estimate based on typical ingredient values and standard portion sizes. Actual nutritional content may vary significantly depending on specific brands used, ingredient substitutions, preparation methods, portion sizes, and individual cooking techniques. For precise nutritional information tailored to your specific ingredients and preparation, please consult with a registered dietitian or use laboratory analysis. This information should not be used for medical nutrition therapy or to manage medical conditions without professional guidance.
Nutrition
Variations
- Cheddar and chive biscuits: Toss ¾ cup of shredded sharp cheddar and 2 tablespoons of chopped chives into the flour along with the grated butter. If you love a savory biscuit, my Cheddar Jalapeno Biscuits use this same dough with a little heat folded in.
- Breakfast sandwich biscuits: Roll the dough to ½ inch so the finished biscuit is the right height for sausage, egg, and cheese without becoming a sandwich you can't get your mouth around.
- Tall biscuits for butter and jam: Roll to ¾ inch instead. You get fewer biscuits and they are noticeably taller and split beautifully.
- Drop biscuits: Skip the rolling and cutting entirely and just pinch off pieces of dough. You lose the defined layers and you save yourself a step.
- Honey butter tops: Brush the biscuits with a little melted butter mixed with honey the moment they come out of the air fryer.
- Herb and black pepper: Add 1 teaspoon of chopped fresh rosemary or thyme and ½ teaspoon of coarse black pepper to the dry ingredients. Lovely alongside soup or roast chicken.
What to Serve With These Biscuits
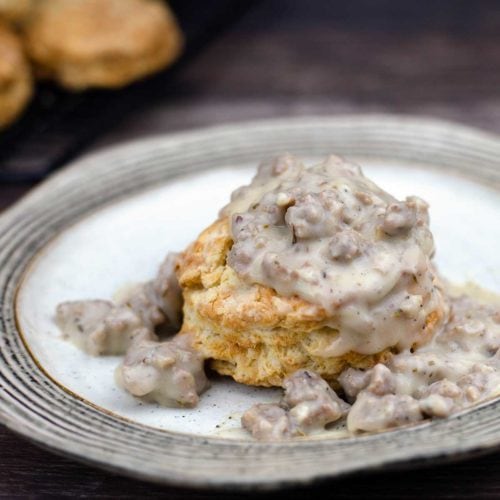
A warm biscuit split open with salted butter and jam is honestly hard to beat. I served mine with homemade mango jalapeño jam, which is a little sweet, a little savory, and just a tad bit spicy, and it is delicious with a Southern style biscuit. These also make a great side dish with soup, chili, or roast chicken, and they are exactly right for a sausage and egg breakfast sandwich or a plate of biscuits and gravy. For a classic biscuits and gravy breakfast, spoon my Easy Sausage Gravy in the Ninja Foodi over a warm split biscuit. Here are a few other easy recipes from The Salted Pepper that would go perfectly with these biscuits!
If you are planning a full spread around these biscuits, here are a few more recipes from The Salted Pepper worth adding to the table.



About the Recipe Author, Louise Long
Louise is a full-time recipe creator and food blogger @ The Salted Pepper. She has over 30 years of experience with cooking and recipe development. She owned a restaurant for several years and was a full-time RN until retiring to blog full-time.

She published her first cookbook in the Fall of 2018 and is very interested in writing several more.
Louise is also the creator of an online Ninja Foodi Pressure Cooking Course with over 100 instructional step-by-step videos. People absolutely rave about the course and all the value they have received from it.
Louise has several very active Facebook groups that help people with the basics of cooking and learning more about the appliances they love.
Ninja Foodi Pressure Cooker & Air Crisper 101
Ninja Woodfire Outdoor Grill & Smoker
Louise is also a YouTube creator and you can find most of her recipes in video format on The Salted Pepper YouTube channel.
She is very responsive to messages and eager to help in any way she can. Get more Information about Louise & contact information
I WOULD LOVE TO SEE WHAT YOU ARE COOKING UP IN YOUR KITCHEN! TAG ME @THESALTEDPEPPER ON YOUR FAVORITE SOCIAL MEDIA PLATFORM WHEN YOU MAKE A DISH!
BE SURE TO FOLLOW THE SALTED PEPPER RIGHT HERE ⇓⇓⇓⇓⇓
Leave a Reply