
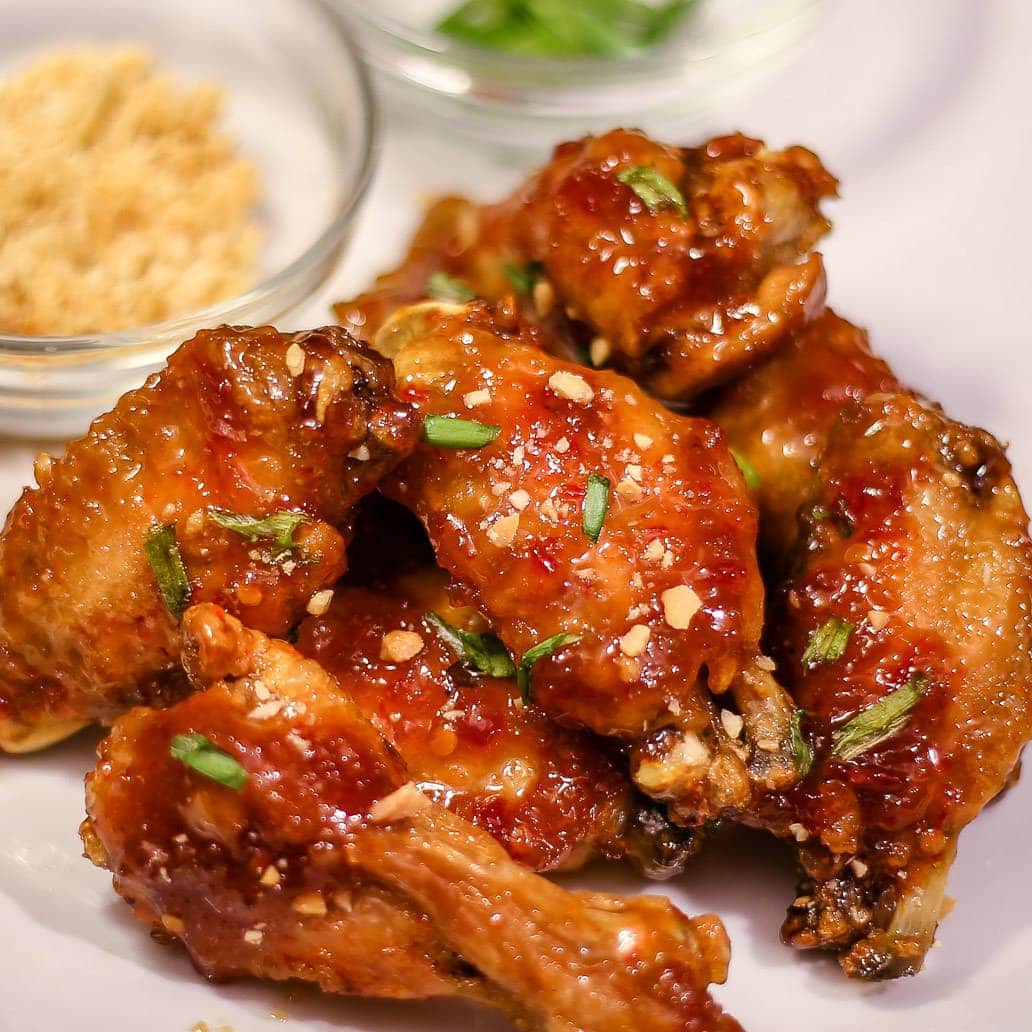
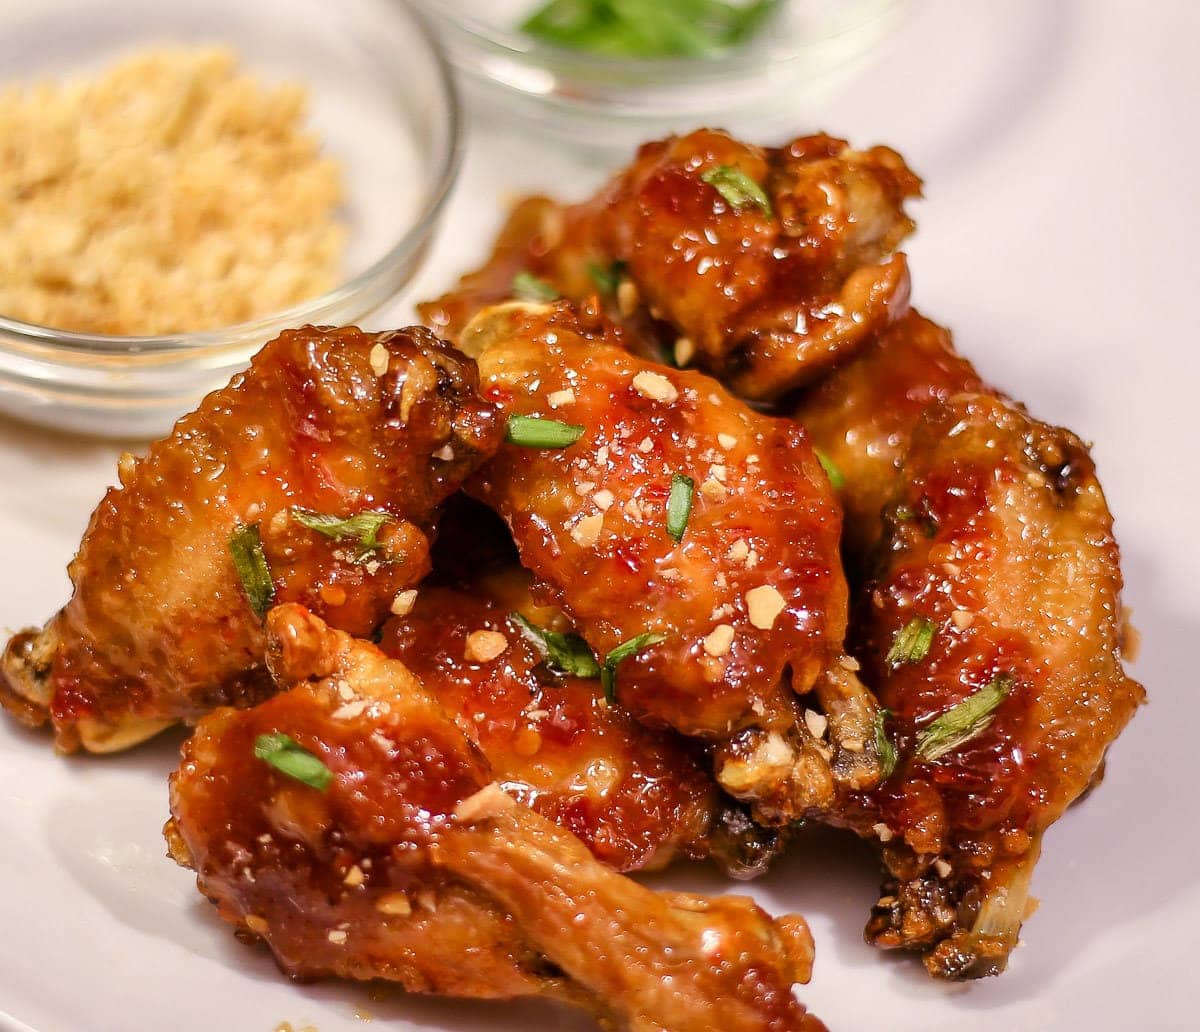
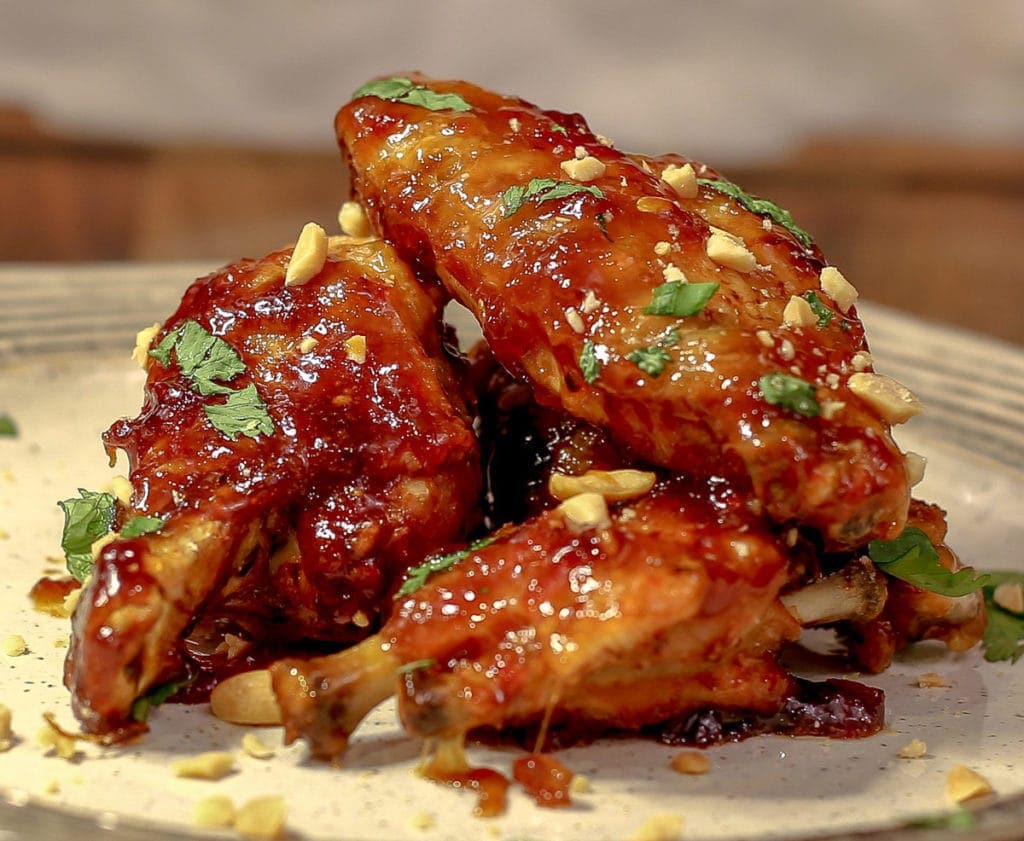
These Asian Sticky Wings are the best wings I have ever eaten! That's saying a lot, because I'm very picky. If wings aren't crispy, they are not worth eating, in my book. It's almost unbelievable that these wings were made in the Ninja Foodi! No oil. Not a drop.
Would you like to save this recipe?
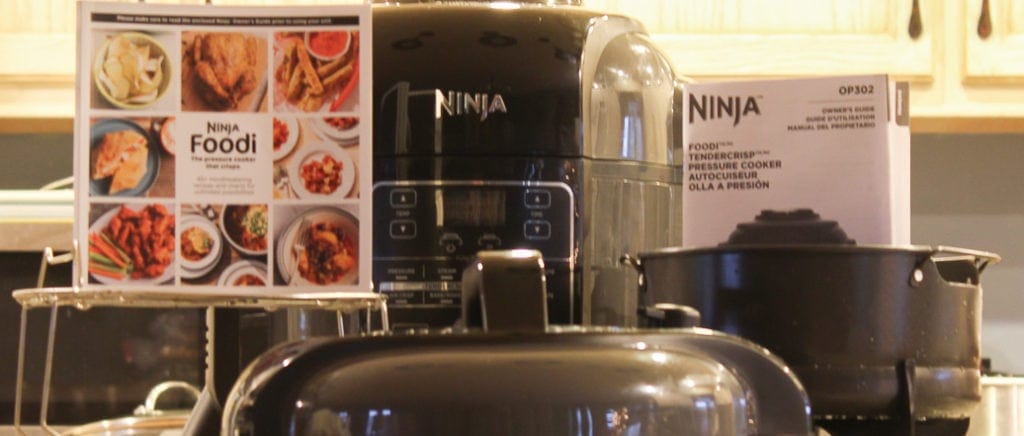
What is the Ninja Foodi?
Only the greatest kitchen appliance in the land. It's true. The Ninja Foodi is the KING of my kitchen right now. Seriously. I might be in love. Okay, okay... I know I'm in love. There, I've said it. I'm in love with a kitchen appliance. Whew... I'm lucky to have you to confide in. Not everyone would understand.
I almost didn't even meet King Ninja Foodi. I didn't know he was out there in appliance land. I was looking at getting another Instant Pot. I still do love my Instant Pot, by the way. I know I'm a two-timer. I can't help it; both are so wonderful!
So... while I was trying to decide if I even needed a second Instant Pot; my friend, Robin, started posting about her new Ninja Foodi. Her what? To be completely honest, I wasn't even that interested. A Ninja Foodi? I chuckled to myself, "What in the world can that do better than my Instant Pot?" Then, I looked it up. And my eyes got very big and my bank account got a little smaller. It was worth it! Robin is my HERO! Thank you, Robin!
Basically, the Ninja Foodi is a pressure cooker that air fries... but it also sautes, sears, bakes, dehydrates, and more! WOW! I'm imaging all the recipes I could make with that. Wings weren't one of them. Why? Because there is no way an air fryer is going to get wings crispy like I like them. I was a doubter. And to be honest, I probably would not have even attempted this Ninja Foodi recipe for Asian Sticky Wings if it wasn't for starting a Facebook Group called Ninja Foodi 101.
It seems almost all new Ninja Foodi owners get their feet wet with wings and if I'm going to be the head of the newbie group, Ninja Foodi 101... I'd better, at least, have attempted to air fry some wings. So, I did. I was shocked. They were the crispiest, best tasting wings I have ever had. No joke. To put this in perspective, I'm the girl who will drive over a hundred miles just to stop at a place that has good wings.
If you don't have a Ninja Foodi yet and want to see what you can expect when it arrives, check out my unboxing video on YouTube. Then... buy one! You will not regret it!
Before you cook with the Ninja Foodi for the first time, be sure to do a pressure test. It's easy and takes just a few minutes. Watch the video below to see how it is done.
Making Crispy Wings in the Ninja Foodi
There are a few tips I want to share on making the crispiest wings in the Ninja Foodi.
- Pressure cook the wings for a few minutes before using the Tender Crisp function- this softens the skin and plumps it up, which makes the wings extra crispy.
- After pressure cooking, remove the wings and dry them as much as you can. Removing the moisture from the skin will result in a crispy wing.
- Dump the water from the pot before air frying (Tender Crisp), even if you aren't making the sauce in this recipe. The increased steam and humidity from air frying with water in the pot reduces the crispiness.
How to make Asian Sticky Wings in the Ninja Foodi
I have a full video on making this recipe for Asian Sticky Wings in the Ninja Foodi on my YouTube Channel; The Salted Pepper or you can scroll down to the recipe and it's posted there as well.
I can hardly believe how easy it is to make wings that taste like they are fried without one drop of oil. Not one single drop. I have tested this recipe several times and each time I felt like I was eating the best fried wings I've ever had. Here is how you do it.
Step One:
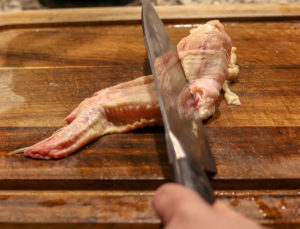
I used fresh chicken wings that I got in a pack from my local grocery store. If you are starting out with frozen wings, you will want to increase the pressure cook time to 3-4 minutes. If your wings are whole like mine were, use a very sharp knife to separate the wing at the joint like shown in the picture. Also cut the tip off of the wing. No need to season at this point.
Add 2 cups of water to the inner pot and place the rack in the low position inside the pot. Place wings on a single layer on the rack that came with your Ninja Foodi on the low position. Place the pressure lid on and turn the valve to seal. Set pressure on High and the time for 2 minutes. When the time is up, immediately release the pressure and remove the lid when all the pressure has been released.
Step Two:
While the wings are pressure cooking, make the sauce. In a bowl, combine rice vinegar, zest & juice from a small orange or tangelo, red pepper paste, freshly grated ginger, 2 cloves of minced garlic, ½ teaspoon fine grind sea salt, honey. I make my own red chili pepper paste by pressure cooking 1 ½ lbs of Fresno chili peppers with 2 cups of water and 1Tbsp lemon juice for 10 minutes on high pressure, natural release x 10 minutes, then release the rest of the pressure. Then I puree in a blender and add ½ teaspoon of salt and about 1 teaspoon of xanthan gum to thicken. You don't have to do that if you don't want to, you can usually find Gourmet Garden chili pepper paste in the produce department of many grocery stores.
Step Three:
Remove the chicken wings from the rack and place on paper towels. Pat dry until as much moisture has been removed as possible. Salt wings with remaining ½ teaspoon fine grind sea salt. It is not necessary to use the entire ½ tsp, just sprinkle the salt over the wings. Dump the water out of the inner Ninja Foodi pot and rinse.
Step Four:
Put the Asian sauce in the inner pot of the Ninja Foodi. Place the rack in the low position into the inner pot. Put the dried wings in a single layer on the rack. Set the Tender Crisp function to 390° F. for 30 minutes. Flip the wings every 10 minutes until desired color is reached.
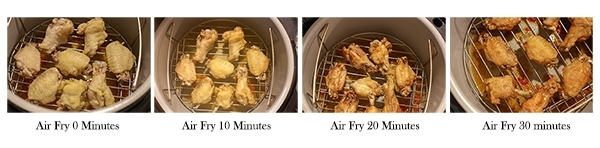
I let mine go the entire 30 minutes, but if you want to go longer, you will want to remove the sauce. At 30 minutes the Asian sauce will be thick and starting to brown cooking longer may burn the sauce. If the sauce is not thick enough, turn the pot to saute and cook until bubbly and thick. Using pot holders, lift the rack and dump the wings into the pot. Stir to coat with sauce. I sprinkled mine with crushed peanuts and green onions. Allow to cool just a few minutes. Serve and Enjoy!
More Recipes you can make in the Ninja Foodi
I have been super busy creating new and delicious recipes in the Ninja Foodi and am putting out new videos every week, so be sure to subscribe to The Salted Pepper's YouTube channel.
One of our favorites has been this recipe for Stuffed Chicken Breasts. While I don't have an official post on this yet, I did make a video and the recipe is listed in the description section.
Here are some of the tools I love using with the Ninja Foodi
Silicone Finger Grips make it so easy to lift things out of your Ninja Foodi.
The Mix N Chop is great for breaking up ground meats when sauteing.
The mini spatula is the perfect size for getting food out of the Ninja Foodi pot.
I use this silicone basting brush all the time for lightly coating food with oil before air frying. It is also great for greasing pans before baking.
*I may earn a small commission if you make a purchase after clicking these links. Please know that I only recommend products that I love and use in my own kitchen.
Most Instant Pot recipes can be made in the Ninja Foodi, here are some you may enjoy. Make sure to pin them for later!


Ninja Foodi Asian Sticky Wings
Ingredients
Would you like to save this recipe?
Instructions
- Add 2 cups of water to the inner pot and place the rack in the low position inside the pot. Place wings on a single layer on the rack that came with your Ninja Foodi on the low position. Place the pressure lid on and turn the valve to seal. Set pressure on High and the time for 2 minutes. When the time is up, immediately release the pressure and remove the lid when all the pressure has been released.
- In a bowl, combine rice vinegar, zest & juice from a small orange or tangelo, red pepper paste, freshly grated ginger, 2 cloves of minced garlic, ½ teaspoon fine grind sea salt, honey.
- Remove the chicken wings from the rack and place on paper towels. Pat dry until as much moisture has been removed as possible. Salt wings with remaining ½ teaspoon fine grind sea salt.
- Dump the water from pressure cooking. Put the Asian sauce in the inner pot of the Ninja Foodi. Place the rack in the low position into the inner pot. Put the dried wings in a single layer on the rack. Set the Tender Crisp function to 390° F. for 30 minutes. Flip the wings every 10 minutes until desired color is reached. See post for timing and color chart.
- Dump wings into pot and stir to coat with sauce. Remove from pot and allow to cool slightly before eating. Enjoy!
Optional Toppings
- Sprinkle wings with crushed peanuts, chopped cilantro, and / or chopped green onions.
Moti says
Hi Louise,
The first time I tried this I worked from the printed recipe. Unfortunately, the instruction to dump the water from the pressure cooker doesn't appear here, only in the longer article. Please add it!
The second time the result was very good except that the sauce dried out after spending 20-30 minutes in the inner pot. Wouldn't it be better to add the sauce at the end??
Louise says
Thank you so much for bringing that to my attention and I will fix it right now. As far as the sauce goes, there should be enough liquid so that it reduces to a sticky sauce, but not become dry during the air frying time. However, if you think the sauce is getting too thick, then I would probably make it on the stove or in the Foodi pot, but then remove it when it is the consistency you want.
Sharon S. says
Yes, M’am, the Salted Pepper just continues to amaze us…. I usually make crispy wings with oil, baking powder and spices. Then dip in chunky blue cheese or ranch dressing. But these NF Asian Sticky Wings are fabulous. A lovely change from my norm. And oh, that sauce, and the crushed peanuts are just the cherry on the top. These will be popular in our house now…
Louise says
I'm so glad you liked them!
Melanie says
These are amazing. Thank you Louise! I made 4 lbs and 4x’s the sauce recipe. We have a wing lovin’ family. I followed the recipe instructions except cooked the sauce in a pan on the stove. The chicken came out dry probably because I didn’t have the sauce in the foodie. Today I’m doing a re-do and cooking the chicken on the grill xl and the sauce in a fry pan so it will camamelize faster. I’m looking forward to it being perfect this time. The sauce is incredible. I also add a lot of sriracha to spice it up more and served with a delicious spinach salad.
Louise says
It may be the size of your chicken wings. Mine were fresh and they were pretty meaty. Only cook them to how you like them. I'm glad you love the sauce!
Debbie says
You are amazing and have helped so many of us shine with our foodi. I haven’t used my oven in months.Every recipe of yours has just come out perfect, the only downfall is my husband doesn’t want to eat out anymore, says my cooking is better and we KNOW what we’re eating🤣🤣
Louise says
I consider that a huge compliment! Thank you!
Terry says
Louise, You and your recipes are the BOMB!!!! I'm new to this but every recipe of yours has been spot on for seasoning and cook times. My husband and I just LOVE your recipes! Thank You!!!
Louise says
Thank you so much!