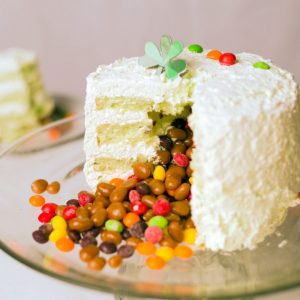
 Yep, you read that right. We are making a Cascading Candy Cake in the Ninja Foodi and it couldn't be easier! See all that lovely candy cascading out of the center? How cool is that? Way Cool!
Have you seen those cakes that when you cut them, the candy pours out? That's a Candy Explosion Cake and guess what? We are making one in the Ninja Foodi, but can we really call it an explosion cake?
This post may contain affiliate links. If you make a purchase after clicking a link, I may earn a small commission. Thank you for your support!
Candy Avalanche Cake -VS- Cascading Candy Cake
My husband has this thing for words and when I told him the cake is called an explosion cake, he looked at me funny and asked, "Does it blow up?" Umm, no... that would be dangerous. Then he calmly said, "then it isn't an explosion cake."
Okay, how can I argue with that logic? You can't, you rename the cake! So, after running various names by husband, Candy Avalanche Cake was named.
After the video was done and I sat down to write the recipe post, I thought to myself... why didn't I name it Cascading Candy Cake? That's catchy, isn't it? I thought so and I renamed the cake!
When you watch the YouTube video, you will hear me refer to it as an avalanche cake, but that won't be confusing because you are awesome and you are reading this recipe post!
My Epic Fail!
I have to share the story behind the Cascading Candy Cake and how my epic fail forced me to re-think my strategy and I ended up with this cool cake as a result.
I started out making my traditional St. Patrick's Day pistachio cake in the Ninja Foodi. Of course, I could have just baked the pistachio cake in the Ninja Foodi and you would be reading a post about a very delicious pistachio cake. However, I decided to pressure cook the cake.
It was a disaster. A complete disaster. The cake was hard, chewy and dense and just gross in 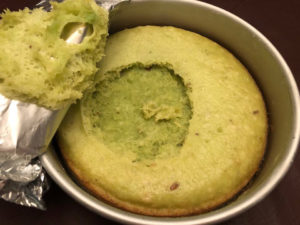
Not one to give up, I started thinking. I knew I could use a bundt cake pan... but I didn't want a bundt cake. I wanted to make a layered cake with the pistachio cream icing. I'm stubborn, I know it.
I decided to try to use biscuit cutters in the center of my 6" Fat Daddio Cake Pans. I was thinking, the aluminium biscuit cutters will heat up and help cook the center of the cake. Of course I had no idea how I would get them out, but one thing at a time. Let's make the cake.
So, I did... and it worked. I decided that I could remove the center biscuit cutter and the cake baked inside and then plug the hole with the cake before assembling it. When I removed the center, I knew immediately what to do! Fill it with candy and call it Candy Explosion Cake Candy Avalanche Cake Cascading Candy Cake!
Have you ever had a Pistachio Cake?
If not, I urge to give it a try. If you have, then you already know how delicious it is. There is something really special about this Pistachio Cake, maybe it's my memories of childhood and mom making it every St. Patrick's Day. Or maybe it's because it is the lightest, moistest, creamiest cake I've ever tasted. Now, I have a secret to confess.
This Cascading Candy Cake is a box of white cake mix with a box of pistachio pudding. I'm so glad that is out in the open now. I've truly been worried. You know my thoughts on Real Life ~ Real Food ~ Real Simple. I hardly EVER use boxed anything or a prepared whipped topping, but this is REAL LIFE and in REAL LIFE there are always exceptions. This is one of them and I don't regret it one bit. You won't either.
Can I change the flavor of the Cascading Candy Cake?
Of course! Although I really urge you to try the pistachio cake at least once, I understand that it may not be your thing and that's okay.
You can use any cake flavor you like, with or without pudding added to the mix. You can also use any type of icing you like.
This pistachio cake with pudding added is a super moist cake and I think that prevented a more robust cascade because the candy clung to the cake. You can probably avoid this by skipping the pudding and using a traditional buttercream icing that you also line the hole with and cover in candy before filling the center with additional candy.
What type of Candy can I use?
You can use pretty much any small candy that you like, but there are a few things to keep in mind.
Hard shell candies work much better than chocolate coated candies because the chocolate tends to sweat inside the cake and doesn't cascade as well. In fact, I think that happened a bit with my choice of sugar babies. Here are a few examples of candies I think will work the best:
- Skittles
- Sugar Babies
- M&M's
- Sprinkles
- Sixlets
- Sweet Tarts
- Jelly Beans
There are many more of course, but this should give you an idea. I would stay way from gummy candies as they will stick together and not fall as easily out of the Cascading Candy Cake.
Can I make the Cascading Candy Cake ahead of time?
Yes, up to a point. You can cook and freeze the cake layers up to a month in advance. You can even assemble the first three layers a day or so ahead of time.
You will want to make sure the cake is wrapped well in plastic wrap and be careful not to squeeze out the filling between the layers. Wrap the top layer separately and don't fill the cake until the day you want to serve it.
Once you fill the Cascading Candy Cake with candy and finish assembling the cake, you can refrigerate it for a couple of hours. Any longer than that and the candy just doesn't cascade as nicely.
How to serve the Cascading Candy Cake
When you are ready to cut into the cake, you want to make the first slice on the large side, 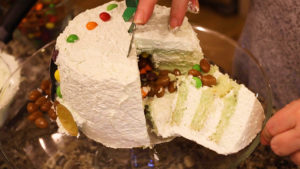
After that first slice is cut, you cut the slices as small as you like.
How to make the Cascading Candy Cake
The first thing you want to do is gather all of your ingredients and supplies needed. Here is a list of the items I used to make this cake:
- 1 box white cake mix (with ingredients to make the cake)
- 1 cup club soda
- almond emulsion
- 2 (8oz) containers of whipped topping
- 2 packages of pistachio pudding
- your choice of candy (about 2 cups)
- 2 (6") round cake pans
- 6" parchment round
- spreader for icing
- cake plate
Prepare your cake pans by lightly coating with pan grease or any type of grease you like and flour. I really love this recipe for Bakery Pan Grease because I can make up a batch and either freeze it or put it in the fridge until I'm ready to use it. Nothing sticks when I use this recipe, it's seriously fantastic!
Mix up the cake mix per the package instructions. If you are making the pistachio cake like I did, I recommend substituting club soda for the water. This really lightens the cake up and even helps it to rise a bit more. You can use the club soda instead of water in any flavor cake mix, but I haven't tried it in anything other than this pistachio cake.
I also add in 1 teaspoon of Almond Bakery Emulsion and 1 package of pistachio pudding to the pistachio cake. If you making a different flavor, I would add 1 teaspoon of vanilla extract.
Evenly divide cake batter between 2 (6") flat walled cake pans, placing the batter 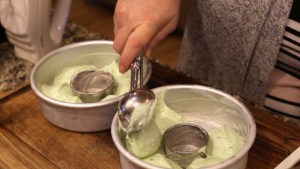
If you want to use 8" cake pans, that is fine, but you will need two boxes of cake mix and there will be some batter left over. You only want to fill the cake pans ⅔rds of the way full to keep the batter from spilling over when cooked.
Cover both pans with aluminium foil and place on the rack that came with the Ninja Foodi. I used this silicone waffle mold as a buffer between the cake pans. The waffle mold hasn't proven useful for waffles, like my husband was hoping... but I do use it as a low trivet 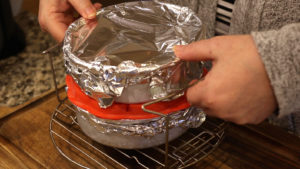
Place one cup of water into the inner pot of the Ninja Foodi and place the rack, on the low position, with both cake pans into the inner pot of the Ninja Foodi. Set the pressure to high and the time for 21 minutes. Make sure the valve is turned to seal and press start.
When the time is up, allow to natural release for 10 minutes and then manually release the rest of the pressure.
Remove the rack and the cakes from the Ninja Foodi and let them sit for at least 5 minutes, and then carefully remove the aluminum foil. Run a cake tester or knife around the edges to make sure the cake is not stuck. I use a cake tester from Pampered Chef and, let me tell you, I have found so many uses for it with the Ninja Foodi!
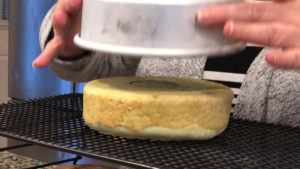
Remove the biscuit cutter carefully from the center. What I do is gently turn and pull up to remove it. If it is really stuck, then run the cake tester around the outer edges to loosen. Reserve the center pieces in case you need to use them as a plug for the top layer.
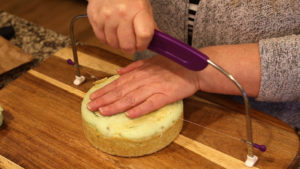
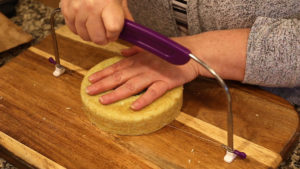
Now, let's level the cakes. The first thing you want to do is take the uneven tops off of each cake. You can use a long serrated knife and your eyes to cut of the uneven parts or you can use a cake leveler like I use. The one I have is a 10" cake leveler from Wilton and it's super inexpensive and works great for my needs.
Split each cake into two layers. I do this fast and easy with that cake leveler I have, but you can also use a serrated knife to cut straight through the middle of each cake. You want to have 4 cake layers about the same height. If you get lucky, like I did, one of the tops won't have a hole in it and you can use this as the top layer. If not, no worries. We will use one of the center pieces to create a plug for the top layer.
Combine 16 oz of cool whip to 1 package of pistachio pudding mix and mix together until the dry pudding mix is incorporated into the cool whip.
Stack the cake. Pick a sturdy layer to be the base of your cake and cut a 6" parchment round. Place the parchment round on the 6" cake pan turned upside down. Place the cake 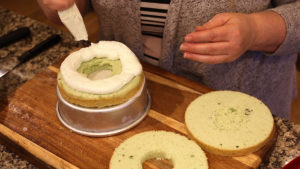
Candy time! Fill the cake with the candy of your choice and create a small mound on 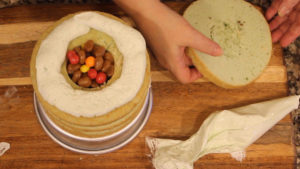
Using an offset icing spatula or butter knife, dump about a cup of the cool whip/ pudding mixture on top of the cake and spread down the sides. Turn the cake pan as you need too, until the all the sides of the cake have a layer of the cool whip. Then scrape off the top, 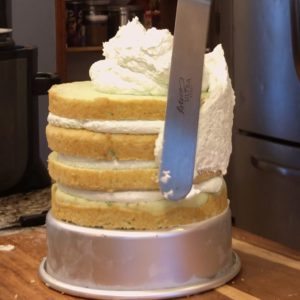
Decorate how you like and get ready to cut the cake!
When you are ready to cut the cake, you want to make the first slice fairly large. I went about ⅕th of the cake for the first slice to allow the candy to cascade.
Cascading Candy Cake
Print Recipe Pin RecipeIngredients
- 1 box white cake mix plus ingredients on package
- 2 packages pistachio pudding dry and divided
- ½ teaspoon almond emulsion
- 1 cup club soda substitute for water in cake recipe when making pistachio cake
- 2 8oz cool whip
Instructions
- Prepare your 6" cake pans by lightly coating with bakery pan grease (see post for details). Set 2 similar sized biscuit cuttesr into the center of the cake pans. You want about a 2" size hole
- Mix up the cake mix per the package instructions. If you are making the pistachio cake like I did, I recommend substituting club soda for the water. Also add 1 tps almond emulstion or extract if making pistachio cake. All other flavors, add vanilla extract or other extract of choice.
- Evenly divide cake batter between 2 (6") flat walled cake pans, placing the batter around the outside of the biscuit cutter. See post for more details.
- Cover both pans with aluminium foil and place on the rack that came with the Ninja Foodi. I used a silicone waffle mold as a buffer between the cake pans.
- Place one cup of water into the inner pot of the Ninja Foodi and place the rack with both cake pans into the inner pot of the Ninja Foodi. Set the pressure to high and the time for 21 minutes. Make sure the valve is turned to seal and press start. When the time is up, allow to natural release for 10 minutes and then manually release the rest of the pressure.
- Remove the rack and the cakes from the Ninja Foodi and let them sit for at least 5 minutes. then carefully remove the aluminum foil. Run a cake tester or knife around the edges to make sure the cake is not stuck.
- Flip the cakes onto cooling racks. Allow to cool completely. You can pop them in the fridge to speed up the process. Carefully remove the biscuit cutters from the center and keep the middle cake part in case you need it later.
- Take the uneven tops off of each cake. You can use a long serrated knife and your eyes to cut of the uneven tops or you can use a cake leveler.
- Split each cake into two layers. I do this fast and easy with that cake leveler I have, but you can also use a serrated knife to cut straight through the middle of each cake. You want to have 4 cake layers about the same height. If you get lucky, like I did, one of the tops won't have a hole in it and you can use this as the top layer. If not, no worries. We will use one of the center pieces to create a plug for the top layer.
- Combine 16 oz of cool whip to 1 package of pistachio pudding mix and mix together until the dry pudding mix is incorporated into the cool whip.
- Place the parchment round on the 6" cake pan turned upside down. Place one cake layer on top. Pipe the cool whip/pudding mixture on the top of the cake so it is about ½"-1" high. Repeat this process until you have 3 layers. Try to make sure the cake is level and you can push down on the top layer in spots if you need to adjust it, or add more cool whip if you have a noticeable slant.
- Fill the cake with the candy of your choice and create a small mound on top. Pipe the cool whip/pudding around the cake like we did for the other three layers and place on the top layer. If your top layer has a hole in it, just cut one of the pieces that was inside of the biscuit cutter to about an inch and put in the center to plug the hole. If your biscuit cutters are different sizes like mine were, use the center that is the same size as the hole.
- Using an offset icing spatula or butter knife, dump about a cup of the cool whip/ pudding mixture on top of the cake and spread down the sides. Turn the cake pan as you need too, until the all the sides of the cake have a layer of the cool whip. Then scrape off the top, leaving about ¼" or so of the cool whip frosting on top. Even out the sides by scraping around the cake and removing the excess. You can watch how I do this in the video below the recipe.

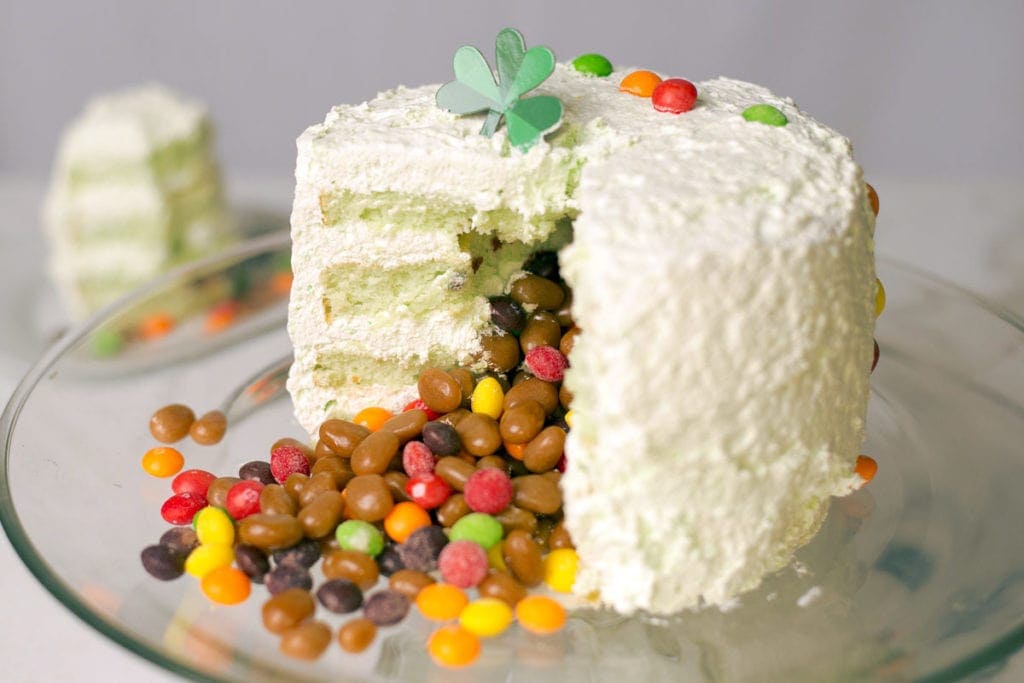 Yep, you read that right. We are making a Cascading Candy Cake in the Ninja Foodi and it couldn't be easier! See all that lovely candy cascading out of the center? How cool is that? Way Cool!
Debra Stansfield
Hi Louise:
I have made this cake 3 times in the past with no problems. Cake turned out perfect each time. Today, however, one of the cakes was very runny and gooey. Uncooked. The other one was fine. I cooked it exactly as I did the last 3 times, using the same brand cske mix, the same pans, same amount of cooking time, etc. Why do you suppose today's cake didn't work out?
As you know from one of my other comments here, I have had an issue with the pressure cooker lid catching on the inner pot on some (most) occasions and when this happens, the lid lifts the entire pot out of the foodi. I have googled this issue and have found several other people who have experienced or are experiencing the same issue. I have contacted the company and they are sending me a new unit. I know this is a long shot, but could this issue be what caused today's problem with my cake? I would love your input on what caused this.
Thank you
Louise
I am not positive what caused it and I'm curious if it was the top or bottom cake that didn't cook. It doesn't seem to make sense that a sticking lid would cause issues with the pressure cooking cycle unless it just isn't sealing well and there was heat/steam escaping the whole time, but in small enough amounts that you didn't notice. I hope the new one works better! Did you change anything else, like the type of cake mix or anything like that?
Debra Stansfield
Hi Louise:
I just attempted to make this cake for the 4th time. First 3 times, it came out perfect, but today the center of the top cake was sopping wet - appears not to have cooked at all, just raw and gooey I did everything exactly the same as always, used the exact same pans, etc. Any idea what may have happened? As you know, for the last month or so, I have had an issue with the pressure lid attaching to the pot occasionally when I try to remove the lid after pressure cooking. I see on the reviews that several other people are experiencing the same issue. Nothing has cooked quite right since this issue began. I am awaiting a new unit from customer care. Anyway, I know it's a long shot but I am wondering if this could be what caused my cake to not work today? What do you think it could be?
Louise
That's kind of strange that it was the top cake and that tells me that there was probably some issue with heat/steam escaping through the lid. Have you tried removing the silver cap on the underside of the lid?