

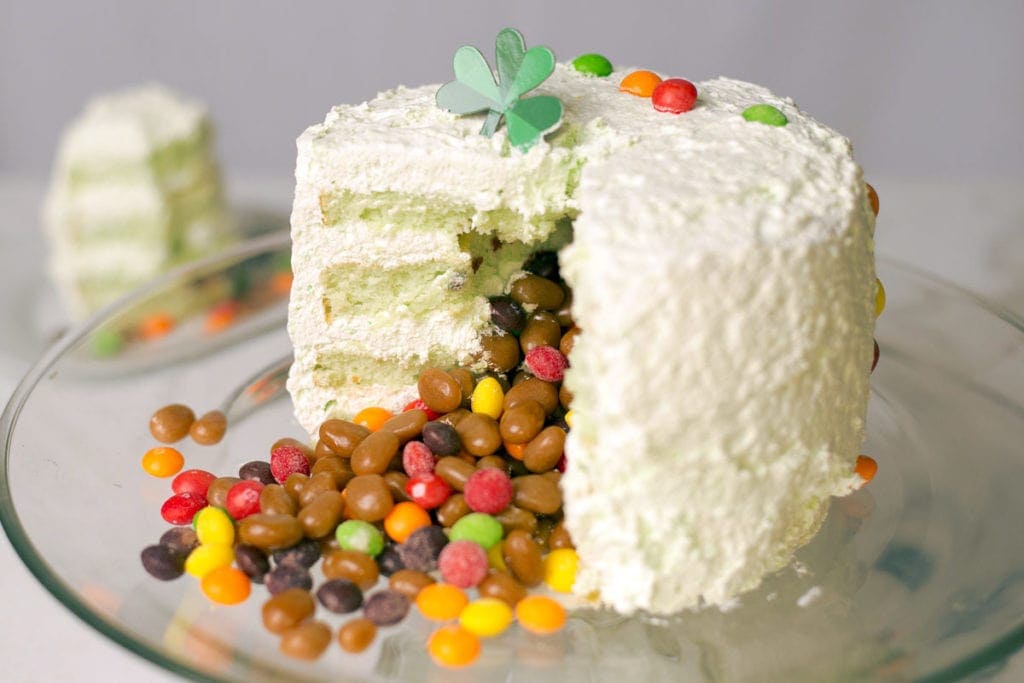
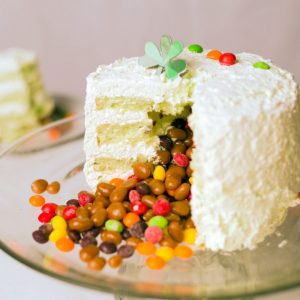
 Yep, you read that right. We are making a Cascading Candy Cake in the Ninja Foodi and it couldn't be easier! See all that lovely candy cascading out of the center? How cool is that? Way Cool!
Have you seen those cakes that when you cut them, the candy pours out? That's a Candy Explosion Cake and guess what? We are making one in the Ninja Foodi, but can we really call it an explosion cake?
This post may contain affiliate links. If you make a purchase after clicking a link, I may earn a small commission. Thank you for your support!
Candy Avalanche Cake -VS- Cascading Candy Cake
My husband has this thing for words and when I told him the cake is called an explosion cake, he looked at me funny and asked, "Does it blow up?" Umm, no... that would be dangerous. Then he calmly said, "then it isn't an explosion cake."
Okay, how can I argue with that logic? You can't, you rename the cake! So, after running various names by husband, Candy Avalanche Cake was named.
After the video was done and I sat down to write the recipe post, I thought to myself... why didn't I name it Cascading Candy Cake? That's catchy, isn't it? I thought so and I renamed the cake!
When you watch the YouTube video, you will hear me refer to it as an avalanche cake, but that won't be confusing because you are awesome and you are reading this recipe post!
My Epic Fail!
I have to share the story behind the Cascading Candy Cake and how my epic fail forced me to re-think my strategy and I ended up with this cool cake as a result.
I started out making my traditional St. Patrick's Day pistachio cake in the Ninja Foodi. Of course, I could have just baked the pistachio cake in the Ninja Foodi and you would be reading a post about a very delicious pistachio cake. However, I decided to pressure cook the cake.
It was a disaster. A complete disaster. The cake was hard, chewy and dense and just gross in 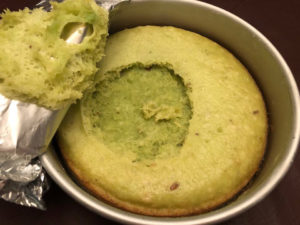 the middle. The edges were almost burnt (yes, you can burn food under pressure) and the whole cake was inedible.
Not one to give up, I started thinking. I knew I could use a bundt cake pan... but I didn't want a bundt cake. I wanted to make a layered cake with the pistachio cream icing. I'm stubborn, I know it.
I decided to try to use biscuit cutters in the center of my 6" Fat Daddio Cake Pans. I was thinking, the aluminium biscuit cutters will heat up and help cook the center of the cake. Of course I had no idea how I would get them out, but one thing at a time. Let's make the cake.
So, I did... and it worked. I decided that I could remove the center biscuit cutter and the cake baked inside and then plug the hole with the cake before assembling it. When I removed the center, I knew immediately what to do! Fill it with candy and call it Candy Explosion Cake Candy Avalanche Cake Cascading Candy Cake!
Have you ever had a Pistachio Cake?
If not, I urge to give it a try. If you have, then you already know how delicious it is. There is something really special about this Pistachio Cake, maybe it's my memories of childhood and mom making it every St. Patrick's Day. Or maybe it's because it is the lightest, moistest, creamiest cake I've ever tasted. Now, I have a secret to confess.
This Cascading Candy Cake is a box of white cake mix with a box of pistachio pudding. I'm so glad that is out in the open now. I've truly been worried. You know my thoughts on Real Life ~ Real Food ~ Real Simple. I hardly EVER use boxed anything or a prepared whipped topping, but this is REAL LIFE and in REAL LIFE there are always exceptions. This is one of them and I don't regret it one bit. You won't either.
Can I change the flavor of the Cascading Candy Cake?
Of course! Although I really urge you to try the pistachio cake at least once, I understand that it may not be your thing and that's okay.
You can use any cake flavor you like, with or without pudding added to the mix. You can also use any type of icing you like.
This pistachio cake with pudding added is a super moist cake and I think that prevented a more robust cascade because the candy clung to the cake. You can probably avoid this by skipping the pudding and using a traditional buttercream icing that you also line the hole with and cover in candy before filling the center with additional candy.
What type of Candy can I use?
You can use pretty much any small candy that you like, but there are a few things to keep in mind.
Hard shell candies work much better than chocolate coated candies because the chocolate tends to sweat inside the cake and doesn't cascade as well. In fact, I think that happened a bit with my choice of sugar babies. Here are a few examples of candies I think will work the best:
- Skittles
- Sugar Babies
- M&M's
- Sprinkles
- Sixlets
- Sweet Tarts
- Jelly Beans
There are many more of course, but this should give you an idea. I would stay way from gummy candies as they will stick together and not fall as easily out of the Cascading Candy Cake.
Can I make the Cascading Candy Cake ahead of time?
Yes, up to a point. You can cook and freeze the cake layers up to a month in advance. You can even assemble the first three layers a day or so ahead of time.
You will want to make sure the cake is wrapped well in plastic wrap and be careful not to squeeze out the filling between the layers. Wrap the top layer separately and don't fill the cake until the day you want to serve it.
Once you fill the Cascading Candy Cake with candy and finish assembling the cake, you can refrigerate it for a couple of hours. Any longer than that and the candy just doesn't cascade as nicely.
How to serve the Cascading Candy Cake
When you are ready to cut into the cake, you want to make the first slice on the large side, 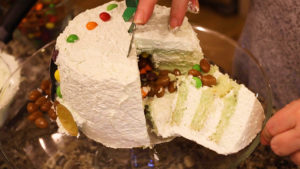 probably about ⅕th to ⅙th of the cake. This will allow better flow of the candy onto the cake plate. You can cut that first cake slice into several servings.
After that first slice is cut, you cut the slices as small as you like.
How to make the Cascading Candy Cake
The first thing you want to do is gather all of your ingredients and supplies needed. Here is a list of the items I used to make this cake:
- 1 box white cake mix (with ingredients to make the cake)
- 1 cup club soda
- almond emulsion
- 2 (8oz) containers of whipped topping
- 2 packages of pistachio pudding
- your choice of candy (about 2 cups)
- 2 (6") round cake pans
- 6" parchment round
- spreader for icing
- cake plate
Prepare your cake pans by lightly coating with pan grease or any type of grease you like and flour. I really love this recipe for Bakery Pan Grease because I can make up a batch and either freeze it or put it in the fridge until I'm ready to use it. Nothing sticks when I use this recipe, it's seriously fantastic!
Mix up the cake mix per the package instructions. If you are making the pistachio cake like I did, I recommend substituting club soda for the water. This really lightens the cake up and even helps it to rise a bit more. You can use the club soda instead of water in any flavor cake mix, but I haven't tried it in anything other than this pistachio cake.
I also add in 1 teaspoon of Almond Bakery Emulsion and 1 package of pistachio pudding to the pistachio cake. If you making a different flavor, I would add 1 teaspoon of vanilla extract.
Evenly divide cake batter between 2 (6") flat walled cake pans, placing the batter 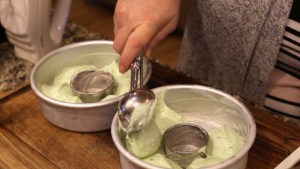 around the outside of the biscuit cutters. I use and love the cake pans from Fat Daddio. In order for this recipe to work in the Ninja Foodi or any pressure cooker, you either have to have flat walled sides or a way to separate the cake pans so one doesn't fall into the other one. You will also have to do some trimming. You can check to see of your pans are flat walled, by stacking them on top of each other and if the top one does not nest into the bottom one, you are good to go.
If you want to use 8" cake pans, that is fine, but you will need two boxes of cake mix and there will be some batter left over. You only want to fill the cake pans ⅔rds of the way full to keep the batter from spilling over when cooked.
Cover both pans with aluminium foil and place on the rack that came with the Ninja Foodi. I used this silicone waffle mold as a buffer between the cake pans. The waffle mold hasn't proven useful for waffles, like my husband was hoping... but I do use it as a low trivet 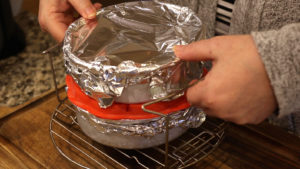 when doing pot in pot cooking as well as in this recipe.
Place one cup of water into the inner pot of the Ninja Foodi and place the rack, on the low position, with both cake pans into the inner pot of the Ninja Foodi. Set the pressure to high and the time for 21 minutes. Make sure the valve is turned to seal and press start.
When the time is up, allow to natural release for 10 minutes and then manually release the rest of the pressure.
Remove the rack and the cakes from the Ninja Foodi and let them sit for at least 5 minutes, and then carefully remove the aluminum foil. Run a cake tester or knife around the edges to make sure the cake is not stuck. I use a cake tester from Pampered Chef and, let me tell you, I have found so many uses for it with the Ninja Foodi!
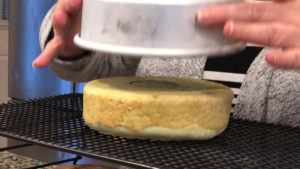 Flip the cakes onto cooling racks. I love my stackable cooling racks from Pampered Chef. They are such a space saver. If you want to see how I do this, please watch the video on YouTube or at the end of the recipe in this post. Allow to cool completely. You can pop them in the fridge to speed up the process.
Remove the biscuit cutter carefully from the center. What I do is gently turn and pull up to remove it. If it is really stuck, then run the cake tester around the outer edges to loosen. Reserve the center pieces in case you need to use them as a plug for the top layer.
Now, let's level the cakes. The first thing you want to do is take the uneven tops off of each cake. You can use a long serrated knife and your eyes to cut of the uneven parts or you can use a cake leveler like I use. The one I have is a 10" cake leveler from Wilton and it's super inexpensive and works great for my needs.
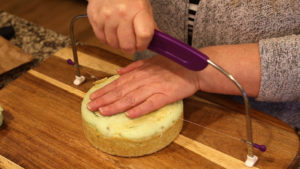
Split each cake into two layers. I do this fast and easy with that cake leveler I have, but you can also use a serrated knife to cut straight through the middle of each cake. You want to have 4 cake layers about the same height. If you get lucky, like I did, one of the tops won't have a hole in it and you can use this as the top layer. If not, no worries. We will use one of the center pieces to create a plug for the top layer.

Combine 16 oz of cool whip to 1 package of pistachio pudding mix and mix together until the dry pudding mix is incorporated into the cool whip.
Stack the cake. Pick a sturdy layer to be the base of your cake and cut a 6" parchment round. Place the parchment round on the 6" cake pan turned upside down. Place the cake 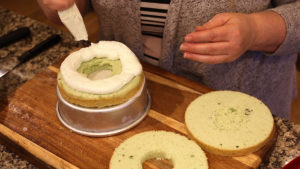 layer on top. Pipe the cool whip/pudding mixture on the top of the cake so it is about ½"-1" high. I like to use these disposable decorating bags, but you can use a plastic baggy and just cut the corner off, or you can use a regular decorating bag. Place the second layer on top, pipe the cool whip/ pudding mixture on top, and repeat for the third layer. Look to see if your cake is level and make any adjustments needed.
Candy time! Fill the cake with the candy of your choice and create a small mound on 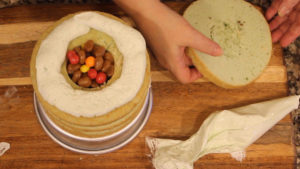 top. Pipe the cool whip/pudding around the cake like we did for the other three layers and place on the top layer. If your top layer has a hole in it, just cut one of the pieces that was inside of the biscuit cutter to about an inch and put in the center to plug the hole. If your biscuit cutters are different sizes like mine were, use the center that is the same size as the hole.
Using an offset icing spatula or butter knife, dump about a cup of the cool whip/ pudding mixture on top of the cake and spread down the sides. Turn the cake pan as you need too, until the all the sides of the cake have a layer of the cool whip. Then scrape off the top, 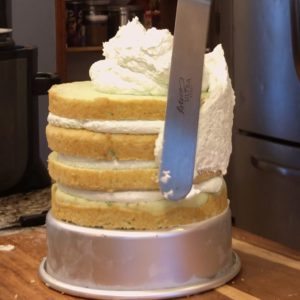 leaving about ¼" or so of the cool whip frosting on top. Even out the sides by scraping around the cake and removing the excess. You can watch how I do this in the video below the recipe.
Decorate how you like and get ready to cut the cake!
When you are ready to cut the cake, you want to make the first slice fairly large. I went about ⅕th of the cake for the first slice to allow the candy to cascade.
Cascading Candy Cake
Ingredients
- 1 box white cake mix plus ingredients on package
- 2 packages pistachio pudding dry and divided
- ½ teaspoon almond emulsion
- 1 cup club soda substitute for water in cake recipe when making pistachio cake
- 2 8oz cool whip
Would you like to save this recipe?
Instructions
- Prepare your 6" cake pans by lightly coating with bakery pan grease (see post for details). Set 2 similar sized biscuit cuttesr into the center of the cake pans. You want about a 2" size hole
- Mix up the cake mix per the package instructions. If you are making the pistachio cake like I did, I recommend substituting club soda for the water. Also add 1 tps almond emulstion or extract if making pistachio cake. All other flavors, add vanilla extract or other extract of choice.
- Evenly divide cake batter between 2 (6") flat walled cake pans, placing the batter around the outside of the biscuit cutter. See post for more details.
- Cover both pans with aluminium foil and place on the rack that came with the Ninja Foodi. I used a silicone waffle mold as a buffer between the cake pans.
- Place one cup of water into the inner pot of the Ninja Foodi and place the rack with both cake pans into the inner pot of the Ninja Foodi. Set the pressure to high and the time for 21 minutes. Make sure the valve is turned to seal and press start. When the time is up, allow to natural release for 10 minutes and then manually release the rest of the pressure.
- Remove the rack and the cakes from the Ninja Foodi and let them sit for at least 5 minutes. then carefully remove the aluminum foil. Run a cake tester or knife around the edges to make sure the cake is not stuck.
- Flip the cakes onto cooling racks. Allow to cool completely. You can pop them in the fridge to speed up the process. Carefully remove the biscuit cutters from the center and keep the middle cake part in case you need it later.
- Take the uneven tops off of each cake. You can use a long serrated knife and your eyes to cut of the uneven tops or you can use a cake leveler.
- Split each cake into two layers. I do this fast and easy with that cake leveler I have, but you can also use a serrated knife to cut straight through the middle of each cake. You want to have 4 cake layers about the same height. If you get lucky, like I did, one of the tops won't have a hole in it and you can use this as the top layer. If not, no worries. We will use one of the center pieces to create a plug for the top layer.
- Combine 16 oz of cool whip to 1 package of pistachio pudding mix and mix together until the dry pudding mix is incorporated into the cool whip.
- Place the parchment round on the 6" cake pan turned upside down. Place one cake layer on top. Pipe the cool whip/pudding mixture on the top of the cake so it is about ½"-1" high. Repeat this process until you have 3 layers. Try to make sure the cake is level and you can push down on the top layer in spots if you need to adjust it, or add more cool whip if you have a noticeable slant.
- Fill the cake with the candy of your choice and create a small mound on top. Pipe the cool whip/pudding around the cake like we did for the other three layers and place on the top layer. If your top layer has a hole in it, just cut one of the pieces that was inside of the biscuit cutter to about an inch and put in the center to plug the hole. If your biscuit cutters are different sizes like mine were, use the center that is the same size as the hole.
- Using an offset icing spatula or butter knife, dump about a cup of the cool whip/ pudding mixture on top of the cake and spread down the sides. Turn the cake pan as you need too, until the all the sides of the cake have a layer of the cool whip. Then scrape off the top, leaving about ¼" or so of the cool whip frosting on top. Even out the sides by scraping around the cake and removing the excess. You can watch how I do this in the video below the recipe.
Debra Stansfield says
Just made this little piece of heaven for the first time and it worked out perfectly! I sm NOT a cook or a baker. In fact, I have ALWAYS hated cooking and baking. I guess because I was never very good at it. Anytime I cooked in the past, it was always something simple like KD for the kids, or maybe a turkey on Thanksgiving every now and again, but I was never one to really go beyond the basic. So even though I am 59, married 25 years and have grown children, I am still a "newbie" at cooking. So imagine my apprehension at trying what looked like a complicated recipe. Boy was I wrong! It came out perfectly on my very first try and the flavour is to die for! This is my new go to cake - especially for special occasions.
Louise, I could never have done it without you! Your recipes are simple, easy to follow, and you gave me the confidence to learn new recipes. Now, I love to cook and bake. So thank you for that! I look forward to learning new recipes.
Louise says
I'm so thrilled it turned out well and thank you for sending the pictures! It really looked great, even better than mine!
Debra Stansfield says
Hi again
I STILL haven't attempted to make this cake yet because there us a part in your video that confuses me. With the first cake, you took the biscuit cutter out perfectly bt twisting and gently pulling it. It us the part where you tried to take the other biscuit cutter out of the second cake and it got stuck. I have watched this video 3 times now and I still can't see where you remove the stuck one. I see you use the cake tester and run it around the outside and inside of biscuit cutter, but then at that point in the video you say you have to get it out, but then you say you only want to remove about 3/4 of the cake inside it. So I watch abd you take the center batter out if the biscuit cutter, but you don't remove the actual cutter. Am I missing something?
Debra Stansfield says
Hi Louise:
I am desperate! I have tried for 3 days last week to get ahold of ninja customer service with no luck so I am reaching out to you.
I have found that for about the last 3 weeks or so, whenever I remove the pressure cooker lid after cooking is complete, it gets CAUGHT on the pot and sometimes lifts the ENTIRE pot with it! I have checked to make sure the silicone ring is clean and attached properly, but it STILL catches and pulls the pot out/up. This can be dangerous because the pot could fall off suddenly and burn someone. Do you have any idea what could be causing this and, more importantly, how do i fix it? HELP!!
Louise says
I'm honestly at a loss as to why that is happening. Is there any change the pot is dented around the top? I have heard of this happening on occasion, but not every time. Try to contact Ninja through their FB page by sending a private message, they are usually really good about getting back to people that way. The only other thing is to call them, which I'm sure you have tried doing. Covid-19 is really hurting customer service departments in many companies.
Debra Stansfield says
Hi Louise:
I checked the pot and no dents, nicks, etc. It seems to happen only sometimes. It has worked fine the last 3 days. I took your advice and contacted them through Facebook. They are sending me a new machine.
Thank you for your help.
Debra Stansfield says
I want to attempt to make this cake, but I only have 7" baking pans that I bought specifically for my ninja foodi. They are 2" high. How long would I need to cook it for?
Louise says
I would only fill them 2/3rds of the way and cook for maybe 2 minutes less. I can't say for sure because I haven't tested the recipe in 7" pans.
Debra Joy Stansfield says
Hi Louise:
Let me start by saying that you are my "FOODI GURU" and I just LOVE your videos!
Anyway, I ended up purchasing 2 - 6" fat daddio pans as well as all the other accessories you used. I followed your directions EXACTLY, but for some reason, both cakes were cracked on the bottom??? I am not sure why it happened. Any thoughts?
Louise says
Hi Debra! Thanks so much. Do you by chance have the 8qt model? I'm not sure why your cakes would crack, but I'm wondering if the time to pressure was more, which is longer cook time. Did you use the biscuit cutters in the center? How was the texture of the cake over all? I'm thinking it overcooked for some reason. Did it stick? Sorry for all the questions, but I'd love to figure out why it didn't work for you.
Debra Stansfield says
Hi Louise:
Here are the answers to your questions:
1) I have the 6 quart foodi
2) yes, I used 2" biscuit cutters
3) overall texture of cake was moist (perfect).
4) no, it did not stick
So that is why I am confused on why it cracked!
Debra Joy Stansfield says
Hi again Louise:
I am curious about a couple of things with this recipe.
I am wondering if, instead of using biscuit cutters in the center of each cake, if a simple, one piece tube pan would work (not a 2 piece angel food pan). Would have to cook each cake separately I presume. But still, do you think that would work?
Or 2 bundt cake pans?
Or, conversely, just make the cakes without a hole in center and cut the hole out later using a biscuit cutter or a cupcake/apple corer?
I am new to this (not much of a baker) so I thought I would ask you your opinion since you are the expert.
Louise says
I am just as confused as you regarding the cracking. As far as the bundt pans go, you wouldn't be able to stack them if the tops were that round. If that isn't an issue, then yes, a bundt pan would work great. I had a lot of trouble getting the middle cooked and didn't have heating cores at the time, that is why I used the biscuit cutters. If you have heating cores, then cutting the circle afterwards is definitely an option. You might be interested in reading my article on baking in the Foodi: https://thesaltedpepper.com/baking-in-the-ninja-foodi/
Debra Joy Stansfield says
Hi again Louise:
Your videos are totally awesome and I just subscribed to your website. You are also very engaging and so natural!
Now, I have a really dumb question and I apologize - again, I am new at baking.
My question is: what is a "heating core" and where can i purchase one?
You mentioned that a bundt pan would work. Can the same be said for a regular tube cake pan?
Also, what about the cupcake corer idea?
Louise says
Heating cores help to distribute the heat to the center of the cake and get the middle done. I'm not sure what a cupcake corer is, but I imagine it is something that you use to remove a center section to fill a cupcake. I always use a decorating tip for that. I would read that article on baking because it will answer a lot of your questions. The heating cores can be found on Amazon (affiliate link): https://amzn.to/2AhB6Ie
Debra Joy Stansfield says
Hi Louise:
I just read your article as recommended and that helped. So, if I understand correctly, I could use the heating core instead of the biscuit cutters and then just cut a hole in cake layers later? Is that correct?
I live in Canada and was looking on amazon.ca for something that would cut a 2" diameter hole in a cake and discovered something called s "cupcake corer".
I don't know how to add the link to it or I would. But it looks like a neat idea.
Check it out on Amazon. It is called a cupcake corer. There is one made by Foxrun that looks cool. I may buy it.
Debra Stansfield says
Hi Louise:
I am desperate! I have tried for 3 days last week to get ahold of ninja customer service with no luck so I am reaching out to you.
I have found that for about the last 3 weeks or so, whenever I remove the pressure cooker lid after cooking is complete, it gets CAUGHT on the pot and sometimes lifts the ENTIRE pot with it! I have checked to make sure the silicone ring is clean and attached properly, but it STILL catches and pulls the pot out/up. This can be dangerous because the pot could fall off suddenly and burn someone. Do you have any idea what could be causing this and, more importantly, how do i fix it? HELP!!
Georgie Harp says
This cake is amazing!!! The flavor is awesome and texture is wonderful!! I tweaked mine since I didn't have my Ninja Foodi yet as it was under the tree haha. I left out the candy and had only eight-inch pans so I adjusted it and did one with French Vanilla pudding. I had to bake longer due to the pan size but turned out beautifully. I know it will do great in the Foodi!! This is my FAVORITE kind of icing as it is so light and forgiving. The pan grease is also a HUGE ASSET in baking and the recipe you provide is easy and works great!! I love your channel and the thoroughness of everything you do, although not easy I'm sure, it is appreciated. Thank you and blessings!!
Louise says
Thank you so much and I'm so glad the cake turned out amazing for you! It is one of my favorite cakes in the world. One day, try the pistachio, it is so darn good!