

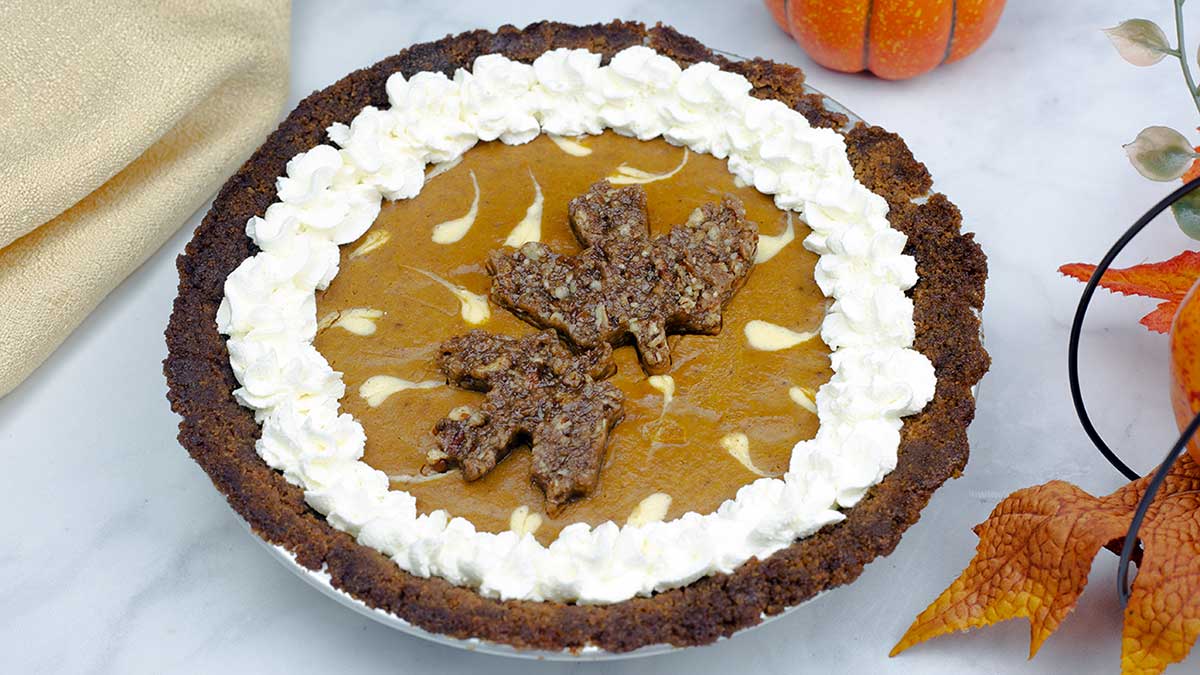
If you happen to LOVE pumpkin pie, cheesecake, and pecan pie... this Layered Pumpkin Cheesecake Pie is the recipe for you!
Would you like to save this recipe?
So, this is how it usually goes for me when I'm baking pies. I want a pumpkin one, an apple one, a pecan one, and throw in a cheesecake, too. Then, I have pies that, while delicious, are usually not eaten.
I make them all anyway and every year I wonder why I do that!
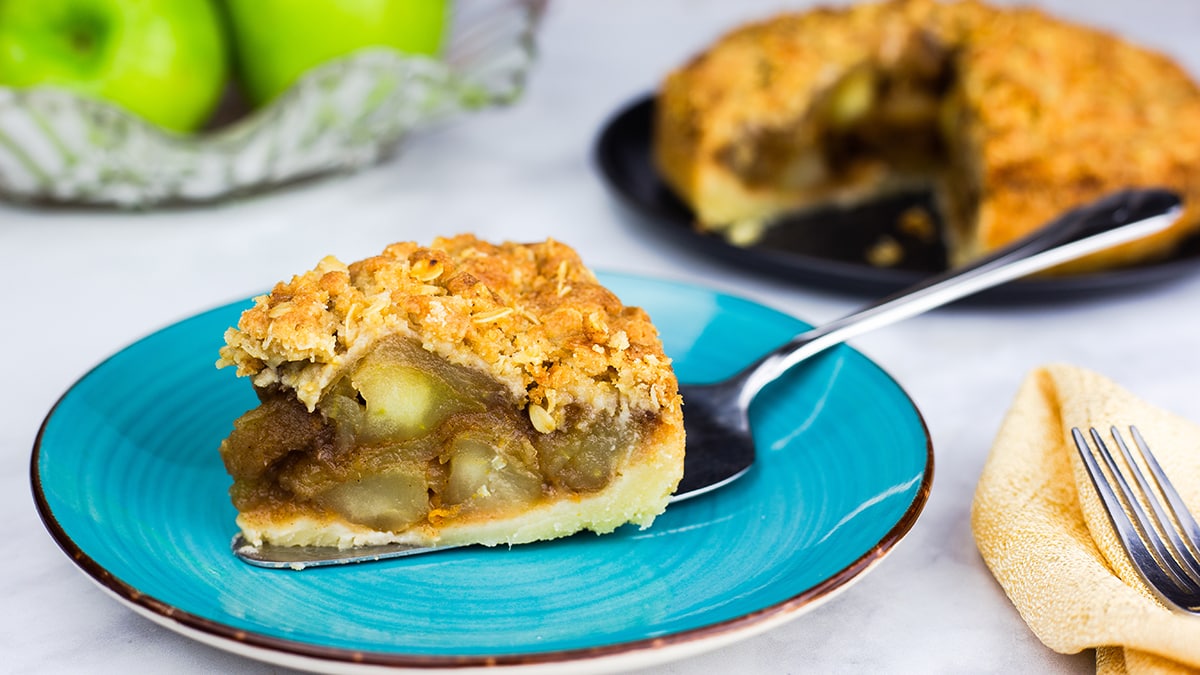
This year, I decided to make a layered pumpkin cheesecake pie with a pecan praline topping. Now, I have 1 pie that satisfies all the flavors I love, except for apple. I will still make the Apple Crisp Pie in my Flavors of Fall cookbook, it's my husband's favorite!
Of course, I might be able to skip that one because I've made it 10 times already while testing the recipe! Jeff might be okay just skipping it. I think I'll work on a baked apple recipe instead!
There are numerous recipes for pumpkin cheesecake out there in internet land, but I wanted to be a little different and create a recipe that has the components of pumpkin pie, cheesecake, AND pecan pie. I also wanted it to be a little fancy. After a gazillion attempts, it finally came together exactly how I wanted it to!
I will warn you that there are several steps involved in making this pie, but they are all easy. You can also skip the fancy and get it done a lot quicker and I will go over those options in this post.
The best way to approach this pie is by breaking it down into steps. Yes, there are steps. BUT... they are EASY steps that anyone can do even if you have never made a pie before!
What pan do I need to make a Layered Pumpkin Cheesecake Pie?
I used a Fat Daddio 9" pie pan and it worked perfectly! (affiliate link)The Fat Daddio 9 inch pie pan fits on the reversible rack because it has a very small lip. Not all 9" pie pans will fit, so if you have one make sure to check it before assembling your pie. Fat Daddio pans are very well made and I highly recommend them. If you are interested in picking one up, they can be found on Amazon: (affiliate link)Fat Daddio 9 inch pie pan
You can also use a 7" or an 8" springform pan. With an 8" springform pan, you would not need to make any changes. If you are using a 7" springform pan, I would either cut back on the pumpkin pie batter by about ¼ OR use it all and increase the pressure cook time to 25 minutes with a 5 minute natural release. This are my educated guesses based on experience, but I have only tested the Layered Pumpkin Cheesecake Pie using the FD 9" pie pan.
Can I skip the fancy and just make simple pie?
Yes, of course! You can do that in several ways.
You can simply 1 ½ times the ingredients in the pumpkin pie filling and make a basic pumpkin pie. Pressure cook time and natural release time will be the same.
Or, you can put all the cheesecake filling on the bottom and all of the pumpkin pie filling on top. Or, vice versa. No changes in pressure cook time or natural release time.
You can even put ¾ of the cheesecake filling on the bottom, followed by all of the pumpkin and then the remaining ¼ of the cheesecake filling and use a knife to swirl the top.
There are numerous ways you can make this pie, get creative and make it yours! However, if you want to venture into just a little fancy, take a look at the steps for making this Layered Pumpkin Cheesecake Pie and I bet you will find them pretty simple to do.
The Crust for Your Layered Pumpkin Cheesecake Pie
I decided to do a cookie crust and used gingersnaps, which turned out amazing! You can do a variety of different crusts. The only one I am not sure about is an actual pie crust. Because we go under pressure to bake this pie, I think a traditional pie crust is going to completely fall apart.
What I would recommend is using any type of cookies or graham crackers for the crust and you would make it exactly the same way as I did in this recipe.
I used my (affiliate link)Ninja Foodi Hot Cold Blender to make the crust and it was so fast to do! No worries if you don't have the Hot Cold Blender, this can be done a variety of ways.

By hand: Melt your butter in the microwave or in the inner pot of the Ninja Foodi. Place your cookies or graham crackers in a plastic sealable bag. Crush the cookies using a rolling pin or often times I'll use a (affiliate link)meat tenderizer from Pampered Chef.
Once your cookies are crushed, place them in a mixing bowl with sugar and cinnamon (if using) and pour over the butter. Mix with a fork until you have a mixutre that is like a course, wet sand.
Food Processor: Melt your butter in the microwave or in the inner pot of the Ninja Foodi. Place the cookies in the food processor and pulse until they are finely ground. Combine with butter and sugar/spice (if using).
If you want to get a more traditional pie crust flavor, I would use butter cookies. I really loved the ginger snaps though! Be sure to let me know what you choose for your crust!
Once you have the crust done, go ahead and press it into your pie pan or springform pan. If you want to see how I did this, you can watch this quick video.
Pumpkin Pie Filling
This pumpkin pie filling is very straightforward and easy, but you can also use your own recipe and just cut it in half. I decided to use evaporated milk in this recipe because I wasn't sure if heavy cream would split under the higher heat of pressure cooking.
Sometimes you can get away with using cream and milk based products under pressure when doing pot in pot cooking. So, I think you'll be fine if you want to do that. Just know that I haven't tested the recipe using anything other than evaporated milk, so I can't promise that it will work out.
As far as spices go for this pumpkin pie filling, I kept them pretty basic and I really liked the flavor of the pumpkin pie. You can also use pumpkin pie spice and I would recommend using 1½-2 teaspoons.
Or you can use your own blend of spices. Keep in mind that if you are using ginger snaps as the crust, they have a nice spice to them and you don't want to go overboard on spices.
The pumpkin pie filling can be made in a medium sized mixing bowl by slightly whipping two eggs and then adding in the remaining ingredients and whisk until combined. There really isn't anything to making the pumpkin pie filling.

Cheesecake Filling
Making a cheesecake filling is very easy and uses just a few ingredients, but there are some tips that you should be aware of to get the best results.
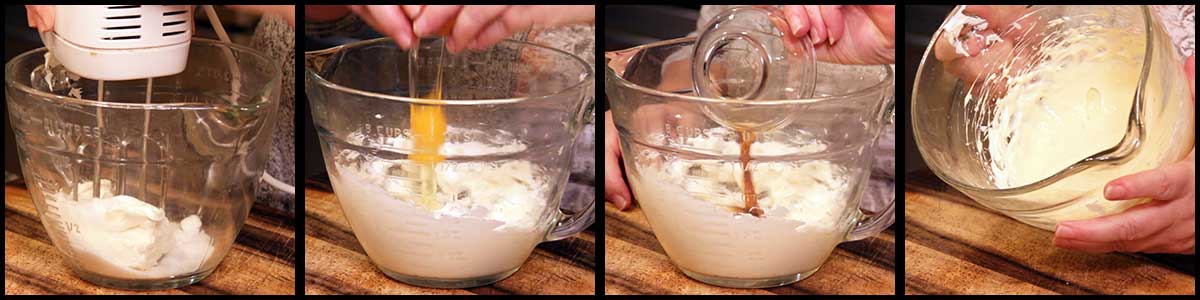
Use room temperature cream cheese. There isn't really anyway around this one. You just have to remember to take your cream cheese out of the refrigerator several hours before you want to make your cheesecake filling. You can't heat up the cream cheese artificially because it changes the texture of the cheesecake. I have, on occasion, used the paddle on my KitchenAid mixer to whip up cream cheese that isn't quite room temp. Sometimes that has worked, but other times I'm left with a lumpy filling that doesn't cook exactly right.
Don't overmix the batter. In order to get the best results, you only want to mix long enough to incorporate the ingredients. Whipping longer introduces too much air into the batter and it tends to crack either during the cooking process or the cooling process. I also think that overbeating the mixture changes the texture of cheesecake a little.
I usually use a hand mixer for making cheesecake filling, but you can use your stand mixer instead. Either way, you'll want to add your sugar to your cream cheese and beat just until incorporated. Then add the egg and vanilla and again, beat just until incorporated.
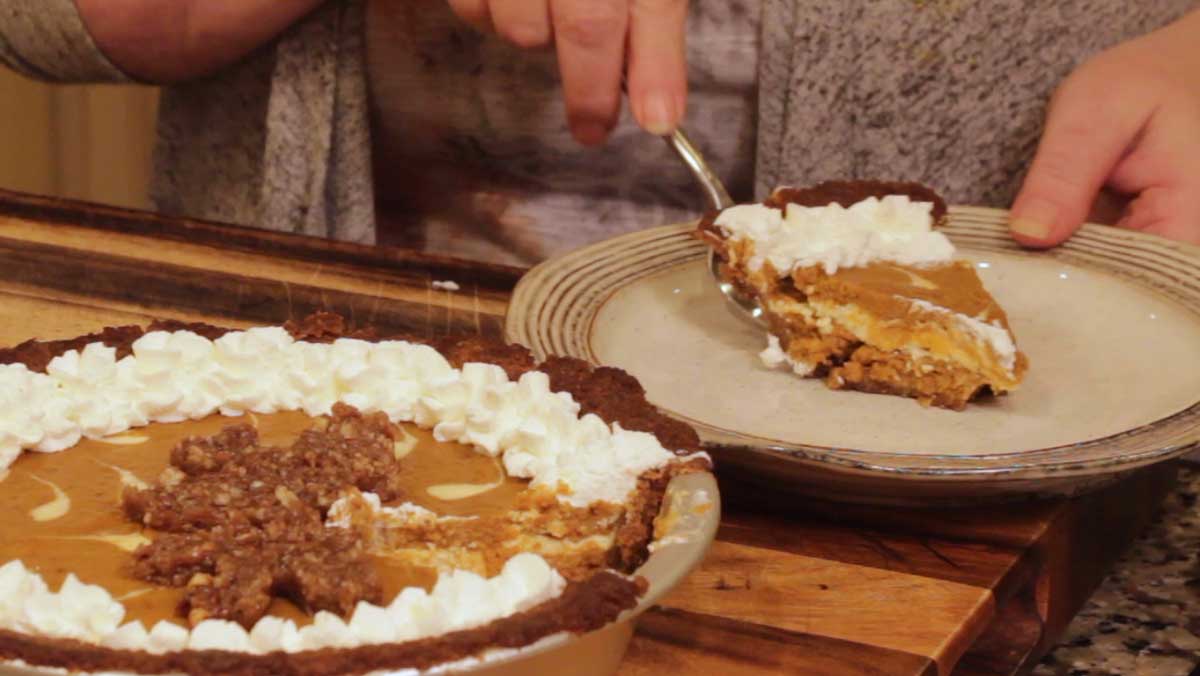
Pecan Praline Maple Leaves. This final touch is absolutely not necessary, but I was determined to decorate my pie with maple leaves and after testing several different ways, this worked the best AND gave that added third element of the pecan pie!
You can use any cookie cutters you want or even make cutouts from cardstock or parchment paper. To do that, find a picture of whatever decoration you want and print it out. Cut out the image and trace it onto parchment or cardstock. Cut a square around the traced image and cut the image out of the parchment or card stock. I probably just made that way more confusing than it needs to be, but you get the idea.
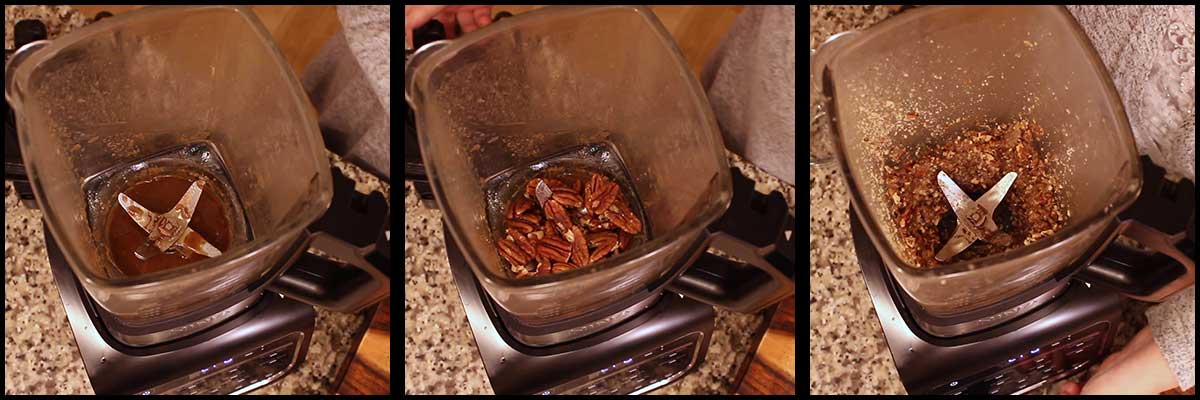
I kept my mixture really simple, but you could add an assortment of nuts or various spices if you like. I used my (affiliate link)Hot Cold Blender (I love this thing) to make the pecan praline and it was super easy. Simply add the butter and brown sugar. Heat until melted, add nuts and pulse a few times. Scrape the sides and pulse again. Cook on high for about 5 minutes and then add vanilla and pulse one more time. Done!
You can also do this in the inner pot or on the stove and just crush up the nuts by hand or with a food processor.
Making the Layered Pumpkin Cheesecake Pie
Once you have the crust pressed into your pan, bake it in the Ninja Foodi on the rack in the low position on 325° F for 5 minutes. No need to preheat for this, we only need enough heat to barely bake the crust so it sets up and can handle being pressure cooked. Once it's baked, let it cool about 10 minutes.
Layer half of the pumpkin pie filling on the bottom of the crust.
The next layer takes a little more effort, but not much. Use a spoon or other small scoop and scoop out the cheesecake filling and gently layer it on top of the pumpkin layer. If you poured the cheesecake filling in, it will fall below the pumpkin layer, so I do this gently. If you plan on making decorations on the top with the cheesecake like I did, reserve a couple of tablespoons of filling. If not, use it all.
Using a spoon or scoop, scoop the remaining pumpkin pie filling on top.

To make the cheesecake decorations in the top, use a knife or a cake tester and get about ⅛ of a teaspoon on the end and make little dots on the top. Then take a clean knife end and pull them out from the circle through the pumpkin pie filling. I am sure there a million different and way more creative ways to decorate the top and I can't wait to see what you come up with! If you do something cool, please share the pictures with me!
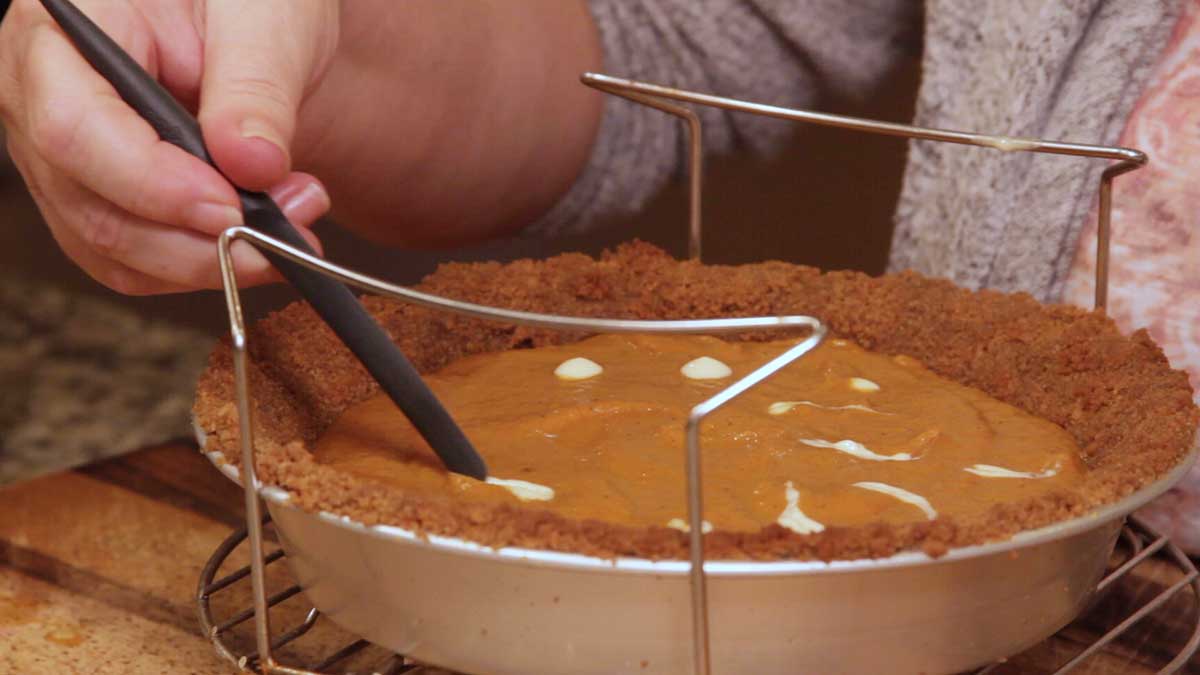
Cover with a silicone cover or aluminium foil. Put 1 cup of water in the inner pot and place the cheesecake on the rack in the low position. Put the pressure lid on and turn the valve to seal. Pressure cook on high for 20 minutes. Let the pressure natural release for 5 minutes and then release the remaining pressure.
Allow to cool for 4-6 hours.
Once cooled, you can put on the praline topping. Decorate with whipped cream and Serve!

YAY! You just made a beautiful Layered Pumpkin Cheesecake Pie! Enjoy!

Layered Pumpkin Cheesecake Pie
Equipment
- (affiliate link)Ninja Foodi Hot Cold Blender
Ingredients
Gingersnap Crust
- 6 tablespoon butter salted
- 3 cups gingersnaps
- 1 tablespoon sugar
- ½ teaspoon cinnamon
Pumpkin Pie Filling
- 2 large eggs
- 1 cup pumpkin puree
- ⅓ cup brown sugar
- 1 tablespoon white sugar
- ⅓ cup evaporated milk
- ½ teaspoon vanilla extract
- ½ teaspoon cinnamon ground
- ½ teaspoon nutmeg ground
- ¼ teaspoon cloves ground
- pinch sea salt
Cheesecake Filling
- 6 ounces cream cheese
- 2 tablespoon white sugar
- 1 large egg
- ⅛ teaspoon sea salt
- ½ teaspoon vanilla extract
Pecan Praline Topping
- 2 tablespoon butter salted
- ¼ cup brown sugar
- ½ teaspoon cinnamon
- pinch sea salt
- ½ teaspoon nutmeg
- ½ cup pecans
- ½ teaspoon vanilla extract
Would you like to save this recipe?
Instructions
Gingersnap Crust
- Melt 6 tablespoons of butter.
- Crush 3 cups of gingersnaps into fine crumbles.
- Add sugar and cinnamon to gingersnaps.
- Pour melted butter over the gingersnaps and mix until it resembles a course, wet sand.
- OR Use the Ninja Foodi Hot Cold Blender to melt the butter, add the gingersnaps, sugar, and cinnamon. Pulse blend until it resembles course, wet sand.
- Once the pie crust is pressed into the pan, put it on the rack in the low position and put the rack into the Ninja Foodi. Bake at 325° F for 5 minutes. You do not need to preheat the Foodi for this. Allow the crust to cool slightly before assembling the pie.
Pumpkin Pie Filling
- Beat two eggs in a medium size mixing bowl.
- Add both sugars, pumpkin puree, spices, evaporated milk, and vanilla extract to the eggs. Whisk until combined.
Cheesecake Filling
- In a medium mixing bowl, combine sugar and cream cheese. Beat with a hand mixer or stand mixer until combined.
- Add the egg, vanilla extract, and salt to the cream cheese mixture and beat just until the egg is incorporated and you have a smooth filling. Do not over mix.
Pecan Praline Topping
- Melt the butter and brown sugar in the pitcher of the Hot Cold Blender. Add nuts and pulse several times until they are finely chopped. Scrape down the sides as needed. Cook for 5 minutes, add vanilla and pulse once. OR
- Melt the butter and sugar in the inner pot of the Ninja Foodi or in a small saucepan on the stove. Crush the nuts in a food processor or by hand using a sealable bag and a rolling pin. Add the nuts and cook for 5 minutes over medium heat. Add vanilla and stir.
Assembling the Layered Pumpkin Cheesecake Pie
- Pour or scoop ½ of the pumpkin pie filling into the crust.
- Carefully scoop out about a Tablespoon at a time of cream cheese filling and carefully put it on top of the pumpkin pie filling. You don't want to pour it on or it will sink into the pumpkin filling and you will lose your layers. Do this until you have covered the pumpkin filling, but make sure to reserve 1-2 Tablespoons for the decorations on top if you are doing those.
- Scoop on the remaining the pumpkin pie filling. Again, do this carefully so it doesn't displace the cream cheese filling.
- To make the decorations like I did. Place small dots of cream cheese filling on the top of the pumpkin filling and using the back of a knife or a similar utensil (I used my Pampered Chef cake tester) drag the cream cheese through the pumpkin in a sweeping motion.
- Cover the pie with a silicone cover or foil. Carefully place the pie pan on the rack in the low position. Add 1 cup of water to the inner pot and lower the rack into the inner pot.
- Put the pressure lid on and turn the valve to seal. Pressure cook on high for 20 minutes. Allow to natural release for 5 minutes. Remove cover carefully and try not to get any water into the pie. Refrigerate for 4-6 hours.
Praline Decorations
- Place your cookie cutters or cut outs on the pie where you want the decorations. Fill about ¼" with the praline mixture. If the mixture is too stiff, you can warm it in the microwave, but only for a few seconds. You don't want it too hot or you won't get clean decorations. Carefully remove the cookie cutters or cut outs. Refrigerate or serve immediately. Enjoy!
Notes
Nutrition
ABOUT THE RECIPE AUTHOR, LOUISE LONG

Louise is a full-time recipe creator and food blogger @ The Salted Pepper. She has over 30 years of experience with cooking and recipe development. She owned a restaurant for several years and was a full-time RN until retiring to blog full-time.
Louise has several very active Facebook groups that help people with the basics of cooking and getting the most out of the Ninja Foodi.
Ninja Foodi Fresh & Healthy Meals
Seeing the need for easy, delicious, and high quality recipes, she is focusing all of her efforts creating recipes specifically for the Ninja Foodi. Her recipes are easy for the home cook to follow and provide step-by-step instructions.
Louise is also a YouTube creator and you can find most of her recipes in video format on The Salted Pepper YouTube channel.
She is very responsive to messages and eager to help in any way she can.
Donna says
I used this recipe in an 8 in springform and layered all the pumpkin on the bottom. And the cheesecake on top. The 20 minute cook time was not enough. I had to put it in the oven so I would recommend increasing the PC time.
Louise says
Hmmm, that didn't happen in the pie pan, but thanks so much for the tip in case someone else wants to use a springform pan. I wonder if the reversing of layers made a difference?