

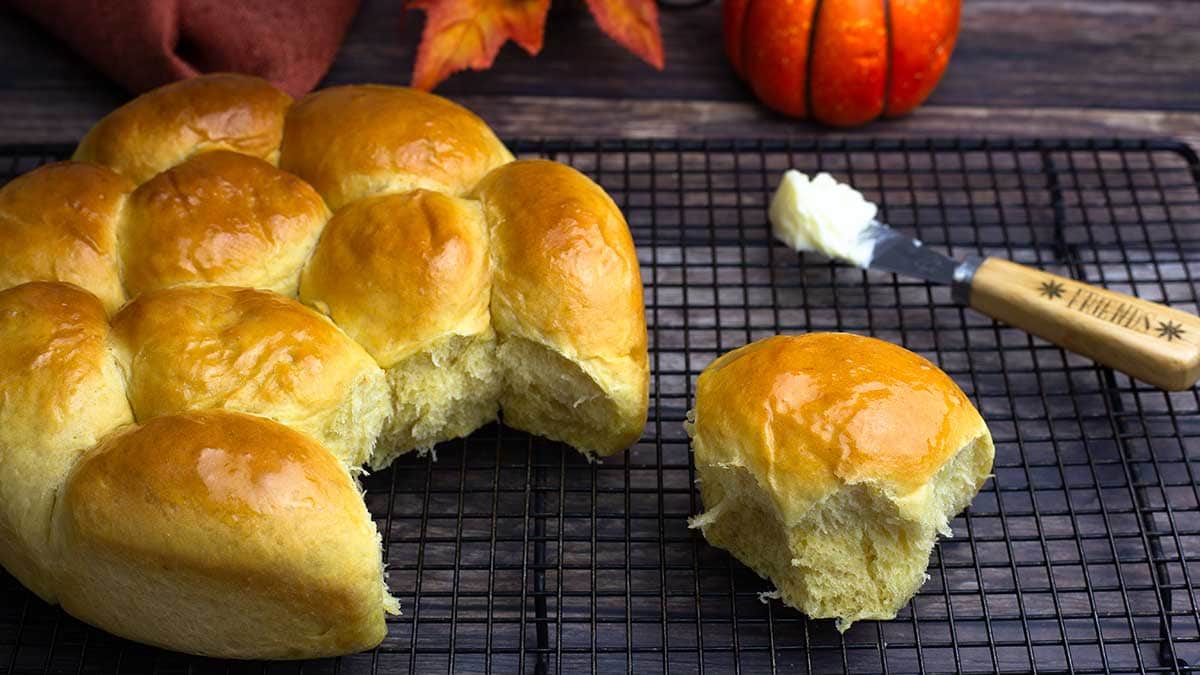
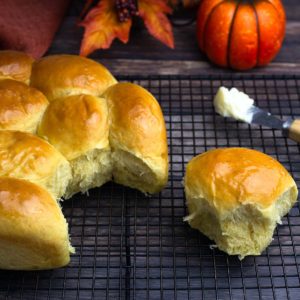
You know those sweet Hawaiian rolls you can buy (or make)? These Sweet Potato Rolls are BETTER! So good, in fact, I dare say they beat my Aunt Kathy's famous rolls in texture and taste!
Would you like to save this recipe?
Now, I realize you probably haven't had my Aunt Kathy's rolls (unless you made my Homemade Roll recipe in my Flavors of Fall Cookbook, because that is the same recipe just modified for the Ninja Foodi), but her rolls are the most talked about rolls in our family!
They are superb, the best I've ever had... until now! I used to think she had magical powers with her roll recipe because I could never get them perfectly formed and light and fluffy like she did.
This post may contain affiliate links. If you make a purchase after clicking a link, I may earn a small commission. As an Amazon Associate, I earn from qualifying purchases.
Turns out, it's not so hard after all and I think these Sweet Potato Rolls are even lighter and fluffier than hers! Sorry, Aunt Kathy!
The secret to perfect dinner rolls is how you form them and put them in your pan. I'm going to share all the "secrets" in this recipe, so you can make the BEST rolls for your next dinner, too!
Tips for making the BEST Sweet Potato Dinner Rolls
Use bread flour. Now, I'm not a flour snob and I don't usually keep bread flour on hand because I just don't. Almost all of my bread recipes call for all-purpose flour, because that is what I always have and I refuse to run out to the store for "special" flour.
However, I do buy bread flour when I am making rolls. The extra gluten in bread flour really helps with getting tall, airy, fluffy, and slightly chewy dinner rolls. It's worth getting for this recipe and no worries, just pop the bag in the freezer until you need it again.
You will need it again. Why? Because you are going to want to make my Cinnamon Bun recipe (it's in testing now) and I use bread flour in that recipe, as well.
Now, if you don't have time or can't get out to the store to grab some bread flour, use equal amounts of all purpose flour and you will be fine. Your rolls might be a little shorter and a little denser, but trust me... they will still be delicious!
Heat your half and half and butter. You want to use melted butter and warm half and half or whole milk in this recipe. I put the half and half into a 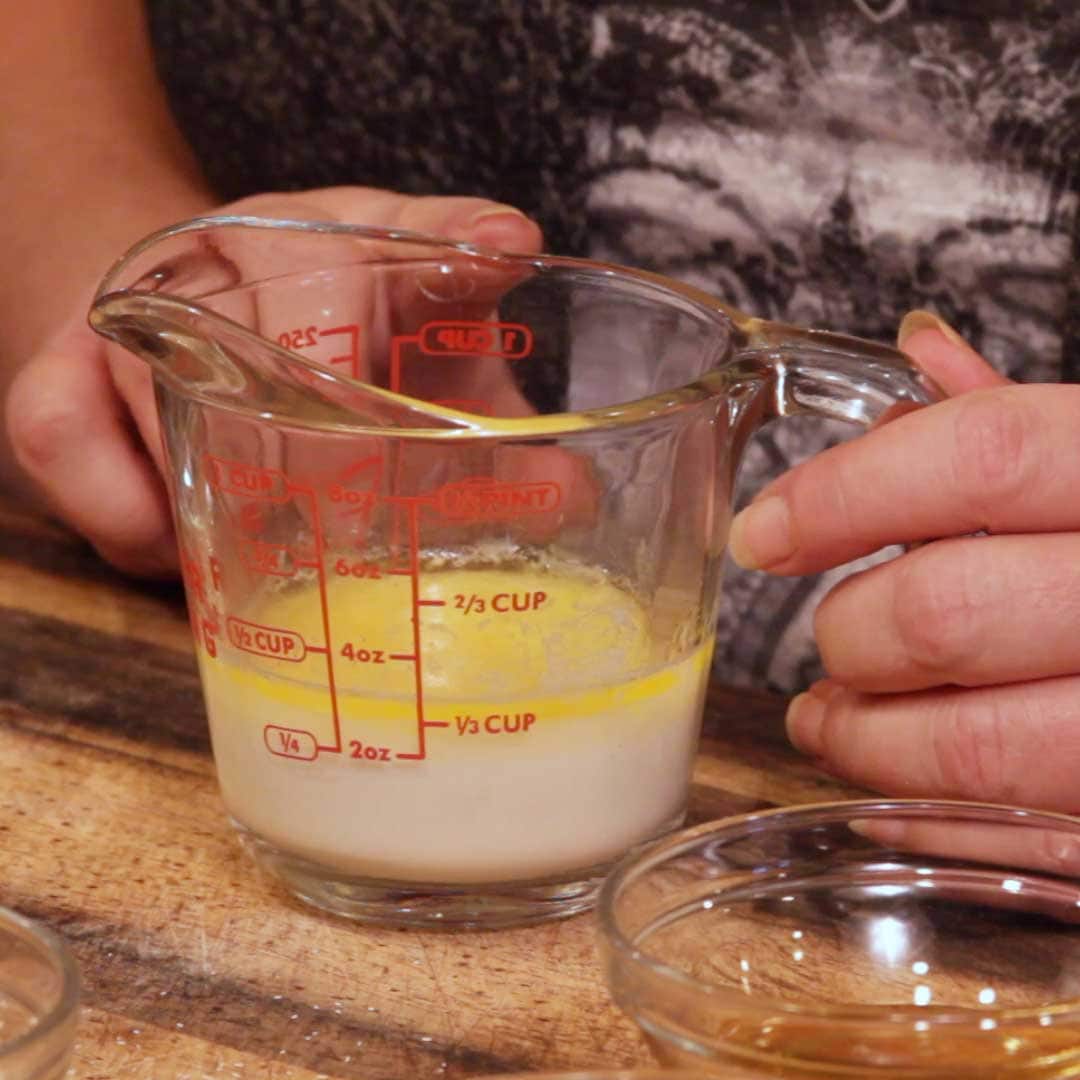 microwave safe container with the butter and microwave for about 30 seconds. This is all the time it needs to bring the milk to just shy of boiling. This is called scalding.
Years and years ago, most bread recipes called for scalding the milk to remove any bacteria. This is no longer necessary since we (mostly) use pasteurized milk products. However, there is also another reason. The whey.
The Whey in milk can weaken the gluten in flour, but when you scald it, the whey protein is denatured and doesn't have as much effect on the gluten.
Heating milk (in my opinion) results in a softer roll. This is total speculation, but I've made a lot of rolls in my lifetime and sometimes I skip heating the milk. I can tell in the texture.
Use my recipe for sweet potato casserole as the sweet potato in this roll recipe. That is what I used each time and it's perfect! Here is the recipe: Sweet Potato Casserole. You only use ¼ cup of the sweet potato mash, none 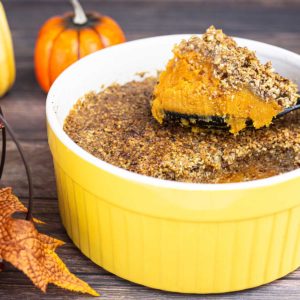 of the topping. What I did is take 1 cup of the sweet potato mash out and I used ¼ cup in the roll recipe, froze the rest in ¼ cup servings for making more rolls!
You can even just cut the recipe down to 1 sweet potato and mash it up with a bit of honey, salt, and a pinch of red pepper flakes... or skip the red pepper flakes. It will be fine.
Of course, you can use canned sweet potatoes and just mash them, as well. I think you could even use canned pumpkin!
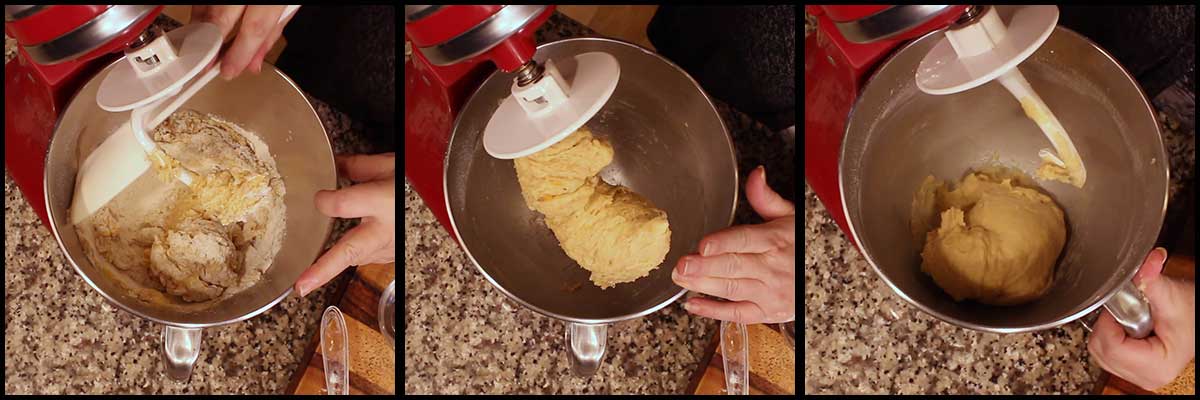
Knead the long enough. You want this dough to be very elastic, so make sure you knead it long enough. You can do this by hand or with a dough hook on a KitchenAid mixer or in a bread machine. The dough should be soft and a little tacky, but not sticky. Here is what the dough will look like during various stages.
Weigh the dough. I know. What a pain. Of course, you do not have to do this, but it will result in rolls that cook evenly and rise the same. What I do is weigh the dough and, for this recipe, I divide by 10. That will give you the number of ounces each roll should be. If you don't have a kitchen scale, I really recommend picking one up. Here is one that I found very reasonably priced on Amazon. (affiliate link)Digital Precision Food Scale. This isn't the one I have, but it is similar and they don't make the one I have anymore. What I like about this scale is the low price AND the weighing tray is removable. You want this feature for cleaning purposes. There are some scales with a bowl, but I find those limiting and I'm not a fan of them.
Form your rolls using a pop and twist technique. There is a certain way that I've been taught to form my rolls, so you stretch out the dough between your fingers and twist off the bottom. This results in that perfectly smooth dome top on your dinner rolls. It's a little hard to explain how I do this, so here is a video clip where I demonstrate it. Now there are various ways to accomplish the same thing, but here is how I do it.
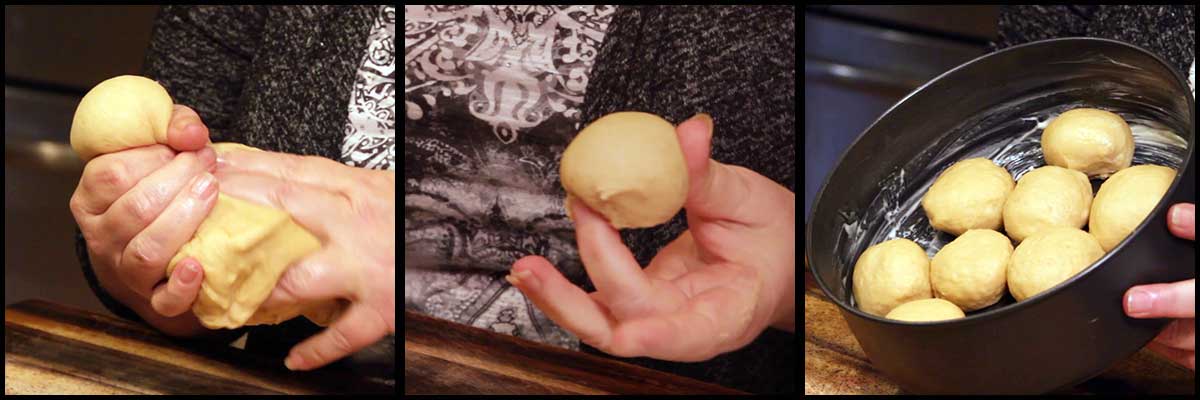
Choose the right pan. The pan choice is pretty important for this recipe. Mostly because you want to have a deep enough pan to allow for the rise and not have the rolls rise over the edge of the pan. While there are several choices that do work. The best choice is the (affiliate link)Ninja Foodi All Purpose Pan that is sold separately or in the baking kit. It is the perfect size and, also, this is one of those times where a darker colored pan is to our advantage.
If you have watched any of my baking videos, you know I love the light colored (affiliate link)Fat Daddio pans and I do. However, every once in a while, the darker pan is better for baking and this sweet potato roll recipe is one of those times.
The darker coating on the pan transfers heat faster and browns the outside of the rolls. The all purpose pan is also the perfect size. It's 8.75" in diameter and 2.75" in height. This allows the rolls to rise perfectly when you make 10 rolls.
Can I still make these Sweet Potato Rolls without the All Purpose Pan?
Yes, you can. You will need to make a few changes, depending on the pan you want to use. I have not tested these rolls out in every different type of pan, so I am giving you my best suggestions here, not tested suggestions.
8" springform pan: Most springform pans are around 3" in height, so that makes them ideal for rolls. If you have an 8" springform pan that fits in the Foodi on the rack, use it. You don't need to make any changes to the baking directions.
7" springform pan: If you try to use a 7" springform pan and make 10 rolls, your rolls are going to be very tall, too tall. I would suggest making nine 2-ounce rolls and refrigerate or freeze the remaining dough. You should not have to make any changes to the baking directions.
8" x 2" Fat Daddio pan: The 2" height is what causes the most issues with rolls, but there is a workaround. Make your rolls smaller, but don't over crowd them in the pan. Leave at least 1" between the rolls, so they spread out and not up. You can probably fit eight 1- to 1.5-ounce rolls in the 8" pan and be fine. Your rolls will be wider and shorter, but still delicious. Due to the size of your rolls, I would not change the temperature settings, but I would decrease the time some. Check on your rolls after 15 minutes and then determine if you need to cook longer or not. You can always take a temp with a (affiliate link)food thermometer and if the center roll is at least 180° F, they are done enough and will finish cooking while they cool.
There are way too many types of pans for me to go over all of them, but if you have questions about a certain pan you can leave me a comment or catch up with me on Facebook.
Can I make Eight Larger Rolls or Twelve Smaller Rolls?
I don't see any problems in making 12 smaller rolls as long as you have the All Purpose Pan or a pan of similar size. Keep in mind that the closer together the rolls are, the higher they will rise. I think you will be absolutely fine though and you shouldn't need to adjust the baking time. I would check on them about 15 minutes in to the bake time, just to be sure.
Making 8 larger rolls could have you run into some trouble, but with a few adjustments, you should be fine. If you are using the All Purpose Pan, I would arrange 7 rolls on the outside and 1 in the middle. I would also make the middle one just a tad smaller so it cooks all the way through.
You may want to lower your baking temp by 25 degrees and cook an additional 5 minutes (covered) to make sure they are completely done before uncovering to brown the tops.
How can I make these Sweet Potato Rolls in the Oven?
Preheat your oven to 375° F. Place the pan with the rolls on the lower rack of the oven and bake 15-20 minutes or until they are golden brown. You can always lower your temp if they are browning too much. Or cover them in foil during the last few minutes of baking.
No matter how you make these rolls, I hope you love them!
Homemade Sweet Potato Rolls
Ingredients
Would you like to save this recipe?
Instructions
- Put the warm water into a small bowl and sprinkle over the yeast. Allow to bloom for 5 minutes.
- Melt the butter and the warm the half & half together in a container for about 30 seconds in the microwave. Add the sweet potato mixture and stir to combine. This will bring down the temperature so it is not hot enough to kill the yeast.
- While the yeast is blooming, add the flour, salt, and brown sugar to a mixing bowl or the bowl of your stand mixer.
- Add the yeast, egg, honey, and butter/ half & half mixture. Using the paddle attachment or the dough hook, turn the mixer on low to low-medium speed to combine ingredients. If you are doing this by hand, combine all the ingredients in a large mixing bowl until you have a loose dough. If the flour mixture is clinging to the sides, use a scraper to scrape it back into the center so it gets combined.
- The dough should be very soft and tacky, but it shouldn't stick to your fingers. If it sticks to your hands, add 1 teaspoon of bread flour and mix again. Repeat this until the dough is tacky, but not sticking to your hands.
- Continue to mix using the dough hook on medium speed for about 5 minutes. This will knead your dough. If your dough becomes too sticky during this kneading time, add another teaspoon of flour and mix again. If you are doing this by hand, knead the dough for about 7-10 minutes or until you have a very smooth and soft dough that does not stick to your hands.
- Butter your pan and form the smooth ball of dough into a disc. Place the dough into the pan and cover with a damp towel. I also cover with a silicone cover if proofing using the dehydration function so the towel doesn't dry out. Place the pan on the rack in the lower position, close the TenderCrisp lid and select the dehydration function on 105° F. The rolls will proof in about 30 minutes. *see notes if you do not have the dehydration function, you can still proof in the Ninja Foodi.
- Once the dough has doubled in size, it's time to form the rolls. I do suggest weighing the dough and making 10 equal 2 ounce dough. There is a technique that I use for forming the rolls and you can see the video in the recipe post.
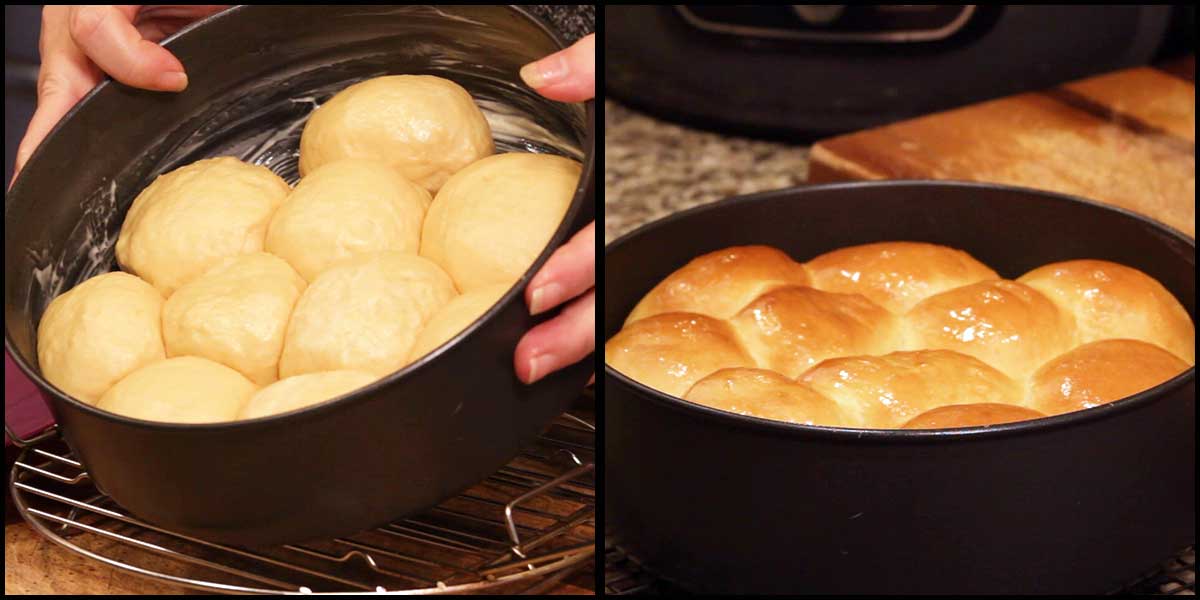
- Place the rolls in the pan. I usually arrange 7 around the outside and 3 in the middle for this recipe. There will be about ½" of space between rolls. Cover with a damp towel (and silicone or foil if using the dehydration function) and proof the rolls again for 30 minutes or until doubled in size. Remove the rack with the rolls.
- Preheat the Ninja Foodi on 350° F for 5 minutes. Cover the rolls with foil or a silicone cover and place the pan of rolls on the rack and lower into the Ninja Foodi. Bake covered at 350° F for 20 minutes.
- Uncover and continue to bake uncovered for an additional 3-5 minutes at 350°F or if they are really brown already lower the temp to 325° F and bake for 3-5 minutes You can also take a temp of the center roll and if it is at least 180°F, they are done. Brush with melted butter if desired. Allow the rolls to cool slightly, they will finish cooking as they cool.
- Serve & Enjoy!
Notes
Nutrition
ABOUT THE RECIPE AUTHOR, LOUISE LONG
Louise is a full-time recipe creator and food blogger @ The Salted Pepper. She has over 30 years of  experience with cooking and recipe development. She owned a restaurant for several years and was a full-time RN until retiring to blog full-time.
Louise has several very active Facebook groups that help people with the basics of cooking and getting the most out of the Ninja Foodi.
Ninja Foodi Fresh & Healthy Meals
Seeing the need for easy, delicious, and high quality recipes, she is focusing all of her efforts creating recipes specifically for the Ninja Foodi. Her recipes are easy for the home cook to follow and provide step-by-step instructions.
Louise is also a YouTube creator and you can find most of her recipes in video format on The Salted Pepper YouTube channel.
She is very responsive to messages and eager to help in any way she can.
Julie says
Im in the UK and made these for the first today, they were lovely. Thanks for the recipe
Louise says
I'm so glad you enjoyed them!
Mia Padilla says
your recipe is now my favorite 🥰
what i did differently from yours is
used mashed sweet potato
used a 9x9 square pan and divide the dough into 16pcs
brush with milk and egg wash before baking
Louise says
I'm so glad you enjoyed them!
Amber Meyer says
I made these to serve with my Ninja Foodi ribs and mac & cheese tonight. Nobody in my family likes sweet potatoes (except me!) and you know what? They absolutely LOVED these! Of course I did not let them know there was sweet potato in it. LOL I really recommend this recipe. These rolls are incredibly delicious! Thank you Louise! Another perfect recipe!
Louise says
I'm so glad you liked them!