
 Can you believe this beautiful Ninja Foodi Apple Cake was made in a pressure cooker? It was! From start to finish... yes, the caramel icing too! Everything was made in the best small appliance of the century! I'm in love and you will be too!
This post may contain affiliate links. If you make a purchase after clicking a link, I may earn a small commission. Thank you for your support!
My Ninja Foodi is KING of the kitchen!
If you have read any of my recent posts; I know I sound like a broken record... I don't think there is anything the Ninja Foodi can't do! Well... it doesn't wash my clothes, clean my house or wash my dishes; although, I do have to say that I have a lot fewer dishes since the Ninja Foodi entered my life! AND it made this delicious Ninja Foodi Apple Cake with Caramel Icing, too! Let the KING cook for you... buy a Ninja Foodi! I'm not paid to say this stuff, I really love the Ninja Foodi!
When I set out to make a cake in a pressure cooker, I honestly didn't have high hopes. Cakes cook in an oven. THE END. However, so many people are raving about their cheesecakes made in a pressure cooker, I just couldn't help myself.
Not one to repeat what has already been done a gazillion times, I decided to use up the apples that I had to make an apple cake. I've never even made an Apple Cake before, but what the hey... let's pressure cook the thing! Nothing ventured, nothing gained. Right? Right.
Trial and Error Makes for Greatness in the Kitchen
Friends, I had no idea what I was doing. Seriously. I've never pressure cooked a cake before. I really didn't even know how to make an apple cake, much less a Ninja Foodi apple cake. I do know what I like and how to make a cake, so I used the basic principles to develop an apple cake recipe. Then I crossed my fingers, put the cake into the Ninja Foodi and waited.
The first one I made was very good: flavorful and moist, but very dense. Like WAY dense. Like fruit cake dense. Not my cup of tea. Everyone liked it; it was good, but not good enough. So, I tried again. This time I pressure cooked it longer. A little better... but jeeze, if you have to pressure cook a cake for 60 minutes, use the oven!
I was determined to figure out how to make this Ninja Foodi Apple Cake and I did! Yay!
Then the Light Bulb Clicked On... What You are Cooking in Matters
Oh, yeah... I felt a little dumb! I was "baking" the cake in a very heavy walled, deep ceramic casserole dish. That's why the center wasn't getting done! Now, I was on a mission to find something I could "bake" this cake in that would allow the center to be done AND would fit in my wonderful Ninja Foodi. I ripped apart my cabinets, looking for the right pan, and then the light bulb clicked on.
Turns out, it's the obvious choice... a cake pan! Actually, two cake pans. Now, why didn't I think of that in the first place? Because, you aren't supposed to put metal in the Ninja Foodi. The inner pot is non-stick. Right? I wish I could say that was why. The real reason was, I just hadn't thought of it!
Turns out there is a bunch of controversy over using ceramic and glass in pressure cooking, too. I've never had a problem with either; I just make sure they are oven and microwave safe. I like to test the limits though, so I won't officially tell you it's okay to use your glass or ceramic casserole dishes when cooking under pressure. Okay? K.
Things can break under pressure, especially if they have hairline cracks that you might not even notice. I would hate for you to ruin dinner because you thought it was safe to use oven/microwave dishes when cooking under pressure and then it left you with nothing but inedible shards when it would have been great food. K.
Now, scratching the Ninja Foodi's inner pot can happen. So, I made sure my 8" cake pans fit on the Ninja Foodi rack (which, I think is made of metal too). A little weird, but let's keep that warranty.
I decided to use two 8" cake pans that were 2" deep to make the Ninja Foodi apple cake and it turned out perfect in every way. Yay.
Can I make this Apple Cake in an Instant Pot or regular oven?
Sure. Although I haven't tested either out, this is what I would do:
For the Instant Pot or pressure cooker, I would follow the same instructions.
For the Oven, I would preheat to 325° F and bake for about 25-30 minutes or until the center is done. If you make one cake instead of two layers, you will have to increase the baking time to about 40-50 minutes, I would think. You can easily check this with a butter knife; or what I like to use is a cake tester from Pampered Chef. When using the cake tester, you don't create a large knife mark in the center of the cake. Make the icing in a pot on the stove. Be sure to let me know if you make this cake in the oven, as I'd love to update this post with the time it takes!
This is how I made the delicious Ninja Foodi Apple Cake with Caramel Icing!
Now, before you glance down and see all these steps and say, "forget it." It really is an easy cake to make. Yes, there are a lot of steps, but that is because I'm breaking it down into small steps for the beginner. If you are a seasoned baker, you will skim right past most of this stuff. I also have detailed video of all the steps on YouTube; Ninja Foodi Apple Cake with Caramel Glaze by The Salted Pepper. The video is also in the recipe below. I hope you love this recipe for Ninja Foodi Apple cake as much as I do! Please let me know in the comments how it turned out!
Step One:
Gather all your ingredients. It is so much easier to bake when everything is measured out and ready to go. Grease two 8" metal cake pans that have straight walls. You don't want to use the kind that stack inside of each other, because, when we put them into the Ninja Foodi, the top pan will compress onto the second pan. A quick way to test if you have the correct pans is just to put on top of the other and if the top one doesn't fall into the bottom one, you are good to go. These pans by Fat Daddio are my absolute favorite! I have them in several sizes, but the ones you want for this recipe is the 8" x 2" cake pans.
Step Two:
Grease the two cake pans with either butter or what I prefer to use for all my baking: this recipe for pan grease. The easiest way I've found to grease your pans is by using a silicone basting brush. This one is the one I use all the time and I love it! Silicone Basting Brush.
Step Three:
Peel and slice 2-3 apples. You will want enough slices to cover the bottom of the cake pans. In a small mixing bowl, combine ½ cup brown sugar and 2 teaspoon of cinnamon. Put sliced apples in the bowl and cover with sugar mixture.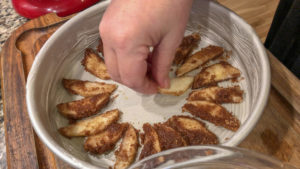 Arrange apples in a single layer on the bottom of the pan as shown in the picture. Sprinkle any extra sugar mixture over apples.
Step Four:
In medium mixing bowl; add flour, cinnamon (1 Tablespoon), salt and baking soda. Stir to combine and set aside. In a stand mixer (or large mixing bowl if using a hand mixer), combine remaining sugars and butter. Mix on low-medium until creamed together. Add one egg at a time and mix until incorporated. Add vanilla extract and mix.
Add in ⅓ of the flour mixture, mix until flour is mostly incorporated into the batter. Add in ½ of the oil. Mix. Add another ⅓ of the flour mixture. Mix until flour is incorporated. Scrape the sides. Add remaining oil, mix. Add remaining flour. Mix, scrape down the sides, and mix just until the flour is incorporated.
Step Five: Peel and chop apples. You want about 3 cups of chopped apples. Add apples to batter and mix just until incorporated. Evenly divide batter between two cake pans and cover with aluminum foil. Put a few holes in 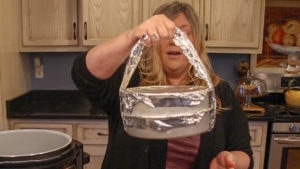 the pan that will be on the bottom. You can make an aluminum foil strap as shown in picture (for more details watch the video in the recipe below or on YouTube) to lower the cakes into the inner pot of the Ninja Foodi. This really comes in handy when we remove them!
Step Six: Place 2 cups of water in the Ninja Foodi. Place a pressure resistant dish that is about ¾ or 1 inch high in the bottom of the inner pot. If you don't have one, use balls of foil arranged so the first cake pan is slightly raised out of the water and try to get them to sit as even as possible. Pressure cook on high for 35 minutes. Make sure to turn your valve to seal. When done, natural release for 30 minutes. Then manually release the rest of the pressure.
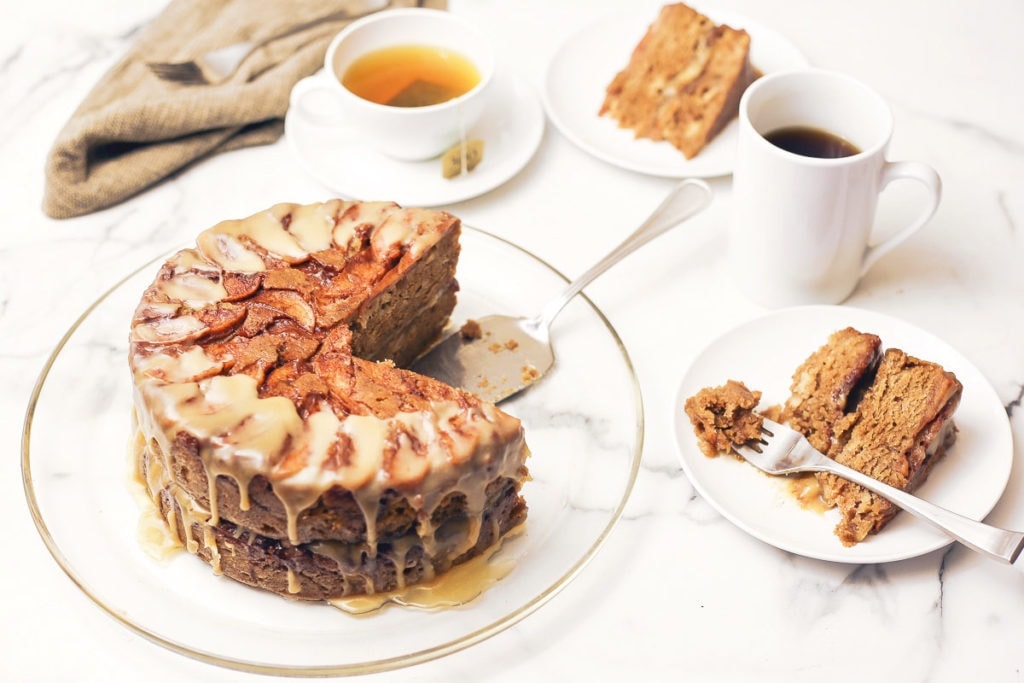
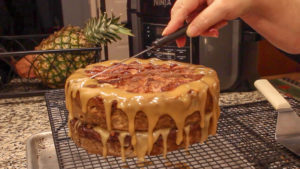
Step Seven: Remove cakes from the Ninja Foodi and allow to cool for about 5-10 minutes. Carefully flip cakes onto cooking rack. My trick for doing this is demonstrated in the video in the recipe below. The tops with the apple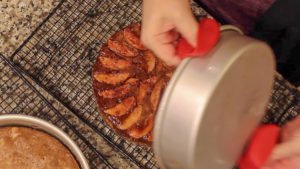 slices should be showing now. Aren't they beautiful? I oooh'd and ahhh'd quite a bit when I saw them. I felt fancy. Allow to cool completely. If you try to glaze the cakes before they are cool, the glaze will just run off. If you aren't planning on glazing them, then you can try a slice now.
Step Eight: Make the glaze! Sift the powdered sugar to reduce the clumps. This will really make a difference when mixing in to thicken the icing. Dump any water remaining in the inner pot of the Ninja Foodi and wipe dry with a cloth. Add butter, cream, and brown sugar. Set the Ninja Foodi to saute mode and keep on High. Using a coated whisk or plastic spatula, stir to combine as the mixture is melting. As bubbles start to form across the top, stir. Then let sit and continue to cook until the bubbles have formed uniformly across the top. This takes a few minutes.
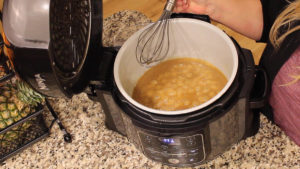
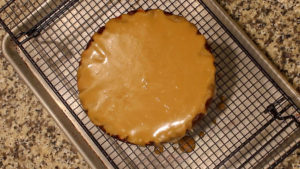
Step Nine: Turn the Ninja Foodi off and remove the inner pot to prevent the mixture from burning. Slowly add in powdered sugar, whisking (make sure to use a silicone whisk) as you go. Whisk until it starts to thicken and pour about ¾ cup over the top of the bottom cake layer. Allow to sit and set for a few minutes or put the cake into the fridge to speed up the process. Repeat by pouring another ¾ (approx) of glaze over the bottom layer. You want to have it drip over the sides.
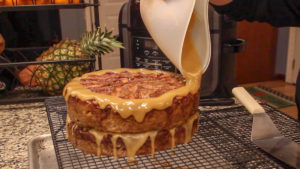
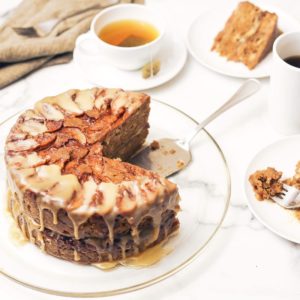
Step Ten: Carefully set the top layer onto the bottom layer. Using the remaining glaze, start at the outer edge and pour over the edge of the cake. We want the apples to show, so I started about 1-1 ½ inches from the edge and allowed the glaze to drip down the sides. Allow glaze to set. You can leave it on the counter, or place in the fridge for a few minutes. Serve and Enjoy your Ninja Foodi Apple Cake!
Are you loving your Ninja Foodi as much as I am? Come on over to Facebook and join either or both of our Ninja Foodi groups!
Ninja Foodi Fresh & Healthy Meals
We also have several other Ninja Foodi recipes that you may enjoy! Be sure to check out The Salted Pepper's YouTube channel.
Here is our recent recipe for Asian Sticky Wings. Boy are they delicious!

Ninja Foodi Recipe~ Apple Cake with Caramel Glaze
Ingredients
Apple Topping
- 2 granny smith apples You want enough to cover both cake pans with a single layer. If your apples are small, you may need 3.
- ½ cup brown sugar
- 2 teaspoons ground cinnamon
Cake Ingredients
- 3 Granny Smith Apples You want three cups of diced apples for the cake
- 1 cup white sugar
- 1 cup Brown Sugar
- ¾ cup butter salted
- 3 large eggs
- 1 Tablespoon vanilla extract
- 3 cups all purpose flour
- 1 Tablespoon ground cinnamon
- 1 teaspoon baking soda
- ½ teaspoon sea salt fine grind
- ¾ cup canola oil or vegetable oil
Glaze Ingredients
- ½ cup butter salted
- 1 cup brown sugar
- ⅓ cup heavy whipping cream
- 1 teaspoon vanilla extract
- 1 cup powdered sugar sifted
Would you like to save this recipe?
Instructions
Topping Instructions
- Grease two 8" flat walled cake pans (see post for more details). Combine ½ cup brown sugar and 2 teaspoon cinnamon in a medium size mixing bowl. Peel and slice apples and coat in sugar/cinnamon mixture. Place single layer of apple slices facing the same direction, around the pan to make an outer circle. Repeat to make an inner circle of apples. See post for details. Set pans aside.
Apple Cake Instructions
- In a stand mixer combine white and brown sugar & butter. Mix on low to medium speed until they are creamed together. Add eggs, one at a time mixing after each addition. Add vanilla and mix until incorporated.
- In a small bowl combine flour, cinnamon, salt and baking soda. Add ⅓ flour mixture to cake batter. Mix. Add ½ oil. Mix. Add another ⅓ flour mixture. Mix. Add remaining oil. Mix. Add remaining flour. Mix until incorporated. Scraping down the sides occasionally.
- Chop apples and add to the cake batter. Stir to combine. Divide Cake Batter between both cake pans and cover with aluminium foil. Poke a few holes in the foil of the bottom layer. Stack on top of each other. See post for details and tips for getting the cakes in and out of the Ninja Foodi.
- Add 2 cups of water to the inner pot. Place a pressure cooker safe dish about 1" high to raise the cakes out of the water. Set both cakes into the Ninja Foodi. Set on high pressure for 35 minutes. When done, allow the pressure to naturally release for 30 minutes. Then manually release the rest.
- Remove the cakes from the Ninja Foodi and allow to cool slightly. Remove the foil. Flip each one carefully onto a cooling rack and allow to cool completely. You can put them in the fridge to speed up this process.
Caramel Glaze
- Sift the powdered sugar. Empty water from the inner pot of the Ninja Foodi and wipe dry. Add butter, cream, brown sugar. Set the Saute function to high. Stir frequently until all ingredients are melted and starting to bubble on the edges. When bubbles form across the top of the glaze, turn the Ninja Foodi off and remove the inner pot. Add vanilla and stir.
- Using a silicone whisk, slowly add in the sifted powdered sugar. Whisking between each addition. Whisk until any clumps are removed and you have a smooth glaze.
- When the cakes are completely cool, pour about ⅓ of the glaze over the top of the bottom layer of the cake. Allow the glaze to drip over the edges. Let it set for about 10 minutes. You can put it in the fridge to hasten this process. Repeat this step so that you have two layers of glaze on the bottom cake layer.
- When set. Place top cake layer on the bottom cake layer. Pour remaining ⅓ of the icing starting at the edges and only going in about an inch. Allow to drip down the sides. You can also use a small cake spreader or butter knife to pull the caramel glaze in towards the center of the cake to make the decoration shown in the picture. Serve and Enjoy!
Nutrition
Thanks so much for being a part of The Salted Pepper! We are so happy you stopped by and checked out our recipe for Ninja Foodi Apple Cake! Be sure to let me know in the comments if you make it! Don't forget to subscribe to our email list so you are the first to know when something cool is going on.
As always, if you have any questions about this recipe for Ninja Foodi Apple Cake or any of our other recipes, just comment on the post with your question or shoot me an email and I'm happy to help!
Allan Levine says
does the caramel apple cake need to be kept in the refrigerator? how long is it ok to store before using?