
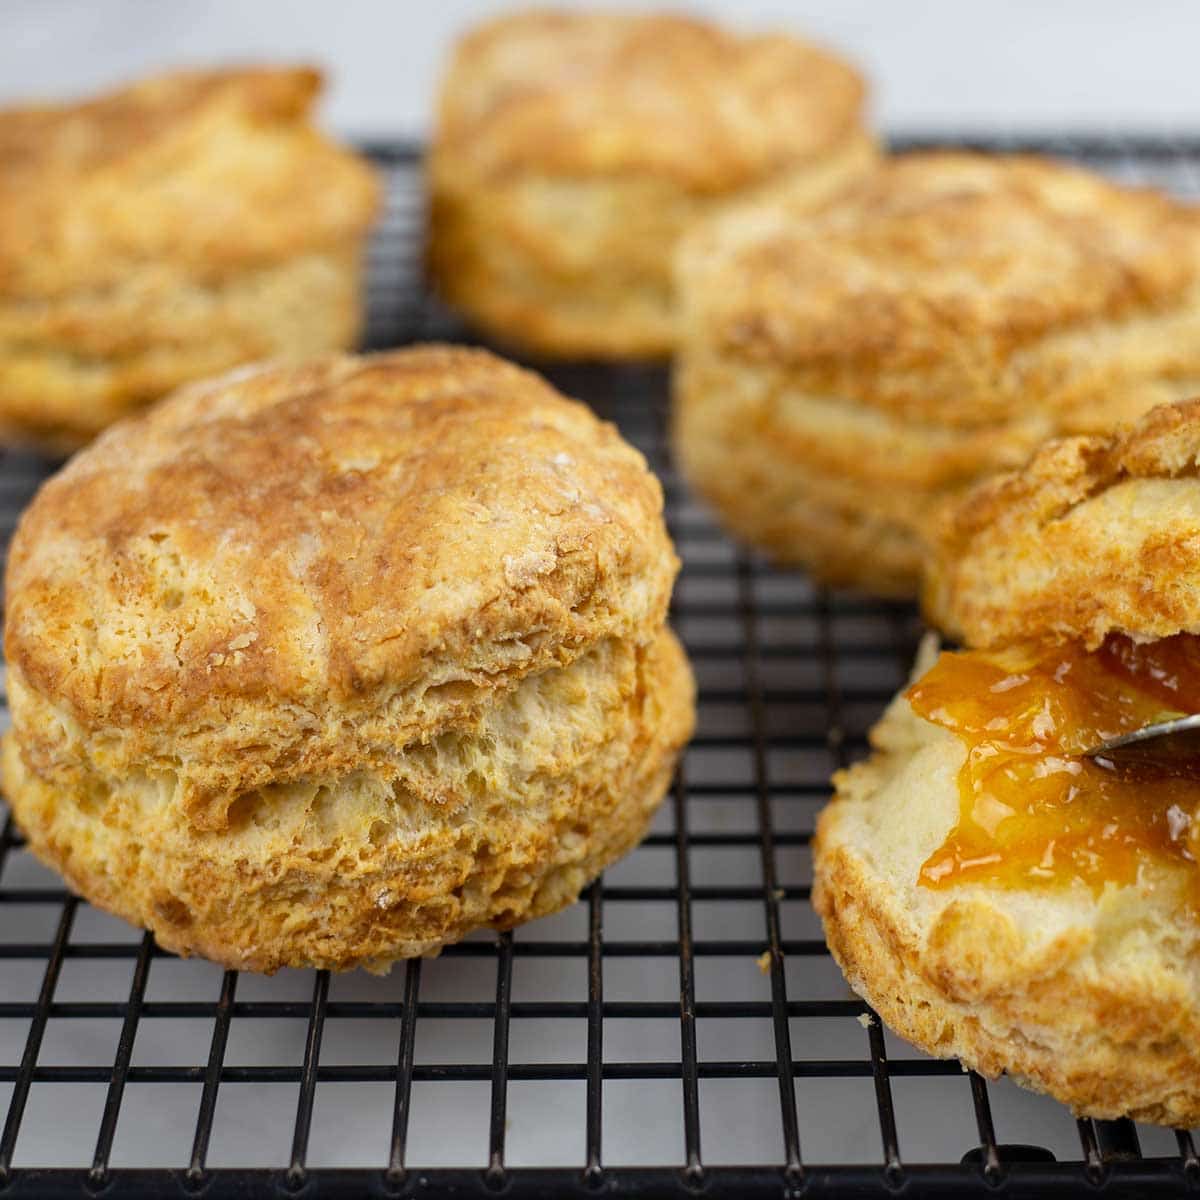

These easy homemade biscuits made in the Ninja Foodi are the epitome of a southern-style biscuit. Fluffy and light on the inside, with that slightly crunchy exterior that makes us say "Oh, man," after taking a bite.
This post may contain affiliate links. If you make a purchase after clicking a link, I may earn a small commission. Thank you for your support!
Hi y'all! Since we are making easy homemade biscuits today, I thought I'd start off with a friendly, southern hello.
I'm not from the South, but I live in Tennessee now and I've just been dying to say, "Hi, y'all," without sounding ridiculous! This was my golden moment, because I just made these Easy Homemade Biscuits in the Ninja Foodi and they are as southern as it gets!
What makes a biscuit southern?
We see this all the time, don't we? Southern biscuits on a menu. Homemade Southern Biscuit recipes on the Internet. So what is it about a biscuit that makes it southern? I didn't know, so I looked it up.
I found definitions of southern biscuits being flaky and crunchy on the outside and fluffy on the inside. I found "southern" style biscuit recipes that call for buttermilk; so, could that be what makes a biscuit "southern?" Nope, many biscuit recipes that say they are "southern biscuits" call for milk as the liquid. Hmmm.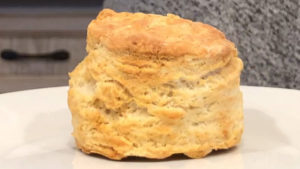
I wasn't getting anywhere, so I did a different search. "What is a northern biscuit?," I typed into google. Makes sense right? If there is a southern biscuit, there should be a northern, eastern, & western biscuit. And then I laughed and laughed and laughed. Type in northern biscuit and all the top results are for dog treats! Makes sense though, because when I lived in Maryland, I tried to make biscuits and they were as tasteless (not that I've ever eaten a dog treat, but you get my point) and as hard as dog treats! Turns out, I had made "Old Fashioned" biscuits! The kind soldiers took because they can slip into your pocket and never crumble. Hard as rocks, those biscuits were!
From what I can remember, the basic recipe is the same as the one I made in Maryland. I did add one different ingredient that might surprise you, but for the most part it was the same basic biscuit recipe. Maybe it's the southern air that made these easy homemade biscuits turn out so perfectly? Or maybe it's the Ninja Foodi? I kind of like to think it's my recipe and technique combined with the Ninja Foodi that makes these extra special. Do me a favor, when you make these biscuits, take a quick picture and post it to your favorite social media platform (Facebook, Twitter, Instagram), write what state you made them in and tag me @thesaltedpepper! This will be our experiment, and I bet it isn't the southern air that makes a biscuit southern!
If you want to read more about the history of biscuits, I enjoyed reading this article on The Light and Fluffy History of Biscuits.
So, from what I've read, what makes a biscuit "southern" is exactly what these biscuits are! Flaky with the slightest crunch on the outside and fluffy and soft inside! So, I suppose, we are making southern easy homemade biscuits today, y'all! Sorry... had to do it, it might be my last chance!
Is there a secret to making flaky and tender biscuits?
Yes and no, has to be my answer today. Yesterday, I would have said, "no," it's all about technique. Today, I think I uncovered a secret or two to making easy homemade biscuits quite by accident and I'm certainly going to share it with you!
I want you to be able to share in the glory of these easy homemade biscuits and you don't even have to tell your family about our chat today. Take the credit, you deserve it! You are the one making them! When you serve these beauties and everyone goes, "oh, man," after taking the first bite, just smile. Then, hurry up and get one before they are all gone! No joke!
I made 10 (baked 8, froze two), and before I knew it, my husband had gathered up 5 to take to work! I'm not upset though, I love feeding his co-workers. They are nurses and paramedics that work 24-hour shifts, helping to save the lives of the people in our community. The least I can do is send treats.
They are always so willing to give me feedback as I develop new recipes, and this is what they had to say about these easy homemade biscuits made in the Ninja Foodi!

Tips on making Easy Homemade Biscuits
Most important is the technique. Second is the ingredient temperatures. Third is believing that you can, and not skipping the details. That sounded kind of scary. It isn't. There is nothing difficult about this recipe, I promise. The other great news is they are mixed, cut and baked in less than 30 minutes. I'm not kidding you. In fact, that's one of the important techniques. If you want to see me make these biscuits, you can check out my video for Easy Homemade Biscuits made in the Ninja Foodi on YouTube or towards the end of this post, just below the recipe.
My secrets... revealed, just for you.
Shhh, this chat is just between us. YOU are making these biscuits and YOU take the credit!
First a disclaimer: I can't take credit for the "secrets" either. They happened by chance and by necessity; but, the end result was the best biscuit I have ever eaten anywhere!
I can't even prove that these little secrets of mine were what made these biscuits out-of-this-world good, but based on the "old fashioned" (aka, rock hard) biscuits I made in Maryland; I think there is a pretty good chance.
Refrigerate your flour: I know this is weird and it can create issues with other recipes, but for biscuits (and pie crusts and puff pastry, to name a few)... the colder the better. I always keep my flour in the fridge because I buy it in huge 25 lb bags and have nowhere else to store it but in the big garage fridge. Usually, I'm a bit frustrated when I forget to bring the flour to room temp before making this or that. Today, I think, I uncovered a secret to making the perfect biscuit! This is not a deal breaker if you don't have time to chill your flour. Still whip up these biscuits, but keep it mind if you plan on making them again.
Use Greek Yogurt: I don't know why, but I think this had a lot to do with the fluffy texture of the biscuit. I wish I had studied food science instead of nursing many moons ago! No, not really. I loved being a nurse and helping people! Now, I get to help you make the most amazing biscuits ever... win-win.
These biscuits were an afterthought to a beef stew I made from left over Ninja Foodi style Pot Roast. My husband is working night shift this week and I always like to send him to work with a good meal. I started to make the biscuits and realized that I didn't have milk and, if I used the half and half, I wouldn't have any for my coffee in the morning. That would be a bad thing, because I need my coffee!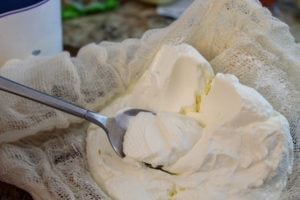
So, I grabbed my Greek yogurt that I made in the Instant Pot. I make my Greek yogurt from whole milk with no added sweeteners, so it's important that if you buy Greek yogurt for this recipe make sure it is plain and not flavored or low fat. It still might add a touch of sweetness, but I don't think it will affect the flavor enough to worry about.
Since getting the Ninja Foodi, that is the only thing I really use the Instant Pot for... but, it makes the BEST yogurt! I've tried to make yogurt in the Ninja Foodi, but haven't been successful.. yet!
Can I use Plain Yogurt Instead of Greek Yogurt?
Yes... probably, but I can't say for sure because Greek yogurt is made from regular yogurt that has been strained. The straining process removes the whey, which is a protein, and I don't know how it affects the texture of the biscuit (which is magical, by the whey). Yeah, I had to.
A lot of recipes call for whole milk; which would contain the whey, so you can use plain yogurt if you must. Skip the water though and just use the full ¾ cup of yogurt.
Seriously though, I wouldn't risk it, because this will be the best biscuit you have ever eaten. I promise!
TIP: If you have plain yogurt and want to make Greek yogurt, check out this post on How to Make Greek Yogurt the Easy Way.
Let's Chat about the Do's and Don'ts for Making the BEST Biscuits!
Don't get your cold ingredients out of the fridge like practically every other baking recipe tells you to do. In fact, if you have the time, throw your flour in the fridge for 4 hours or the freezer for 1 hour. If not, still make the biscuits!
Do use a metal mixing bowl if you have one, or put a glass one in the fridge for a bit. If not, still make the biscuits!
Don't use a mixer, beater, or any other type of fast machine to mix the dough. This is all done by hand and it's easy!
Do pre-heat the Ninja Foodi. It's just like an oven, start the bake temp at 375° F. and set the time for 20 minutes. These biscuits only take 12 minutes to cook and the prep time is less than 10, so you'll be fine! If you take a little longer, just reset the time to 12 minutes when you put the biscuits in.
Don't let the batter sit after you add the wet ingredients. The leavening or rising properties of baking powder start as soon as it's mixed with a liquid. You don't want your baking powder to use up all its rising abilities before baking.
Do watch the video on YouTube on how to make this recipe for Easy Homemade Biscuits in the Ninja Foodi.
Don't overwork the dough. If you handle the dough too much, the heat from your hands will melt the butter. If the butter melts before baking, your biscuits won't be as flaky and fluffy. During the baking process, the melting butter forms steam in the dough and this helps create the flaky layers of a great biscuit.
Do feel confident that you can and will make the best biscuits you've ever eaten!
Okay, let's get to it, y'all. I had to. It's the last time, I promise. In this post anyway.
How to Make Easy Homemade Biscuits in the Ninja Foodi!
Step One: Select the bake function on the Ninja Foodi and set the temperature for 375º F and the time for 20 minutes. Mix 2 cups of cold flour with 1 Tablespoon of baking powder and ½ teaspoon of fine grind sea salt in a metal or cold glass mixing bowl. Mix together with a fork.
Step Two: Take your butter out of the fridge and slice into ¼ inch slices right over the bowl while it is in the wrapper, try not to handle the butter with your hands. Use a pastry cutter or fork to cut the butter into the flour until you have very course crumbles. It's okay if there is still some loose flour.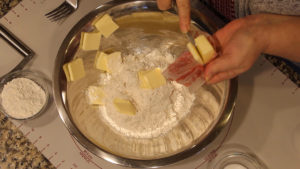
Step Three: Take the Greek yogurt out of the fridge and mix with cold tap water. Make a well in the middle of the flour/butter mixture and pour in your yogurt mixture. Use a fork to toss and mix the flour into the liquid until you have a very loose mixture. It should not look like dough at this stage.
Step Four: Dump out the loose "dough" onto a well-floured surface (about ¼ of a cup). Bring the dough together by pulling the flour mixture from the top onto the pile and pressing down. Do this until the dough comes together. Be careful not to overwork the dough. If the butter starts to melt, throw the dough back in the fridge for a few minutes.

Use your fingertips to press the dough down gently until it is slightly flat and about 4 inches x 4 inches, then pull up the top of the dough and fold it over towards the bottom. Turn the dough 90° and repeat, gathering more of the loose flour, this time make it 5" x 5". Do this about 2 more times bringing in more of the loose flour each time.
Step Five: Gently press the dough down until it is about an 1 ½" thick. Don't be concerned about the number of biscuits at this point. Press a 2-2 ½" inch biscuit cutter straight down into the dough, don't twist. I didn't have a biscuit cutter handy the first time I made these (we moved and I couldn't find my set), so I used a wine glass. The biscuit gurus will tell you not to use a glass. It worked fine for me, but don't twist it. Just press straight down. You might hear a pop, no worries. Bring the cutter or glass straight up. Repeat this until you get as many biscuits as you can. 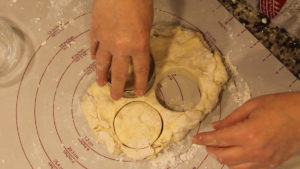
Step Six: Repeat step five. And repeat again. The Ninja Foodi basket will only hold 8 biscuits, but I made 10 before the dough was used up. I put those extra 2 biscuits on a plate in the freezer and once they are frozen, I will put them in a freezer baggie to make later.
Step Seven: Place biscuits in the fryer/steam basket that came with the Ninja Foodi in a single layer. Bake in the pre-heated Ninja Foodi at 375° F. for 12 minutes. 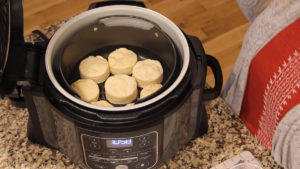
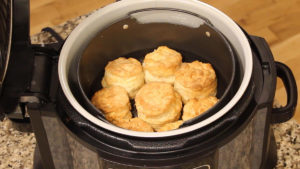
Step Eight: Serve and Enjoy! Just look at those babies!
How to Make Easy Homemade Biscuits in the Oven
Follow all the steps above for making the dough and cutting the biscuits. Place biscuits on a baking sheet pan in a preheated oven on 425° F. for 10-12 minutes. Enjoy!

Easy Homemade Biscuits made in the Ninja Foodi
Ingredients
- 2 cups flour all purpose, chilled
- ½ teaspoon sea salt fine grind
- 1 tablespoon baking powder
- 1 tablespoon granulated white sugar
- 6 tablespoon butter salted
- ½ cup Greek yogurt plain, whole fat, unsweetened
- ¼ cup water
Would you like to save this recipe?
Instructions
- Select the Bake function on the Ninja Foodi, set the temp for 375° and the time for 20 minutes. Combine flour, salt, baking powder and sugar in a metal mixing bowl or a chilled glass bowl.
- Remove the butter from the fridge and cut into ¼ inch slices into the bow with the flour. Use a pastry cutter or fork to combine the flour and butter until it has a very course texture.
- Make a well in the middle of the flour/butter mixture and pour in the Greek yogurt and water mixture. Use a fork to gently combine the flour mixture and the liquid mixture. You should not have a dough yet. See video for details.
- Dump mixture onto a floured surface and press down with your fingertips until you have a 4"x 4" piece of dough. Fold the top down to the bottom. Turn 90° and repeat x 5, gathering all the loose flour/butter as you go. Each time you press and rotate, make the square bigger, but don't go more than 8" x 8". Don't over work the dough,, see post for details.
- When all the loose flour is incorporated, gently press dough down with your fingers until it is about 1" thick. Use a 2" biscuit cutter to cut out the biscuits. Press straight down, don't twist.
- After you get as many biscuits as you can out of that dough, gently bring it back together and press it down again to 1" thick. You should get at least 8 biscuits. I got 10. Only 8 will fit in the Ninja Foodi, but see the post for details on freezing the other two.
- Place cut biscuits in a circle around the Ninja Foodi basket, you should be able to get 6 or 7, depending on how big you cut them. Place one in the middle and put the basket into the inner pot.
- Bake on 375° F for 12 minutes. Serve and Enjoy!
Notes
Nutrition
Want to see more recipes made in the Ninja Foodi? Check these out and remember to pin for them later!


Don't forget to tag @thesaltedpepper when you make a recipe! I love to see what everyone is cooking.
You can find us here: ⇓⇓⇓⇓⇓
Cheryl says
Great recipe! I halved it because there are only 2 of us and baked it in my dual drawer Ninja air fryer in one side only. The only downside is that the inside center was a little under done. Next time I will bake it at 360 or maybe even 350 degrees.
Louise says
I'm glad you liked the recipe! Each air fryer does work a little differently and might not circulate the. hot air the same which can require changes in temps and times. It's definitely a balance of temp and time and sometimes I find you have to cook longer at a lower temp to cook the middle more. Next time you make them, keep an eye on. how they are browning. I would start out at a higher tempand if they are browning too much or too quickly, lower it and cook a few minutes longer. I hope you get the perfect results next time!
FSethman says
What about using self rising flour from the fridge? I do keep flours in the fridge as you have suggested before. Thank you!
Louise says
You can use self-rising flour, but omit the baking powder and salt in the recipe.
Dawn says
Chile forget the recipe. Please tell me why I just read this from start to finish. I’m sure if this is a food blog or a quick recipe site(definitely not that) but hey that was fun to read. Now I feel like a food scientist is on my long list of things I want to be when I grow up lol
Louise says
LOL! If you want to use my website as a quick recipe site, click the jump to recipe button! If you want to learn all about the ins and outs of the recipe, read the article. See, I cater to everyone... busy people who just want biscuits and aspiring food scientists. LOL
Wanda Oppie says
Thank you for the great biscuit receipt! best I ever made. I will try the sausage gravy next, very interesting receipt. You are a wonderful teacher.
Louise says
Thank you! I'm so glad you enjoyed them!
Lunagalmoon says
These were great. For quickness on a weeknight, could you use a baking mix such as Bisquick?
Louise says
I don't see why not.