
There are a gazillion things you can make with chicken breasts in the Ninja Foodi, but it's hard to beat this recipe for Stuffed Chicken Breasts!
If you have ever had the Chicken Cordon Bleu or Broccoli & Cheese Stuffed Chicken breasts from Sam's Club, that is what these are like.... but BETTER!
Would you like to save this recipe?
It was one of the very first things I made when I got my Ninja Foodi back in November of 2019 and honestly, this recipe made be fall in love with the Ninja Foodi. These Ninja Foodi Stuffed Chicken Breasts are 100% restaurant quality or better.
Just recently someone asked me for my recipe and guess what??? I never wrote it up on my website! I'm so glad I did a video on it so I can remember exactly how I made them!
This post may contain affiliate links. If you make a purchase after clicking a link, I may earn a small commission. As an Amazon Associate, I earn from qualifying purchases.
Tons of people have made it and loved it based on the video recipe, but I knew I just had to get it written for all the people who prefer a printable version!
The beauty about a recipe like this stuffed chicken breast is you can stuff it with anything you want!
What Variations of stuffing can I use?
Basically, if you think it and want to try the flavor combination out, you can stuff these Ninja Foodi Chicken Breasts with any combination of ingredients you want.
Spinach, Sausage, & Feta Stuffed Chicken Breasts
This is what I did for the video. I used a leftover spinach dip that I had made out of my spinach ball recipe. One recipe became another recipe and then became the filling for my Ninja Foodi Stuffed Chicken Breast recipe video. I love when that happens!
Chicken Cordon Bleu
Once you pound out your chicken breasts, place a few slices of thinly sliced ham and a few slices of swiss cheese. Then follow the recipe for rolling, coating, and air crisping. Delicious!
You can even make a wine and blue cheese cream sauce to put on top. I tried to create a recipe, but I'm not quite there yet. I'll be sure to share it when it's perfect!
Mexican Stuffed Chicken Breasts
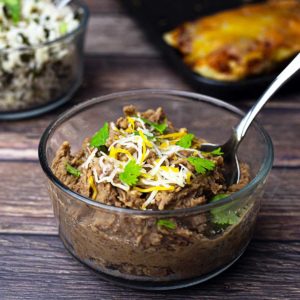
Layer some Homemade Refried Beans, taco meat or cooked chorizo, and cheese and roll it up! Instead of bread crumbs, used crushed tortillas!
French Onion Stuffed Chicken Breasts
Stuff with caramelized onions and swiss cheese and then proceed with the recipe. I'm definitely trying this one soon!
Veggie Stuffed Chicken Breasts
Use some roasted peppers, sautéed onions and mushrooms or any vegetables you like. Just make sure to cook them first so they are soft and you can roll the chicken.
Italian Stuffed Chicken Breasts
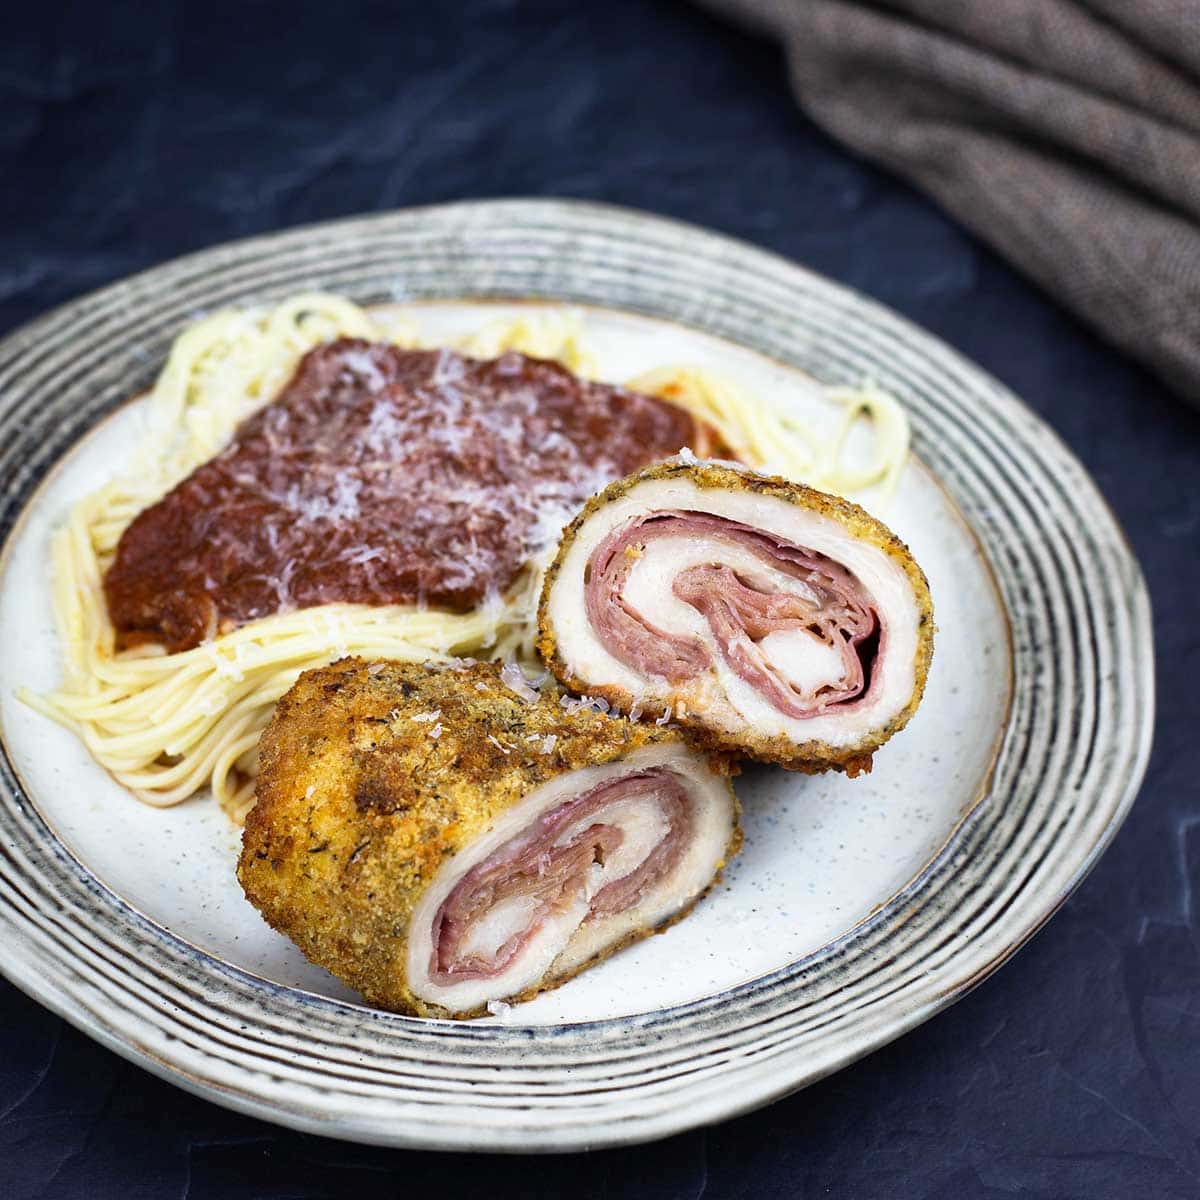
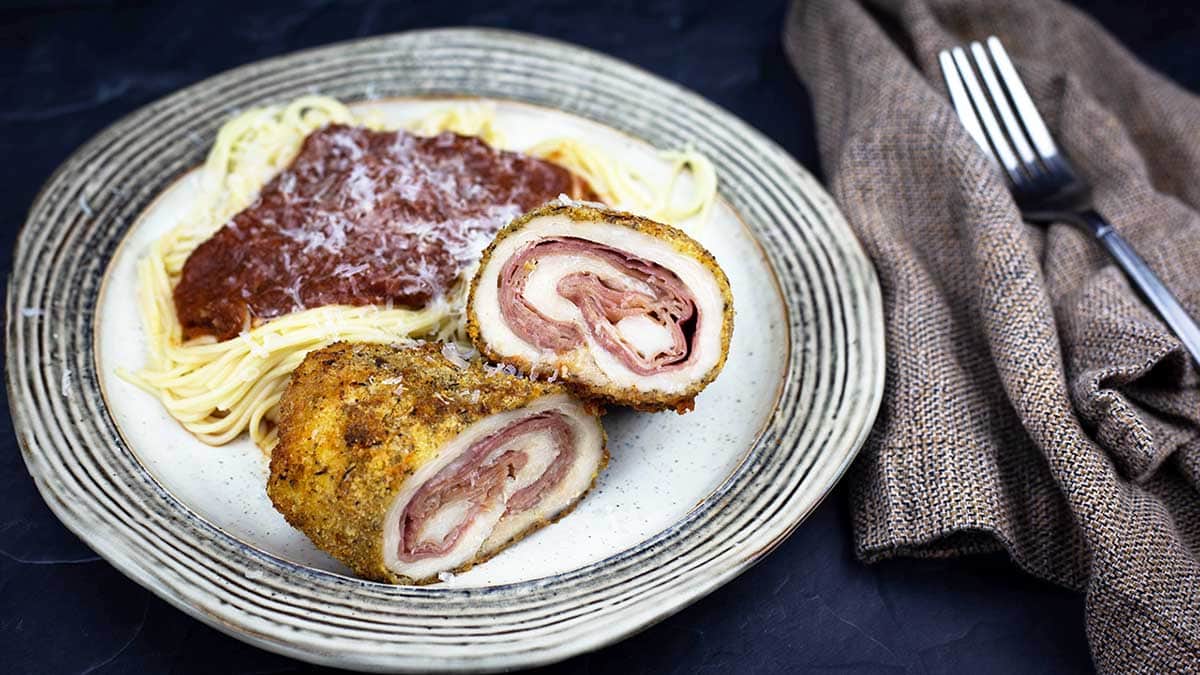
This is the style I just made and shows in the picture above. Stuff with Genoa salami, prosciutto and provolone and serve it with a side of pasta and this Homemade Marinara Sauce!
This is probably one of the most versatile recipes and I haven't even scratched the surface of possibilities! They really are endless and I can't wait to hear what you use as the filling in your Ninja Foodi Stuffed Chicken Breasts! Make sure to leave me a comment or tag me @thesaltedpepper on social media!
Do I have to use Chicken Breasts?
Nope, not really! I chose to use them because they can be cut in half easily and they do really well when pounded thin because of their shape.
You could do the same thing with a flank or skirt steak or even a sirloin.
I bet chicken thighs would work as well, they would just be a little smaller, so reduce the filling a little.
Cabbage would even work I bet. Blanch the cabbage leaves, roll them with whatever filling you want. Then coat and air crisp them.
If you wanted to use fish, I would assemble them and then freeze them before cooking. That way the fish doesn't overcook before the crust gets crunchy and brown.
Pork is another great option. Simply pound out some thin pork chops and stuff them.
You can even try using ground meat and form an oval patty, apply the filling and then roll it. I would probably coat it twice in the egg and bread crumbs to get a thicker coating because the filling might leak out (and still might), but hey... if all you have is ground meat, use it!
What can I use instead of Bread Crumbs?
Here is another place where the possibilities are endless. I'm a big fan of looking around your house and using up things you already have, so don't run out for bread crumbs. Shop at home!
Panko would be great!
Potato chips will work, but make sure to cut the salt down when you season the chicken.
Corn Chips sound delicious for a Mexican inspired Stuffed Chicken Breast.
Any crackers, especially Ritz or a butter cracker. Delicious!
If you want to keep it Keto, use crushed pork rinds or almond flour.
A gluten free option would be almond flour. Just keep an eye on your time and temp. If the almond flour is getting too brown and the chicken hasn't had time to cook, lower the temp and/or switch to bake/roast.
Pretzels are another choice! Stuff the chicken with onions sautéd in beer and some gooey cheese, then make a mustard sauce! That sounds heavenly and I might have to write that recipe up!
If you really want to use breadcrumbs and don't have any, use some leftover bread. Cube it up and coat it lightly with oil or butter, then AC it until hard and dry. Keep your heat low so it doesn't burn. Crush them up and you have your own bread crumbs.
I think you get the idea! Shop at home and I bet you come up with the perfect coating without running to the store for bread crumbs.
Storage & Tips for Making Ninja Foodi Stuffed Chicken Breasts
Can I make these and freeze them?
Yes! They freeze beautifully! Simply, stuff, roll, coat and place them on a parchment lined tray and pop them in the freezer. Once completely frozen, you can put them in freezer bags and take one out when you want to cook it.
Can I cook from frozen?
Yes, but I haven't done this yet. I would preheat the Ninja Foodi on AC at 400℉/200℃ for 10 minutes.
Spritz the chicken with oil and AC at 325℉/160℃ for 10 minutes per side and then increase up to 375℉/190℃ for another few minutes or until the chicken is completely cooked and the crust is golden brown and crunchy.
How Long will they last in the Refrigerator?
If you assemble them and put them in the fridge before cooking, I would not store them longer than 24 hours before cooking. Your coating will not be as crisp either.
If you cook them and then refrigerate them (my preference), then you can keep them 3 days. To reheat, preheat the NF for 10 minutes on 400℉/200℃ AC for 10 minutes. Then AC on 325℉/190℃ until they are warmed through.
You can increase the temp if you need more crisping on the coating.
Don't over stuff the Chicken Breasts
Less is more here for sure! I know we all want to pack in that yummy stuffing, but your chicken will not roll properly if you overstuff it.
For flat things like deli meats and cheeses, a couple of thin slices of each works great. If the slices are thicker, use one slice.
If your filling is more like a dip consistency, I would use no more than ¼ cup per chicken breast.
For veggies and chunky fillings, make sure the chunks are as small as possible and about ¼ cup is what I would recommend.
What if I don't have a Ninja Foodi?
No problem! Of course, I have to recommend that you consider getting one because they are awesome! Until you make the leap, you can cook these chicken breasts a ton of different ways!
Any Air Fryer: Since we are only using the Air Crisp function in this recipe, you can use any Air Fryer without any changes to the recipe.
Ninja Foodi Oven: I would use the tray that comes with the (affiliate link)Ninja Foodi Digital Air Fry Oven and keep the settings the same. So cook on 375℉ for 10 minutes, then flip and go another 5-10 minutes. Keep an eye on your chicken and if the outside is getting too brown, lower the heat.
Ninja Foodi Grill: Preheat the grill on Air Crisp at 375℉, then add the chicken to the basket. AC for 10 minutes, flip and AC another 5-10 minutes. Adjust your temp up or down depending on browning. I would peek every 5 minutes.
How to Make Stuffed Chicken Breasts in the Ninja Foodi
I hope this isn't going to be confusing because the pictures that go along with the steps are taken from the video I did and in that video I used a spinach, sausage, and feta dip.
In these steps, I'm going to keep the filling generic because it doesn't matter what you stuff the chicken with, the process is the same. In the written recipe, I'm going to give specifics for Italian Stuffed Chicken Breasts.
Please bear with me for now. I will update the post once I do the video for the Italian Stuffed Chicken Breasts so it is less confusing.
Okay, so this is a simple recipe and like I said, it doesn't matter what you use to stuff your chicken with.
Make sure your chicken is thawed and preferably out of the fridge for about 30 minutes before you assemble them. I find them easier to pound and roll that way.
I used 2 chicken breasts that were about ½ pound each. You can use larger chicken breasts and that won't make a difference.
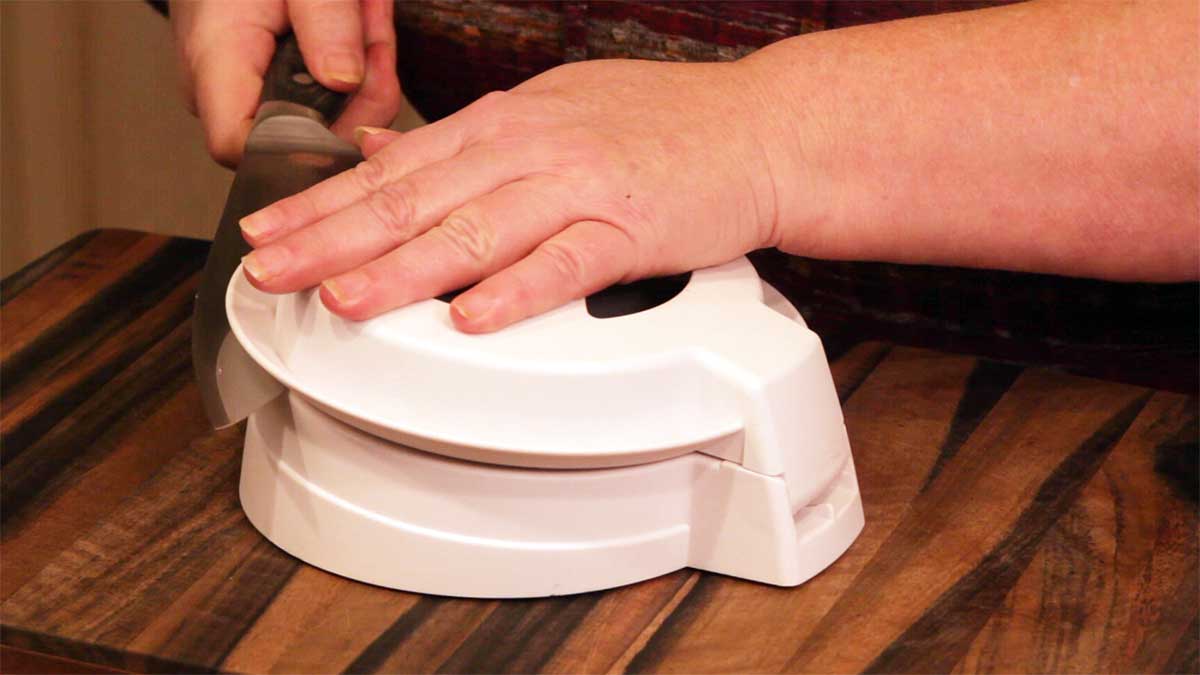
The first thing you want to do is trim up the chicken breast. Remove all visible fat and sinewy stuff. Then you want to cut each breast in half through the middle lengthwise or horizontally. I never quite know how to word that. I could say butterflied, but this time you cut all the way through the chicken and not just part way.
The easiest and fastest way to cut the chicken breasts in half is with (affiliate link)this tool from Pampered Chef. It works great and you get even slices! However, you can just use a knife to cut them.
Once you cut your chicken breasts in half, lay them out on a piece of parchment paper and cover them with a second piece of parchment paper.
Then, use the flat side of a mallet or a meat tenderizer to pound the chicken. Do this sort of gently or the chicken can tear and split. You want the chicken to me no more than ½" thick. I try to get mine as close to ¼" as possible.
Add the filling. In the picture, I'm using about ¼ cup of a sausage, spinach, and feta mixture. If you are doing lunchmeat, just lay the slices on the chicken.
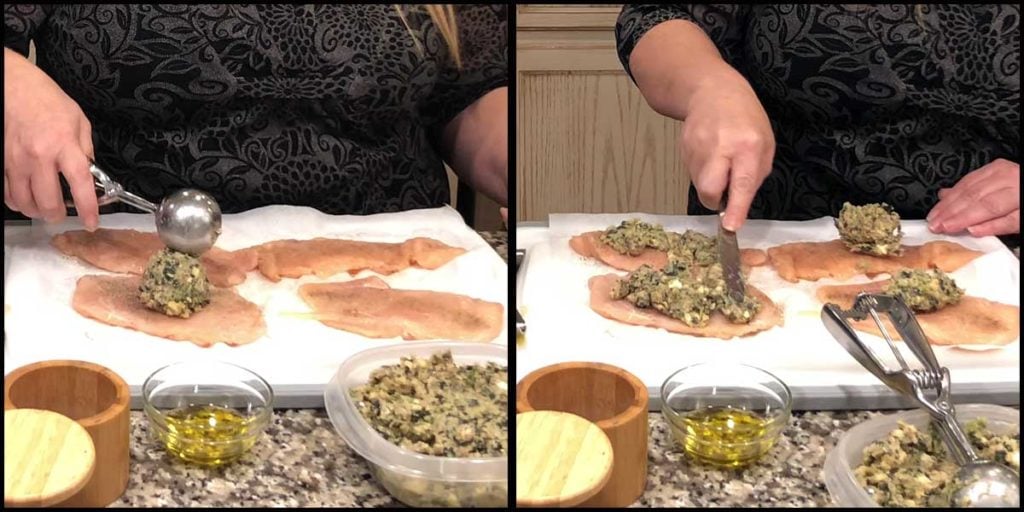
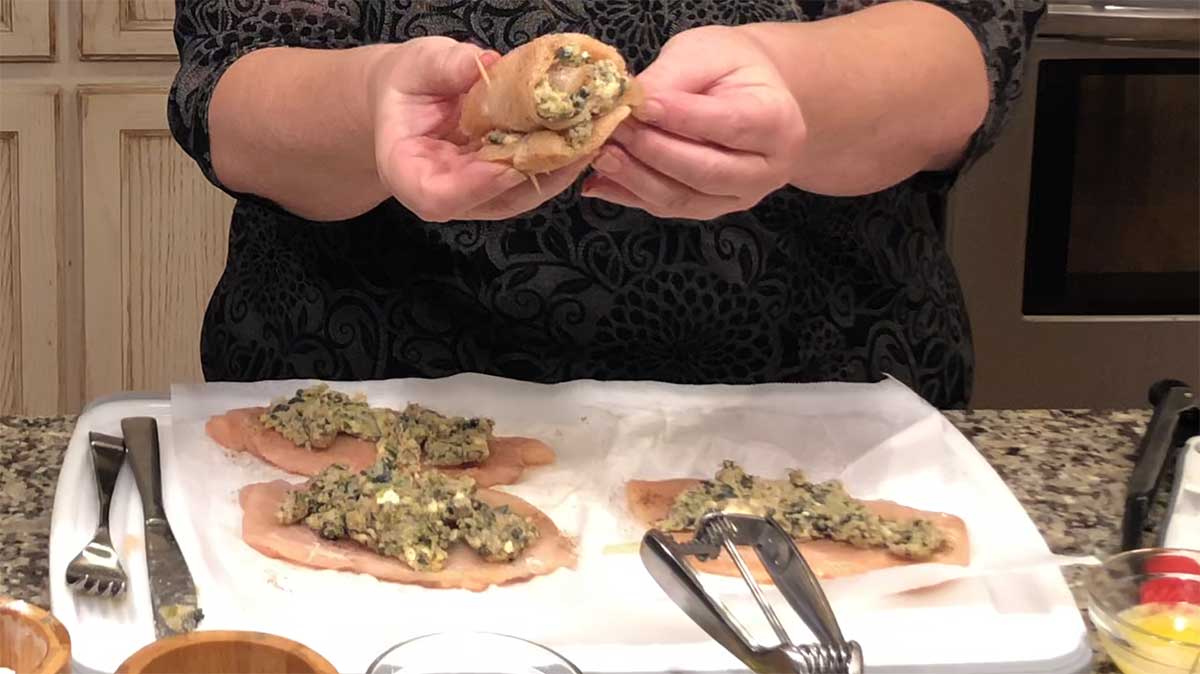
Then roll the chicken, starting at the narrow end and secure with toothpicks or you can wrap kitchen twine around them and secure them that way.
Most recently what I used are these (affiliate link)meat pins that the owner of GrillGrates sent me. I have to be honest, at first I really thought they were so gimmicky and a waste of money. Then, I used them when I made the Italian Stuffed Chicken Breasts and I was so wrong! They are amazing! I really wish I would have taken a picture of them in the chicken because I can't get over how easy they are to use. If you like making stuffed meat, you'll want a few sets of these for sure. If you head on over to their website, make sure you check out the (affiliate link)Sear 'N Sizzle for the Ninja Foodi. It's amazing, too!
Now it's time to get the Ninja Foodi preheated. Place the basket in the inner pot and preheat on AC at 400℉/200℃ for 10 minutes. This will give you time to coat the chicken with egg and breadcrumbs.
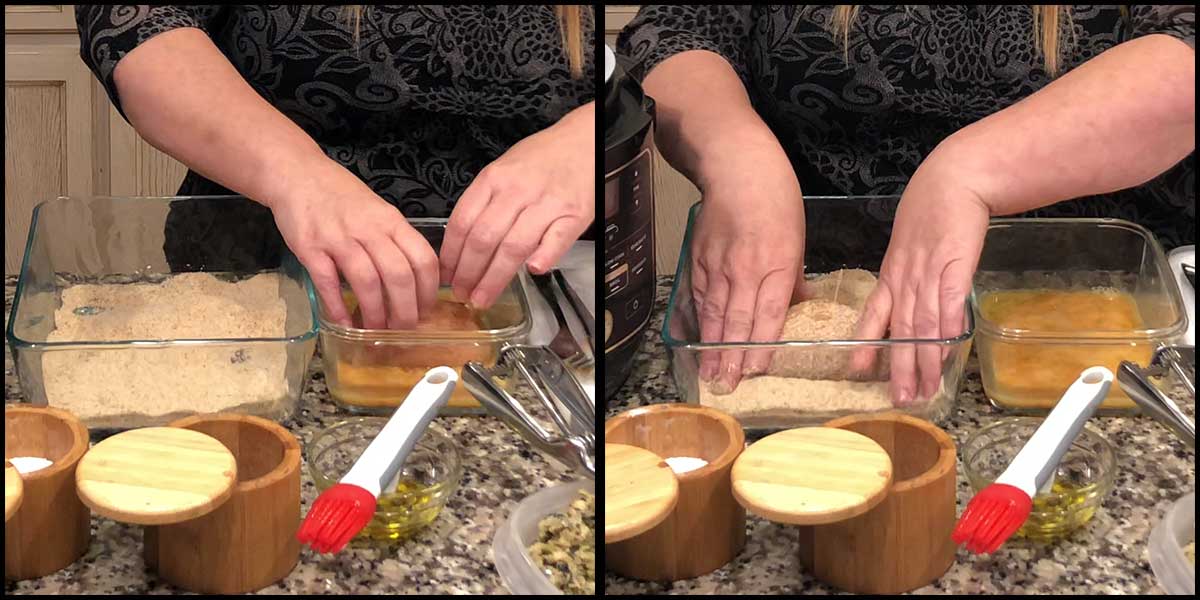
Use two shallow dishes or these (affiliate link)coating trays from Pampered Chef to use for your egg and breadcrumbs. Lightly beat one egg in one of the dishes and pour 1 cup of breadcrumbs to the second one. Add seasonings to the breadcrumbs and mix.
Roll the rolled chicken breast in the egg mixture and then into the bread crumbs so it is evenly coated. Set aside and repeat with the remaining chicken.
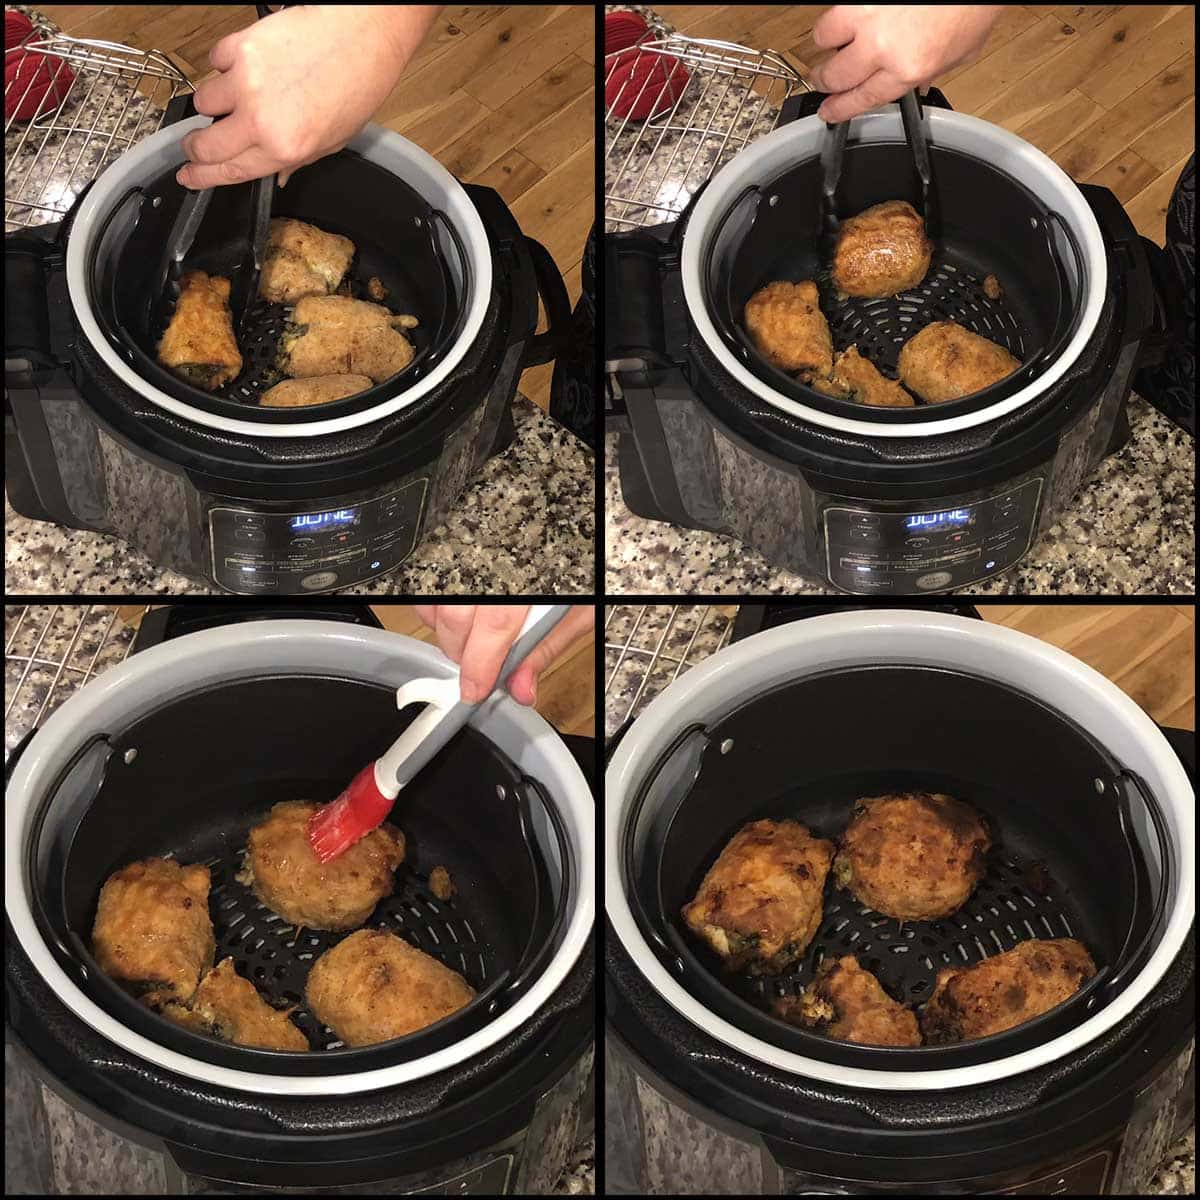
When the Ninja Foodi has preheated, open the TenderCrisp lid and spritz with oil or baste the bottom with a little oil. Place the chicken breasts into the basket. I was able to fit all 4, but if your chicken breasts are larger, you might have to cook in batches.
Usually, I place the chicken breasts seam side down for the first 10 minutes, but you can see in this photo that some are down and some are up. They all cooked fine, so don't worry too much about that.
Baste the tops with butter. I really like to use butter in this recipe, but spritzing with oil will work just fine.
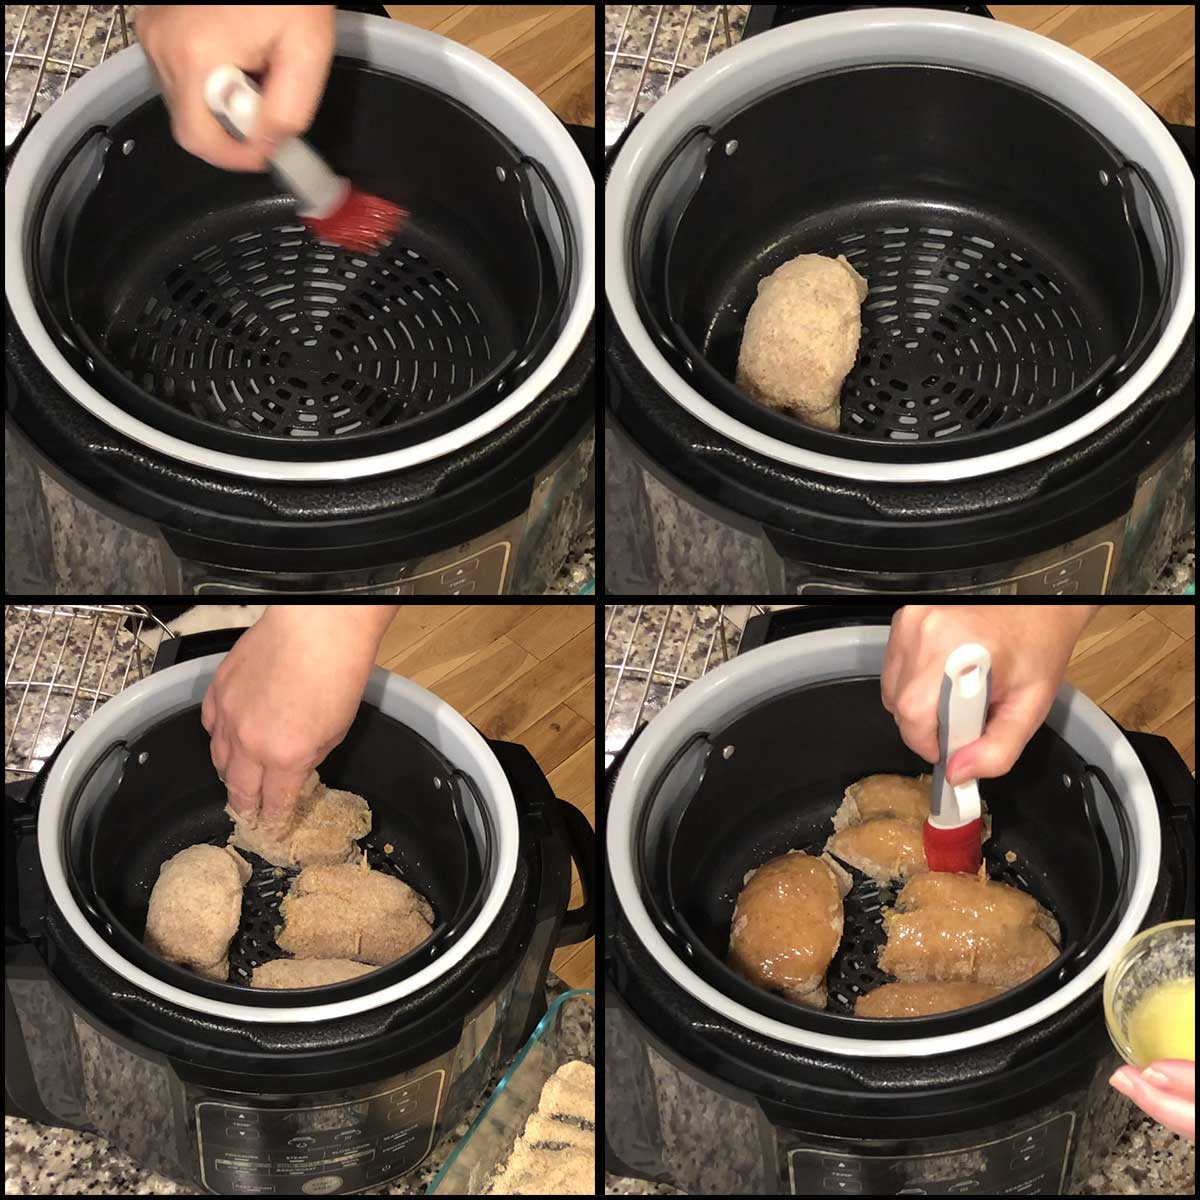
Close the TenderCrisp lid and Air Crisp on 375℉/190℃ for 10 minutes. Flip the chicken, baste with butter if needed and AC another 5-10 minutes. The timing will depend on how thick your chicken is. Since it is pounded thin, it does cook faster than regular baked chicken. I have gone the whole 20 minutes and my chicken wasn't dry and I have stopped at 15 minutes and the chicken was cooked thoroughly. It's hard to judge doneness with a thermometer because you will be temping the center which is part chicken and part filling. To be on the safe side, make sure the center is at least 160℉/71℃. The temp will continue to rise as it rests, so it will get to 165℉/74℃ before serving.
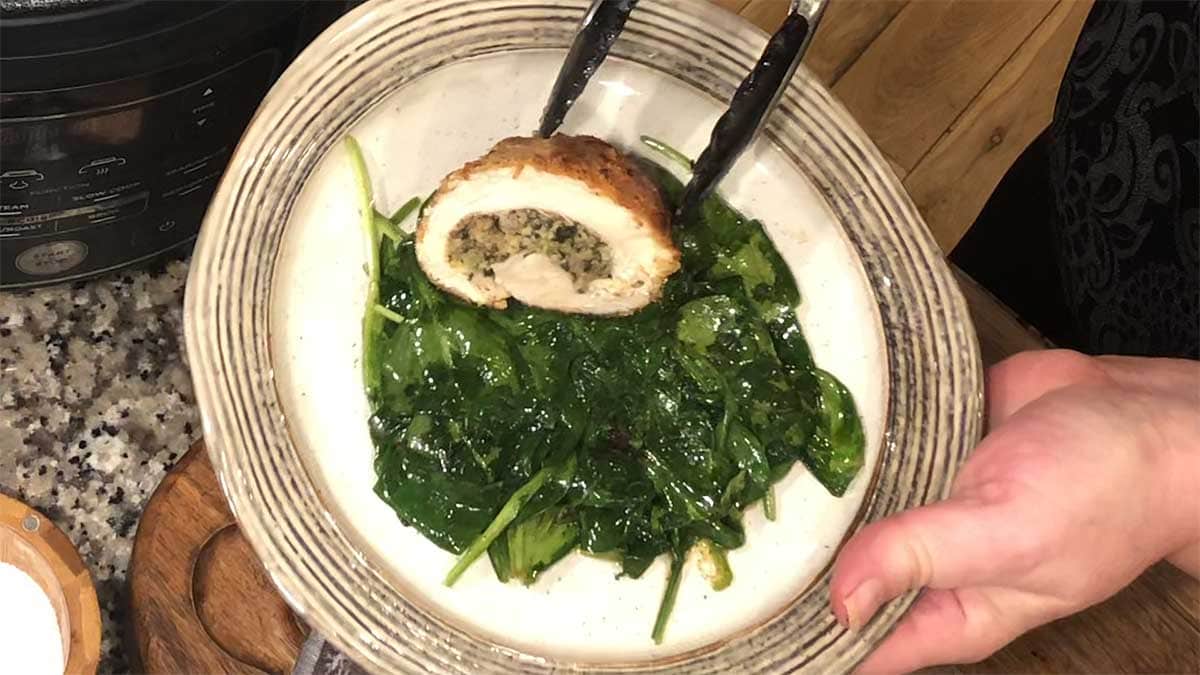
Remove the finished Stuffed Chicken breasts from the Ninja Foodi and set on a cooling rack or a cutting board. I recommend a cooling rack so the bottom doesn't steam and get soggy. Let the chicken breasts cool for 5-10 minutes. If you cut them too quickly, the filling will ooze out.
Serve & Enjoy!

Italian Stuffed Chicken Breasts
Equipment
- Ninja Foodi Pressure Cooker & Air Crisper
Ingredients
- 1 lb chicken breasts 2 medium sized
- ¼ lb Provolone Cheese
- 3 ounces Prosciutto
- ¼ lb Genoa Salami
- 1 large egg
- 1 cup bread crumbs
- 1 teaspoon Italian Seasoning
- 1 tablespoon butter
- salt and pepper to season chicken breasts
Would you like to save this recipe?
Instructions
- Trim chicken breasts of visible fat. Cut chicken breasts in half horizontally through the middle. Place each piece on parchment and place another sheet of parchment on top. With the flat end of a meat tenderizer, pound the chicken breasts to about ¼" thin. Season lightly with salt and pepper.
- Place 2-3 slices of provolone, 2-3 slices of Genoa salami, and 1-2 slices of prosciutto on each chicken breast. Starting at the narrow end, roll the chicken breast and secure with meat pins, toothpicks, or kitchen twine.
- Preheat the Ninja Foodi with the basket in on AC at 400°F/200°C for 10 minutes.
- Lightly beat an egg in a shallow dish. Mix bread crumbs and Italian seasoning in a second shallow dish.
- Roll the chicken breasts in the egg and then in the breadcrumbs to coat evenly. Melt the butter in a small dish in the microwave.
- When the Ninja Foodi is preheated, spritz the basket with oil or brush with butter. Place the chicken breasts in the basket, brush the tops with butter or spritz with oil and close the TenderCrisp lid. Air Crisp at 375°F/190°C for 10 minutes. Flip, brush with butter (or spritz with oil) if needed and cook another 5-10 minutes until they are golden brown. The temp should be around 160°F/71°C in the middle. The temperature of the chicken will rise as it rests. See post for more information.
- Remove the chicken breasts from the basket and let them rest on a cooling rack for 5-10 minutes. Serve & Enjoy!
RT says
Hi Louise,
Can I do this without coating the chicken? Trying to keep the recipe super healthy.
Many thanks,
Louise says
You can, but the chicken won't stay as moist and the filling may leak out.