A classic peanut butter cookie encased around a sweet bite of jelly and drizzled with white chocolate is definitely a cookie you don't want to miss! The flavors are so much like peanut butter and jelly sandwiches, but with a crunch!
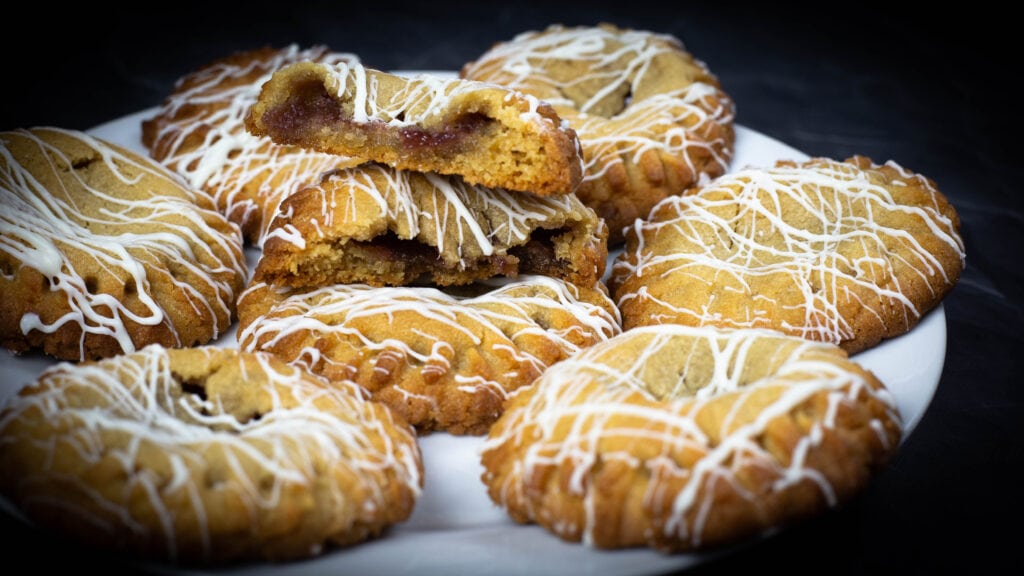
I started testing out peanut butter and jelly thumbprint cookies and the picture of Uncrustables® kept popping in my head, and I knew I had to try to make a cookie that looked more like that, so I did! The great thing about this recipe is you can use it to make peanut butter cookies without the jelly, or keep it a little simpler and make the thumbprint cookies. This recipe does take a little longer to make than other varieties because there is some refrigeration time, but it's worth it!
These peanut butter and jelly cookies are wonderful anytime of the year and they are festive enough for the holiday season.
Tips for Making Peanut Butter & Jelly Cookies
Chill the Cookies AFTER Assembly
Chill the cookies for 30-60 minutes before baking for the best results.
Chilling firms up the jelly which results in less leaking and it slows the spread of the cookie when baking and that helps keep the cookies looking beautiful and keeps that jelly where it belongs.
Cracking Cookie Dough
I've made this recipe at least 5 times, and 4 times the dough was great to work with, but the 5th time it was a little drier and wanted to crack when I put the top on the cookie.
This can happen if you are heavy handed with the flour or even humidity can affect the dough, so don't worry if it happens. An easy way to fix it is to add another Tablespoon of butter to the dough and mix until it's incorporated. This will soften the dough and reducing the cracking.
A little cracking on top is normal, so don't worry about little hairline looking cracks. Only add the butter if your dough is dry and crumbly and you have major cracking.
Line the Trays with Parchment
Bake the cookies on parchment paper or another non stick surface. If, for some reason, any jelly does leak out of the peanut butter cookie this will prevent it from sticking to the sheet pan.
Preheat the Oven
Preheating the oven on 400℉/200℃ for a full 10 minutes (or longer if your oven heats slowly) is very important in this recipe.
You need the chilled cookies to go into a hot oven so they start to cook and set up quickly before the jelly on the inside becomes too hot and starts to combine with the cookie dough causing leaky bottoms.
Cookie Tops Collapsing after Baking
This is completely normal and it's going to happen to a different degree with all of the cookies.
Some of mine have barely settled and others have collapsed and cracked wide open on the top. I think it adds character and gives the cookie a homemade feel. Life isn't perfect and cookies don't need to be, either!
Once they cool and settle, drizzle with white chocolate and, I promise, you they will look perfect! Have fun with the process and enjoy the peanut butter & jelly cookies!
Ingredients & Substitutions
Peanut Butter
I do recommend using creamy peanut butter, because you have more chances of the jelly leaking out if you use crunchy peanut butter.
I also recommend using store-bought processed peanut butter like Jif or Skippy for making the cookies. That's not something you'll hear me say often because, you know, I am all about reducing the processed foods in recipes; however, natural peanut butter and homemade peanut butter just don't act the same in baking recipes and I want you to have a great outcome.
Now, if you have a favorite peanut butter cookie recipe that uses a less processed peanut butter, by all means, give it a try.
If you want to use your favorite peanut butter cookie recipe that should be fine as long as the dough is smooth and holds together well.
Jelly
I used grape jelly in this recipe to keep things fairly traditional, but you can certainly use different jams or jellies. I've even tried it with my banana jam recipe and, let me tell you... it's delicious!
Seedless raspberry jam, strawberry jam, strawberry jelly, or any other jelly that you love on peanut butter and jelly sandwiches will work just fine.
I would stay away from strawberry preserves (or any kind of preserves) because they have fruit pieces in them which could poke through the peanut butter cookie dough and cause leakages.
I also don't suggest any jams with seeds because as the jam cooks, some of it is absorbed into the cookie dough and you could end up biting into a pocket of seeds and that's no fun when eating a cookie! Other than that, use your favorite flavor of jam or your favorite jelly.
White Chocolate
This is completely optional, but really makes the cookie extra special, in my opinion. The white chocolate really compliments the peanut butter and jelly cookie and it makes for such a beautiful presentation.
While I wouldn't necessarily use a milk, semi sweet, or dark chocolate with a grape jelly center, I certainly would consider that if using banana jam!
Variations of Peanut Butter Cookies
The stuffed Peanut Butter & Jelly Cookies do take longer to assemble, so if you are short on time and still want an amazing tray of cookies, here are some other ways to use the dough.
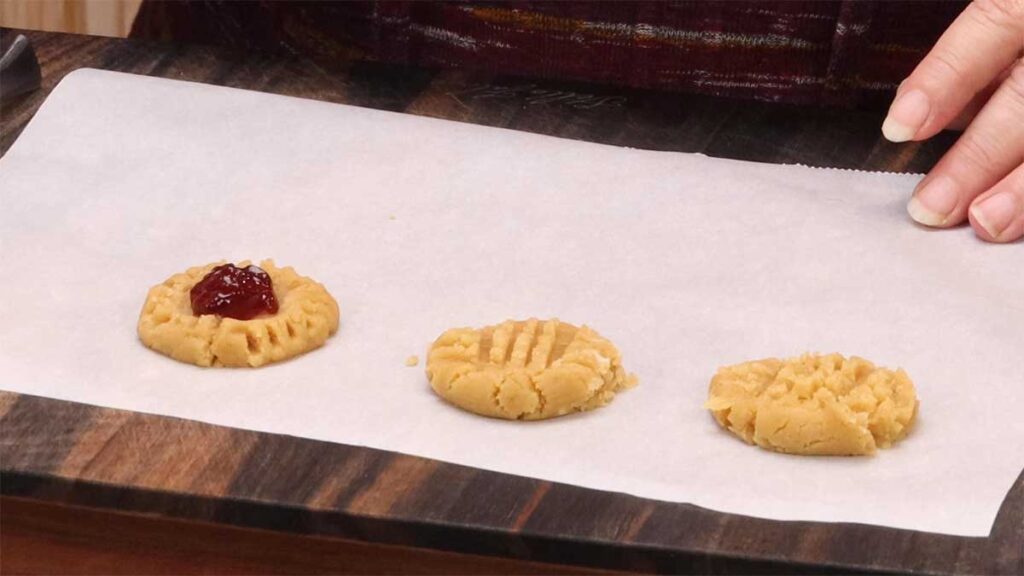
Thumbprint Peanut Butter & Jelly Cookies
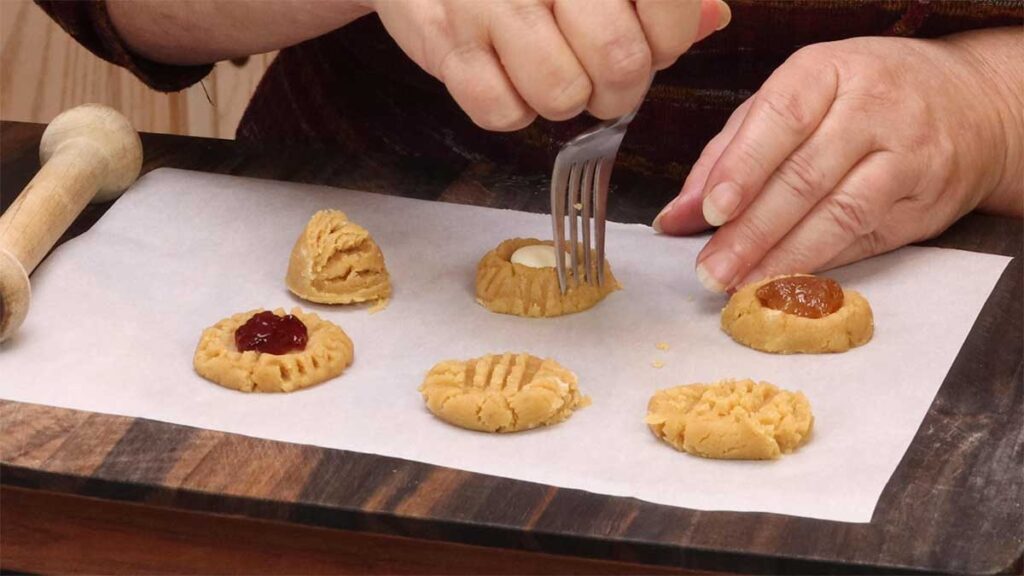
Follow the same instructions for making the dough and use a 1 Tablespoon scoop to scoop the cookies onto the tray (I line mine with parchment). Press your thumb or use a tart shaper to create a recessed center and add about ½ teaspoon of jelly.
Bake at 350℉/175℃ for 10-12 minutes in a preheated oven. Cool on a cooling rack.
Traditional Peanut Butter Cookies
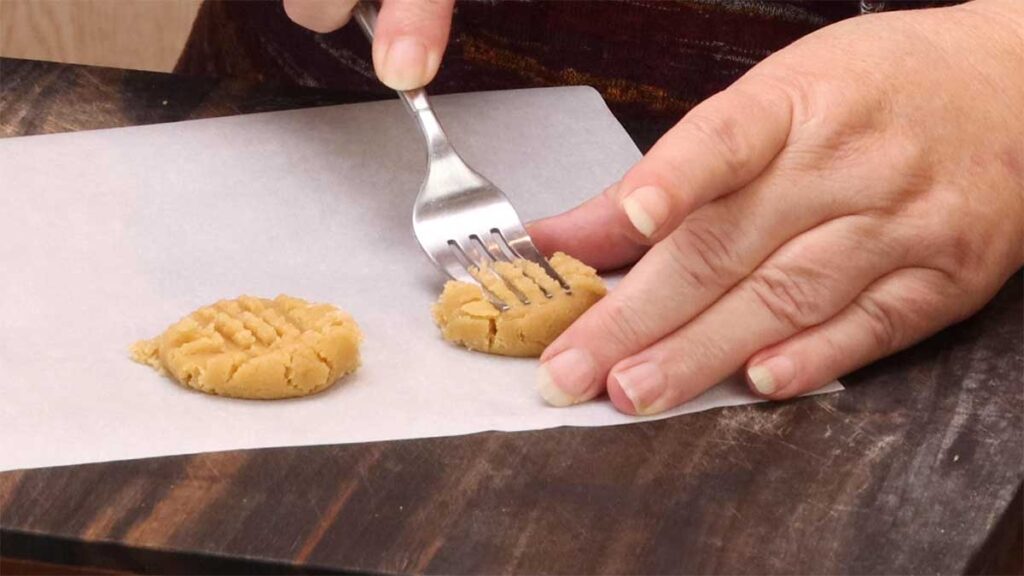
Making a traditional peanut butter cookie is definitely the easiest of all the varieties. Simply scoop out about 1 Tablespoon of the cookie mixture onto parchment or directly on your cookie sheet.
Take a fork and press down on the top of the ball to flatten, rotate 90° and press down with a fork again to create a criss cross pattern on the top of the cookie.
Bake at 350℉/175℃ for 10-12 minutes in a preheated oven. Cool on a cooling rack.
Chocolate Button Peanut Butter Cookies
This style of cookie has so much potential, but I think you'll want to skip the white chocolate melting wafer. It just wasn't good. The white chocolate was way too sweet for the peanut butter cookie, in my opinion.
To make this style of cookie, make a basic thumbprint cookie and use 1-2 melting wafers (milk or dark chocolate will be best) to fill the center.
Bake at 350℉/175℃ for 10-12 minutes in a preheated oven. Cool on a cooling rack.
Peanut Butter Cup Cookies
I didn't have any peanut butter cups, so I couldn't take a picture of this style, but it starts out the same as the thumbprint cookie.
Once you have your depressed area in the middle of the cookie, then bake in a preheated oven at 350℉ for about 10 minutes. Take the cookies out of the oven and set a peanut butter cup in the center and gently press it down.
Immediately put the tray of cookies into the fridge or freezer to prevent the peanut butter cup from melting.
Although, a pile of melted peanut butter and chocolate on top of a peanut butter cup doesn't sound bad to me!
How to Make the Peanut Butter Cookie Dough
This recipe makes a delicious peanut butter cookie with or without the jelly, so if you want a plain peanut butter cookie, give this recipe a try!
You can use either a stand mixer or an electric hand mixer to make the cookie dough.
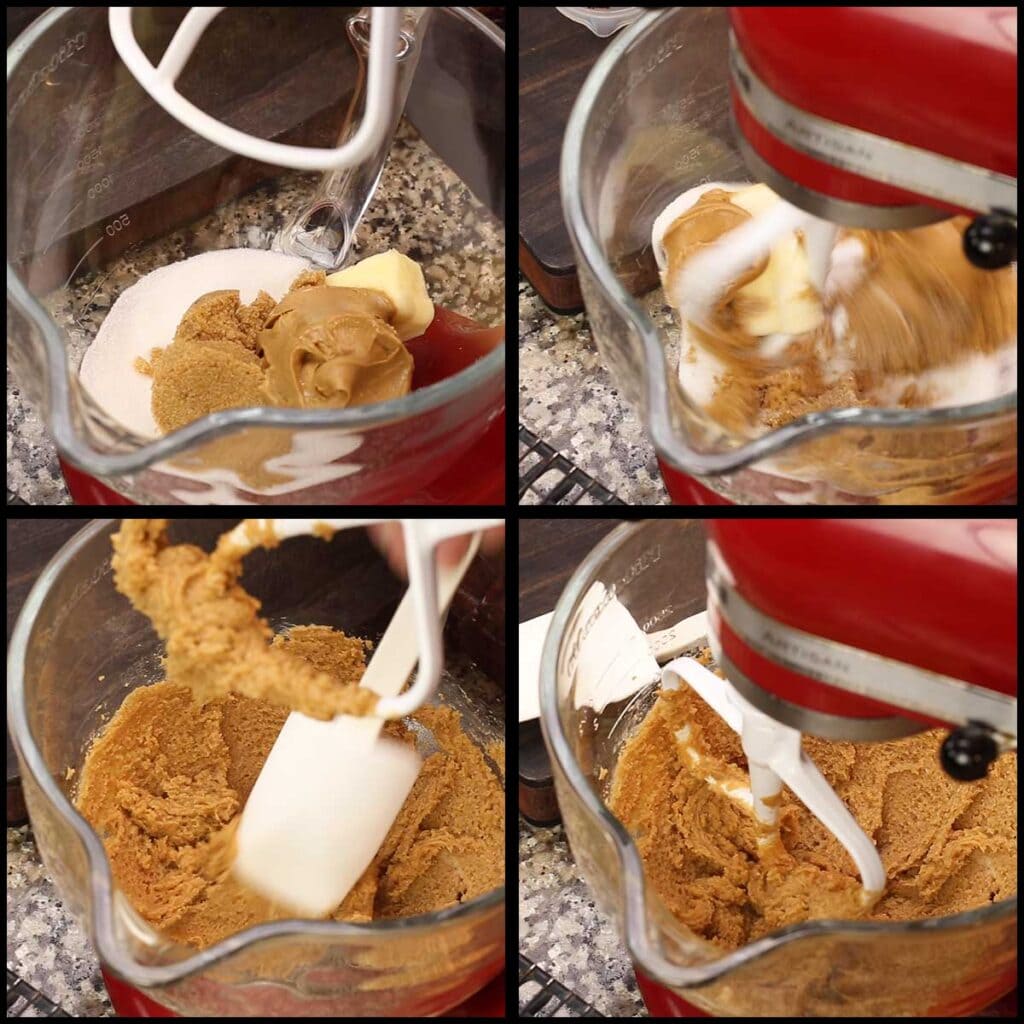
Add the butter, brown sugar, white sugar and peanut butter to the bowl of your stand mixer or a large mixing bowl if using a hand held mixer. Mix on low speed until the sugars start to combine with the butter. Scrape the sides of the mixing bowl and beat on medium-high speed until mixed well.
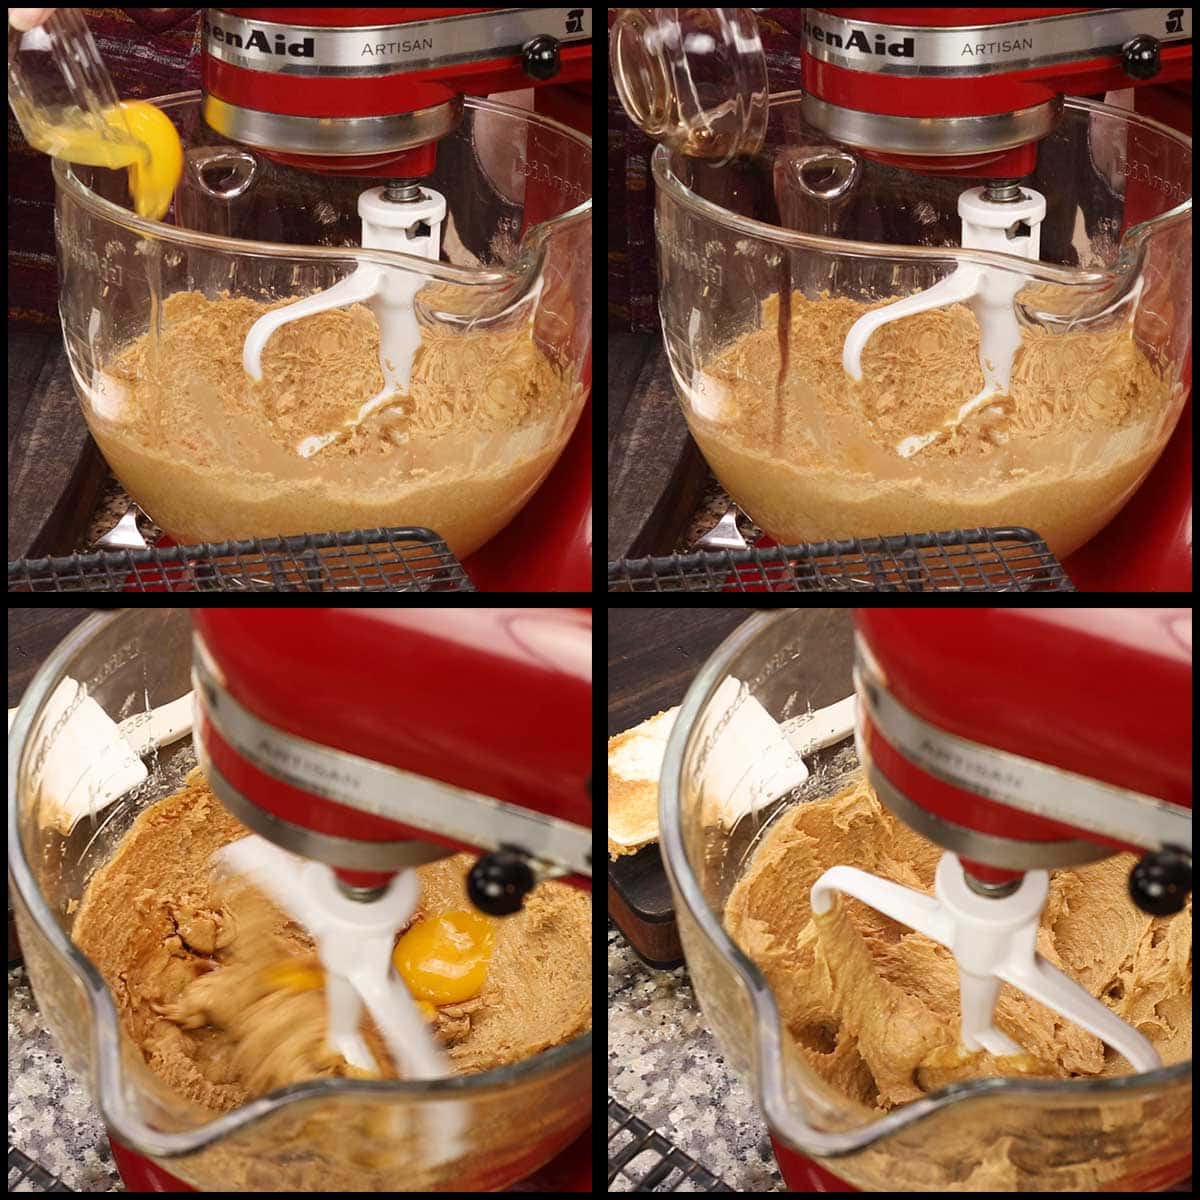
Add in the egg and vanilla extract. Mix on medium speed until well-combined.
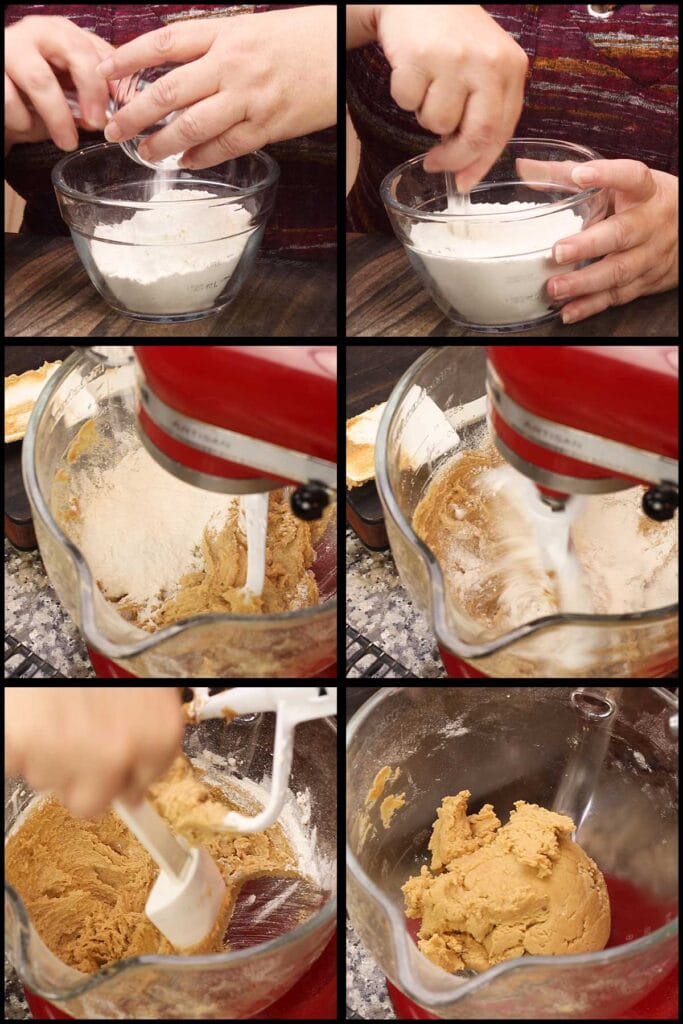
In a separate bowl, combine the flour, salt, and baking soda and mix well. Add about ¼ cup of the dry ingredients to the wet ingredients and mix on low speed until incorporated. Repeat until all the dry ingredients are incorporated.
The cookie dough is done and ready to be assembled into yummy peanut butter & jelly cookies!
How to Assemble the Stuffed Peanut Butter & Jelly Cookies
I find it best to work with the cookie dough right after mixing it up. If you make it up ahead of time and refrigerate it, let it come to room temperature before assembling the cookies and make sure it's covered in the fridge so it doesn't dry out.
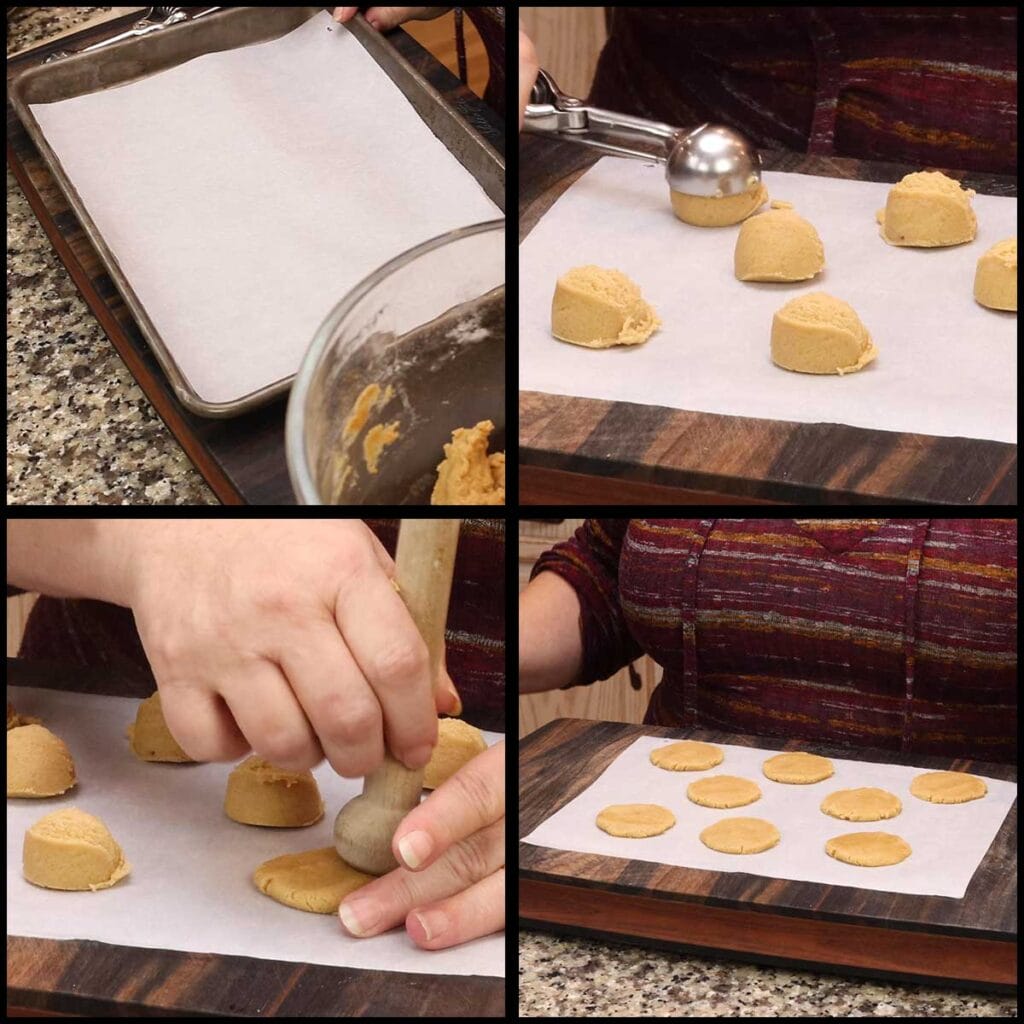
Line your sheet pans or cookie trays with parchment paper. Use about ½ tablespoon of the cookie dough and roll into a ball. Place the balls about 2" apart. Press down the dough until the diameter of the circle is about 2".
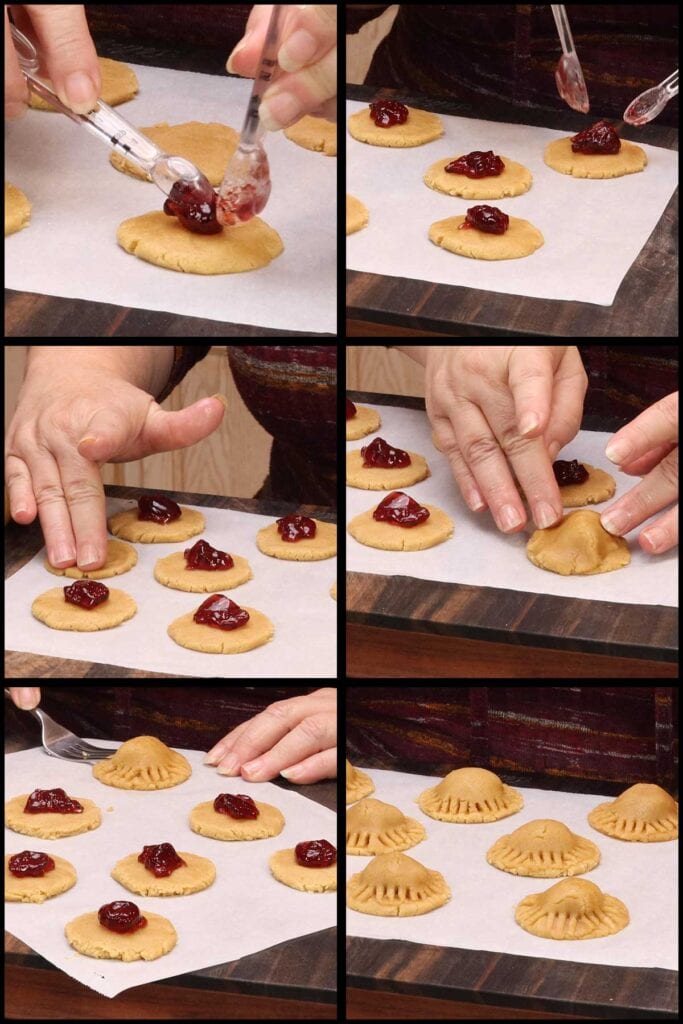
Next, measure out ½ teaspoon of the jelly and put it right in the center of the base cookie. You don't want to use more of the jelly because it makes it harder to get the top on without cracking and it tends to leak out.
For the top of the cookie, use ½ Tablespoon of the cookie dough and press it out to about 2" diameter. Drape the cookie top over the jelly and press down the sides. You want to have a dome over the jelly. If the top cracks, gently push it back together. If your dough is very dry and crumbly, then add a little more butter to the dough until it's more pliable.
Take a fork and press down the edges to crimp and seal them.
Refrigerate the assembled cookies on the parchment-lined cookie tray for at least 30 minutes. If you want to refrigerate them overnight that should be just fine as well.
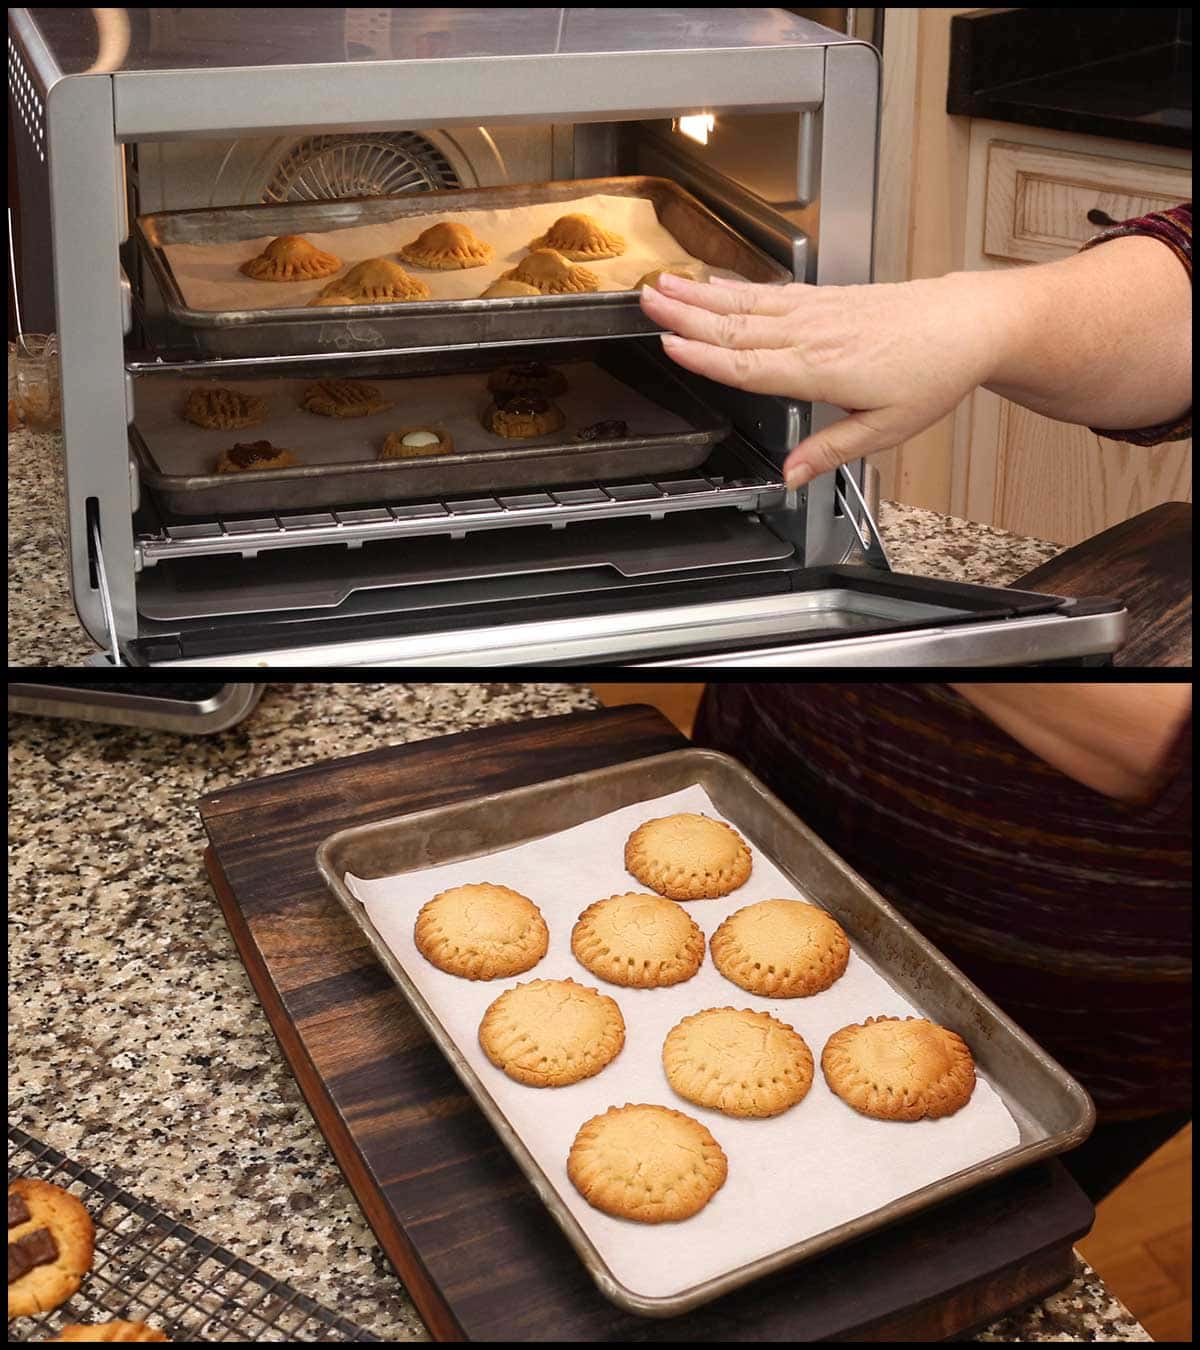
10 minutes before you bring the cookies out of the oven, preheat your oven on 400℉/200℃. I recommend this starting temperature for both convection ovens and regular ovens. The higher temperature will help the cookie set up before the jelly warms up and settles down into the bottom of the cookie and potentially leaks through.
I baked my cookies in a small convection style oven and kept the temp on 400℉ the entire time, but my oven tends to run a bit cooler than the temp I set, so keep an eye on the cookies and decrease the heat after 3-5 minutes if you notice them getting too dark.
Bake the peanut butter & jelly cookies at 400℉/200℃ for 9-12 minutes. I realize that is a big time range and the average time is about 10 minutes, however my last batch was done in 9 minutes. So, start checking the cookies at 8 minutes and, when they are golden brown, they are done.
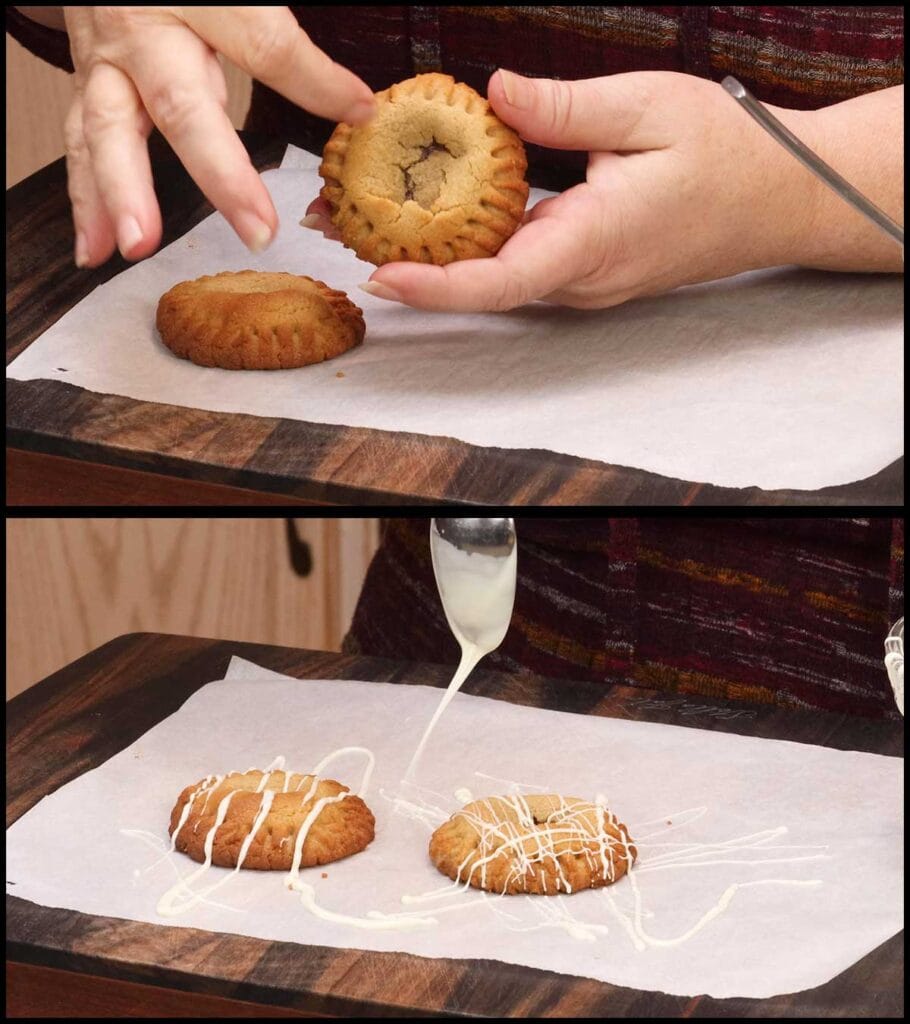
Immediately transfer the cookies to a cooling rack and allow them to fully cool before adding the chocolate decoration.
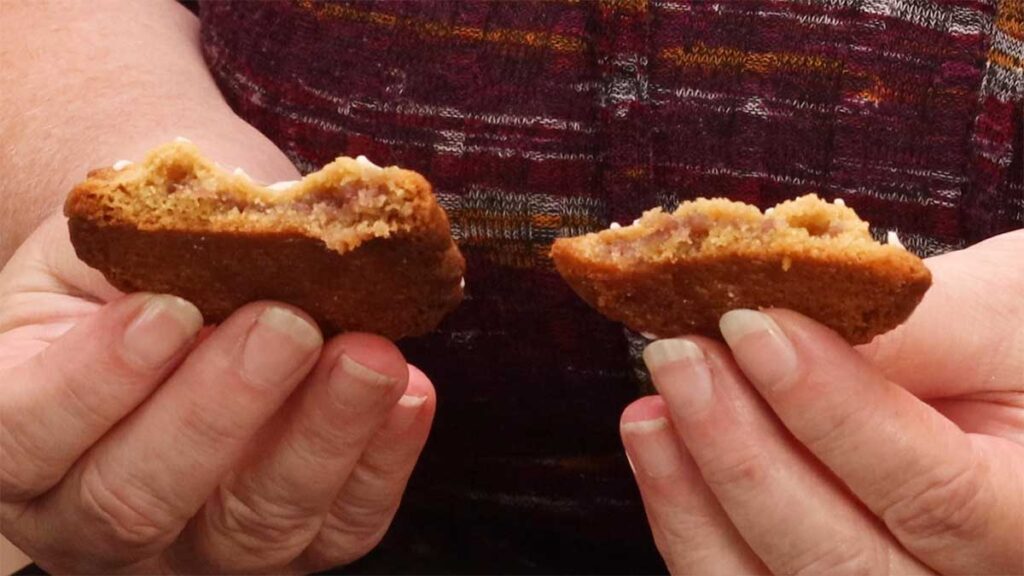
Don't cry when you see your perfect domes start to collapse and sometimes even split and show the jelly, it's perfectly normal! Once the jelly heats up, it takes up less space, so the dome is filled with air and as the cookies cool, the dome falls.
This happens to a different degree with each cookie and it adds character to each one! I think they look beautiful just as they are, but if you want to dress the cookies up a bit more, then use some melted white chocolate and drizzle it over the top!
Grab that glass of cold milk and break one open! Enjoy!
Peanut Butter & Jelly Cookies
Print Recipe Pin RecipeIngredients
- ¼ cup butter salted or unsalted
- ½ cup creamy peanut butter
- ½ cup white sugar
- ½ cup brown sugar
- 1 large egg
- 1 teaspoon vanilla extract
- 1¼ cups all purpose flour
- ½ teaspoon baking soda
- ¼ teaspoon fine grind sea salt
- ¼ cup grape jelly
- 2 ounces white chocolate optional for decoration.
Instructions
Peanut Butter Cookie Base
- Add the white sugar, brown sugar, butter, and peanut butter to a large mixing bowl or the bowl of a stand mixer
- Using a stand mixer with the paddle attachment or an electric hand held mixer blend the sugars, butter and peanut butter until well combined.
- Add the egg and the vanilla extract and blend until well combined.
- In a medium size mixing bowl add the flour, salt, and baking soda and mix together. Add about ¼ cup of the dry mixture to the wet batter and blend on low speed until incorporated. Scrape down the sides of the bowl. Repeat this until all the flour is added.
Assembling and Baking the Peanut Butter & Jelly Cookies
- Line your cookie trays with parchment paper. Take 1 Tablespoon of the cookie dough and form a ball. Place it on the parchment paper and gently press it down until you have a 2" circle. Repeat for each cookie base, leaving about 2" in between each cookie.
- Place ½ teaspoon of grape jelly into the center of each circle.
- Take ½ Tablespoon of the cookie dough and press it down into a 2" circle. Drape the circle over the jelly and form a dome. If the tops crack, gently push them back together. Press down the top circle so it joins the bottom circle.
- Take a fork and press it into the edges to seal and create a design. Refrigerate the cookies for at least 30 minutes.
- Preheat the oven on 400℉/200℃ for a full 10 minutes. Put the cookie trays in the oven and bake for 9-12 minutes. The tops of the cookies should be golden brown.
- Remove them from the oven and immediately transfer to a cooling rack. Allow to cool completely if you want to decorate them with chocolate.
- To decorate the tops with white chocolate, place white chocolate melting wafers in the microwave and heat at 15 second intervals, stirring each time until the chocolate is melted. If your microwave is high powered, you may want to reduce the power to 5.
- Take a spoonful of the chocolate and hold over the bowl until you have a nice stream of chocolate and then drizzle it over the cookie tops. Allow the chocolate to set. Serve & Enjoy!
Notes
Nutrition
ABOUT THE RECIPE AUTHOR, LOUISE LONG
Louise is a full-time recipe creator and food blogger @ The Salted Pepper. She has over 30 years of experience with cooking and recipe development. She owned a restaurant for several years and was a full-time RN until retiring to blog full-time.

She published her first cookbook in the Fall of 2018 and is very interested in writing several more.
Louise is also the creator of an online Ninja Foodi Pressure Cooking Course with over 100 instructional step-by-step videos. People absolutely rave about the course and all the value they have received from it.
Louise has several very active Facebook groups that help people with the basics of cooking and getting the most out of the Ninja Foodi.
Louise is also a YouTube creator and you can find most of her recipes in video format on The Salted Pepper YouTube channel.
She is very responsive to messages and eager to help in any way she can. Get more Information about Louise & contact information
I WOULD LOVE TO SEE WHAT YOU ARE COOKING UP IN YOUR KITCHEN! TAG ME @THESALTEDPEPPER ON YOUR FAVORITE SOCIAL MEDIA PLATFORM WHEN YOU MAKE A DISH!
BE SURE TO FOLLOW THE SALTED PEPPER RIGHT HERE ⇓⇓⇓⇓⇓


Leave a Reply