
- Possible Cooker Pro OR
- Large Pot with Lid
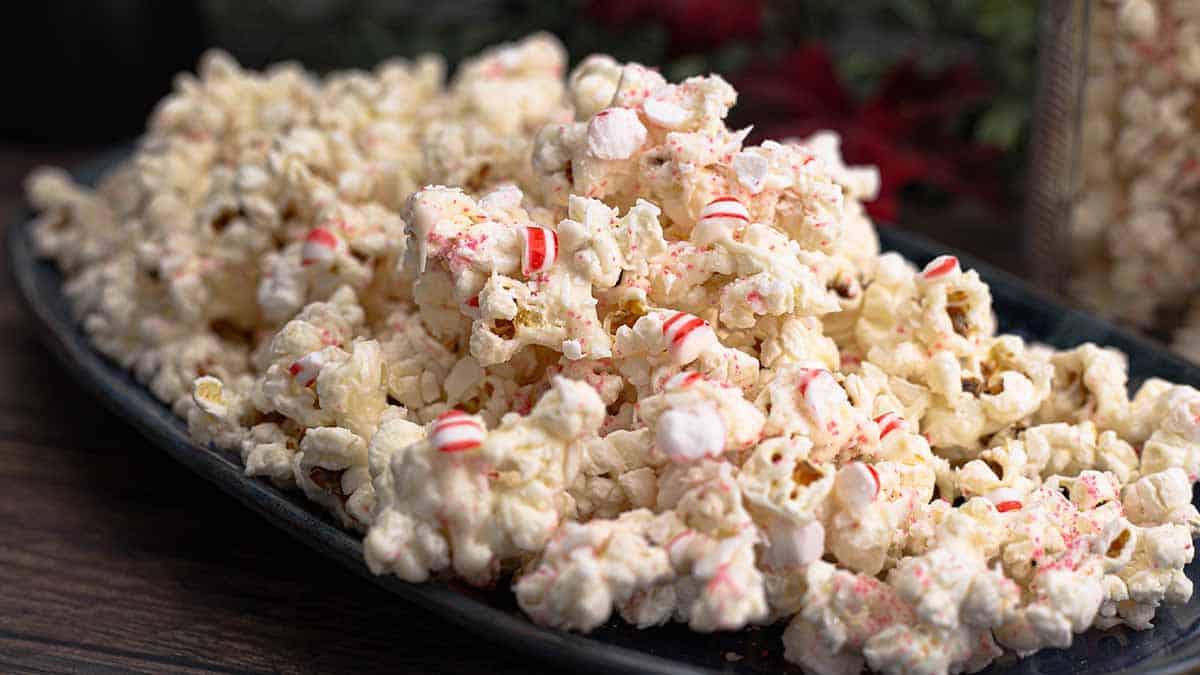
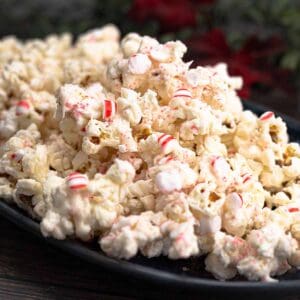
Quicker and easier than cookies, this festive treat is ready in about 20 minutes and makes the perfect holiday snack for holiday movie marathons, holiday parties, gift giving, or sneaking handfuls while wrapping presents. White peppermint flavored chocolate combines perfectly with popped popcorn and crushed peppermint candies for an irresistible flavor that will have reaching for more!
Would you like to save this recipe?
Before you say this doesn't sound good, trust me, it is absolutely delicious. This gourmet popcorn recipe delivers the perfect blend of sweet white chocolate, cool peppermint flavors, and that satisfying crunchy texture that makes it impossible to stop eating. The peppermint candy bits add just the right texture while the sanding sugar gives it a beautiful sparkle that captures the spirit of the festive season. Whether you're looking for a tasty snack to share at a holiday party or searching for the perfect holiday gift idea, this white chocolate popcorn fits the bill.
Suggested Kitchen Tools for White Chocolate Peppermint Popcorn
- Ninja Foodi Possible Cooker Pro (or large pot with lid)
- Double Boiler (or small saucepan with glass bowl)
- Two Large Sheet Trays
- Parchment Paper or Wax Paper
- Large Mixing Bowl or Bin
- Tongs
- Rolling Pin
- Sealed Bag (for crushing candy)
Ingredients & Substitutions
This holiday popcorn recipe uses simple ingredients that are easy to find during the holiday season. Most of these items are pantry staples or readily available at any grocery store.
Popcorn Kernels
Used in Recipe: Unpopped popcorn kernels are the base of this fun popcorn recipe. Making your own popped popcorn ensures you get perfectly fresh popcorn without added butter or excess salt.
What it Does: Homemade popcorn gives you complete control over the salt level, which is important for this recipe. Pre-made or microwave popcorn typically contains butter and salt that can interfere with the chocolate coating and create an unbalanced flavor profile.
Substitutions: You can use an air popper to make your popcorn if you prefer. If using store-bought popped popcorn, choose an unsalted, unbuttered variety. Avoid microwave popcorn as it contains too much butter and salt for this recipe.
Neutral Oil
Used in Recipe: A neutral-flavored oil is used to pop the popcorn kernels on the stovetop or in the Possible Cooker Pro.
What it Does: The oil heats evenly and transfers heat to the popcorn kernels, allowing them to pop properly. Using a neutral oil ensures no competing flavors interfere with the peppermint and white chocolate.
Substitutions: Avocado oil, vegetable oil, canola oil, or any neutral-flavored oil with a high smoke point works well. Avoid olive oil as it has its own distinct flavor. You can use coconut oil if you prefer a subtle coconut undertone.
Kosher Salt
Used in Recipe: A small amount of salt is added to the oil before popping the corn.
What it Does: The salt provides that essential sweet and salty balance that makes this mouth-watering popcorn so addicting. Adding it to the oil ensures even distribution throughout the popcorn.
Substitutions: Fine grain sea salt can be used in equal amounts. If using table salt, reduce the amount by half.
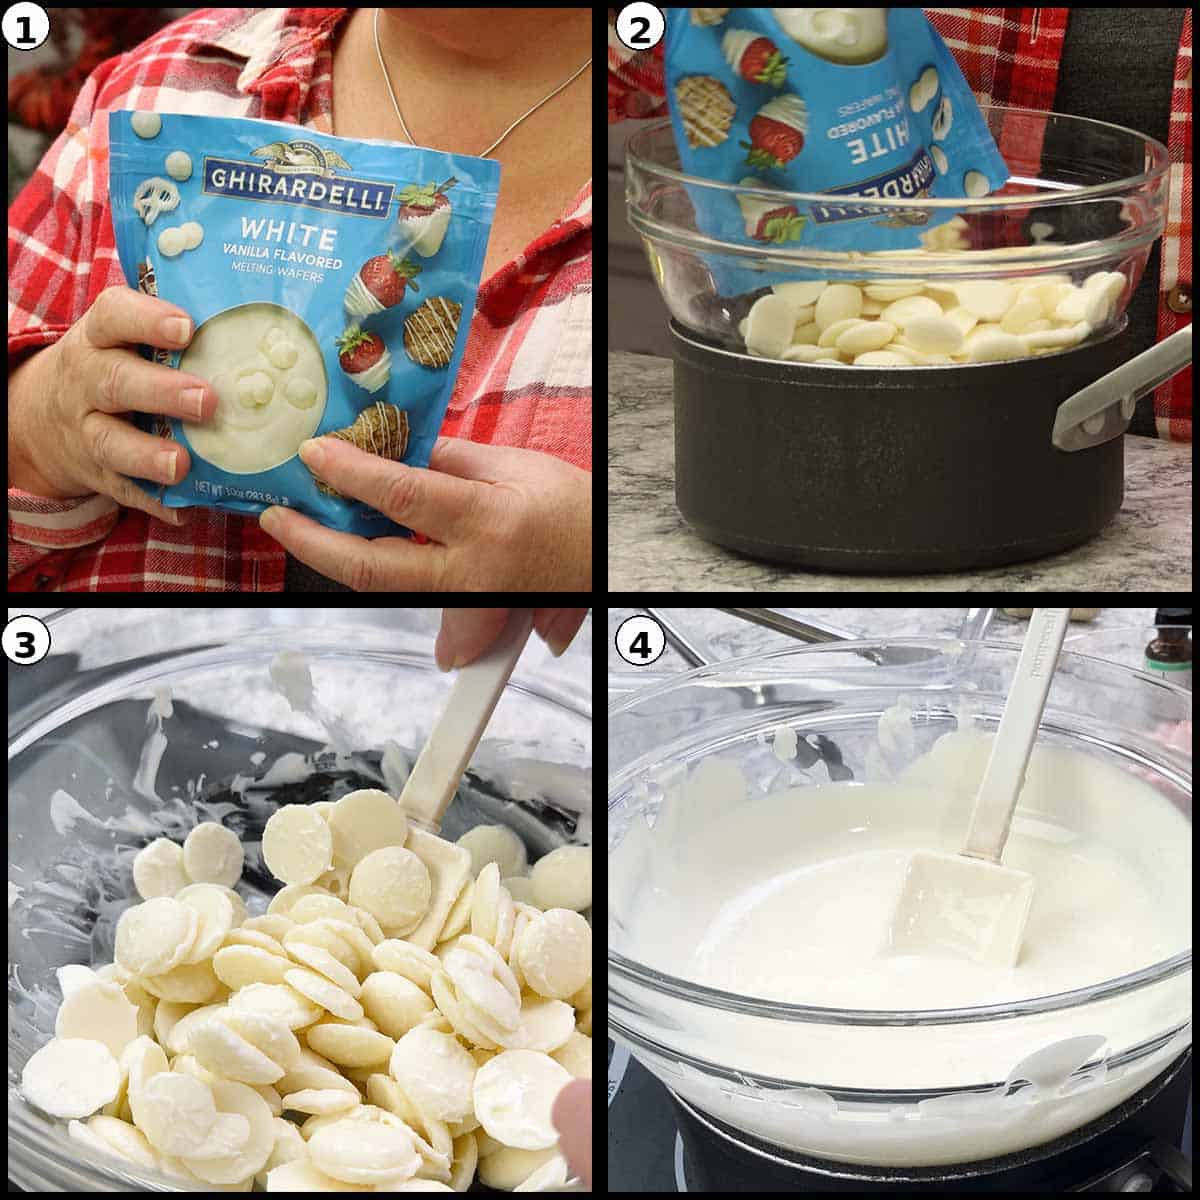
White Chocolate Melting Wafers
Used in Recipe: White chocolate melting wafers create the smooth, creamy coating that binds the peppermint candy to the popcorn.
What it Does: Melting wafers are specifically designed to melt smoothly and coat evenly without seizing or becoming thick and clumpy. They create a thin, even layer that coats the popcorn nicely rather than forming thick globs. Ghirardelli white melting chocolate wafers deliver the best flavor in my opinion, but any white melting chocolate is fine.
Substitutions: Almond bark or other brands of white melting wafers work well. Do not use white chocolate chips as they are not designed for melting and will result in a thick, uneven coating. White chocolate chips contain stabilizers that prevent smooth melting.
Peppermint Candies
Used in Recipe: Starlight peppermint candies are crushed and mixed throughout the popcorn to provide bursts of cool peppermint flavor in every bite.
What it Does: The crushed peppermint candy adds that signature holiday peppermint flavor and creates a delightful crunchy texture contrast against the crisp popcorn and smooth chocolate. The red peppermint flakes also add beautiful color to this festive snack.
Substitutions: You can break candy canes instead of using starlight mints, though the mints are easier to unwrap and crush.
Peppermint Oil
Used in Recipe: A small amount of peppermint oil is stirred into the melted white chocolate.
What it Does: The peppermint oil intensifies the peppermint flavor throughout the chocolate coating, ensuring every bite has that refreshing peppermint taste rather than relying solely on the candy pieces.
Substitutions: Peppermint emulsion can be used as an alternative. Do not use peppermint extract as the water content can cause chocolate to seize. If you only have extract, you may try it with melting wafers (which are more forgiving), but oil or emulsion is the safest choice.
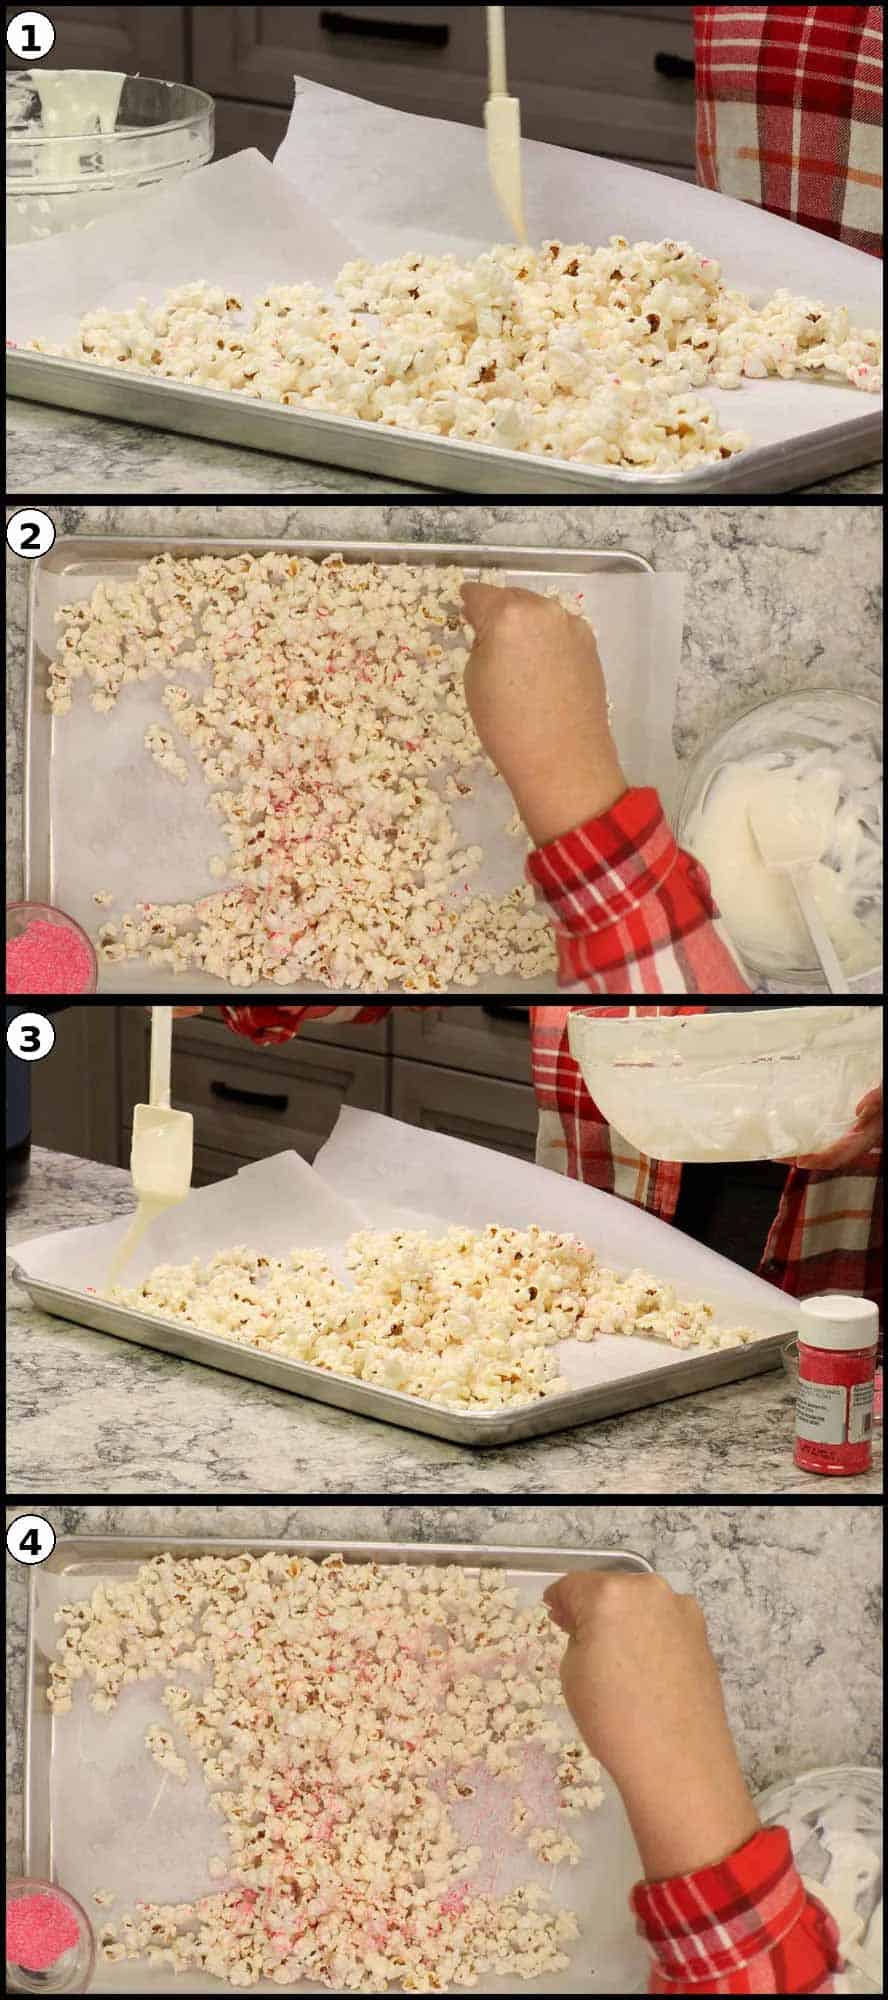
Sanding Sugar
Used in Recipe: Pink and white sanding sugar is sprinkled over the final chocolate drizzle.
What it Does: The sanding sugar adheres to the wet chocolate drizzle and creates a beautiful sparkle that makes this popcorn look truly festive and gift-worthy. The combination of pink and white creates a candy cane color palette.
Substitutions: Crushed candy cane bits can be used instead for additional peppermint flavor. Regular sugar will not provide the same sparkle effect.
Use both pink and white together as pink alone creates too much of a unicorn look rather than a holiday candy cane appearance.
How to Make White Chocolate Peppermint Popcorn
This recipe moves quickly once you start, so having everything measured and ready is important. The entire time from start to finish is about 20 minutes, making this one of the fastest holiday treats you can make.
Mise En Place
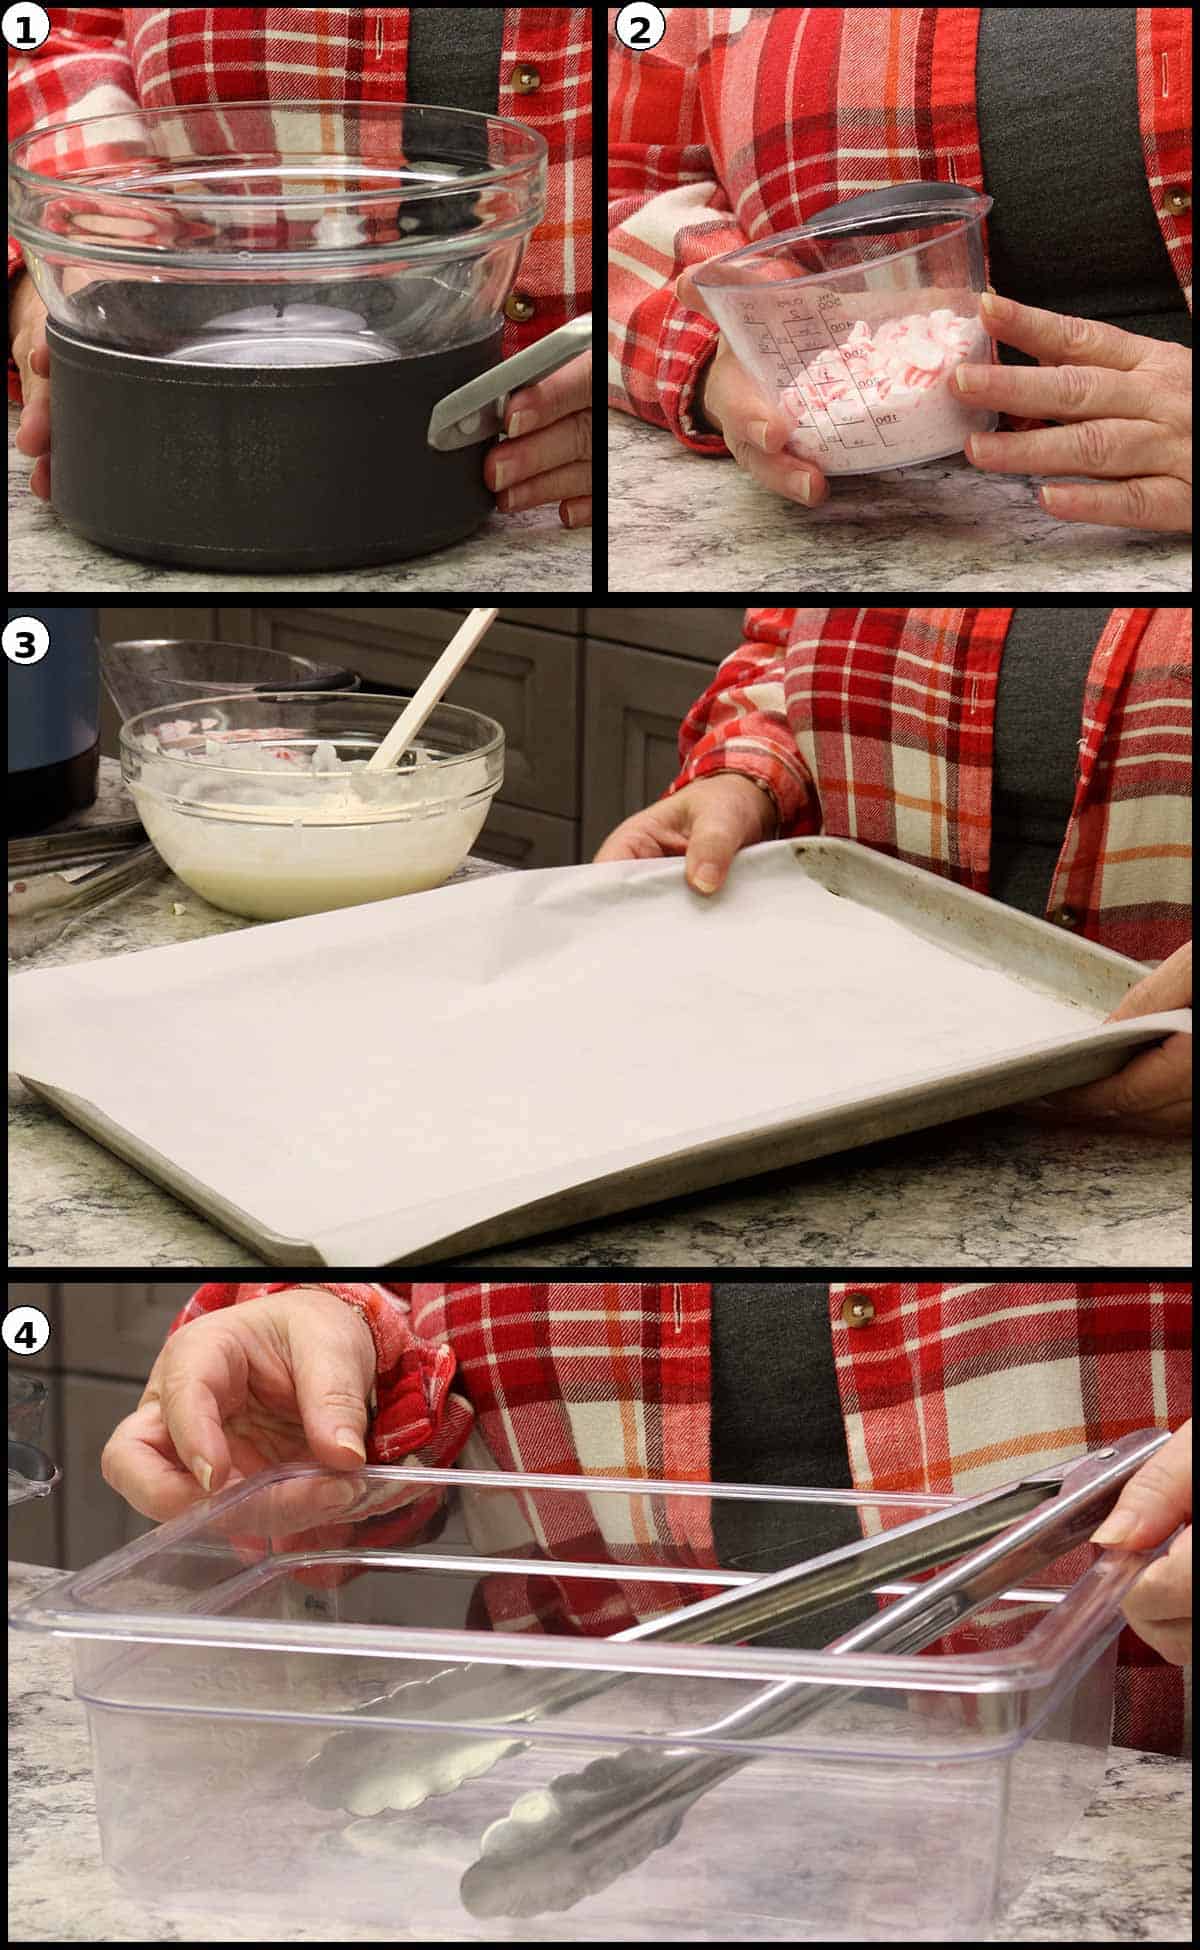
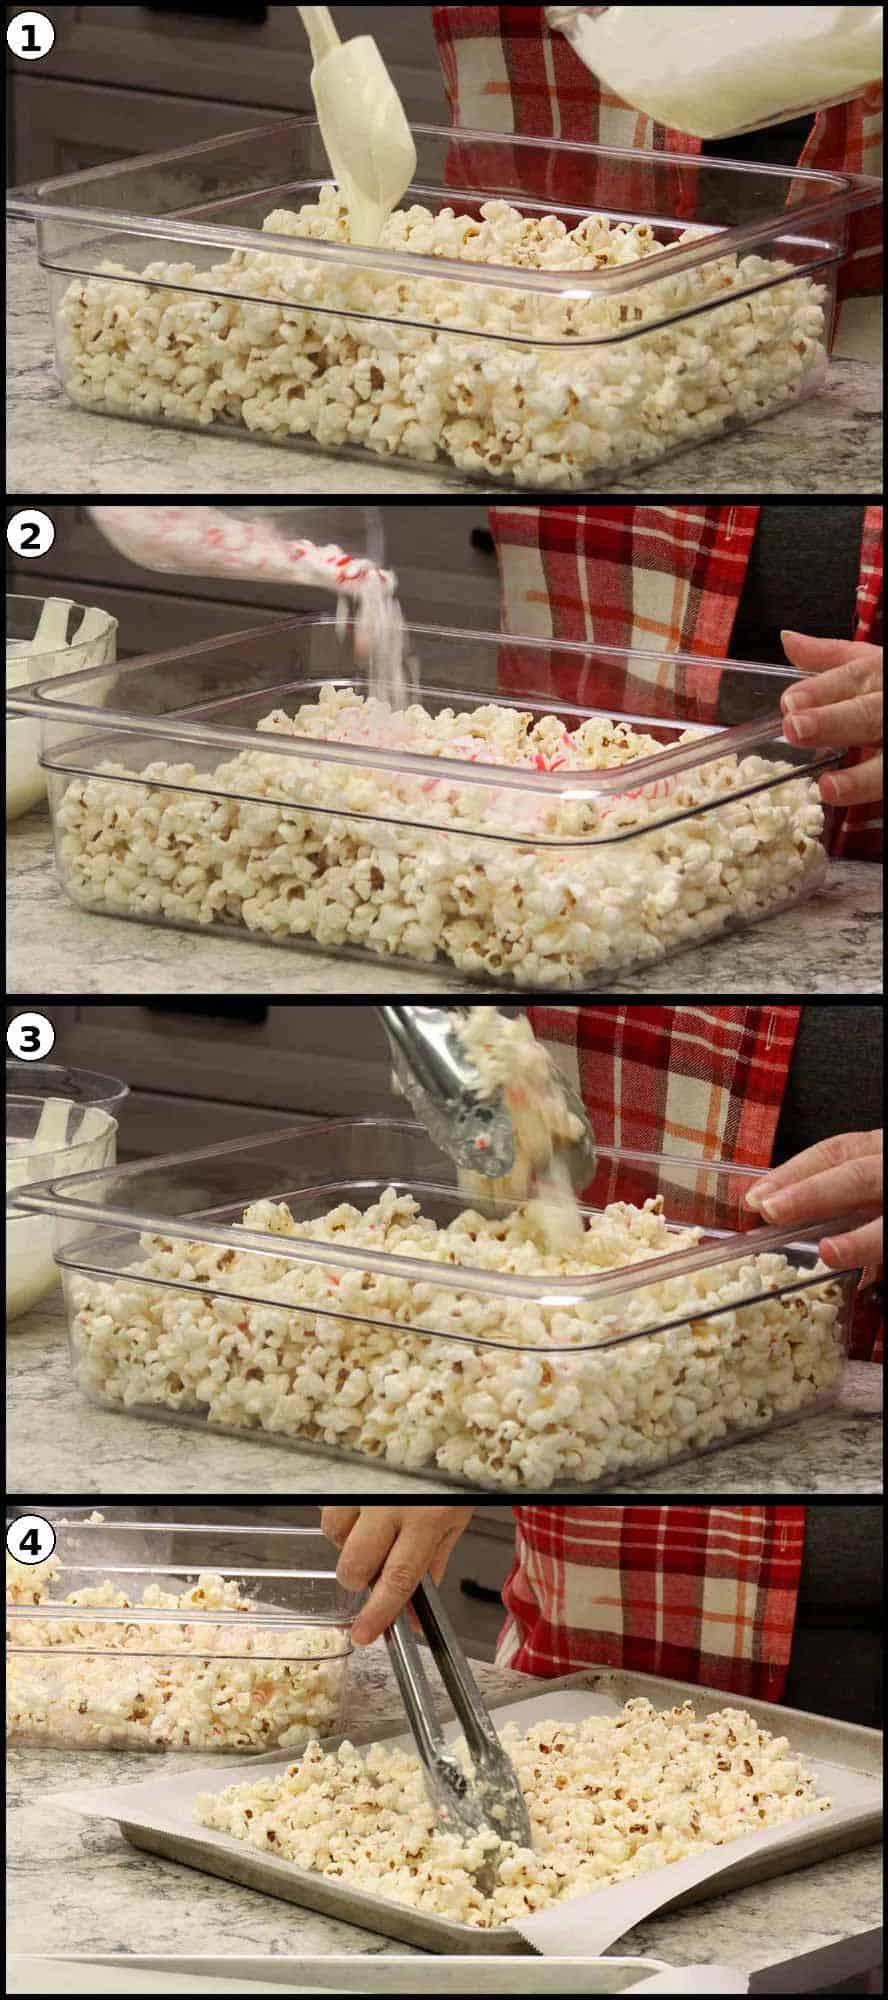
Before you begin, gather all your equipment and measure out your ingredients. Prepare your sheet trays by lining them with parchment paper or wax paper. Unwrap your peppermint candies, place them in a sealed bag (get the air out so it doesn't pop), and crush them with a rolling pin until they are in small pieces. You want them larger than dust but smaller than halves so each piece provides a nice crunchy bit of candy in every bite. Set up your large bowl or bin for tossing and have your tongs ready.
Step One: Start Melting the Chocolate
Use a double boiler or fill a small saucepan with about two inches of water and place a glass or metal bowl on top to create a double boiler. Add the white chocolate melting wafers to the bowl and place over low heat. The chocolate will melt while you pop the popcorn, which takes about the same amount of time. Stir occasionally to ensure even melting.
Quick Tip:
You can also melt chocolate in the microwave using 15-30 second microwave intervals, stirring between each one to prevent scorching. A microwave-safe bowl works perfectly for this method.
Step Two: Pop the Popcorn
Turn on the Possible Cooker Pro, select Sear/Sauté on high, and press start. Add the neutral oil to the bottom and let it heat during the preheat time, which takes about five minutes. Once preheated, add 2-3 test kernels to the pot and put the lid on. When these kernels pop, your oil is hot enough.
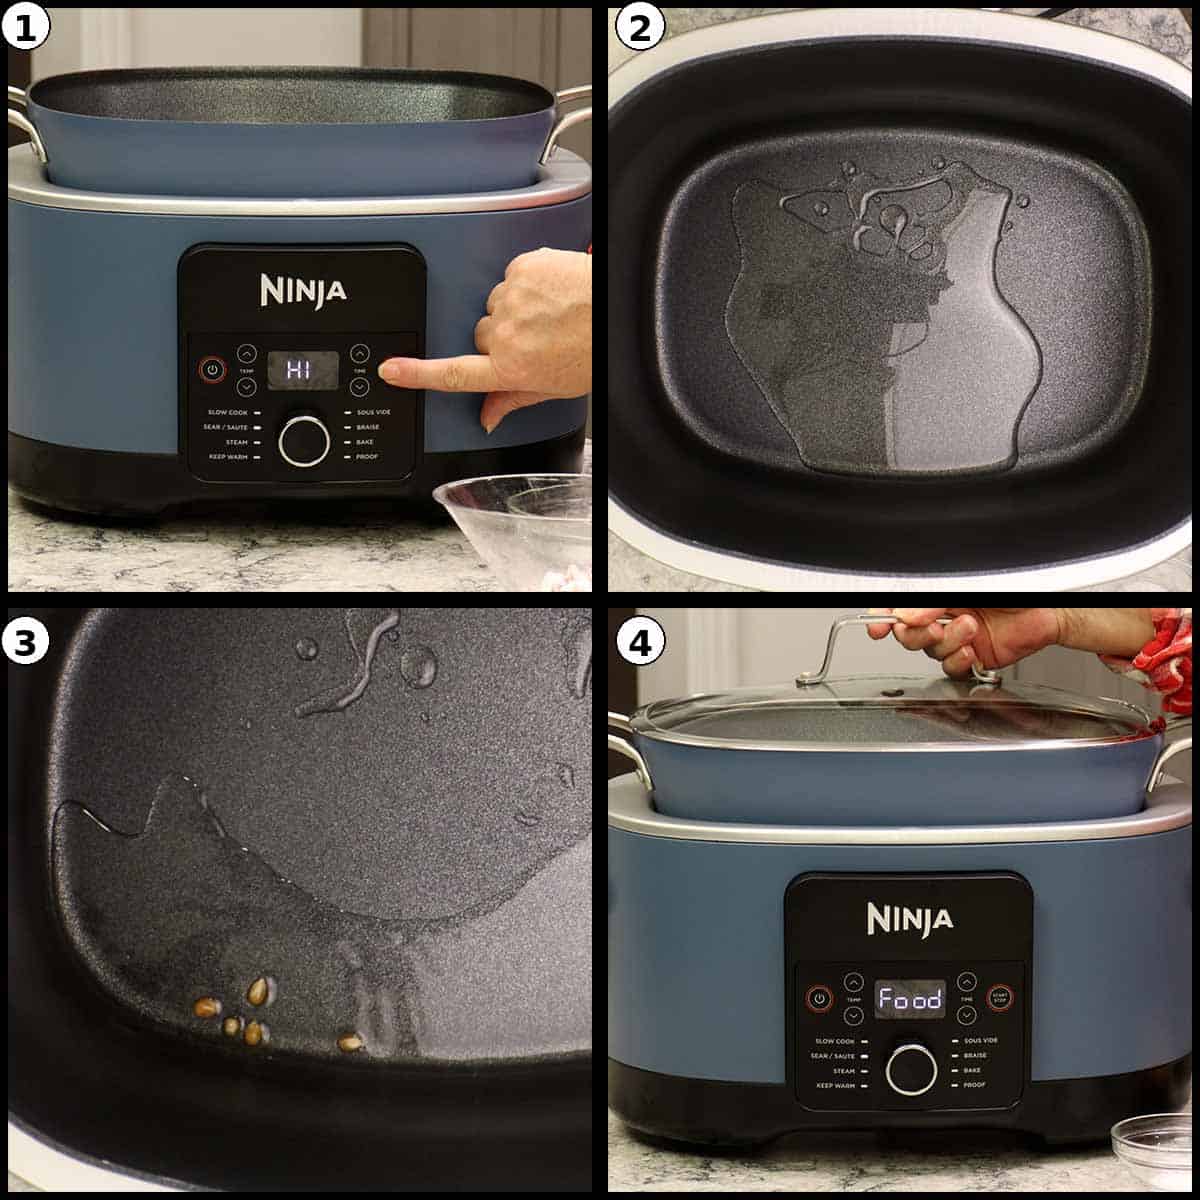
Add the salt to the hot oil, then pour in the remaining kernels. Replace the lid and let the kernels pop. I do remove and shake the pot once or twice as the popcorn is popping.
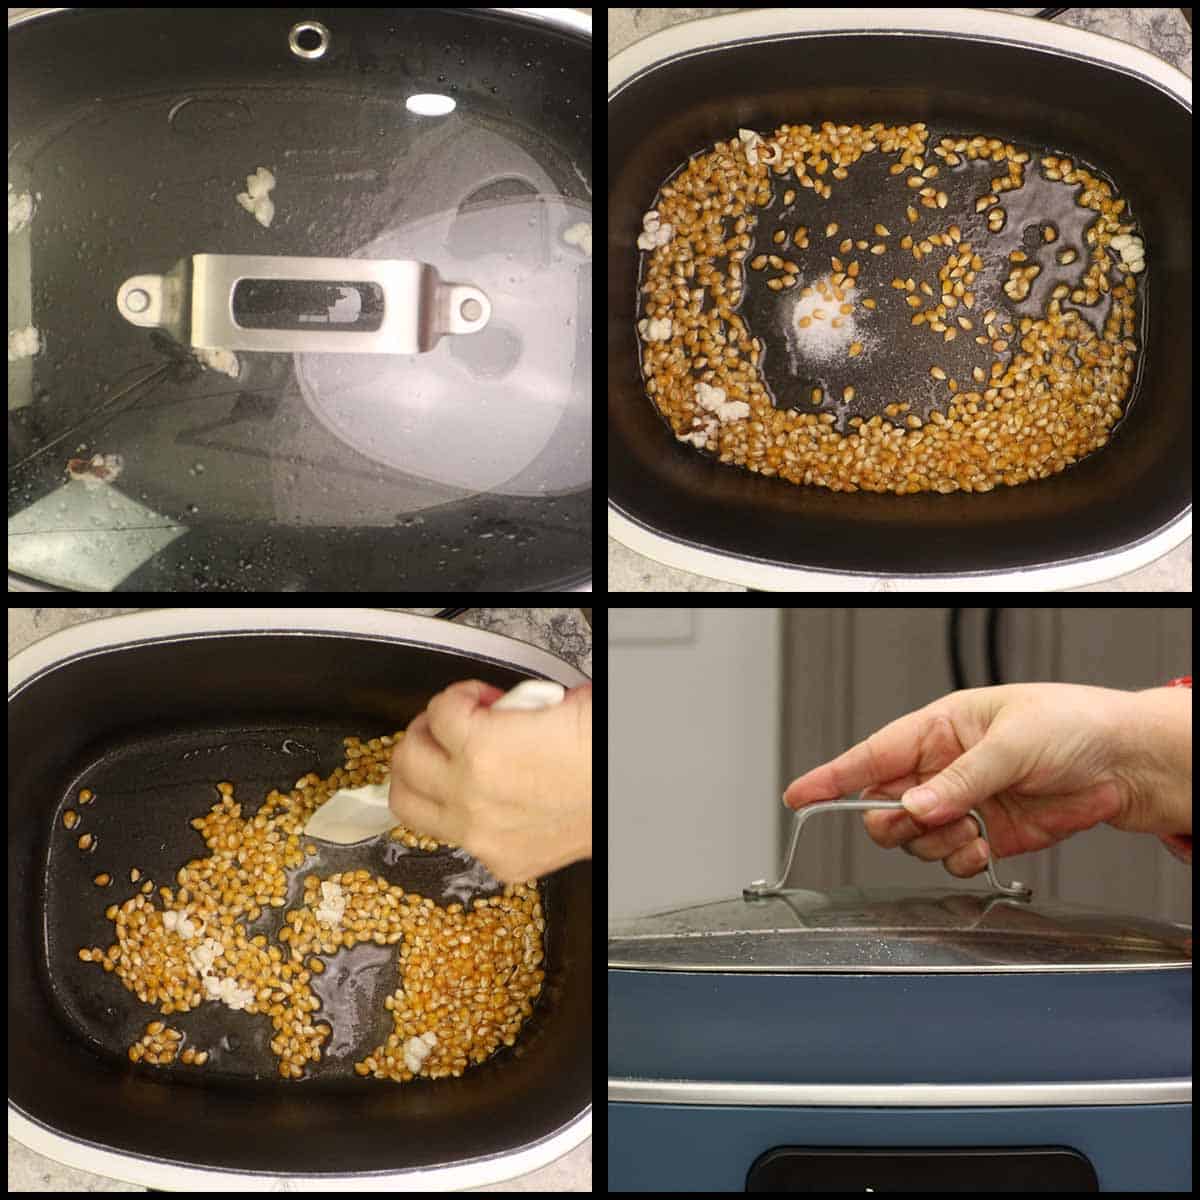
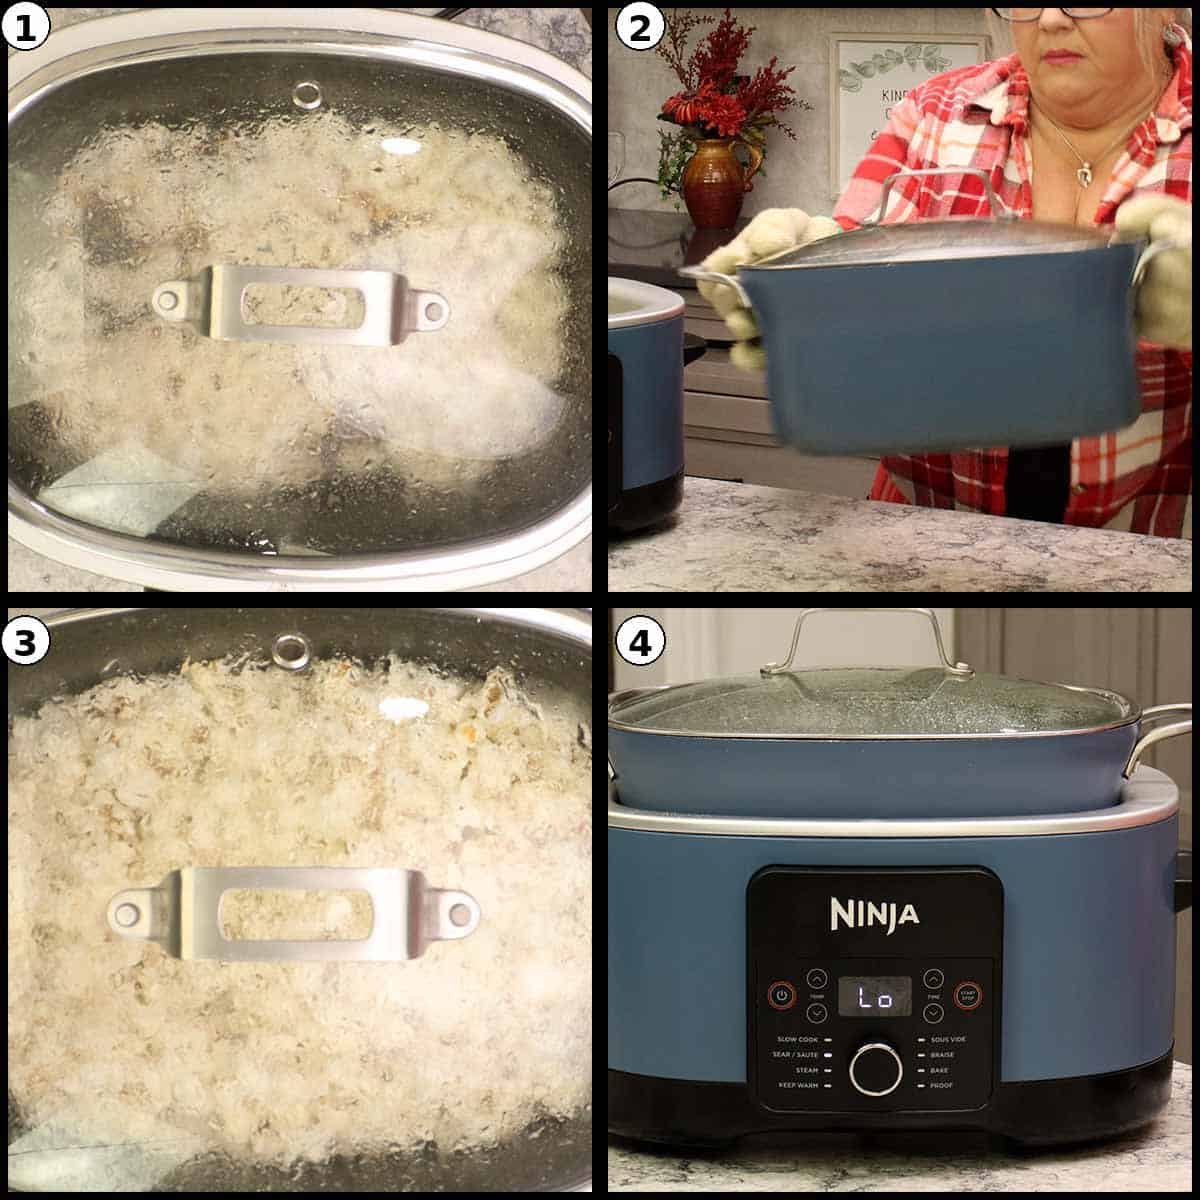
When the popping starts to slow down (usually between 8-9 minutes), reduce the heat to low to prevent burning while allowing the remaining kernels to finish popping. Give the pot one or two shakes during this time.
Quick Tip:
If using a pot on the stove, cook over medium heat following the same process. You can also use your own popper or an air popper if you prefer.
Step Three: Cool the Popcorn
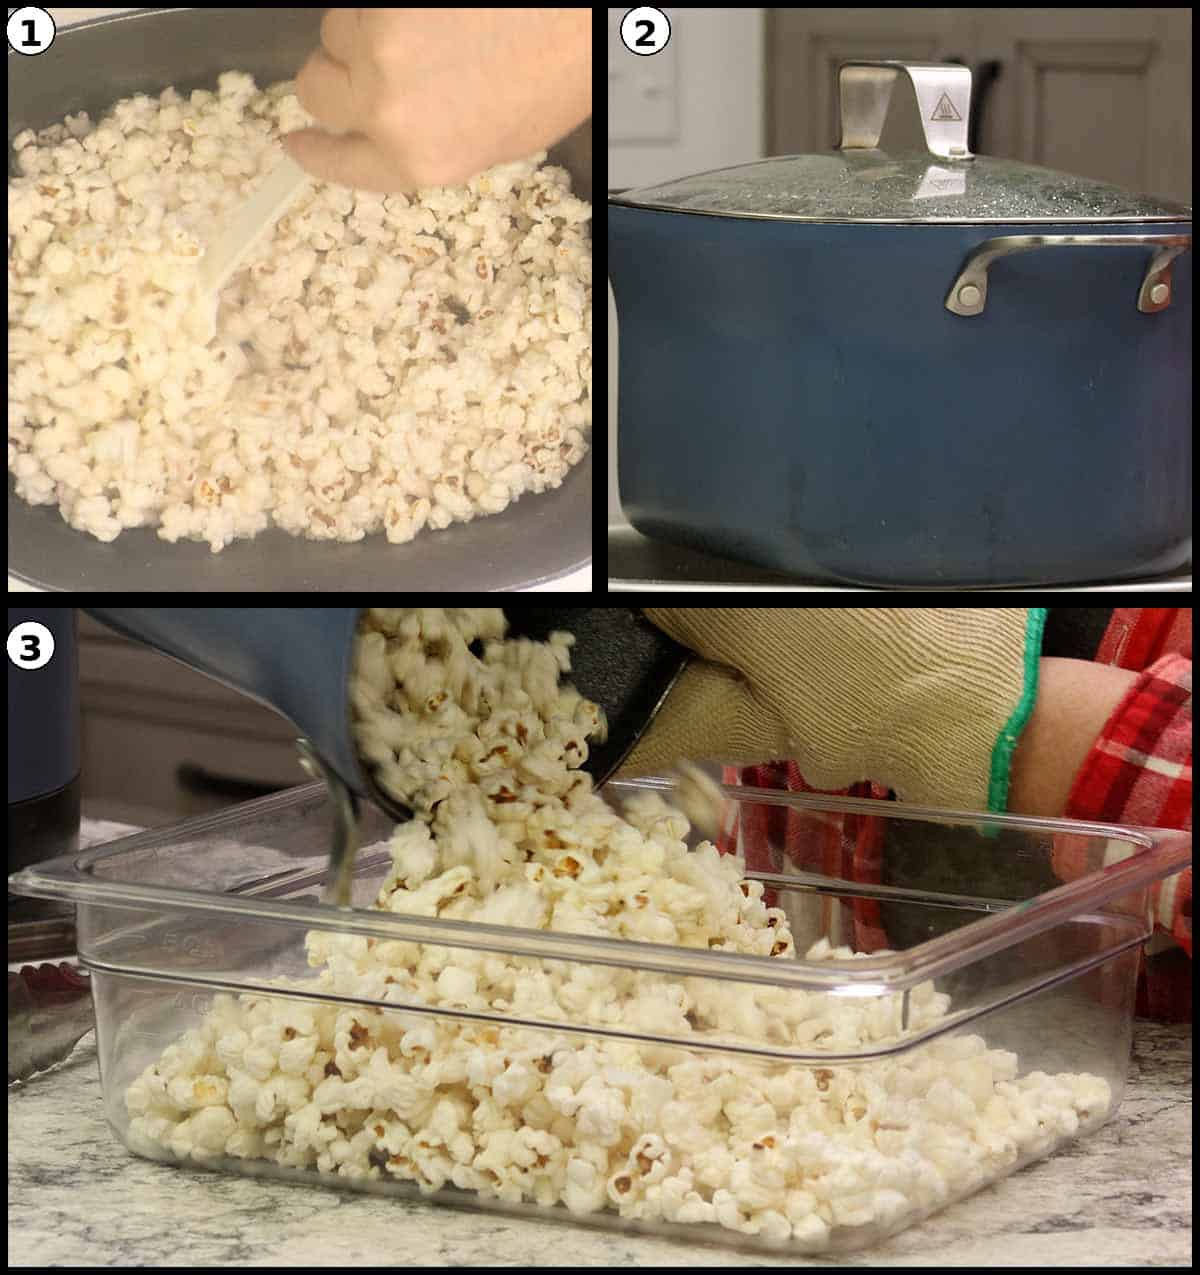
Once popping is complete, remove the pot from direct heat. You can set the inner pot on top of the cooker base or transfer to a trivet. Remove the lid to help the popcorn cool faster. Transfer the popped popcorn to your large bowl or bin, picking out any unpopped kernels as you go. The popcorn must be cool to the touch before adding chocolate.
Quick Tip:
It is important that the popcorn is completely cool before adding chocolate. If the popcorn is warm, the chocolate will soak into it rather than coating the outside, resulting in soggy popcorn.
Step Four: Flavor the Chocolate
Once the white chocolate is completely melted and smooth, add the peppermint oil and stir to combine. Start with a small amount as the peppermint flavor is potent. The chocolate can sit at this point while waiting for your popcorn to cool, which is perfectly fine.
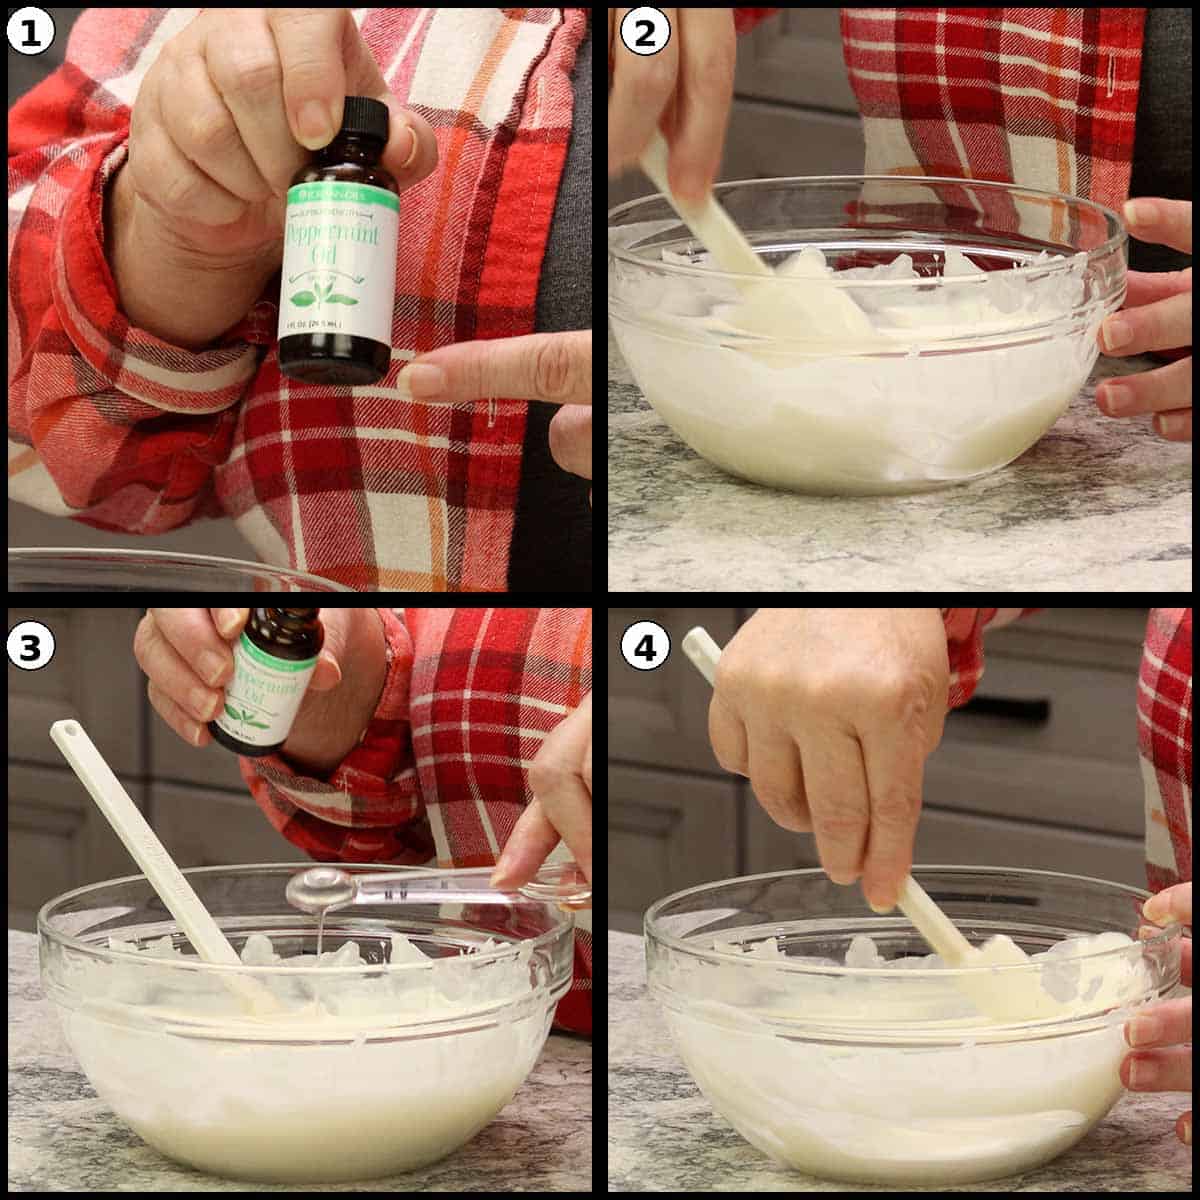
Quick Tip:
A quarter teaspoon of peppermint oil is the right taste for most people. If you prefer a more subtle flavor, start with an eighth of a teaspoon. A half teaspoon is too much and will overpower the other flavors.
Step Five: Coat the Popcorn
Working in layers, drizzle about one-third of the melted chocolate over the cooled popcorn. Add half of the crushed peppermint candy and use tongs to toss everything together until the popcorn is evenly coated. The chocolate should coat all over the popcorn in a thin, even layer.
Add the second layer (another one-third) of chocolate and toss again, then add the remaining crushed candy and toss once more. Reserve about one-third of the chocolate for the final drizzle. This layering technique ensures even distribution of both chocolate and candy throughout the popcorn.
Step Six: Spread and Set
Pour the coated popcorn onto your prepared sheet trays lined with parchment paper or wax paper, spreading it out into an even layer. Spreading the popcorn creates nice little clusters that are perfect for snacking. Allow the chocolate to set completely until you can pick up the popcorn without getting chocolate all over your hands.
Step Seven: Final Drizzle and Garnish
This final step takes this festive snack from ordinary to extraordinary. You may need to rewarm your reserved chocolate if it has solidified. Using a spoon or spatula, lift the chocolate high above the popcorn and drizzle it back and forth in thin ribbons. The height creates nice thin lines rather than thick globs.
Immediately after drizzling, sprinkle the mixed pink and white sanding sugar over the top while the chocolate is still wet. The sugar will adhere to the chocolate and create a beautiful sparkle. Repeat this process for both sheet trays. Allow the final drizzle to set completely before serving or packaging.
Quick Tip:
Always use both pink and white sanding sugar together. Using only pink creates a unicorn-like appearance, while the combination of both colors gives that classic candy cane look that screams holiday season.
Variations
Chocolate Drizzle Variation: For a more dramatic presentation, drizzle dark chocolate or milk chocolate over the top in addition to the white chocolate. This adds visual contrast and a deeper chocolate flavor for those who enjoy more complex peppermint flavors.
Extra Chocolate: If you love a heavier chocolate coating, increase the white chocolate melting wafers to 12 ounces. This provides more chocolate for both the initial coating and the final drizzle.
Candy Cane Version: Substitute crushed candy canes for the starlight mints if that is what you have on hand. The flavor will be identical, though candy canes require a bit more effort to unwrap and crush.
Stovetop Method: If you do not have a Possible Cooker Pro, make the popcorn in a large pot on the stove over medium heat following the same technique with the test kernels and reducing heat when popping slows.
Storage Instructions
How to Store White Chocolate Peppermint Popcorn
Proper storage keeps this holiday treat fresh and maintains its delightful crunchy texture. The hardest part will be not eating it all before you can store it!
Room Temperature
Store the peppermint popcorn in an airtight container at room temperature for 3-5 days. Make sure the container is properly sealed to maintain freshness and prevent the popcorn from becoming stale. Keep away from heat sources as the chocolate can melt.
Freezer
For longer storage, place the popcorn in freezer-safe airtight containers or vacuum-sealed bags and freeze for up to one month. Make sure the popcorn is completely cool and the chocolate is fully set before freezing. Allow to come to room temperature before serving.
Quick Tip
This popcorn makes a wonderful Christmas gift! Package it in clear containers or cellophane bags tied with festive ribbon. The sparkle from the sanding sugar makes it look absolutely beautiful and gift-worthy.
White Chocolate Peppermint Popcorn
Equipment
- Possible Cooker Pro OR
- Large Pot with Lid
Ingredients
- ½ cup popcorn kernels yields about 12 cups popped
- 3 tablespoons neutral oil avocado, vegetable, or canola oil
- ½ teaspoon kosher salt or fine grain sea salt
- 10 ounces white chocolate melting wafers Ghirardelli recommended; do not use chocolate chips
- ¼ teaspoon peppermint oil not extract; can use peppermint emulsion
- 6 ounces starlight peppermint candies unwrapped and crushed; candy canes can be substituted
- 2 teaspoons pink sanding sugar
- 2 teaspoons white sanding sugar
Would you like to save this recipe?
Instructions
- Prepare your workspace by lining two large sheet trays with parchment paper. Unwrap the peppermint candies, place them in a sealed plastic bag, and crush with a rolling pin until broken into small pieces (not dust). Mix the pink and white sanding sugars together in a small bowl. Have a large bowl or bin and tongs ready for tossing.
- Set up a double boiler by filling a small saucepan with about 2 inches of water and placing a glass bowl on top. Add the white chocolate melting wafers to the bowl and place over low heat to melt while you pop the popcorn. Stir occasionally until smooth.10 ounces white chocolate melting wafers
- Turn on the Ninja Foodi Possible Cooker Pro (or use a large pot on the stove), select Sear/Sauté on high, and press start. Add the neutral oil to the bottom and let it heat during the preheat time, about 5 minutes.3 tablespoons neutral oil
- Once preheated, add 2-3 test kernels to the pot and put the lid on. When these kernels pop, your oil is hot enough. Add the salt to the hot oil, then pour in the remaining popcorn kernels. Replace the lid.½ teaspoon kosher salt, ½ cup popcorn kernels
- Let the kernels pop, giving the pot one or two shakes. When the popping starts to slow down (usually between 8-9 minutes), reduce the heat to low to prevent burning while allowing the remaining kernels to finish popping.
- Remove the pot from direct heat and take off the lid. Transfer the popped popcorn to your large bowl or bin, picking out any unpopped kernels. Let the popcorn cool completely until cool to the touch.
- Once the chocolate is melted and smooth, stir in the peppermint oil. The chocolate can sit while waiting for the popcorn to cool.¼ teaspoon peppermint oil
- Working in layers, drizzle about two-thirds of the melted chocolate over the cooled popcorn. Add half of the crushed peppermint candy and use tongs to toss everything together. Add the remaining candy and toss again. Reserve about one-third of the chocolate for the final drizzle.6 ounces starlight peppermint candies
- Pour the coated popcorn onto the prepared sheet trays, spreading it out into an even layer to form clusters. Allow the chocolate to set completely until you can pick up the popcorn without getting chocolate on your hands.
- Rewarm the reserved chocolate if needed. Using a spoon or spatula, lift the chocolate high above the popcorn and drizzle it back and forth in thin ribbons. Immediately sprinkle the mixed sanding sugar over the top while the chocolate is still wet. Repeat for both trays.2 teaspoons pink sanding sugar, 2 teaspoons white sanding sugar
- Allow the final drizzle to set completely before serving or packaging. Break apart any large clumps if desired.
Notes
• Crush the peppermint candies into small pieces, not dust. You want crunchy bits in each bite, not powder.
• Starlight mints are easier to unwrap and crush than candy canes, but either works.
• Have all ingredients measured and equipment ready before starting as this recipe moves quickly. COOKING TIPS
• Use the test kernel method to know when your oil is hot enough for popping.
• Reduce heat to low when popping slows to prevent burning while finishing the remaining kernels.
• The popcorn must be completely cool before adding chocolate, or the chocolate will soak in and make the popcorn soggy. CHOCOLATE TIPS
• Do not use white chocolate chips - they contain stabilizers that prevent smooth melting.
• Use peppermint oil or emulsion, not extract. The water in extract can cause chocolate to seize.
• Start with ⅛ teaspoon peppermint oil if you prefer a subtle flavor; ¼ teaspoon gives a nice peppermint punch.
• For more chocolate coverage, use 12-15 ounces of white chocolate melting wafers.
• Drizzle the final chocolate from high above the popcorn to create thin ribbons rather than thick globs. GARNISH TIPS
• Always use both pink and white sanding sugar together - pink alone looks too much like a unicorn theme rather than holiday candy canes.
• Sprinkle the sanding sugar immediately while the chocolate drizzle is still wet so it adheres. VARIATIONS
• Add a drizzle of dark chocolate or milk chocolate over the top for color contrast.
• Use an air popper instead of stovetop popping if preferred.
• Make on the stovetop in a large pot over medium heat using the same technique. SERVING SUGGESTIONS
• Package in clear containers or cellophane bags with festive ribbon for homemade gifts.
• Serve alongside hot cocoa for holiday movie nights.
• Add to a dessert buffet or holiday snack spread. STORAGE
• Room Temperature: Store in an airtight container for 3-5 days.
• Freezer: Store in airtight containers or vacuum-sealed bags for up to 1 month. Allow to come to room temperature before serving. NUTRITIONAL DISCLAIMER
Nutritional information provided is an estimate based on typical ingredient values and standard portion sizes. Actual nutritional content may vary significantly depending on specific brands used, ingredient substitutions, preparation methods, portion sizes, and individual cooking techniques. For precise nutritional information tailored to your specific ingredients and preparation, please consult with a registered dietitian or use laboratory analysis. This information should not be used for medical nutrition therapy or to manage medical conditions without professional guidance.
Nutrition
Frequently Asked Questions
I don't recommend white chocolate chips because they contain stabilizers that prevent them from melting smoothly, resulting in a thick, clumpy coating that does not spread evenly over the popcorn. White chocolate melting wafers or almond bark are specifically designed to melt smoothly and create that perfect thin coating.
Peppermint extract contains water, which can cause chocolate to seize up and become grainy or clumpy. Peppermint oil is pure oil that blends seamlessly with melted chocolate. You can use oil based extracts.
I do not recommend using microwave popcorn. Most microwave popcorn contains butter, salt, and other seasonings that will interfere with the chocolate coating and create an unbalanced flavor. Making your own popcorn from kernels allows you to control the salt level and ensures a clean, neutral base for the white chocolate and peppermint flavors.
If the popcorn is still warm when you add the chocolate, the heat will cause the chocolate to soak into the popcorn rather than coating the outside. This results in soggy popcorn instead of that delightful crunchy texture we want. Cool popcorn allows the chocolate to set up quickly on the surface, keeping everything crisp.
When stored in an airtight container at room temperature, this popcorn stays fresh for 3-5 days. For longer storage, freeze in airtight containers or vacuum-sealed bags for up to one month. The key is keeping it in a sealed container away from heat and humidity.
Yes, you can easily double this recipe for larger batches, which is perfect for holiday parties or making multiple gifts. Simply double all the ingredients and use additional sheet trays for spreading the popcorn. You may want to work in batches when coating with chocolate to ensure even coverage.
Perfect Pairings for Your Holiday Spread
This white chocolate peppermint popcorn is the perfect treat on its own, but it also pairs wonderfully with other holiday favorites for a complete holiday spread. Set it out alongside hot cocoa for holiday movie marathons, or include it as part of a dessert buffet at your next holiday party. It also makes a delicious addition to a homemade popcorn gift basket paired with other gourmet popcorn varieties and popcorn recipes.

About the Recipe Author, Louise Long
Louise is a full-time recipe creator and food blogger @ The Salted Pepper. She has over 30 years of experience with cooking and recipe development. She owned a restaurant for several years and was a full-time RN until retiring to blog full-time.

She published her first cookbook in the Fall of 2018 and is very interested in writing several more.
Louise is also the creator of an online Ninja Foodi Pressure Cooking Course with over 100 instructional step-by-step videos. People absolutely rave about the course and all the value they have received from it.
Louise has several very active Facebook groups that help people with the basics of cooking and learning more about the appliances they love.
Ninja Foodi Pressure Cooker & Air Crisper 101
Ninja Woodfire Outdoor Grill & Smoker
Louise is also a YouTube creator and you can find most of her recipes in video format on The Salted Pepper YouTube channel.
She is very responsive to messages and eager to help in any way she can. Get more Information about Louise & contact information
I WOULD LOVE TO SEE WHAT YOU ARE COOKING UP IN YOUR KITCHEN! TAG ME @THESALTEDPEPPER ON YOUR FAVORITE SOCIAL MEDIA PLATFORM WHEN YOU MAKE A DISH!
BE SURE TO FOLLOW THE SALTED PEPPER RIGHT HERE ⇓⇓⇓⇓⇓
Amber says
Wow! This is so delicious. Perfect for Christmas. Not to mention it was so easy to make. This is also great to give as a gift. Thank you again for another well thought out and fantastic recipe. I will make this one over and over again! 😀
Louise says
I'm so glad you like it!