

- Electric Pressure Cooker
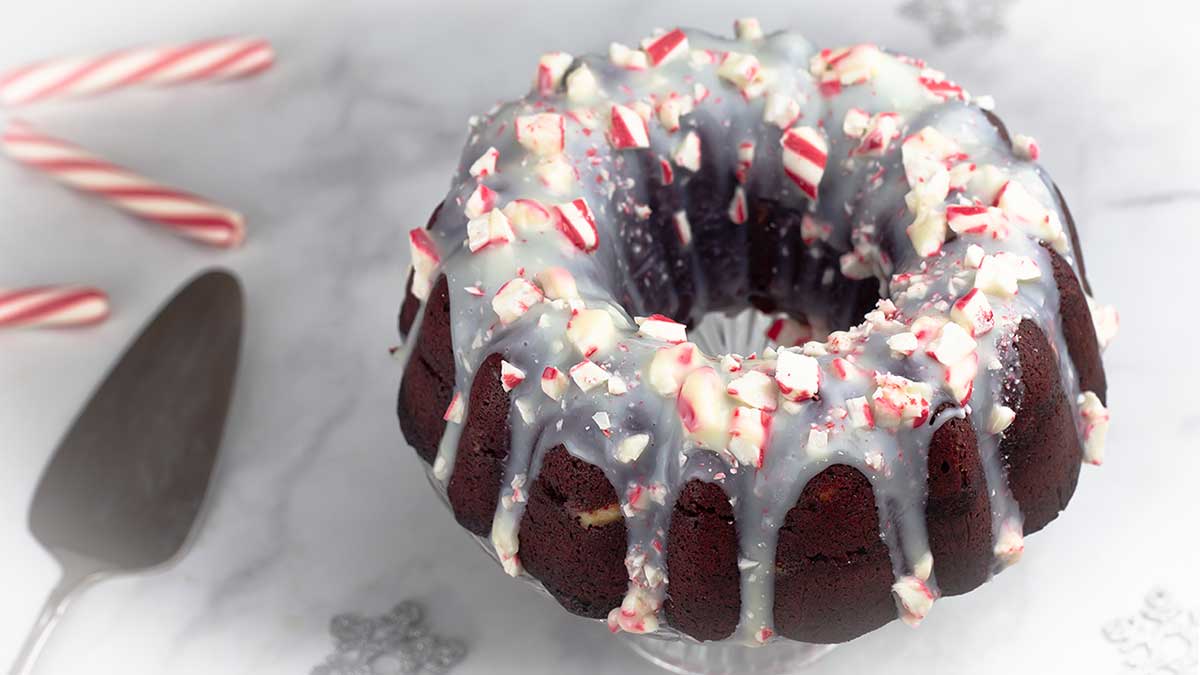
If you are looking for an EASY and SPECTACULAR Cake... this Red Velvet Bundt Cake is it!
Would you like to save this recipe?
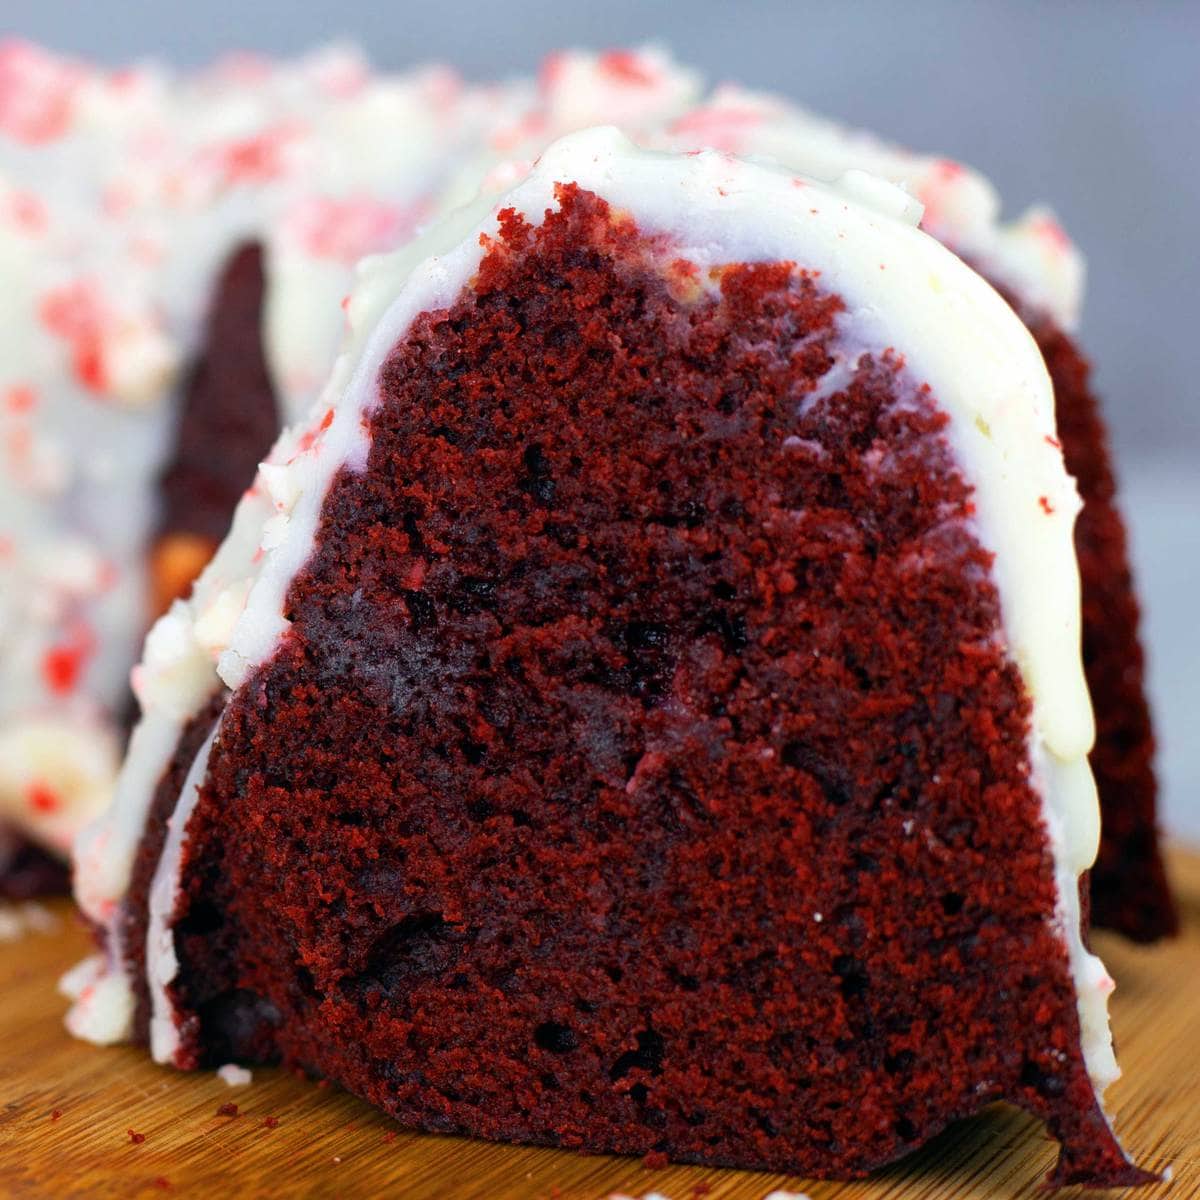
You won't believe how easy this cake is to make and the texture is outstanding! Honestly, I was shocked! I have never been a huge fan of red velvet cake, it has always been dry and not very flavorful to me.
This Red Velvet Bundt Cake started out as a chocolate bundt cake and I switched it up midway through the testing process because I thought the maroon color was beautiful with the peppermint ganache. Perfect for the holidays!
This cake has been tested 9 times and I also tested it in a different pan. So, if you don't have the size bundt pan I do, no worries! I'll give alternant suggestions in this post.
The end result is a Red Velvet Bundt Cake that is full of chocolatey flavor, very moist, and not dense like some pressure cooked cakes! You are going to LOVE it!
What is Red Velvet Cake?
Don't feel bad if you don't know. I didn't either. I thought it was simply adding food coloring to a chocolate cake. I was wrong though. What sets apart a red velvet cake from a chocolate cake, isn't just the food coloring. In fact, you don't have to add the food coloring at all.
Red Velvet Cake is made with a few ingredients that, when combined, have a chemical reaction that turns the cake a dark red. That combination of ingredients are: buttermilk, vinegar, and baking soda.
Now, you will not get the bright red color that most of us associate with a red velvet cake unless you add the food coloring. I wish I would have tested this final cake without the food coloring so I could show you a picture, but I didn't. When I tested the cake at first, I didn't use buttermilk or vinegar or baking soda and it was a beautiful chocolate cake!
I think the next time I make this Red Velvet Bundt Cake, I will skip the food coloring and update the post. I'm thinking it will turn out to be just slightly maroon and not the deep red that comes from the food coloring.
Do I have to use Food Coloring in this Red Velvet Bundt Cake?
NOPE! Omitting the food coloring is not going to change the texture or taste of this cake one bit. The color will be darker for sure, but that is it. I didn't really want to use food coloring at all and thought about trying a more natural approach, like using beets or something like that. I just didn't have time. Maybe I can experiment with that in the future.
If you don't want to use red food coloring, simply omit it from the recipe and no other changes are necessary. The small amount of liquid added from the food coloring is not enough to be concerned with.
Do I have to use Buttermilk in this Red Velvet Bundt Cake?
NOPE! In fact, the first several test runs were made with heavy cream in place of buttermilk and it worked perfectly. The only reason I decided to change the heavy cream to buttermilk is because that is how a red velvet cake is usually made.
If you don't have buttermilk, no worries. You can use the heavy cream or simply make your own buttermilk.
How to make your own Buttermilk
To make just enough buttermilk for this recipe, combine ½ cup of milk with ½ Tablespoon of an acid. I find that lower fat milk (2% and skim) works best, but you can use any milk you have on hand.
You can use either vinegar or lemon juice as the acid and don't worry, your cake won't taste like lemon or vinegar.
You can also make buttermilk with plain yogurt by adding in ½ Tablespoon of vinegar or lemon juice to ½ cup of yogurt.
I have heard that cream of tartar can be used with milk as well to make buttermilk, but I have never tried that.
Do I have to use Peppermint Ganache?

Of course not. If you don't want to have a peppermint flavor in or on your cake, you can skip it. You can make a regular white chocolate ganache by following the recipe and omitting the peppermint emulsion or extract.
I like to use emulsions and in this recipe I used a (affiliate link)Peppermint emulsion, but you can use a peppermint extract and it will be fine.
Or, you can add whatever flavoring you want. I think a raspberry white chocolate ganache would be delicious. If you like orange, give the glaze on this recipe for Pumpkin Bread a try, it's delicious!
You could also make a more traditional cream cheese type of glaze for your cake.
What type of Peppermint Candy works best for the topping?
The peppermint candy I used was soft peppermint sticks that I found at Dollar Tree. You can also find them on (affiliate link)Amazon, but they are a lot more expensive! I think the softer texture is nicer than biting into a hard peppermint candy or even crushed candy canes.
If you can't find the peppermint sticks and want to use candy canes or another type of hard peppermint candy, I would crush them fine before sprinkling over the cake.
What Types of Pans can I use to make this cake?
My first choice is a Bundt style pan because I think it produces the nicest looking cake and it's the perfect size to use all the batter. The bundt pan that I used is from Pampered Chef: (affiliate link)Quick Cooker Fluted Cake Pan
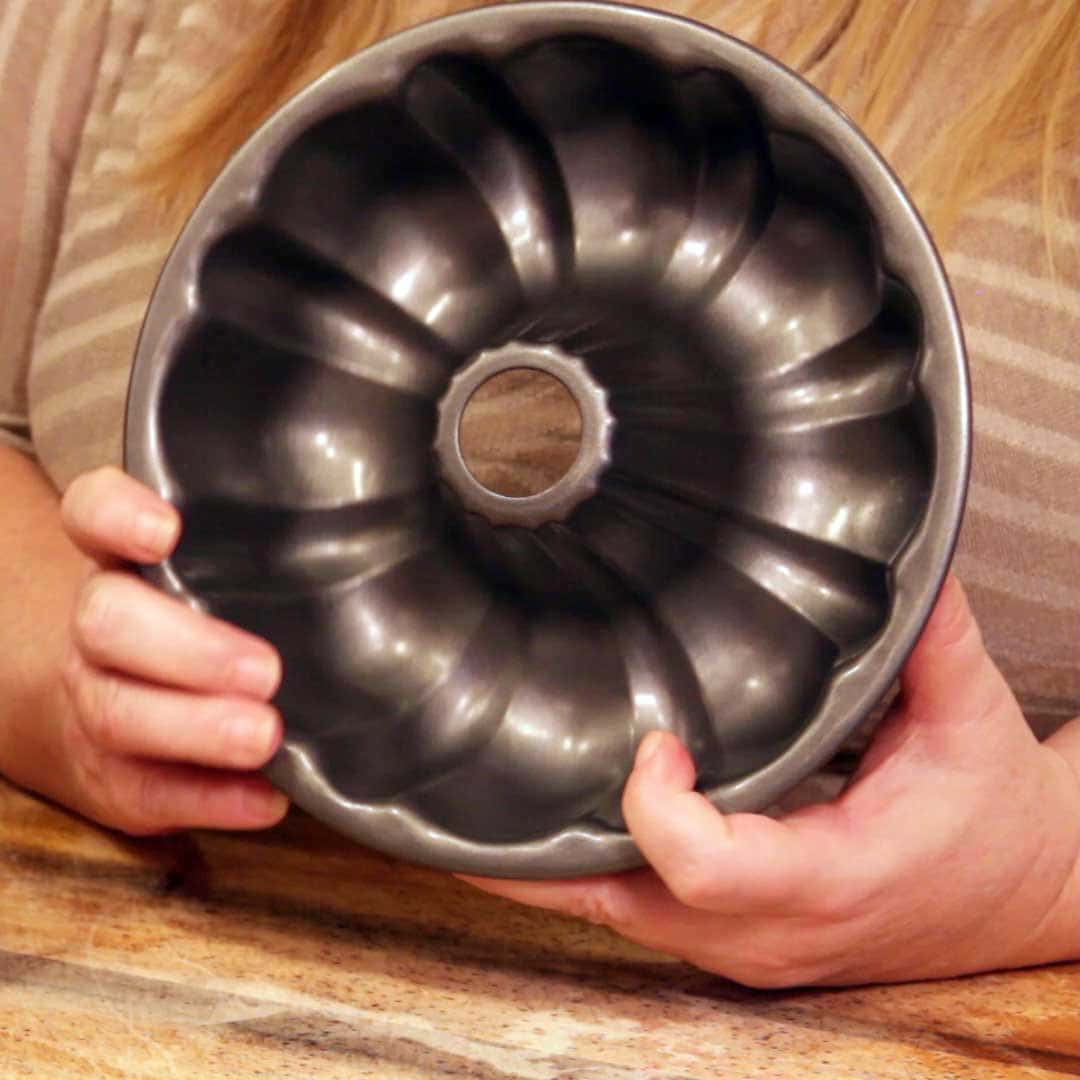
This fluted cake pan ("Bundt" is trademarked, so other distributors often use the term fluted to refer to their bundt style pans) measures 8½" across and holds up to 5 cups of batter, according the Pampered Chef Website. Please don't fill it to capacity if you are making anything that rises, though, or it will spill over the top. The rule of thumb for baked goods that rise is fill ⅔rds of the way. This batter goes a little beyond that, but works just fine.
If you have a bundt pan that fits in the Ninja Foodi, you can use that as well. If your bundt pan is wider than 8½", the batter may not fill it all the way and you might want to decrease your pressure cook time by 2-3 minutes. Pressure cook time for this cake is dependent on the depth of the batter, so adjust accordingly.
I tested this cake in the (affiliate link)Flower Pan, too! It works just fine, but you won't be able to use all the batter or your cake will overflow. Just use enough to fill it ⅔rds of the way and no changes in the cook time are needed. Use the remaining batter to make little cake bites in an egg bite mold. Unfortunately, I didn't test the cake bites out and I'm not sure about cooking time. I think I would PC for 5 minutes with a natural release of 5 minutes, but I'm only guessing!
If you wanted to make this cake in an 8" round pan, you certainly can. You will need to make some adjustments, though. I would recommend using a couple (affiliate link)heating cores so that heat is distributed to the center of the cake. If you don't have heating cores, you can also use a small biscuit cutter in the center. I have not tested this recipe in a round cake pan, but I would decrease the pressure cook time to 25 minutes. If the center is not quite done, then use bake/roast on 250°F with the cake covered to finish cooking it.
Can I bake the Red Velvet Bundt Cake in the Oven?
Yes. I know some people don't like pressure cooked cakes and I totally understand that. However, if you are worried about pressure cooking this cake because your cakes have turned out dense in the pressure cooker, you don't need to worry about that with this recipe.
As long as you cover your cake, the result is just like it was baked in the oven. I promise! I hope you give pressure cooking a cake a try!
If you still want to bake your cake in the oven, I would bake on 325°F for 25-35 minutes depending on your pan type.
How to Make a Red Velvet Bundt Cake in a Pressure Cooker
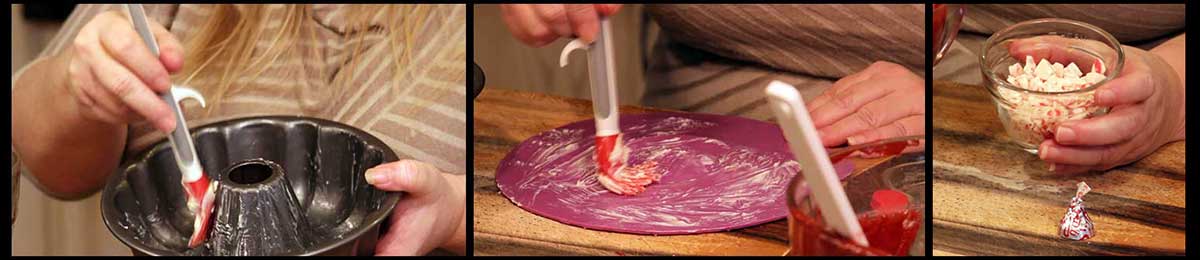
First, gather and measure all of your ingredients for the cake. This is going to make things much easier and faster. Prepare your pan by brushing it with butter. You also want to butter your silicone cover or the underside of your foil. I use my (affiliate link)silicone brush to do this and it is incredibly easy! Chop your candy cane hershey kisses into small pieces.
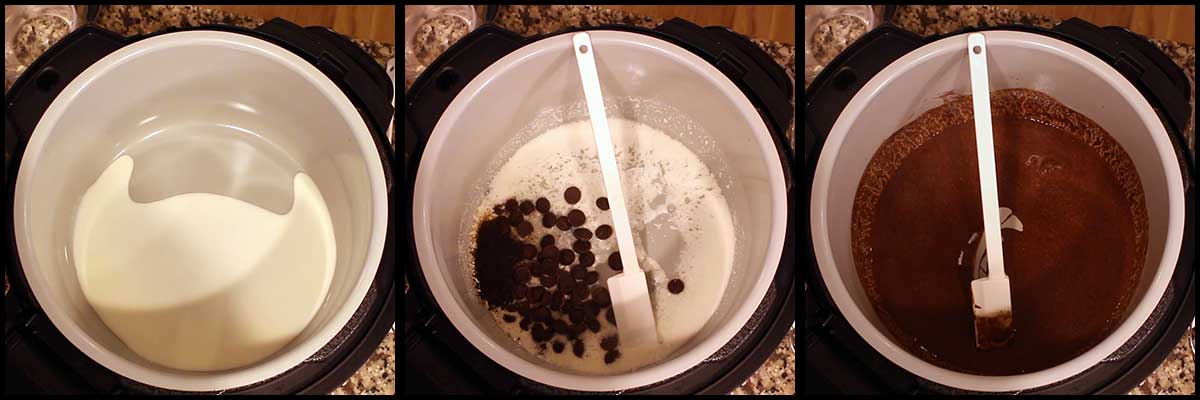
Second, get your chocolate mixture done so it has sufficient time to cool. Add the buttermilk to the inner pot of the Ninja Foodi and use sear/sauté on medium-low to heat the buttermilk. Do not bring to a boil, though. Turn the Ninja Foodi off. Add the chocolate and the espresso powder and stir until chocolate is melted. Allow to cool in the pot until you are ready to add it to the wet ingredients.
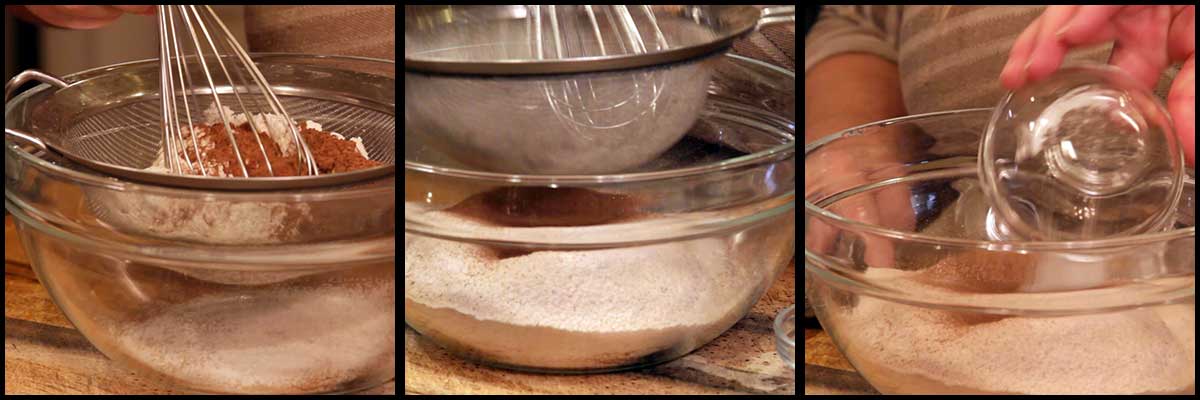
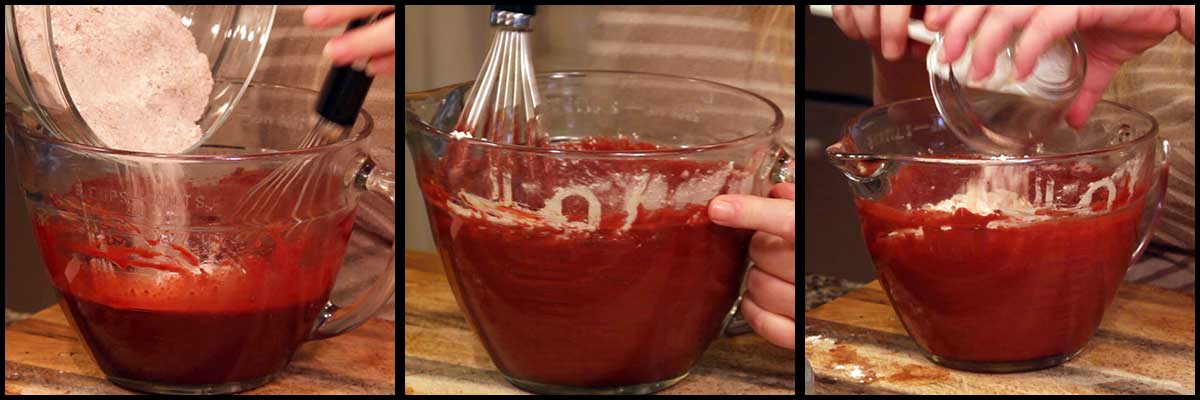
In a medium size mixing bowl, sift your flour, cocoa powder, baking soda, and baking powder together. I use a (affiliate link)fine sieve strainer to sift my ingredients and I find this to be easy. There are certain recipes that turn out much better if you take the time to sift the flour and this is one of them, so I encourage you to take the time for this. Add the salt and stir to combine. Set that bowl aside and get another medium size mixing bowl for your wet ingredients.
Now, let's get the wet ingredients mixed up. Add 2 eggs, oil, and sugar to a medium mixing bowl and whisk together. I like to use my (affiliate link)Classic Batter Bowl, because it has a spout for pouring and makes it really easy to pour the batter into the bundt pan.
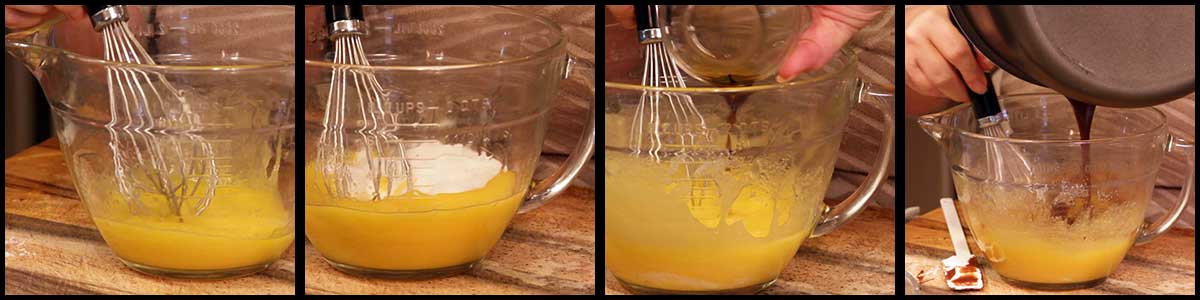
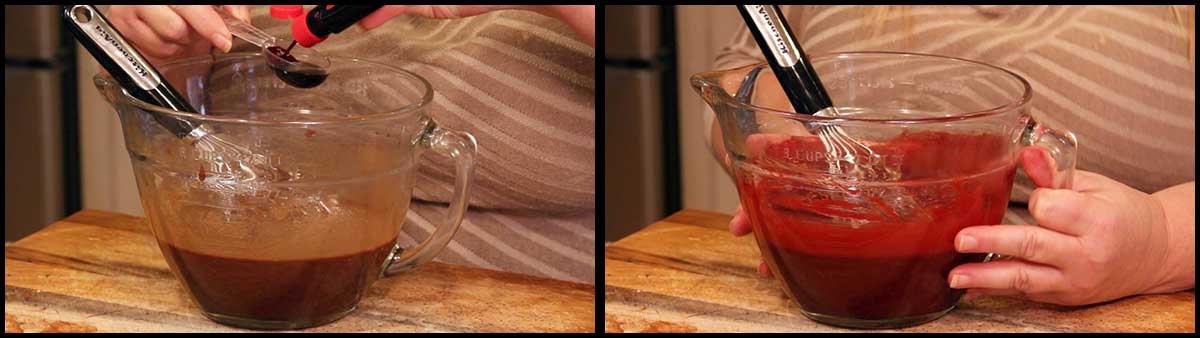
Next add the vanilla extract, vinegar, and cooled chocolate mixture to the wet ingredients and whisk to combine. Add the food coloring if you are using it and whisk to combine.
Dump the dry ingredients into the wet ingredients. You can do this all at once. Whisk until combined and you no longer see any flour. Fold in the chopped candy cane Hershey's kisses.
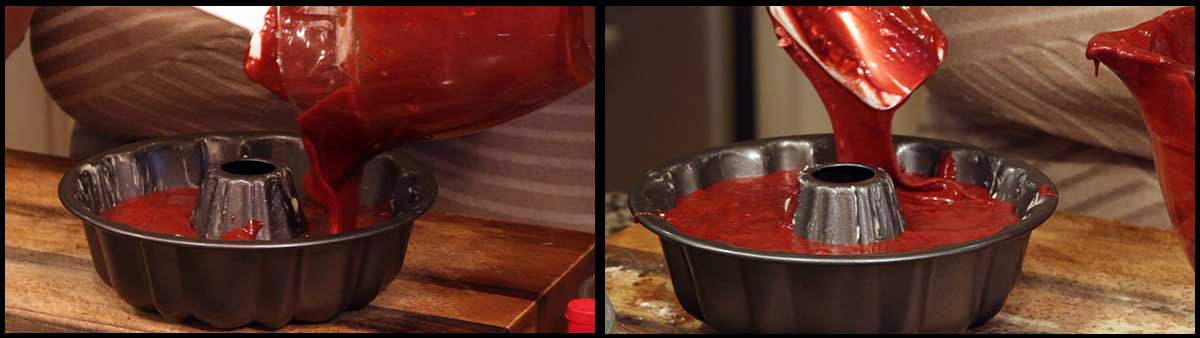
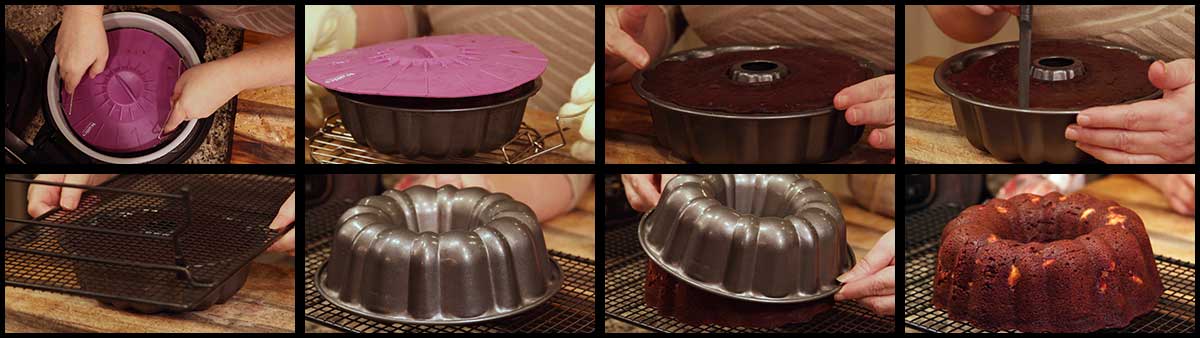
Pour the ingredients into the prepared bundt pan. Cover with Silicone Cover and place on the rack in the low position. Pour 1 cup of water into the inner pot. Place the rack into the Ninja Foodi and put on the pressure lid. Turn the valve to seal and set the pressure on high for 28 minutes. Natural release for 10 minutes, then release the remaining pressure.
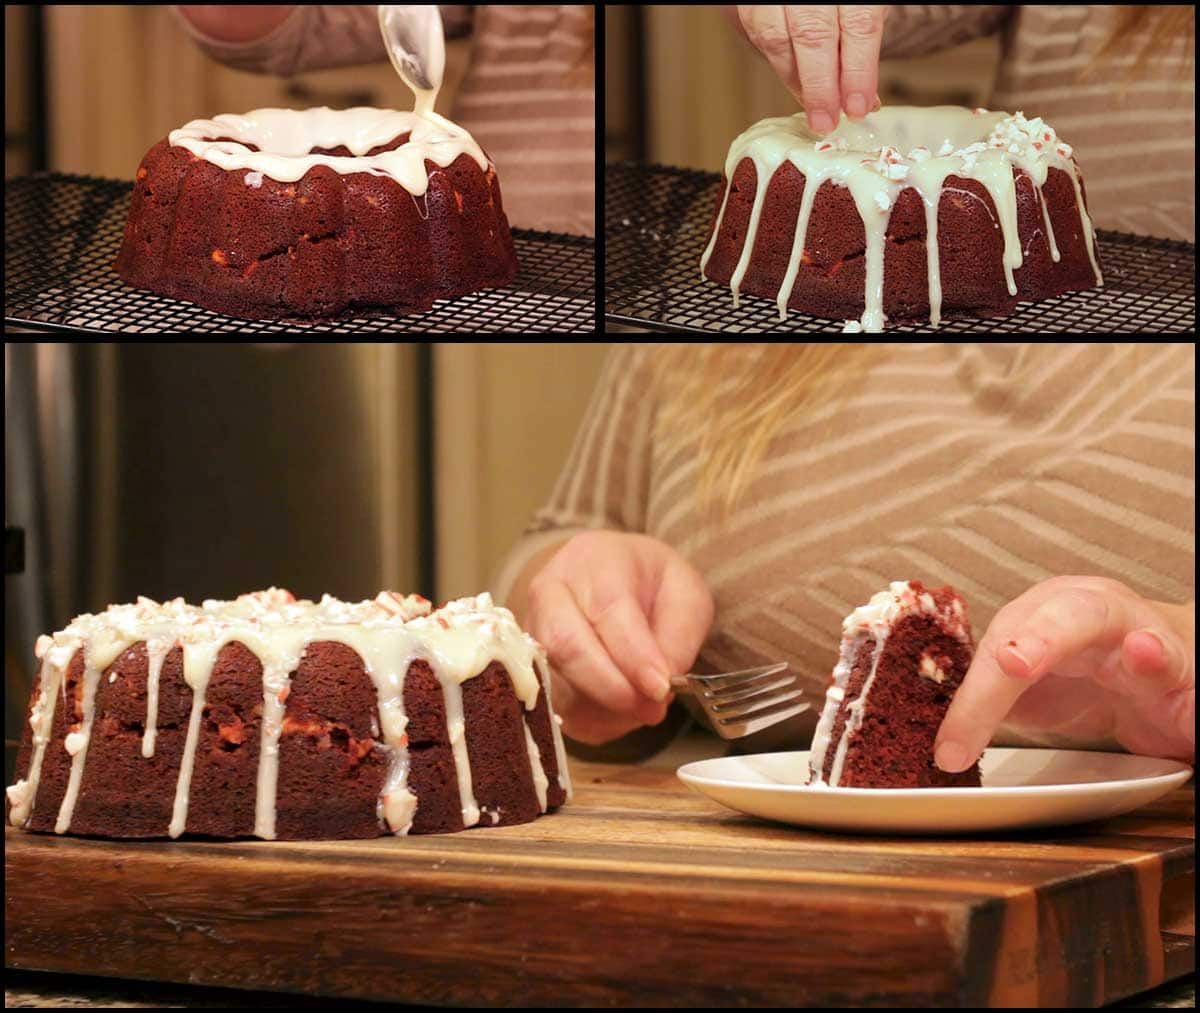
Remove the cake from the inner pot. Allow the cake to sit for 5 minutes before removing the cover. Remove the cover and use a cake tester to pull back the edges slightly to make sure they are not sticking. Then flip over onto cooling rack and leave pan in place for 5-10 minutes. Remove pan by gently lifting up. If you meet resistance, leave it alone for a few more minutes and then remove. Cool completely before decorating.
Peppermint Ganache
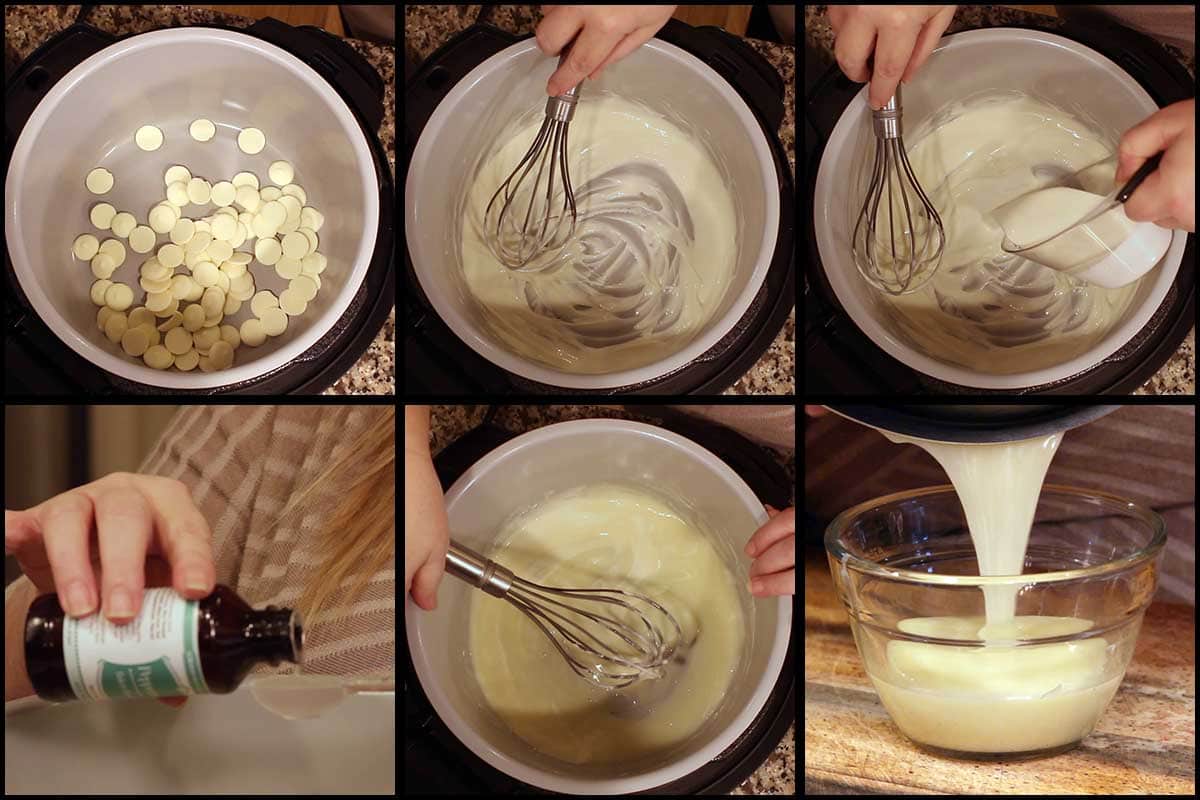
Start with a clean, dry inner pot to make the Peppermint Ganache. Add the white melting chocolate to the inner pot and turn the sear/sauté on low. Allow the chocolate to melt completely and turn the Ninja Foodi off. Add the cream and stir to combine. Add peppermint emulsion and whisk until combined. Pour into a bowl and allow to cool while the cake is cooling.
Decorating the Red Velvet Bundt Cake
The ganache should be the right consistency by the time the cake is cool. If it is too thick and doesn't cascade down the cake, reheat in the microwave 5 seconds at a time. If it is too thin, put it in the refrigerator for a few minutes.
To decorate, place parchment paper under the cooling rack to catch dripping peppermint ganache. Pour the ganache over the top of the cake and let it cascade down the sides of the cake. If it is running right off the cake, don't worry. Just put your ganache in the fridge for a few minutes and then pour it over the cake.
Chop up the soft peppermint candies and sprinkle on top. Put another layer of ganache on top. Let the cake sit so the chocolate hardens some. Serve & Enjoy!
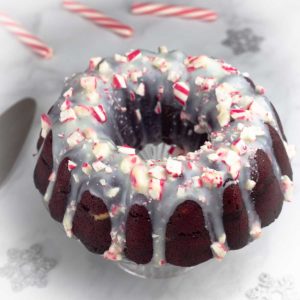
Red Velvet Bundt Cake with Peppermint Ganache
Equipment
- Electric Pressure Cooker
Ingredients
Red Velvet Bundt Cake
- ½ cup buttermilk
- ⅓ cup chocolate chips I used Ghirardelli dark chocolate chips
- 1½ teaspoon Instant Espresso Coffee
- 1¾ cup flour
- 1½ tablespoon unsweetened cocoa powder
- 1 teaspoon baking powder
- 1 teaspoon baking soda
- ½ teaspoon fine grind sea salt
- 2 large eggs
- ½ cup canola oil
- 1 cup sugar
- 1 teaspoon vanilla extract
- 1½ teaspoon white vinegar
- 1 tablespoon red food coloring optional
- ½ cup Candy Cane Hershey's kisses about 15, chopped into small pieces.
- 1 tablespoon butter for greasing the pan and cover
Peppermint Ganache
- 1 cup white melting chocolate
- ⅓ cup heavy whipping cream
- 2 teaspoon peppermint emulsion or peppermint extract
- 4 soft peppermint sticks
Would you like to save this recipe?
Instructions
Red Velvet Bundt Cake
- Add the buttermilk to the inner pot of the Ninja Foodi and heat on low-medium using sear/saueé until it is warm, but not boiling. Add dark chocolate chips and the espresso powder, turn the Ninja Foodi off. Stir to allow the chocolate chips to melt. Allow to cool slightly. I do this right in the inner pot with the Foodi turned off.
- In a medium size mixing bowl, sift the flour, cocoa, baking soda, and baking powder. Then add the salt and stir to combine.
- In a second medium size mixing bowl, add the eggs, oil and sugar. Use a whisk to combine or you can use a hand mixer as well.
- Add in the vanilla extract, the vinegar and the cooled chocolate mixture to the other wet ingredients, whisking as you pour the chocolate in. Add in the red food coloring and whisk to combine.
- Butter the pan you are using. Butter the underside of your silicone cover or foil.
- Add the dry ingredients to the wet ingredients and stir until combined and you don't see any unincorporated flour.
- Chop up about 15 Candy Cane Hershey kisses into small pieces and fold into batter.
- Pour the batter into your prepared cake pan and cover with a silicone cover or foil. *see post for directions for various pans if you aren't using the bundt pan.
- Place 1 cup of water into the inner pot. Set the cake on the rack in the low position. Put the pressure lid on and turn the valve to seal. Set the pressure to high for 28 minutes. Natural release for 10 minutes. Remove cake and allow to cool in the pan, covered for 5-10 minutes. Remove the cover and go around the edges with a cake tester to make sure the cake is not stuck to the pan.
- Flip the cake over onto a cooling rack and let cool another 10 minutes. Remove the cake pan and allow to cool completely. While the cake is cooling, make the ganache.
Peppermint Ganache
- Add the white melting chocolate to a dry inner pot and turn the sear/sauté on low to melt the chocolate. Once the chocolate is melted, turn the Ninja Foodi off and add in the heavy cream and whisk to incorporate. Add in the peppermint emulsion or extract, stir to combine. Pour the ganache into a bowl and allow to cool until it thickens up, but is still pourable.
- Place parchment paper under your cooking rack to catch the excess ganache. When the ganache has cooled enough and the cake is completely cool, pour the ganache over the cake. Top with the chopped peppermint pieces and pour another layer of the ganache on top to secure the pieces in place.
- Let sit on the counter or in the fridge until the chocolate ganache is set. Serve and enjoy!
Nutrition
ABOUT THE RECIPE AUTHOR, LOUISE LONG

Louise is a full-time recipe creator and food blogger @ The Salted Pepper. She has over 30 years of experience with cooking and recipe development. She owned a restaurant for several years and was a full-time RN until retiring to blog full-time.
Louise has several very active Facebook groups that help people with the basics of cooking and getting the most out of the Ninja Foodi.
Ninja Foodi Fresh & Healthy Meals
Seeing the need for easy, delicious, and high quality recipes, she is focusing all of her efforts creating recipes specifically for the Ninja Foodi. Her recipes are easy for the home cook to follow and provide step-by-step instructions.
Louise is also a YouTube creator and you can find most of her recipes in video format on The Salted Pepper YouTube channel.
She is very responsive to messages and eager to help in any way she can.
Jenny says
Oh my gosh, Louise! I made this cake for the first time as directed, and it legitimately tastes like Christmas. I'm not even big on peppermint, or red velvet but it looked so festive that I just had to make it. And OH MY GOSH. I'm making this every year for Christmas. Thank you so much for creating this.
Louise says
I'm so glad to hear that! I LOVE this cake and worked on the recipe for what seemed like forever last year, so it makes me so happy that you tried it and loved it!
Aprile says
Hi Louise,
I'm not finding this 5 cup fluted pan on the PC website?
Is it still available?
Thanks! -- Aprile
Louise says
It looks like they stopped carrying it. That's a shame because it's a great pan. I'll have to search for an alternative.