
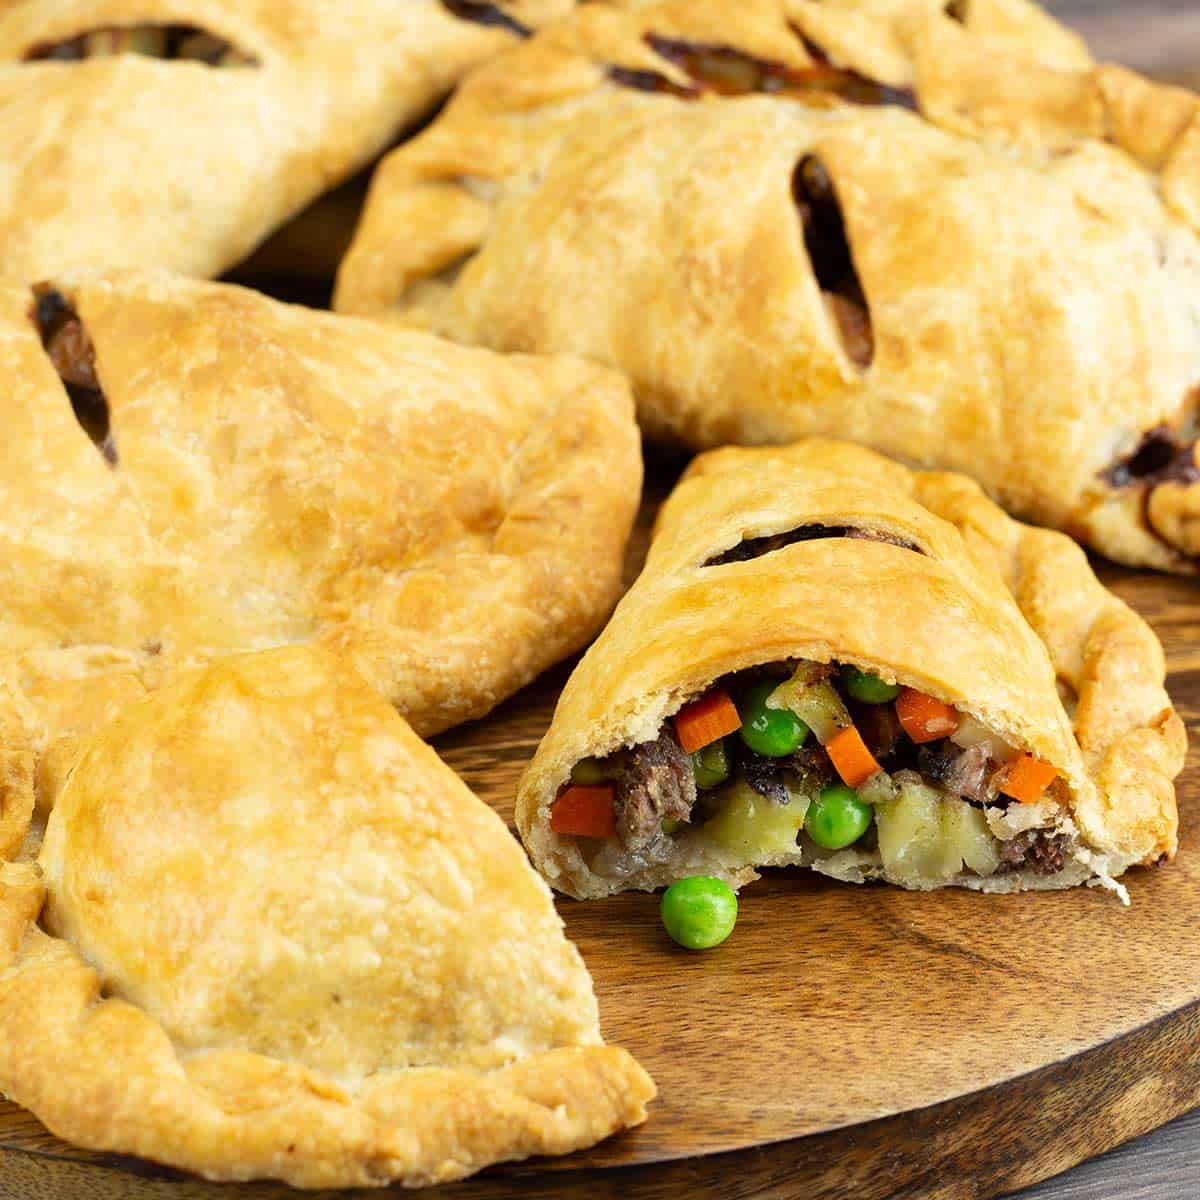
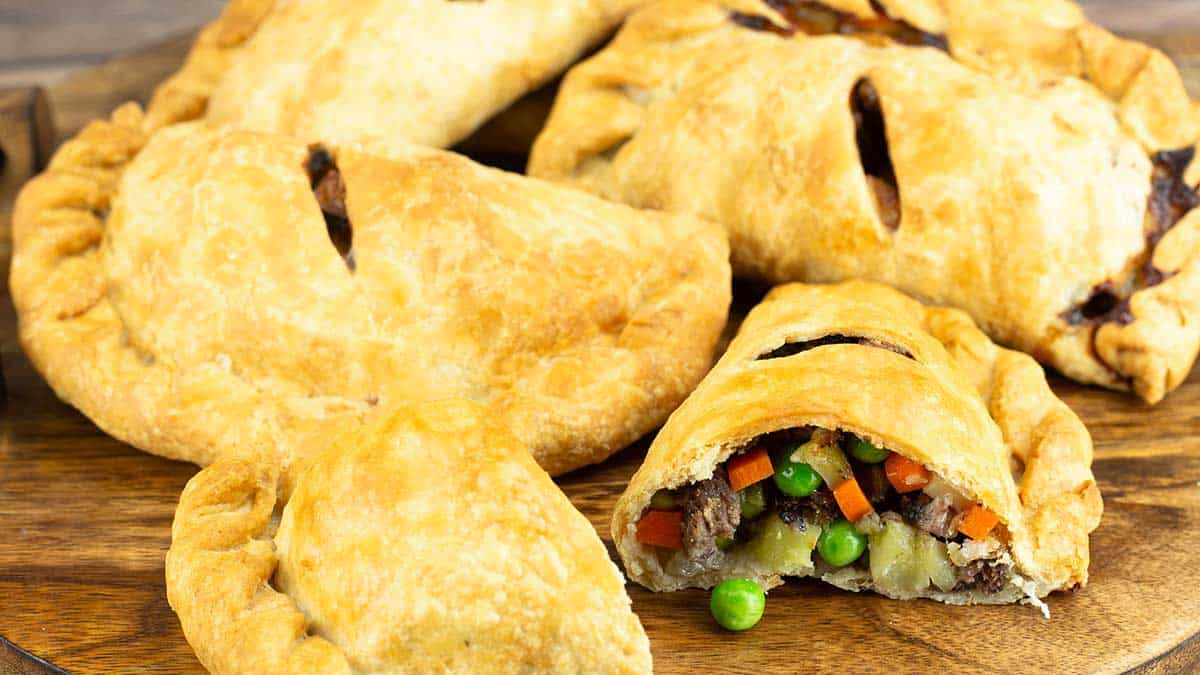
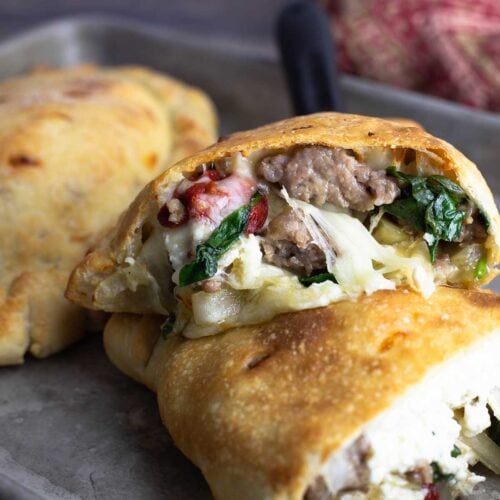
These Savory Hand Pies are my twist on a classic pasty recipe. The savory filling is made up of all the ingredients in a delicious beef stew and wrapped in a homemade pastry crust that is baked golden brown.
They are absolutely delicious, and you can customize the fillings in so many different ways.
Would you like to save this recipe?
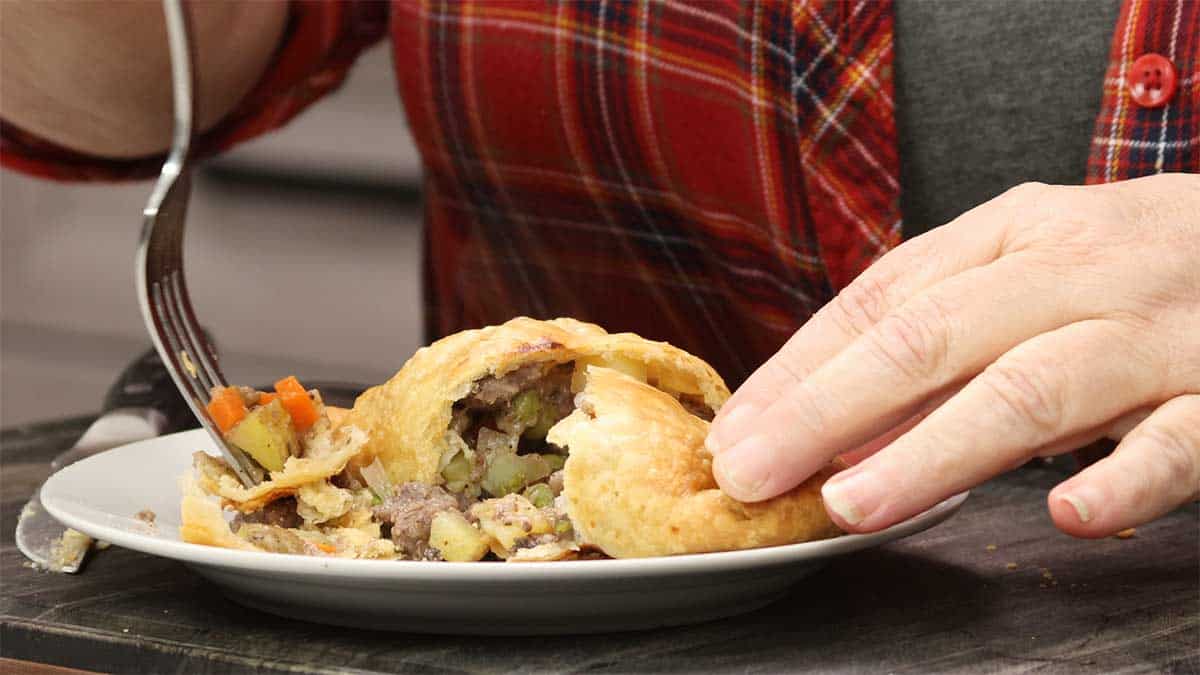
The first time I made these with the filling, it was like eating the best beef potpie with a flaky crust, perfectly cooked beef, and veggies in a light sauce. I immediately fell in love with them, and I know you will too!
You can make this recipe in the oven or an air fryer, or if you have the Ninja Combi oven, they turn out amazing using Combi Crisp. The combination of steam and air crisping produces the best results.
You can also turn these savory pies into a classic pasty, breakfast hand pies, or a chicken pot pie version just by switching up a few ingredients, and I will go over all of that in this recipe article.
Suggested Kitchen Tools for Savory Hand Pies
- Rolling Pin
- (affiliate link)Pastry Mat or Large Work Surface
- Large Mixing Bowl
What is the Difference between a Savory Hand Pie and a Cornish Pasty
The filling is the key difference.
A traditional Cornish Pasty has a very specific filling of swede (rutabaga), potatoes, onions, and a cheap cut of meat, usually lamb or beef. There is a very interesting history of the Cornish Pasty that you can read here: History of the Cornish Pasty.
Cornish immigrants brought the pasty to the Upper Peninsula of Michigan in the US back in the 1800s.
Jeff and I traveled to Michigan, and that is where we were introduced to the famous pasty. We tried them from a few different places and loved them!
When I got home and tried to replicate them, I had a very hard time finding rutabaga near me, and when I did, it was very strong flavored, and my pasties just didn't taste as good as I knew they should.
So, I switched things up and added a different filling, and my pasty recipe became savory hand pies.
Both the Cornish Pasty and my version of a Savory Hand Pie have a sturdy crust (that is still flaky and delicious) that is crimped around the edge. The crimped edge acts like a handle for holding the Pasty or Hand Pie.
In present time, we eat the handle too! However, when the Pasty was the miners' lunch they held the crimped edge so they could eat the rest of it without getting their dirty hands on the food. The crimped edge was usually thrown away.
I also read that sometimes the Pasty would have a savory side and a dessert side so the miner could eat lunch and dessert. That's simply brilliant, and one day, I will try to make them that way.
You can get super creative when making your filling and still call them Pasties, but I wanted to make sure that I didn't take too many liberties here because a traditional pasty has quite a history, and I want to respect that.
In Michigan, we saw cheesesteak pasties, cheeseburger pasties, dessert pasties, chicken cordon bleu pasties, veggie pasties, and more.
Feel free to make your Pasty or Savory Hand Pie anyway you like. The most important thing is that you love it!
Ingredients & Substitutions
In this section, I will go over my recommended filling amounts for both a Traditional Pasty and my version of a Hand Pie.
What ingredients you use aren't as important as the filling amount and ratios. Plan on ¾ cup of filling per individual pie.
You also want to choose denser vegetables like root veggies or vegetables that don't give off a lot of liquid when they are cooked.
If you wanted to add spinach, you may want to wilt it first to remove most of the liquid so your crust isn't soggy.
Pastry Crust
The pastry crust I use for this recipe is very similar to a shortcrust pastry which is a ratio of 2 parts flour to 1 part fat. Mine has a little more fat in it because, after testing the recipe numerous times, this gave the best combination of flavor and texture while leaving the crust easy to work with.
You can also use your favorite homemade pie crust recipe or even a store-bought pie crust will work. If you purchase boxed pie dough that you roll out, plan on 2-3 hand pies per pie crust. You will want to roll it out to about ¼" thick just like the homemade pie crust. Because they are round right out of the box, you may want to cut it in thirds and then form a ball out of the dough and roll it out again.
You can use homemade or store-bought puff pastry, but the results will be very different, and I recommend you cook the filling first before putting it into puff pastry sheets. These bake for a long time, and I'm not sure how well the puff pastry dough will do with a 40-50 minute cooking time.
Flour
I also use bread flour instead of all-purpose flour because I found it much easier to work with the crust and make all the crimps. You can absolutely use all-purpose flour if that is all you have on hand. The only difference is you may need just a touch less water when making the dough and you won't have as much stretch in the dough when making the hand pies.
Fat
The fats I use are a combination of butter and lard. Lard is traditionally used in a pasty crust, but butter gives a better flavor. The lard makes the crust flakier than all butter, but you can use all butter if you prefer.
You can use any combination of solid fat that you want in your pie crust and Crisco vegetable shortening will give the same flakiness as the lard, so if you have that on hand absolutely use it.
The more lard or vegetable shortening you use, the flakier the crust, but the less butter you use the less flavor in the pie crust. So, it's a balancing thing and I really enjoyed the ratio of butter to lard in this recipe.
Feel free to play around with it and use more or less of the butter, lard, or vegetable shortening until you find the perfect combination for you.
Don't try to use liquid fats like vegetable oil, olive oil, or any other liquid in your pastry crust because you won't get the correct results. The fat has to be chilled and solid.
Filling
The filling I use is made of sirloin, yellow potatoes, sweet onions, carrots, mushrooms, and peas. These ingredients are all chopped (except the peas) into a small dice that is about ½".
I use frozen peas, and it is fine to put them in frozen. This helps them retain a nice green color and stay firm after cooking. If they are thawed before adding to the filling, they will become a dull green and be very soft.
The two important things to remember about the filling is that you need a total of ¾-1 cup of filling per hand pie you are making. This recipe makes 6 hand pies, so I aim for 4½ cups of filling total, and you want to cut all of the ingredients small; ½" cubes is a good size.
A traditional Cornish Pasty has beef (or lamb), rutabaga (swede), onions, and potatoes. That is it. They are very good! However, I like to do my own thing, and I encourage you to do that as well. Here are some suggestions for substituting the ingredients in the filling.
Sirloin
I use sirloin steak in my filling, but you can use filet mignon, ribeye, flank steak; really any kind of steak you want. I try to pick a cut of beef that isn't too expensive because these are meant to be a frugal meal.
You can also substitute ground beef, and you don't have to cook it first! I recommend using a 90/10 instead of 80/20 so you don't have too much fat and juices inside the hand pie.
You could also use lamb, chicken, ground chicken, ground turkey, ham, pork tenderloin, or pork loin. Or skip the meat altogether and make it a Veggie Hand Pie.
Potatoes
I recommend using yellow or Yukon gold potatoes in this recipe because they hold their shape and stay firmer than Russets. If you aren't in the US, choose a waxy potato versus a floury potato.
You could also use sweet potatoes instead of white potatoes if you prefer.
You can skip the potatoes and add more of another filling ingredient if you like.
Onion
I use sweet onions because I always have them on hand, but you can use a yellow onion or even a red onion if you prefer.
I don't recommend using green onions unless you only use the white part because the green part of the onion will get very soft during the long cooking time.
You could also use the white part of a leek.
Carrots
I love the look and taste of the carrots in my savory hand pies, but it is totally up to you if you use them or not. If you skip the carrots, make sure use more of another filling ingredient so you have the correct volume of filling.
Mushrooms
If you don't want to use the mushrooms, omit them and use more of another filling ingredient to make up the difference.
Peas
I recommend using frozen peas and putting them in the filling when they are still frozen for the best outcome. You can skip the peas and use more of another filling ingredient to make up the difference in volume.
Filling for a Traditional Cornish Pasty
If you want to make a traditional Pasty, you will use the following ingredients for the filling. You can change the ratios of each ingredient but try to have at least 4½ cups of filling for 6 Pasties.
- 1½ cups chopped sirloin (rump in the UK)
- 1½ cups potato (use a waxy potato)
- 1 cup rutabaga (swede)
- ½ cup onion (yellow, white or sweet)
The way you make and cook the Pasty is exactly the same way as in the recipe.
Seasonings
This will depend on what kind of savory hand pie you are making and how you want it to taste. I use salt, black pepper, and thyme because those spices remind me of beef stew. You can use simple salt and pepper or get creative and put your spin on the seasonings.
I did play around with the salt and black pepper amounts and found that 1½ teaspoons of a kosher or fine-grind sea salt was perfect for me. When I used 1 teaspoon of sea salt, the filling was just a tad bland and that extra ½ teaspoon really brought out all the flavors in the filling.
You can certainly use less or more salt, but I don't think you will need more than 1½ teaspoons of sea or kosher salt for 4½ cups of filling. If you are using table salt, reduce the amount to ¾-1 teaspoon because the grains are much finer, and it is easy to oversalt.
I like my filling peppery, and I use 1½ teaspoons of black pepper. If you don't like peppery food, decrease that to 1 teaspoon.
How to Make Savory Hand Pies
Mise En Place (Prep)
If you are making your own pastry dough (and I really hope you do!), you can do that the day before you want to assemble and bake the hand pies or as part of the prep for the recipe.
The dough needs to chill at least 30 minutes in the refrigerator before it can be divided and rolled out, but it can be refrigerated longer if needed.
I like to prep the filling while the dough is chilling.
Make the Pastry Dough
Making pastry dough is pretty easy to do and even if you have never made it before, I will walk you through each step with both video and photos.
Before we get started, make sure your butter, lard, and water are cold. This is an important part of making the pastry crust. We don't want to melt the fat in the flour, we want to combine it so the fat and the flour create little balls.
I got ahead of myself in the video and you'll see me adding the salt after I add the lard and the butter. This is not how I usually do it. You want to add the salt to the flour and give it a quick mix to incorporate and then add the cold lard and cubed butter.
You can put in sliced butter, but I found the cubes easier to work with.
I also tried grating the butter, but even though it was very cold this did not work as well for me. If you want to grate the butter I recommend freezing it before combining it with the flour.
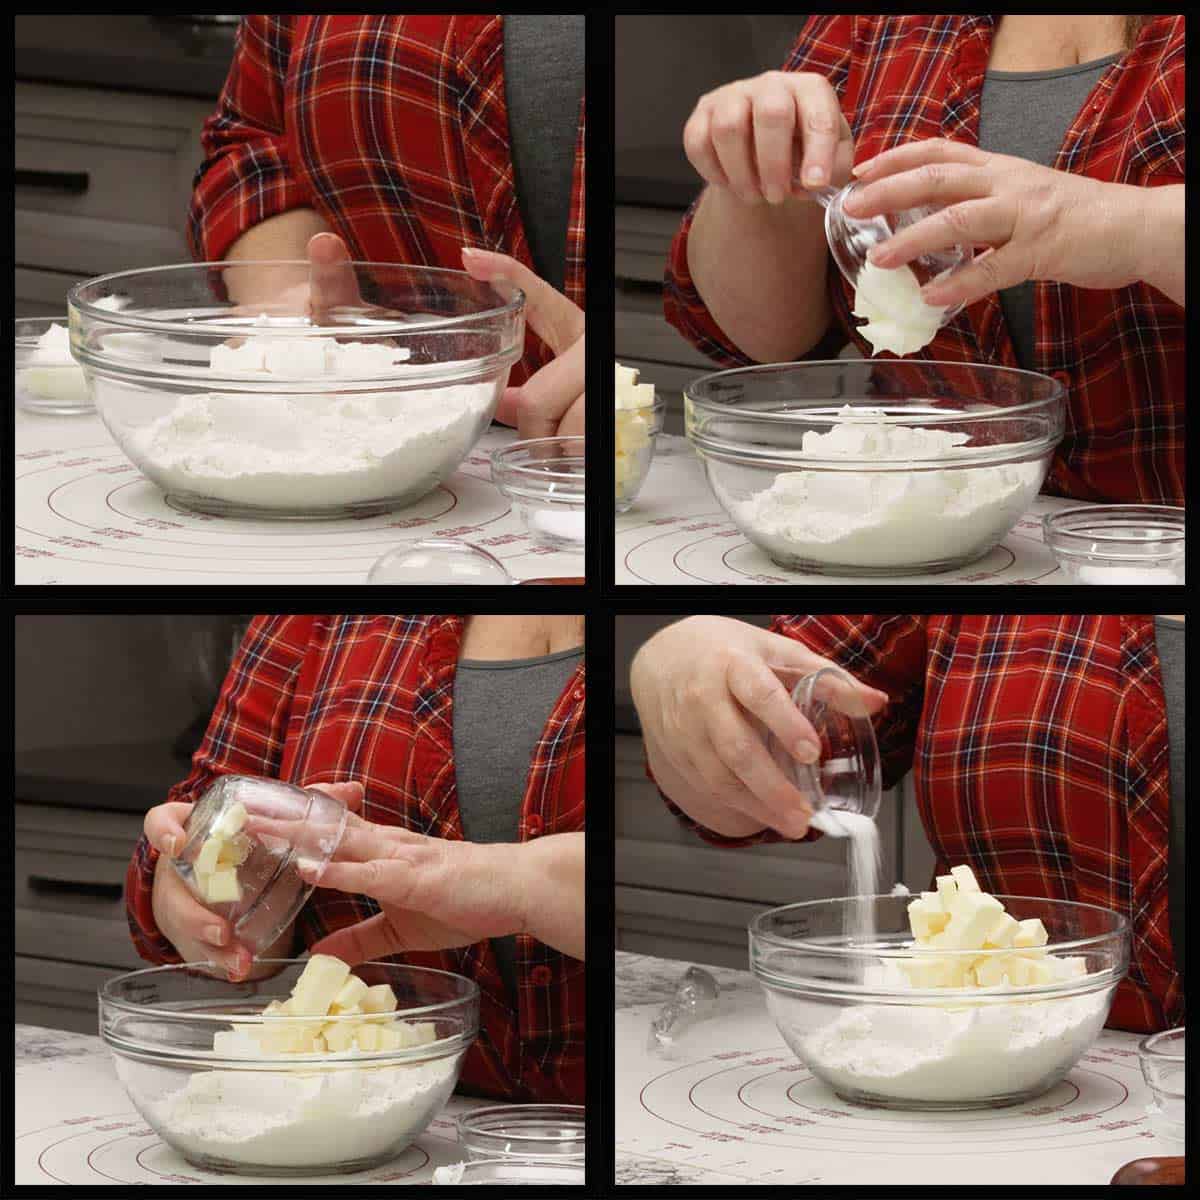
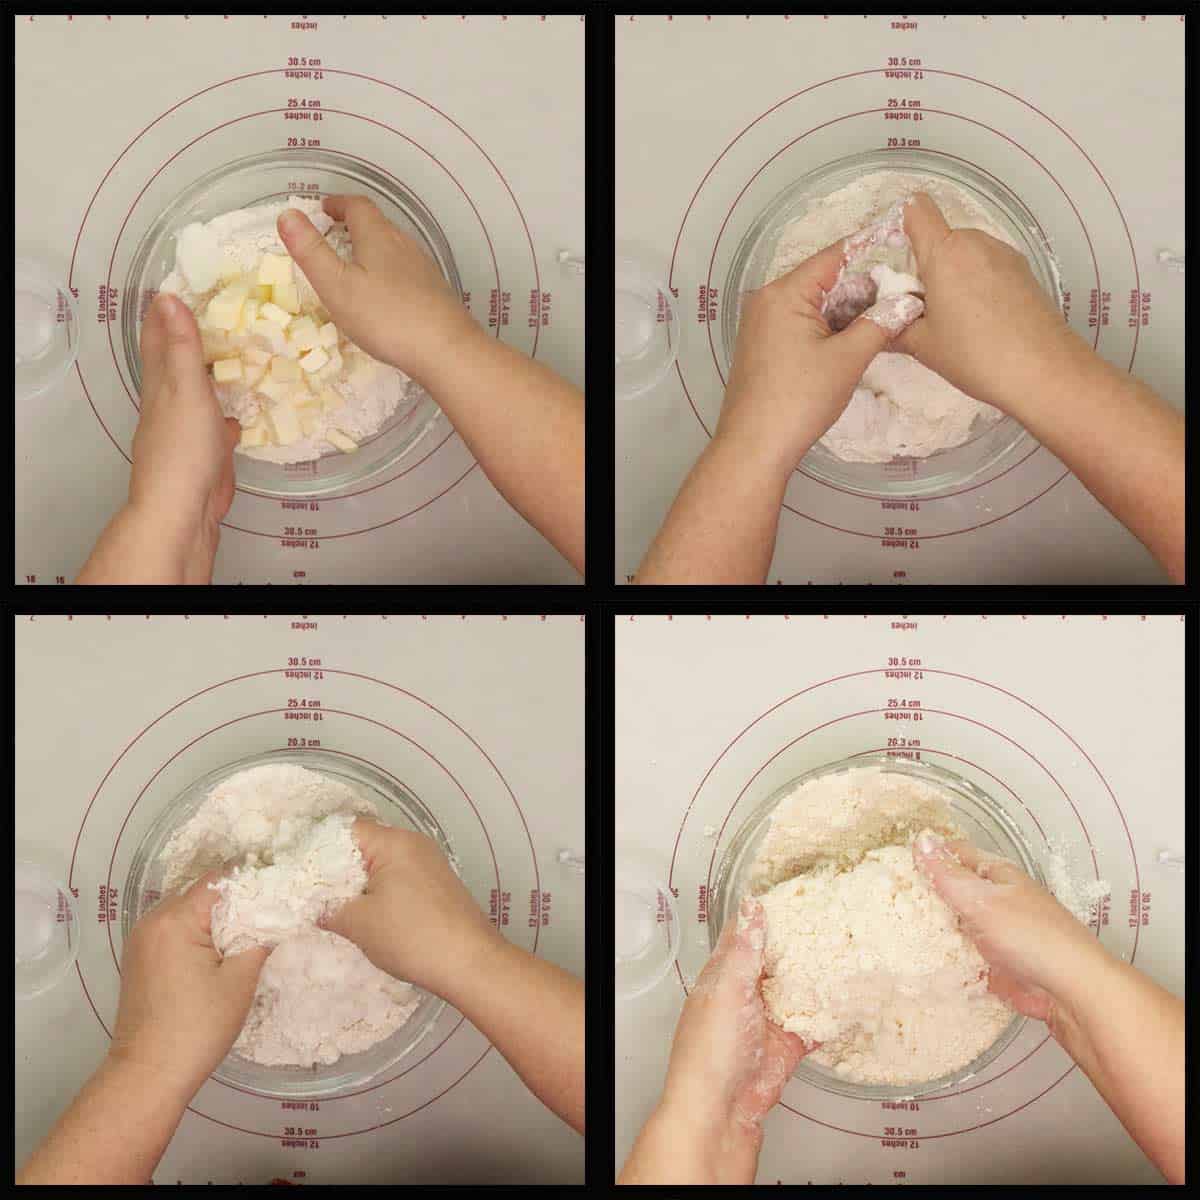
Once all the ingredients are in the bowl, toss everything together with your hands. This step coats the fat with the flour.
Then, begin breaking up the lard and butter into smaller pieces and toss again. If at any time you feel your butter is melting or getting too soft, cover the bowl and stick it in the refrigerator for 15-20 minutes.
You can use a food processor or a pastry blender or cutter, but I find it just as easy to use my fingers to create the small pebbles.
You are going to repeat this process until you have all of the fat combined with the flour and the mixture resembles a very coarse sand. The little pieces of flour and fat are even smaller than small pebbles.
If you prefer to watch me complete this step, you can watch the video lesson below.
Video Lesson
Combining Flour & Fat for Pastry Crust
Now it is time to hydrate the pastry crust and the amount of cold water you need to use will depend on several factors.
If you are using bread flour you will need a little more water than if you are using all purpose flour. If you live in a more humid environment, you may need less water than if you are in a very dry environment.
Usually, I need about 8-9 Tablespoons of cold water with my bread flour and 6-8 Tablespoons with all-purpose flour.
Start off by adding 4 Tablespoons and toss the flour around to hydrate it with the water. Then add 1 Tablespoon at a time until the dough can be pushed together and not crumble in your hands.
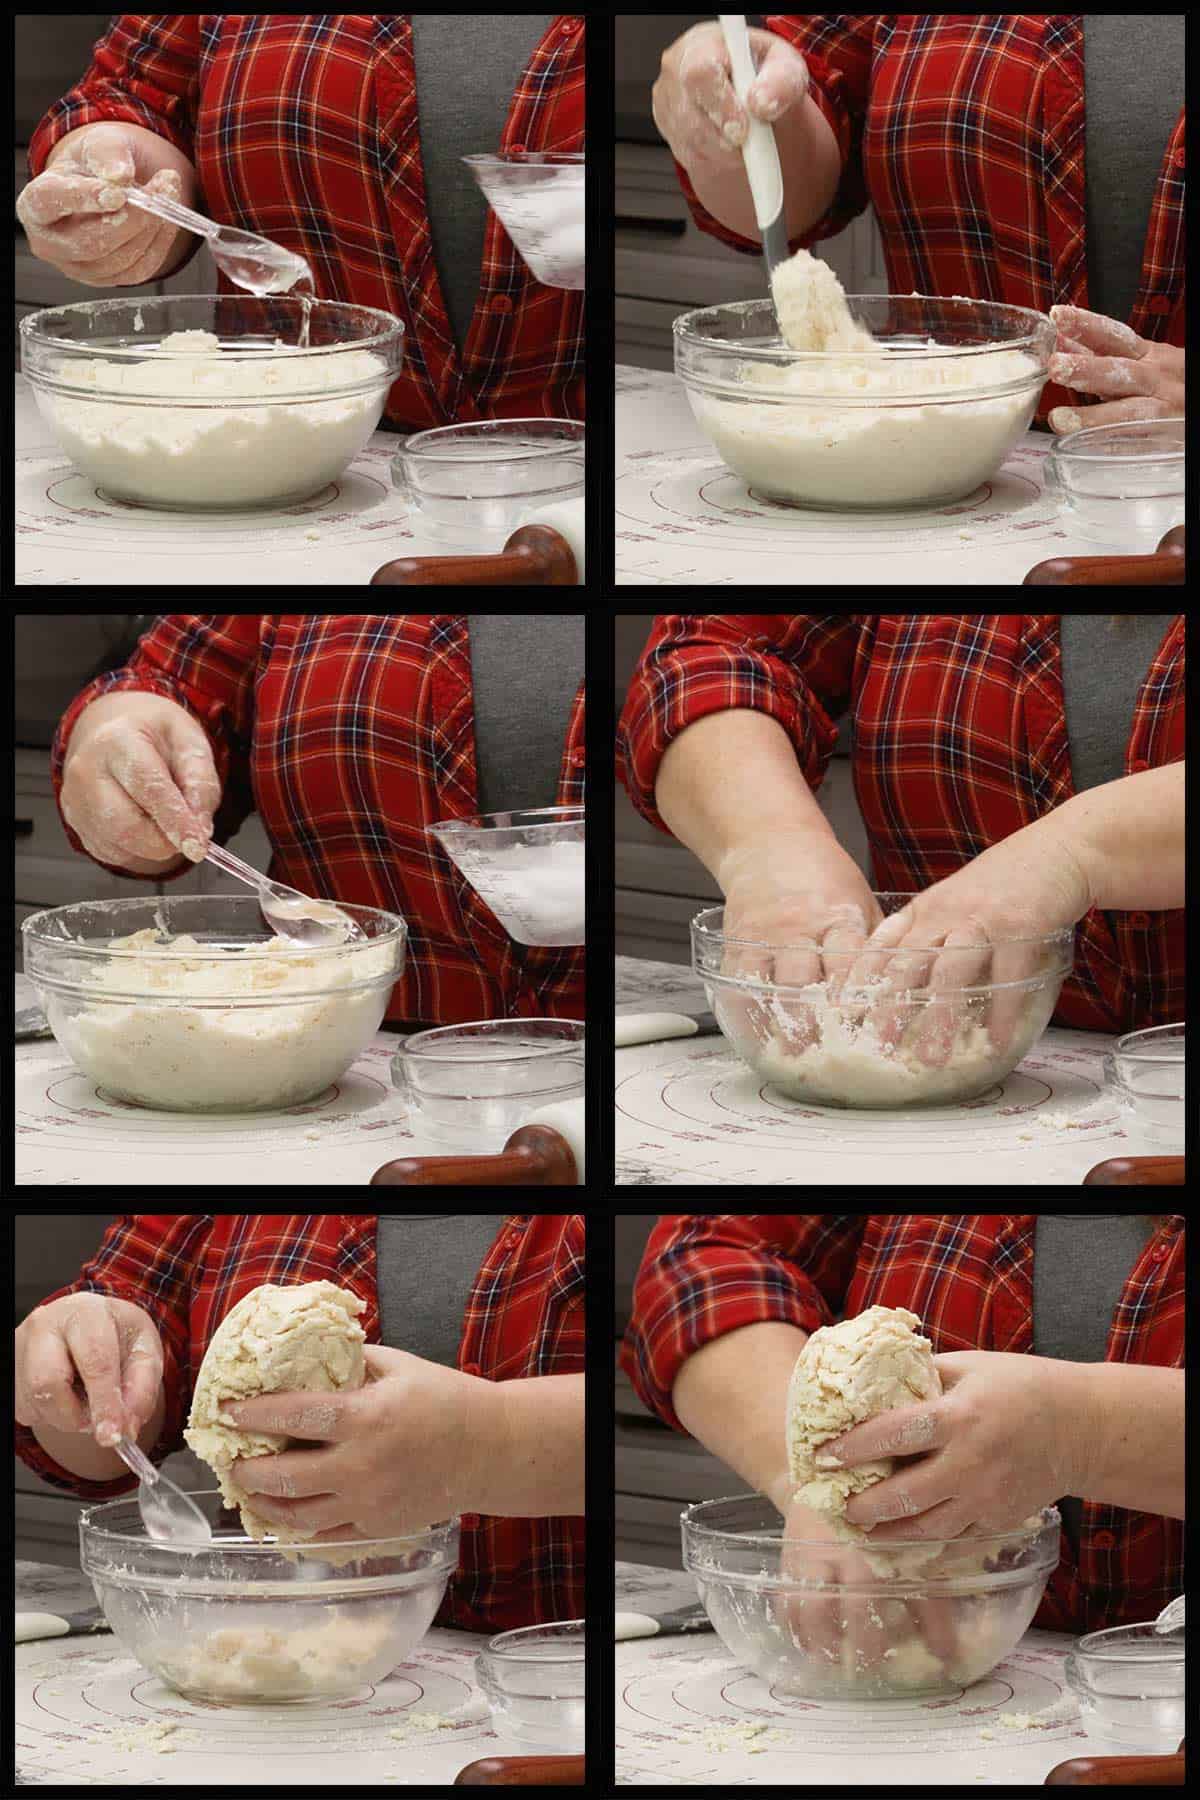
The pastry dough shouldn't be wet to touch and it's fine if doesn't all hold together at first.
Video Lesson
Hydrating Pastry Dough
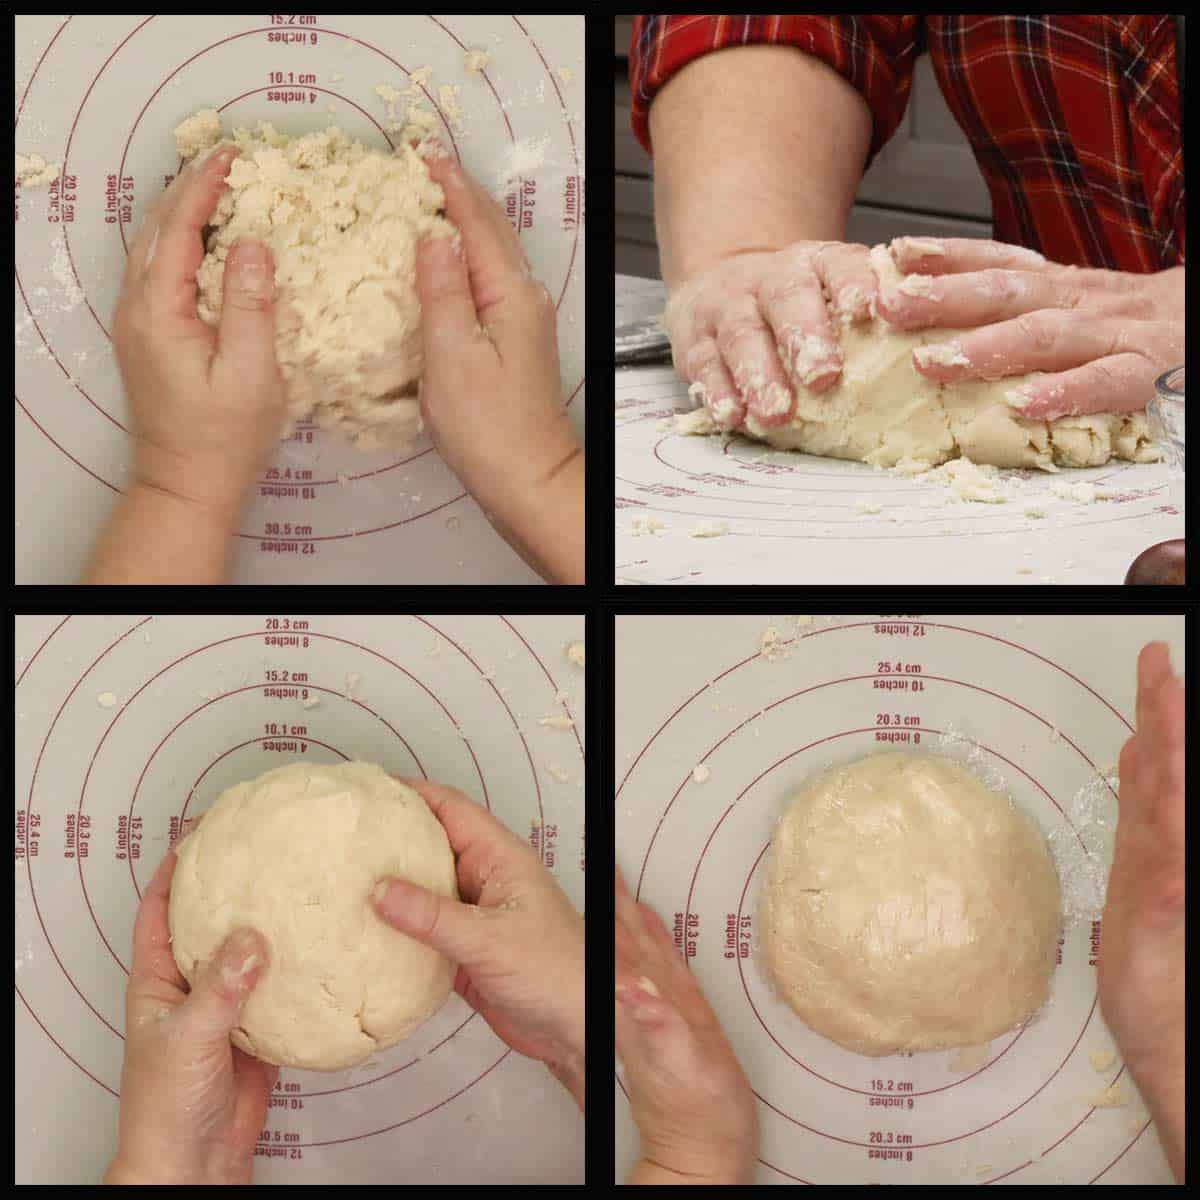
Place the dough onto a clean large work surface (you don't need to flour the surface). I love using my (affiliate link)Pampered Chef Pastry mat anytime I make pastry or dough that I need to work with because it gives a nice large surface to work on.
If the dough isn't staying together in a ball, use your hands to press it together and then flatten it into a disc. If the dough is crumbly at this point, you can add another tablespoon of cold water and work it into the dough.
Quick Tip
You can make and freeze the pastry dough for up to 2 months as long as it is wrapped well in plastic wrap, and then I recommend wrapping it in aluminum foil and placing it into a freezer bag.
Flatten the dough into a disc and wrap in plastic wrap. Put the dough in the refrigerator for a minimum of 30 minutes. The dough will stay fresh in the fridge for up to 2 days.
Video Lesson
Forming the dough into a disc before chilling
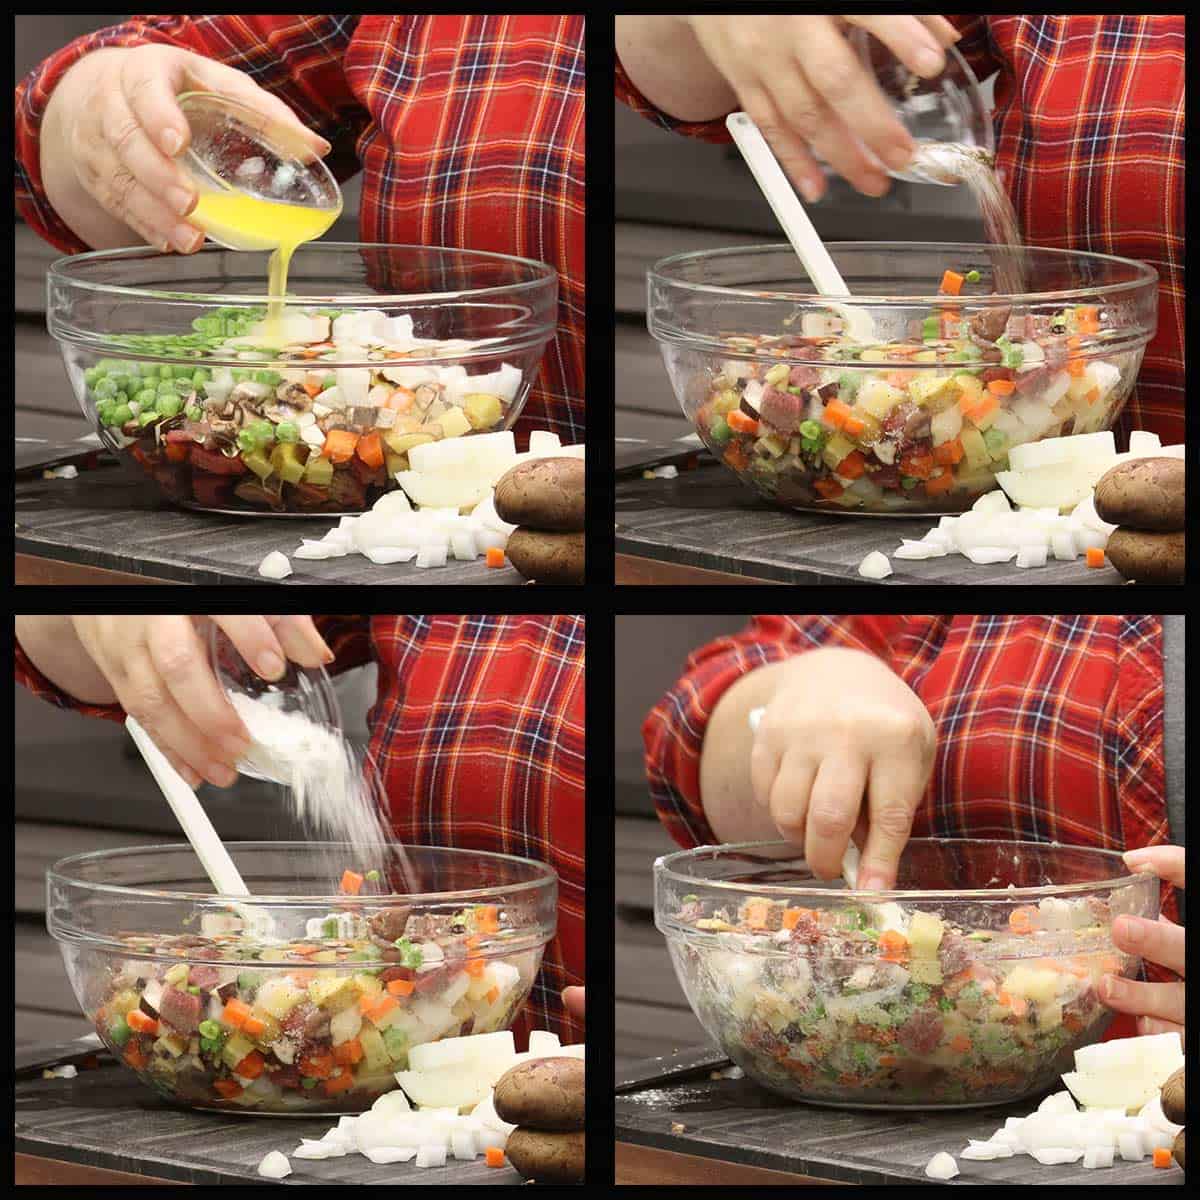
Prepare the Filling
While the dough is chilling, prepare the filling if you are making the hand pies right away. You don't want to prepare the filling more than a few hours in advance of baking for the best results.
The filling goes into the hand pies without being cooked, and I realize this may be concerning to some. Please don't worry; everything cooks perfectly right inside the crust, and the temperature of the meat and everything else is way above food safety standards.
- Trim any gristle or connective tissue from the sirloin and cube it into ½" pieces. Leaving some fat on the meat is perfectly fine. It will render during the cooking process and help to create the gravy. Place the cubed meat into a large mixing bowl.
- Cut the mushrooms into ½" dice and add to the bowl with the meat.
- Cut a slice off of the peeled carrot to create a flat surface and then cut planks that are about ¼-½" thick. Cut those planks into sticks and then into dices so you have ¼-½" dice.
- Cut the potato the same way as the carrot. I don't peel my potatoes, but you can if you want.

Video Lesson
Cutting Vegetables for Hand Pies
Add all the ingredients to the large mixing bowl. You should have 4½ cups of filling total.
Add the melted butter, seasonings, and flour to the mixture and stir to combine. The melted butter and flour bind with the juices of the vegetables and meat during the cooking process and creates a gravy of sorts. This is optional though and you can simply season the mixture without adding the butter and flour.
The gravy isn't thick like you would make stovetop, but I enjoyed the meat pies with the addition of butter and flour.
Video Lesson
Adding Butter, Seasonings, and Flour
Assemble the Savory Hand Pies
Now we are ready to roll out the pastry dough, fill our pies, and crimp those edges!
Quick Tip
If your pastry dough is frozen, make sure to let it thaw for at least 2 hours at room temp or overnight in the refrigerator before rolling it out.
Remove the dough from the plastic wrap and divide it into 6 equal sections. Wrap all but one piece of dough in the plastic wrap.
You can weigh the dough and divide by 6 to get your weight for each of the 6 pieces, but I usually eyeball it instead. If you have a smaller piece of dough and realize it when you roll it out, just use a little less filling.
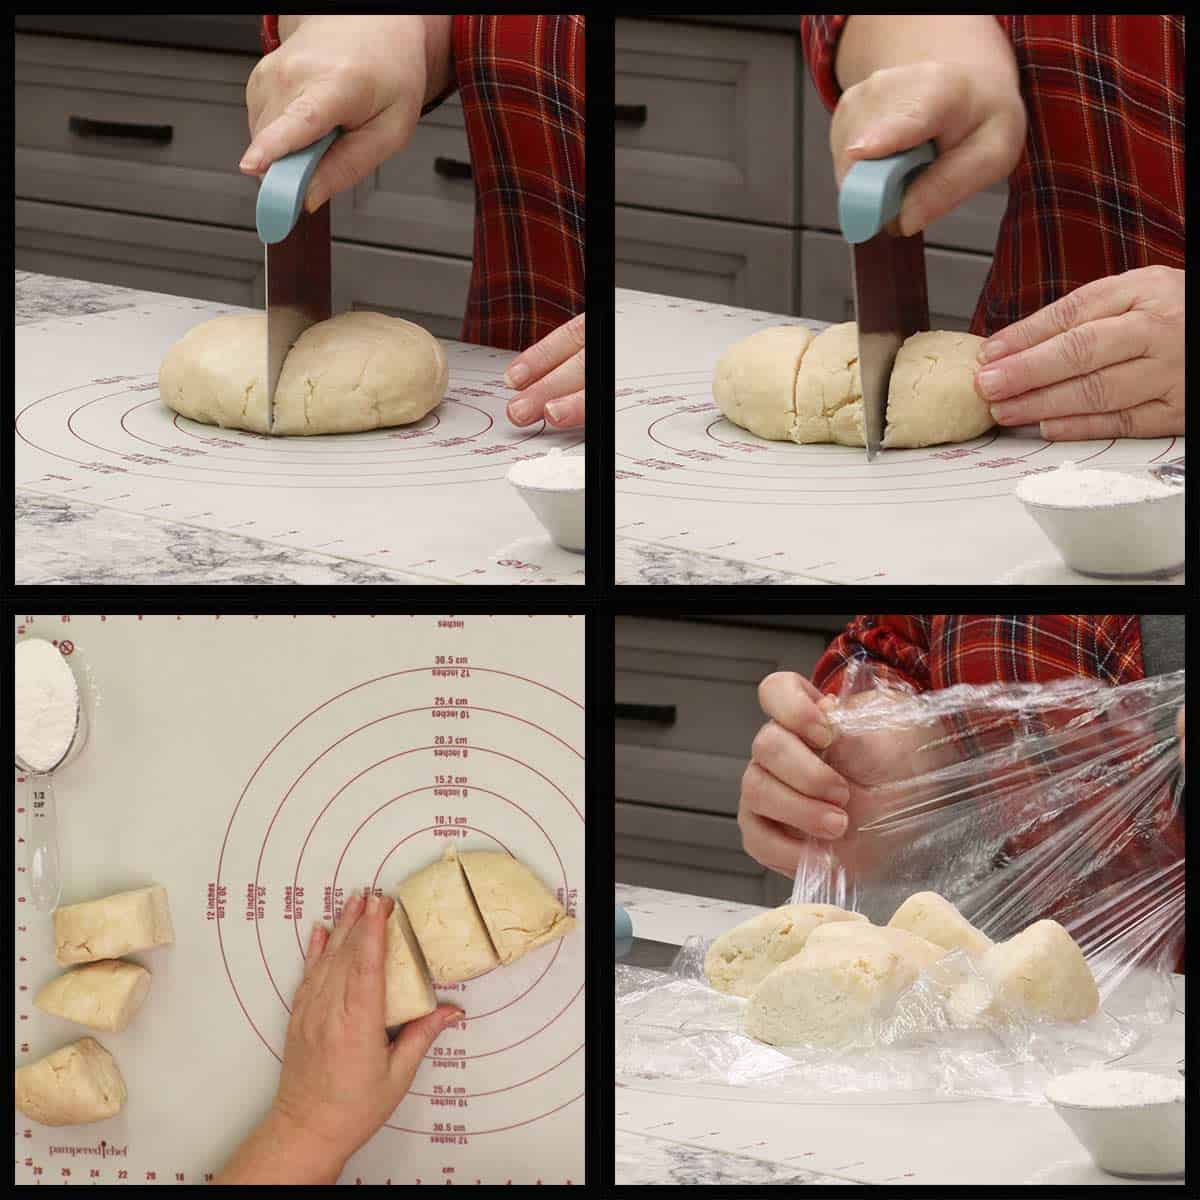
Form one of the six pieces of dough into a round disc and lightly flour your work surface. You will also want to flour the top of the dough lightly.
It's important that the rolling pin doesn't stick to the dough and that the dough doesn't stick to the work surface. You will want to flip the dough frequently and add more flour as needed.
Roll the dough out into an oval that is about 10" in diameter. I realize an oval is not going to be exactly 10", but I found that having more dough on the top and bottom and a little less on the sides made it easier to fill and crimp the hand pies. So from top to bottom, aim for 10" and side to side, 8-9" is fine.
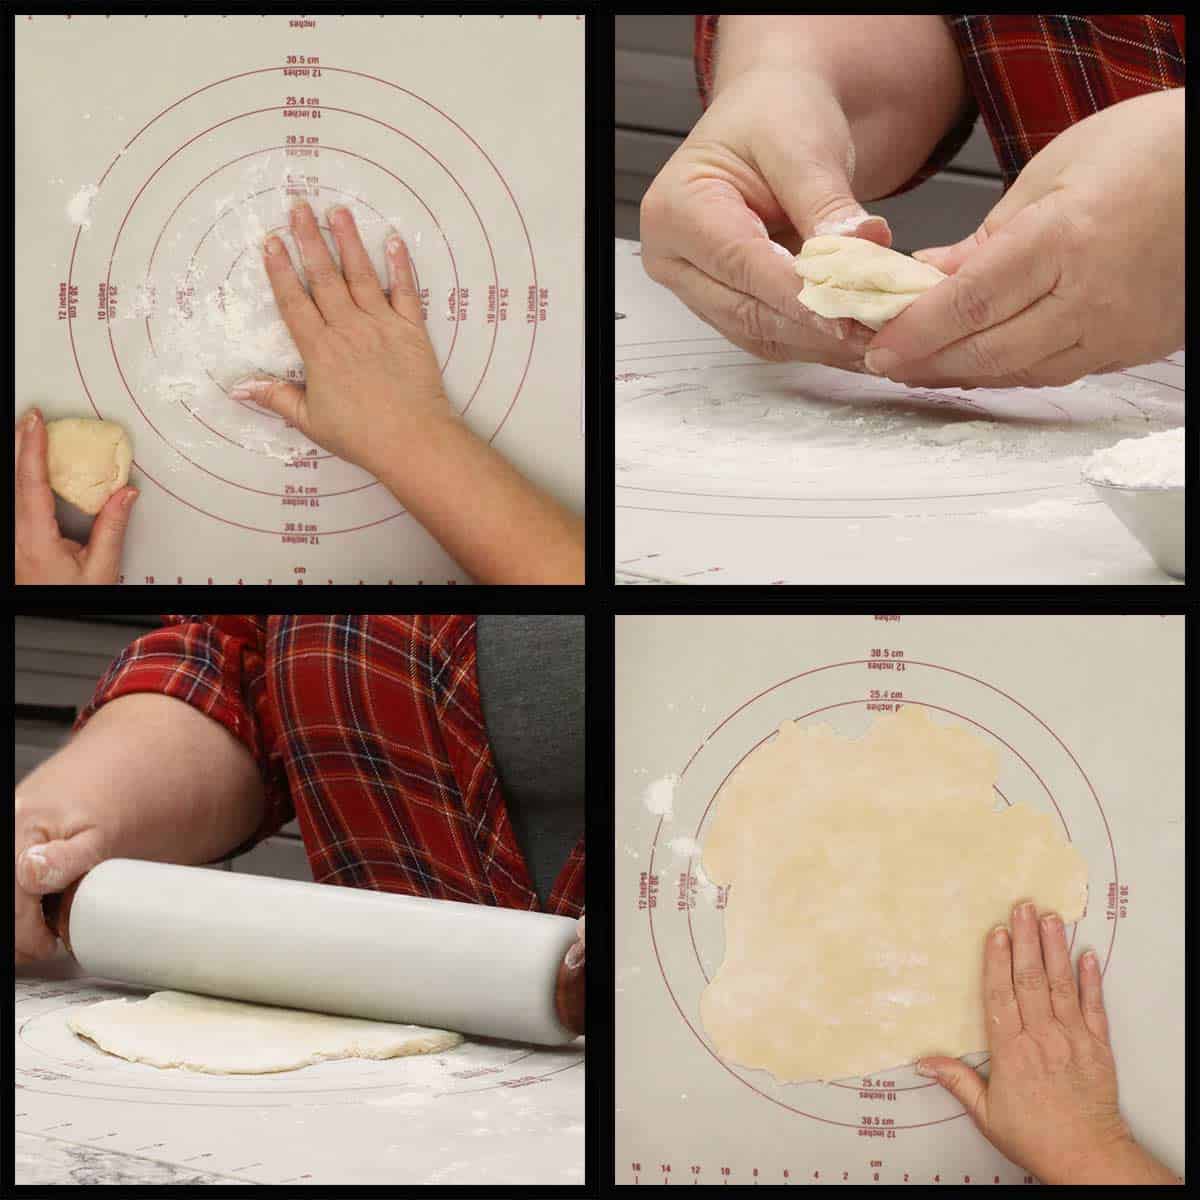
Don't worry too much if the edges aren't even, it all works out just fine. In the picture above I could have rolled it just a tad bigger from top to bottom.
Video Lesson
Rolling out dough
I like to fill and crimp each hand pie as I roll out the dough, but you can work in an assembly line fashion and roll out all 6 pieces of dough and then fill and crimp them. Whatever works best for you is fine.
Place about ¾ cup of the filling just slightly closer to you than the center of the dough. You need enough dough on top to be able to pull it over the filling and still seal the edges.
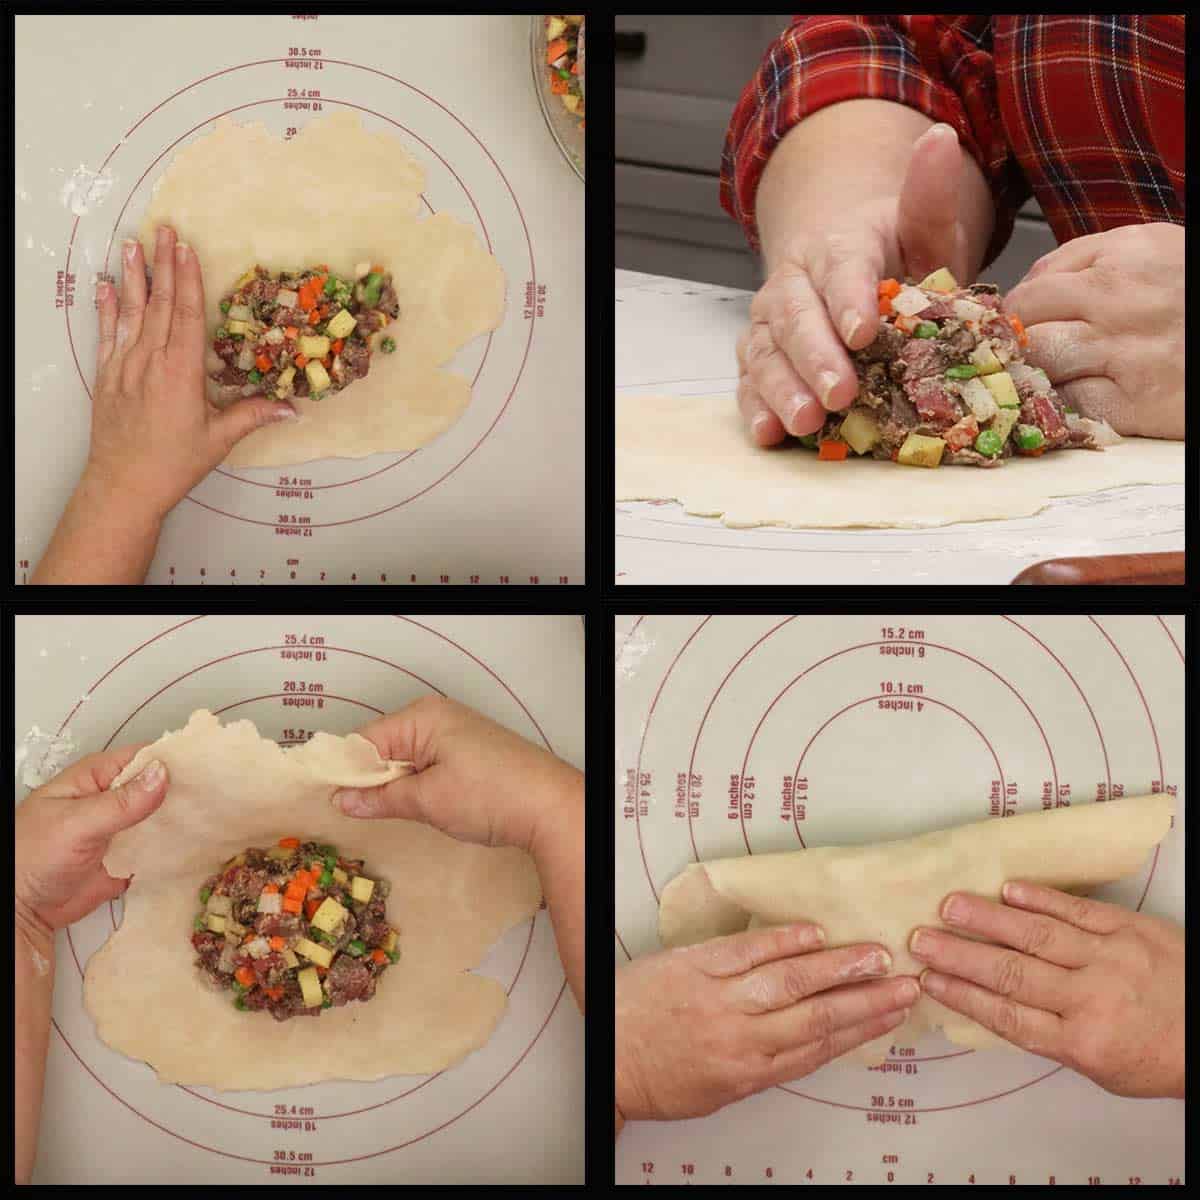
If the filling starts to fall out, just push it back together so you can seal the pastry crust. You should have a nice big mound of filling right in the middle with enough of an edge all around it to create a good seal.
I don't use egg wash or water to seal my pies because I found that it made things more difficult but feel free to try it that way if you like.
What I do is use the edge of my hands to go around the mound of filling and press the dough together right where the filling ends and press it all the way to the edge.
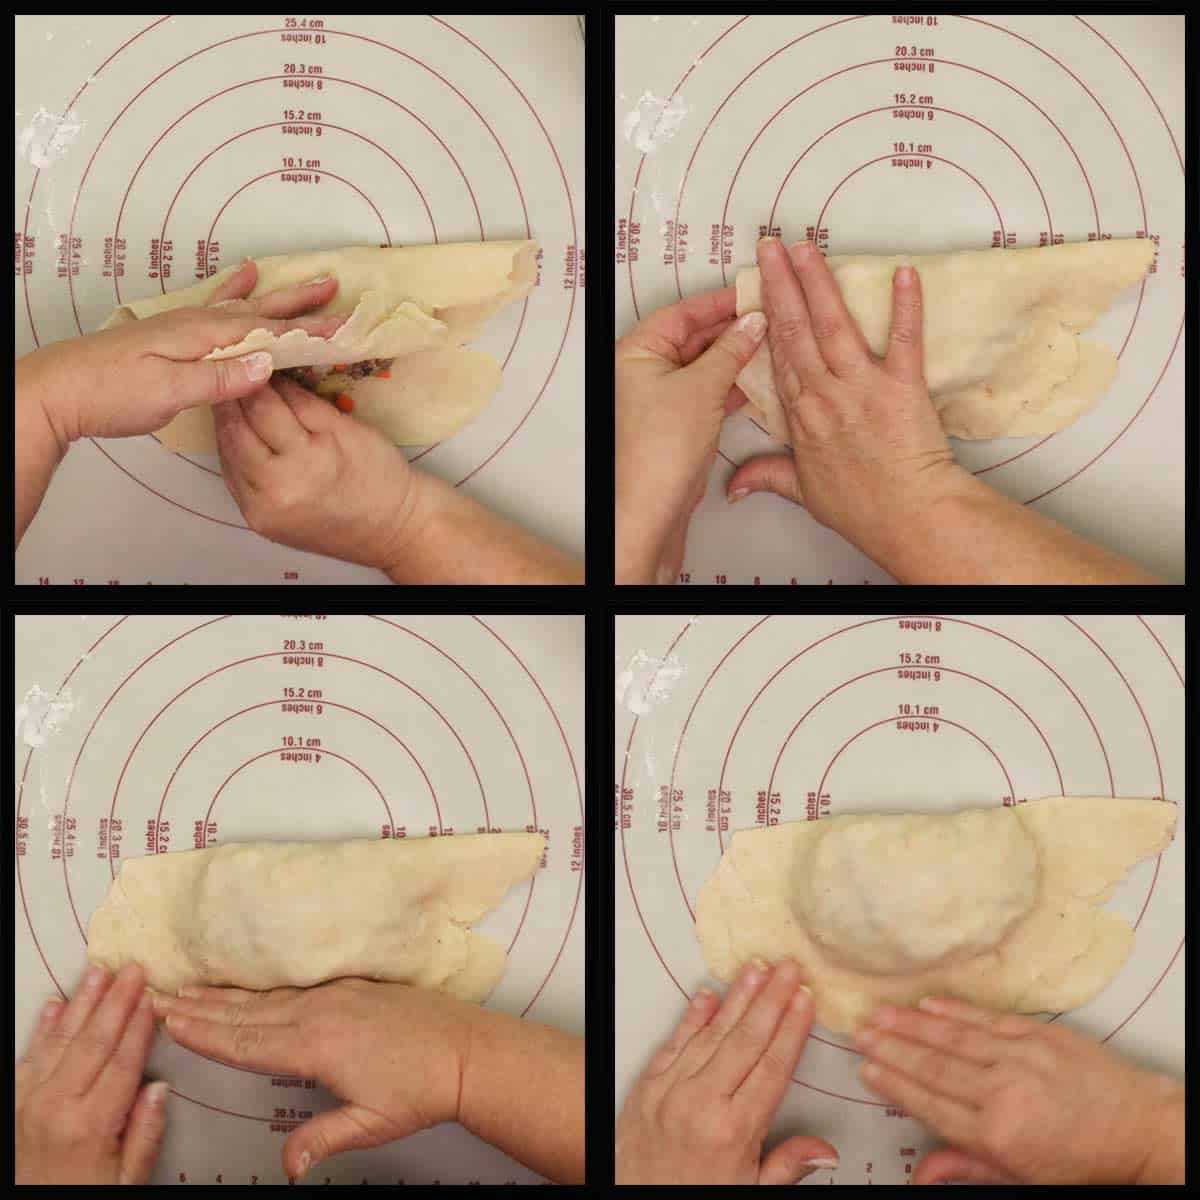
Trim the edges to tidy them up, but leave about 2" on the right and left and 2-3" on the rounded side closest to you, if possible. I didn't have enough dough in the picture above to do that, and I ran into a little trouble when I went to crimp the edges. It all worked out though, so don't worry too much about it.
Video Lesson
Filling and sealing pastry crust
Let me first say that you do not have to crimp your edges like I did. You can use a fork to make marks along the edge to help make sure the crust is sealed.
After many failed attempts at crimping the edges, I found a technique that works great for me and I hope it works for you as well!
You probably won't do it perfectly the first time, but it gets easier and easier and by the sixth one you will have it down!
Lightly flour the surface under the hand pie so you can turn it easily as you crimp the edges.
Place your thumb beside the filling at the top right (or left if that is easier for you) and with the other hand pull the dough up and over your thumb. Remove your thumb and press down without changing the position of your other hand.
Put your thumb on the place you just pressed down and with your other hand repeat the same thing. Continue to do this until the entire edge is crimped all the way around the hand pie.
I like to rotate the pastry crust so I am always working from the same angle, but do what is most comfortable for you.
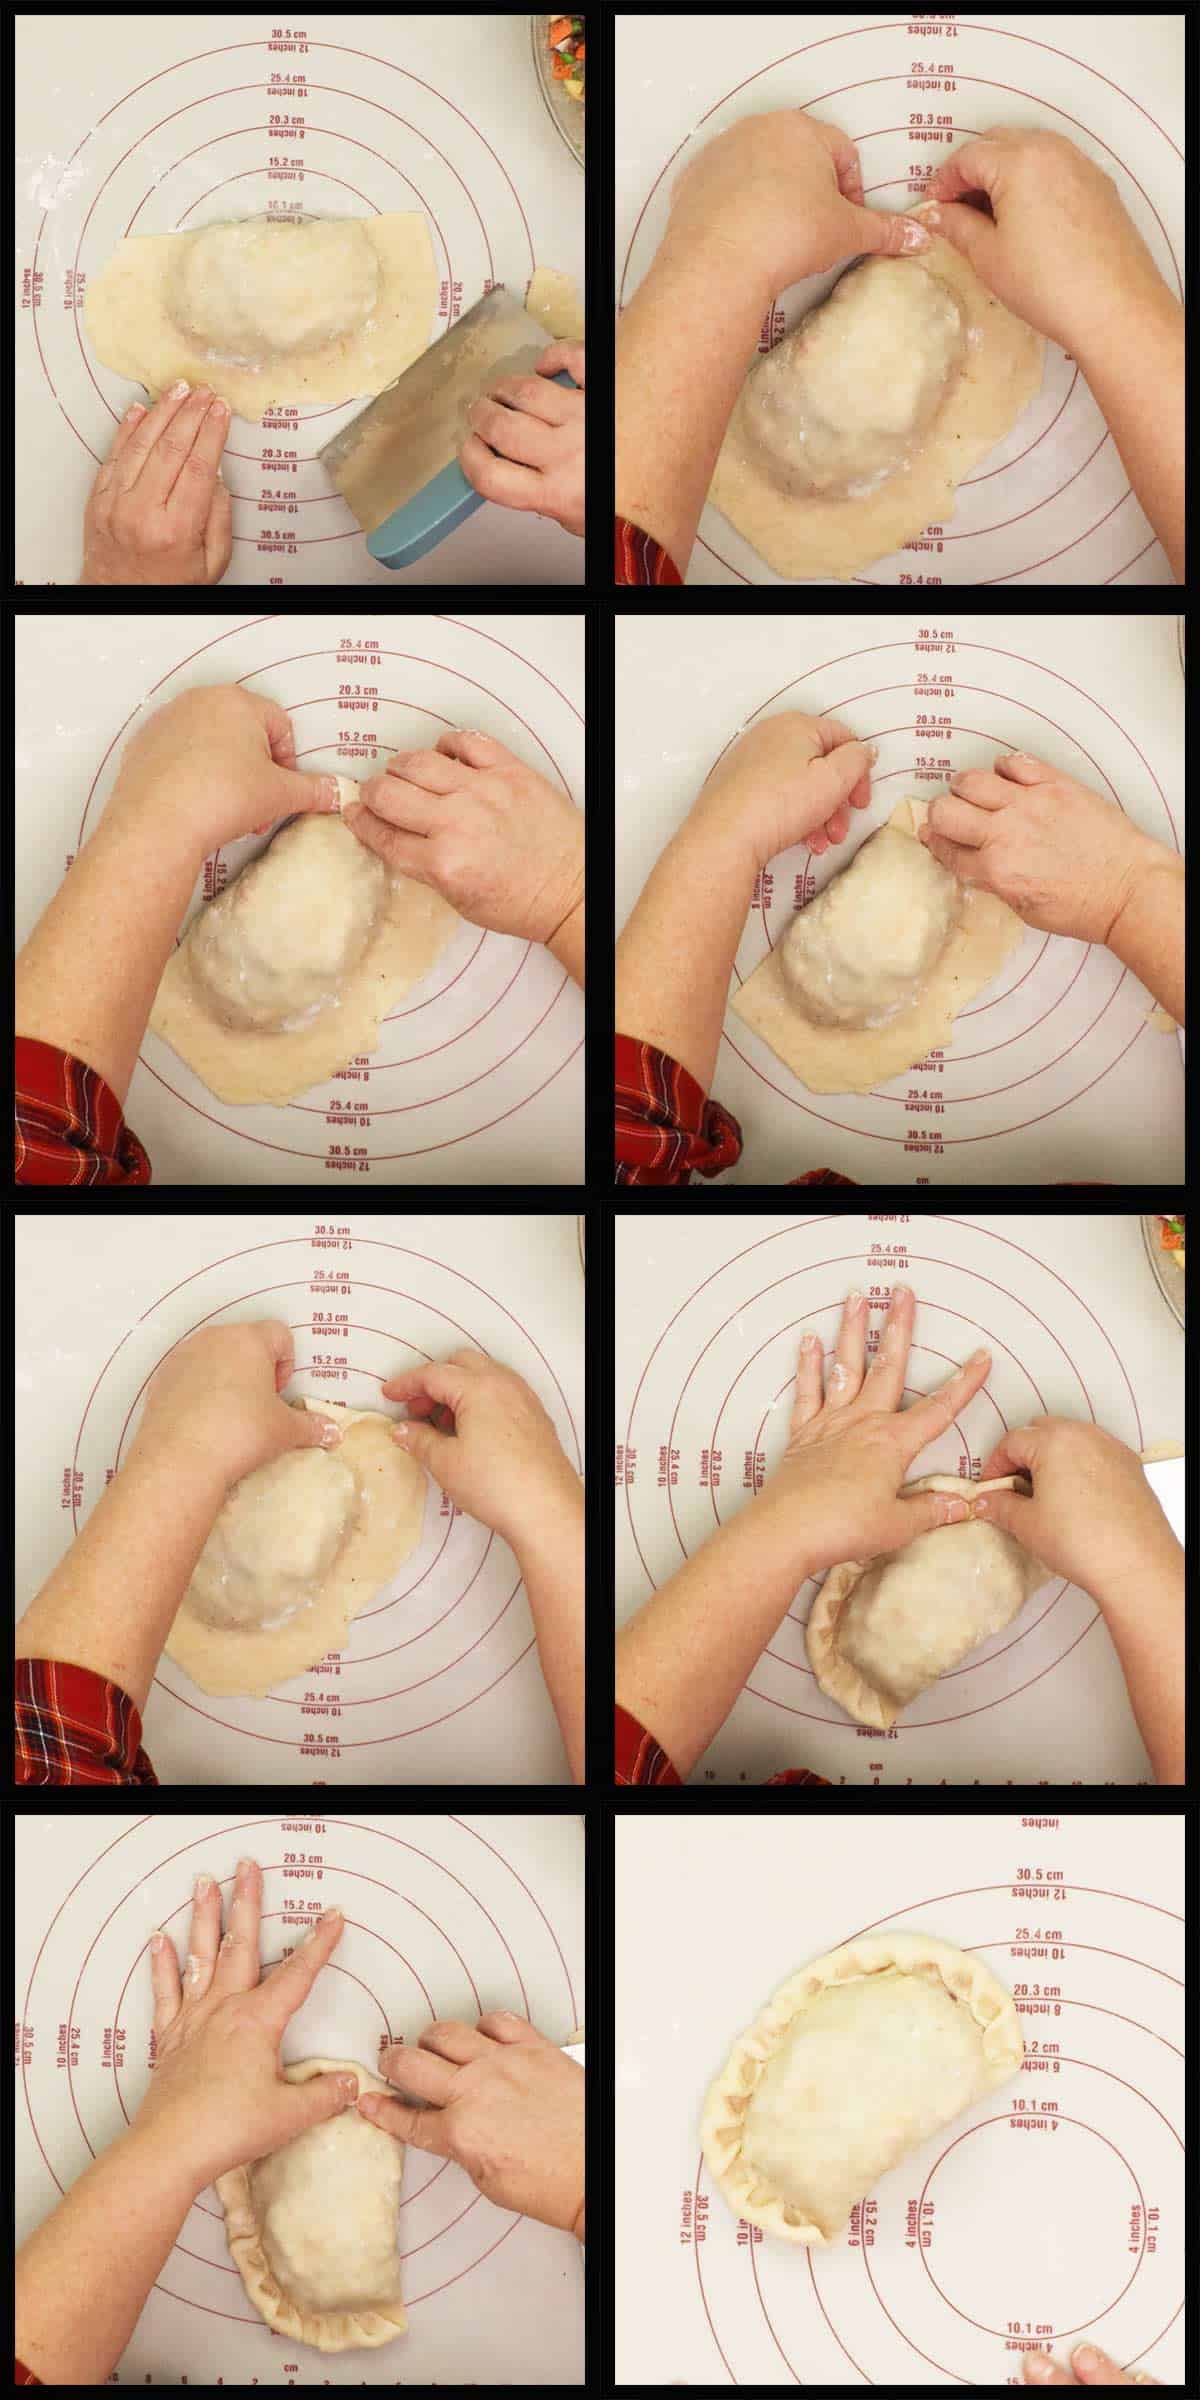
Repeat that for all 6 of the hand pies and let's get them in to bake!
Video Lesson
Crimping the Edges of the Hand Pie
Baking Instructions
There are several ways you can cook your hand pies so don't worry if you don't have any special appliance, you can simply use your oven
My favorite way to cook the Savory Hand Pies is in the Ninja Combi using the Combi Crisp function. I have tested this recipe in the oven, using two different air fryers, and using the Ninja Foodi steam/crisp function and still the Combi is just a step ahead of the other because it evenly browns top to bottom and you can set the time/temp and forget about it until it's done.
I am going to give you all the different cooking methods, so pick whichever one fits you best.
If you want to air fry the hand pies, I recommend using an egg wash first. This will keep the crust nice and shiny and golden brown. When I didn't use it before air frying, the crust took on a dull appearance.
The egg wash is optional in the oven and definitely not needed if you are using a steam/crisp function on the Ninja Foodi or Speedi or the Combi Crisp function on the Ninja Combi.
Egg Wash Instructions
In a small bowl combine 1 large egg with 2 Tablespoons of water and whisk until combined. Use a pastry brush to brush the egg wash on top of the hand pies.
Oven Directions
- Preheat the oven to 375℉/190℃. Place the hand pies on a parchment lined tray. You can brush the crust with an egg wash if desired.
- Place 1-3 slits in the top of the hand pie to release steam.
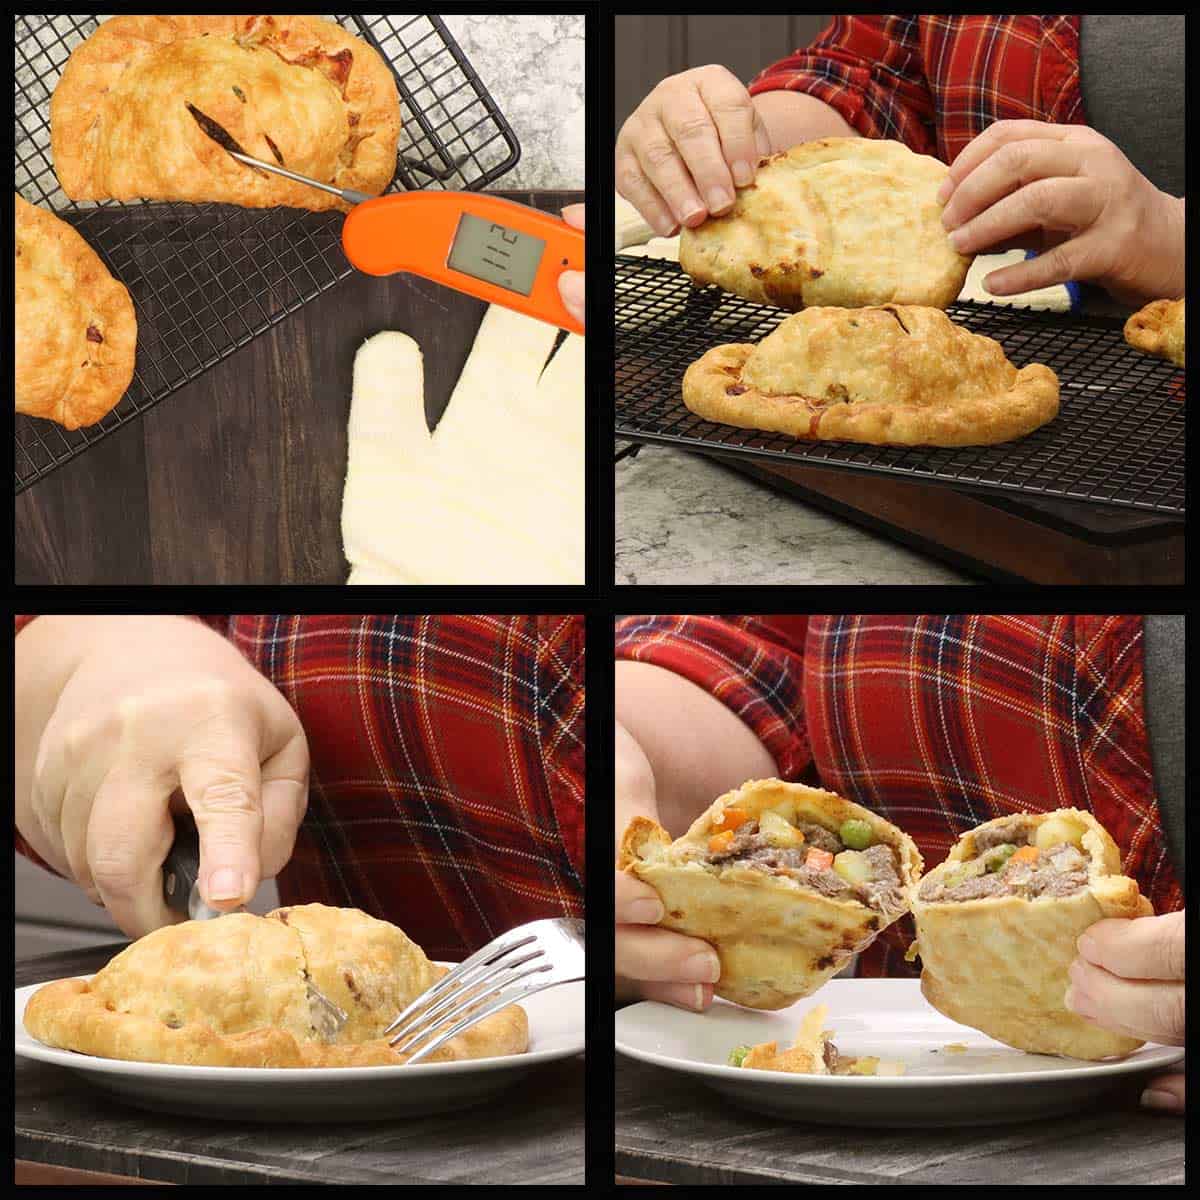
- Bake at 375℉/190℃ for 40-45 minutes or until the crust is golden brown and the filling is around 200℉/93℃.
- Remove from the oven and allow to cool on a cooling rack.These are best when they sit about 15 minutes before serving. Enjoy!
Air Fryer Directions
- Preheat the air fryer on 350℉/175℃ for 10 minutes with the crisping plate or basket inside the appliance.
- Brush the tops of each hand pie that you are cooking with egg wash and make one slit in the top to allow steam to escape.
- Cut a piece of parchment that fits under the hand pie without excess around the sides.
- Air Fry on 350℉/175℃ for 35-40 minutes or until the crust is golden brown and the filling temp is around 200℉/93℃.
- Remove from the air fryer and allow to cool for at least 15 minutes on a cooling rack.
- Depending on the size of your air fryer, you may need to air fry in batches.
Ninja Speedi or Ninja Foodi using Steam/Crisp Function
- Place ¼ cup of water in the inner pot of the Speedi/Foodi.
- Use the rack in low on the Speedi and the basket or crisping plate in the Foodi.
- You do not need an egg wash when using steam/crisp.
- Place the hand pies on a piece of parchment paper cut to fit. You don't want any excess around the edges or it folds over and impedes the crisping.
- Cut 1-3 slits in the top of each hand pie to allow the steam to release.
- Place the hand pies in the Speedi or Foodi. Select the steam/crisp function and set the temperature to 350℉/175℃ and the time for 30 minutes. Press start.
- Flip the hand pies over after about 20-25 minutes of the countdown to allow the bottom to crisp up.
- They are done when the pastry crust is golden brown and the filling is around 200℉/93℃. Remove and allow to cool at least 15 minutes before serving. Enjoy!
Ninja Combi Instructions
- Place ¼ cup of water in the combi pan. Place the rack into the combi pan.
- Cut 1-3 slits in the top of each hand pie. Place the hand pies on a piece of parchment paper cut to fit. You don't want any excess around the edges or it folds over and impedes the crisping.
- Place the Combi pan into the Combi and close the door. Select Combi Crisp and set the temperature to 350℉/175℃ and the time for 30 minutes.
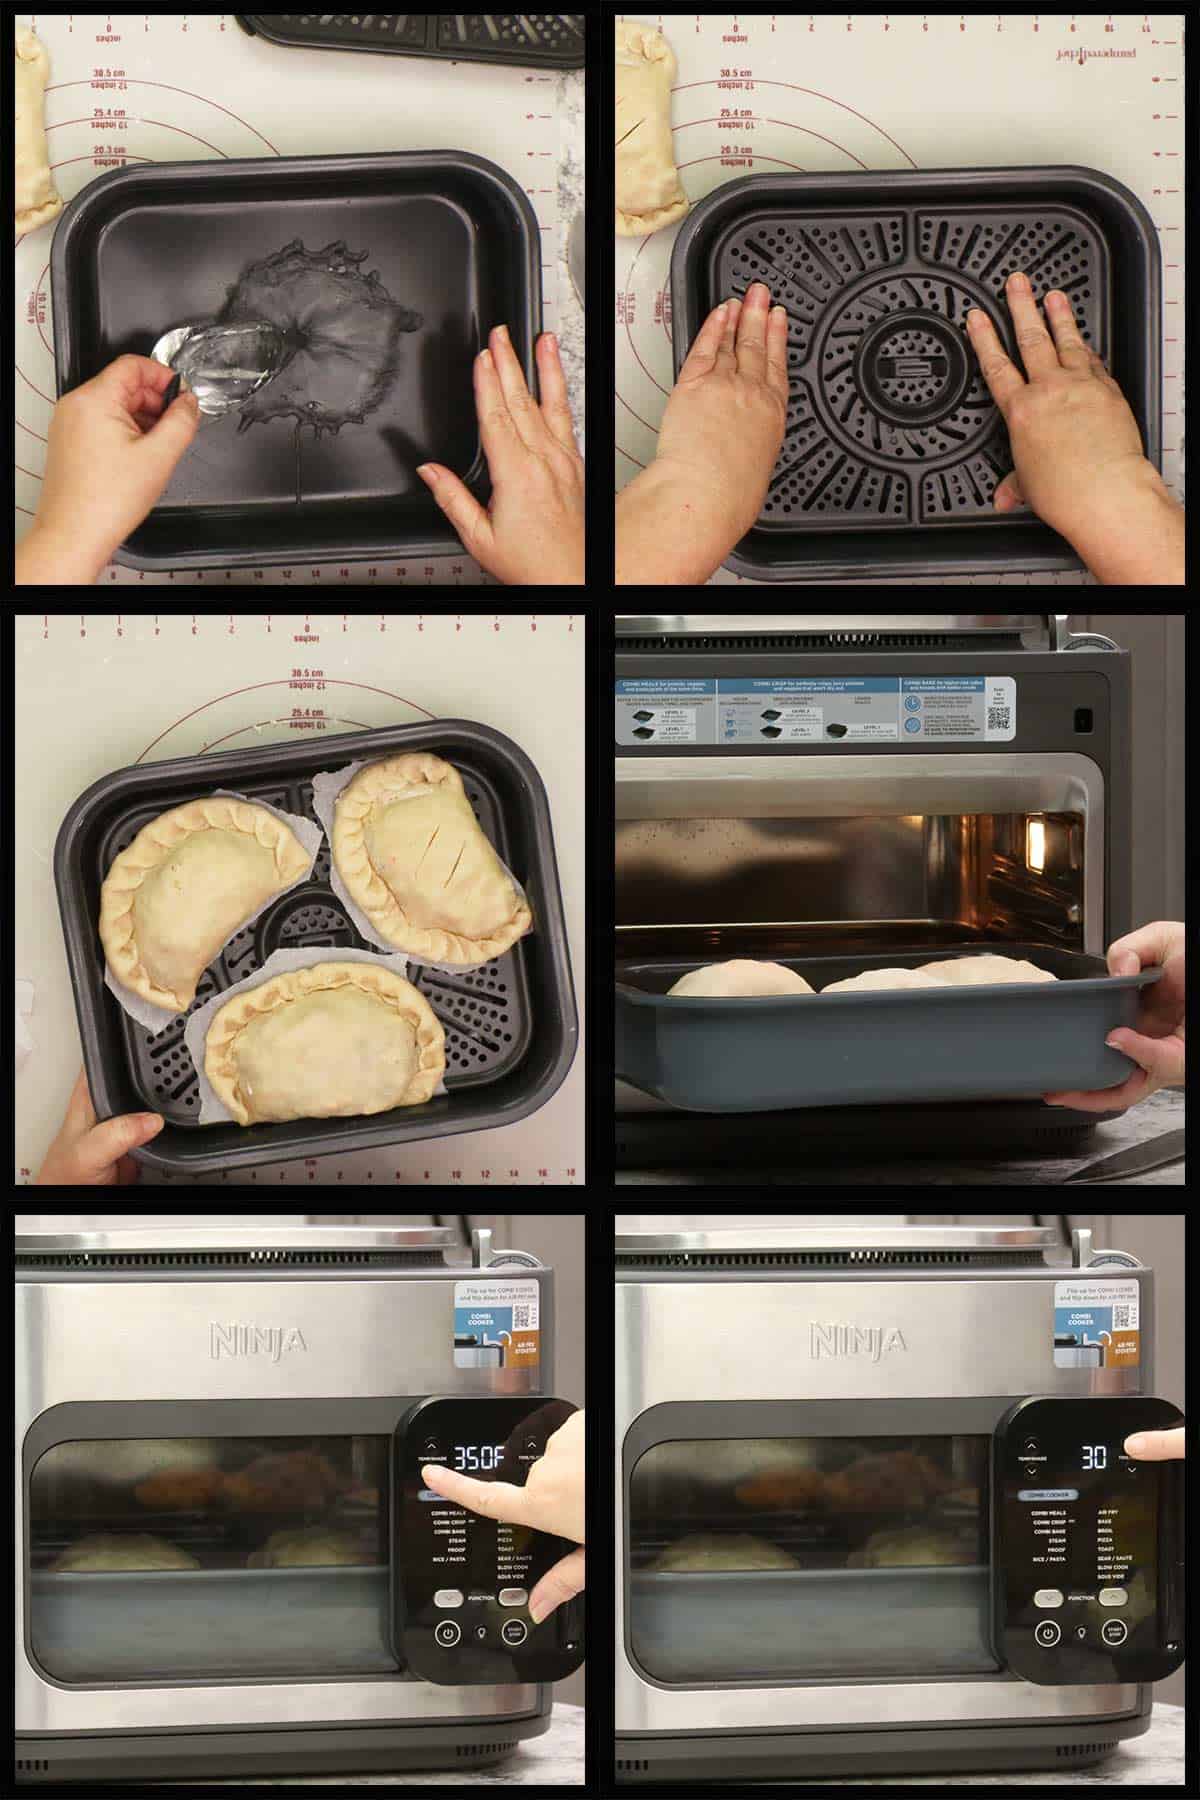
- The preheat is about 3-5 minutes and this is when the steam will be produced. Then it will switch over to dry heat only and you will see the steam disapate within 5-10 minutes.
- They are done when the pastry crust is golden brown and the filling is around 200℉/93℃. Remove and allow to cool at least 15 minutes before serving. Enjoy!
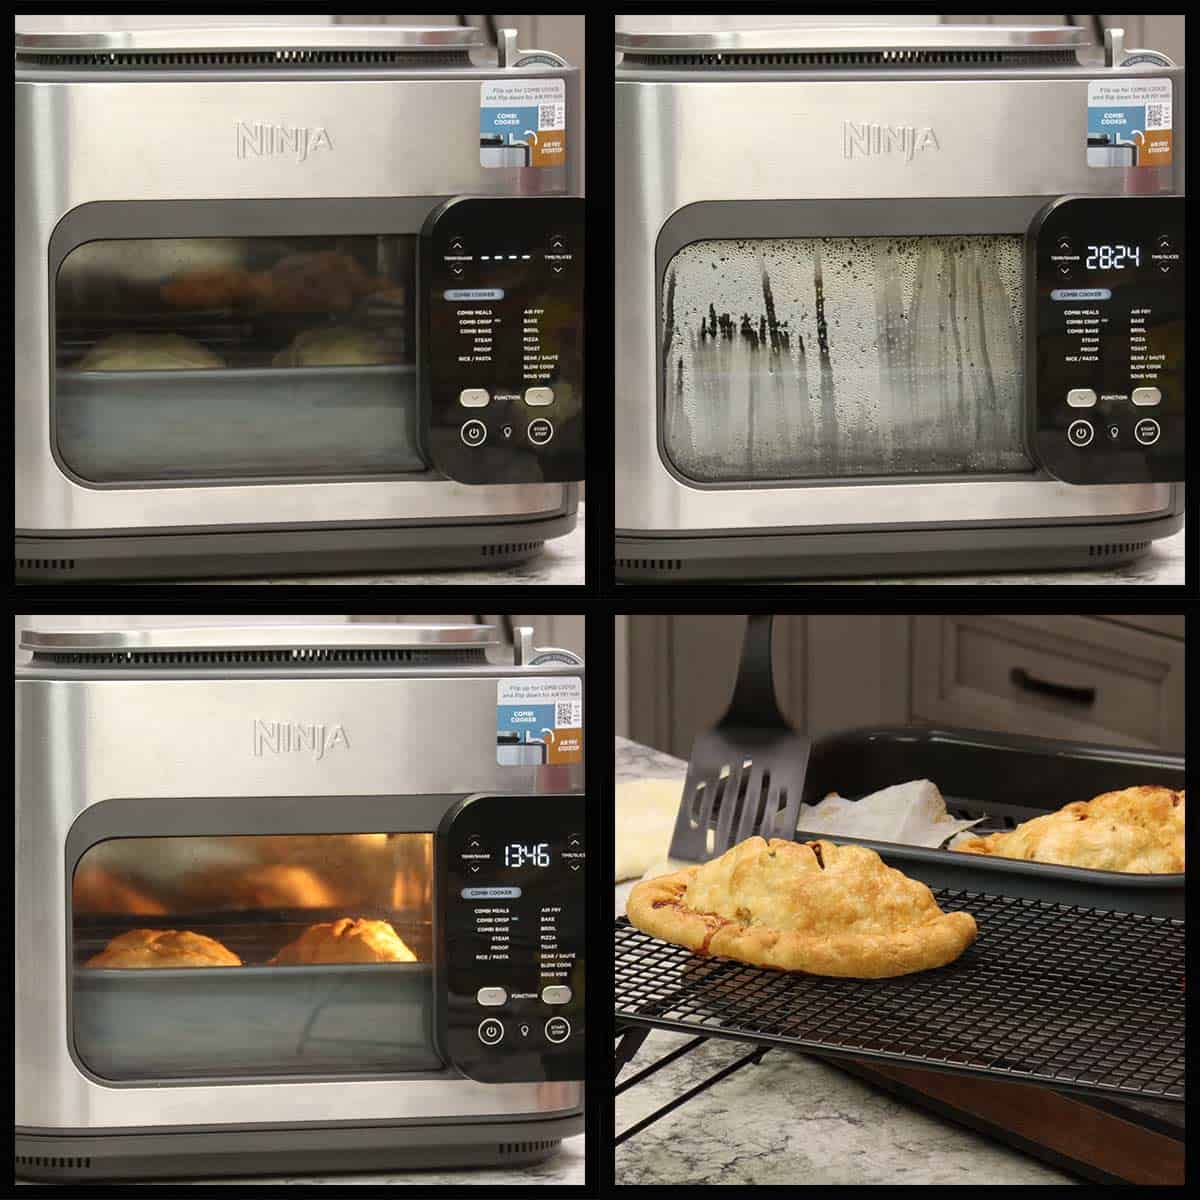
No matter how you cook these hand pies, they are delicious!
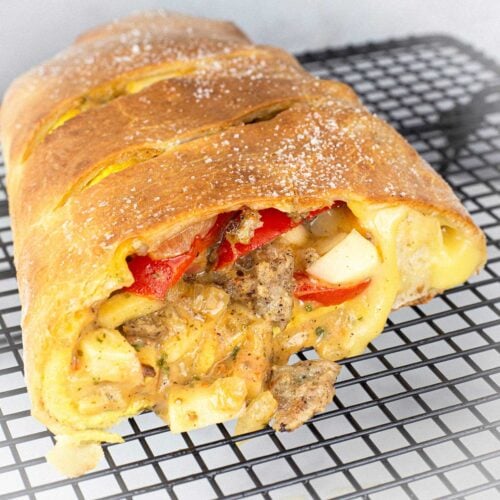
Variations of Hand Pies
There are so many variations of Savory Hand Pies you can make just by changing the filling.
Taco Hand Pies: use sirloin or ground beef, black beans, onions, drained diced tomatoes, shredded cheese, and taco seasoning
Pizza Hand Pies: You could either follow my Calzone recipe or use this pastry crust recipe and fillings like pepperoni, marinara sauce (no more than ¼ cup in the filling, but having extra for dipping would be great), parmesan cheese, mozzarella cheese, onions, or any pizza toppings you love. These would be kind of like pizza hot pockets.
Cheesesteak Hand Pies: Use thinly sliced ribeye, onions, green peppers, and whatever cheeses you love.
Chicken or Turkey Hand Pies: Substitute the sirloin for cubes of raw or leftover cooked chicken or turkey to make individual chicken or turkey pot pies.
Ham Hand Pies: Use leftover cubed ham and pair it with vegetables for a ham pot pie type of hand pie or use cheese for a ham and cheese hot pocket.
Storage & Reheating Instructions
How to Store Leftover Hand Pies
Refrigeration
Once the hand pies are completely cool, you can wrap them in plastic wrap or aluminum foil or place them in an airtight container and refrigerate them for up to 3 days.
Freezer
Before freezing it is very important that the hand pies are cold, so refrigerate them overnight if you are freezing them after they have been cooked.
After they are cold, make sure they are well wrapped in plastic wrap and then aluminum foil and place them in a freezer bag. They can be stored frozen until you want to reheat them. I would try to use them within 3 months for the best quality.
You can also freeze uncooked hand pies and then bake them from frozen. Once they are assembled, place them on a parchment lined tray and freeze overnight.
Once they are completely frozen you can wrap them and place them in freezer bags.
I actually frozen an uncooked one and vacuum sealed it and then removed it from the bag and baked it from frozen. It worked great and tasted just like the freshly baked ones.
How to Reheat Savory Meat Pies
The best method for reheating depends on if they are cooked or not and if they are frozen or refrigerated.
Cooked & Refrigerated
You can bake or air fry at 350℉/175℃ for about 20-25 minutes.
Uncooked & Frozen
OVEN: Place the uncooked and frozen hand pie on a parchment lined tray in a 325℉/160℃ preheated oven and bake for about 60 minutes or until the filling inside reaches at least 200℉/93℃ and the crust is golden brown.
Quick Tip
Don't let your uncooked frozen hand pies thaw before baking or they may become soggy.
Ninja Combi or Ninja Foodi or Ninja Speedi using Steam/Bake (Combi Bake)
Surprisingly I found using the steam/bake function on the Ninja Foodi and Speedi or combi bake on the Ninja Combi to work really well for cooking an unbaked hand pie from frozen.
The preheat time (when it is really steaming) is about 20 minutes and this time thawed the hand pie and started to cook the crust, then the dry bake time finished crisping the crust.
At first I thought it would be too much steam, but it wasn't. It tasted just like a freshly baked one.
Place one cup of water in the inner pot and then use the crisping basket or plate and place the frozen hand pie on parchement cut to size. Steam/Bake or Combi/Bake on 375F for 20-25 minutes.
The filling should reach 200℉/93℃ and the crust should be golden brown.
Air Fry
You can air fry them from frozen as well. 300℉/150℃ for 45-50 minutes or until the filling reaches 200℉/93℃ and the crust is golden brown.
Cooked & Frozen
Use the oven on 300℉/150℃ or the air fryer on 275℉/135℃ and bake from frozen for 30-40 minutes or until the filling is at least 165℉/74℃.
Frequently Asked Questions
Yes, but I would recommend using an all butter crust or swapping the lard with Crisco.
If you are making a fruit hand pie, you don't have to cook the fruit, but skip the butter in the filling. Toss the fruit with the flour and any spices you want to use.
Then fill the hand pies and seal them. The fruit won't take as long to cook, so you can increase your oven temp and bake for about 30 minutes.
Yep! Simply increase or decrease the ingredients and the cook time is unchanged.
They are a complete meal so you really don't have to serve anything with them. However, a nice side salad or something very light like steamed broccoli would go perfectly with them.
Other recipes you may enjoy!
If you like this recipe, you may want to try these too!

Savory Hand Pie Recipe
Ingredients
Pastry Ingredients
- 2½ cups bread flour all-purpose flour can be used
- 1 teaspoon kosher or sea salt
- 3 Tablespoons Cold Lard or Crisco Vegetable Shortening
- 8 Tablespoons Cold Butter salted or unsalted, cubed
- 6-9 Tablespoons Cold Water
Filling Ingredients
- 10-12 ounces Sirloin Steak ½"dice to equal about 1½ cups
- 1 cup diced yellow potatoes about ½" dice, about 1 medium size potato
- ½ cup diced carrot about ½" dice, 1 small carrot
- ½ cup mushrooms any kind is fine, ½" dice
- ½ cup sweet or yellow onion ½" dice, about ½ an onion
- ½ cup frozen peas
- 3 Tablespoons melted butter
- 1½ teaspoons kosher or fine grind sea salt
- 1-1½ teaspoons black pepper
- ½ teaspoon dried thyme leaves
- 3 Tablespoons all purpose flour
Optional Egg Wash
- 1 large egg lightly beaten
- 2 Tablespoons water beaten with egg
Would you like to save this recipe?
Instructions
Pastry Dough
- In a large mixing bowl, combine the bread flour and salt. Add the cold lard and butter and toss with your hands to coat with the flour. Using your hands, break up the lard and butter. You want the mixture to become like a coarse sand with tiny bits of fat covered in flour.2½ cups bread flour, 1 teaspoon kosher or sea salt, 3 Tablespoons Cold Lard, 8 Tablespoons Cold Butter
- Add 4-5 Tablespoons of cold water to the bowl and toss the mixture around to hydrate the flour. Continue to add 1 Tablespoon at a time until the dough sticks together in a ball and there isn't any loose flour.6-9 Tablespoons Cold Water
- Form the pastry dough into a disc and wrap in plastic wrap. Refrigerate for at least 30 minutes while you get the filling prepared.
Filling
- Trim any connective tissue or hard gristle from the beef and cube it into ½-¾" cubes. Put the beef cubes into a large mixing bowl. Dice the potatoes, carrots, mushrooms and onions all in ½" dice. Measure out the frozen peas. Add everything to the bowl.10-12 ounces Sirloin Steak, 1 cup diced yellow potatoes, ½ cup diced carrot, ½ cup mushrooms, ½ cup sweet or yellow onion, ½ cup frozen peas
- Pour the melted butter over the filling mixture and stir to combine. Sprinkle the seasonings and flour over the filling mixture and stir well to combine. If you are going to assemble the hand pies right away, leave the mixture at room temp. If you aren't, cover and refrigerate until use.3 Tablespoons melted butter, 1½ teaspoons kosher or fine grind sea salt, 1-1½ teaspoons black pepper, ½ teaspoon dried thyme leaves, 3 Tablespoons all purpose flour
Assembling the Savory Hand Pies
- Remove the dough from the fridge and divide it into 6 equal sections. Wrap 5 pieces back in plastic wrap and set aside. Lightly flour a large pastry mat or work surface and form one piece of the dough into a disc. Place a little flour on top of the dough and use a rolling pin to roll out an oval shape with the top to bottom being about 10-12" and the sides being about 8-10". You want the dough to be about ¼" thick.
- Place ¾ cup of the filling in the center of the dough, but just a tad closer to you than the top of the dough. Pull the top of the dough and fold it over the filling. If any of the filling starts to come out of the sides, push it back into the center. Press the dough down with the sides of your hands all around the filling to create a seal and then press outward until all of the surrounding dough is nicely sealed.
- Trim off any excess dough, leaving at least 2" on each side and 2½-3" on the rounded end. This extra dough helps with crimping. To crimp the edges, lightly flour the work surface so the dough can move freely as you crimp. Place your thumb on the right (or left) upper side and using your other hand, pull the dough over your thumb and then remove your thumb and press the dough down close to the filling. This will leave a little crimp of dough. Place your thumb in the place that was just pressed down and using the other hand, pull the dough over your thumb, remove your thumb and press the dough down close to the filling. Repeat the process all around the edge until it is all crimped. Repeat for all 6 pies.
- Make 1-3 slits with a sharp knife in the top of the hand pies to vent the steam.
Oven Baking Directions
- Preheat the oven to 375℉/190℃. Place the hand pies on a parchment lined tray. You can brush the crust with an egg wash if desired.1 large egg, 2 Tablespoons water
- Bake at 375℉/190℃ for 40-45 minutes or until the crust is golden brown and the filling is around 200℉/93℃. Remove from the oven and allow to cool on a cooling rack. These are best when they sit about 15 minutes before serving. Enjoy!
Air Fryer Directions
- Preheat the air fryer on 350℉/175℃ for 10 minutes with the crisping plate or basket inside the appliance. Brush the tops of each hand pie that you are cooking with egg wash and make one slit in the top to allow steam to escape. Cut a piece of parchment that fits under the hand pie without excess around the sides. *Because of how drying the airfryer is, I recommend using the egg wash when using this cooking method.1 large egg, 2 Tablespoons water
- Air Fry on 350℉/175℃ for 35-40 minutes or until the crust is golden brown and the filling temp is around 200℉/93℃. Remove from the air fryer and allow to cool for at least 15 minutes on a cooling rack. Depending on the size of your air fryer, you may need to air fry in batches.
Steam Crisp or Combi Crisp Directions
- If you have the Ninja Combi, Ninja Speedi, or Ninja Foodi with steam/crisp than you will want to use this method over baking or air frying. The instructions are the same in each of the different appliances, but with the Speedi and Foodi you may need to flip the hand pie over the last 5 minutes of cooking to crisp the bottom a little more.
- Place ¼ cup of water in the combi pan or inner pot of the Speedi/Foodi. Place the rack into the combi pan, use the rack in low on the Speedi and the basket or crisping plate in the Foodi.
- You do not need an egg wash when using steam/crisp or combi crisp. Place the hand pies on a piece of parchment paper cut to fit. You don't want any excess around the edges or it folds over and impedes the crisping. Place the tray or rack into the Combi, Speedi, or Foodi. Select the Combi Crisp or the Steam Crisp function and set the temperature to 350℉/175℃ and the time for 30 minutes.
- They are done when the pastry crust is golden brown and the filling is around 200℉/93℃. Remove and allow to cool at least 15 minutes before serving. Enjoy!
Nutrition
About the Recipe Author, Louise Long
Louise is a full-time recipe creator and food blogger @ The Salted Pepper. She has over 30 years of experience with cooking and recipe development. She owned a restaurant for several years and was a full-time RN until retiring to blog full-time.

She published her first cookbook in the Fall of 2018 and is very interested in writing several more.
Louise is also the creator of an online Ninja Foodi Pressure Cooking Course with over 100 instructional step-by-step videos. People absolutely rave about the course and all the value they have received from it.
Louise has several very active Facebook groups that help people with the basics of cooking and learning more about the appliances they love.
Ninja Foodi Pressure Cooker & Air Crisper 101
Ninja Woodfire Outdoor Grill & Smoker
Louise is also a YouTube creator and you can find most of her recipes in video format on The Salted Pepper YouTube channel.
She is very responsive to messages and eager to help in any way she can. Get more Information about Louise & contact information
I WOULD LOVE TO SEE WHAT YOU ARE COOKING UP IN YOUR KITCHEN! TAG ME @THESALTEDPEPPER ON YOUR FAVORITE SOCIAL MEDIA PLATFORM WHEN YOU MAKE A DISH!
BE SURE TO FOLLOW THE SALTED PEPPER RIGHT HERE ⇓⇓⇓⇓⇓
Richard Capitan says
Welp. Used ground thyme and not dried leaves. Yikes, super duper too thymey. I goofed. Will try again
Louise says
Oh no! That would definitely change things and not in a good way! I hope you give them another try with the thyme leaves!
Allison says
I really want to make this recipe but I need it to be without any dairy. What would you recommend to use for the crust instead of butter?
Louise says
You could use lard or any vegetable shortening in place of the butter.
Deborah Ausman says
Tried these for the first time today and they are simply amazing. Thanks for the thorough instructions! Wow, so happy!
Louise says
Thank you so much! I am thrilled that you enjoyed them!
Katherine Chappell says
I love hand pies but I hate making pie crust and pastry dough...is it really "cheating" if I buy pre-made pie crusts?
Louise says
Not at all! Just when you buy the premade pie crust for this recipe, don't roll it out too much. You want a nice sturdy crust.