
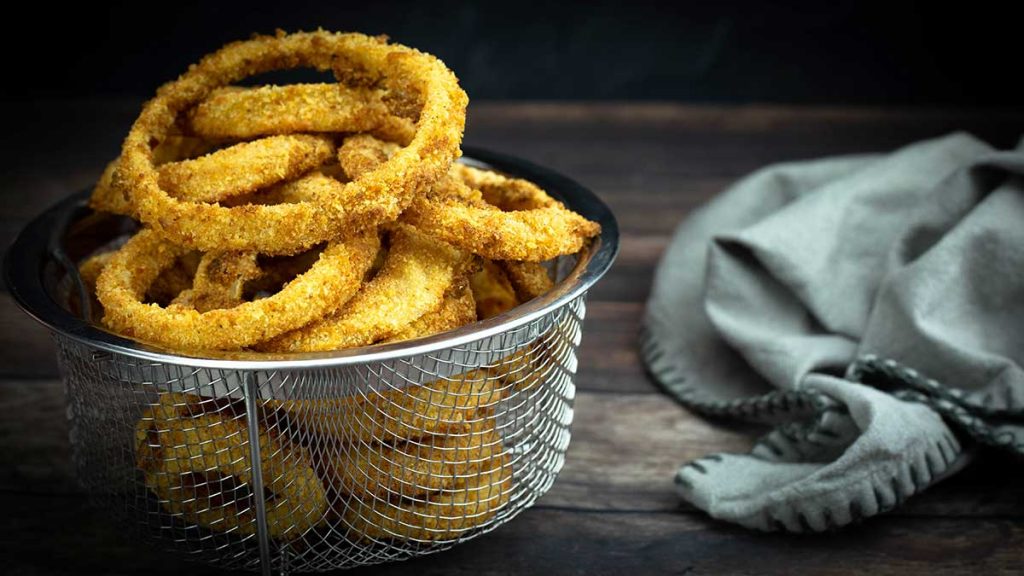
Making Homemade Onion Rings in your air fryer is a game changer!
Simply follow this technique and cooking times and you will have the BEST Air Fryer Onion Rings in no time at all!
Would you like to save this recipe?
I should know, I had to make about 100 batches before getting the breading, seasonings, and timing perfected! Let's just say that I came to know pretty well what a mediocre onion ring was like and, as soon as all the stars aligned in the sky, I tasted the BEST air fryer onion ring EVER!
This post may contain affiliate links. If you make a purchase after clicking a link, I may earn a small commission. As an Amazon Associate, I earn from qualifying purchases.
These are so good, I think they are better than the deep fried kind! Jeff agrees and he is an onion ring snob, if you know what I mean. He orders them as a side when we go out almost 100% of the time and he is usually disappointed.
A great onion ring has to be flavorful with a perfectly cooked onion that DOES NOT completely pull out of the breading when you take a bite. It has to be crunchy, but not taste like grease. There is a lot to consider when making a great onion ring, but no worries.... 100 batches later, I've got it perfected so you can make them at home, right in your air fryer!
Frequently Asked Questions
Most onion rings that you buy in the freezer section of your store have already been fried in oil and then frozen. So, to make them in your air fryer, you simply preheat the air fryer on 400°F/200℃ for 5-10 minutes. Add the frozen onion rings and Air Fry at the same temperature for 8-10 minutes, tossing them mid way through the cooking cycle.
Be careful not to add too many or the air won't circulate for even crisping. If they are piled on top of each other, steam can occur which inhibits crisping.
This recipe is for Homemade Onion Rings and not store-bought, I hope you try them because they are delicious!
Uncooked onions tend to get watery and soft when frozen, so for the best outcome, I recommend air frying the onion rings before freezing.
I go over how to freeze & air fry frozen homemade onion rings later in this article.
Ingredients & Substitutions
As with most recipes, there are tons of ways to modify ingredients to your liking, but there are also a few things that, when changed, will alter the outcome.
Onions
Onions are the main ingredient here and cannot be substituted without affecting the outcome.
You can use whatever type of onion you prefer. I used Vidalia because I like a sweeter onion. For a stronger onion flavor, use a white onion. A yellow onion will be in between. You can also use a red onion.
If you want to make a different air fried vegetable, I would find a specific recipe for that vegetable.
For example, here are my recipes for air fryer cauliflower and air fryer mushrooms. All of these recipes use a slightly different breading technique to achieve the desired outcome due the water content of the vegetable and how long it takes to cook.
Liquid Batter
The liquid batter I'm using is made of beer, cholula, egg, and flour. The beer can be substituted with water without any problems. The cholula can be substituted with your favorite hot sauce, just adjust it if your hot sauce is really hot or it can be omitted without making any other changes.
I have not tested the recipe without the use of an egg or all purpose flour, so I am not sure how it would turn out if you wanted to use alternatives to these ingredients.
I think you will be fine to use a gluten free flour if it is a 1:1 substitute for all purpose flour. I have read that people like to use a combination of rice flour and cornstarch, but I'm not sure how that would work in this wet batter since we aren't frying in oil.
I have also read that people substitute flax seeds or chia seeds for eggs in recipes, here is a recipe on how to do that: How to Make Flax Eggs. I have never tried this so I don't know how it will work. Please let me know if you try it!
Dry Breading
The dry breading I use is bread crumbs with seasonings. I found this combination of seasonings allowed the full onion flavor to come through without being overpowering in spices.
You can certainly modify any of the seasonings to your liking. If you like a little more spice, add some cayenne pepper or even chipotle powder for a smoky heat.
You can also use panko or a combination of panko and bread crumbs. I tried this and did not think the onion rings were as good as using bread crumbs alone, but they were crunchy.
In this recipe I tried to get as close to the texture and flavor of a deep fried onion ring and bread crumbs with seasonings did that in my opinion.
Another popular substitution to lower carbs is pork rinds, however in other recipes I've tried with crushed pork rinds, they didn't crisp up enough when using a wet batter like in this recipe.
Tips for Making the BEST Air Fryer Onion Rings
- Keep your onion, eggs, and beer (or water) cold until just before making the recipe. This helps the batter adhere to the onion better and it also makes it easier to remove the membrane of the onion.
- Take the time to remove the membrane of the onion slices. If you have ever had a onion ring where the onion pulls completely out of the breading when you take a bite, it's because the membrane wasn't removed. I'll go over how to do this in the next section. Don't worry, it's easy!
- Air Fry in batches. You don't want to crowd the air fryer, cooking them in a single level is best for the most even browning and crisping. The size and shape of your air fryer will determine how many onion rings you can air fry at one time.
- Set the air fried onion rings on a cooling rack or wire rack until serving. This prevents steam from softening them.
How to Remove the Membrane from an Onion Slice
This may sound really odd to you and I bet that a lot of people will simply skip this step, but I hope you don't!
This is probably one of the MOST important steps if you really want the BEST air fryer onion rings and it isn't hard to do!
Onions have a translucent membrane in between each layer that provides structure (and protection) to the onion. It's also the thing that causes the entire onion part of an onion ring to pull out of the breading when you take a bite.
If you have eaten onion rings on multiple occasions, I bet it has happened to you! It kind of ruins the experience. You bite into the crispy onion ring and all of a sudden your lip is burning because the onion came out of the breading and landed on your lip and it's VERY hot!
We want to avoid that, so we remove that membrane layer. I have found that starting with a cold onion makes the process easier, so refrigerate your onion overnight if you know you are going to make onion rings.
Once you slice your onion into about ½" rings, take your fingernail (tweezers will work, too) and gently peel off the membrane layer on the inside of the onion slice. When you are lucky, they come off in one fell swoop, easy peasy. Sometimes, you have to pull them off in several places if they break.
How to Freeze and Reheat Homemade Onion Rings
As I mentioned in a previous section, I don't recommend freezing uncooked onion rings. When raw onions are frozen, they tend to get watery and the onion becomes too soft.
I did try to bread and freeze the onion rings before cooking them and the results were not nearly as good as when you air fryer them and then freeze them.
Once your onion rings are battered and air fried, let them cool completely on a wire rack. This prevents steaming which softens the breading.
Place the cooked onion rings on a parchment lined tray, they can overlap some and freeze for at least 4 hours. Place the frozen onion rings in a freezer bag and try to get as much air out as possible.
When you want to reheat them, preheat the air fryer for a full 10 minutes and then AC at 360-375℉/180-190℃ for 4-5 minutes. You don't need to add any extra oil.
Air Fryer Settings by Type
All air fryers are not equal. A temperature setting in one air fryer might be too low or too high in another air fryer. Air Fryers come in a few basic styles, the most common being the basket or drawer style. They also come in oven style and then there are the combination air fryers/pressure cookers like the Ninja Foodi or the Instant Pot Duo Crisp.
No matter what style of air fryer you have, you can successfully make this recipe. I used the Air Crisp or Air Fry setting on each style of air fryer. Through my testing, this is what I found.
Basket Style Air Fryers: The temp of 360℉/180℃ for 7 minutes worked the best in the basket style air fryer I have. This gave the best crunch without overcooking or undercooking the onion. If you usually increase or decrease your temperature when following other air fryer recipes, then I would test out 1 onion ring and see how it works before you do a whole batch. Make sure to preheat for a full 10 minutes on the highest setting for the best results.
Oven Style Air Fryers: If your oven-style air fryer has a fast preheat (mine says it's heated in 90 seconds), I would not pay attention to that. For the best results, preheat on the hottest setting for a full 10 minutes. Depending on how big your oven air fryer is, I suggest increasing the temperature by 25-50°. For example, in the Ninja Foodi Digital Air Fry Oven (AKA the flip oven), I would set the temp around 390-400℉/190-200℃ and air fry for 7 minutes. You can always test out 1 onion ring to make sure this works well in your oven air fryer.
Grill Air Fryers: I have the Ninja Foodi Indoor Grill and the temp of 360℉/180℃ for 7 minutes worked perfectly. I let the grill preheat on the hottest AC setting until it prompted me to "add food" so this may not be a full 10 minutes, but it worked great.
Ninja Foodi or Instant Pot Duo Crisp: In my experience, these air fryer combo appliances work the same as a basket style air fryer and I would preheat, with the basket in the appliance) for a full 10 minutes on the hottest setting (broil in the Ninja Foodi). The temperature of 360℉/180℃ for 10 minutes worked perfectly.
How to Make Air Fryer Onion Rings
No matter which air fryer you are using, the process for making the onion rings is the same.
Prepare the Onion
It's best to use a cold onion, so refrigerate overnight if you can. I leave the paper on the onion while slicing, but you can remove it if you prefer.
Slice a very thin and small slice off of the side of the onion so it sits flat on your cutting board. You want to be careful that you only slice through the paper and the outer part of the onion so you don't break your onion rings.
Cut the stem end off of the onion. Using a very sharp knife, slice the onion into about ½" slices. The amount of slices you get depends on the size of the onion.
When you get close to the root end, you can use a fork to help hold and stabilize the onion if you need to.
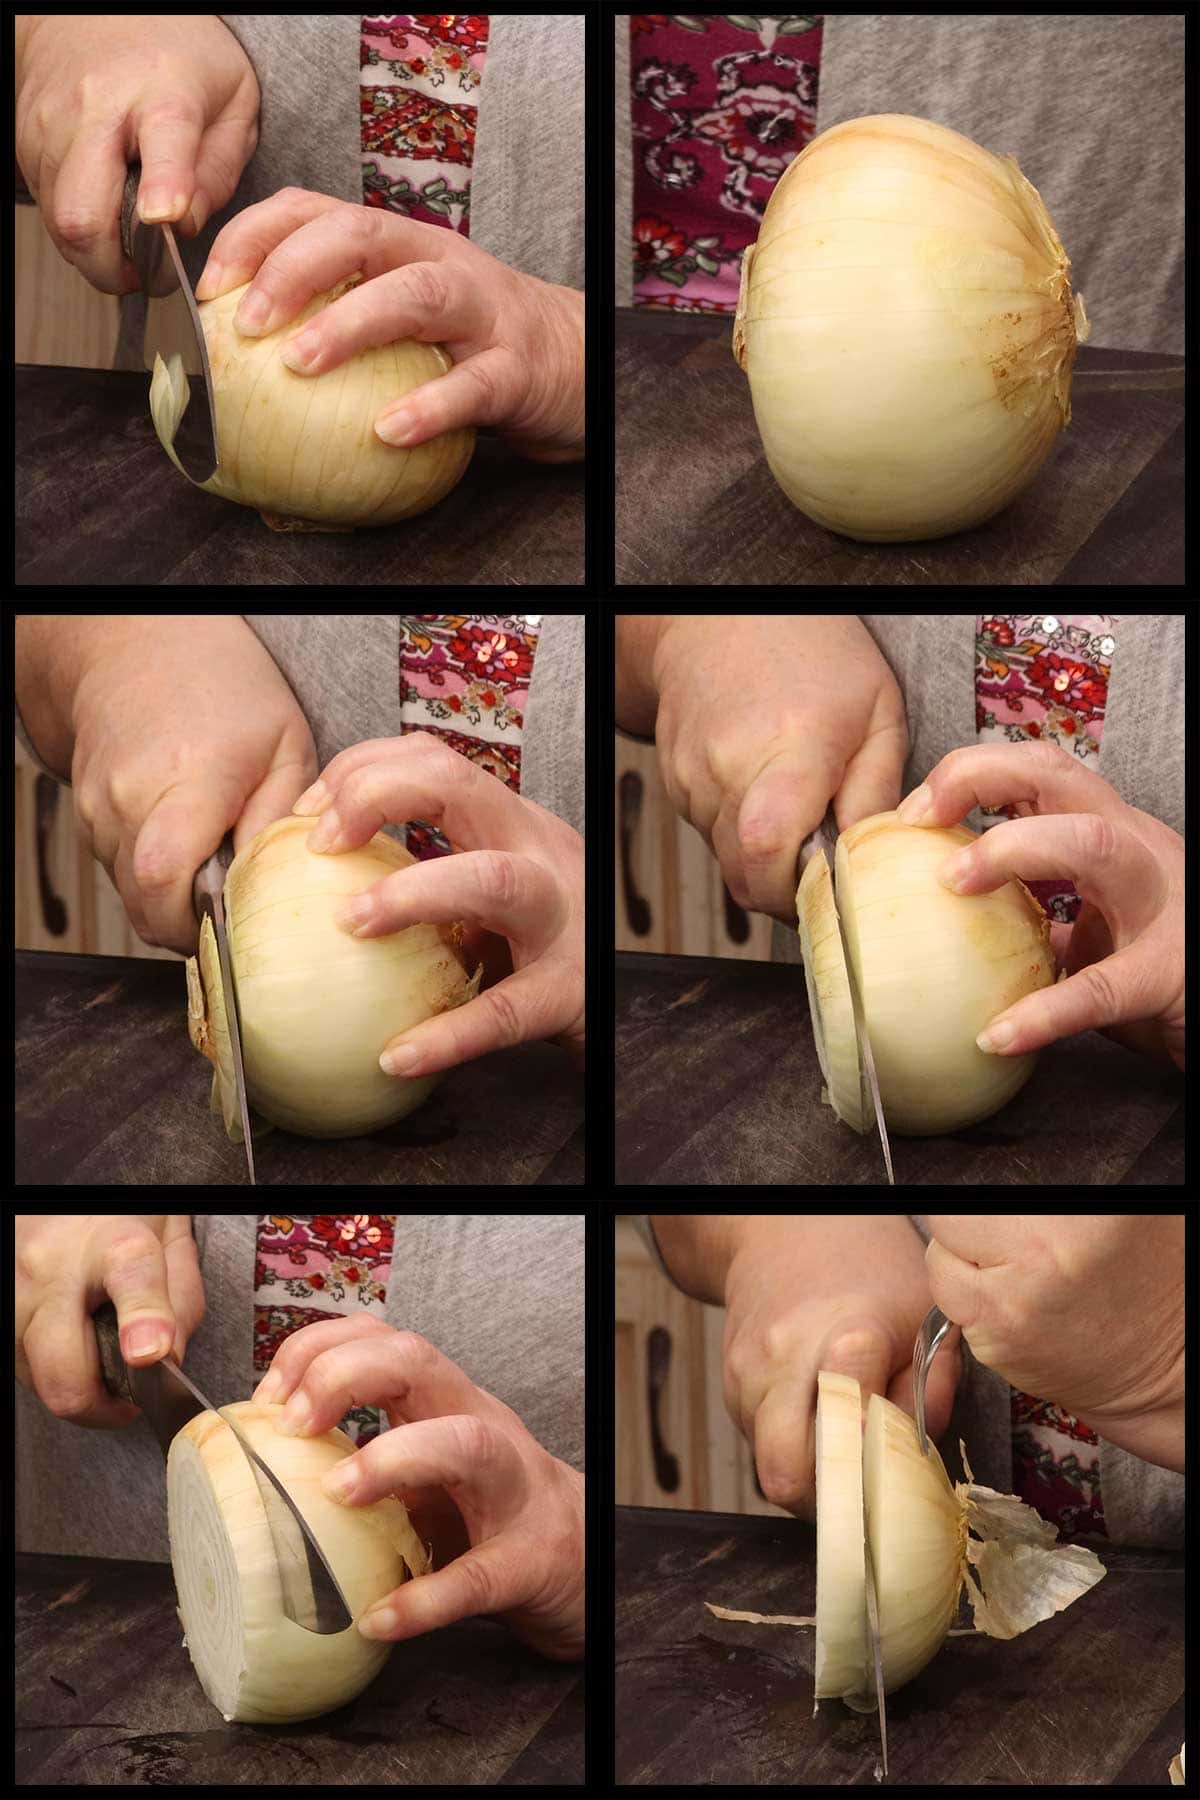
Carefully separate the individual rings by pushing them towards your cutting board. Some onions are harder than others to separate the rings, just be gently and patient and apply equal pressure to both sides and they will pop out.
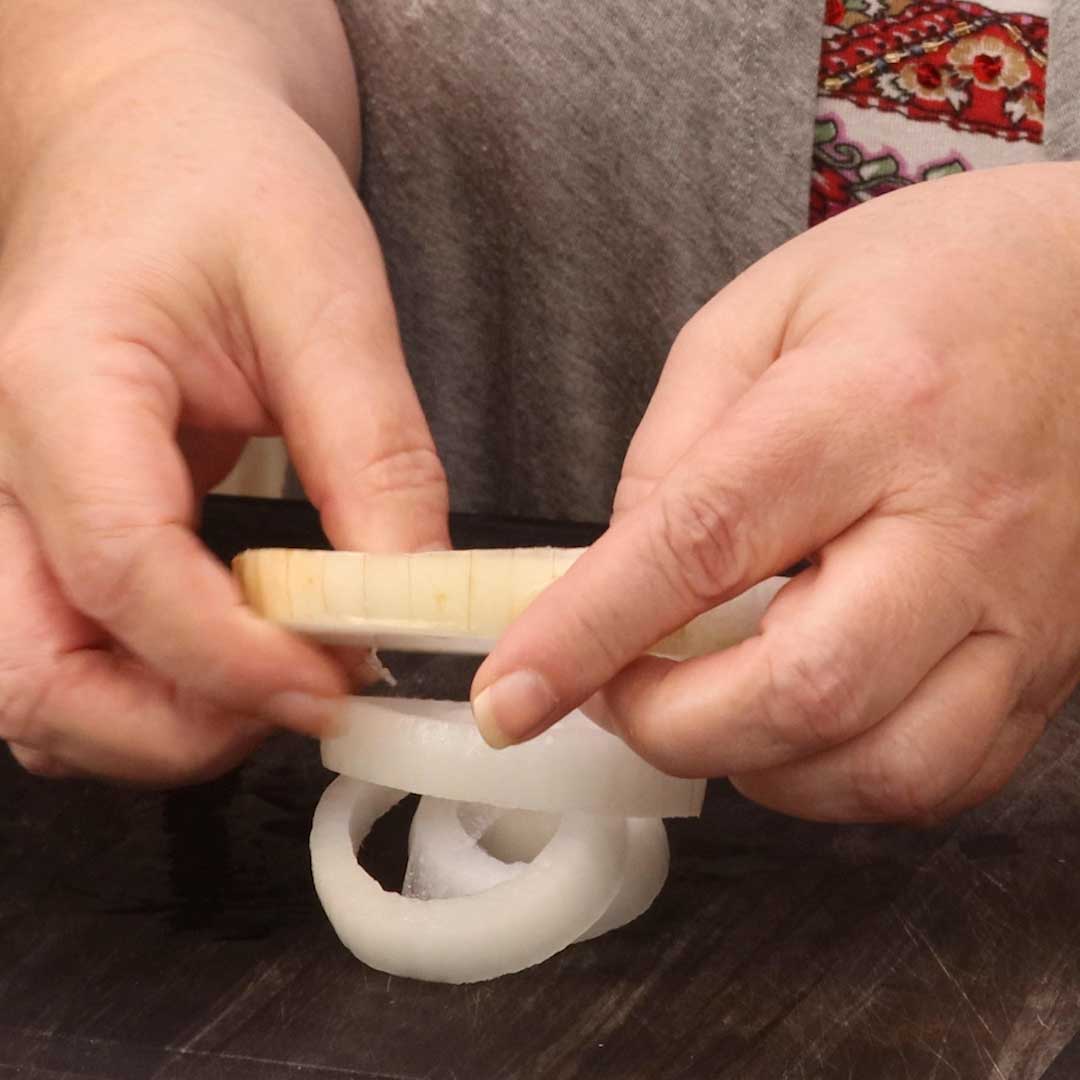
Once all the rings are separated, remove the membrane from each ring. The membrane is usually on the inside of each ring, but I have had some where the membrane comes off by itself and is on the outer part of another ring. In this case, it's not attached and easily removed. Having a cold onion helps make removing the membrane much easier.
Here is a short video showing you how to remove the membrane.
If you are using a very strong onion and want a milder flavor, you can soak the rings in cold water for 30 minutes. Make sure you dry them completely before breading or the batter won't stick. I use Vidalia Onions so I never have to worry about this.
Make the Wet Batter
It's important to use cold ingredients in the wet batter, so make sure your water or beer is cold, as well as the egg.
Add the beer/water, egg, and cholula or hot sauce (if using) into a shallow dish or coating tray. Whisk with a fork until combined. I use the (affiliate link)coating trays from Pampered Chef, but any shallow dish will work just fine.
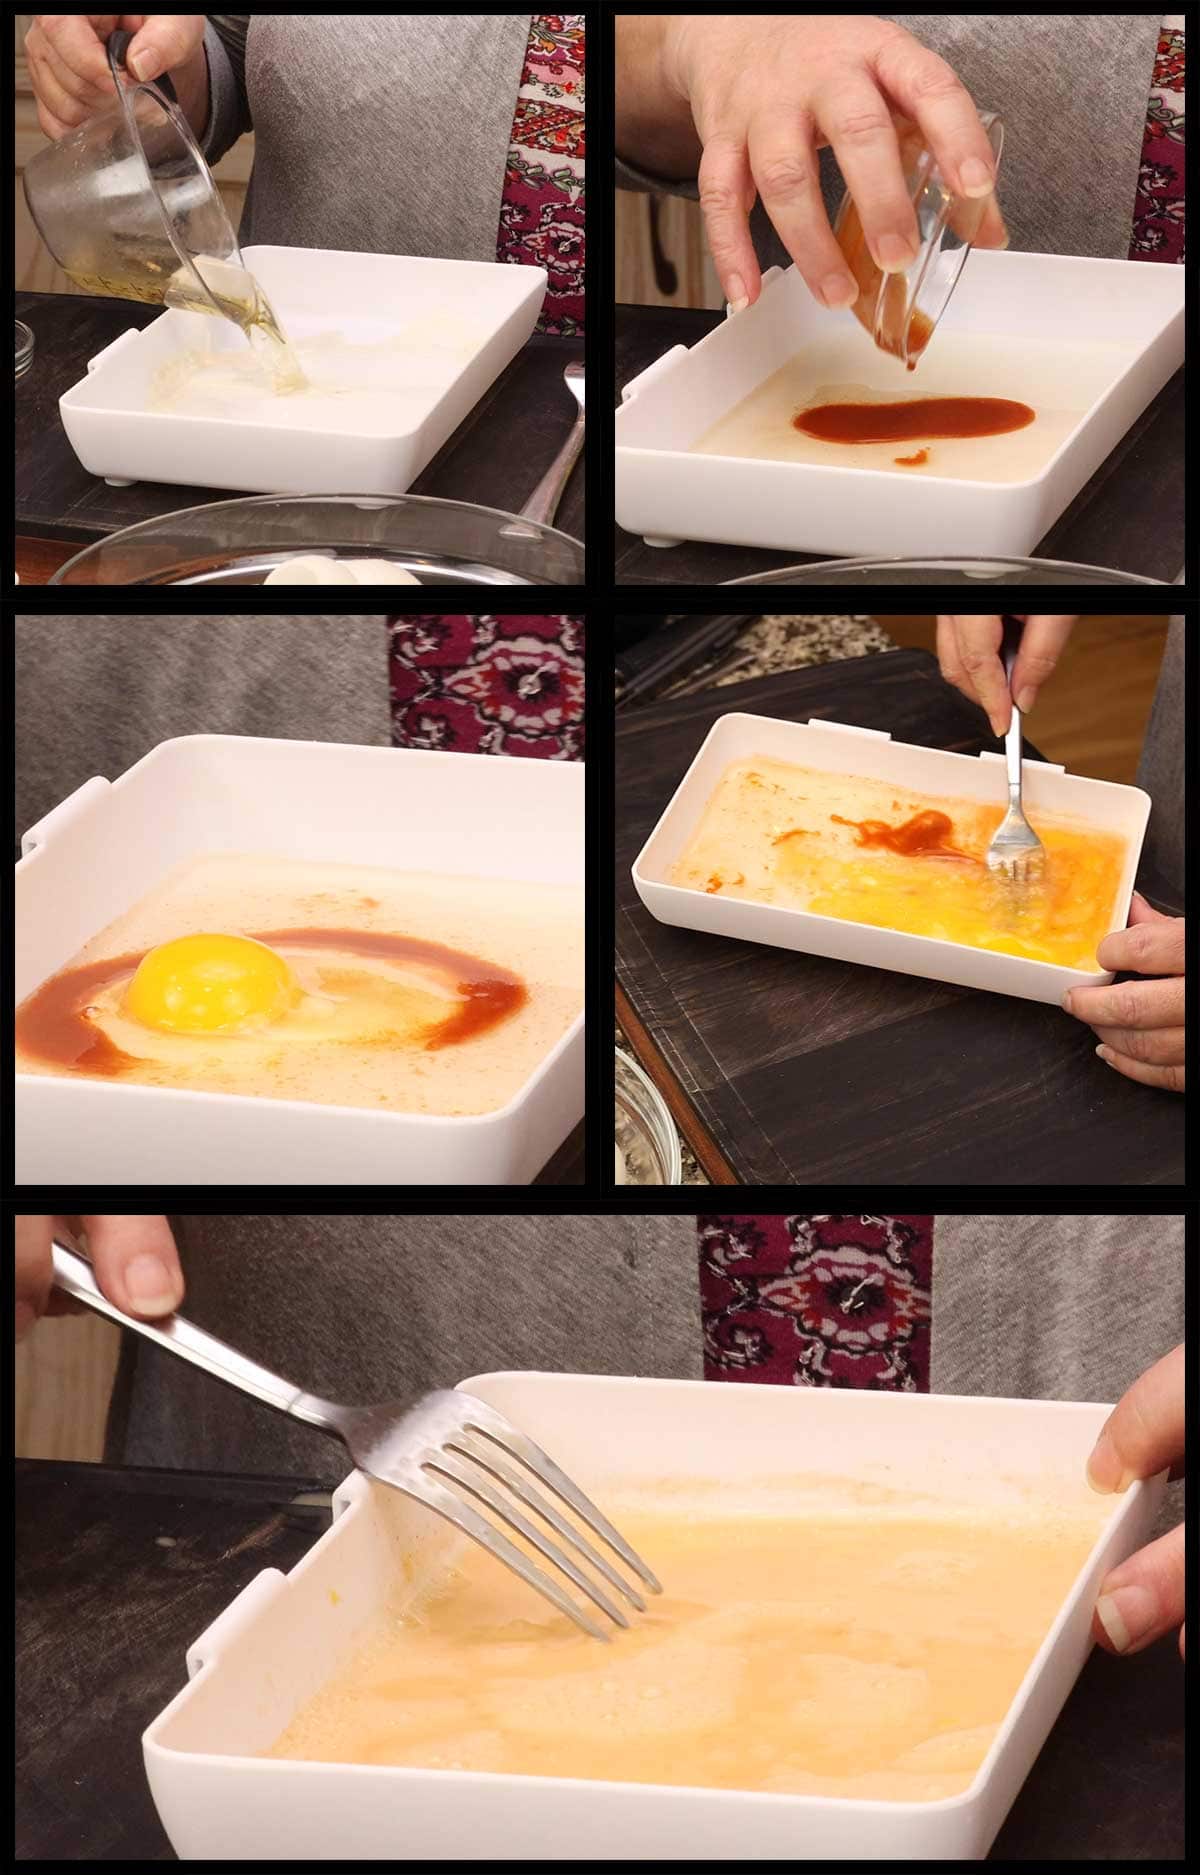
Sift ¼ cup of flour over the top of the liquid mixture and then gently fold it in with a fork or a chopstick. You don't want to whisk or aggressively mix in the flour or you will develop the gluten in the flour. Once you can no longer see any flour on top, repeat with the second ¼ cup. It is perfectly normal to see some clumps, they will work themselves out or you can press them with a fork to break them up.
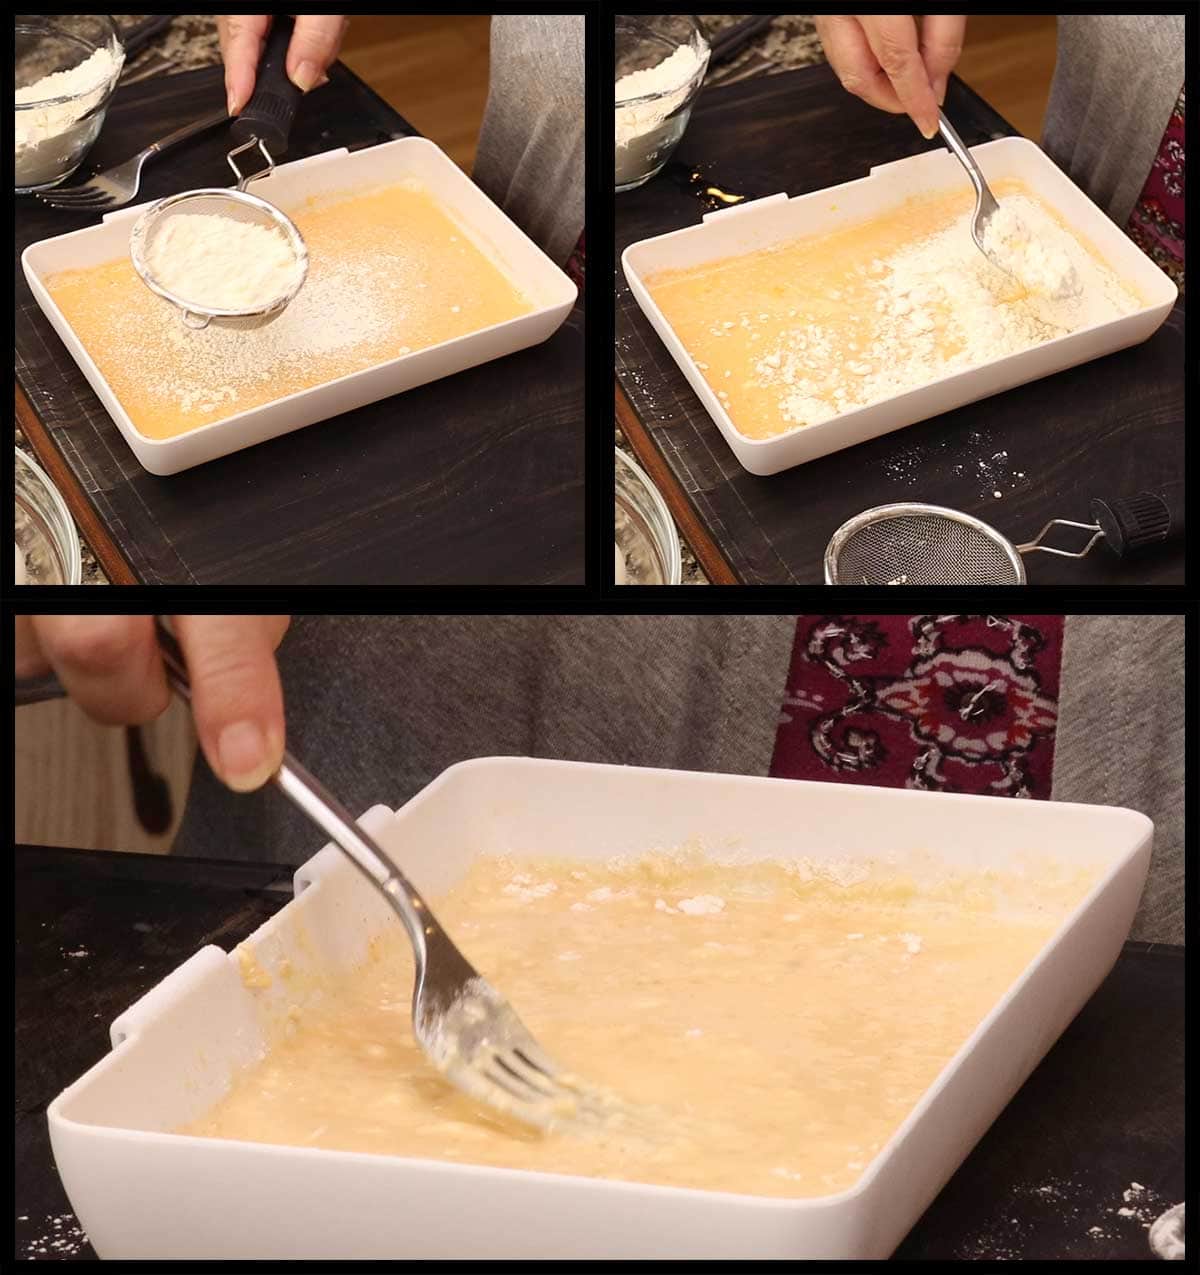
Continue to sift and fold in the flour until your mixture is the consistency of a thin pancake batter. Here is what it should look like.
The amount of flour you need can vary, so go by the consistency of the batter more than the amount of flour in the recipe. If you don't live in the US, you might find that your flour has more protein in it and you will need a lot less to achieve the same results. Humidity is also a factor that can affect how much flour you need.
If your batter is too thick, add 1 teaspoon of cold water or beer at a time until it is the right consistency. If it is too thin, sift in 1 Tablespoon of flour and gently fold it in, repeat until it is the correct consistency.
Add the salt and gently mix to incorporate. This is optional, but I found the onion rings were better when I salted both the wet batter and dry breading.
Make the Dry Breading
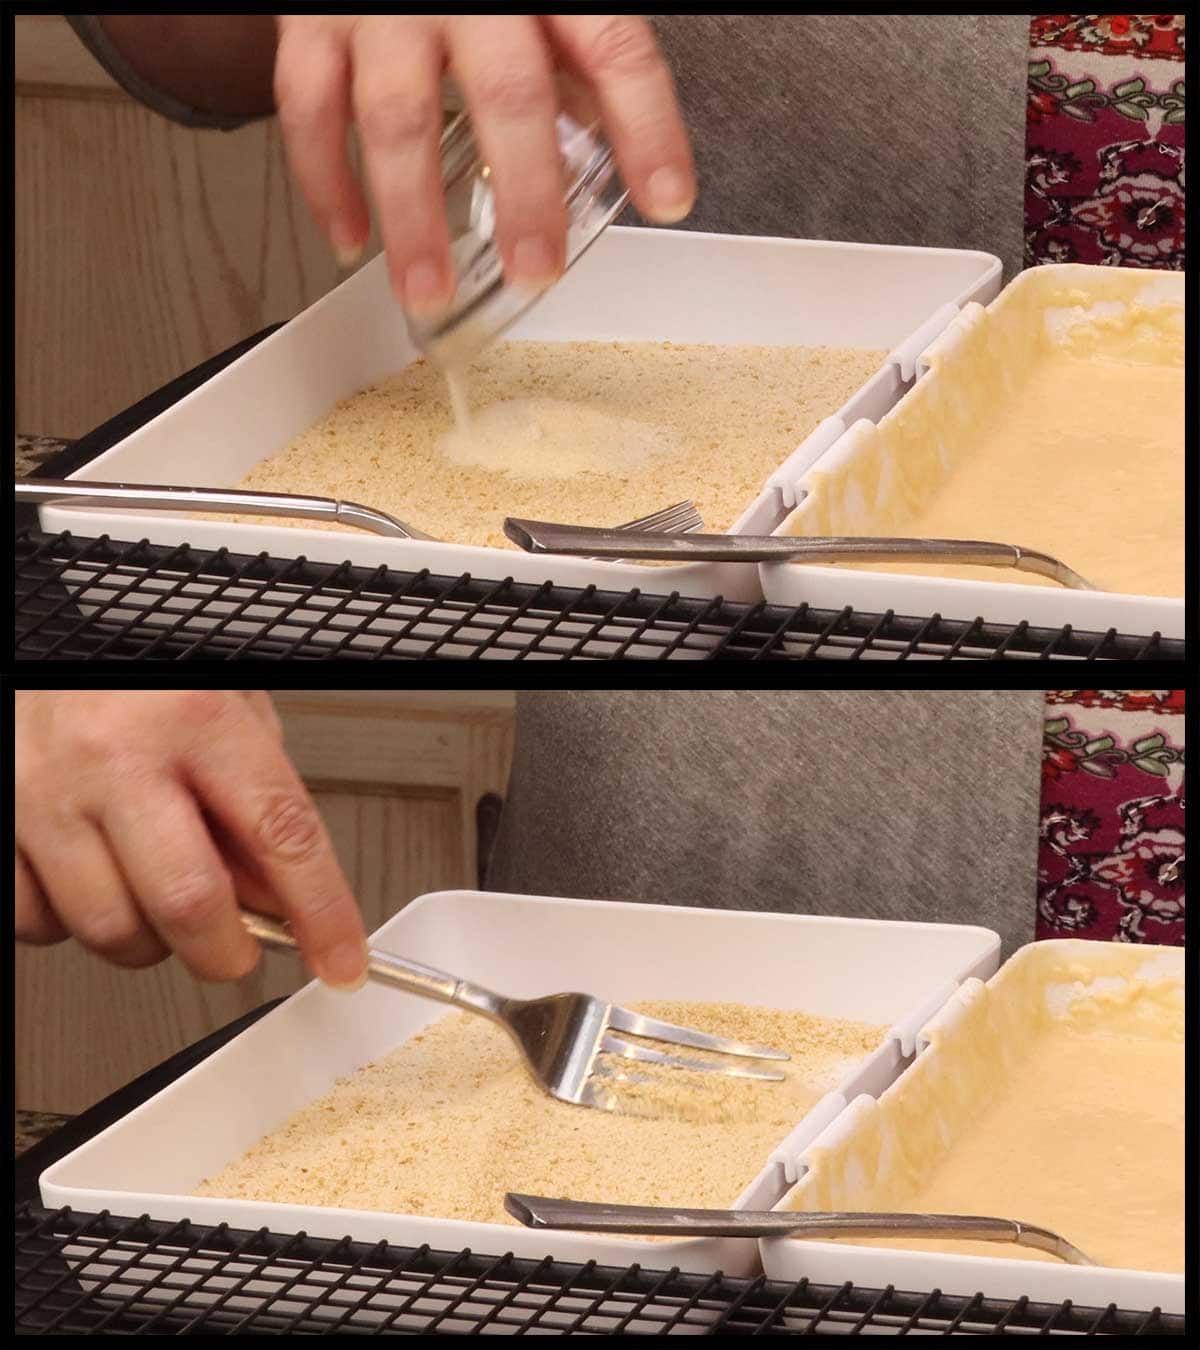
In a second shallow dish, mix the bread crumbs and the seasonings together.
Batter the Onion Rings
Preheat your air fryer on the hottest setting. On the Ninja Foodi Pressure Cooker & Air Crisper, I use the broil (grill in the UK) setting.
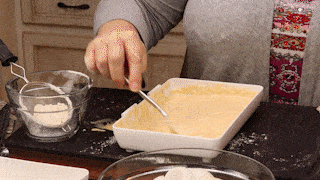
Place an onion ring into the wet batter and flip it over until the entire onion ring is coated. Hold up with a fork and let the excess batter drip off. Place onion ring into dry breading and cover with bread crumbs. Let it sit in the dry breading while you coat another ring with wet batter. This helps set the breading onto the onion ring.
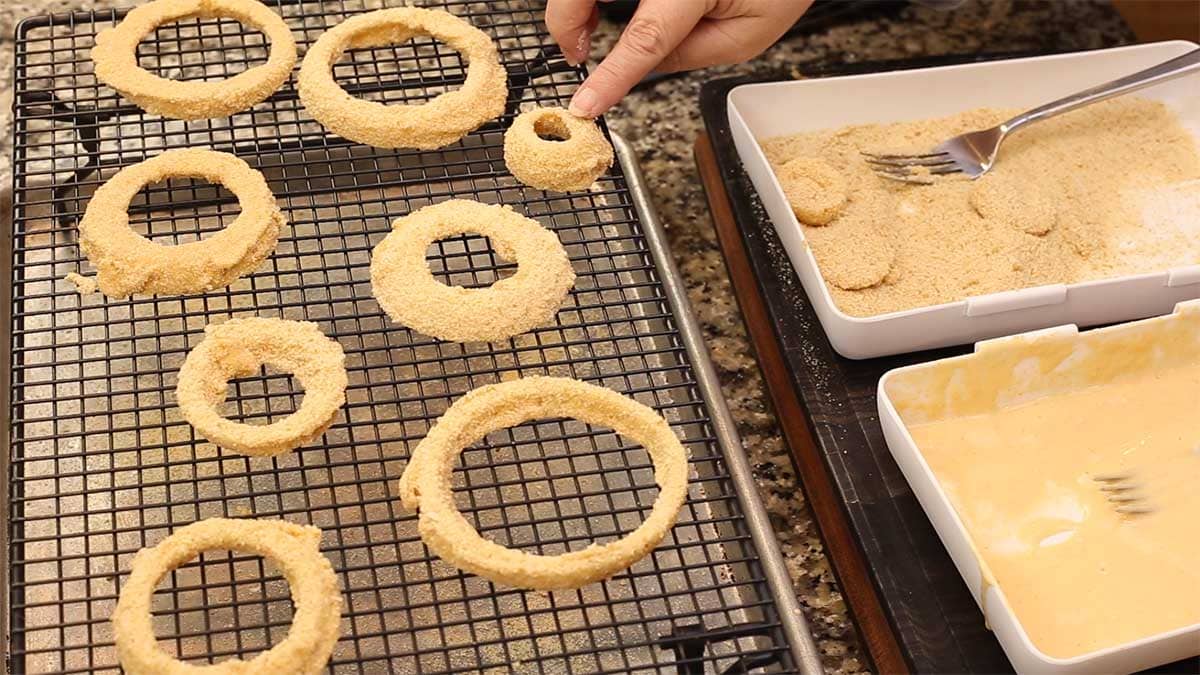
Carefully remove the breaded onion ring (I use a fork) and place on a (affiliate link)cooling rack or large tray.
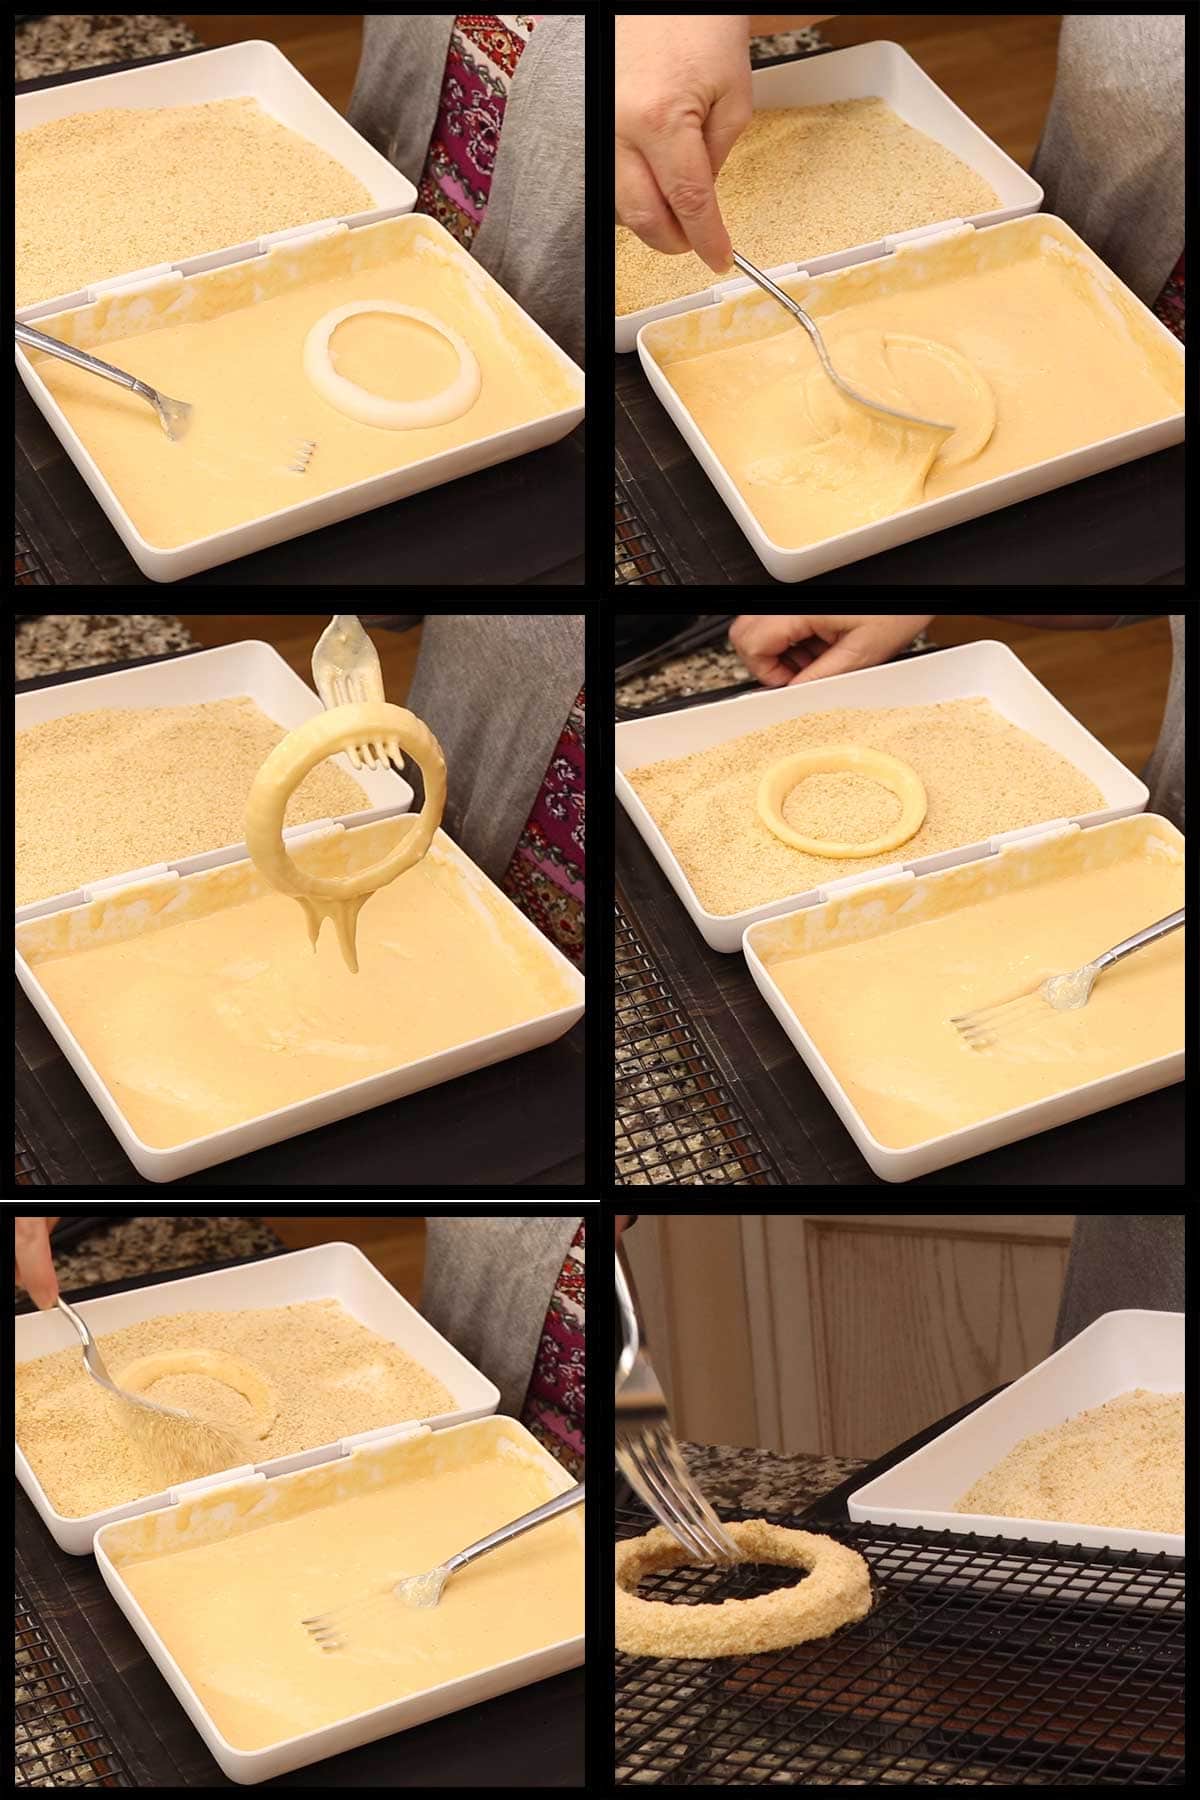
Repeat with the onion until the air fryer has preheated for a full 10 minutes. Try to batter some large and some small rings so you can fit more into the air fryer. You can put a little one inside of a bigger one as long as they don't touch.
When the air fryer has preheated, spritz the basket with oil and place as many onion rings as you can fit without them touching each other. This will vary based on the style of air fryer you have.
Spritz the tops with oil. You can use whatever type of oil you like, but I suggest a neutral flavored one like avocado or canola oil.
Air Fry on 360℉/180℃ for 7 minutes. While that batch is air frying, continue battering and breading the remaining onion rings. If using an oven style air fryer, increase your temperature by 25-50° and cook for 7 minutes.
You do not need to flip the onion rings while they are cooking, in most cases.
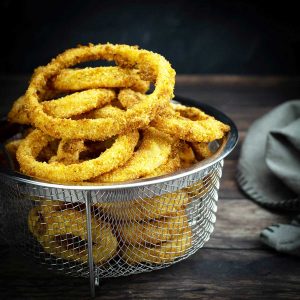
Remove the onion rings and set on a (affiliate link)cooling rack. This will prevent the bottoms from steaming and getting soggy.

Serve with your favorite dipping sauce & enjoy!
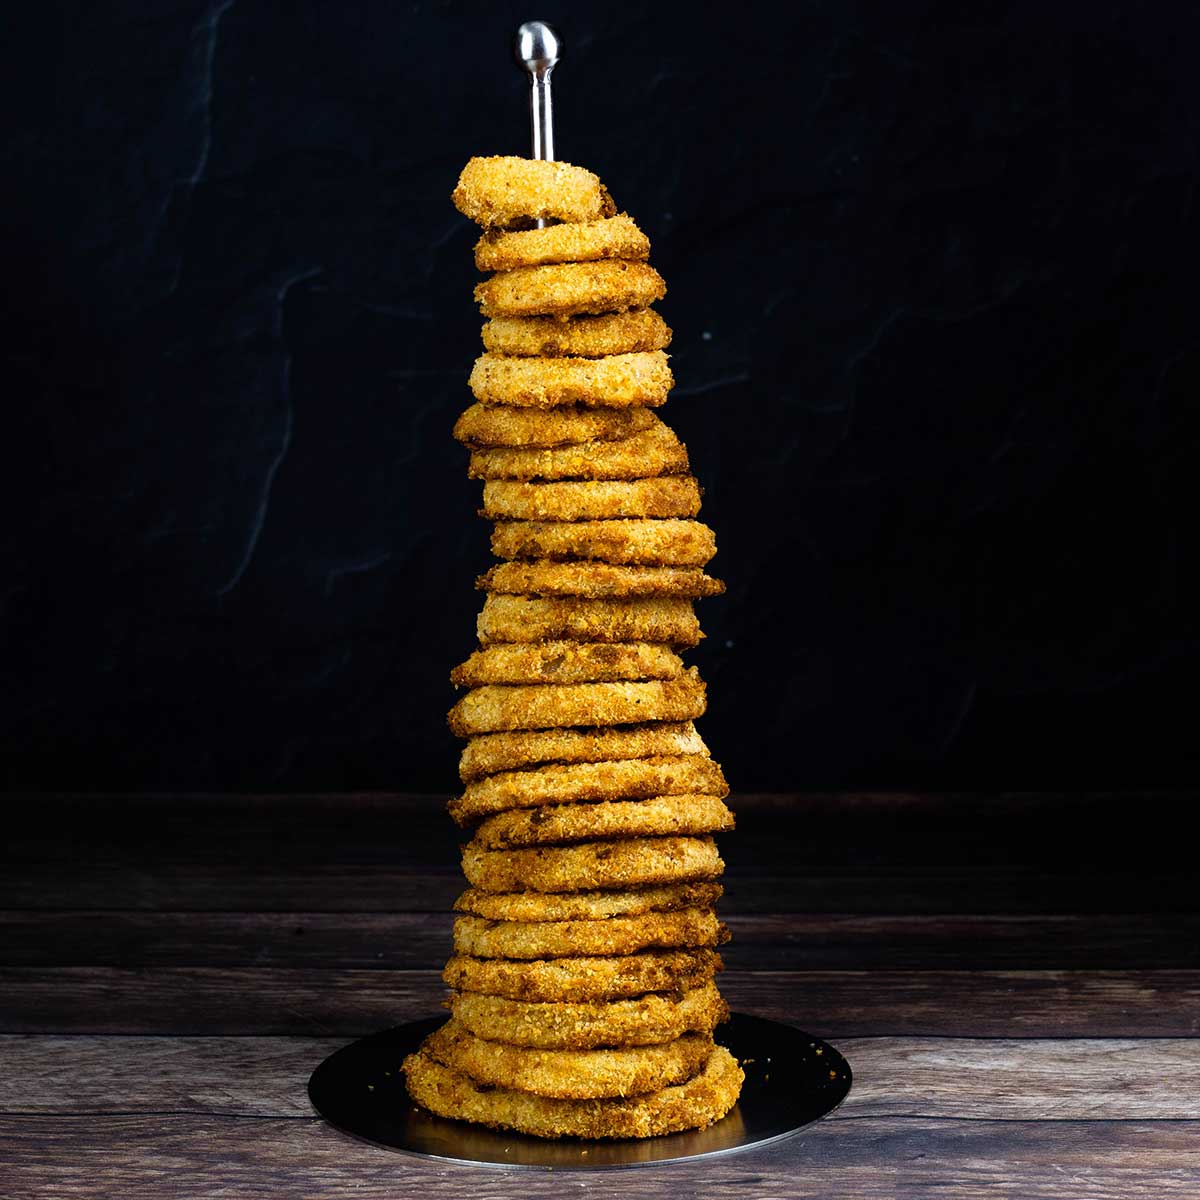
The Onion Ring Tower I used in this video is way too tall for normal use. After I ordered it, I chuckled because I think it's a paper towel holder repurposed! Anyway, I found a different one on Amazon that I think will work much better if anyone was interested in buying one: (affiliate link)Onion Ring Tower
Air Fryer Onion Rings
Equipment
- Air Fryer
Ingredients
- 1 Large Onion any variety is fine, I used Vidalia
- 1-2 Tbsps oil for spritzing
Wet Batter
Dry Breading
- 1 cup bread crumbs
- ½ teaspoon fine grind sea salt
- ½ teaspoon onion powder
- ½ teaspoon garlic powder
Would you like to save this recipe?
Instructions
Prepare the onion
- Cut the stem end off of the onion and slice the onion into ½" slices. I keep the paper on and make a small slice on the side of the onion to create a flat spot for stability. Place the flat side on the cutting board before slicing. Slice 3-4 slices of onion, each ½" thick. The amount of slices you get will depend on the size of the onion.
- Carefully separate the onion into individual rings.
- Remove the membrane from each onion ring. If you need instruction, see the written post or the video. This is easier with a cold onion.
Make the Wet Batter
- whisk together the ½ cup of beer or cold water with 1 tablespoon of hot sauce and egg and put into a shallow container. Sift in ¼ cup of all purpose flour and gently fold into wet mixture until combined. Repeat with another ¼ cup of flour. Sift in the remaining ¼ cup of flour a Tablespoon at a time and fold into batter until the batter is the consistency of a thin pancake batter. You may use it all or you might not, go by the consistency and not the total amount of flour.
- Add in the ½ teaspoon of sea salt and fold to combine into the wet batter.
Make the Dry Breading
- Combine the 1 cup of breadcrumbs with ½ teaspoon of sea salt, ½ teaspoon garlic powder, and ½ teaspoon of onion powder and mix together in a (affiliate link)shallow dish or tray.
Batter the Onion Rings
- Preheat your airfryer (with the basket in) on the hottest setting for a full 10 minutes.
- Dip each ring into the wet batter to coat and lift with a fork to let the excess drip off.
- Place the coated onion ring in the dry breading and cover the onion ring with the breadcrumbs. Let sit in the dry breading until you dip the next onion ring in the wet batter. This gives it a chance to set up.
- Place each battered onion ring on a tray or cooling rack until you have enough for one batch. Try to batter various sizes so you can increase the amount you air fry at once by placing a smaller onion ring inside a larger onion ring. Just make sure they aren't touching.
- Repeat for all the onion rings. I start air frying one batch while I'm still coating to speed up the process.
Air Frying the Onion Rings
- Spritz the basket with oil. Place the onion rings in the airfryer making sure they don't touch for the best air flow and crisping. Spritz the tops with oil. Set the air fry (or air crisp) temp to 360℉/180℃ and the time for 7 minutes. You don't need to flip.
- Place the air fried onion rings on a (affiliate link)cooling rack to prevent steaming which causes them to get soft.
- Repeat for the remaining onion rings. Serve & Enjoy!
Notes
Nutrition
About the Recipe Author, Louise Long
Louise is a full-time recipe creator and food blogger @ The Salted Pepper. She has over 30 years of experience with cooking and recipe development. She owned a restaurant for several years and was a full-time RN until retiring to blog full-time.

She published her first cookbook in the Fall of 2018 and is very interested in writing several more.
Louise is also the creator of an online Ninja Foodi Pressure Cooking Course with over 100 instructional step-by-step videos. People absolutely rave about the course and all the value they have received from it.
Louise has several very active Facebook groups that help people with the basics of cooking and learning more about the appliances they love.
Ninja Foodi Pressure Cooker & Air Crisper 101
Ninja Woodfire Outdoor Grill & Smoker
Louise is also a YouTube creator and you can find most of her recipes in video format on The Salted Pepper YouTube channel.
She is very responsive to messages and eager to help in any way she can. Get more Information about Louise & contact information
I WOULD LOVE TO SEE WHAT YOU ARE COOKING UP IN YOUR KITCHEN! TAG ME @THESALTEDPEPPER ON YOUR FAVORITE SOCIAL MEDIA PLATFORM WHEN YOU MAKE A DISH!
BE SURE TO FOLLOW THE SALTED PEPPER RIGHT HERE ⇓⇓⇓⇓⇓
Dolores says
I love this recipe! I had dover sole and wanted to coat and air fry. It was the BEST fish coating I've ever eaten! I"m going too use it on everything! Thank you!!
Louise says
I'm so glad to hear that!
Carol Michaels says
Just bought the Ninja Two Drawer Air Fryer. Your onion rings was the first recipe I tried. They were delicious. Because of that I am looking up more of your recipes. Perhaps a chicken recipe for tomorrow. Thanks so much. Just wish I could have fitted more of the onions in the two drawers but worth the wait.
Joy Williams says
Thank you for your research and your efforts to share your recipe, I'll try these. One question I have is have you ever tried corn starch and baking powder added to your wet batter mix? I did this with a air fried chicken batter and it worked well. Just wondering about the ratios or if you've tried them. Thanks again for the recipe!
Louise says
I haven't tried that.
Cindy H says
What oil sprayer do you like that doesn’t clog up the sprayer? I see it looks like a glass bottle on the video for the onion rings. I have tried some and they clog up the sprayer so wondered if you had a recommendation. Thanks. And I love love all of your recipes and videos! Thank you for taking all of the time to help all of us out!
Louise says
Thanks so much! I use a plastic EVO oil sprayer. Here is the link and I also responded to your email: (affiliate link) https://amzn.to/32f2LUK
Cammie Kristy says
thank you for all the tips and tricks when making onion rings!!! We loved the onions rings and will try diff spices as you mentioned. One question, how do you keep your onion rings warm and staying crispy while eating them? I saw you can put them in a 200 degree oven to keep them warm. Thoughts? Onion rings get cold fast. Thank you again!!!
Louise says
I'm so glad you enjoyed them! I don't know of any way, short of using a heat lamp, to keep them warm once you plate them up.
Louise says
I'm so glad you liked them! I don't know of any tricks to keeping them warm, short of using a heat lamp, once they are plated. If you wrapped them, they would steam and soften up.