
- Air Fryer
- Two shallow breading containers
- Oil mister or spray bottle
- Instant-read thermometer
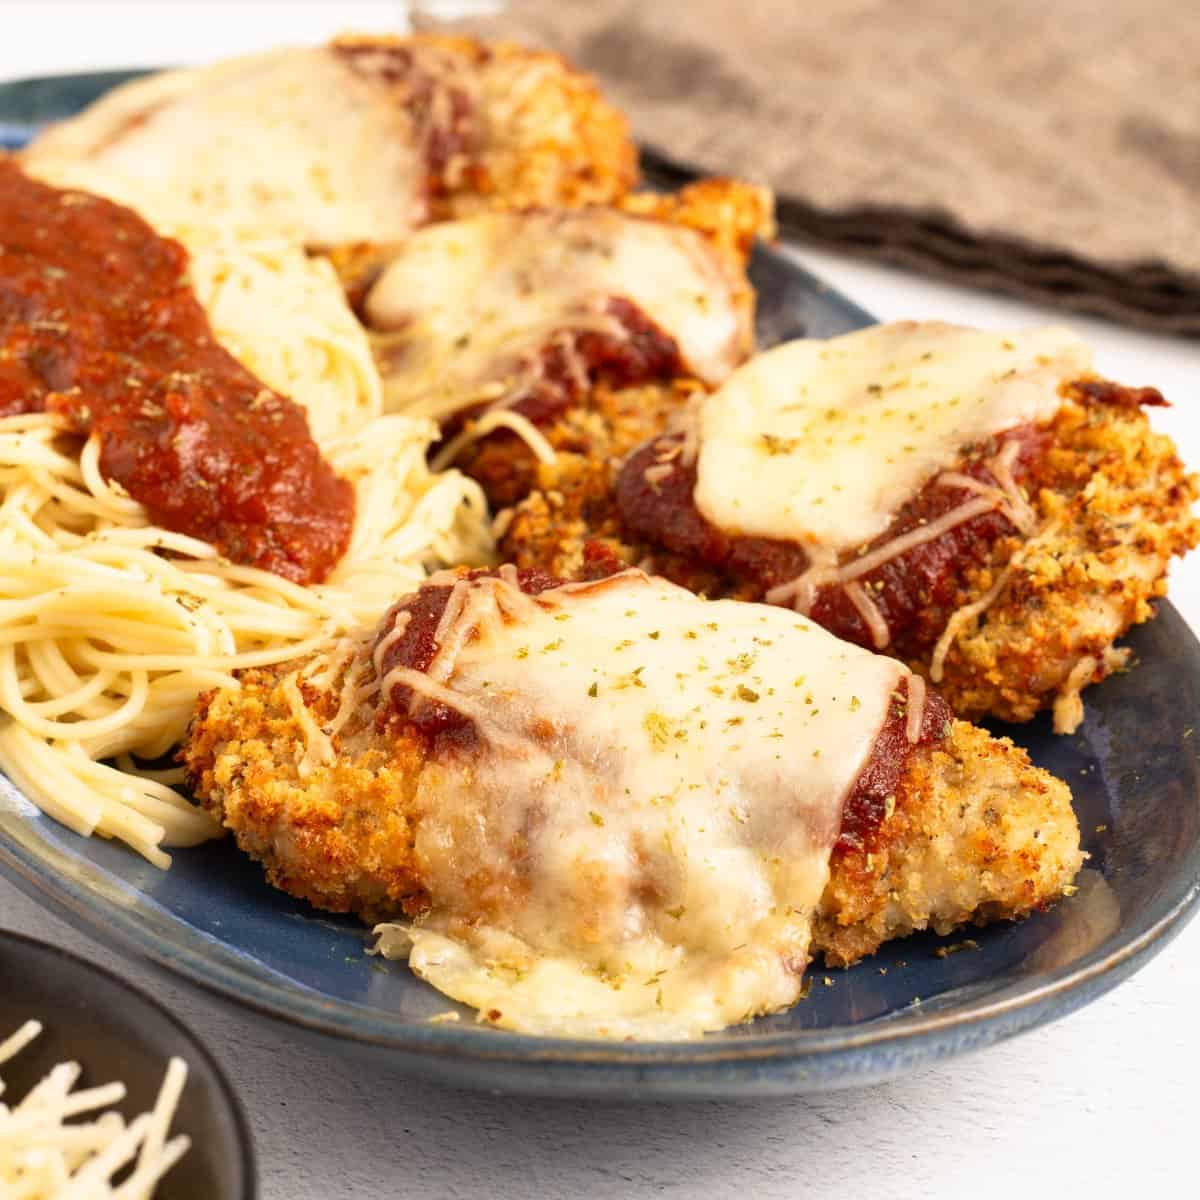
I used to pan fry my chicken Parmesan, but not anymore. This crispy chicken parmesan recipe is made in the air fryer, and it is even better than the pan fried version I made for years. The coating is panko and Parmesan, the dip is heavy cream instead of egg, and the chicken comes out tender inside with an outside that is genuinely crunchy. You will be so happy and surprised at how easy it is.
The heavy cream is the part that surprises people. A lot of recipes reach for eggs, and I found the heavy cream brings in the richness, coats the chicken, and it just makes everything perfect. It clings to the chicken in a way a thin egg wash never does, so the seasoned panko has something to hold onto. I really do recommend using the heavy cream here.
Would you like to save this recipe?
There are two other things that make this air fryer chicken parmesan work, and neither one takes any extra effort. The breaded chicken rests for 10 minutes before it goes in, and the air fryer preheats a full 10 minutes while it does. Those two things happen at the same time, so you are not adding time to dinner, you are just letting the coating set and the cooking surface get hot for the best crisping (and it helps prevent sticking). And if you cannot fit all 6 cutlets at once, don't worry about that. They freeze beautifully, and I will tell you exactly how.
Suggested Kitchen Tools for Air Fryer Chicken Parmesan
- Ninja Foodi (or any air fryer you have)
- Two shallow containers for the breading station
- Oil mister or spray bottle
- Instant-read thermometer
Ingredients & Substitutions
This recipe uses very simple and easy to find ingredients. Let's take a closer look at each part so you know what it is doing and what you can use instead.
Chicken Breast Cutlets
Used in Recipe: 6 boneless skinless chicken breast cutlets, about ½ inch thick and between 4 and 6 ounces each.
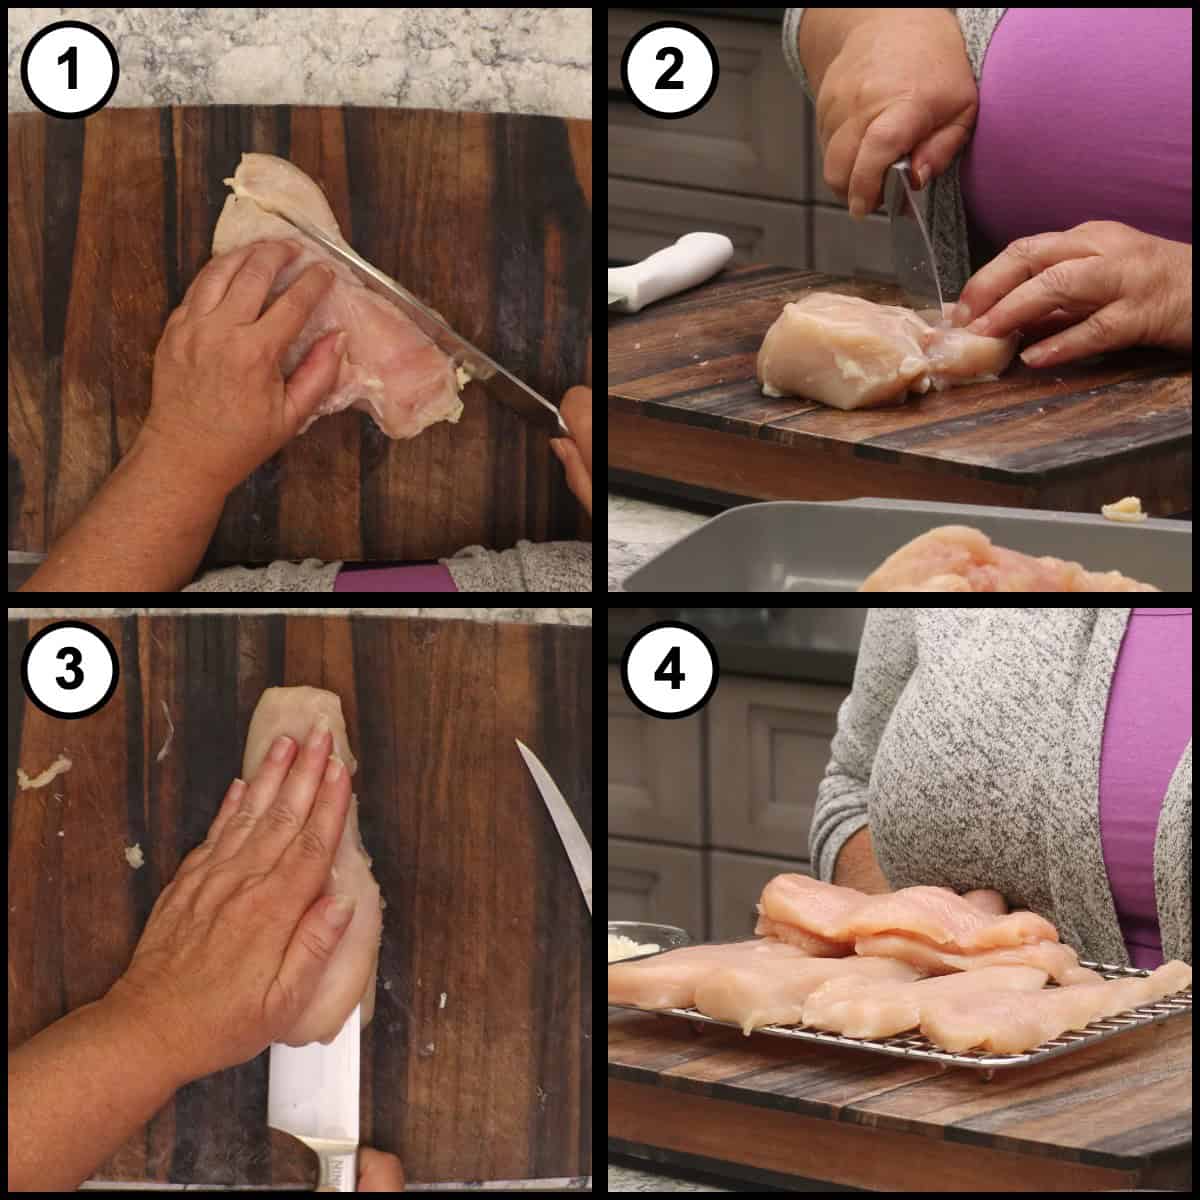
What it Does: The thickness is what matters most here. At about ½-¾ inch, the chicken cooks through in the same window the breading needs to crisp up, so you get perfectly cooked and crispy chicken. I don't buy the fancy cutlets. I buy the family pack and cut them down myself, and I get the thickness by slicing the breast rather than pounding it thin. Slicing keeps the meat intact, and a pounded cutlet tends to tear. If you would rather pay the extra and buy them already done, that's perfectly fine too.
Substitutions: Chicken thighs can be used if you prefer dark meat, though you will need to watch the timing, they may take a little longer.
Panko Breadcrumbs
Used in Recipe: 1½ cups of plain panko breadcrumbs form the base of the coating.
What it Does: Panko is important for the crispiness of this chicken Parmesan. The flakes are larger and drier than regular breadcrumbs, so they stay open and crunchy instead of packing down into a soft layer. I use plain panko and put my own seasoning blend in, which means I control exactly how it tastes.
Substitutions: Don't substitute flour or fine breadcrumbs, you will lose the texture that makes this worth making. You could probably get away with a half-and-half mixture of breadcrumbs and panko, but the panko is perfect, so pick it up if you can. Seasoned panko works if that is what you have, you just won't need the seasoning blend below.
Parmesan Cheese
Used in Recipe: 2 ounces of coarsely shredded Parmesan cheese, which worked out to about ½ cup, goes right into the breading. A little more gets shaved over the top at serving.
What it Does: The Parmesan is part of the breading, not a garnish, and that is why the coating tastes so good! Plus, it is called Parmesan Chicken so we should have Parmesan in it! You want a coarse shred for the best coating.
Substitutions: The bagged shredded Parmesan is perfectly fine to use in this recipe. If you want to grate fresh Parmesan yourself, that's great, just don't use the super fine side of the grater. You want a medium to coarse grate for the breading.
Heavy Cream
Used in Recipe: ½ cup of heavy cream is the wet mixture the chicken goes through before it hits the breading.
What it Does: This is the interesting part of the recipe, and it is the reason mine is different from most chicken Parmesan you will find. Most recipes call for an egg wash. I found the heavy cream brings in the richness, coats the chicken, and it just makes everything perfect. The cream is thick enough to stay where you put it, and as the breaded cutlets rest it dries and holds the panko in place. Sometimes I'll bread the chicken several hours before and let it sit in the fridge on a rack and it's so interesting how it stiffens up and makes transferring it to the air fryer so easy. That coating doesn't move!
Substitutions: Milk and half-and-half are not going to work the same, so I wouldn't reach for those. You definitely want heavy cream for this one. In a pinch you could whip up a couple of eggs instead, but the cream is what I recommend and it is what this recipe was built around.
The Seasoning Blend
Used in Recipe: ½ teaspoon of fine grind sea salt, ½ teaspoon of black pepper, 1 teaspoon of onion powder, 1 teaspoon of garlic powder, 1½ teaspoons of dried oregano, and 1½ teaspoons of dried basil all go into the panko. The chicken itself gets a separate mix of 1 teaspoon of salt and 1 teaspoon of black pepper.
What it Does: Seasoning the panko means the flavor is in the coating, which is the part you taste first. Seasoning the chicken separately, ahead of the breading, does something different: the salt has 15 to 20 minutes to start absorbing into the meat, so the chicken is seasoned and this makes a huge difference in flavor, don't skip it!
Substitutions: You can season up your panko any way you like, this is just how I do it. The amounts are not set in stone. If you are out of dried basil, lean on the oregano, and don't worry about it. Or, simply use Italian Seasoning instead.
Marinara Sauce and Fresh Mozzarella
Used in Recipe: About 1 cup of warm marinara sauce and 6 slices of fresh mozzarella cut about ½ inch thick.
What it Does: Both go on in the last couple of minutes of cooking, which is the whole trick. The sauce warms and the mozzarella melts without having enough time to soak into the coating. My Easy Homemade Marinara Sauce is what I use here, and it is so easy to make and so delicious.
Substitutions: Your favorite spaghetti sauce works perfectly fine in place of homemade marinara. Shredded mozzarella can replace the sliced fresh mozzarella. I like cutting a log into ½ inch pieces and laying a whole piece or half a piece on each cutlet because it looks beautiful and gives you the meltiest cheese on top.
How to Make This Crispy Chicken Parmesan Recipe in the Air Fryer
From start to finish this takes about 20 minutes of hands-on work and 10 to 14 minutes in the air fryer, plus two 10-minute rests that overlap with each other. Here is everything you need to know.
Cut the Chicken Into Even Cutlets and Get Everything Ready
Start by slicing your chicken breasts horizontally into cutlets. You are looking for about ½ inch thick, somewhere between 4 and 6 ounces each, and I check mine by hand as I go rather than measuring. Even thickness matters more than the exact number, because cutlets that match each other cook at the same rate and finish at the same time. Lay them out on a wire rack as you cut them.
Here is everything you want prepped and sitting within reach before you start breading:
- Prep 6 chicken breast cutlets so each one is about ½ inch thick and weighs between 4 and 6 ounces.
- Mix 1 teaspoon of salt with 1 teaspoon of black pepper in a small bowl for seasoning the chicken.
- Measure the breading: 1½ cups of plain panko, 2 ounces of coarsely shredded Parmesan, ½ teaspoon of fine grind sea salt, ½ teaspoon of black pepper, 1 teaspoon of onion powder, 1 teaspoon of garlic powder, 1½ teaspoons of dried oregano, and 1½ teaspoons of dried basil.
- Measure ½ cup of heavy cream.
- Set a wire rack on a sheet tray and have it sitting next to your breading station.
- Slice the fresh mozzarella about ½ inch thick and have about 1 cup of marinara ready to warm.
- Have your oil mister and your metal tipped tongs within reach.
Season the Chicken First
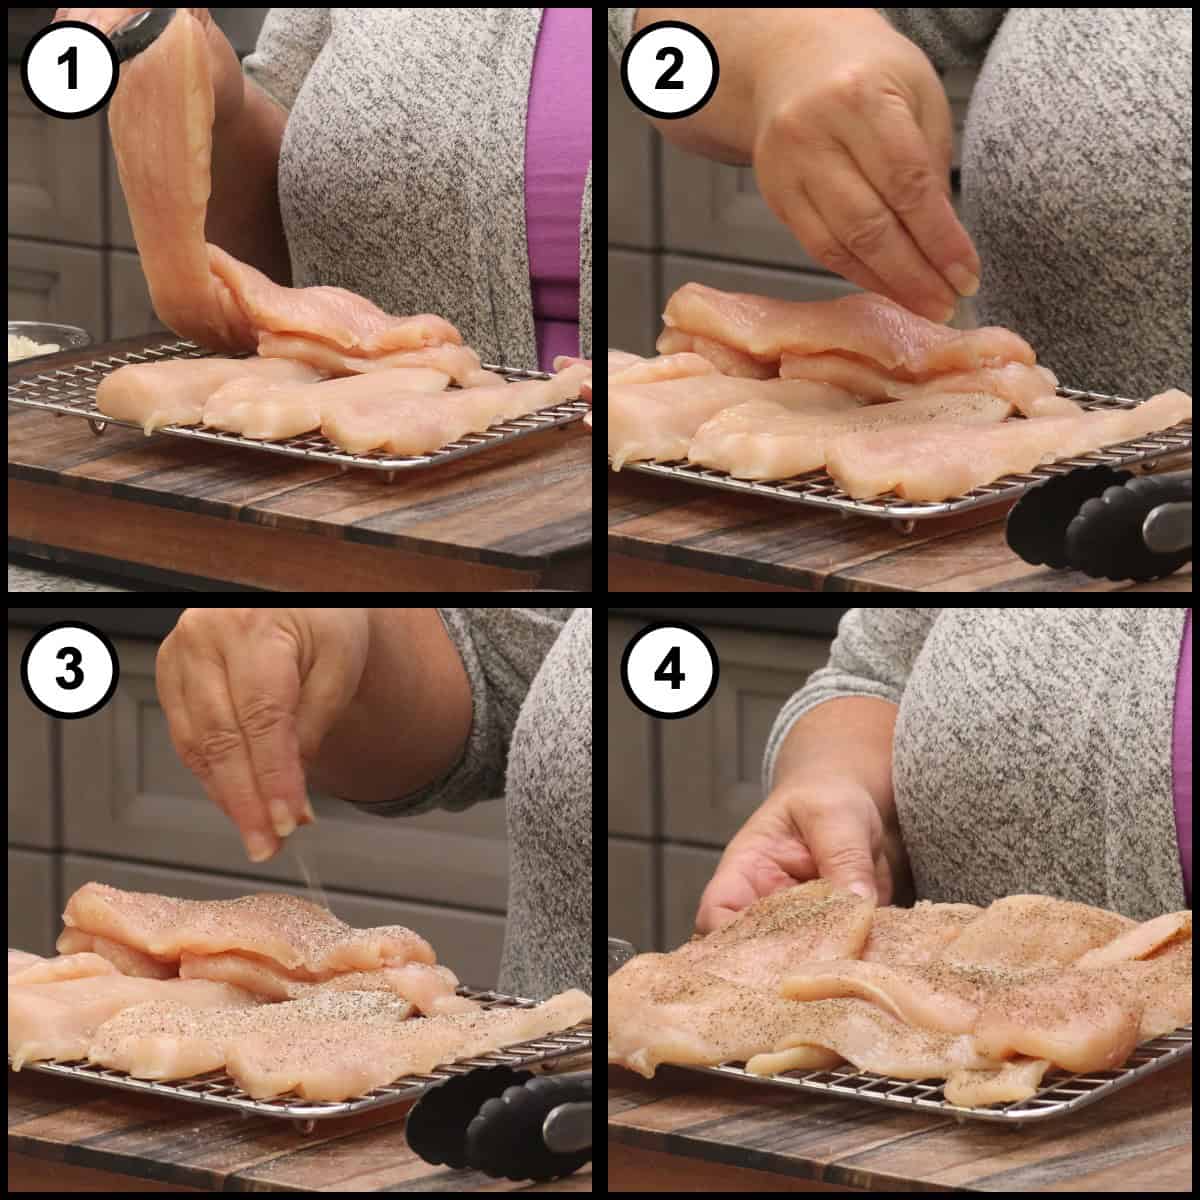
The first thing you want to do, before you even deal with the breading, is get the chicken seasoned. Mix equal parts salt and pepper, then broadcast it over one side of each cutlet, flip them all over, and repeat on the other side. You are only going to use about 1 teaspoon of the mixture total, just enough to coat both sides. Set the chicken to the side for 15 to 20 minutes and let that salt start to absorb while you make up the breading.
Mix the Seasoned Panko and Pour the Cream
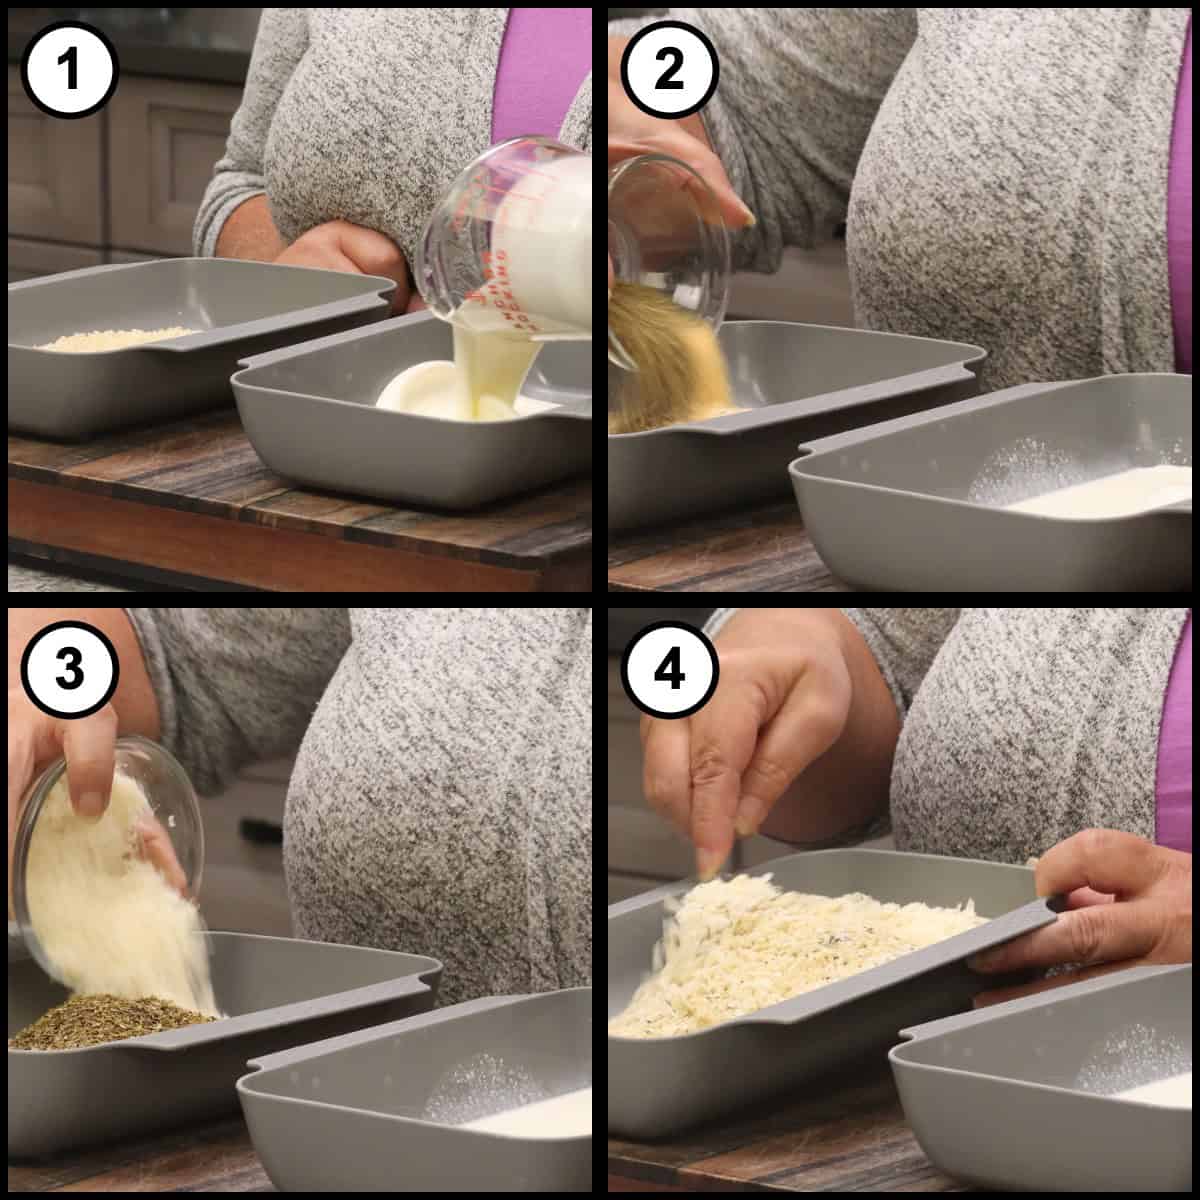
Put 1½ cups of plain panko into a shallow container. Add the fine grind sea salt, black pepper, onion powder, garlic powder, oregano, and basil right on top. Then add the Parmesan, which is very, very important, and mix everything together well. Use a coarse shred so the cheese stays in real pieces rather than disappearing into the crumbs. This blend is the whole flavor of the coating, so give it a good stir and make sure the seasonings are spread all the way through.
Pour ½ cup of heavy cream into a second shallow container so you have your wet and your dry side by side. Set the wire rack on its tray at the end of the line, because every cutlet goes straight from the breading onto that rack. One thing to mention here: this is not the time to preheat the air fryer. You might think it is, but the chicken needs to sit for 10 minutes once it is breaded, and that is when we preheat.
Dip Each Cutlet in Cream, Then Lay It in the Breading
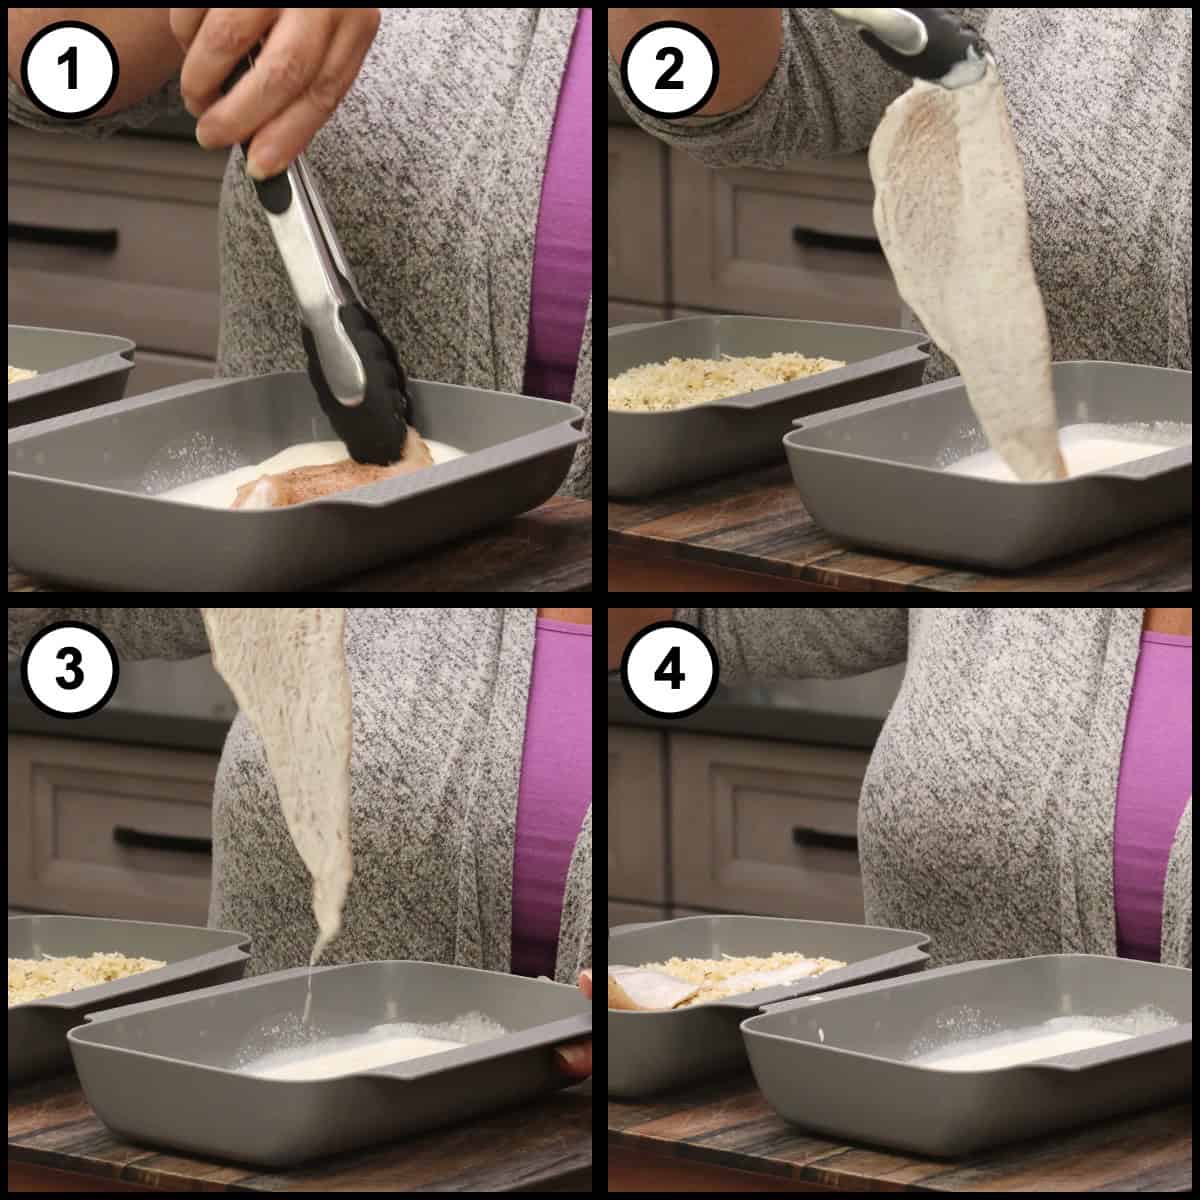
Lay a cutlet into the cream and turn it so both sides have a light coat. Pick it up with your tongs, let the extra drip off for a second, and lay it into the breading mixture. You want a light coat of cream, not a heavy one. The cream is there to give the seasoned panko something to hold onto, and too much of it just slides around.
Spoon the Breading On and Press It In
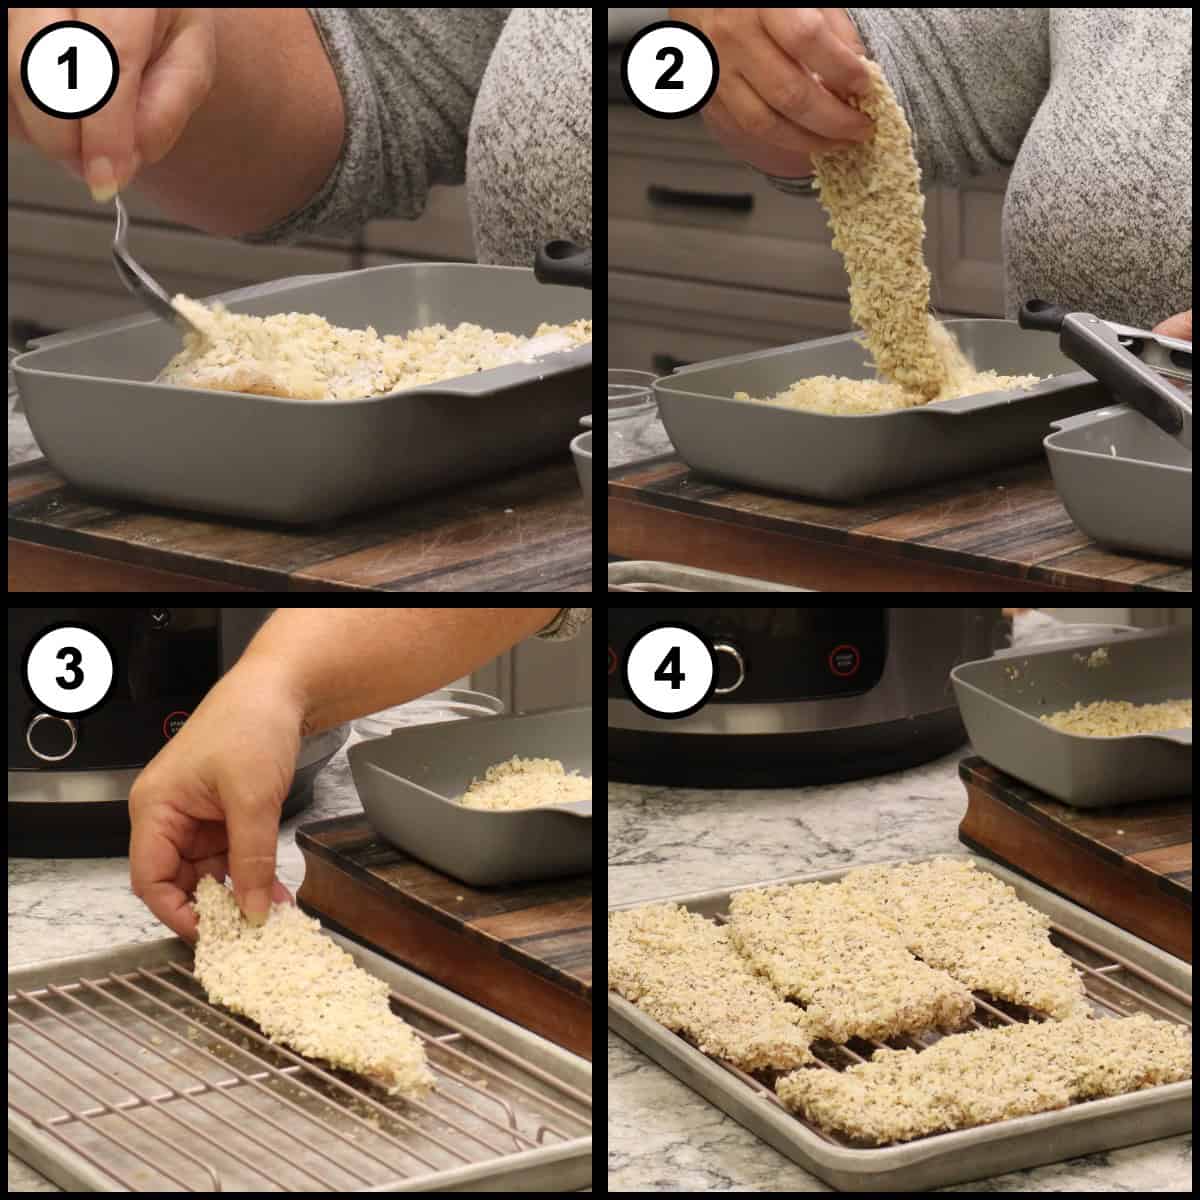
Here's the thing about breading chicken: you really want that coating to actually stick, and spooning it on works so much better than shaking it in a bag. When you spoon the breading mixture directly onto each piece, you can press it down firmly so it grabs onto the chicken instead of sliding around. That pressure is what makes the difference between a coating that stays put and one that flakes off in the pan.
So spoon the breading over the top, press it in, then gently pick the cutlet up, turn it over, and pat the other side. Lay it on the wire rack and repeat with the rest, so air can circulate underneath and everything sets in place before cooking. That is also why we make a little extra breading, maybe even more than we need, so each piece can lay in a nice bed of it. When you are done, discard whatever breading and cream is left. Both have had raw chicken in them, so that is not something to save and sprinkle on top later.
Quick Tip
Once the chicken is breaded it needs to sit for 10 minutes if you're going to cook it right away, and that is the time that we preheat our air fryer. Letting it sit gives the breading time to set up and dries the cream, which is what prevents the coating from coming off in the air fryer. Two rests, one clock, no extra time added to dinner.
Set Up the Air Fryer, Preheat, and Spritz With Oil
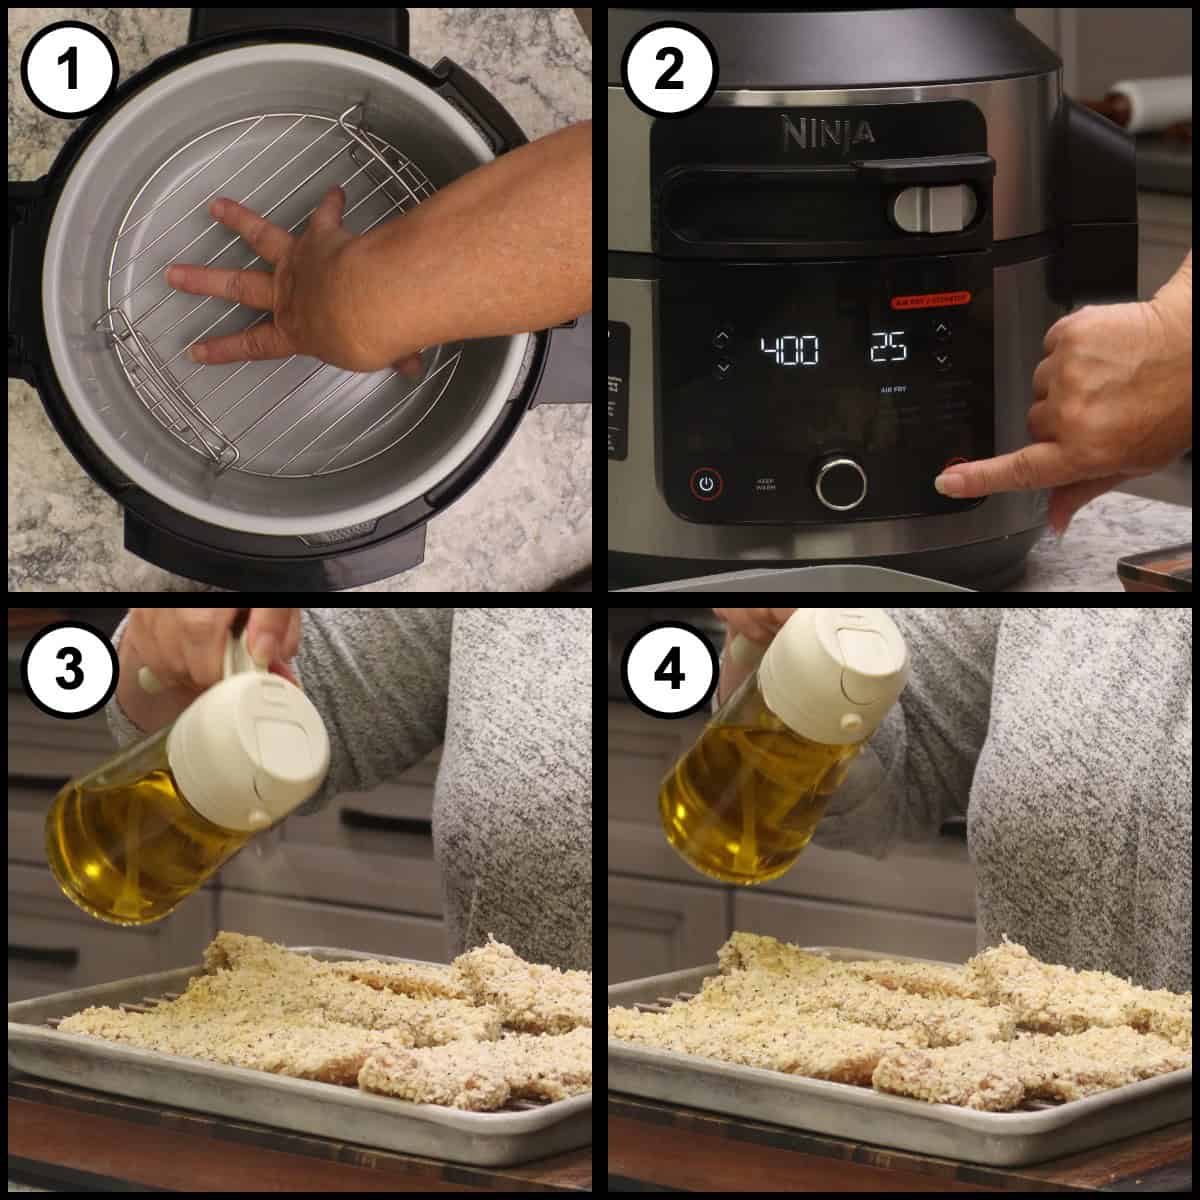
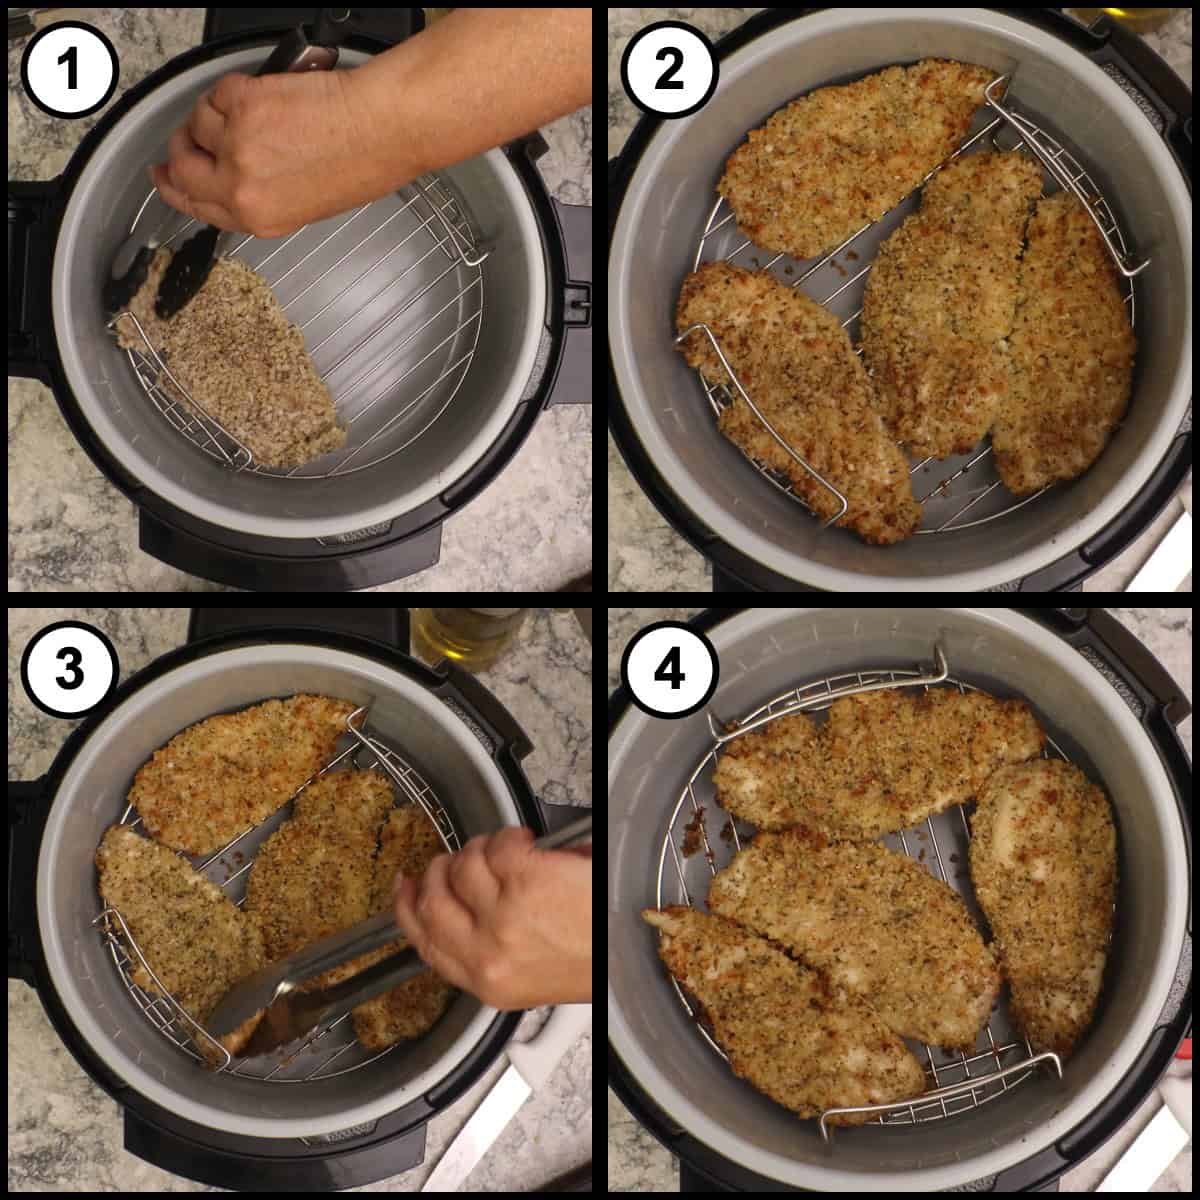
How you set up your air fryer depends on the style you have. For Ninja Foodi chicken Parmesan, which is what I am making here, I use the reversible rack in the low position. It gives me enough clearance from the top, so the breading is not flying around and my mozzarella is not close enough to the heating coil to stick to it, which is a mess to get off. You could also use the basket, but you will only fit about 2 cutlets in there at most. If you have a larger air fryer with a big flat surface rather than a basket, just spread the cutlets out on it.
Whatever surface you are cooking on needs to be inside while it preheats. That part is really important. Preheat at 400℉/200℃ for a full 10 minutes and time it yourself, even if your air fryer has a preheat setting, because they usually don't preheat long enough. Starting on a surface that is properly hot makes a world of difference in the breading staying on the chicken and in the crispiness of the finished dish.
While that comes up to temperature, spritz both sides of every breaded cutlet with oil. Do this whether you are cooking them right now or freezing them to cook later. Get about 1 cup of marinara warming in a small saucepan on the stove over low heat at the same time, and you will have everything ready the moment the preheat is done.
Air Fry, Flip, and Check for Doneness
Once the 10 minutes of preheat is done, lay the chicken on the rack in a single layer and close the lid. Leave them completely alone for at least 5 to 7 minutes. When you take a peek, they should already look beautiful. Now it is time to flip. If you have metal tipped tongs, use them, they have less chance of knocking any breading off than silicone does. Slide them underneath one side and flip carefully, then close the lid and go about another 4 minutes or so. The whole cook runs somewhere between 10 and 14 minutes depending on your air fryer.
Top With Marinara and Mozzarella
With about 2 minutes of cook time left, open the air fryer and spoon a little of the warm marinara right on top of each cutlet. Lay a slice of mozzarella over the sauce, close the lid, and let it finish. You are looking for cheese that is beautifully melted and stretchy rather than browned. If you want it browned, you can go up on the temperature or switch over to broil for those last couple of minutes. That is up to you. I pull mine as soon as the mozzarella is nicely stretchy and gooey.
Pull the chicken when it reads about 162℉/72℃ on an instant read thermometer. By the time it sits and you get everything on the plate, it will come up to 165℉/74℃ on its own.
Quick Tip
Don't put too much sauce on. You can add more at the table, but if you put too much on now, we're going to undo our crispiness, and we don't want to do that. A quarter cup per cutlet is the ceiling and I go lighter than that. What I used was really about a tablespoon.
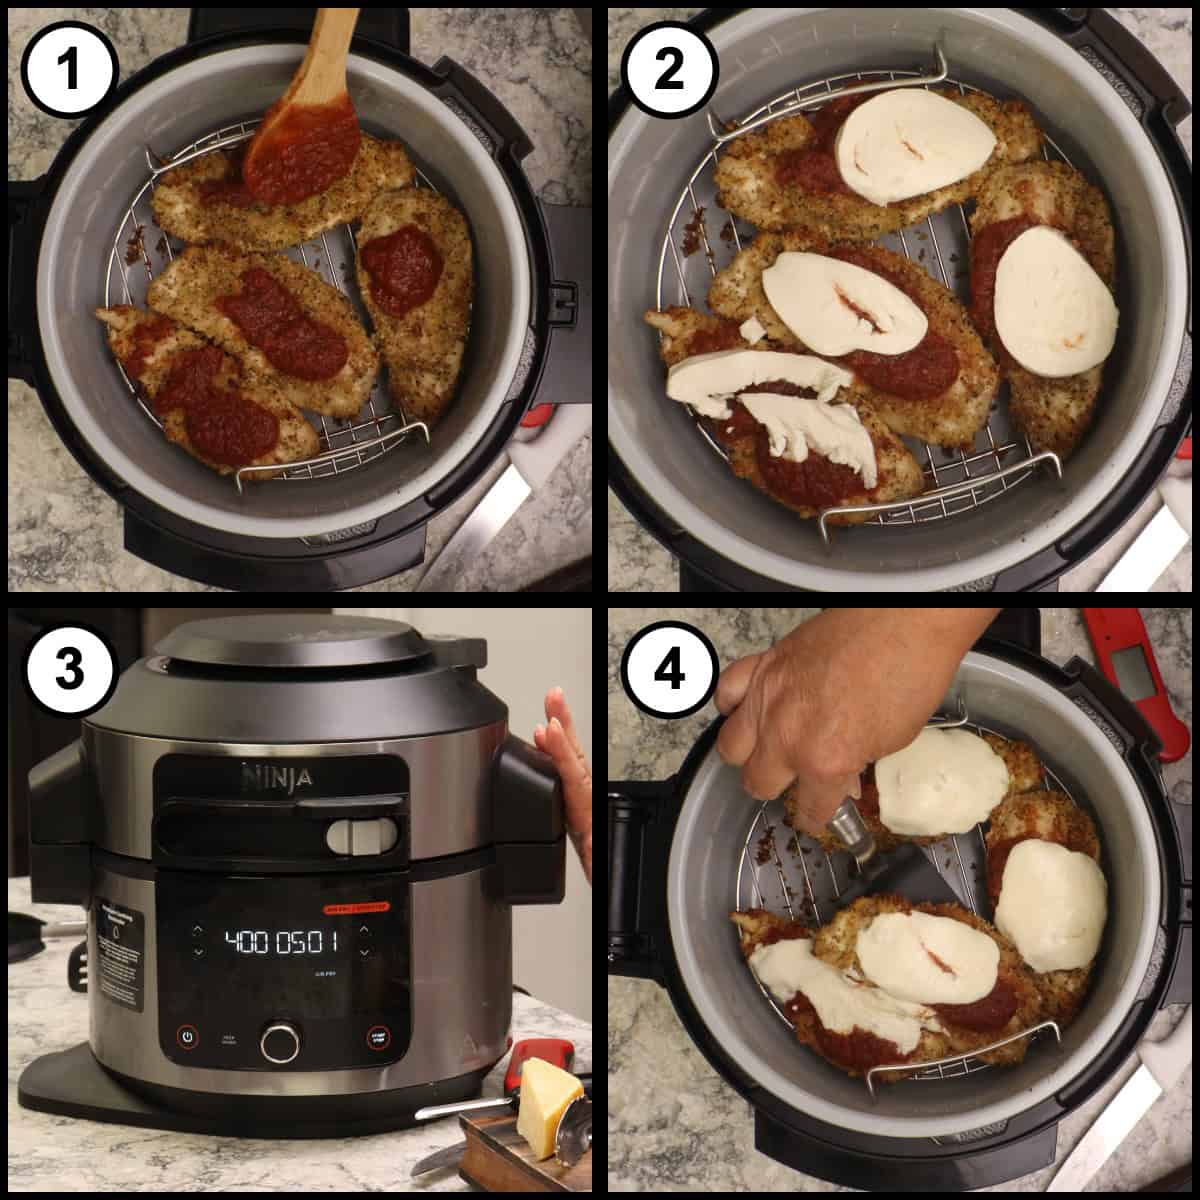
Plate It Up and Finish With Fresh Basil
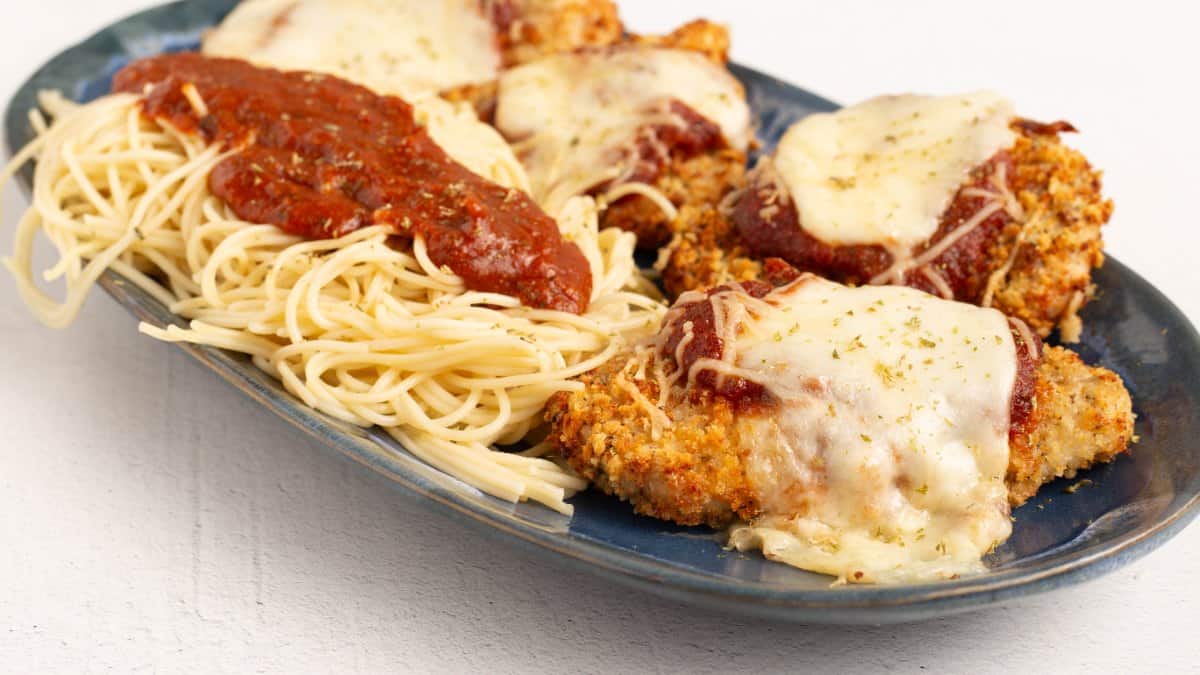
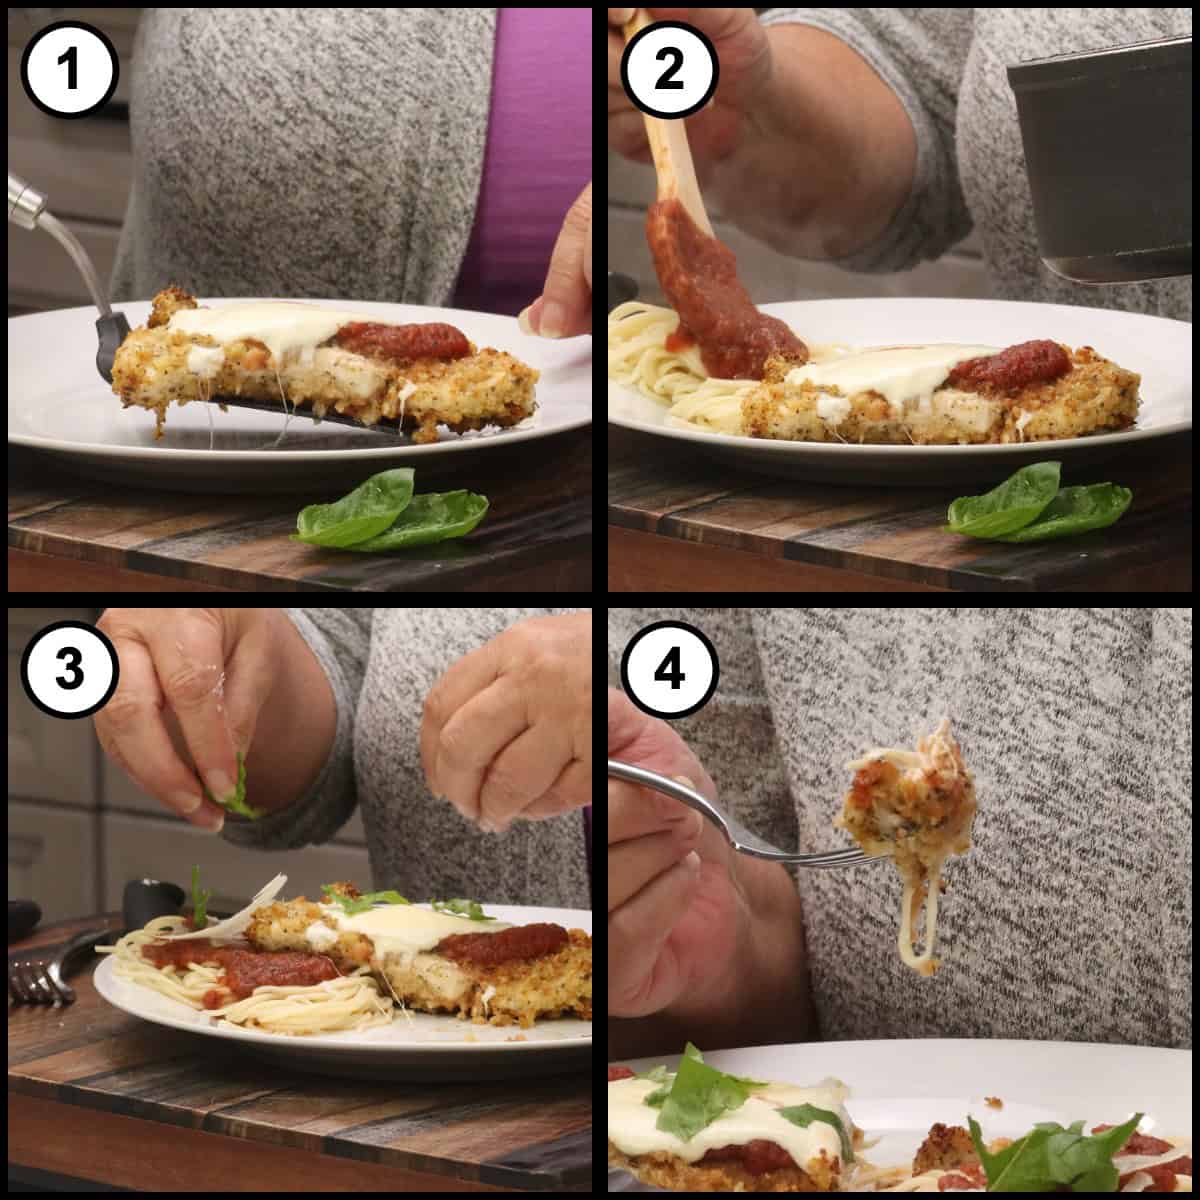
I like to serve mine over angel hair pasta, and I spoon the extra marinara over the pasta rather than over the chicken. That keeps the coating crisp right up to the last bite. Shave a little Parmesan on top, tear some fresh basil over everything, and that is dinner. Put the extra sauce on the table so everyone can add more to their own plate.
Air Fryer Chicken Parmesan
Equipment
- Air Fryer
- Two shallow breading containers
- Oil mister or spray bottle
- Instant-read thermometer
Ingredients
Chicken
- 6 boneless skinless chicken breast cutlets about ½ inch thick and 4 to 6 ounces each; cut them yourself from a family pack or buy them already trimmed
- 1 teaspoon salt mixed with the black pepper below; you only need about 1 teaspoon of the mixture to coat both sides of all 6 cutlets
- 1 teaspoon black pepper mixed with the salt above in equal parts
Seasoned Panko Breading
- 1½ cups panko breadcrumbs plain, not seasoned; panko is what makes this crispy, so do not substitute flour or fine breadcrumbs
- 2 oz Parmesan cheese, coarsely shredded about ½ cup; the bagged shredded kind is perfectly fine, just avoid the fine powdery grate
- ½ teaspoon fine grind sea salt
- ½ teaspoon black pepper
- 1 teaspoon onion powder
- 1 teaspoon garlic powder
- 1½ teaspoon dried oregano
- 1½ teaspoon dried basil
For Dipping
- ½ cup heavy cream milk and half-and-half will not work the same way here
For Cooking, Topping and Serving
- oil spray for spritzing both sides of the breaded cutlets
- 1 cup marinara sauce, warmed homemade or your favorite jarred sauce; use about ¼ cup or less per cutlet and go light, closer to a tablespoon, to protect the crispy coating
- 6 slices fresh mozzarella cut about ½ inch thick from a log; use a whole slice or half a slice per cutlet. Shredded mozzarella works too
- Parmesan cheese, shaved, for serving to taste
- fresh basil leaves, for serving left whole or cut into a chiffonade
- cooked angel hair pasta, for serving optional; any pasta you have on hand is perfectly fine
Would you like to save this recipe?
Instructions
- Prep the chicken so each cutlet is about ½ inch thick and weighs between 4 and 6 ounces. You can cut them yourself from a family pack of chicken breasts or buy cutlets already trimmed, whichever you prefer. This amount of breading will coat 6 cutlets.6 boneless skinless chicken breast cutlets
- Mix 1 teaspoon of salt and 1 teaspoon of black pepper together in a small bowl. Broadcast the mixture lightly over one side of each cutlet, flip them, and repeat on the other side. You only need about 1 teaspoon of the mixture total, just enough to coat both sides. Set the chicken aside for 15 to 20 minutes so the salt can start to absorb.1 tsp salt
- While the chicken rests, make the seasoned panko breading. In a shallow container, combine 1½ cups of plain panko breadcrumbs, 2 ounces of coarsely shredded Parmesan cheese, ½ teaspoon of fine grind sea salt, ½ teaspoon of black pepper, 1 teaspoon of onion powder, 1 teaspoon of garlic powder, 1½ teaspoons of dried oregano, and 1½ teaspoons of dried basil. Mix everything together well.1½ cups panko breadcrumbs, 2 oz Parmesan cheese, coarsely shredded, ½ tsp fine grind sea salt, ½ tsp black pepper, 1 tsp onion powder, 1 tsp garlic powder, 1½ tsp dried oregano, 1½ tsp dried basil
- Pour ½ cup of heavy cream into a second shallow container. Set a wire rack on a sheet tray next to your two containers. Do not preheat the air fryer yet.½ cup heavy cream
- Lay a cutlet in the heavy cream and turn it so both sides have a light coat. Pick it up, let the extra cream drip off, and lay it into the breading mixture.
- Spoon the breading over the top of the cutlet and press it into the chicken. Gently pick the cutlet up, turn it over, and pat the breading onto the other side. Do not use a bag and shake it; you want the breading pressed on, not sliding around. Lay the breaded cutlet on the wire rack and repeat with the remaining chicken.
- Discard any leftover breading and cream. Both have been in contact with raw chicken, so they cannot be saved or used as a topping.
- Spritz both sides of every breaded cutlet with oil. Do this whether you are cooking them now or freezing them for later.oil spray
- Let the breaded chicken sit on the rack for 10 minutes, and use that time to preheat the air fryer to 400℉/200℃ for a full 10 minutes. Preheat with the cooking surface you are going to use already inside. In the Ninja Foodi, use the reversible rack in the low position, which keeps the chicken away from the heating element so the breading stays put and the mozzarella does not touch the coil. Even if your air fryer has a preheat setting, time it for the full 10 minutes.
- While the air fryer preheats, warm about 1 cup of marinara sauce in a small saucepan on the stove over low heat.
- Place the breaded cutlets on the hot cooking surface in a single layer and close the lid. Cook at 400℉/200℃ and leave them alone for 5 to 7 minutes.
- Open the air fryer and flip each cutlet using metal tipped tongs, sliding the tongs underneath one side so you knock off as little breading as possible. Close the lid and cook for about 4 more minutes.
- With about 2 minutes left, top each cutlet with a light spoon of the warm marinara, closer to a tablespoon than a full ¼ cup, then lay a slice of fresh mozzarella over the sauce. Close the lid and finish cooking until the cheese is melted and stretchy. Total cook time runs somewhere between 10 and 14 minutes. The chicken will read about 162℉/72℃ when you pull it and will come up to 165℉/74℃ as it rests.1 cup marinara sauce, warmed, 6 slices fresh mozzarella
- Serve each cutlet as it is or over warmed angel hair pasta with a little extra marinara. Finish with shaved Parmesan cheese and fresh basil.Parmesan cheese, shaved, for serving, fresh basil leaves, for serving, cooked angel hair pasta, for serving
Notes
• Season the chicken before you bread them and let it sit for 15 to 20 minutes. That rest lets the salt start to absorb into the meat and it is hands-off time, so it is not counted in the total time above.
• After breading, the cutlets need to sit for 10 minutes before they go in. That rest is what sets the coating and dries the cream, which is why the breading stays on the chicken instead of coming off in the air fryer.
• Set a wire rack on a sheet tray before you start breading. Air moving underneath the cutlets helps everything set up and keeps the breading on the chicken. COOKING TIPS
• Preheat to 400℉/200℃ for a full 10 minutes with the cooking surface already inside. A properly hot surface makes a real difference in both the crispiness and the breading staying on. • Cook in a single layer and leave the chicken alone for the first 5 to 7 minutes before you flip.
• Metal tipped tongs knock off less breading than silicone. Slide them underneath one side and flip carefully. BREADING TIPS
• Spoon the breading over the chicken and press it in rather than shaking the cutlets in a bag. Pressing is what makes the coating grab the chicken.
• A coarse shred on the Parmesan is what you want because the cheese is part of the breading. If you are grating it fresh, use the medium or coarse side of the grater, never the fine side. • Finish under a broil setting or bump the temperature up for the last couple of minutes if you want the mozzarella browned rather than just melted and stretchy. NUTRITIONAL DISCLAIMER
Nutritional information provided is an estimate based on typical ingredient values and standard portion sizes. Actual nutritional content may vary significantly depending on specific brands used, ingredient substitutions, preparation methods, portion sizes, and individual cooking techniques. For precise nutritional information tailored to your specific ingredients and preparation, please consult with a registered dietitian or use laboratory analysis. This information should not be used for medical nutrition therapy or to manage medical conditions without professional guidance.
Nutrition
Alternate Cooking Instructions
- Ninja Combi: I tested this in the Ninja Combi first and it turns out beautifully as a Combi Meal. In the Combi I cook the cutlets from frozen with the pasta underneath, so the whole dinner finishes together. It is definitely worth making that way and the recipe is coming soon!
- Any other air fryer: I have done this in many different air fryers and it works beautifully. The difference is only how many you can cook at once. If yours has a large flat cooking surface rather than a basket, spread the cutlets out in a single layer on it.
- Straight from frozen: Breaded cutlets can go into the air fryer frozen, no thawing. Cook at a lower temperature for a longer time than you would fresh, and take them to an internal temperature of 165℉/74℃.
Storage & Reheating Instructions
How to Store Leftover Air Fryer Chicken Parmesan
The storage method I use most for this recipe happens before anything is cooked. This breading makes 6 cutlets, and if your air fryer cannot fit all 6 at once, the extras freeze beautifully.
- Freezer, breaded and raw: Bread the cutlets and spritz both sides with oil just as you would if you were cooking them. Set the tray directly into your freezer (line the tray with parchment if you don't have them on a rack) and freeze them overnight. Once they are solid, take them off the tray, put them into any type of freezer bag, and you have chicken Parmesan ready whenever you want it.
- Refrigerator, after cooking: Store cooked leftovers in an airtight container in the refrigerator.
Quick Tip
Freeze the cutlets flat on the tray before you bag them, not straight into the bag. Freezing them on the tray first (line with parchment if you aren't using a rack) means they go into the bag as separate pieces, so you can pull out one or two at a time instead of prying apart a frozen block.
How to Reheat Air Fryer Chicken Parmesan
- Air fryer: Reheat cooked cutlets in the air fryer rather than the microwave. Dry circulating heat firms the panko coating back up, and a microwave will soften it.
- Cooking from frozen: Frozen breaded cutlets go in without thawing. Use a lower temperature than you would for fresh and give them a longer time, cooking until the internal temperature reaches 162℉/74℃. You can also thaw them and cook them exactly as written above.
Frequently Asked Questions
Four things do the work, and none of them are hard. Use panko rather than fine breadcrumbs, because the larger flakes stay open and crunchy. Dip in heavy cream instead of an egg wash so the coating has something thick to hold onto. Let the breaded cutlets rest 10 minutes before cooking so the coating sets and the cream dries. And preheat the air fryer a full 10 minutes with the cooking surface inside, so the chicken hits a properly hot surface. The last one is to go light on the sauce, because too much sauce will undo all of that crispiness.
Put the Parmesan into the breading rather than only on top. I use 2 ounces of coarsely shredded Parmesan, about ½ cup, mixed right into 1½ cups of plain panko with my seasoning blend. A coarse shred matters here because the cheese is part of the coating and you want it in real pieces that brown, not a fine powder that disappears into the crumbs. Then spoon the mixture onto each cutlet and press it in so it grabs hold. Shave a little more Parmesan over the top at serving.
You could whip up a couple of eggs in a pinch, but heavy cream is what I recommend and it is what this recipe was built around. I found the heavy cream brings in the richness, coats the chicken, and it just makes everything perfect. It is thick enough to stay where you put it and it dries down during the rest, which is what holds the panko in place. Milk and half-and-half are not going to work the same way, so I would not substitute those.
Yes, and time it yourself even if your air fryer has a preheat setting, because they usually do not preheat long enough. Preheat at 400℉/200℃ for a full 10 minutes with whatever surface you are cooking on already inside, whether that is the reversible rack or the basket. A properly hot cooking surface makes a world of difference in the breading staying on the chicken and in the crispiness of the finished dish. The timing works out perfectly because the breaded chicken needs to rest 10 minutes anyway.
I get asked this a lot and I do not think you are going to have that good of luck with a bag, shake and bake style. You really want this breading to sit on and press into the chicken, and shaking it around in a bag does the opposite. Spooning the mixture over each cutlet lets you press it down firmly so it grabs onto the chicken, and that pressure is the difference between a coating that stays put and one that flakes off. It also means you can lay each piece in a nice bed of breading, which is why I make a little extra.
Yes, and they freeze beautifully. This breading makes 6 cutlets, so if your air fryer cannot fit all 6 at one time, freezing the extras is the plan. Bread them and spritz both sides with oil exactly as you would for cooking, then set the tray directly into the freezer and freeze overnight. Once they are solid, take them off the tray and put them into any type of freezer bag. When you want chicken Parmesan you can air fry them right from frozen at a lower temperature for a longer time, or thaw them and cook them as written.
Variations
- Shredded mozzarella: Use shredded mozzarella in place of the sliced fresh mozzarella, that is perfectly fine. I like slices off a log because of how they look and how they melt, but shredded gets you to the same delicious place.
- Browned cheese on top: If you would rather have the mozzarella browned than just melted, go up on the temperature or switch over to broil for the last couple of minutes. That is completely up to you.
- Season the panko your way: The blend in this recipe is how I do it, not a rule. Adjust the oregano and basil to your taste, or use seasoned panko and skip the blend entirely.
- Skip the pasta: Serve the cutlet on its own. I love it with angel hair, but honestly, I don't even need the pasta.
Chicken Breast Dinners for a Weeknight
Chicken breasts are what I reach for on a busy weeknight, and these are the dinners we come back to again and again. Every one of them comes together without any fuss, and they are all so delicious. Take a look and see which one you want to make next.
About the Recipe Author, Louise Long
Louise is a full-time recipe creator and food blogger @ The Salted Pepper. She has over 30 years of experience with cooking and recipe development. She owned a restaurant for several years and was a full-time RN until retiring to blog full-time.

She published her first cookbook in the Fall of 2018 and is very interested in writing several more.
Louise is also the creator of an online Ninja Foodi Pressure Cooking Course with over 100 instructional step-by-step videos. People absolutely rave about the course and all the value they have received from it.
Louise has several very active Facebook groups that help people with the basics of cooking and learning more about the appliances they love.
Ninja Foodi Pressure Cooker & Air Crisper 101
Ninja Woodfire Outdoor Grill & Smoker
Louise is also a YouTube creator and you can find most of her recipes in video format on The Salted Pepper YouTube channel.
She is very responsive to messages and eager to help in any way she can. Get more Information about Louise & contact information
I WOULD LOVE TO SEE WHAT YOU ARE COOKING UP IN YOUR KITCHEN! TAG ME @THESALTEDPEPPER ON YOUR FAVORITE SOCIAL MEDIA PLATFORM WHEN YOU MAKE A DISH!
BE SURE TO FOLLOW THE SALTED PEPPER RIGHT HERE ⇓⇓⇓⇓⇓
Leave a Reply