
- 9-inch pie plate
- Box grater
- Large Mixing Bowl
- Rolling Pin
- Medium saucepan
- Baking tray
- Parchment Paper
- Dried beans or pie weights
- Plastic wrap
- Piping bag with a large open star tip
- Vegetable peeler
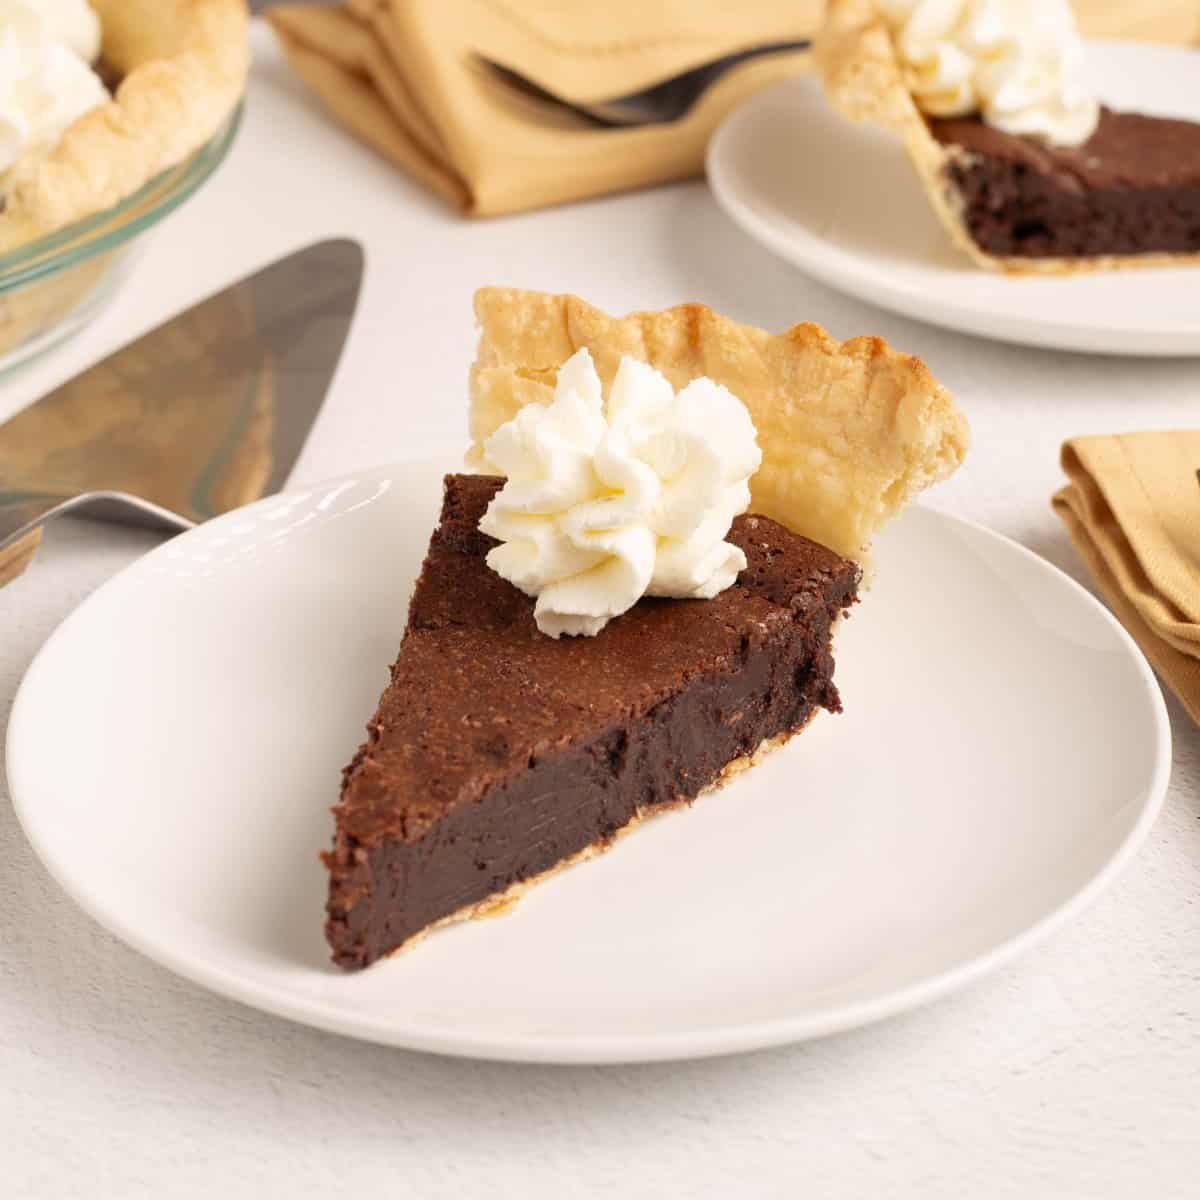
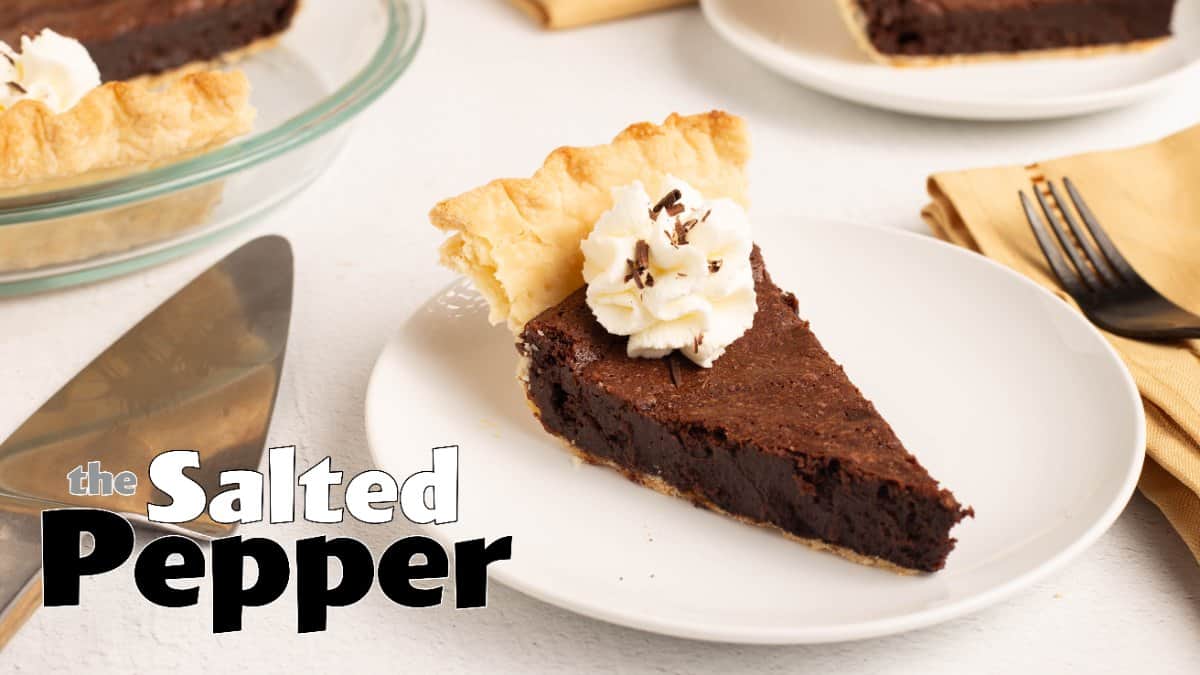
If the Mississippi mud pie recipes you have found online look like a layered pudding dessert, this one is going to surprise you. This is the old fashioned Mississippi mud pie I have been making for 20 years, going all the way back to the days when I served it at my barbecue restaurant. It is a baked chocolate pie with a crackly brownie top, a fudgy center, and an all-butter homemade crust underneath.
Would you like to save this recipe?
Here is the thing about this pie. It is not layered, it is not a refrigerator pie, and there is no flour in the filling. The characteristic of a Mississippi mud pie as I know it is that brownie-like texture, and we get there with sugar and eggs rather than with pudding. Once you taste that crackly top over the fudgy chocolate center, I think you will understand why I have never changed the method. If you want a chocolate pie with no oven time at all, my no-bake chocolate mousse pie is the one to make.
The homemade pie crust is genuinely foolproof, and you do not need a food processor or a mixer to make it. We grate very cold butter into the flour and work it with our hands. I will walk you through every step, including the blind baking and the tempering, because those are the two places where a chocolate pie like this can go sideways.
Suggested Kitchen Tools for Mississippi Mud Pie
- 9-inch pie plate (glass or ceramic)
- Box grater (the large holes)
- Large mixing bowl
- Rolling pin
- Baking tray (used upside down in the oven)
- Parchment paper and about 1 pound of dried beans or pie weights
- Plastic wrap
- Piping bag with a large open star tip
- Vegetable peeler (for the chocolate shavings)
Ingredients & Substitutions
This chocolate Mississippi mud pie recipe uses a short list of ingredients, and most of them are already in your pantry. Let's take a closer look at each one.
All-Purpose Flour and Salt
Used in Recipe: 1¼ cups of all-purpose flour and ¼ teaspoon of fine grind sea salt make up the dry base of the homemade pie crust, with a little extra flour for rolling.
What it Does: The flour gives the crust its structure, and the salt keeps it from tasting flat under all that chocolate. The extra flour you sprinkle on the counter stays on the surface of the dough and never gets worked into it, which is how you roll the dough out without toughening it.
Substitutions: Kosher salt works at the same measurement as fine grind sea salt. If you are using table salt, cut it back to ⅛ teaspoon because it is finer and packs more salt per teaspoon. A measure-for-measure gluten-free blend can stand in for the all-purpose flour, though the dough will be a little more fragile to roll.
Salted Butter
Used in Recipe: ½ cup of very cold salted butter goes into the pie crust, and another ½ cup goes into the chocolate filling. That is 1 stick in each place.
What it Does: In the crust, the butter is everything. We grate it on the large holes of a box grater so it stays in visible strips, and those strips steam in the hot oven and give you the flaky layers. In the filling, the butter carries the chocolate and gives the pie its rich, fudgy body.
Substitutions: Unsalted butter works in both places. Just add a little extra salt to the flour for the crust. The one thing you cannot substitute is the temperature. The butter for the crust has to come straight out of the refrigerator, and if it has been in the freezer, let it sit out about 5 minutes or it will chip instead of grate.
Chocolate
Used in Recipe: 6 ounces of chocolate total, chopped small. I use 2½ ounces of unsweetened chocolate and 3½ ounces of a 50% cacao dark chocolate, which lands around 73% cacao overall. A teaspoon of unsweetened cocoa powder also gets brushed over the parbaked crust.
What it Does: The chocolate is the main flavor so use the type of chocolate that you love. I have tested this with milk chocolate, semi-sweet, and dark, and about 73% cacao is my sweet spot. The best results come from a mix of unsweetened chocolate and the kind of chocolate you like.
The cocoa powder brushed on the crust adds a little extra protection between the crust and the wet filling but is completely optional.
Substitutions: Use whatever combination you like, including dark chocolate with chocolate chips, or all milk chocolate for a sweeter pie. Keep the total at 6 ounces. If you go sweeter than 73% cacao, the pie will be much sweeter and you can decrease the sugar in the pie by about ¼ cup.
Granulated Sugar and Light Brown Sugar
Used in Recipe: ½ cup of granulated sugar and ½ cup of packed light brown sugar go into the chocolate filling.
What it Does: This pair is doing something specific, so do not swap it out casually. I have left the corn syrup out of this recipe, and the brown sugar is what helps keep the sugar from crystallizing without it. More importantly, we do not cook these sugars until they are smooth. The grain that stays in the filling is exactly what gives you the crackly brownie top.
Substitutions: Dark brown sugar can replace the light brown sugar for a deeper molasses note. I would not reduce the total sugar, because the sugar is structural here and not just sweetness.
Eggs and Vanilla
Used in Recipe: 3 large room temperature eggs whisked with 1 teaspoon of vanilla extract and ¼ teaspoon of fine grind sea salt.
What it Does: The eggs are what turn a pan of melted chocolate into a brownie-textured pie. They set the filling, they give you the crackly top with the sugar, and they are the reason this is a baked pie and not a refrigerator pie. Room temperature matters because they whip up better and they temper far more easily against the warm chocolate.
Substitutions: Stick with whole large eggs here. Vanilla paste can replace the extract and works beautifully. Do not be alarmed when the whisked eggs look dark before any chocolate goes in, that is just the vanilla.
Heavy Cream and Powdered Sugar
Used in Recipe: 1 cup of heavy cream, 1 teaspoon of vanilla extract, and 2 tablespoons of powdered sugar make the Chantilly cream that goes around the edge of the pie.
What it Does: This is a simple homemade whipped cream, and it is deliberately not very sweet. Against a pie this rich, a sweet whipped cream would be too much. The recipe makes exactly enough for one pie with no leftovers, which is a good thing because whipped cream does not keep.
Substitutions: Add more powdered sugar if you prefer a sweeter cream. Store-bought whipped topping will work if you are short on time, though the homemade version takes about two minutes and tastes so much better.
How to Make Mississippi Mud Pie
There is about 35 minutes of hands-on work here and 30 minutes of baking, but the pie also needs some patience. The dough rests 30 minutes, the shaped crust chills 10 minutes, and the baked pie wants at least 4 hours in the refrigerator before you cut it. Here is everything you need to know!
Mise En Place
- Measure 1¼ cups of all-purpose flour and ¼ teaspoon of fine grind sea salt into a large bowl. Have extra flour ready for rolling.
- Keep ½ cup of salted butter in the refrigerator until the moment you grate it. Have ¼ cup of cold tap water measured out.
- Measure ½ cup of salted butter, ½ cup of granulated sugar, and ½ cup of packed light brown sugar for the filling.
- Have parchment paper and about 1 pound of dried beans ready for the blind bake, plus a teaspoon of cocoa powder.
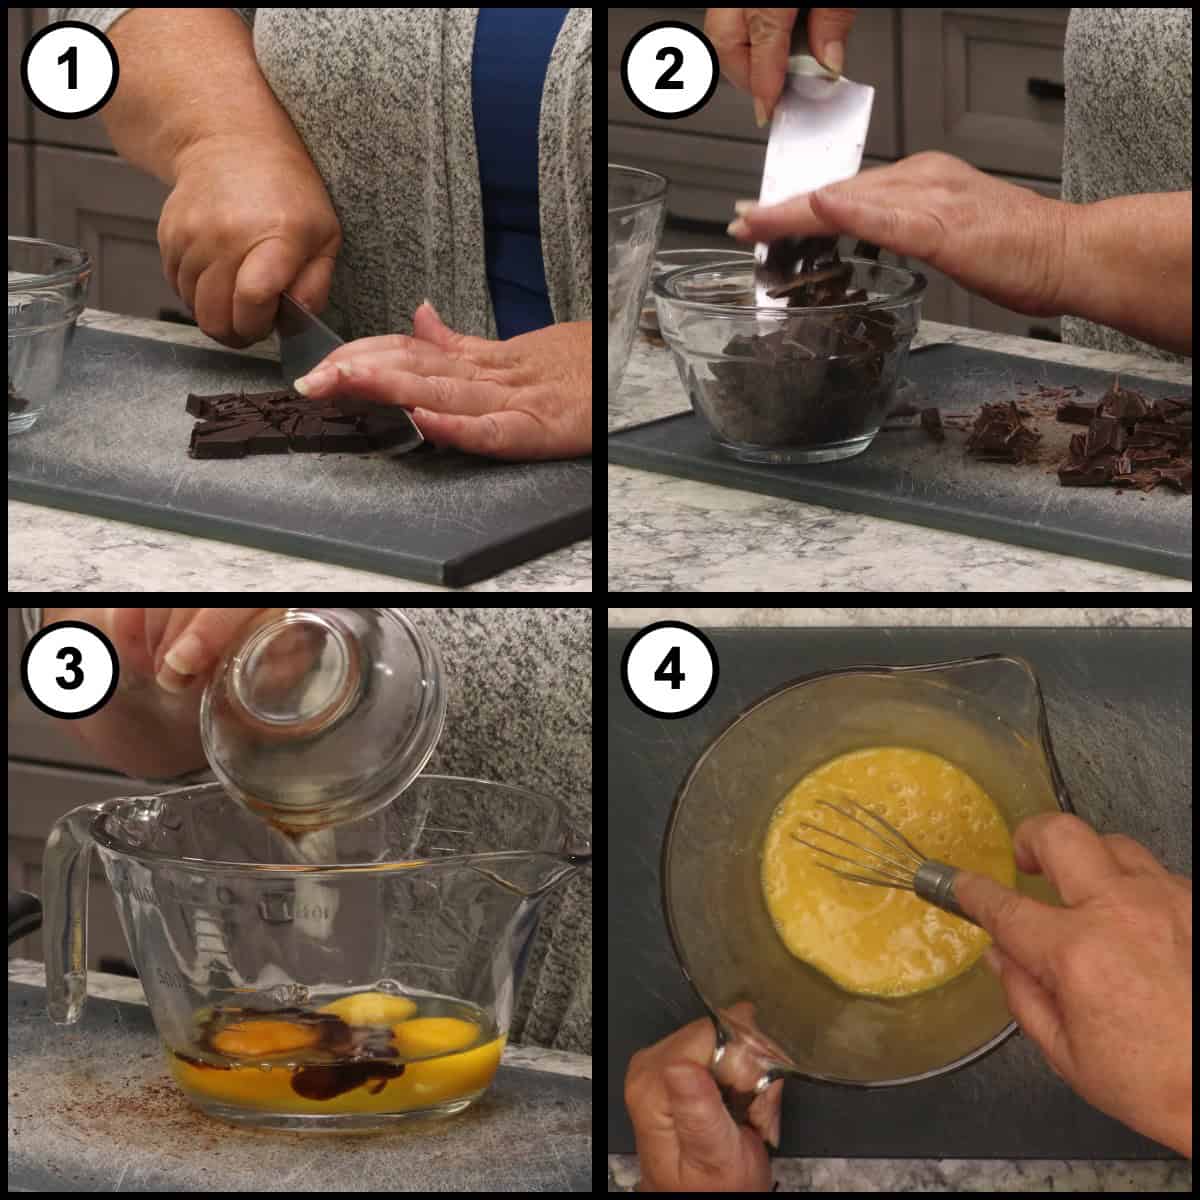
- Chop 6 ounces of chocolate into small pieces so it melts quickly and gently.
- Whisk 3 room temperature eggs with 1 teaspoon of vanilla extract and ¼ teaspoon of fine grind sea salt. Set them aside on the counter and do not refrigerate them.
Quick Tip
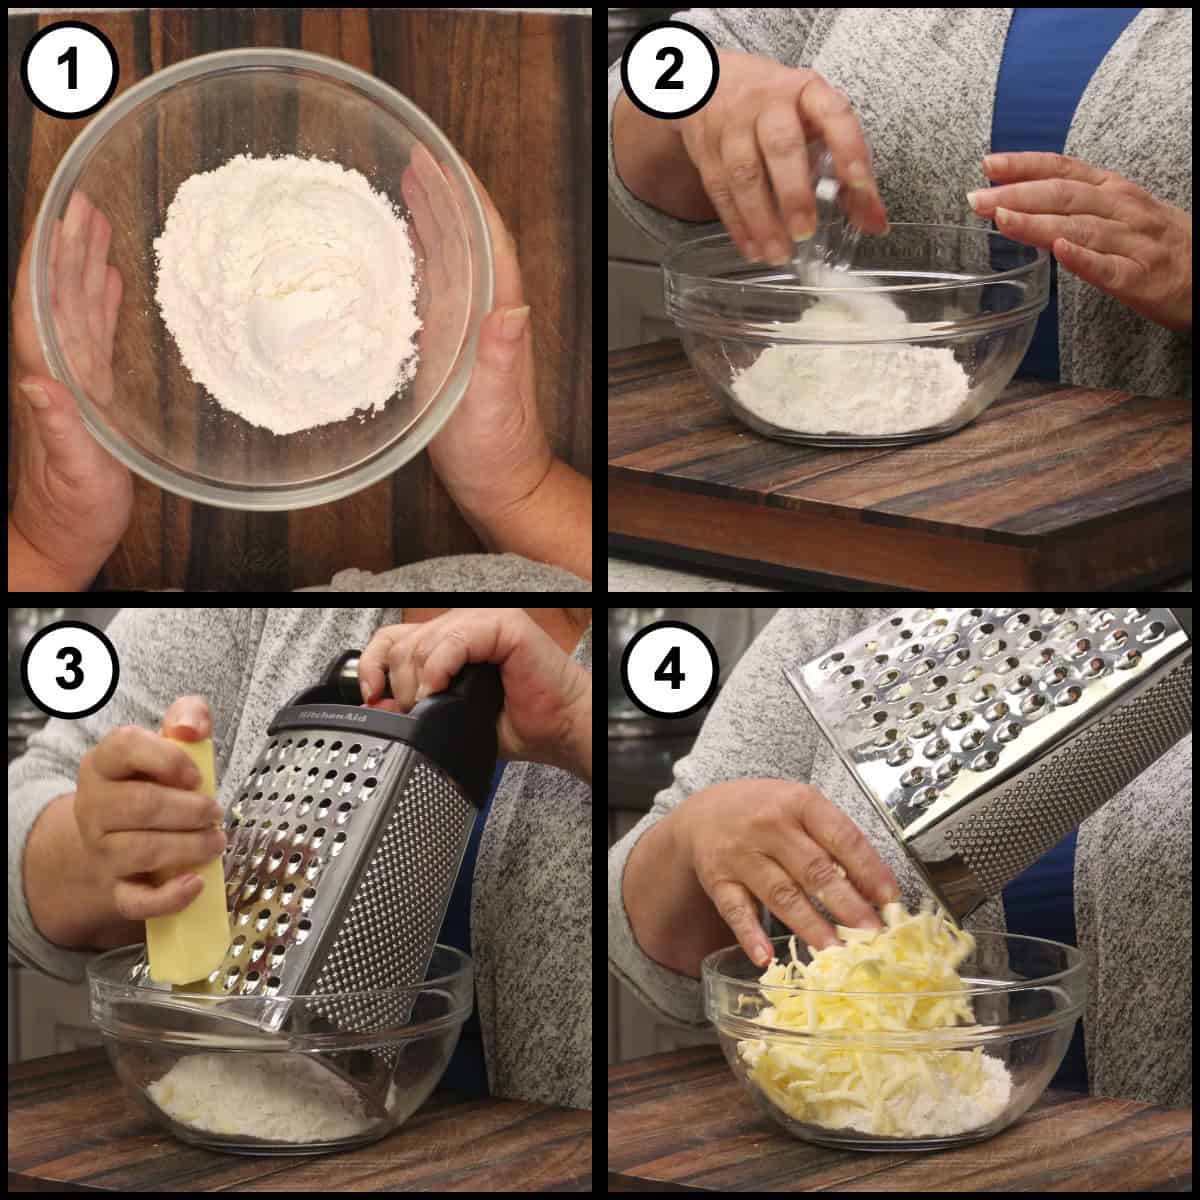
Use the large holes of the box grater, not the small ones. That is really important. Grating the butter into strips and coating each one in flour is what keeps your body heat from melting it, and it is the reason this dough stays so easy to work with.
Homemade Pie Crust
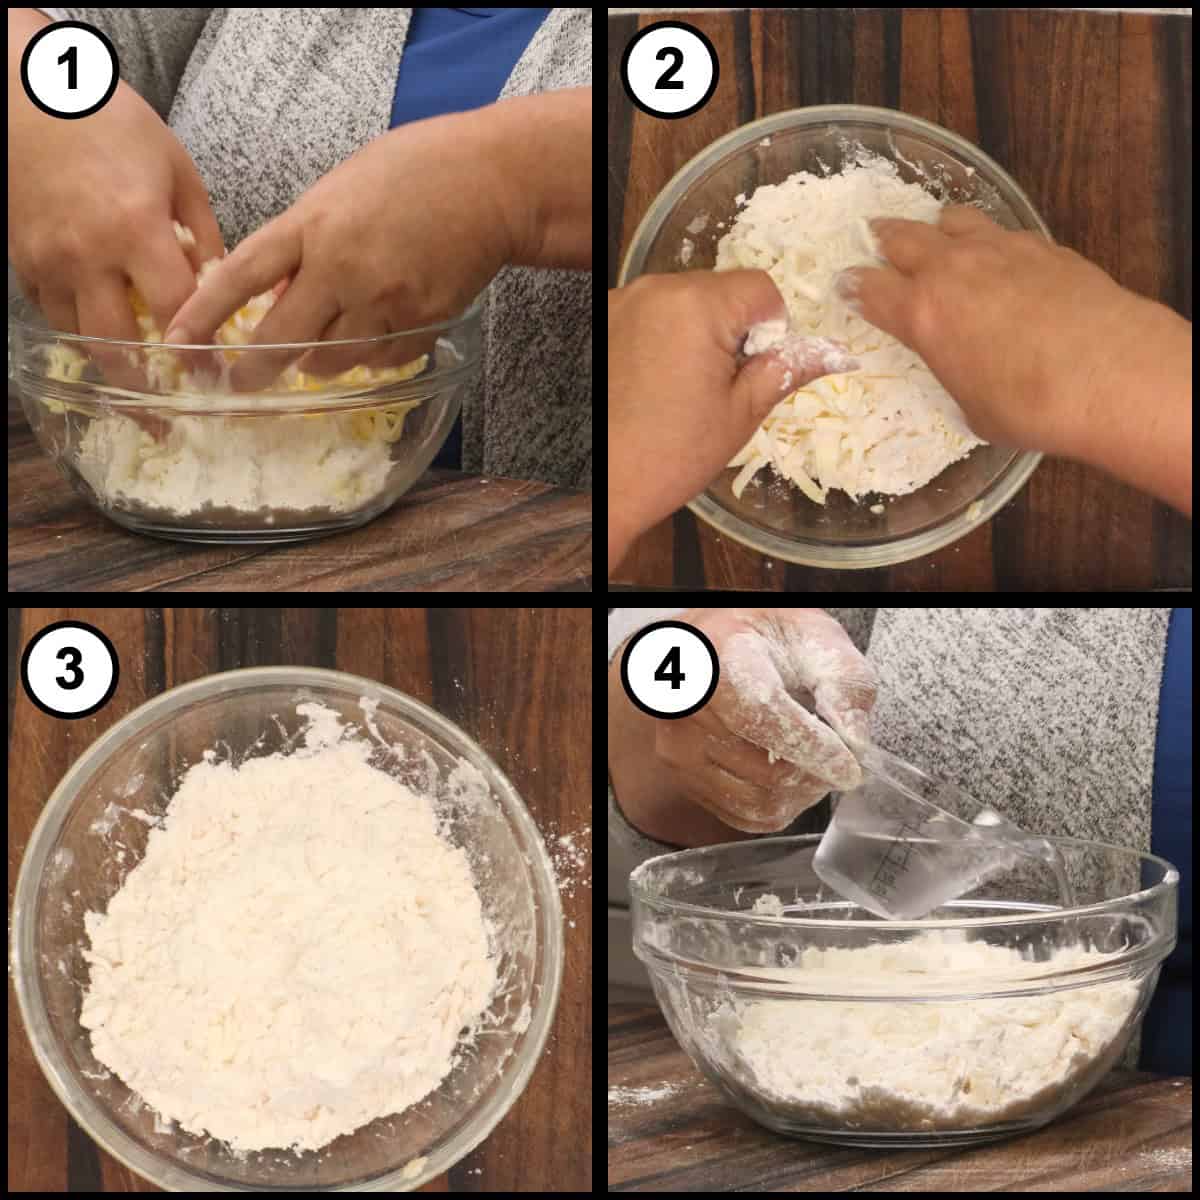
Measure 1¼ cups of all-purpose flour and ¼ teaspoon of fine grind sea salt into a large bowl. Grate the very cold butter on the large holes of a box grater directly into the bowl.
Toss the Butter with the flour and Add the Water
Using your hands, toss the grated butter until every strand is coated with flour, then lightly break the butter up until you have little tiny pebbles. Keep tossing as you go. Do not work it into the flour, you want those pieces to stay visible. Pour ¼ cup of cold tap water over the top.
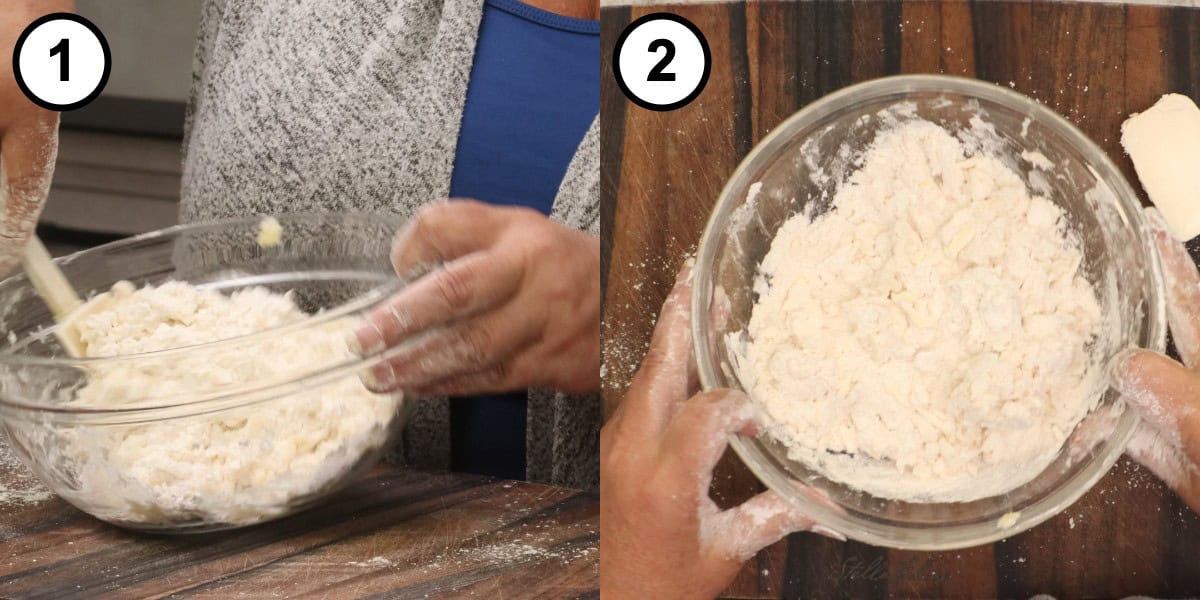
Fold the Water In and Rest the Bowl
Toss the water through with a small spatula. We are not combining anything yet, so the bowl will still look shaggy and loose, and that is exactly right. Put the bowl in the refrigerator for 5 minutes so the water can absorb completely into the flour and the butter can firm back up. This little rest resets the clock on the butter and makes the rest of the crust so much easier to make.
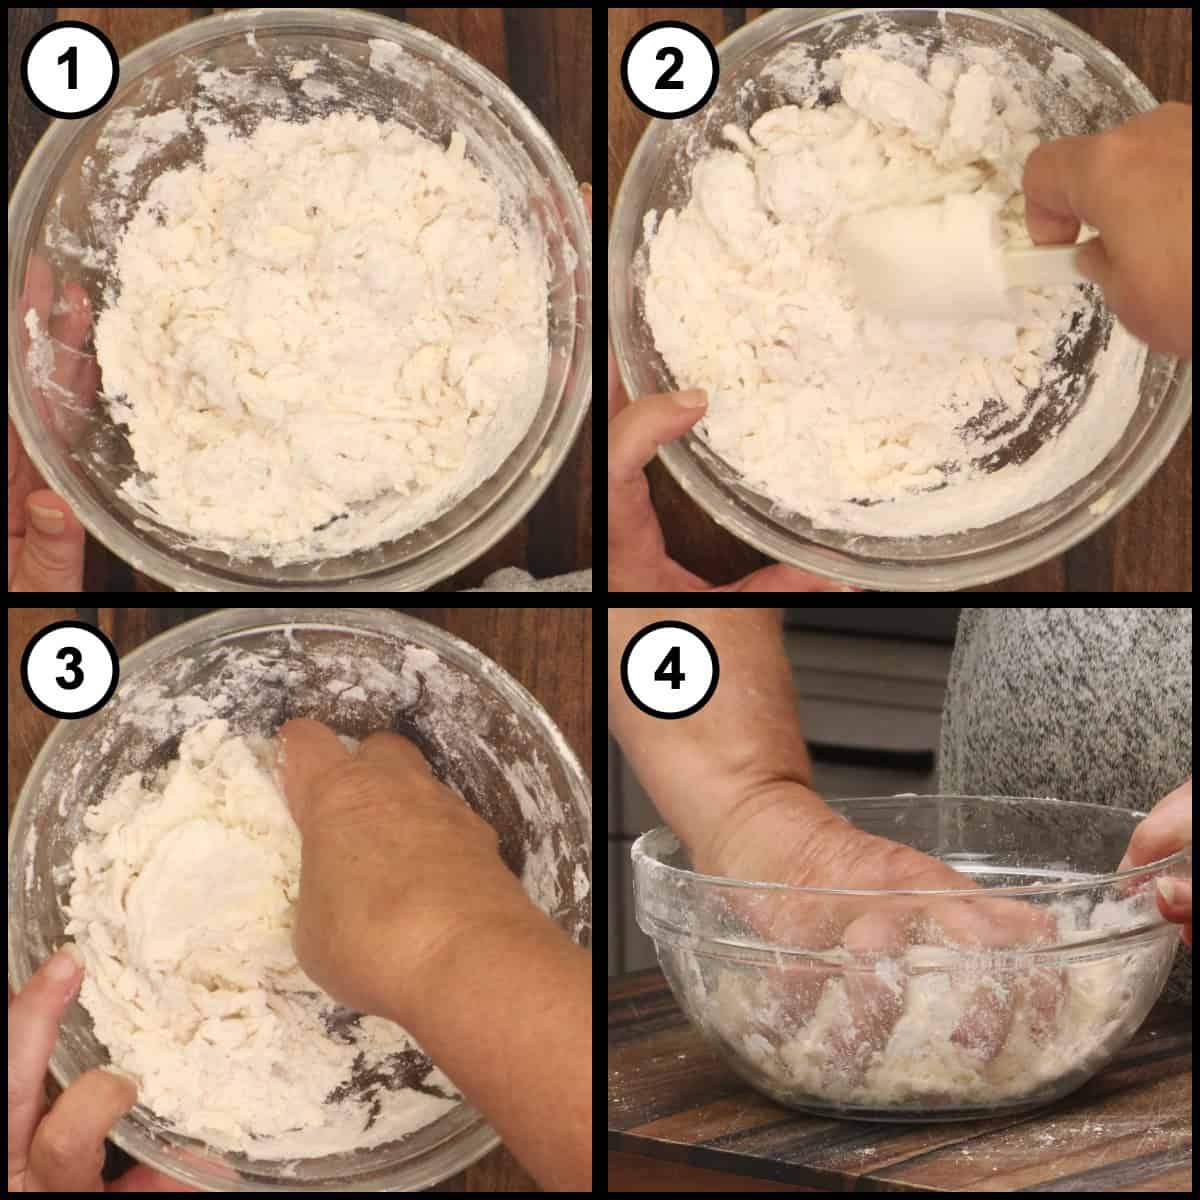
Bring the Dough Together
Mix with the spatula until the dough is almost together. There will still be quite a bit of loose flour in the bowl at this point, and that is fine. Now go in with your hands and start squeezing, flipping the dough and bringing in more flour as you go, until it forms a ball. This takes about 2 minutes. I have never had to add more water, so be careful about deciding you need more liquid. Add a little only if the dough will not come together at all.
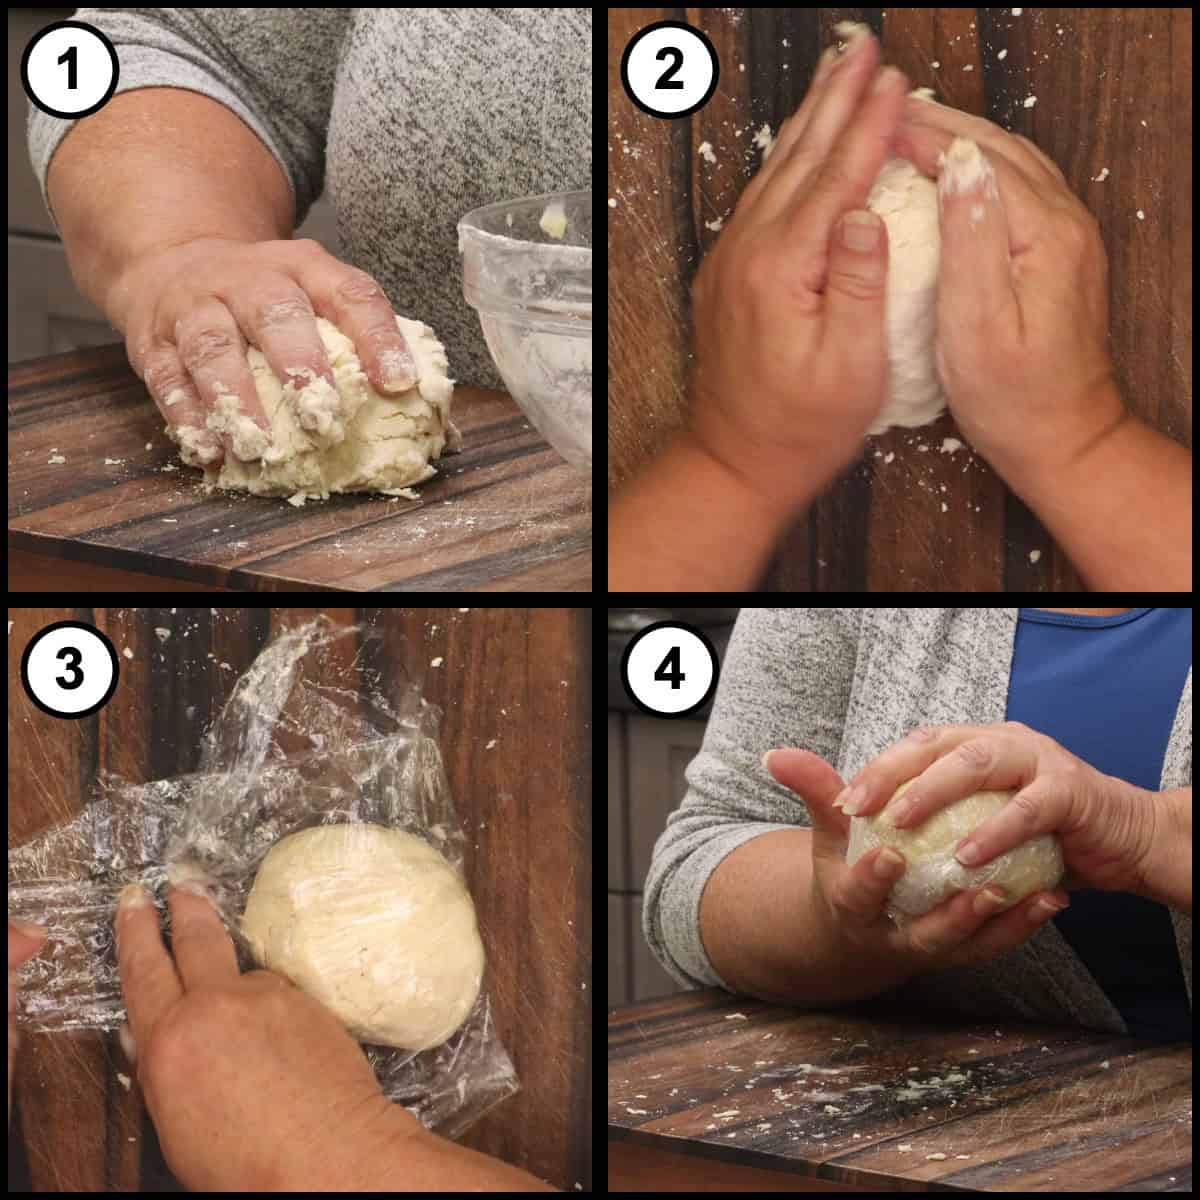
Shape the Disc and Chill It
Turn the dough out onto a cutting board and press the rest of it down into a disc, tidying up the edges. A little cracky is perfectly fine, you just do not want it splitting wide open. Wrap it in plastic wrap and refrigerate for 30 minutes. Do not skip this part, it is really important for rolling the dough out and for the final result.
Preheat the Oven with a Tray Inside
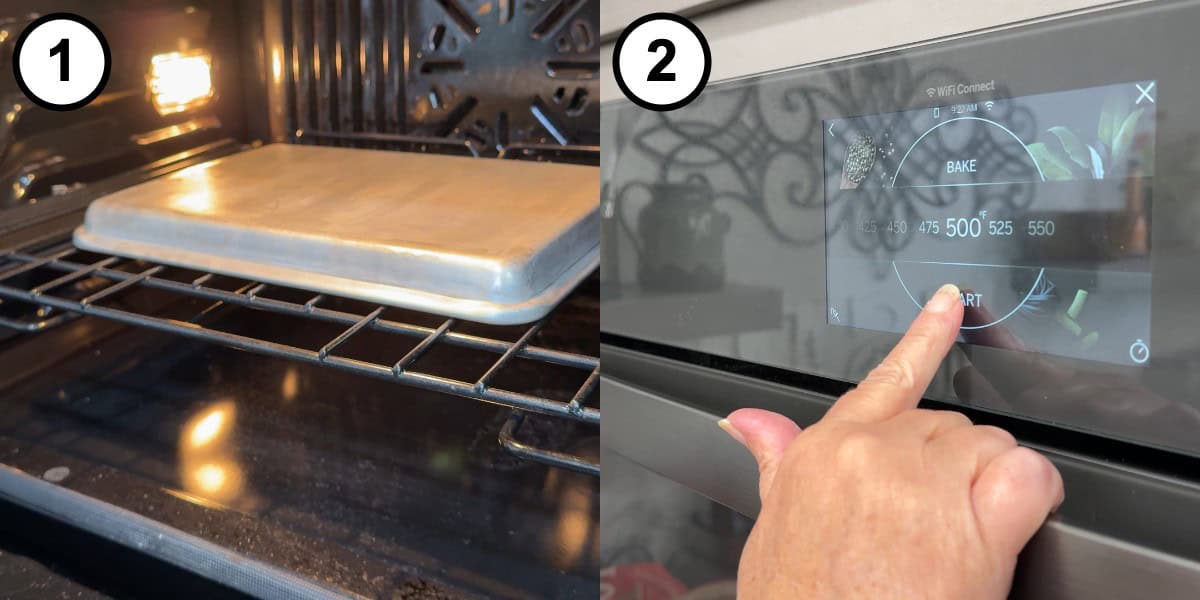
While the dough rests, preheat the oven to 500℉/260℃ with a baking tray turned upside down on the middle rack. Let it preheat for the full 30 minutes. The pie plate goes directly onto that hot tray for the blind bake, and that is what gives you a crisp bottom crust instead of a pale, soft one.
Chop the Chocolate and Whisk the Eggs
While the oven comes up to temperature, get the filling ingredients ready. Chop 6 ounces of chocolate into small pieces so it melts quickly and gently. Whisk 3 room temperature eggs with 1 teaspoon of vanilla extract and ¼ teaspoon of fine grind sea salt, then set them aside on the counter. Do not refrigerate them, because room temperature eggs take the warm chocolate far more easily when we get to the tempering.
Flour the Counter and Start Rolling
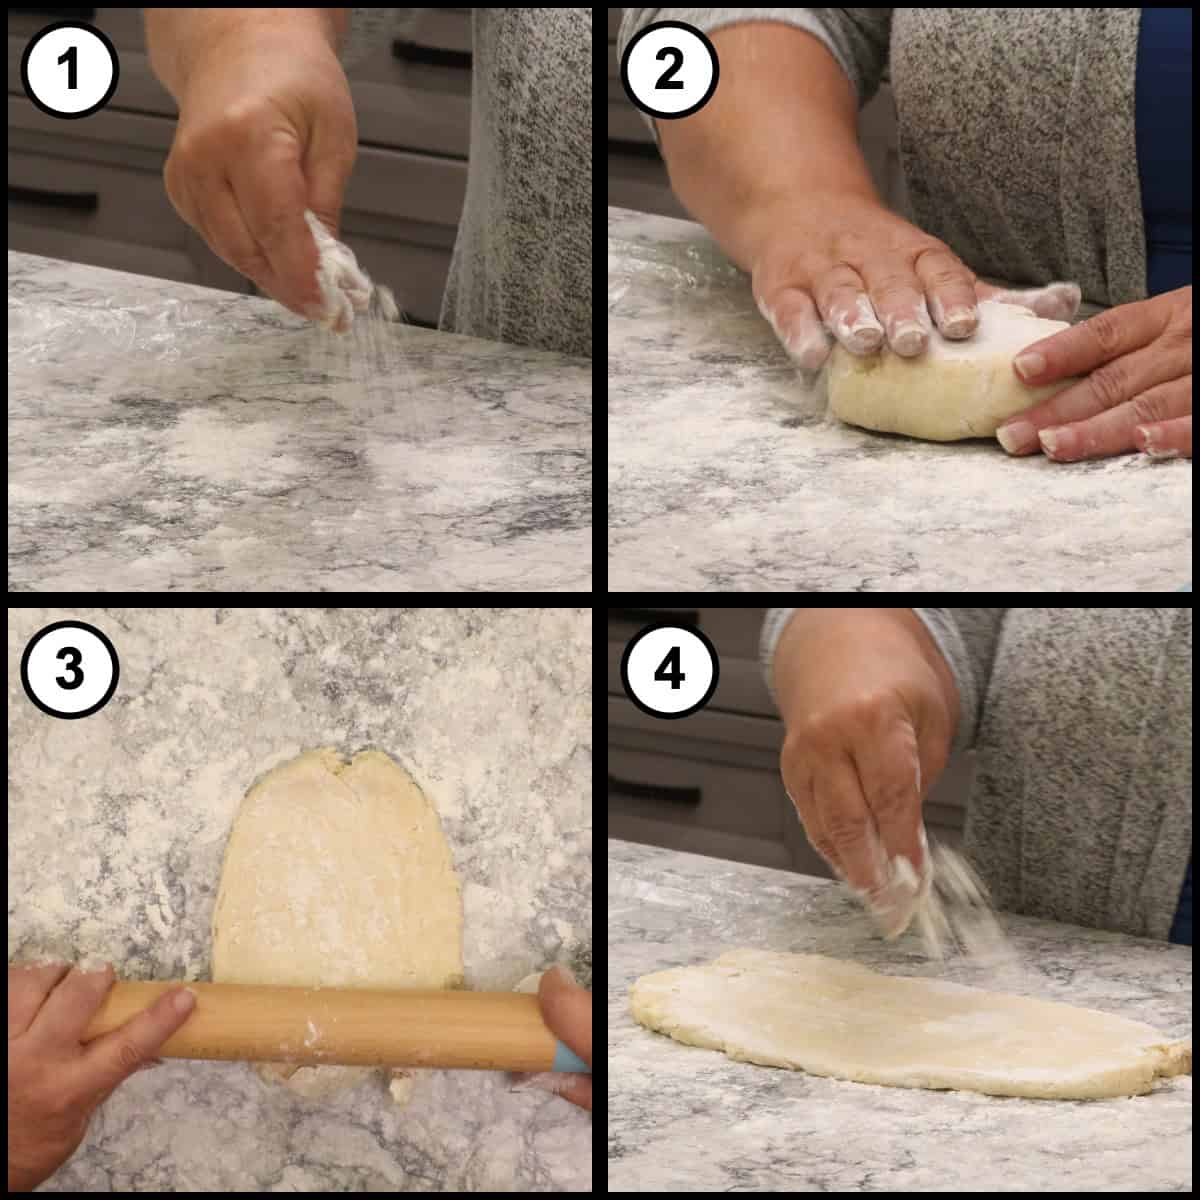
You want a clean, very dry surface with plenty of room, so a cleared counter works better than a cutting board here. Sprinkle flour down and be liberal with it, and put some on top of the dough too. Start with your hands to press the chilled dough into a disc, then begin rolling from the center out.
Roll the Crust Out
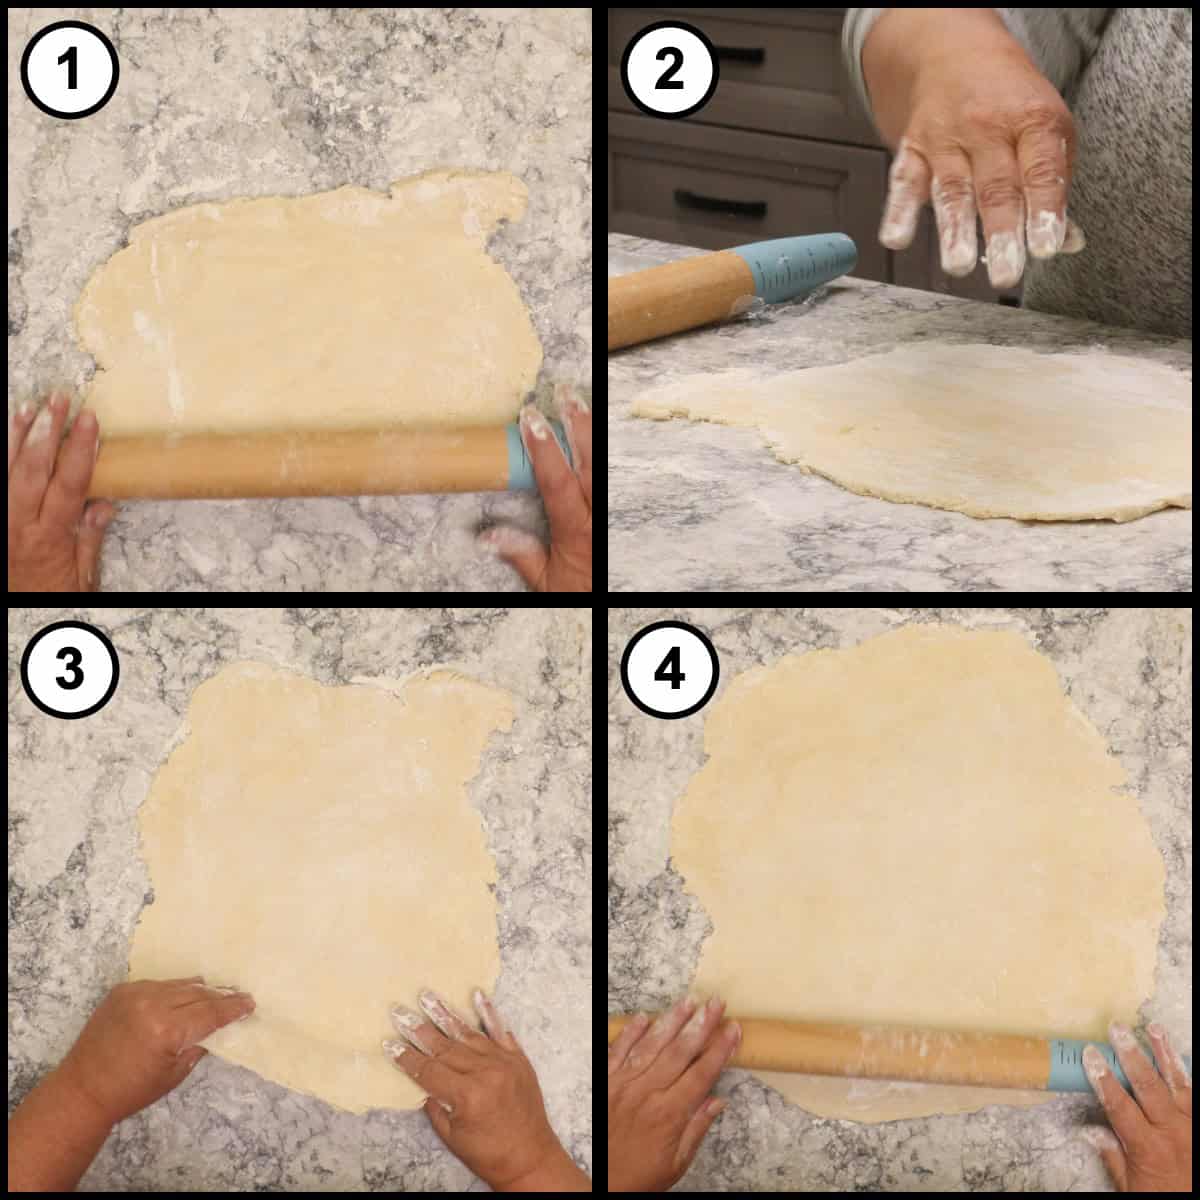
Roll from the center out to about ¼ inch thick. This is a sturdy pie, so I do not roll the dough too thin. Flour, flip, flour, and roll again, working it well past the width of a 9-inch pie plate. If the dough is sticking, you do not have enough flour down. If your house is warm and the dough is softening, wrap it and put it back in the refrigerator for a few minutes.
Move the Crust to the Pie Plate
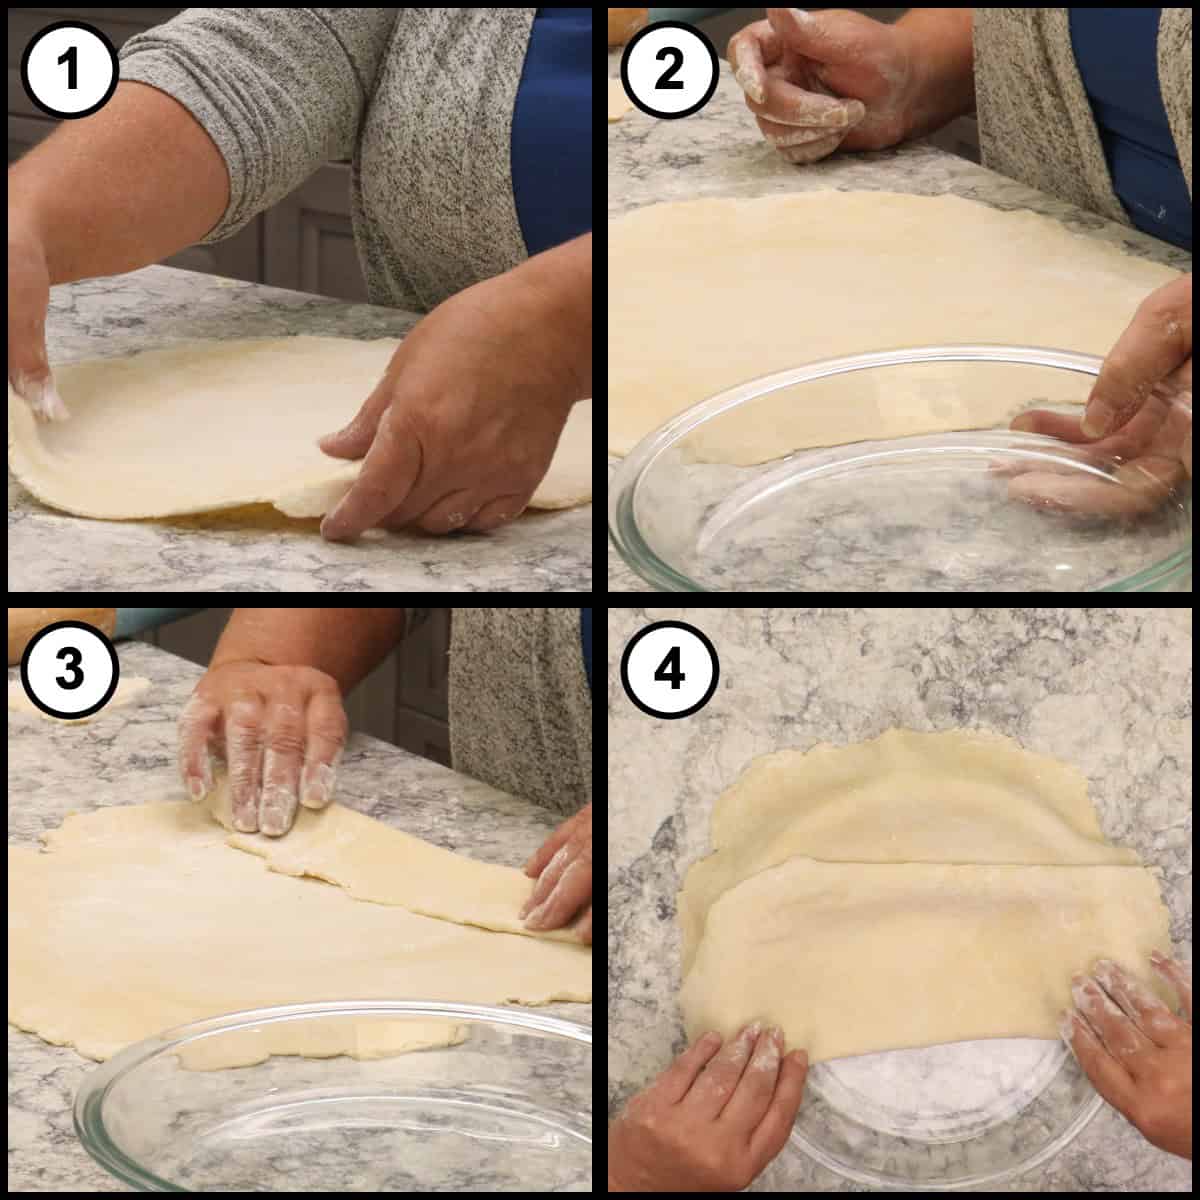
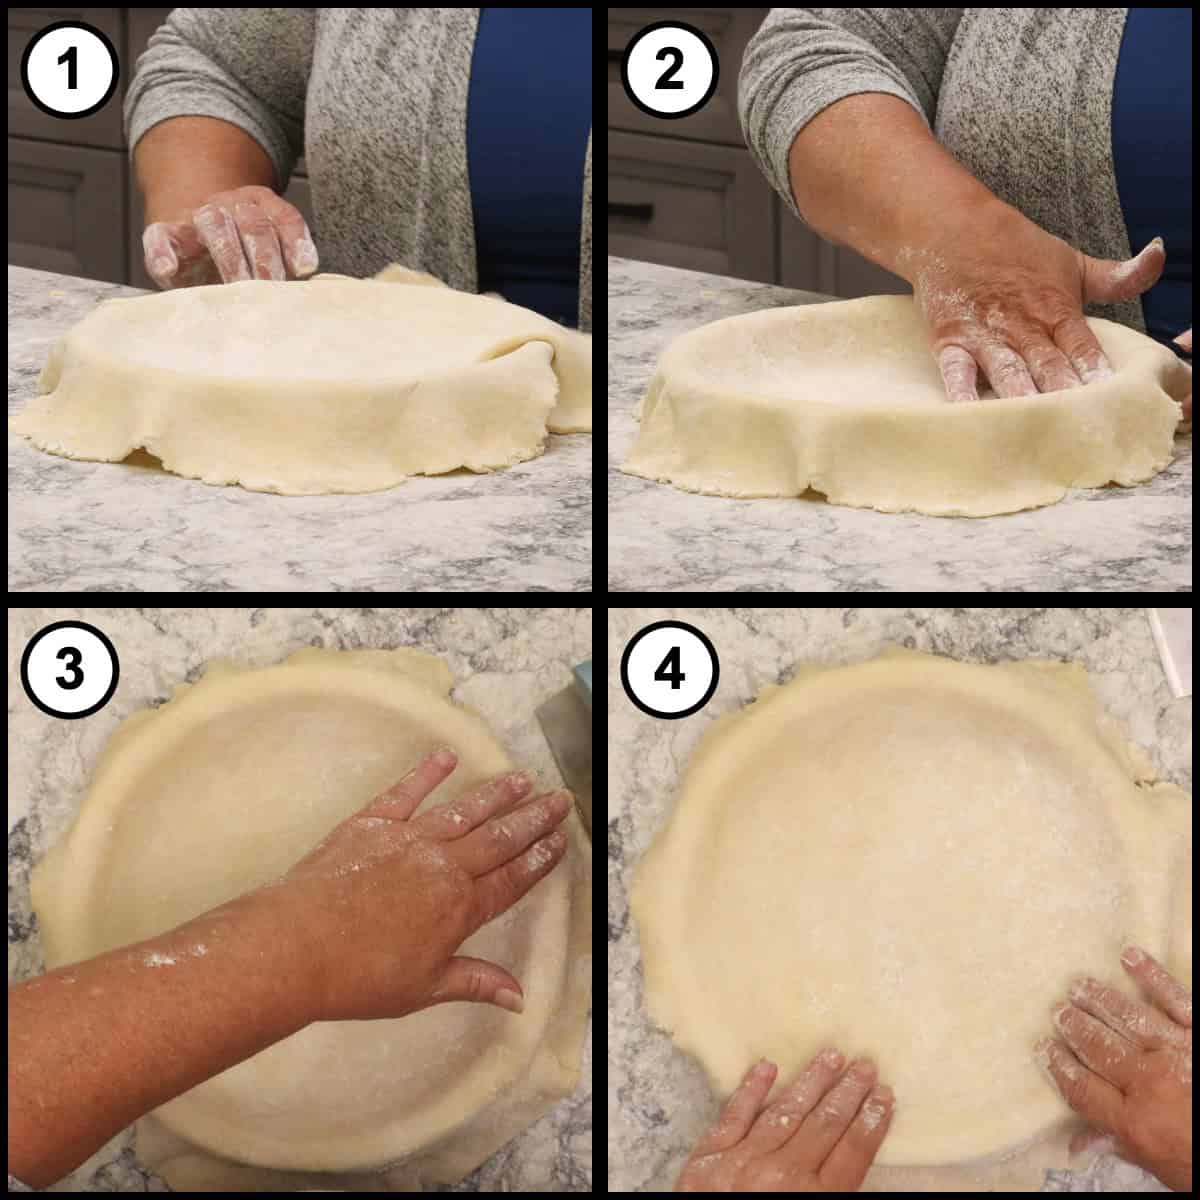
Make sure the dough lifts completely off the counter before you move it. Fold it gently over on itself, carry it across to the pie plate, and lay it over the top.
Settle the Dough In and Trim the Excess
Let the dough settle down into the pie plate and ease it into the bottom corners, without stretching it. Trim off any major excess, leaving about an inch of overhang all the way around.
Build the Edge
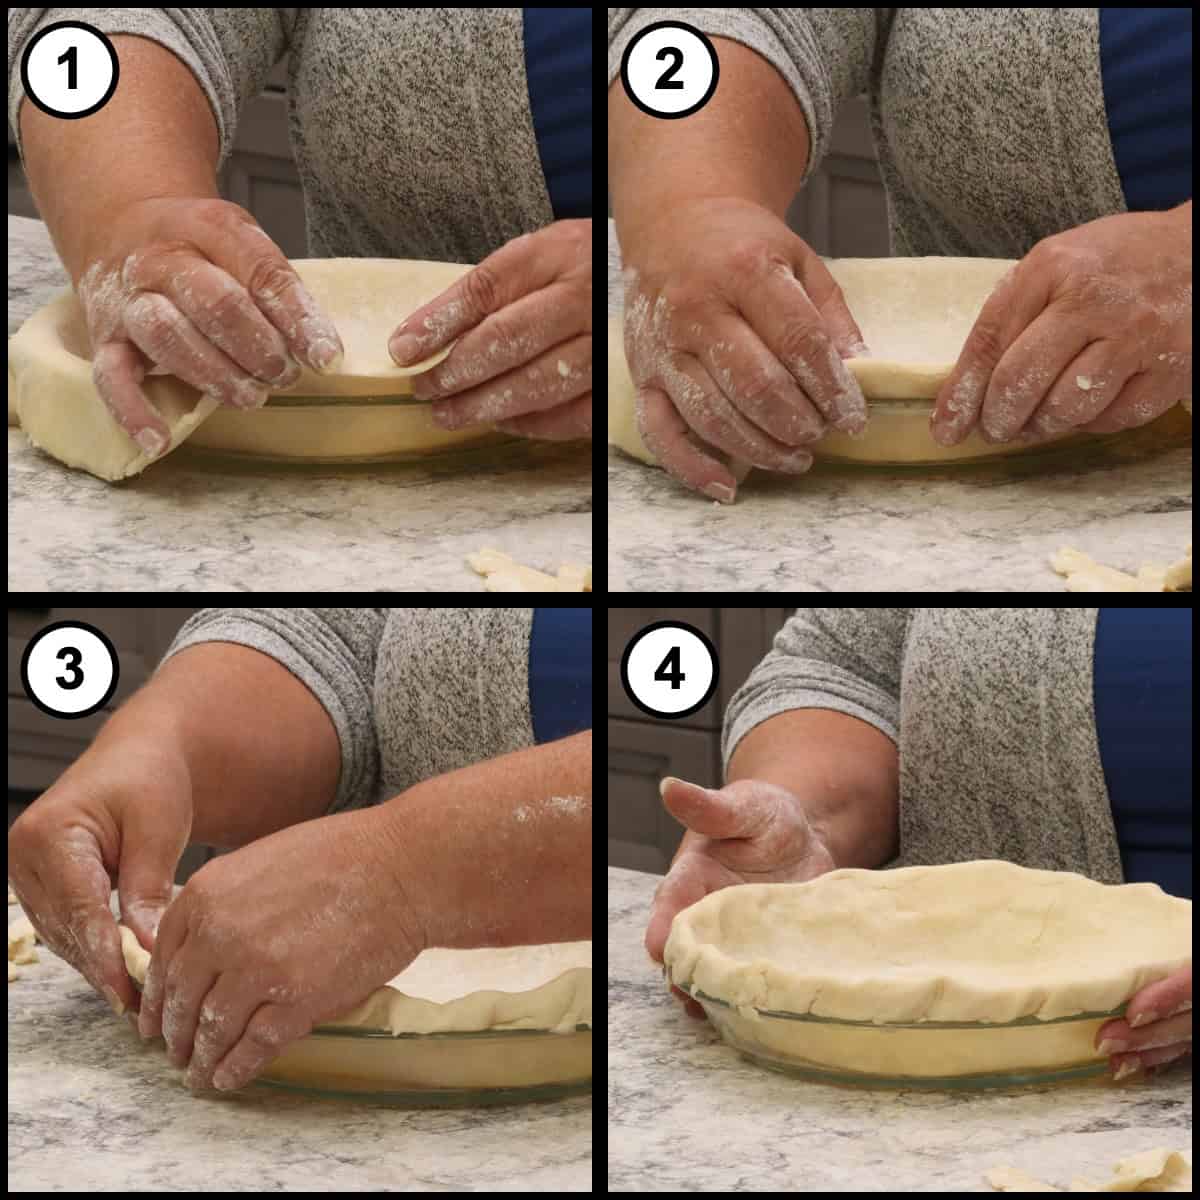
Fold that overhang under itself and press it against the lip of the plate to build a little ledge all the way around. That raised ledge is what you crimp in a moment, and it is also what holds the sides of the crust up during the blind bake.
Crimp the Edge and Chill the Shell
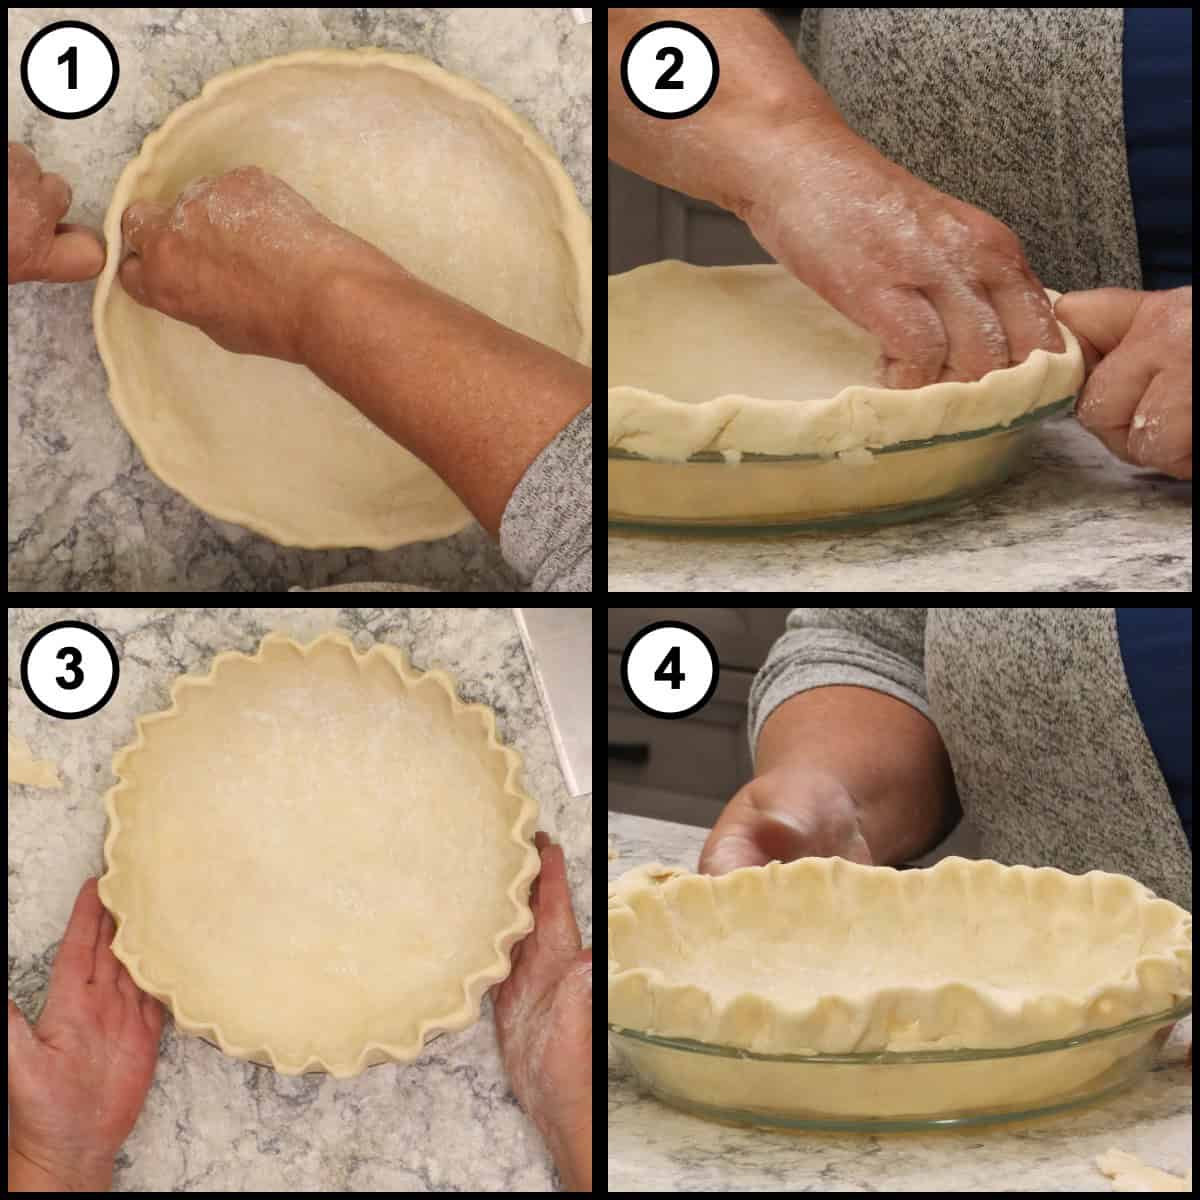
Crimp the ledge with your two hands and your knuckles, working your way around the plate. Is it perfect? No. Does it have to be? No, because it is homemade. Put the shaped crust in the refrigerator for at least 10 minutes.
Line the Crust with Cocoa, Parchment and Beans
Your dough should feel nice and stiff and cold. If it is still floppy, leave it in the refrigerator longer. A crust that goes in soft will shrink and slide down the sides of the plate before it has a chance to set, and that is exactly why people end up with half a crust sitting in the bottom of the pie shell.
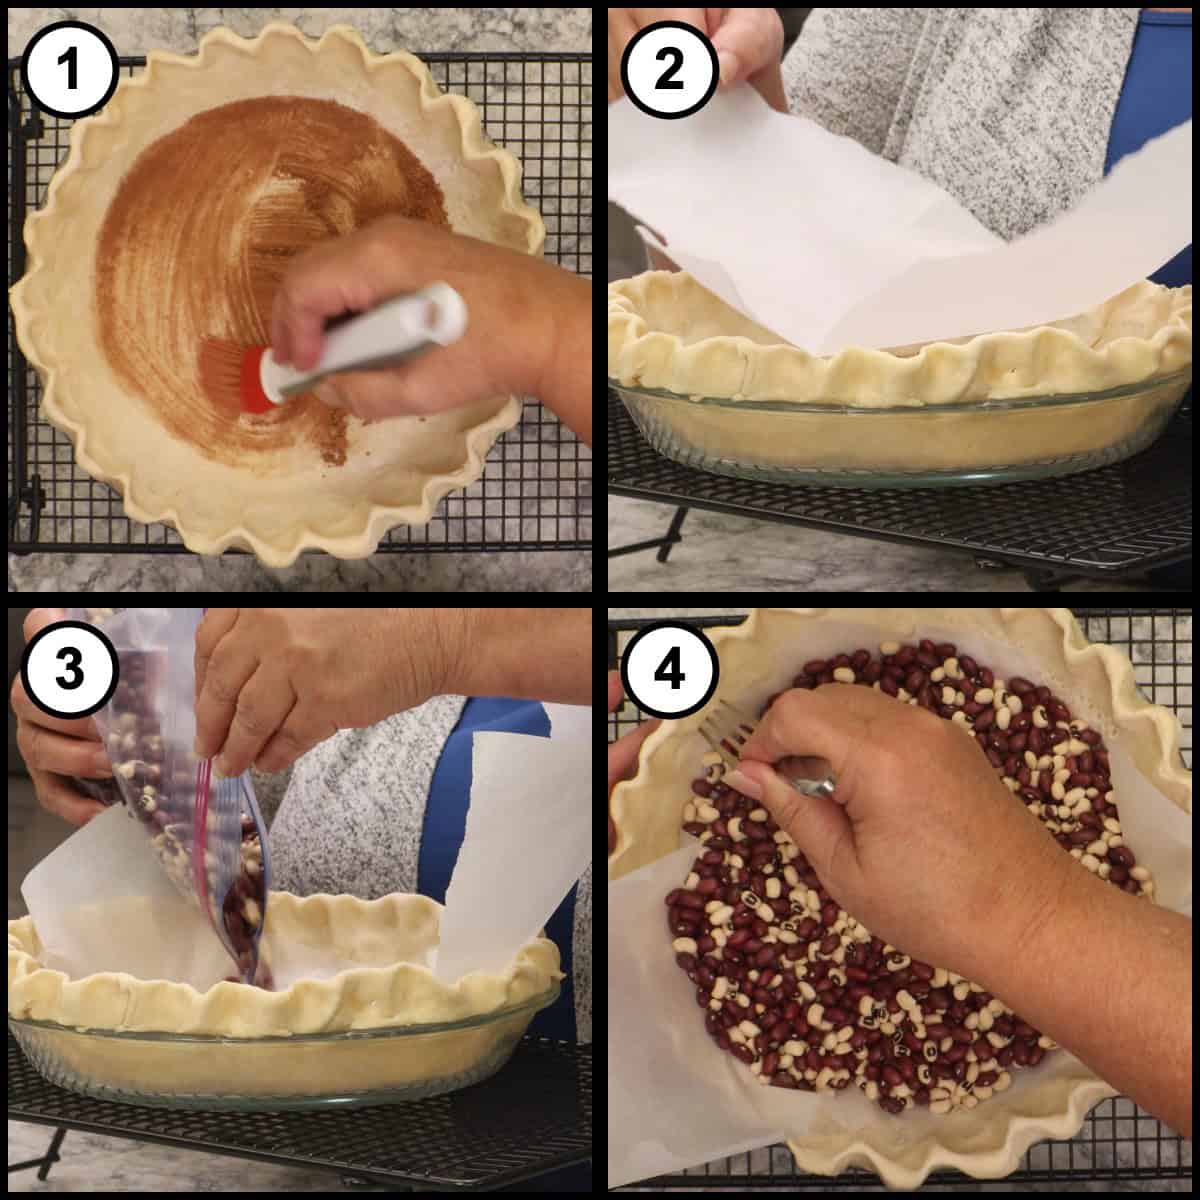
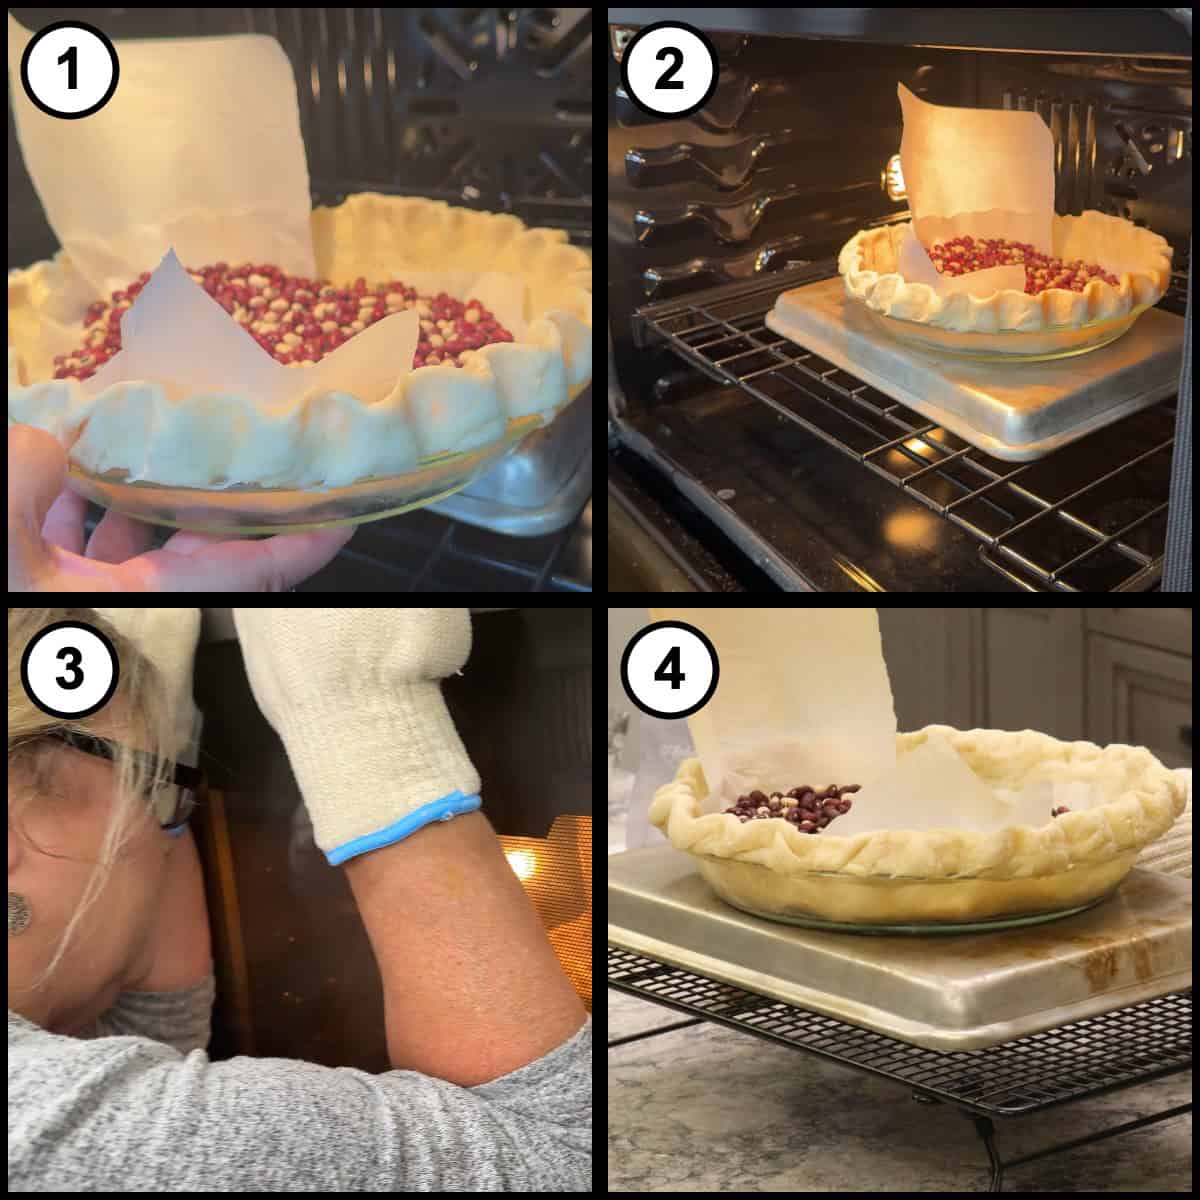
Brush about a teaspoon of cocoa powder over the bottom of the chilled crust. Lay in a piece of parchment that sits in the bottom and comes up the sides a little, leaving the corners long enough to grab like handles. Pour in about a pound of dried beans, keeping them on the parchment, and push them out toward the crimped ledge so the sides set without puffing. If you see a spot that is totally unprotected, press a few holes in it with a fork.
I have a whole tutorial on pre-baking a pie crust in the Ninja Foodi Pressure Cooker & Air Crisper if you want to bake pies in the Foodi.
Blind Bake the Crust
Set the pie plate directly on the preheated tray and bake at 500℉/260℃ for 3 to 5 minutes, until the crust blisters a little and looks set. Mine took 3 and a half minutes. It will not brown. Let the pie crust cool for a few minutes and lift the beans out by the parchment handles and let the crust cool, then prop the oven door open so the oven can come down to 350℉/180℃.
Make the Mississippi Pie Filling
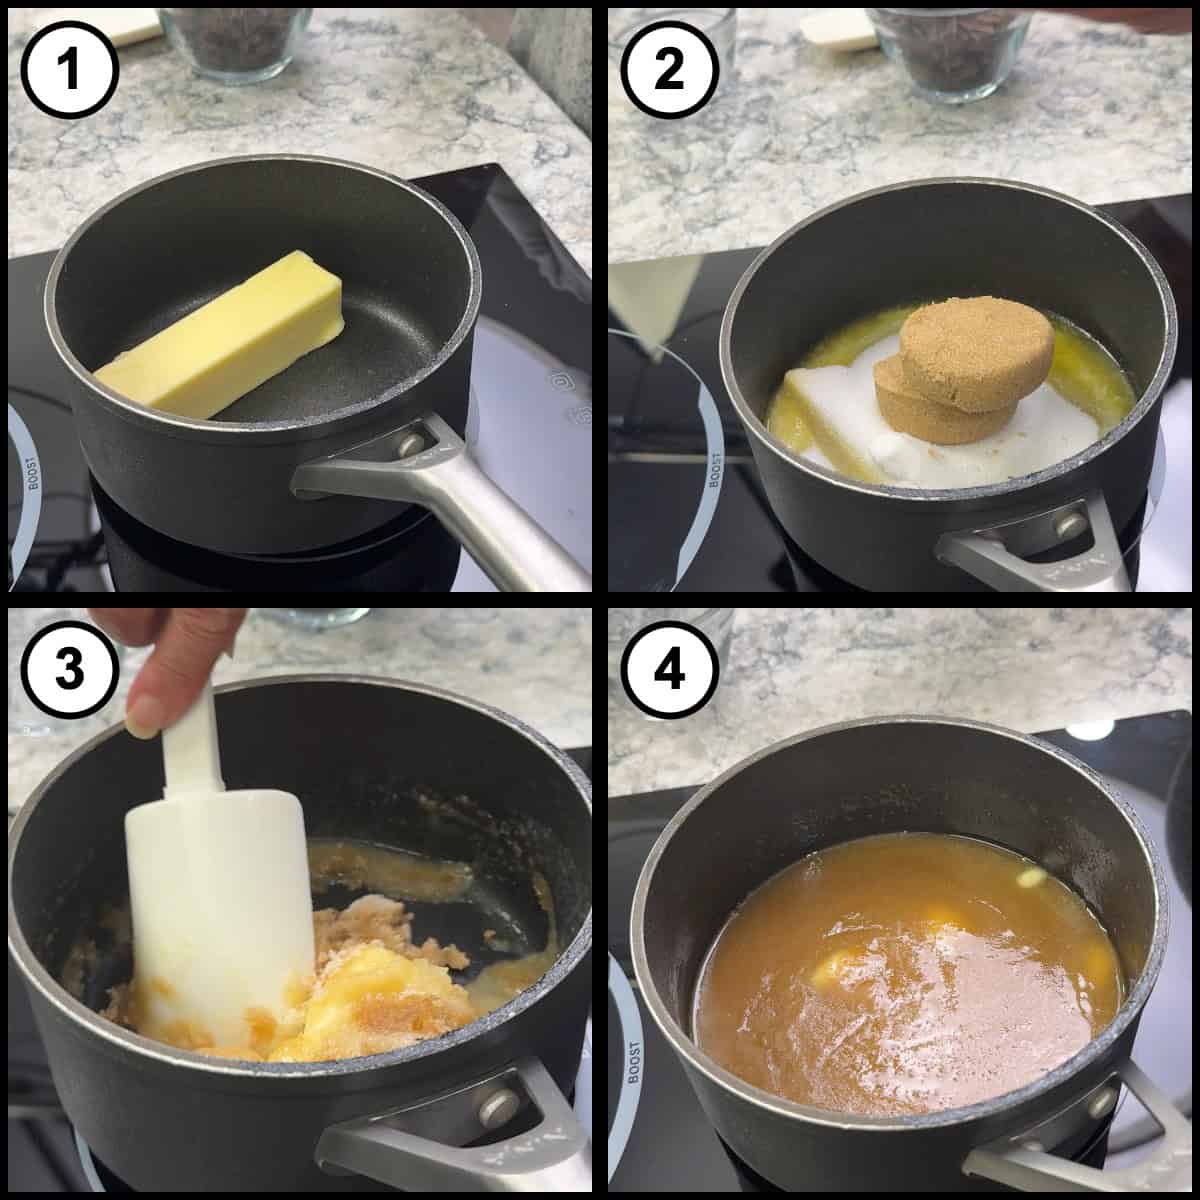
Melt ½ cup of salted butter in a saucepan over medium heat. When the butter is about halfway melted, add ½ cup of granulated sugar and ½ cup of packed light brown sugar and give it a stir to combine.
Stir In the Chocolate
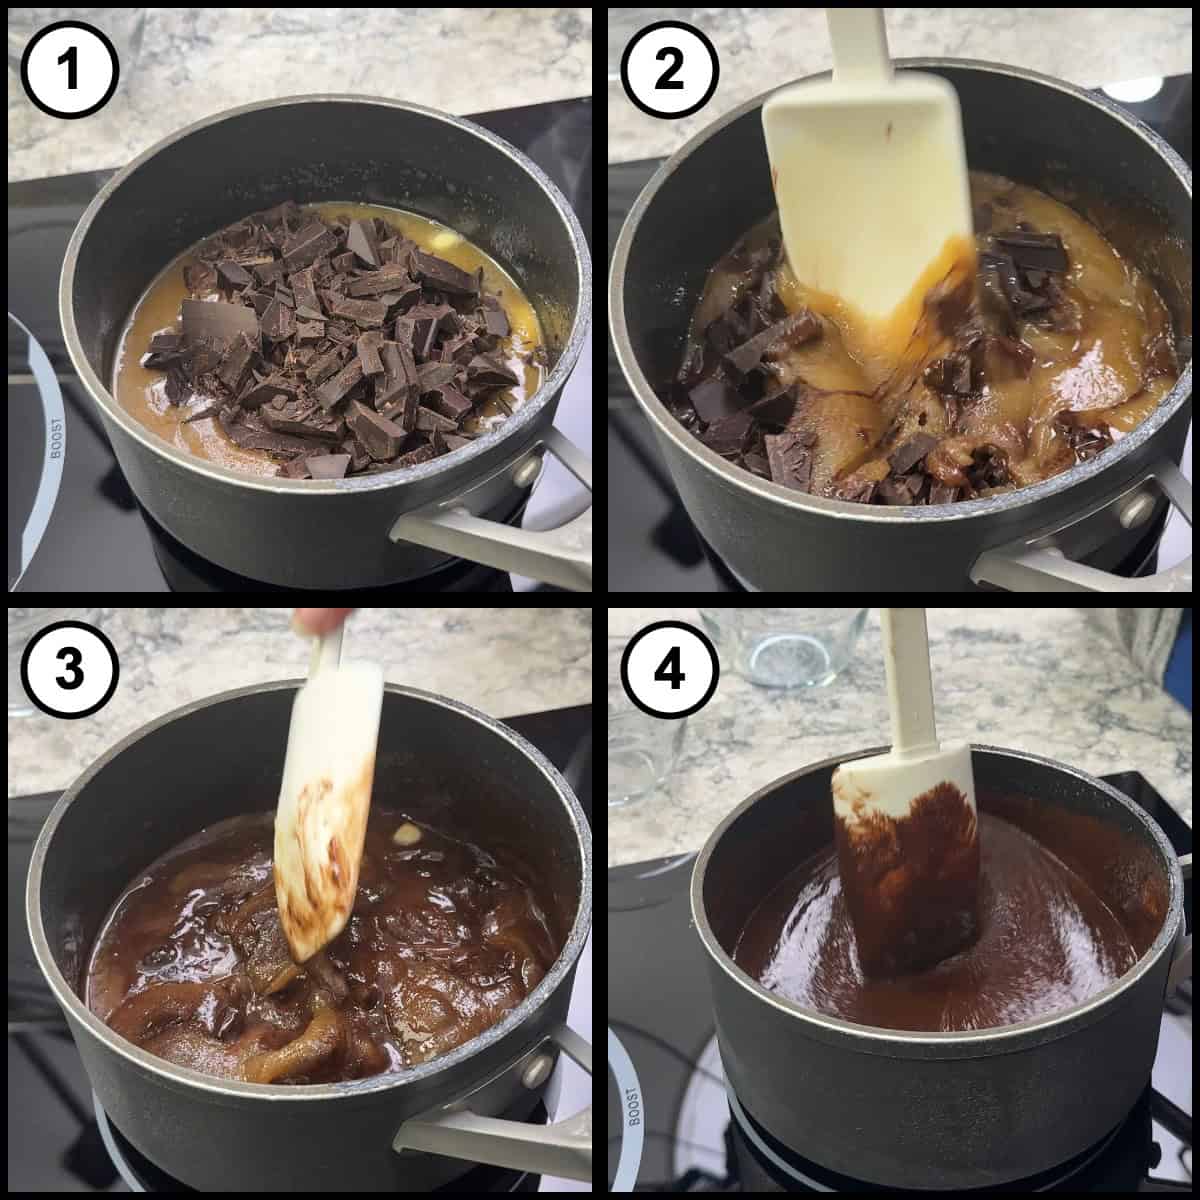
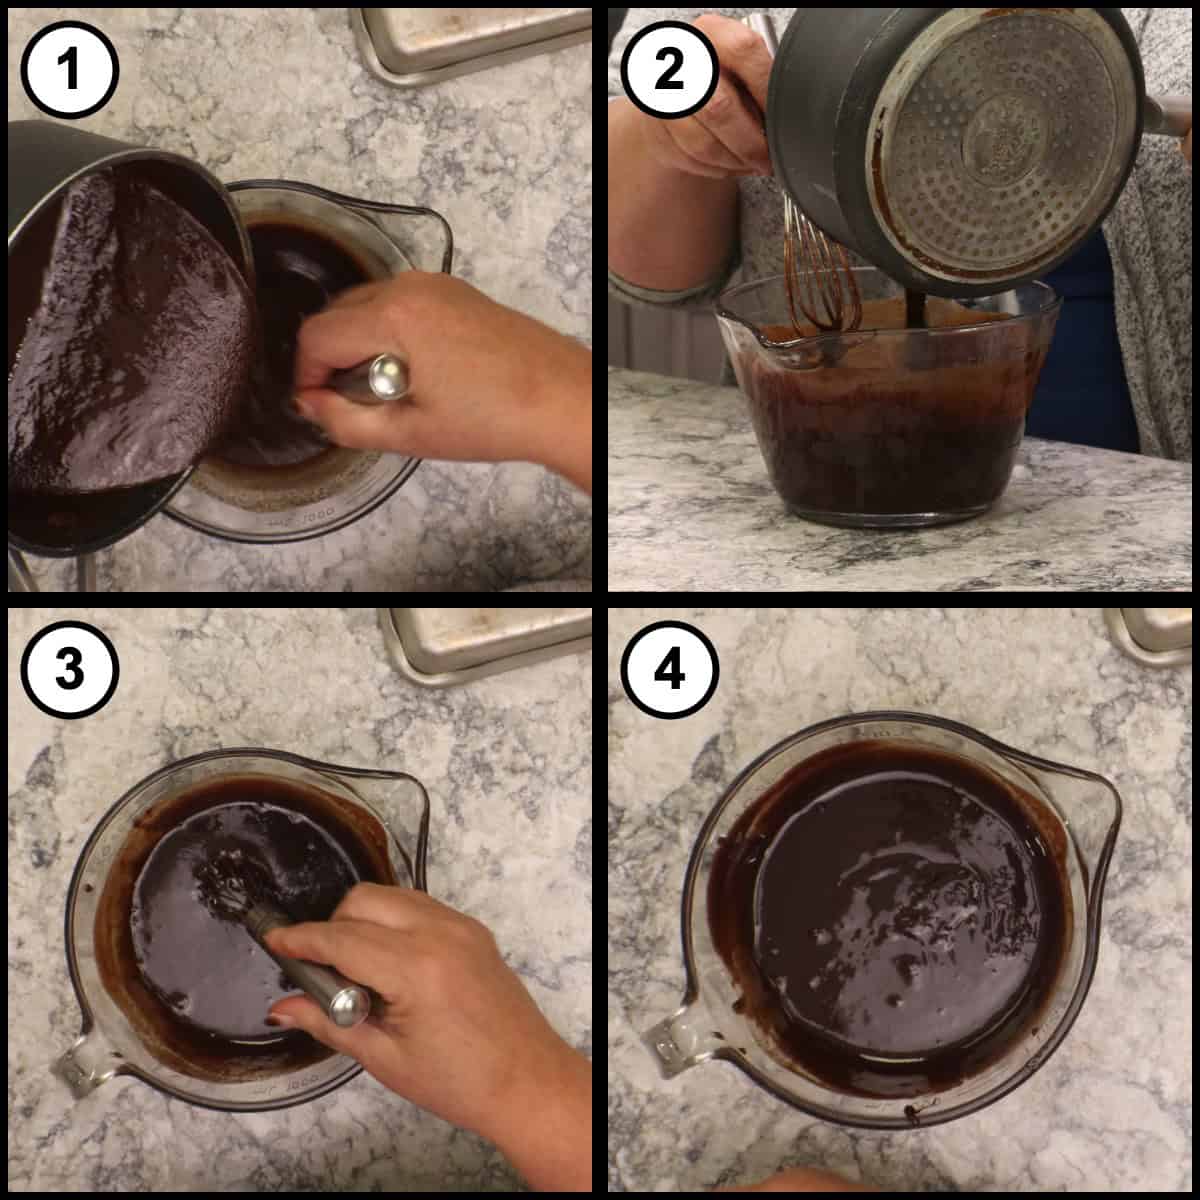
Add the chopped chocolate, stir it in, then turn the heat down to medium-low and gently melt the rest of it. Turn the heat off as soon as the chocolate is completely incorporated. We are only cooking this enough to melt the chocolate and the butter, not to dissolve the sugar.
Quick Tip
You want the sugar to stay grainy. Some pie fillings are cooked until the sugar is completely smooth, but not this one. That grain is by design and it is what gives you the nice crackly brownie top.
Temper the Chocolate into the Eggs
This is the part of the recipe where things can go wrong if you do not do it correctly, so have your whisk handy. If you poured that warm chocolate straight into the eggs, it would start to cook them too fast. You could sit and wait for the chocolate to cool on its own, but then it often gets too cold and will not fold in correctly.
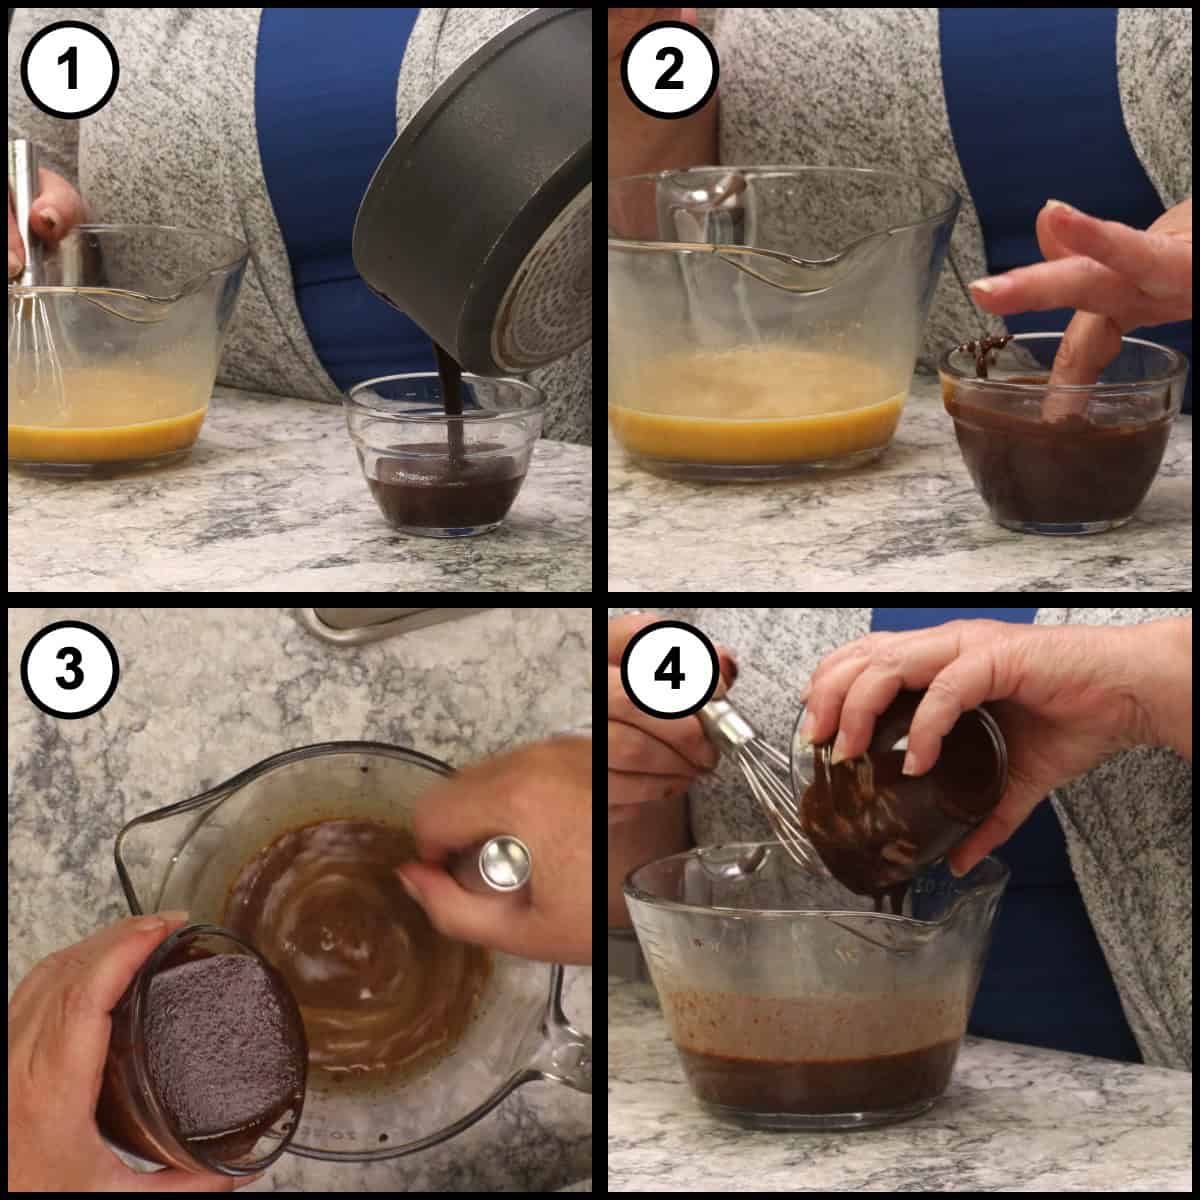
Here is how I do it. Put a little of the chocolate mixture into a smaller container and whisk it, which gets air into it and cools it down. Dip a clean finger in to test. If you have to pull your finger right back out, it is still too hot. You are looking for no more than about 120-130℉/49-54℃. Now, whisking the eggs the entire time, add about a teaspoon of the cooled chocolate at a time. We are slowly narrowing the temperature gap between the eggs and the chocolate.
Stream In the Rest of the Filling
Once you have worked in about ¼ cup, you can start going a little faster, and then stream in the rest slowly while you keep whisking. Scrape the saucepan clean as you go so none of that chocolate is wasted.
If it looks like the mixture is separating and the fat is coming out, you did not do anything wrong. Keep going. It comes together as it cools and as the rest of the chocolate goes in. By the time you pour the last of it in, the filling will be noticeably thicker, almost like a thickened pudding.
Fill the Crust and Bake the Pie
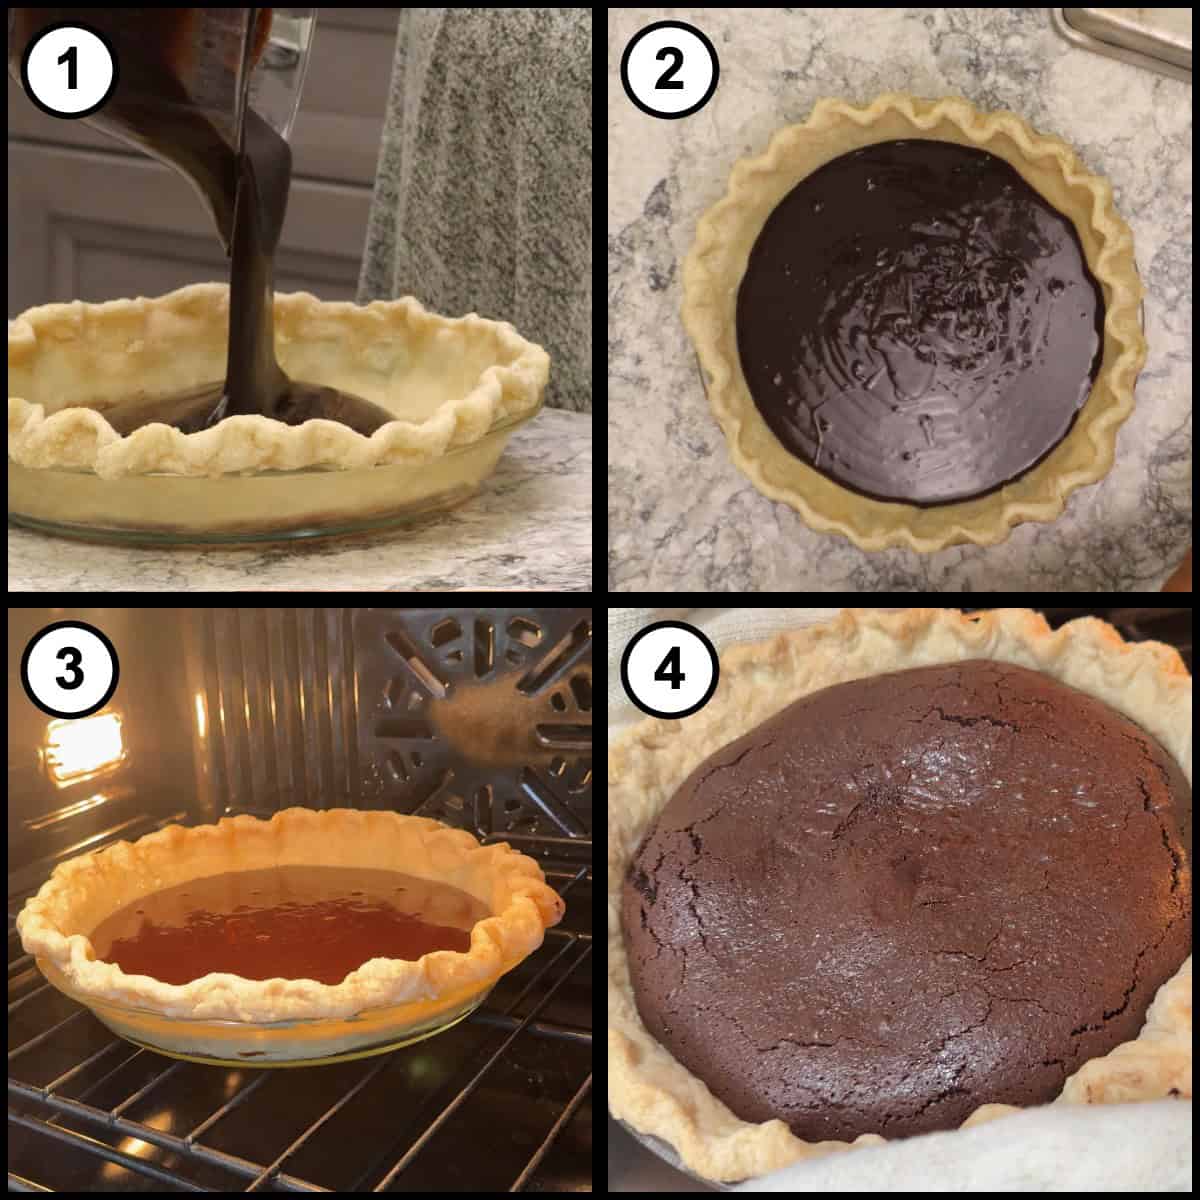
Make sure the oven has actually come down to 350℉/180℃. Here is a trick for checking: set the oven to 350℉/180℃ and watch what it does. If it runs a preheat, you are good. If it immediately reads 350 and skips the preheat, it is still too hot, so give it more time with the door open. Be careful moving a warm glass pie plate onto a cold surface too, because thermal shock can crack it.
Pour the filling into the parbaked crust and bake on the middle rack at 350℉/180℃ for 25 minutes. The idea is a lot like a cheesecake. When you pull it out, the top should look set, but if you give it a little jiggle you will see the center just start to move. Do not worry about small bumps on the surface, they settle down as the pie cools, and do not disturb that crackly top. Let the pie sit for about 15 minutes to settle, then refrigerate it for at least 4 hours.
Whip the Chantilly Cream
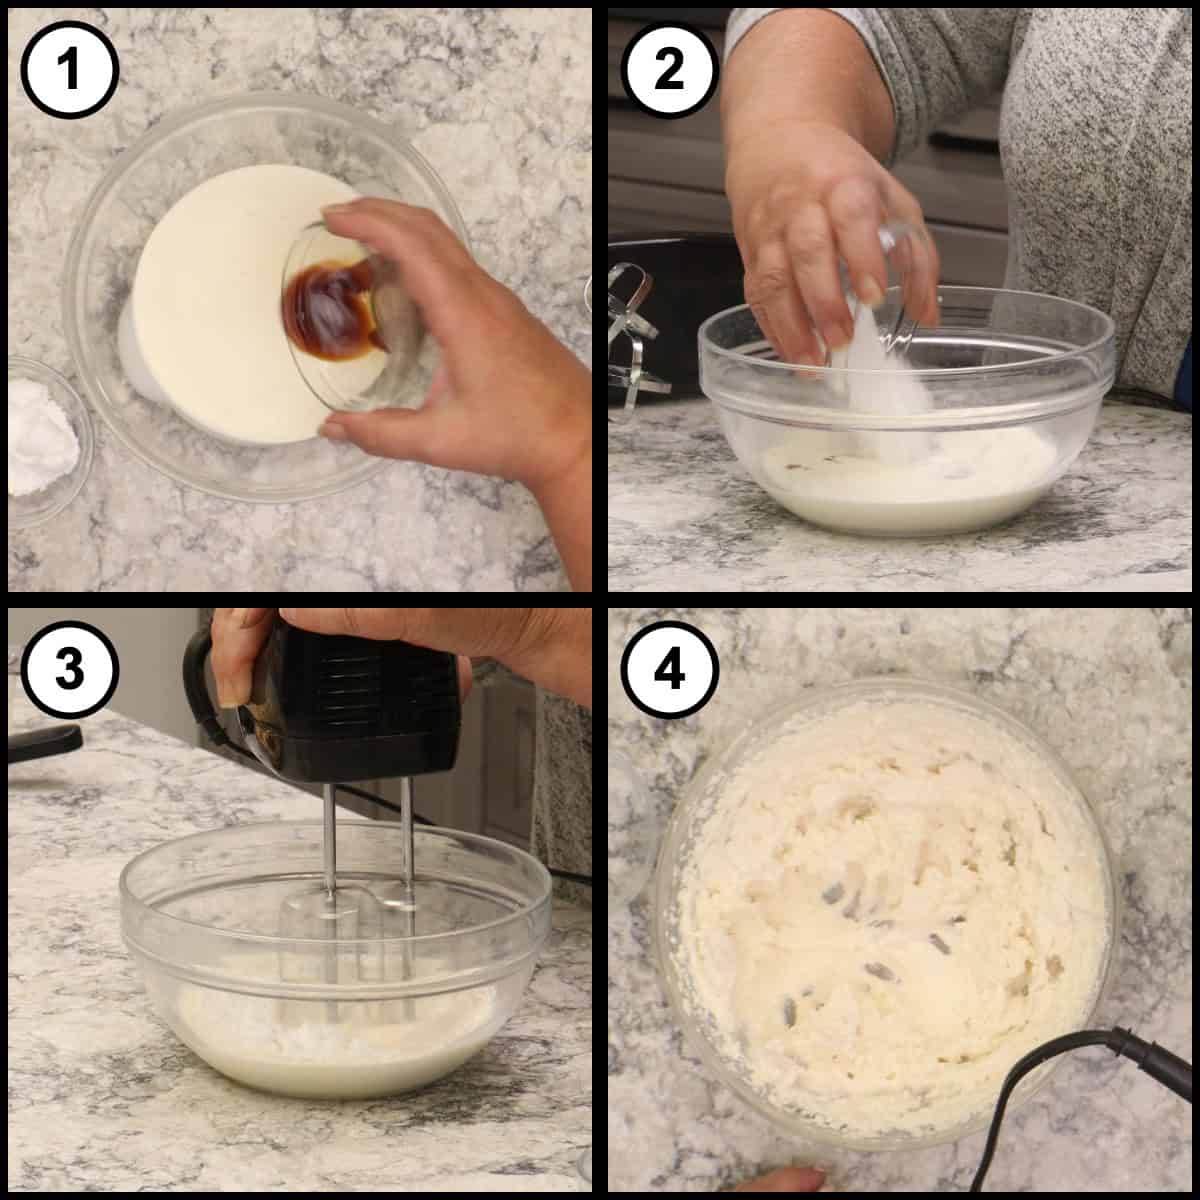
Whip 1 cup of heavy cream with 1 teaspoon of vanilla extract and 2 tablespoons of powdered sugar until it holds a peak.
Pipe the Cream and Shave the Chocolate
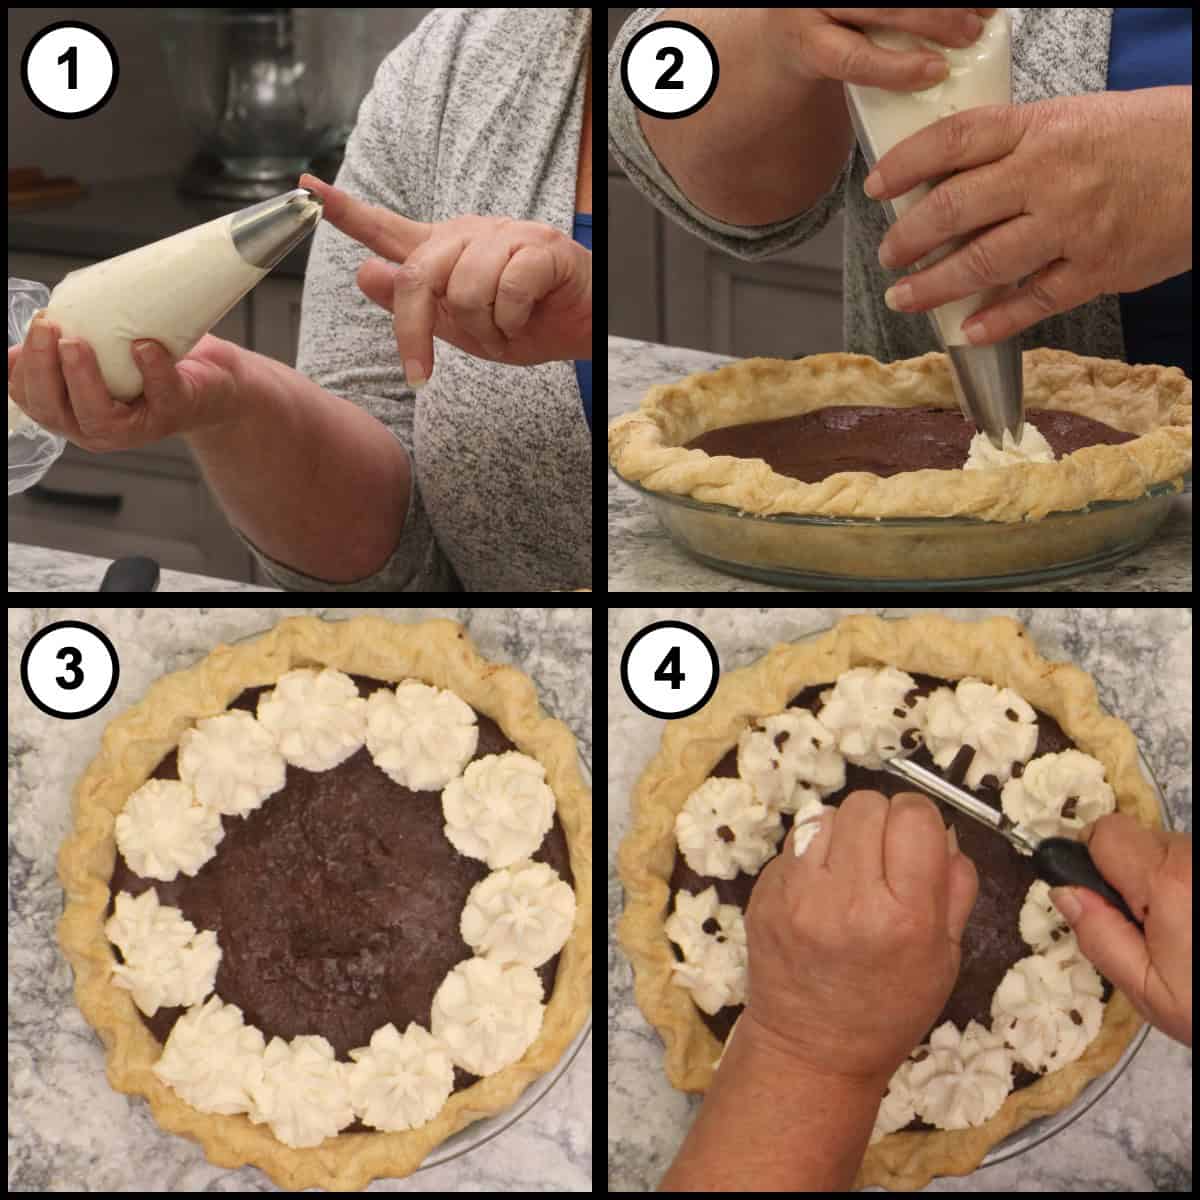
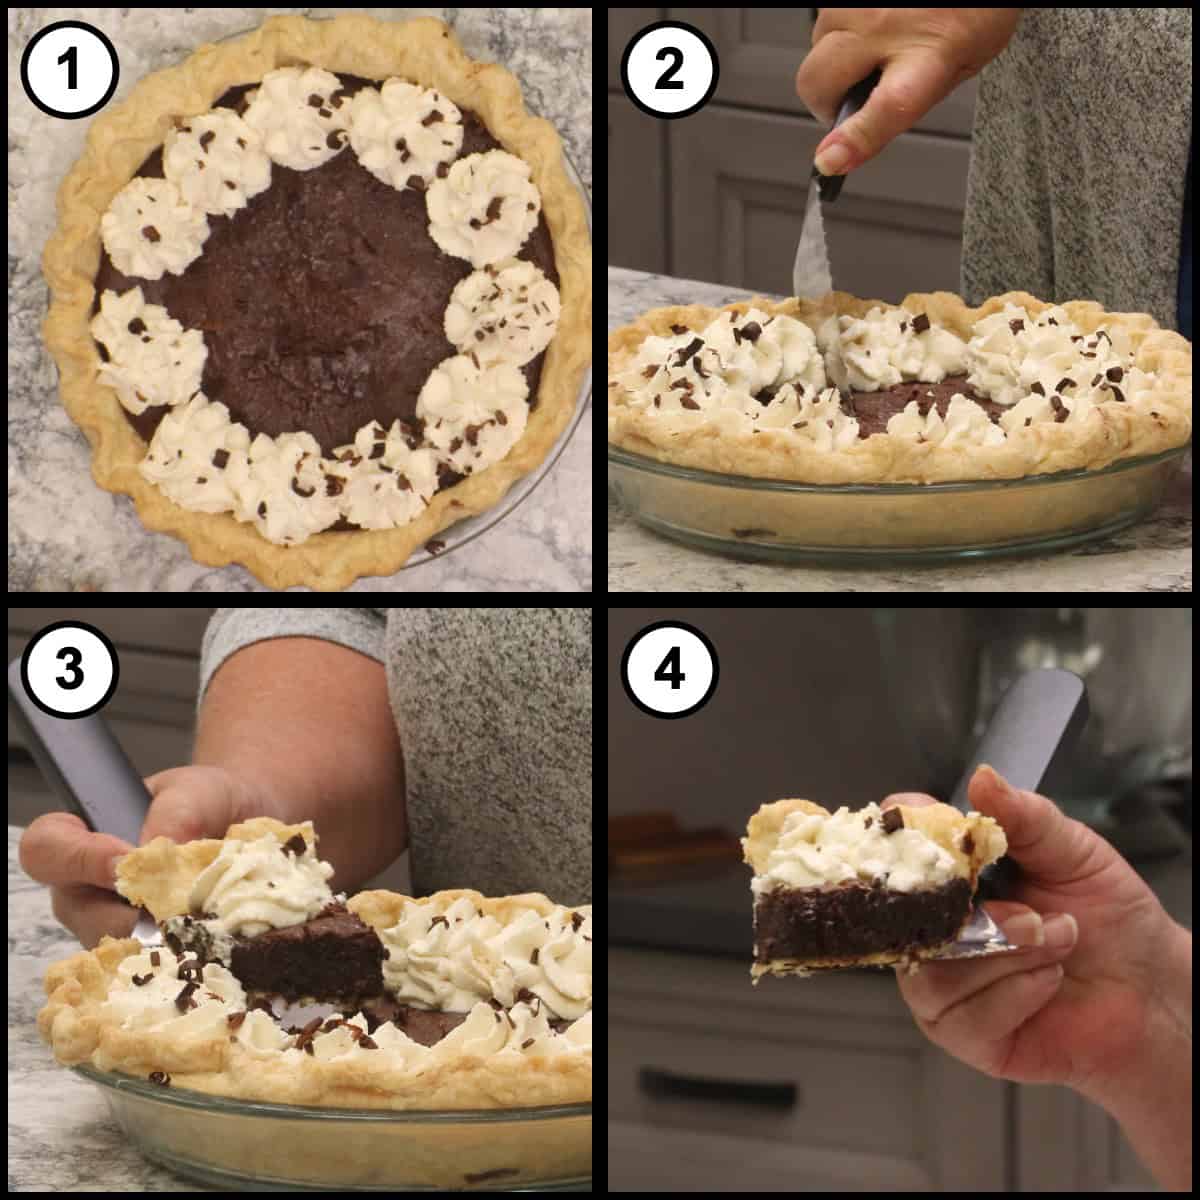
Fit a piping bag with a large open star tip. If you only have one pastry tip in your kitchen, this is the one to get. Pipe a dollop at the edge of the pie and take it all the way out to the very edge of the crust, working your way around. Do not cover the top, because that brownie top is the best part of the pie and covering it undoes what we just did.
For a little extra, take a vegetable peeler to a bit of bittersweet chocolate and make some shavings over the cream. Peels, not gratings. Gratings look like ants, and the shavings curl up and look so much nicer.
Slice and Serve
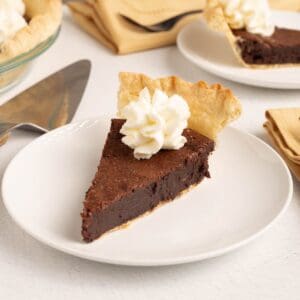
Cut your slices on the smaller side, because this pie is very rich, and it is absolutely delicious.
Mississippi Mud Pie
Equipment
- 9-inch pie plate
- Box grater
- Large Mixing Bowl
- Rolling Pin
- Medium saucepan
- Baking tray
- Parchment Paper
- Dried beans or pie weights
- Plastic wrap
- Piping bag with a large open star tip
- Vegetable peeler
Ingredients
Pie Crust
- 1¼ cups all-purpose flour plus more for rolling out the dough
- ¼ teaspoon fine grind sea salt or kosher salt; use ⅛ teaspoon if using table salt
- ½ cup salted butter, very cold 1 stick; grated on the large holes of a box grater. Unsalted butter works with a little extra salt in the flour
- ¼ cup cold water 4 tablespoons, straight from the tap
- 1 teaspoon unsweetened cocoa powder for brushing the parbaked crust
Chocolate Filling
- ½ cup salted butter 1 stick
- ½ cup granulated sugar
- ½ cup light brown sugar, packed helps prevent the sugar from crystallizing; there is no corn syrup in this filling
- 6 oz chocolate, chopped I use 2½ ounces unsweetened and 3½ ounces of a 50% cacao dark chocolate, which lands around 73% cacao overall
- 3 large eggs, room temperature room temperature eggs whip up better and temper more easily
- 1 teaspoon vanilla extract vanilla paste works too
- ¼ teaspoon fine grind sea salt or kosher salt; use ⅛ teaspoon if using table salt
Chantilly Cream
- 1 cup heavy cream
- 1 teaspoon vanilla extract
- 2 tablespoon powdered sugar add more if you like a sweeter cream
- ½ oz bittersweet chocolate, for shaving optional garnish; any chocolate you have works
Would you like to save this recipe?
Instructions
Homemade Pie Crust
- Make the pie dough. In a large bowl, combine 1¼ cups of all-purpose flour and ¼ teaspoon of fine grind sea salt. Grate ½ cup of very cold salted butter on the large holes of a box grater directly into the flour. Toss with your hands until every strand of butter is coated with flour.1¼ cups all-purpose flour, ¼ tsp fine grind sea salt, ½ cup salted butter, very cold
- Lightly break the butter up into small pebbles, tossing as you go. Do not work it into the flour. You want visible pieces of butter, because that is what gives you a flaky crust at the end.
- Pour ¼ cup of cold tap water over the top and toss with a small spatula just to distribute it. Do not try to bring the dough together yet. Refrigerate for 5 minutes so the flour absorbs the water and the butter firms back up.¼ cup cold water
- Mix with the spatula until the dough is almost together, then squeeze it with your hands, flipping and picking up loose flour as you go, until it forms a ball. This takes about 2 minutes. Resist adding more water unless the dough will not come together at all.
- Turn the dough out onto a cutting board, press the rest of the loose flour in, and tidy it into a disc. A few cracks are perfectly fine, but you do not want it splitting wide open. Wrap it in plastic wrap and refrigerate for 30 minutes. Do not skip this rest.
- While the dough rests, place a baking tray upside down on the middle rack and preheat the oven to 500℉/260℃ for 30 minutes. Chop 6 ounces of chocolate into small pieces. In a small bowl or measuring cup, whisk 3 room temperature eggs with 1 teaspoon of vanilla extract and ¼ teaspoon of fine grind sea salt, then set them aside at room temperature. Do not refrigerate them.
- Flour a clean, dry counter generously and roll the dough out from the center to about ¼ inch thick, flouring and flipping it as you go. The flour stays on the surface of the dough and is never worked into it. Roll it well past the width of a 9-inch pie plate. If your kitchen is warm and the dough softens, wrap it and put it back in the refrigerator for a few minutes.
- Make sure the dough lifts cleanly off the counter, then drape it into a 9-inch pie plate and settle it in without stretching. Trim the excess, leaving about an inch of overhang. Fold the overhang under and press it against the lip of the plate to build a little ledge all the way around, then crimp it with your knuckles. Refrigerate the shaped crust for at least 10 minutes, until it feels stiff and cold.
- Brush about 1 teaspoon of cocoa powder over the bottom of the chilled crust. Line the crust with a piece of parchment that sits in the bottom and comes up the sides a little, leaving the corners long enough to use as handles. Pour in about 1 pound of dried beans, keeping them on the parchment, and push them out toward the crimped ledge so the sides set without puffing.1 tsp unsweetened cocoa powder
- Set the pie plate directly on the preheated tray and parbake at 500℉/260℃ for 3 to 5 minutes, until the crust blisters a little and looks set. It will not brown. Let the pie crust cook a few minutes and lift the beans out by the parchment handles and let the crust cool. Prop the oven door open so the oven can come down to 350℉/180℃.
Mississippi Mud Pie filling
- Make the filling. Melt ½ cup of salted butter in a saucepan over medium heat. When it is about halfway melted, add ½ cup of granulated sugar and ½ cup of packed light brown sugar and stir to combine. Add the chopped chocolate, stir it in, then turn the heat down to medium-low and gently melt the rest. Turn the heat off as soon as the chocolate is fully incorporated.½ cup salted butter, ½ cup granulated sugar, ½ cup light brown sugar, packed, 6 oz chocolate, chopped
- If the mixture looks like it is separating partway through, keep whisking. It comes back together as the rest of the chocolate goes in. Do not cook the sugar smooth. The filling should still feel grainy, which is what gives this pie its crackly brownie top. The finished filling will be noticeably thicker, about the consistency of a thickened pudding.
- Whisk the eggs, salt, and vanilla into a medium size mixing bowl. Temper the eggs. Put a small amount of the chocolate mixture into a separate container and whisk it to cool it down. It should be no hotter than about 120-130℉/49-54℃, cool enough that you can hold a clean finger in it. Whisking the eggs the entire time, add the cooled chocolate a teaspoon at a time until you have worked in about ¼ cup, then stream in the rest slowly while whisking.3 large eggs, room temperature, 1 tsp vanilla extract, ¼ tsp fine grind sea salt
- Pour the filling into the parbaked crust and bake on the middle rack at 350℉/180℃ for 25 minutes. The top should look set, with just a slight jiggle in the center when you nudge it, the same way a cheesecake does. Small bumps on the surface settle as it cools. Do not disturb the crackly top.
- Let the pie settle at room temperature for about 15 minutes, then refrigerate it for at least 4 hours. Bring it out of the refrigerator at least 1 hour before serving so it slices cleanly and comes back toward room temperature.
Chantilly Whipped Cream
- Make the Chantilly cream. Whip 1 cup of heavy cream with 1 teaspoon of vanilla extract and 2 tablespoons of powdered sugar until it holds a peak. Using a large open star tip, pipe it around the edge of the pie only, taking it all the way out to the crust. Leave the brownie top showing.
- Shave a little bittersweet chocolate over the cream with a vegetable peeler so you get curls rather than gratings. Cut the slices on the smaller side, because this pie is very rich.
Notes
• The butter for the crust has to be very cold. Take it straight from the refrigerator. If it is frozen, let it sit out about 5 minutes first or it will chip instead of grate.
• Grate the butter on the large holes of the box grater, not the small ones. This is one of the most important details in the crust.
• Plan for the hands-off time. The dough rests 30 minutes, the shaped crust chills at least 10 minutes, and the baked pie needs at least 4 hours in the refrigerator. None of that is included in the prep or cook time on this card.
• Preheat the oven with a baking tray turned upside down on the middle rack. The pie plate goes directly onto that hot tray, and that is what crisps the bottom crust.
• The crust can be made well ahead. Bake it in the morning and leave it on the counter, or parbake it the day before and refrigerate it overnight. CRUST TIPS
• Toss the grated butter until every strand is coated with flour before you break it up. The coating keeps the heat of your hands from melting it.
• After the water goes in, toss only. Do not try to bring the dough together until it has had its 5 minutes in the refrigerator.
• Resist adding more water. I have never needed more than ¼ cup. Add a little only if the dough will not come together at all.
• Keep the flour on the surface of the dough while rolling, never worked into it. If the dough is sticking, you do not have enough flour down.
• If the shaped crust feels floppy instead of stiff, put it back in the refrigerator. A crust that goes into the parbake soft will shrink and slump down the sides.
• Pour the beans onto the parchment only. Beans that touch the dough embed themselves in the crust and are a nuisance to pick out.
• Save the dough scraps. Wrap them and refrigerate or freeze them, and when you have enough, make a small dessert out of them. FILLING TIPS
• Chop the chocolate small so it melts quickly and gently.
• Any chocolate works here. I use 2½ ounces unsweetened and 3½ ounces of a 50% cacao dark chocolate, which lands around 73% cacao overall, and that is my sweet spot. Keep the total at 6 ounces.
• Do not cook the sugar until it is smooth. The grain in the sugar is what gives the pie its crackly brownie top.
• Tempering is the step where this recipe can go wrong. Cool a small amount of the chocolate mixture first, then add it to the eggs a teaspoon at a time while whisking constantly.
• If the mixture looks separated partway through tempering, keep whisking. It comes back together as the rest of the chocolate goes in.
• There is no flour in this filling, and it is not a refrigerator pie. It gets baked. COOKING TIPS
• The parbake takes 3 to 5 minutes at 500℉/260℃. Watch for the crust to blister slightly and look set. It will not brown.
• Let the oven come down to 350℉/180℃ before the filling goes in. Prop the oven door open while you make the filling. If you set the oven to 350℉/180℃ and it starts right there without running a preheat, it is still too hot.
• The pie is done at 25 minutes when the top looks set and the center still has a slight jiggle.
• Be careful moving a warm glass pie plate onto a cold surface. Thermal shock can crack it. NUTRITIONAL DISCLAIMER
Nutritional information provided is an estimate based on typical ingredient values and standard portion sizes. Actual nutritional content may vary significantly depending on specific brands used, ingredient substitutions, preparation methods, portion sizes, and individual cooking techniques. For precise nutritional information tailored to your specific ingredients and preparation, please consult with a registered dietitian or use laboratory analysis. This information should not be used for medical nutrition therapy or to manage medical conditions without professional guidance.
Nutrition
Storage & Reheating Instructions
How to Store Leftover Mississippi Mud Pie
This is a wonderful make-ahead dessert. Mine sits in the refrigerator for 4 days sometimes, and it is perfect.
- Refrigerator: Cover the pie after it cools completely and refrigerate for up to 4 days.
- Freezer: Wrap individual slices well and freeze for up to 2 months. Thaw overnight in the refrigerator before serving.
- The Chantilly cream: Whipped cream does not last, so if you are making the pie ahead, make and pipe the cream close to serving time rather than before it goes into the refrigerator.
Quick Tip
Take the pie out of the refrigerator at least an hour before you plan to serve it. Letting it come back toward room temperature makes it easier to cut and gives you a softer fudgy pie.
How to Serve Mississippi Mud Pie at Its Best
- Room temperature: Pull the pie out an hour before serving. The filling softens and the slices cut cleanly.
- Slightly warm: A slice will take about 10 seconds in the microwave if you like the filling a little looser and glossier. Do it before adding the cream.
- Cutting tip: Make the slices smaller than you think you need. This pie is very rich and a small slice goes a long way.
Frequently Asked Questions
This Mississippi mud pie is made of an all-butter homemade pie crust and a baked chocolate filling. The filling is butter, granulated sugar, light brown sugar, 6 ounces of chocolate, 3 eggs, vanilla, and salt. There is no flour in the filling and no pudding, which is what gives it a brownie-like texture rather than a soft layered one. It is finished with a lightly sweetened Chantilly cream around the edge and a few chocolate shavings.
Because in my experience it was never meant to be. A lot of the photos you will find online show a layered pudding type of soft dessert, but the Mississippi mud pie I have made for 20 years has one baked chocolate filling with a crackly top and a fudgy center. It is cooked, not chilled into layers, and that brownie-like texture is the whole character of the pie.
The grain in the sugar is what gives you the crackly brownie top. With some pie fillings you cook the sugar until it is completely smooth, but not this one. We only cook the filling enough to melt the chocolate and the butter, which leaves the sugar with its grain. That is by design, so resist the urge to keep cooking it.
You did not. It is very common to see the mixture look separated partway through tempering, as though the fat is coming out. Keep whisking and keep adding the chocolate slowly. It comes back together as it cools and as the rest of the chocolate goes in. By the time the last of it is whisked in, the filling will be smooth and noticeably thicker, about the consistency of a thickened pudding.
Because a soft crust shrinks. If the dough is not firm when it goes into the oven, it starts to slump before it has a chance to set, and you end up with half your crust sliding down into the bottom of the pie shell. After you crimp the edges, give it at least 10 minutes in the refrigerator. It should feel stiff and cold, not floppy. If it is still floppy, leave it in longer.
This pie is genuinely good made ahead. It needs at least 4 hours in the refrigerator after baking, and it will keep there for up to 4 days. You can also prep just the crust well ahead, baking it in the morning to use that afternoon or parbaking it the day before and refrigerating it overnight. Whichever way you go, take the pie out of the refrigerator at least an hour before serving and add the Chantilly cream close to serving time.
Variations
- Change the chocolate: Use milk chocolate, semi-sweet, or a combination of dark chocolate and chocolate chips. I have made it every one of those ways. Just keep the total at 6 ounces and remember that a sweeter chocolate gives you a noticeably sweeter pie.
- All unsweetened chocolate: This is closer to how I made it at the restaurant, with more sugar in the filling to balance it. If you love a really dark, bitter chocolate note, it is worth trying once.
- Skip the homemade crust: A prepackaged rolled dough or a premade crust in a tin works perfectly fine here. You still want to blind bake it and brush the cocoa powder on the bottom.
- A deeper pie: An 8-inch pie plate gives you a deeper pie, and it just needs a little longer in the oven. If you go up to a 9.5 or 10-inch plate, the crust stays the same but you will want to scale the filling up so the pie is not too thin.
- Sweeter cream: The Chantilly cream as written is not very sweet, which I think is perfect against the rich chocolate. Add more powdered sugar if you like it sweeter.
- Use up the dough scraps: Do not throw the pie dough scraps away. Wrap them and keep them in the refrigerator or freezer, and when you have enough, make a little dessert out of them.
More Chocolate Desserts You Will Love
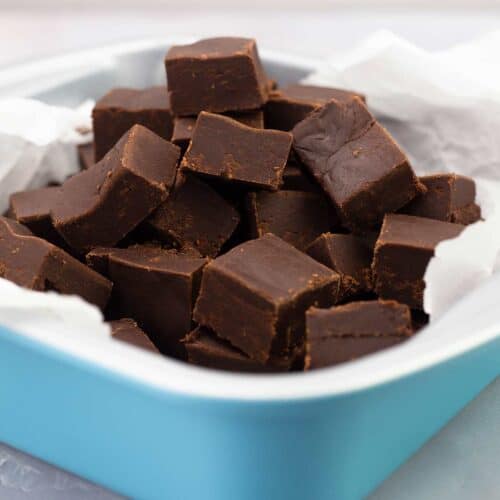
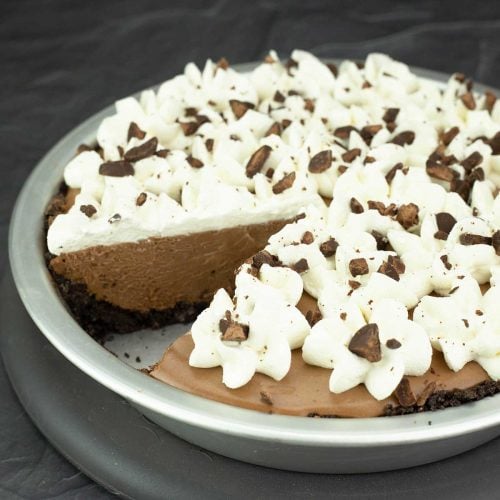
If this pie has you in a chocolate mood, you are in very good company, because the chocolate recipes are some of the most requested ones on The Salted Pepper. Here are a few more that are every bit as good as this pie, from a no-bake version for the days you do not want to turn the oven on, to an old fashioned fudge that takes almost nothing to pull together. Every one of them is delicious, and I think you will find something here worth making this week.
About the Recipe Author, Louise Long
Louise is a full-time recipe creator and food blogger @ The Salted Pepper. She has over 30 years of experience with cooking and recipe development. She owned a restaurant for several years and was a full-time RN until retiring to blog full-time.

She published her first cookbook in the Fall of 2018 and is very interested in writing several more.
Louise is also the creator of an online Ninja Foodi Pressure Cooking Course with over 100 instructional step-by-step videos. People absolutely rave about the course and all the value they have received from it.
Louise has several very active Facebook groups that help people with the basics of cooking and learning more about the appliances they love.
Ninja Foodi Pressure Cooker & Air Crisper 101
Ninja Woodfire Outdoor Grill & Smoker
Louise is also a YouTube creator and you can find most of her recipes in video format on The Salted Pepper YouTube channel.
She is very responsive to messages and eager to help in any way she can. Get more Information about Louise & contact information
I WOULD LOVE TO SEE WHAT YOU ARE COOKING UP IN YOUR KITCHEN! TAG ME @THESALTEDPEPPER ON YOUR FAVORITE SOCIAL MEDIA PLATFORM WHEN YOU MAKE A DISH!
BE SURE TO FOLLOW THE SALTED PEPPER RIGHT HERE ⇓⇓⇓⇓⇓
Leave a Reply