
There are times when you will want to pre-bake your pie crust before adding a filling. This is called blind baking and it's so easy to do in the Ninja Foodi.

Would you like to save this recipe?
Whether you are making your pie crust from scratch or using a refrigerated dough, you can use this method to have a perfectly baked pie crust.
This post may contain affiliate links. If you make a purchase after clicking a link, I may earn a small commission. As an Amazon Associate, I earn from qualifying purchases.
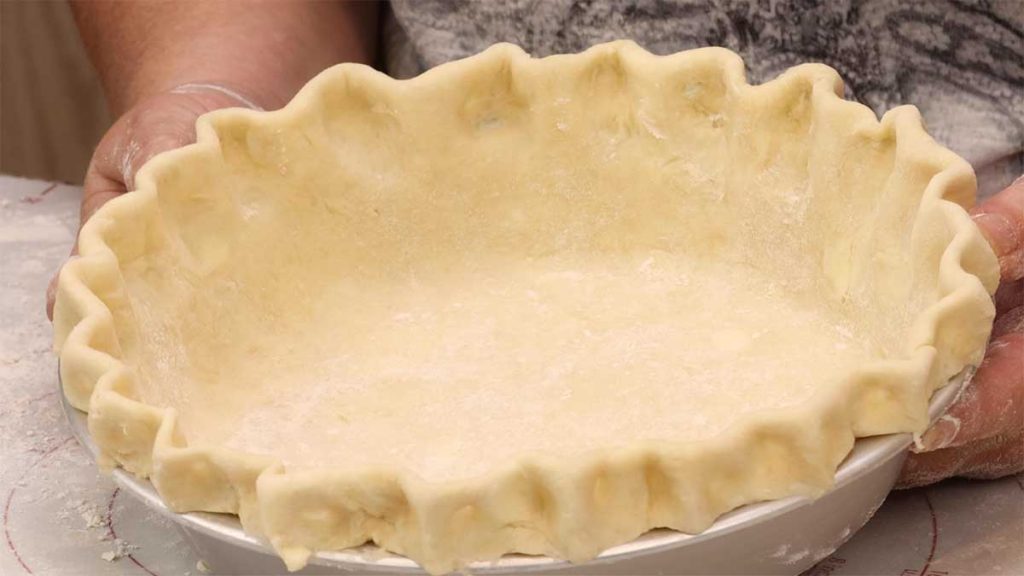
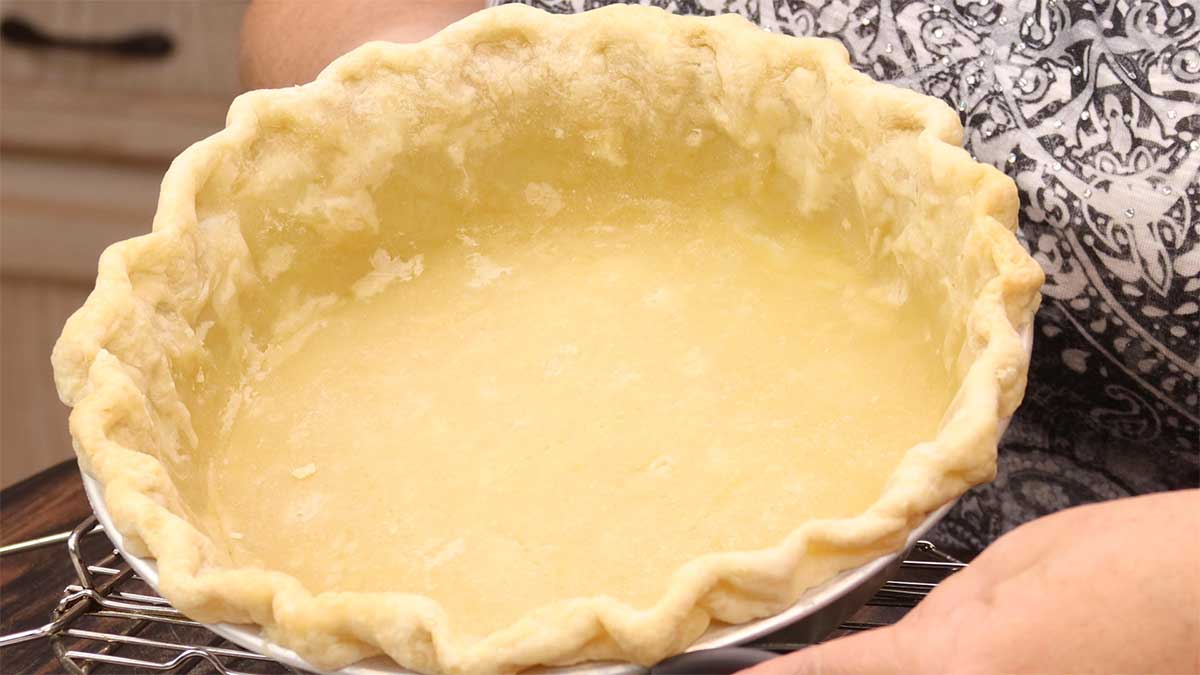
You can easily make a scalloped edge like I did or simply use a fork or a spoon or even your thumb to make a design on the edges.
When Should You Pre-Bake Your Pie Crust?
Personally, I like to pre-bake my pie crusts anytime I want to make a pie in the Ninja Foodi using a dough as the pie crust. This is because it helps keep the bottom crust from being undercooked.
Pre-baking a pie crust is called blind baking and is mostly done when you want to use your pie crust with a no-bake filling, like making a refrigerator pie.
Pre-baking your pie crust is also helpful when making quiche, pecan pie, and even apple pie.
You can control the bake time to get the desired doneness. So, if you are blind baking your crust and then adding a filling that will also be baked, you will only cook the pie crust until it is a blonde color.
If you are blind baking the pie crust and adding a cold filling that sets up in the refrigerator, you will bake it longer, so the crust becomes a golden brown and is completely done.
Blind Baking with Low Temperature Versus High Temperature
Most of the time, you will see methods for blind baking or pre-baking a pie crust at high temperatures, but I found that I get much more consistent results (especially in the Ninja Foodi) when I use a lower temperature.
While you can blind bake at higher temperatures of around 400-425℉/205-220℃, it is harder to control the end result in my opinion. By end result, I mean the degree of doneness and the color of your crust when you are finished making your pie.
Traditionally, when baking in the Ninja Foodi, we lower the temperature by 25-50° from the oven temperature we would use. This is because we are baking in a smaller space with less heat loss AND the Ninja Foodi has a fan that circulates the hot air like a convection oven does.
I found that by decreasing the temperature even further (a total of 100° lower than the usual oven temp) I was able to maintain complete control of the baking process and the pre-baked pie crusts turned out beautiful every single time!
Differences Between a Homemade Pie Crust and a Refrigerated Pie Crust
I know that grabbing a refrigerated pie crust that you roll out and bake is super easy. I've used them for years because making a pie crust was hit-or-miss for me.
They simply aren't the same, though. You will never get those flaky layers of buttery deliciousness in a store-bought pie dough. Why? Butter, Butter, Butter!
Here are the ingredients in a Pillsbury refrigerated pie crust: Enriched Flour Bleached (wheat flour, niacin, ferrous sulfate, thiamin mononitrate, riboflavin, folic acid), Partially Hydrogenated Lard with BHA and BHT to Protect Flavor, Wheat Starch, Water. Contains 2% or less of: Salt, Rice Flour, Xanthan Gum, Potassium Sorbate and Sodium Propionate (preservatives), Citric Acid, Yellow 5, Red 40.
Here are the ingredients in a Homemade All-Butter Pie Crust: flour, butter, salt, water, and sometimes sugar.
I decided that I wanted to always make my own pie dough, so I learned some important tips and now I can make a delicious pie dough in about 5 minutes and it is consistently perfect every time.
It's easy to do and I go over exactly how to do it in this article.
Homemade Pie Crust
What Equipment Do I Need to Blind Bake a Pie Crust?
If you want to make pies in the Ninja Foodi Pressure Cooker & Air Crisper, I really suggest purchasing a (affiliate link)9" Fat Daddio Pie Pan.
This pie pan fits perfectly into the Ninja Foodi on the rack and is a full-size pie. I have tried to use the disposable pie plates and haven't found one that fits well without some trimming.
While you can trim the edges to fit, you lose the structural soundness of the pie pan. It becomes a little flimsy.
If you want to give it a try, I would trim the disposable pie pan to fit and then reinforce the edge with some aluminum foil that you bend up instead of out.
I haven't tried this yet, but I think it will work.
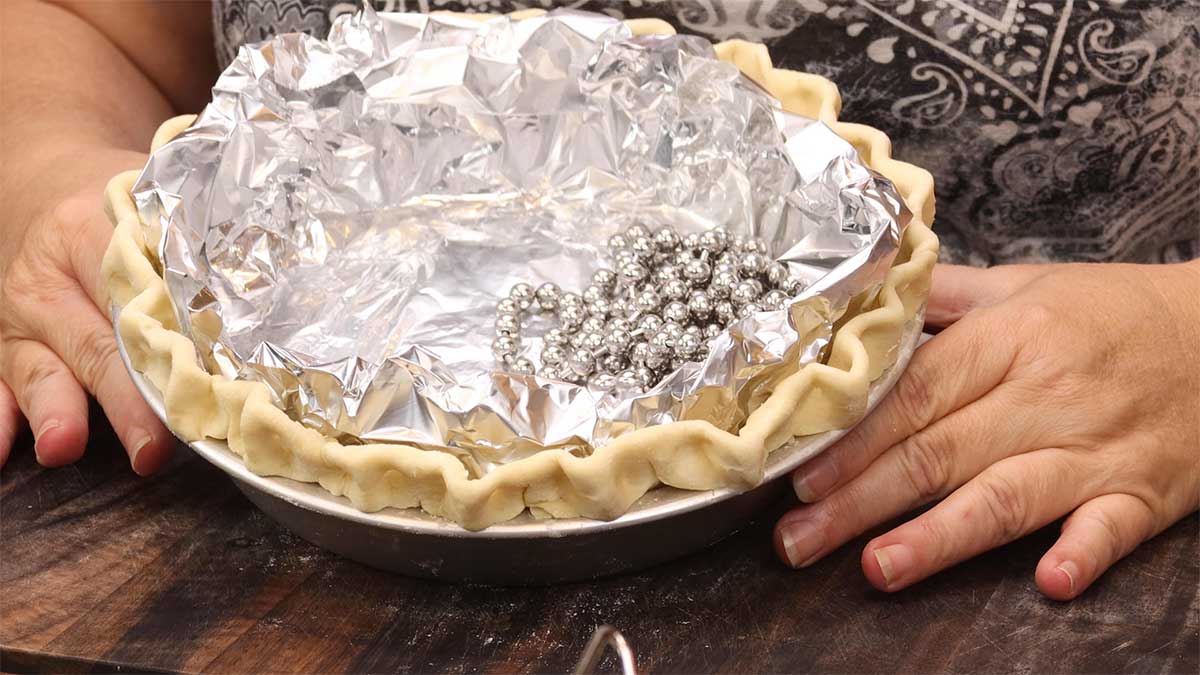
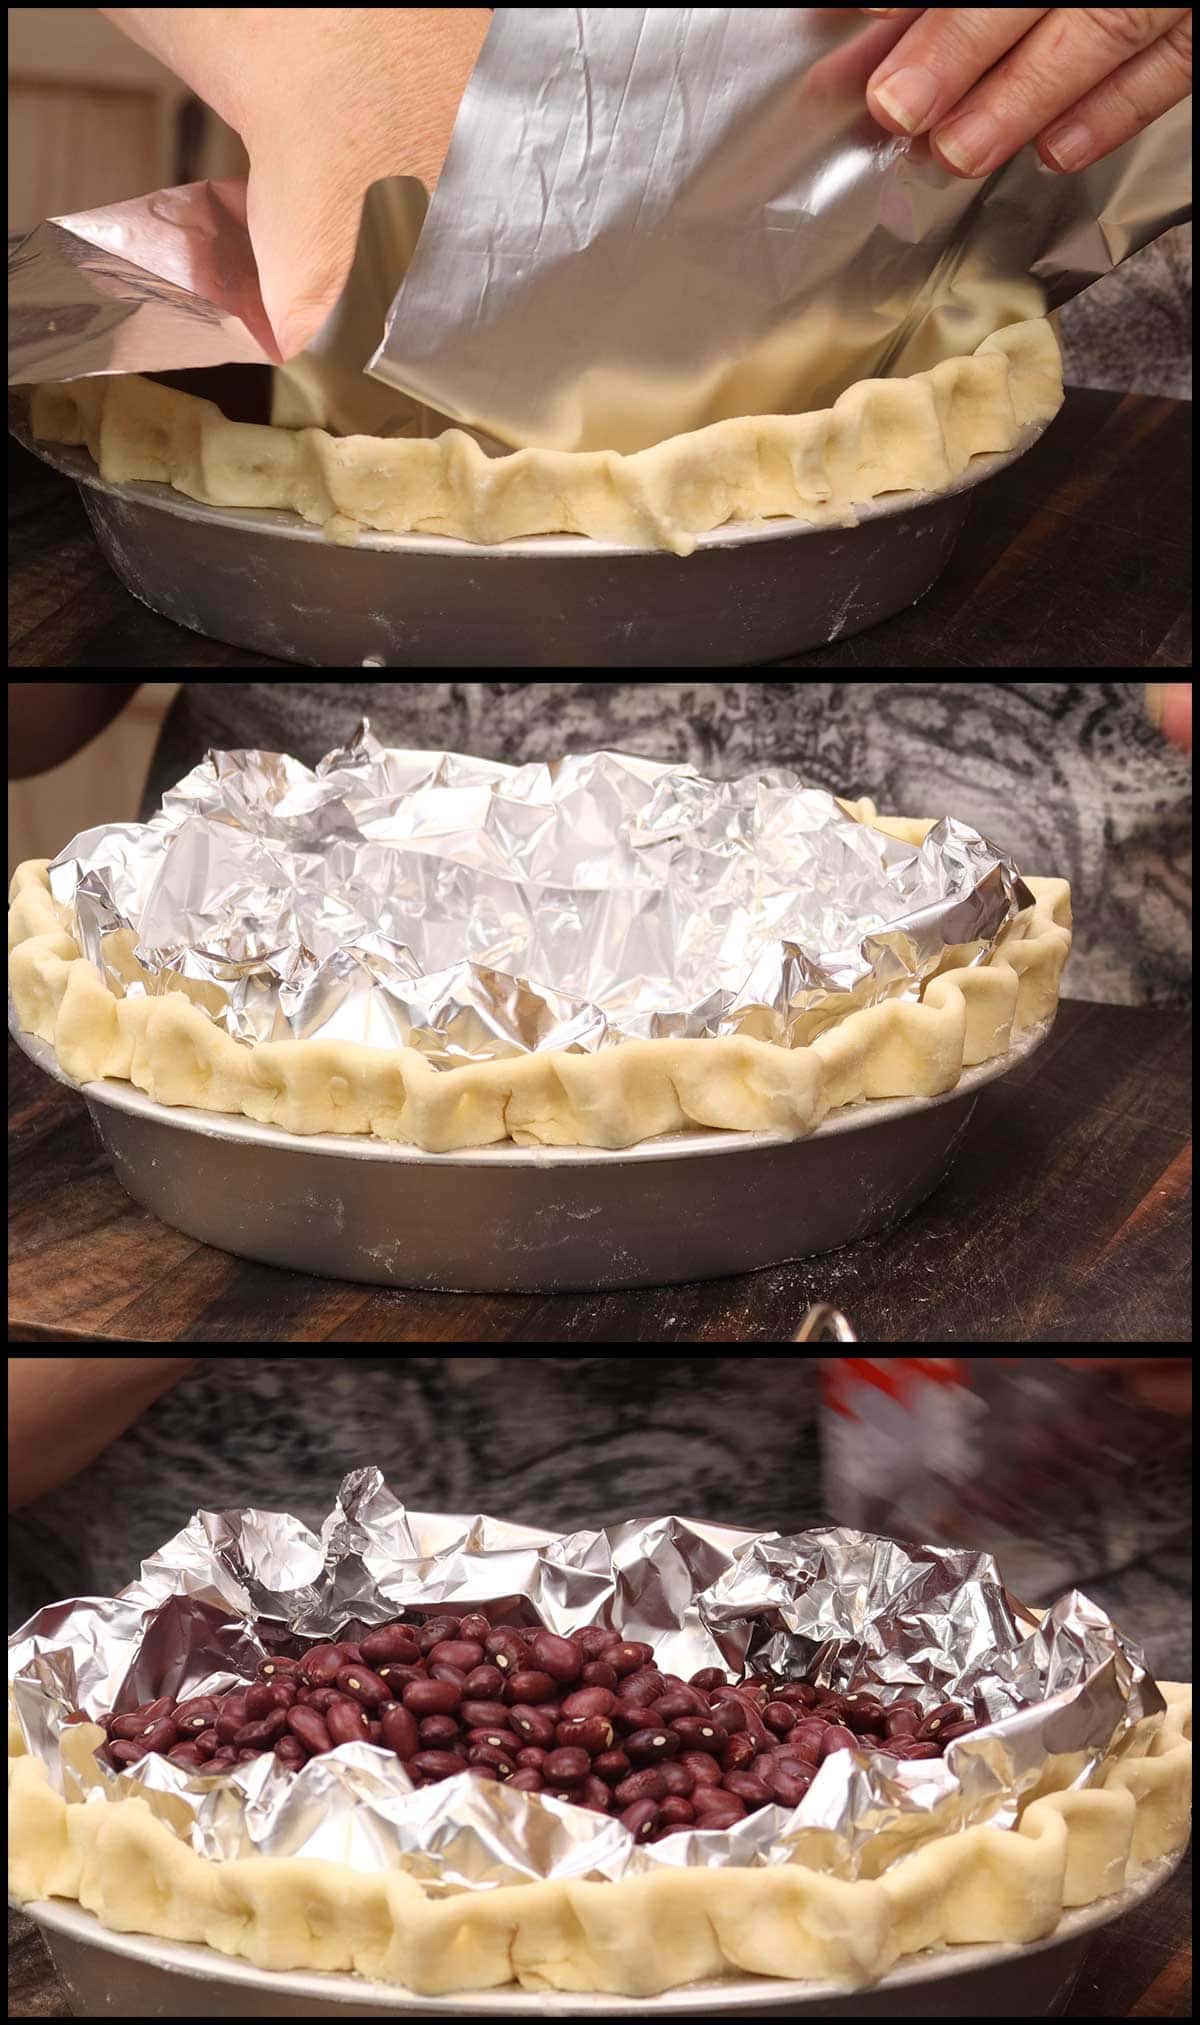
The only other equipment you need are aluminium foil or parchment paper and either pie weights or 2-3 pounds of dry beans.
Pie weights come in different materials and some are loose and some are on a string. I purchased some on a string and loose and feel like I wasted my money. You would need so many to fill your pie shell, it just isn't worth it when you can buy a bag of dry beans for a couple of dollars and use them over and over.
You can see here how 1 strand of pie weights only covers a tiny bit of the bottom. I would need 10 strands or more and that isn't worth it to me.
Any type of dry bean will work, but I used small red beans and found them to be the perfect size for weighing down my pie.
Why Do I Need to Weigh Down the Pie Crust?
If you put your pie crust, formed in the pie pan, in the oven or in the Ninja Foodi, it will simply collapse and make a pool of pie dough in the bottom of the pie pan.
As the pie dough begins to cook, it softens and slides right down the sides of the Fat Daddio Pie Pan. Even if you have a different style of pie pan and you don't have the sliding issue, as the pie dough cooks it contracts and you won't end up with a beautiful pie crust.
How Do I Use the Beans or Pie Weights to Blind Bake the Pie Crust?
After you roll out your pie dough and form it into your pan (see this article for those instructions: Homemade Pie Crust), put it in the refrigerator for about 10 minutes.
This is so the pie dough chills and you won't mess up your pie when you line it with the foil or parchment paper.
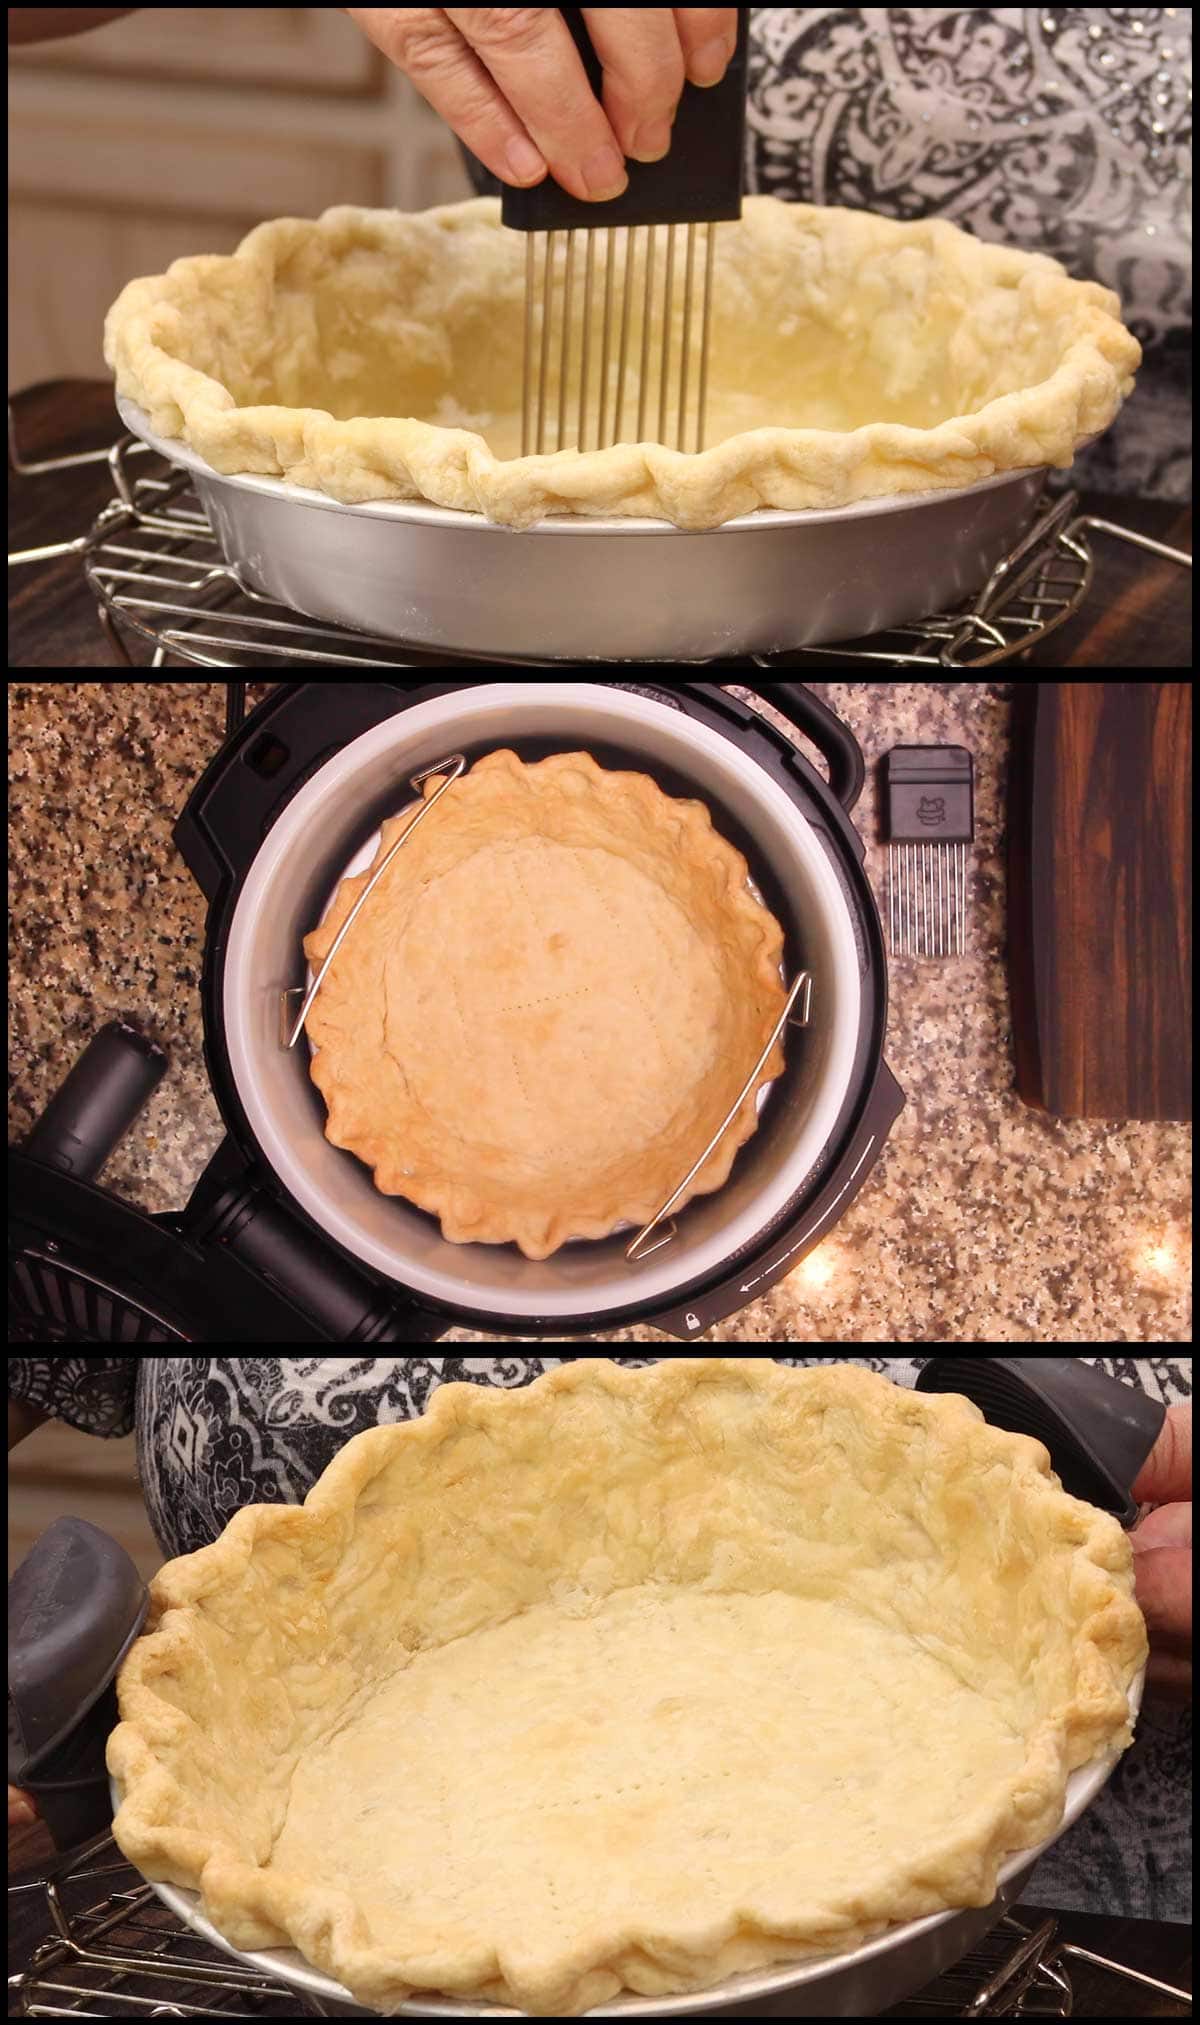
After it is chilled, tear off a piece of aluminium foil or parchment paper and carefully fit it into your pie shell. I found that aluminum foil is easier to work with, but parchment will work.
Then, pour in your beans or pie weights until it fills the pie shell. Make sure the beans or weights are all along the sides of the pie up to the lip for the best results.
Can I Reuse the Beans?
Yep! I wouldn't suggesting making the beans for dinner, but you can store them to use for more pies!
The most important thing to remember is to allow them to cool completely before storing in a bag or container. If they are even the slightest bit warm, condensation can form and then mold can grow because of the moisture.
I usually keep them in the foil and spread them out into a shallow layer and leave them on the counter overnight. Then I put them in a container for the next pie!
How to Blind Bake or Pre-Bake Your Pie Crust in the Ninja Foodi
While your pie crust is chilling (before you add the foil and beans), preheat the Ninja Foodi on Bake/Roast at 300℉/150℃ for about 10 minutes.
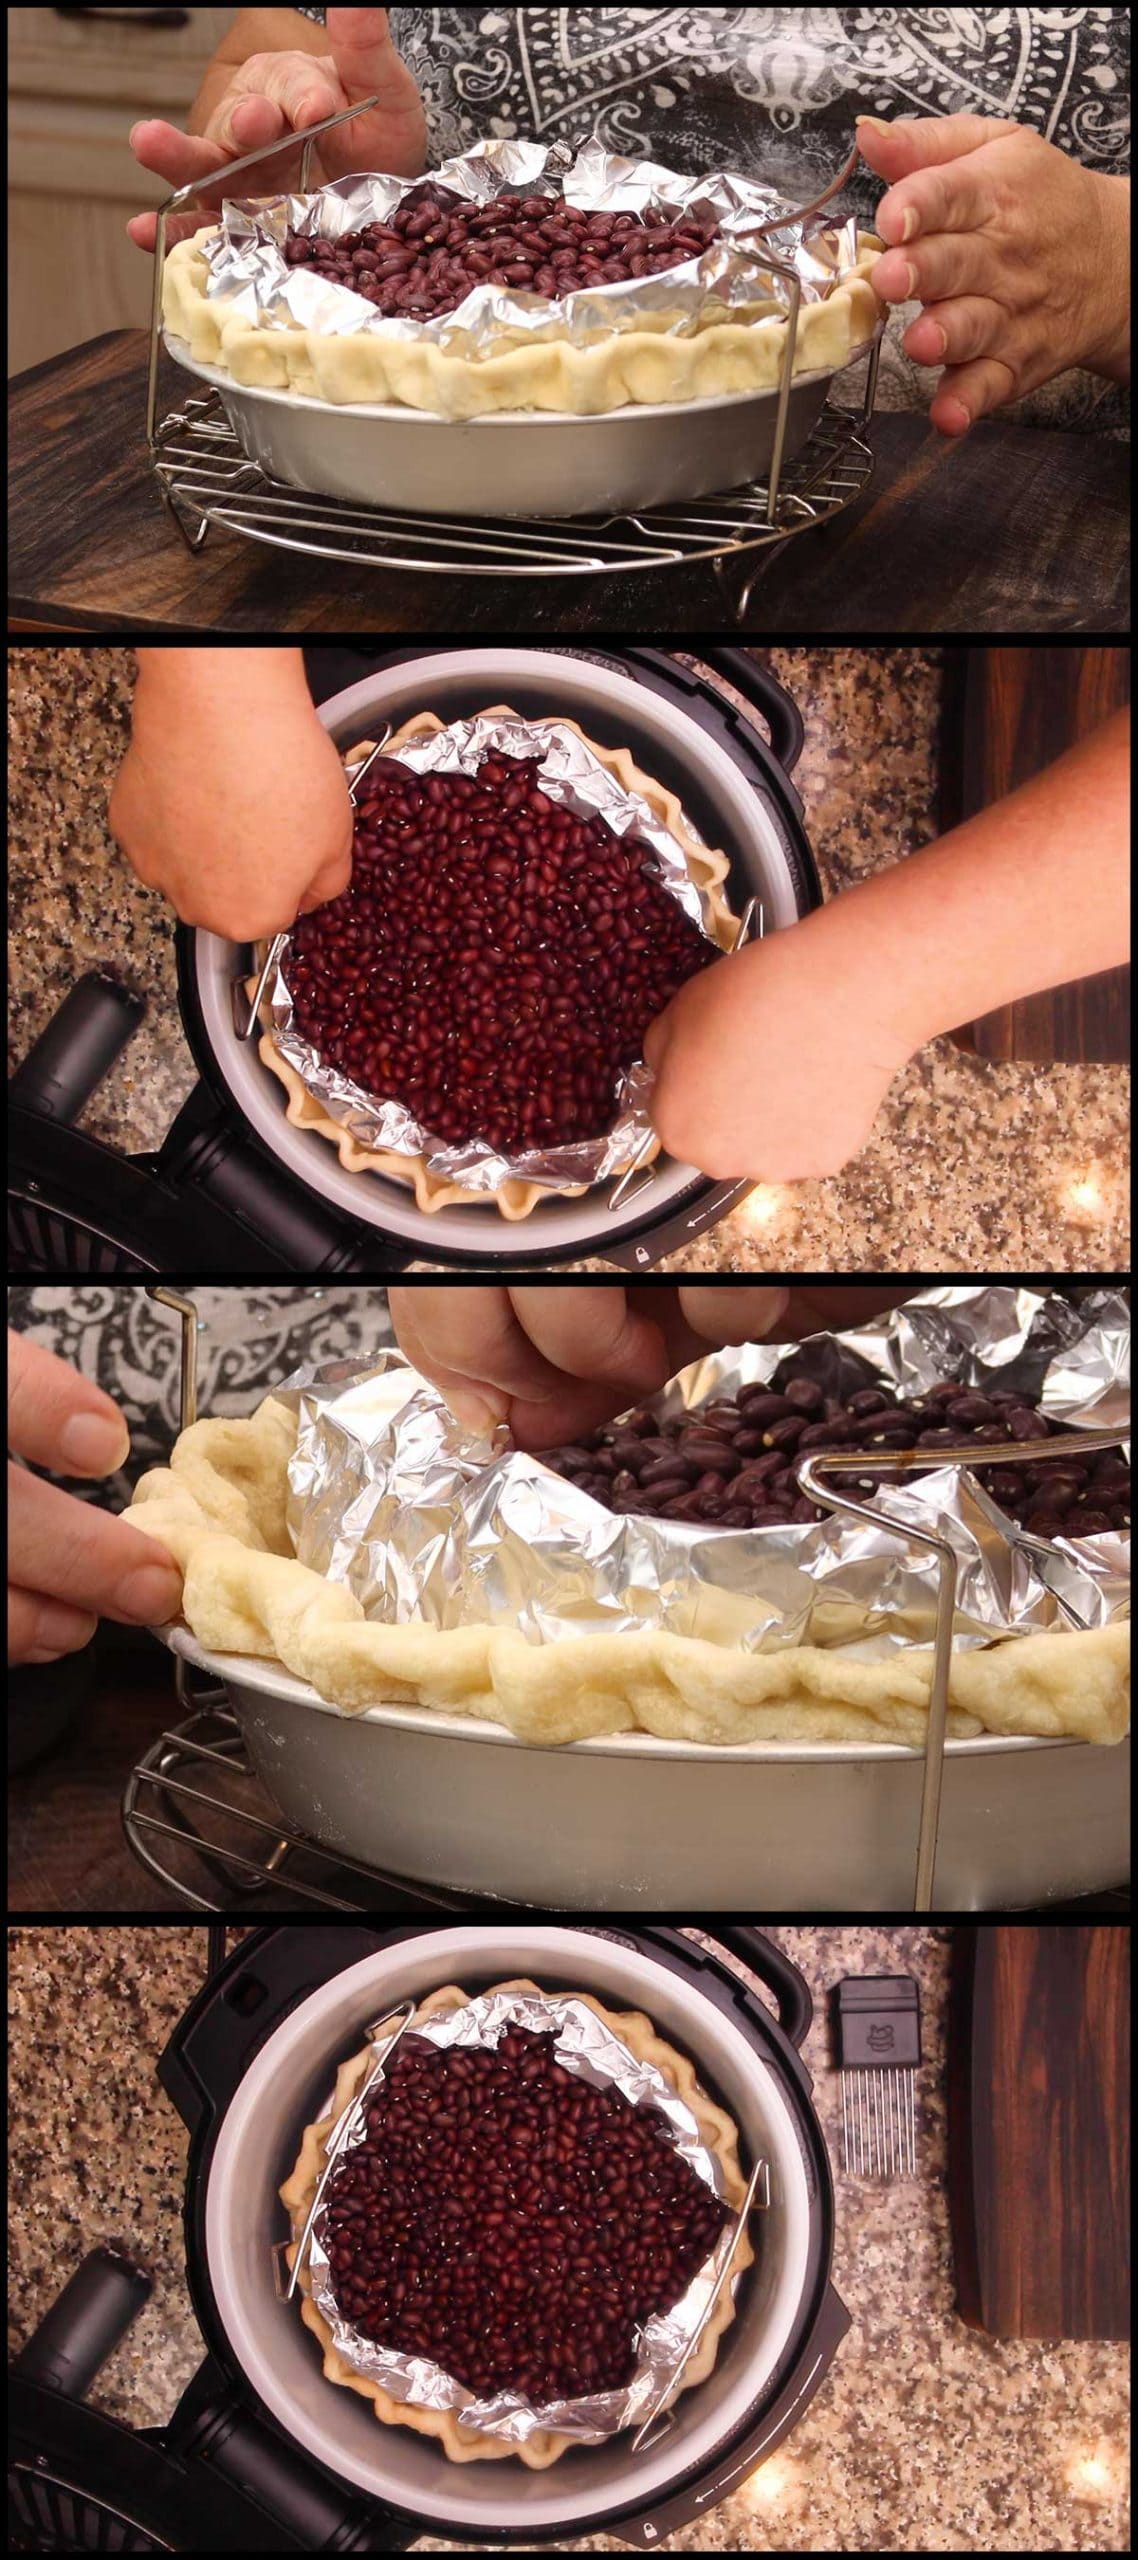
Line your pie shell with foil and add in the beans or pie weights as described above and put the pie on the reversible rack in the low position.
If you have the newer model of the Ninja Foodi that doesn't come with the reversible rack, you can try using the crisping plate instead. It's unfortunate that Ninja Kitchen made this decision to replace the reversible rack with a rack that is simply not as functional, but you can purchase the reversible rack for the 6.5 qt Ninja Foodi on their website and I do recommend it if you want to do stacked cooking.
Place the rack with the pie crust into the Foodi and bake/roast on 300℉ for 10-20 minutes. I like to check the progress after 10 minutes to see if the edges are set enough, but usually it has taken 20 minutes.
Don't bake long enough for the edges to brown because we still have to remove the beans and bake the bottom and the edges will brown more during that time. You just want to make sure the edges are cooked enough that they won't slip down when the beans are removed. The edges should be a very pale blonde color.
Remove the foil with the beans and prick the bottom of the pie crust with a fork or a tool designed to dock crust. Docking a pie simply means putting holes into the bottom of the crust to allow venting so the pie crust doesn't puff up when baking. I use a handheld one that is no longer available and I couldn't find anything similar on Amazon.
No matter how long you cooked the pie shell with the beans or pie weights in the bottom, the bottom crust will not cook, so you have to remove them and then continue to bake.
Return the pie shell to the Ninja Foodi (on the rack) and continue to bake at 300℉/150℃ for another 10-20 minutes depending on how done you want the edges. If you aren't baking the filling, bake until the crust is the color you want. In this picture, I was baking again to make a Quick Apple Pie, so I wanted the edges to be just starting to turn a golden tan color.
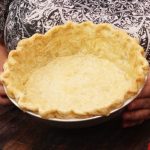
That's it! You are done pre-baking your pie shell. Now, let it cool completely on the counter before adding in any cold fillings.
If you want to make a pie where you bake the filling, let the pie crust cool about 10 minutes, add the filling, and then bake.
How Far in Advance Can I Pre-Bake the Pie Crust?
You can make your crust 1-2 days in advance if you want to keep it on your counter or in the fridge and you can store it in the freezer for quite some time.
The important thing to remember when storing the crust in the fridge or the freezer is to let it cool completely before wrapping and storing. If the pie crust is warm when wrapped, it will produce steam that turns into condensation and will lead to a soggy crust or a crust with ice crystals in the freezer.
How to Blind Bake a Pie Shell in the Ninja Foodi
Ingredients
- 9" (affiliate link)Fat Daddio Pie Pan
- 2 pounds (affiliate link)red beans
- aluminium foil
- 1 recipe for pie dough RECIPE HERE
Instructions
- After forming your pie dough in the pie pan, refrigerate it for at least 10 minutes
- Preheat the Ninja Foodi on Bake/Roast at 300°F/150°C
- Line the pie shell with aluminum foil all the way up to the edges of the pie and fill with beans or pie weights.
- Put the pie on the rack in the low position and bake in the Ninja Foodi for 15-20 minutes or until the edges are a pale blonde color and set.
- Remove the aluminium foil with the beans and poke very small holes in the bottom of the pie crust. Continue to bake on 300°F/150°C for another 5-10 minutes or until the crust is done to your liking.
- Allow to cool completely before adding a no-bake pie filling or about 10 minutes before adding a filling that you plan on baking.
About the Recipe Author, Louise Long
Louise is a full-time recipe creator and food blogger @ The Salted Pepper. She has over 30 years of experience with cooking and recipe development. She owned a restaurant for several years and was a full-time RN until retiring to blog full-time.

She published her first cookbook in the Fall of 2018 and is very interested in writing several more.
Louise is also the creator of an online Ninja Foodi Pressure Cooking Course with over 100 instructional step-by-step videos. People absolutely rave about the course and all the value they have received from it.
Louise has several very active Facebook groups that help people with the basics of cooking and learning more about the appliances they love.
Ninja Foodi Pressure Cooker & Air Crisper 101
Ninja Woodfire Outdoor Grill & Smoker
Louise is also a YouTube creator and you can find most of her recipes in video format on The Salted Pepper YouTube channel.
She is very responsive to messages and eager to help in any way she can. Get more Information about Louise & contact information
I WOULD LOVE TO SEE WHAT YOU ARE COOKING UP IN YOUR KITCHEN! TAG ME @THESALTEDPEPPER ON YOUR FAVORITE SOCIAL MEDIA PLATFORM WHEN YOU MAKE A DISH!
BE SURE TO FOLLOW THE SALTED PEPPER RIGHT HERE ⇓⇓⇓⇓⇓
Sualdam says
Could you clarify something for me, please?
When you say 'we lower the temperature by 25-50° from the oven temperature we would use', is that referenced against the F temperature?
I'm in the UK and we use C, and I'm getting to grips with my Ninja Foodi. I found this as I am looking to experiment with pies.
Louise says
Yes, that is in reference to Fahrenheit temperatures. What I do when trying to get the Celsius temps is use Google for the conversion. You can type in any temp in F and get the equivalent in C. For example, in Fahrenheit, 400 degrees would be 350F when reduced by 50 degrees. In Celsius, 400F is around 200C and 350F is around 175C. It does get confusing and you bring up a great point that I should address in several of my posts.