Making a homemade pie crust isn't hard, but there are some tips that can make it a whole lot easier!
I've been making pie crusts for about 20 years and I've had them go terribly wrong many times!
Sometimes they won't roll out correctly, sometimes they are dense instead of flaky, sometimes I have simply become so frustrated that I throw the dough in the trash and head to the store for the good old box of Pillsbury prepared pie dough.
This post may contain affiliate links. If you make a purchase after clicking a link, I may earn a small commission. As an Amazon Associate, I earn from qualifying purchases.
I actually gave up making them for a while and simply bought the refrigerated dough. Then, I started making pies for a restaurant that I owned and I HAD to learn to make the pie dough myself.
I've tried all kinds of methods and the one that works most consistently for me, is the one I'll be detailing in this post.
Frequently Asked Questions
This recipe makes two 9" pie crusts that are rolled out into 12" circles. If you are using a deep dish pie pan or a larger pie pan, you will need to increase all the ingredients (except the salt) by 25%.
You can also cut the ingredient in half if you only want to make one pie crust.
Yes, absolutely! They store perfectly (wrapped) in the fridge for about 24 hours or so and in the freezer (well wrapped) for about 3 months.
Different Types of Homemade Pie Dough
When it comes to making pie dough, there are several different types you can make and they each will have slightly different character traits. The type you choose is completely up to you, but I prefer the all-butter pie crust, personally.
The all-butter pie crust is just what the name implies: it's made with butter, flour, water, salt, and sometimes sugar. I think the flavor of an all-butter pie crust is the best of all of them, but it can be a little tricky working with butter when making a pie dough. Don't worry though, I'm sharing my tips with you!
Shortening pie crust is made with all shortening (like Crisco) instead of butter. While the shortening can be easier to work with and the dough rolls out nicely, it really lacks the flavor and can even taste a little greasy when baked.
Half-and-half pie dough is when you combine half shortening and half butter with the flour, water, salt, and sugar (optional) to create a dough that (in theory) is both flavorful, flaky, and easy to deal with.
I have made all three types many times and always go back to an all-butter pie dough for the flaky, tender crust and the flavor!
Although this recipe is for an all-butter pie crust, you can substitute part or all of the butter for shortening and it will work out just fine.
What Equipment Do I Need to Make Homemade Pie Crust?
Nothing special! There are a few things that make it easier, but they aren't necessary.
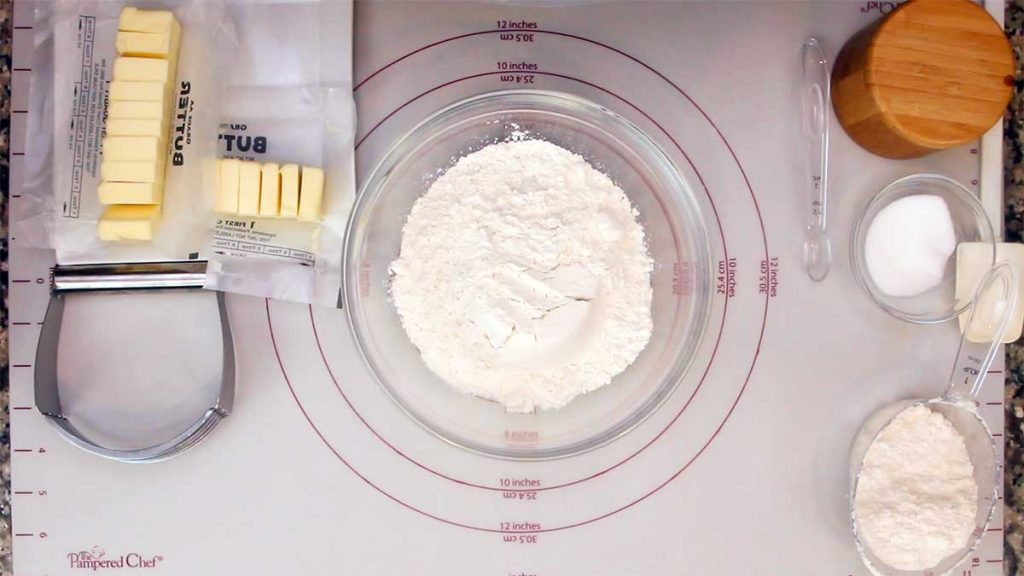
You can make a pie dough with just a bowl and a fork, however, there are some things that make it easier.
Pastry Blender/Cutter: Cutting through the butter can be done with just a fork, but having a pastry blender (also called a pastry cutter) can really speed things up AND requires less work. The one I use is from Pampered Chef and you can find it right here: (affiliate link)Pastry Blender by Pampered Chef
Rolling Pin: A rolling pin is very helpful for rolling out your pastry dough, but you can also use a few things you might have around your house. A wine bottle or a large drinking glass work fairly well, in a pinch. There are many different styles of rolling pins, but the kind I like the most for rolling pie crust is a marble rolling pin. This really helps keep everything nice and cold because the marble doesn't create as much heat as other materials. I also like the weight of it and think it helps when rolling thin pie crusts. The one I have is from Pampered Chef: (affiliate link)Marble Rolling Pin
Pastry Mat: Any flat surface works for rolling out your pie dough, but I like the visual markers on my pastry mat. Here is the one I use: (affiliate link)Pastry Mat
Can I use a Blender or Food Processor for Making Homemade Pie Dough?
You can, but I really suggest learning to make one without the food processor for a few reasons.
I have found that using a food processor or blender can create a tougher crust because the cutting action of the blades tends to overwork the dough resulting in more gluten formation. The food processor or blender also creates heat which can melt your butter and leave you with a tough crust that isn't very flaky.
If using a food processor or blender, keep the blending to a minimum and only use the pulse button instead of a constant blend.
I have also found that I tend to add too much water when using a blender or food processor, and that can lead to a dough that is very sticky and hard to work with. While you can correct this by adding more flour, sometimes I find that I'm chasing the dough, meaning that I add flour, then need to add water and most of the time I end up throwing it away and starting over.
If you want to make your pie crust in the blender or food processor, use the pulse button only to incorporate the butter into the flour until you have small pebble size pieces.
Then, only add enough water and use very short pulses until you see the small pebbles start to form larger pieces. If you add enough water so a dough forms, it usually is a little too sticky to work with.
Tips for Making a Homemade Pie Crust
Start with COLD ingredients
When making a homemade pie crust, chilling the butter and using ice water is very important if you want a flaky and tender crust.
This is done so the butter doesn't melt as you work with the dough. Melted, soft butter releases its water content into the dough BEFORE baking and it's the steam from the water in cold butter that is released during baking that creates those flaky layers.
For the best results, slice or grate your butter and put the butter in the freezer until just before you incorporate into the dough.
Also, use ice cold water. What I usually do is put about 1 cup of water into a container with some ice cubes and let it sit.
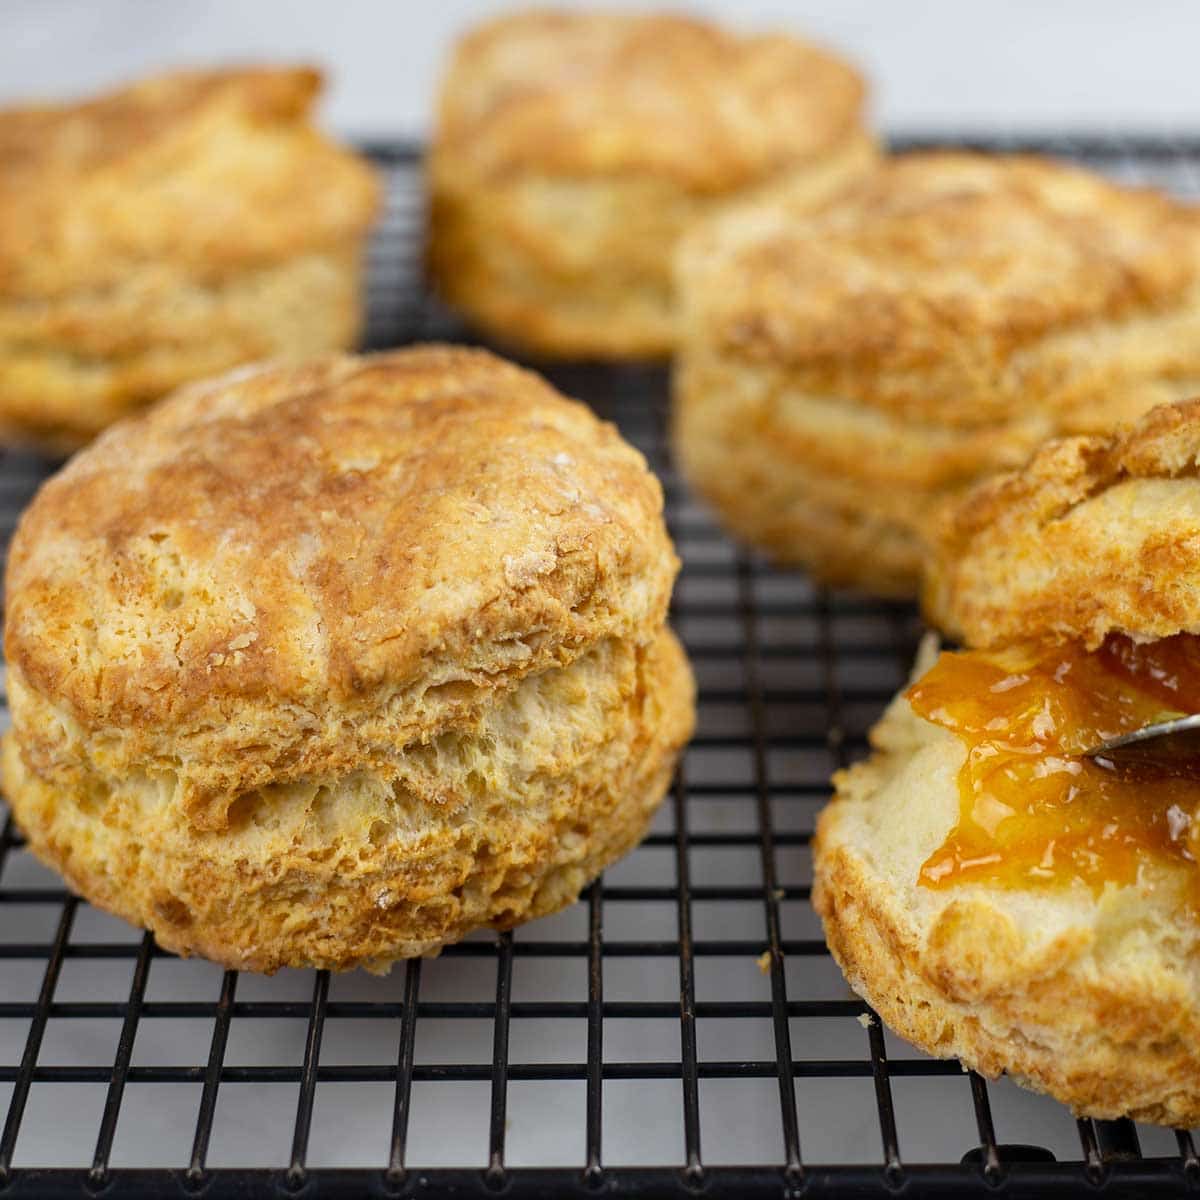
Although I refrigerate my flour in my recipe for these Homemade Biscuits, I don't usually do that with homemade pie dough.
Don't Handle the Dough with Your Hands
The process for making homemade pie crust is very similar to making biscuits and you don't want to handle the dough any more than necessary.
There are two main reasons why you want to avoid using your hands as much as possible.
The heat from your hands can melt the butter and that results in releasing the water into the dough and you won't benefit from the steam action that happens when the crust is baking. The steam produces as the butter melts in the oven, creates those flaky layers we know and love in a pie crust.
The other reason is working with the dough too much activates the gluten in the flour which can result in a tough and chewy crust versus a flaky and tender crust.
Of course, you will have to use your hands from time to time and that is fine, just limit it as much as possible.
If you think your butter is getting too soft, simply refrigerate the dough for 5-10 minutes and then proceed.
Refrigerate the Homemade Pie Dough Before Rolling it Out.
This is a step that I think a lot of people skip and it can lead to tons of frustration when rolling out your dough.
Once you make the dough, wrap it in plastic wrap and refrigerate it for at least 10 minutes, but 30 minutes is even better.
This gives the butter or whatever fat you used in your pie crust a chance to harden up again. Not only will your dough roll easier, but you will have a more tender and flaky crust.
I suggest forming your pie dough into a flat disc, wrapping it tightly in plastic wrap and refrigerating for 15-30 minutes or up to 24 hours. After 24 hours, you may start to see some discoloration in the dough. While this doesn't affect the outcome, it's not very pretty. So, if you want to make up pie dough ahead of time, I suggest freezing it.
Allow the pie dough to sit for about 5-10 minutes before rolling it out if you refrigerated it. If frozen, either thaw in the refrigerator overnight or thaw on the counter, but if it gets too warm, refrigerate it again.
Flour Your Work Surface AND the Dough AND the Rolling Pin
When rolling out your pie crust to form your Homemade Pie Crust, you want a well-floured flat surface that is large enough for you to roll out at least a 12" diameter pie circle.
This can be a clean counter, a very large cutting board, or a (affiliate link)pastry mat like I use.
Now, you don't want to dump a cup of flour on the surface you are using or on the pie dough, but you do want a light dusting at all times so the dough doesn't stick.
Lightly flour several times during the rolling process and even flip your dough over a few times to ensure it doesn't stick. There is nothing worse than rolling out the perfect dough circle, and then, when you go to put into your pie pan, it's sticking and breaks apart. Yes, it's happened to me several times and the frustration is so real, I usually throw the dough in the trash and go to the store for a pie dough!
How to Make Homemade Pie Crust
Place about 1 cup of water in a container with 3-4 ice cubes and let sit.
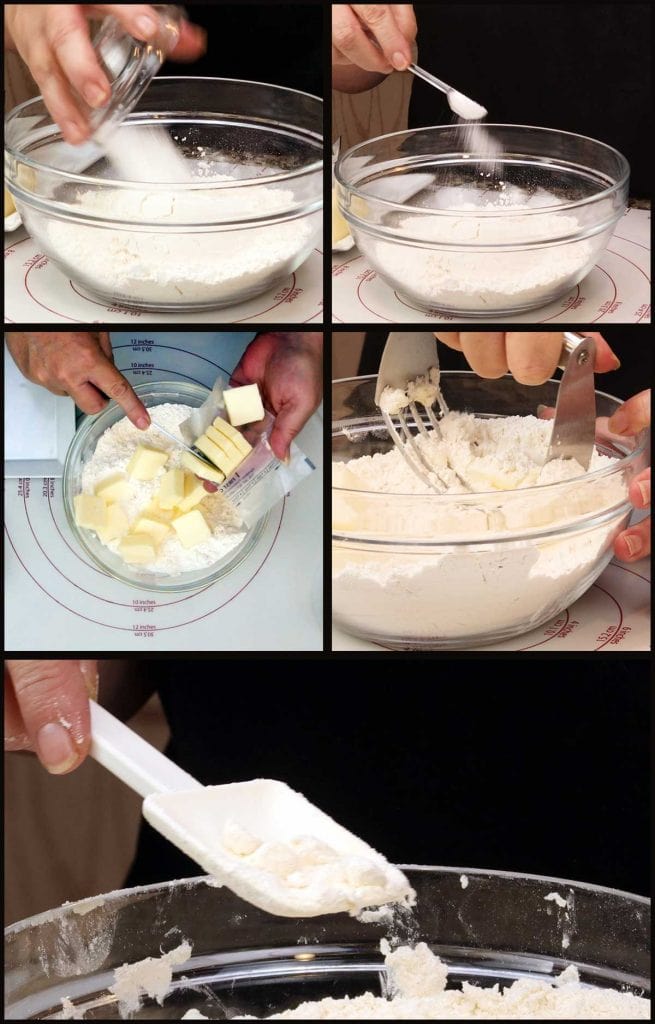
Mix your flour, salt, and sugar in a medium size mixing bowl. The sugar is optional and I only use it when making sweet pies. Salt really helps with the flavor of the pie crust, but is optional.
Cut your COLD butter into teaspoon size slices if you have a pastry cutter or if you are using a fork, grate your butter onto a plate and place in the freezer for a few minutes.
Cut the butter into the flour either with a pastry cutter or a fork until you have small pebbles like the ones shown below. They should be about the size of the tip of your pinky.
Add 3 Tablespoons of the ice cold water to the flour mixture and toss with a fork to combine. Add 1-2 more Tablespoons and toss to combine. You will begin to see the water, flour, butter forming larger balls.
There is not an exact amount of water to add because there are variables such as humidity that will affect the final amount of water needed. This can vary day by day, so the best thing to do is go by look and feel.
The biggest mistake is adding too much water, so restraint is your friend here. Go slowly, especially if you are new to making pie crust. The flour will tell you how much it needs. When you can squeeze some of the mixture in your hand and it holds together without crumbling, that is enough liquid.
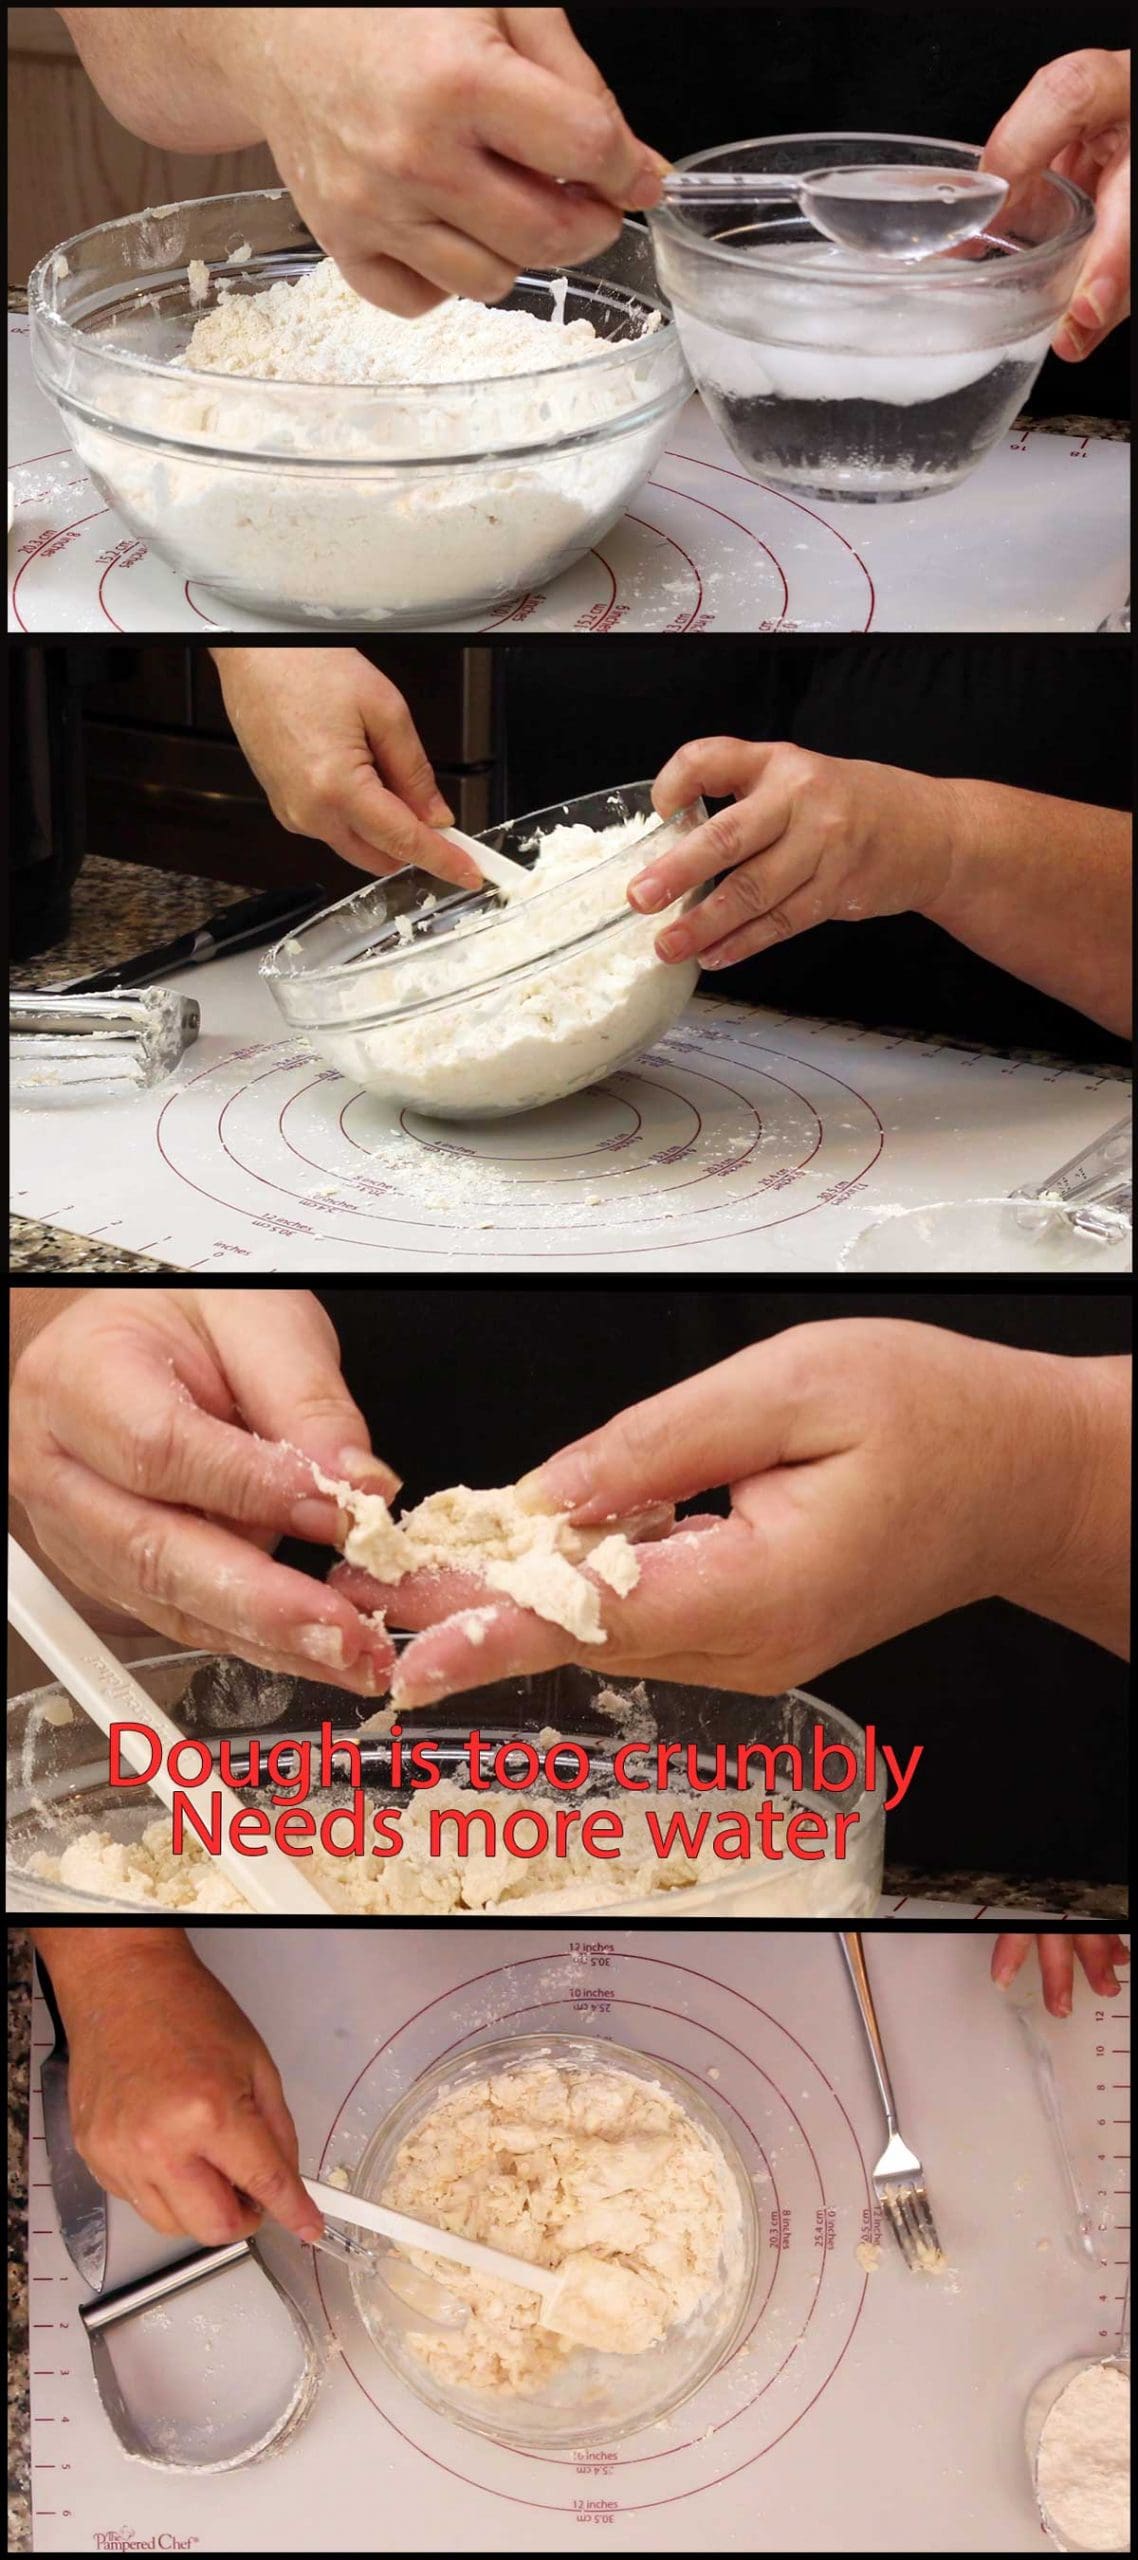
If it crumbles immediately upon squeezing, you need a little more water. What I like to do (and this is not a must) is pour out the mixture onto a large piece of plastic wrap and wrap the pie dough up to see if I can form a disc without it being too crumbly. This way, I'm not transferring as much heat from my hands as I would if I simply formed the disc with my hands.
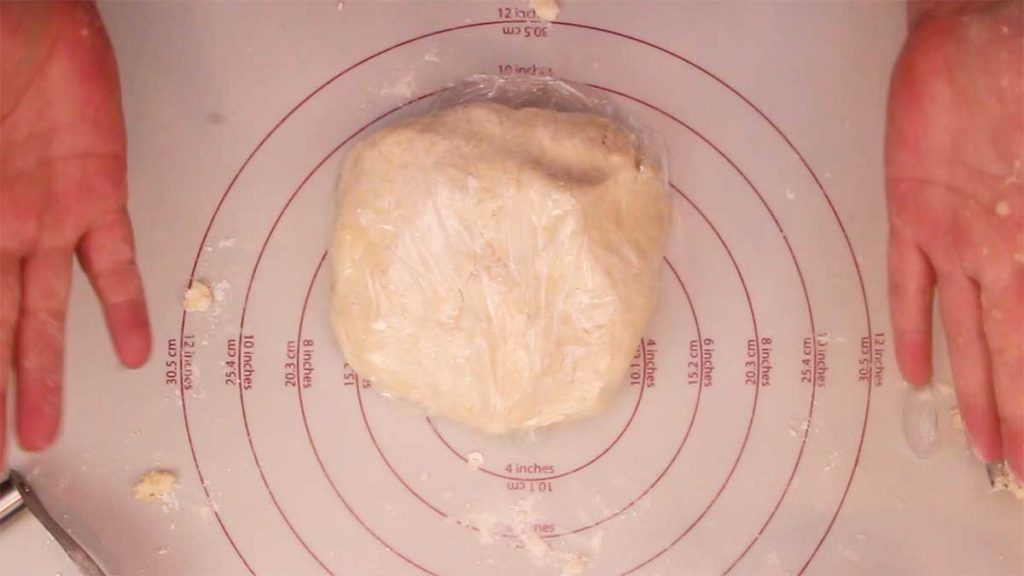
Once you have the right texture of the dough, split it in half. This recipe makes two 9" pie crusts based on the (affiliate link)9" Pie Pan I have from Fat Daddio.
The most accurate way to split your dough into 2 is to weigh it, however I don't always do that.
Put a piece of plastic wrap down and wrap ½ of the dough so it is covered with the plastic wrap and form a flat disc. Do this for the other half and then refrigerate for at least 15-30 minutes before rolling out the pie crust.
How to Roll out the Homemade Pie Crust for a Pie
When you remove the pie crust to roll it out, let it sit a few minutes to soften.
Lightly flour your work surface and make sure the work surface you are using is large enough to accommodate a 12" circle.
Place the disc in the center of your work surface and lightly flour the top. Put the rolling pin in the middle of the disc. Apply light pressure to the rolling pin and roll away from you. Bring the rolling pin back to the center and apply light pressure as you roll back towards you. Do this a few times until the dough starts to flatten. If the rolling pin is sticking, add a little bit more flour to the surface of the dough and the rolling pin.
Flip the dough over and turn it 90°. Repeat the rolling motion, always bringing the rolling pin back to the center. This helps with rolling out an even pie dough.
Once your pie dough is about 6" in size, flip it over and lightly flour both the work surface and the top of the dough. Continue rolling until you have a 12" circle.
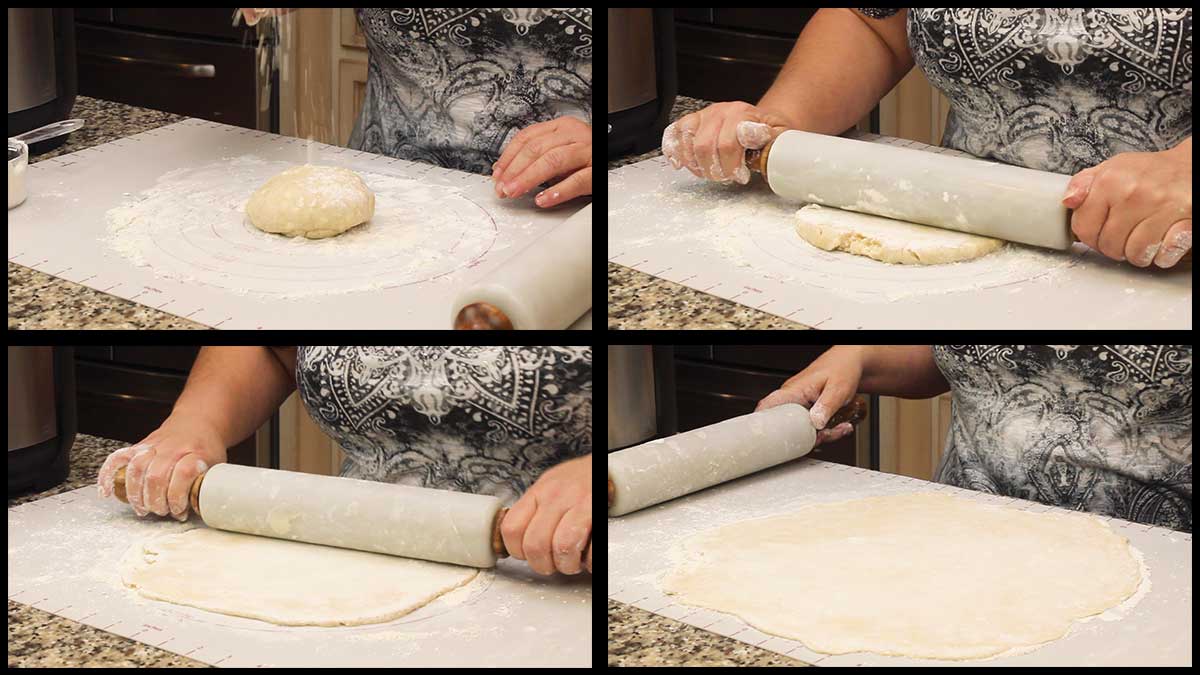
Don't worry if the very edges are cracking, you can roll it out a bit bigger so they are trimmed off when you form your crust.
How to Put your Homemade Pie Crust into the Pie Pan
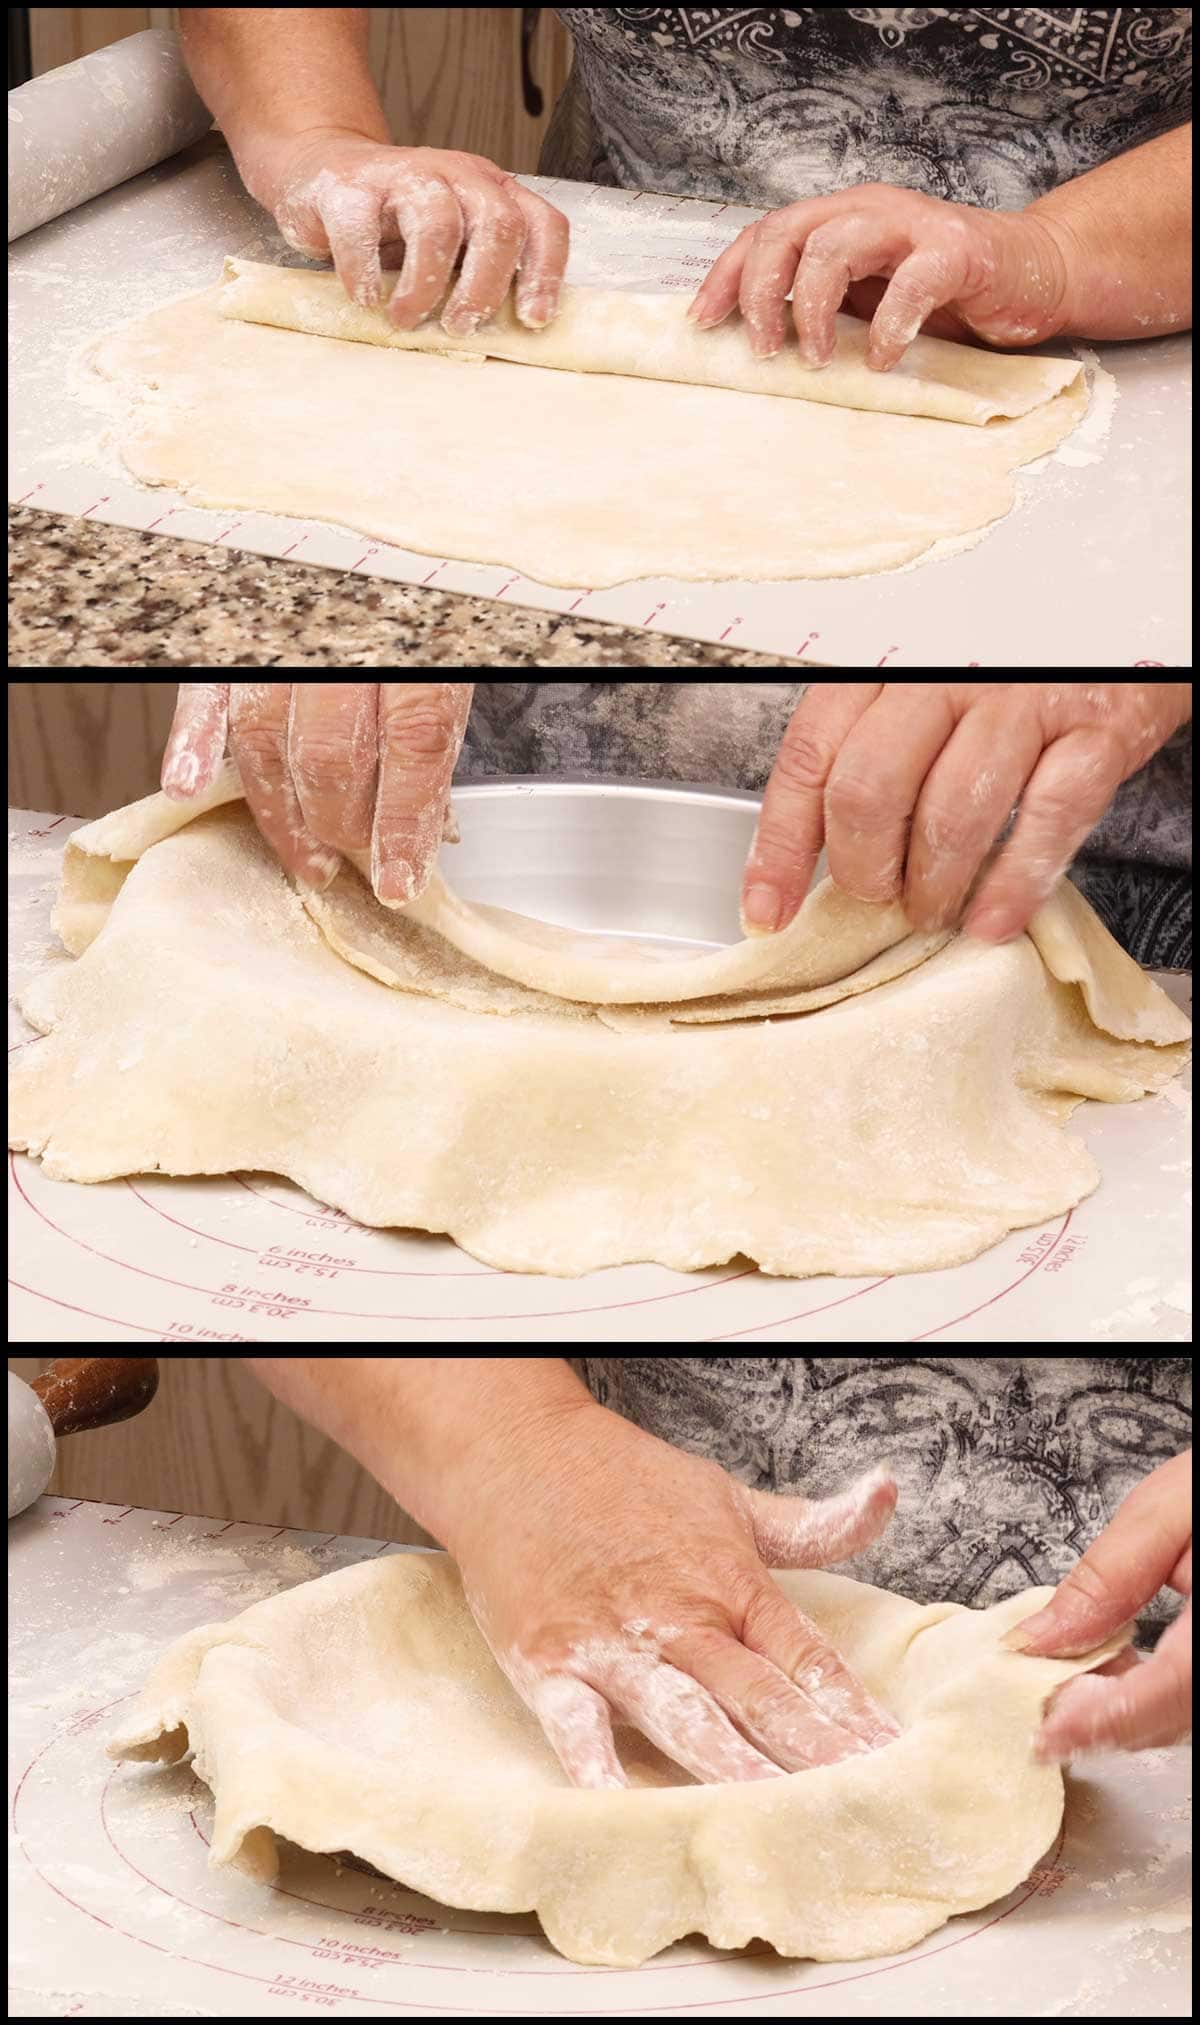
Once rolled out, lightly flour the top of the dough and gently roll it away from you. Add some flour to the work surface if it is sticking at all.
Place the pie pan onto your work surface and gently lift dough onto the pie pan. Unroll it and then form it into the pie pan.
You want a few inches of extra pie dough all around the pie pan.
How to Form the Edges of the Pie Crust
Trim off any excess pie dough so you are left with about 2" of pie dough that extends beyond the pie pan. Make sure that the dough is formed into the pie plate and sitting on the bottom before you do this.
Then, fold over the excess pie dough and press to form the edge. There are many different designs you can do to the edge of your pie crust.
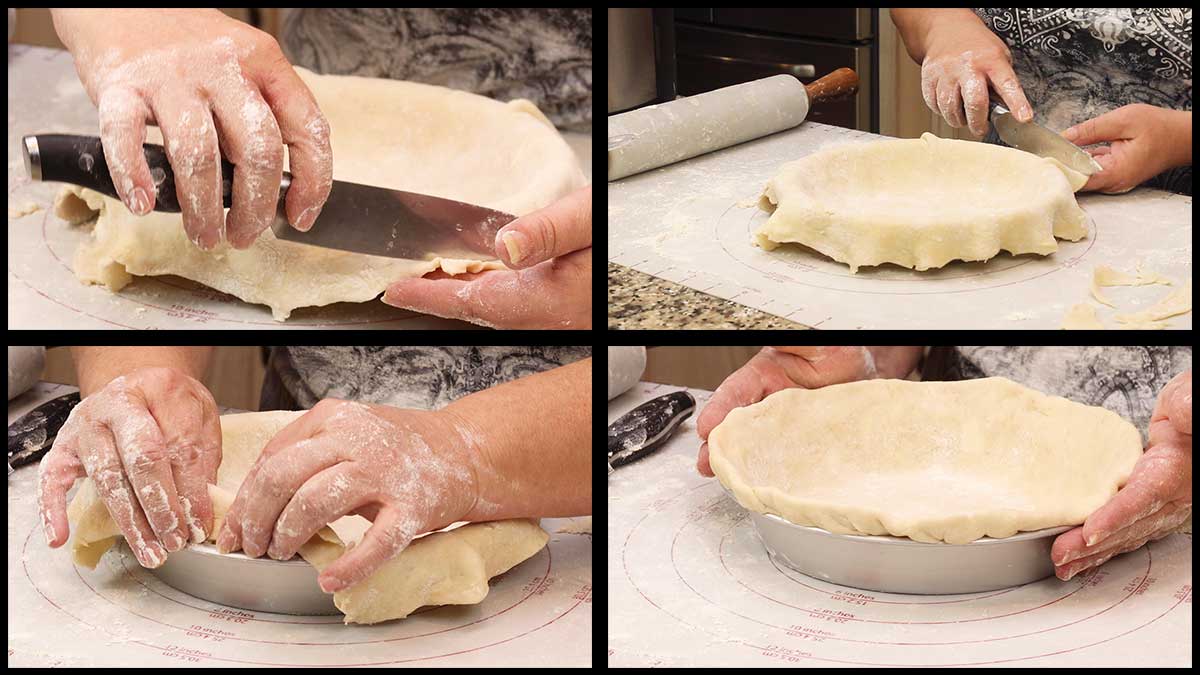
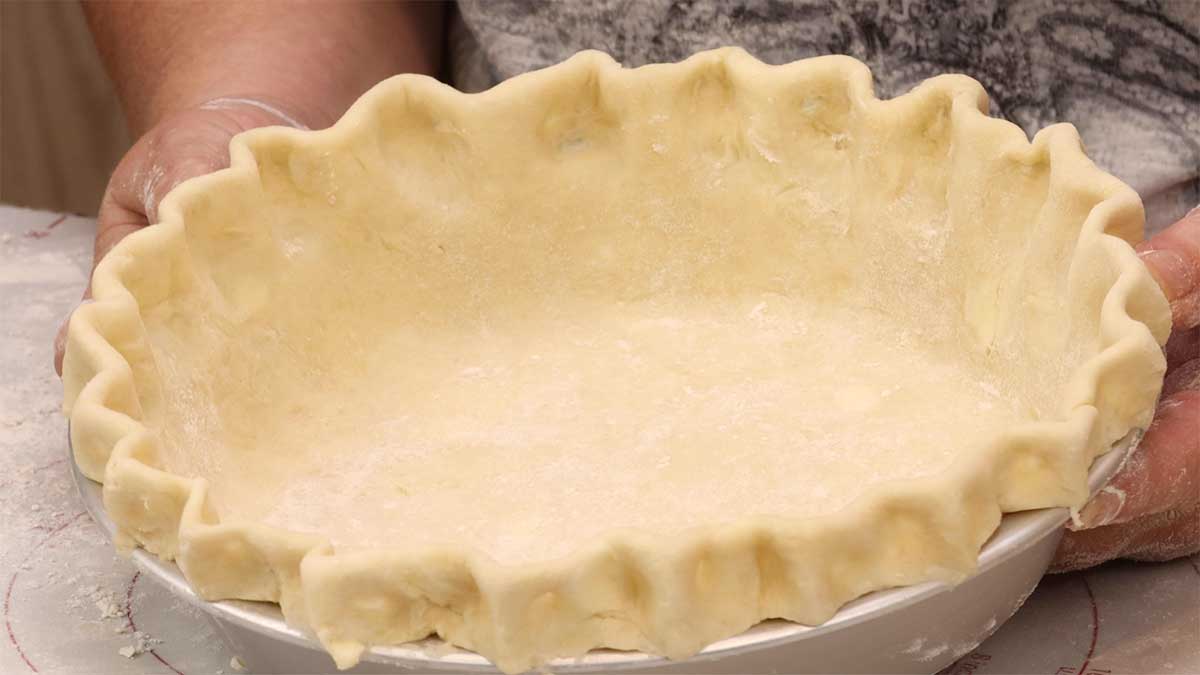
You can simply take a fork or a spoon and gently press down on the edge to form a design or you can make a fluted pie crust like I did.
It's really easy to do and I love the look of the pies after they are baked. Only do this if you are using the pie crust for a pie that doesn't have a pie crust topping.
This design is great for quiches, cold filling pies, pecan pies, and even a crumb top apple pie.
To make the fluted edge, take your first and third fingers on your right hand and fold them back so your knuckles are against the outside of the pie rim. Take your left and and fold back your first finger so the knuckle is on the inside of the pie rim. Press them together so the first finger of your left hand crimps the pie edge in between the first and third knuckles of your right hand.
Repeat this along the entire outer edge of the pie crust.
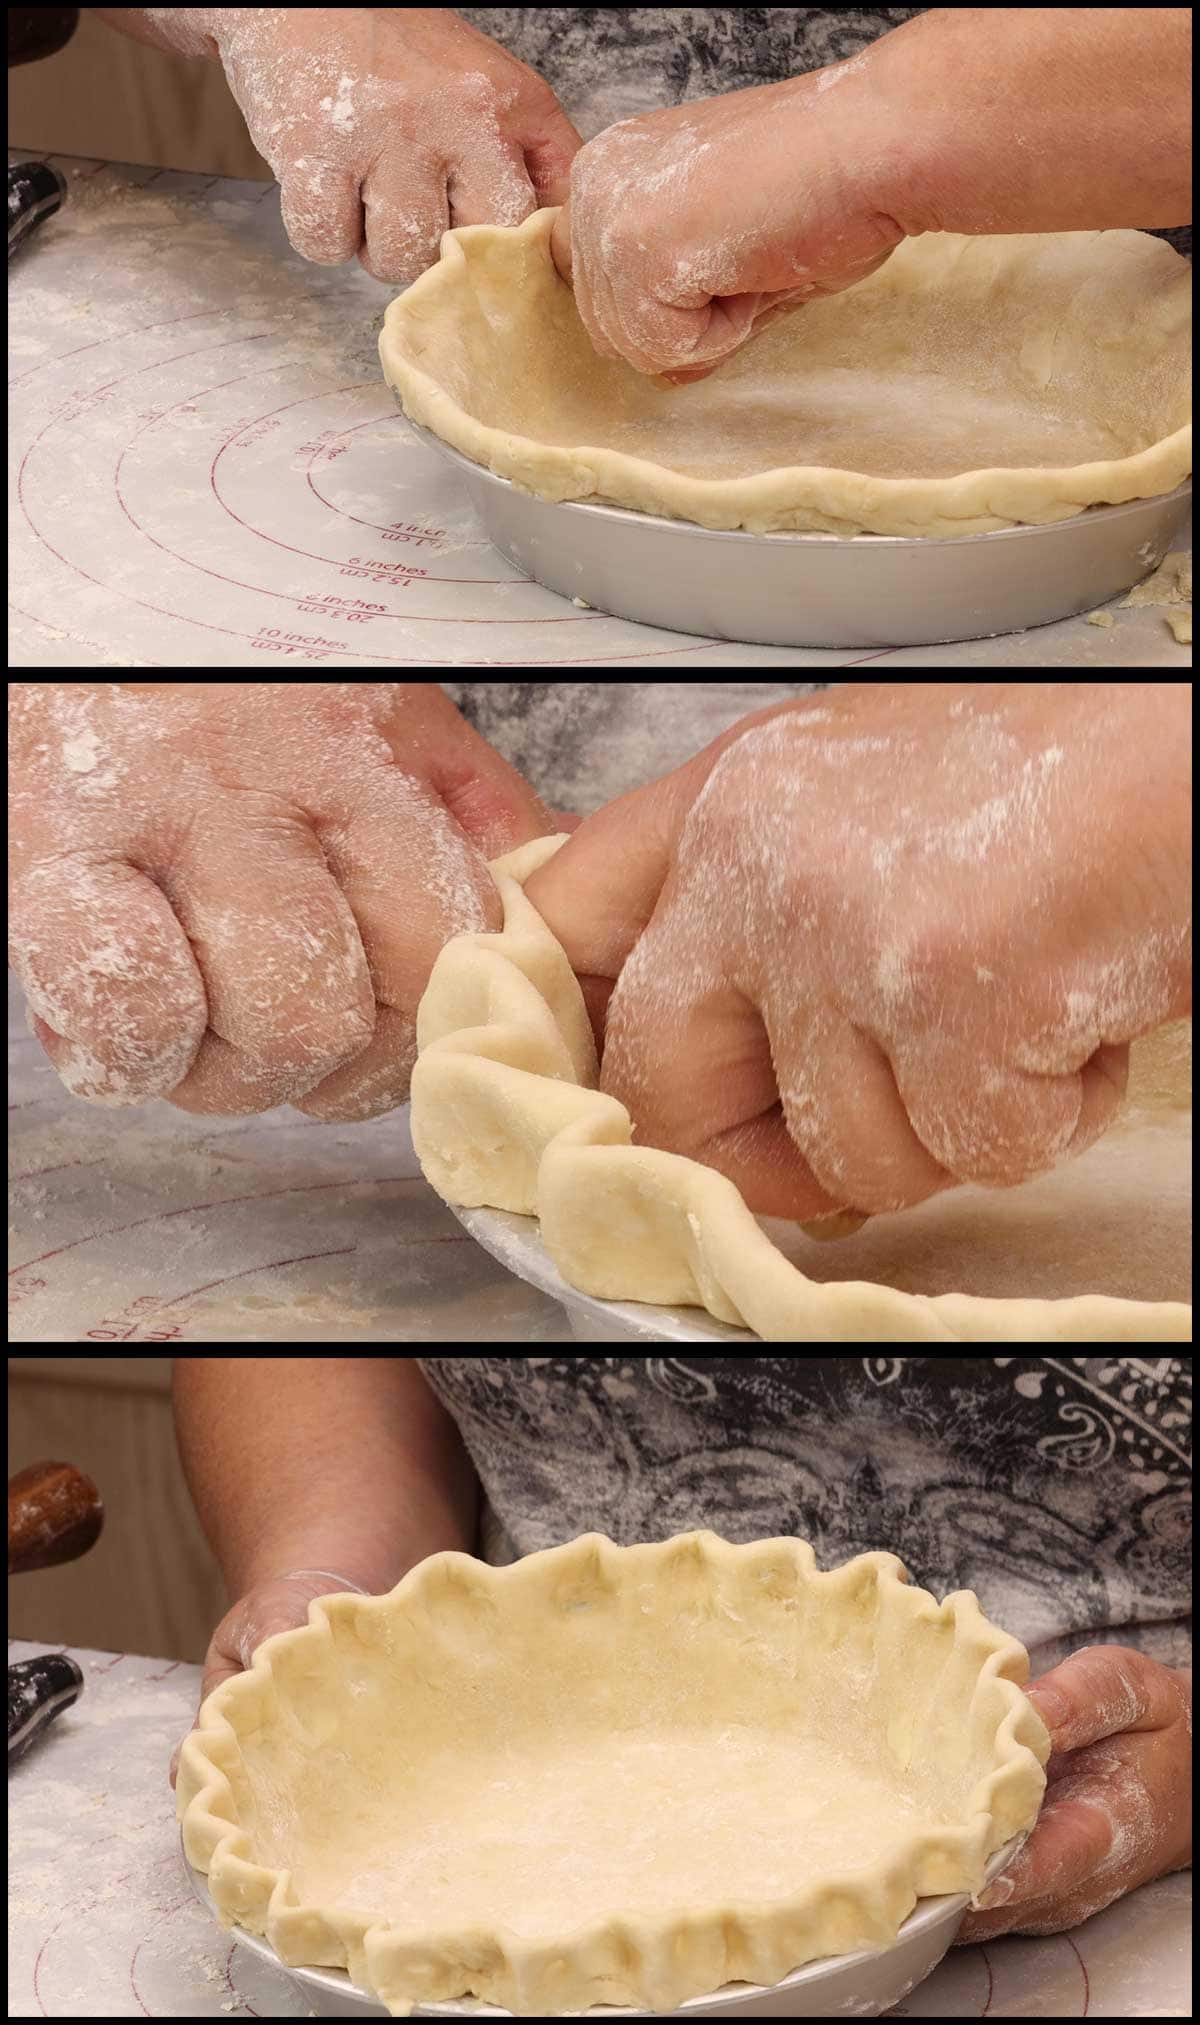
It is so much easier to show you how to do this rather than try to explain it in words, so here is a quick video showing you how to make a fluted pie shell.
Once your pie crust is formed, you can bake it according to the pie recipe you are following.
I really hope you give this pie crust a try and have great success with making your own homemade pie crust. They really are so much better than the store-bought ones!
When you are ready to bake your pie crust, check out this technique for Blind Baking your pie shell. It's perfect for making all kinds of pies!
How to Blind Bake a Pie Shell in the Ninja Foodi
Homemade Pie Crust
Ingredients
- 2 cups all purpose flour plus more for work surface
- 1 teaspoon fine grind sea salt
- 1-2 tablespoon sugar optional
- ¾ cup cold butter
- 6-10 tablespoon ice cold water
Instructions
- Combine the flour, salt, and sugar (if using) in a medium size mixing bowl.
- Cut or grate the very cold butter into small pieces and add to the flour mixture. If grating or using a fork instead of a pastry cutter, I suggest cutting the butter into very small pieces and freezing grated butter for at least 10 minutes before using.
- Using a fork or pastry cutter, work through the flour and butter mixture to combine the two until small pebbles are formed and most of the flour has mixed with the butter.
- Add 3 Tables of very cold water and mix with a fork just until combined. Add 1-2 Tablespoons of very cold water and mix. Continue adding 1 Tablespoon at a time of cold water and mixing gently until the butter and flour starts for form larger pieces. The amount of water you need will vary depending on humidity and other factors, but try not to add too much.
- When you can squeeze some of the pie dough in your hands and it holds its shape without crumbling, you have added enough water. The dough should look crumbly at this point.
- I like to dump the crumbly dough out onto a large piece of plastic wrap and fold the plastic wrap up to cover the dough completely and then form a disc. If the dough is too crumbly, add another Tablespoon of cold water. Once the dough holds together, split it into two disc of equal size. Weighing the dough is the best way to ensure each pie crust is equal. Wrap each disc in plastic wrap and refrigerate for 15-30 minutes before rolling it out and forming your pie crust.
How to Roll out the Pie Crust for a 9" pie
- Remove your pie crust and let sit a few minutes while you prepare your work surface.
- Lightly flour the work surface and keep extra flour nearby. Place the disc of dough on the work surface and lightly flour the top. Place your rolling pin in the center of the dough disc and lightly press down as you roll away from you. Return the rolling pin to the center of the dough disc and lightly press down as you roll towards you. Do this a few times until the dough starts to flatten.
- Flip the dough over and rotate it 90°, make sure to lightly flour the work surface and the top of the dough. You can also flour the rolling pin if you are having trouble with it sticking. Repeat the rolling process, starting in the middle until you have about a 6" circle.
- Flip the dough again and make sure to lightly flour the work surface and the top of the dough. Continue rolling, starting in the middle and roll away from you as well as towards you and to your right and your left until you have about a 12" circle.
How to Place the Pie Crust in your pie pan
- Once rolled out, carefully lift the edge closest to you and don't be afraid to use some more flour if it's sticking at all to your work surface. You can also lightly flour the top of the pie dough. Roll it about half way and place your pie pan on the work surface. Lift the dough onto the pie pan and unroll. You want to have a few inches of extra pie dough all around the pie plate so you can form the outer crust of the pie.
How to form the outer crust
- Trim off any excess pie crust so you are left with about 2" of pie dough that extends beyond the pie pan. Fold over the excess dough away from the pie pan and pinch to form the edge.
- There are tons of ways to decorate the edge. You can simply press it down with a fork or a spoon or create a scalloped edge. To create a scalloped edge see the video in the post because it is much easier to show you than explain in words.
Notes
- This recipe makes 2 pie crusts based on a 9" pie pan. If you are making a deep dish pie or a larger pie, increase your ingredients by 25%.
Nutrition
ABOUT THE RECIPE AUTHOR, LOUISE LONG
Louise is a full-time recipe creator and food blogger @ The Salted Pepper. She has over 30 years of experience with cooking and recipe development. She owned a restaurant for several years and was a full-time RN until retiring to blog full-time.

She published her first cookbook in the Fall of 2018 and is very interested in writing several more.
Louise is also the creator of an online Ninja Foodi Pressure Cooking Course with over 100 instructional step-by-step videos. People absolutely rave about the course and all the value they have received from it.
Louise has several very active Facebook groups that help people with the basics of cooking and getting the most out of the Ninja Foodi.
Louise is also a YouTube creator and you can find most of her recipes in video format on The Salted Pepper YouTube channel.
She is very responsive to messages and eager to help in any way she can. Get more Information about Louise & contact information
I WOULD LOVE TO SEE WHAT YOU ARE COOKING UP IN YOUR KITCHEN! TAG ME @THESALTEDPEPPER ON YOUR FAVORITE SOCIAL MEDIA PLATFORM WHEN YOU MAKE A DISH!
BE SURE TO FOLLOW THE SALTED PEPPER RIGHT HERE ⇓⇓⇓⇓⇓

Karla
Hi there...dough is in the refrigerator now. But I can't seem to find the baking temperature and time for this recipe!?
Louise
This recipe is for an uncooked pie crust, so you would follow the baking instructions for the kind of pie you are making with it. Some require blind baking and others you fill and bake.
Wendy Weatherup
I have never been successful in making a pie crust until I tried your recipe. It was perfect!!!
Louise
That is so wonderful!
Amber Meyer
Perfectly flaky and delicious! Made a bourban pecan pie for Thanksgiving and made this as my crust. Thank you for such an easy and awesome recipe. I am always a little nervous when making pie crust. It typically turns out thick and not flaky at all. This was could not have turned out any better.
Elbridge T Price
Whoever said an old dog can't learn new tricks? Well.... maybe...but. I followed Louise's recepe for blind baking and making pie dough. Except, in the pie dough making, I decided to use my ancient Kitchenaid (Hobart) stand mixer instead of using a fork and hand making the dough. Otherwise, 100% Louise Long! And it turned out great! I used the mixer's paddle attachment at it's slowest speed, gradually adding ice water, tablespoon by tablespoon. I ended up using 10 TBS of water. Following Louse's directions exactly, using plastic wrap, I ended up with 2 pie dough discs, wrapped them and froze them since I made the pie dough ahead of time. On December 23, I placed the discs in the fridge to defrost. Today, I rolled one disc into a pie, placed it into my 9" Daddio pie pan, baked it in my Ninja Foodie per instructions using the bean trick. Then I added apple pie filling (Louise's scratch made filling), her crumble topping and baked. Voila! A perfect apple pie. I can't believe this old dog did it the first time! And... I made it sugar-free using Swerve!
Laverne Smare
Hi Louise,
Thanks for the article, it was very comprehensive. Just a little tip you might like - before placing the dough in the tin, if you are lining a pie, place the loose bottom of the pie tin under the pastry and fold the pastry into quarters. That way you can lift the whole amount of pastry into the tin easily and unfold to line the sides.
If you don’t have a loose base, folding before lifting still helps to handle easier and stop the pastry stretching.
Louise
Thanks for the tip!
Vi Brown
I diligently followed your pie crust recipe and instructions as well as your apple pie filling. However, it was 'tough'. I baked it in my Ninja Grill in which I always bake my 'no knead' bread. Could the air current from the top of the grill toughen my pie crust. Have you ever baked a pie in the Ninja Grill? My apple filling, which I prepared in the Foodie, was delicious.
I would appreciate your input. Thanks.
Louise
tough pie crust is usually from overworking the pie dough. I haven't baked a pie in the Ninja Grill and I would probably lower the temp slightly because the heating element might be a tad closer.