

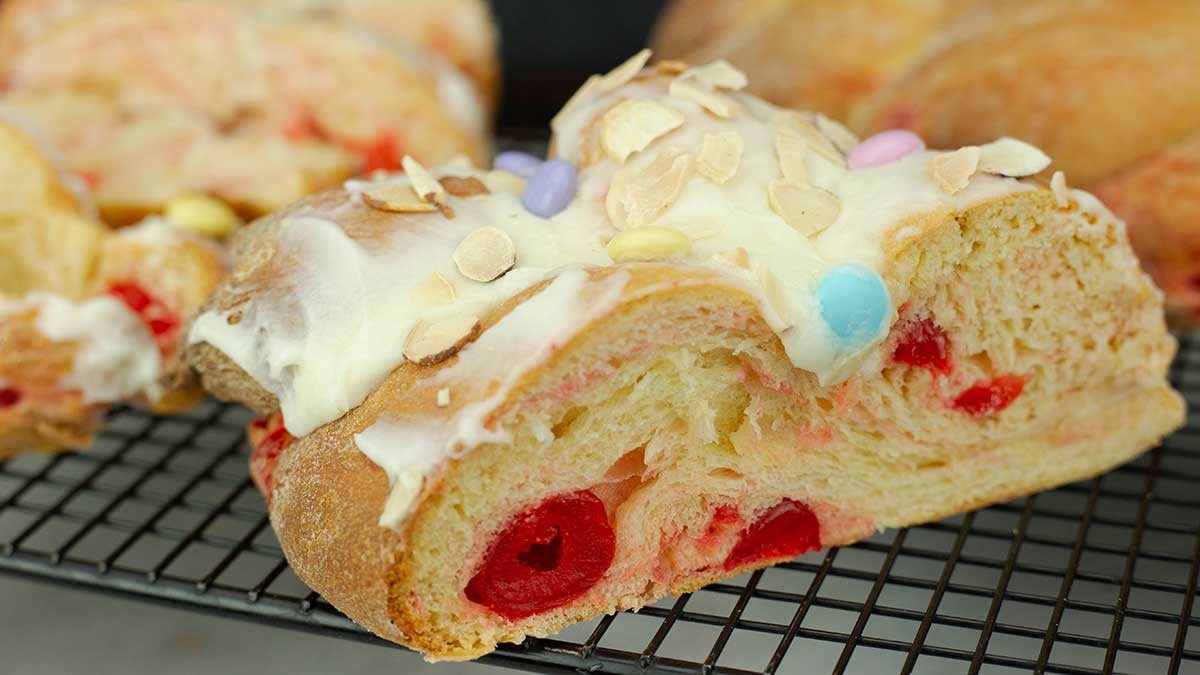
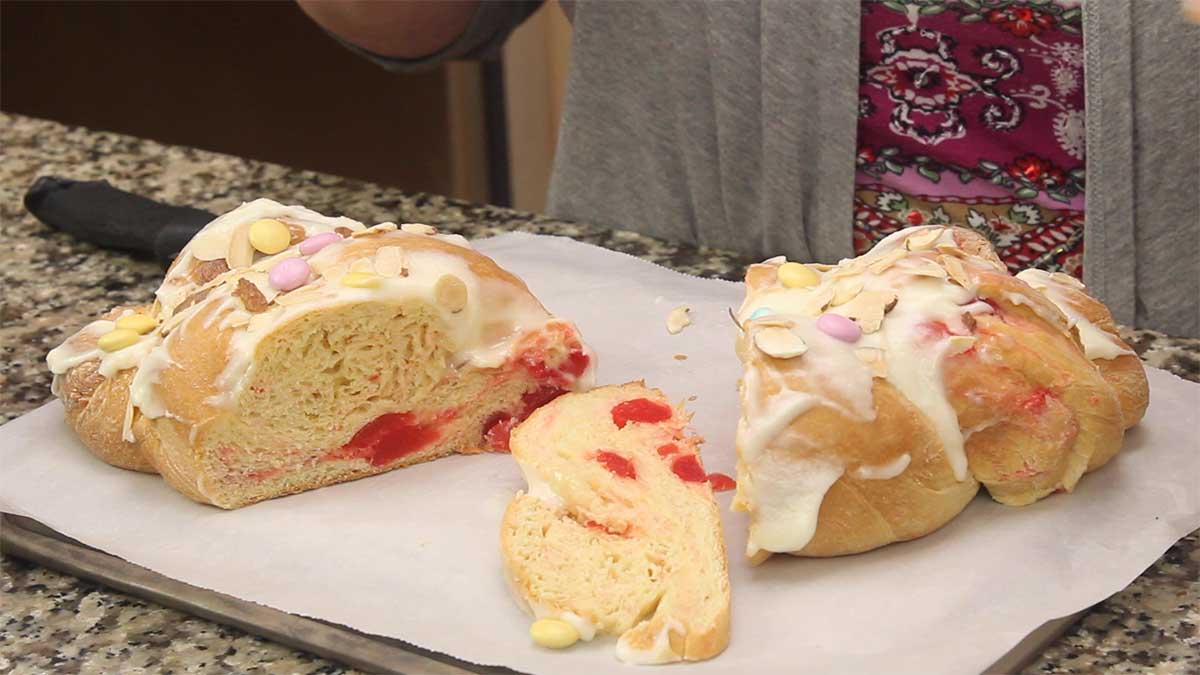
The flavors in this Braided Brioche Bread are incredible. The bread is slightly sweet, but not too sweet, with delicious cherries throughout the bread and topped with an almond glaze. Simple Perfection!
Would you like to save this recipe?
This bread reminds me of the bread that my Mom made for Easter every year, it's soft, slightly sweet and perfect with a cup of tea or coffee!
The only major difference between this braided cherry brioche bread and a more traditional Easter bread is often times hard-boiled, dyed eggs are placed on top of the bread before baking.
I skipped that step because I didn't have any dyed eggs and I wanted to have a recipe that is not just for Easter. This is a bread you will want to make year-round!
The best thing about it is you can customize it anyway you want! Think: cinnamon raisin, cranberry walnut, apple pecan, or even turn it into a savory brioche bread that is perfect with dinner.
Even if you have never made homemade bread before, I will walk you through it step-by-step, so you feel comfortable making it!
Frequently Asked Questions
Brioche bread is an enriched yeast bread, meaning it has eggs, butter, and usually some milk in the dough. Yeast is used as the leavening agent. It is a light and airy bread that is usually slightly sweet, but can also be savory.
Commercially bought brioche bread usually has preservatives in it and it lasts much longer than homemade or even store-made. I have had commercially bought brioche buns that have lasted weeks in the fridge without any sign of going stale or molding. For me, that's kind of scary and I prefer to make my own without all the preservatives.
Homemade brioche should last 3-5 days in the refrigerator and the added fat content helps keep it from going stale.
You can also freeze the brioche bread for 1-2 months before it starts to dry out. Always make sure the baked bread is completely cooled before freezing to avoid ice crystals. Wrap well before freezing.
Variations of Cherry Brioche Bread
I happen to LOVE the flavors of cherry and almond together, but if you don't, no worries! There are tons of difference combinations of flavors you can use, or you can keep it plain.
Here are some suggestions for switching the ingredients to create a sweet brioche bread you will love:
Cinnamon Raisin Brioche
To make a braided cinnamon raisin brioche bread, simply use vanilla extract in place of the cherry emulsion and switch the cherries to raisins. As far as the cinnamon goes, you want to use enough so you taste the cinnamon, but not so much that it is overpowering.
I would use about 2 teaspoon of ground cinnamon in this recipe, worked right into the dough. I tested a batch of cherry brioche bread with cinnamon and used 1 tsp, but the cinnamon flavor did not come through. The cinnamon will turn the bread a darker color.
For the glaze, I'd simply replace the almond emulsion for vanilla extract and adjust the amount to taste.
Cranberry Pecan Brioche Bread
If you want to use cranberries instead, I would definitely use dried cranberries instead of fresh. The fresh cranberries will release too much liquid as they cook and I think your bread will become gummy and stay wet.
Simply replace the cherries with dried cranberries and you can add the pecans to the bread or sprinkle them on top like I did with the almonds.
I would use a simple vanilla glaze by using vanilla extract instead of the almond emulsion.
Apple Walnut Brioche Bread
Cut the apples small and toss them in a little flour to coat them before adding to the dough. Replace the cherry emulsion with vanilla extract. Chop the walnuts fine to add to the dough or simply sprinkle them on top.
I would use a vanilla glaze or maybe even add some cinnamon to it.
Get creative with the add ins or keep it plain by omitting the cherries and cherry flavoring.
Can I make the Brioche Dough Ahead of Time?
Yes! I tested this brioche recipe both ways and saw no difference in the outcome. So, if you want to make the dough the day before and bake it the next day, here is how to do it.
Make the dough according to the instructions and let it rise until doubled in size. Punch the dough down and divide into 6 equal balls.
Roll 3 of the balls into 14" ropes and braid together as instructed. Place the braided loaf on a parchment-lined sheet pan and loosely cover with cling wrap. You want some give in the cling wrap so the bread can rise.
Repeat for the other 3 dough balls. Place both trays in the refrigerator on separate shelves and let them rise for the second time in the refrigerator. You can leave them in there for 8-12 hours without any issues.
Take the trays out 30 minutes before baking. Bake according to the instructions and Enjoy!
Equipment Needed to Make Brioche Bread
Besides an oven to bake the bread, you don't need any special kitchen equipment; however, a stand mixer makes things a whole lot easier and faster!
You will also need a couple of sheet trays for baking, some parchment paper for lining the trays (silpats will work) and cling wrap for covering dough.
The sheet trays I used are quarter pan size (9"x13"), but if you are using a full size oven, you can use a half pan size which is 18"x13". You might be able to fit both braids on one large sheet pan or cookie sheet, but make sure to leave enough room for rising.
I also use a (affiliate link)kitchen scale to weigh out the dough balls to make sure they are equal, but don't worry if you don't have one, just eyeball it.
Tips For Making Braided Cherry Brioche Bread
Make sure your cherries are cut in half or quarters and are VERY dry before adding to the dough.
I tried adding the cherries various ways in my test batches and in the video demonstration. When I cut them into pieces and used the stand mixer to incorporate them into the dough, they broke up into such small pieces that they were barely noticeable.
The way that I think will work best (it's different from the video) is to cut the cherries in half or even in quarters and let them dry on a cooling rack for several hours. After you make the dough, toss them in a little flour and mix them into the dough by hand.
Allow enough time for the dough to rise.
This dough will take longer to rise because of the sugar content and, if you don't let it rise enough, it becomes dense and not light and flaky like you want.
I found that using the dehydration function on 105℉/40℃ on the Ninja Foodi XL oven worked great and each rise took about 90 minutes. If you have any equipment that uses the dehydration function and the bread will fit, you can use that.
You can also turn your oven to the lowest setting and let it heat up for about 5 minutes, TURN THE OVEN OFF and then put the dough in the oven to rise. You don't want to leave the oven on because even the lowest setting on most ovens will be too hot and kill the yeast.
You can let it rise on the countertop, but it will take at least 2 hours to double in size.
Once you braid the bread, you can also do the second rise in the refrigerator and this will take 8-12 hours.
Let the bread cool about 75% before adding the icing.
If you add the icing too soon, it will melt with the heat of the bread and drip off. It takes about 30 minutes or so for it to cool enough for the icing to stay in place.
You can test this by putting a little icing on the top and if it doesn't melt off within 10 minutes, your bread is cool enough.
Don't stress over the look of the braids.
I've made this bread at least 5 times now and sometimes the braids are perfect and sometimes they aren't. It doesn't matter. Once the braided bread rises and bakes, and you put icing on it, it's always beautiful!
Even more important, it will taste amazing.
How to Prepare the Cherries Before Adding to the Dough
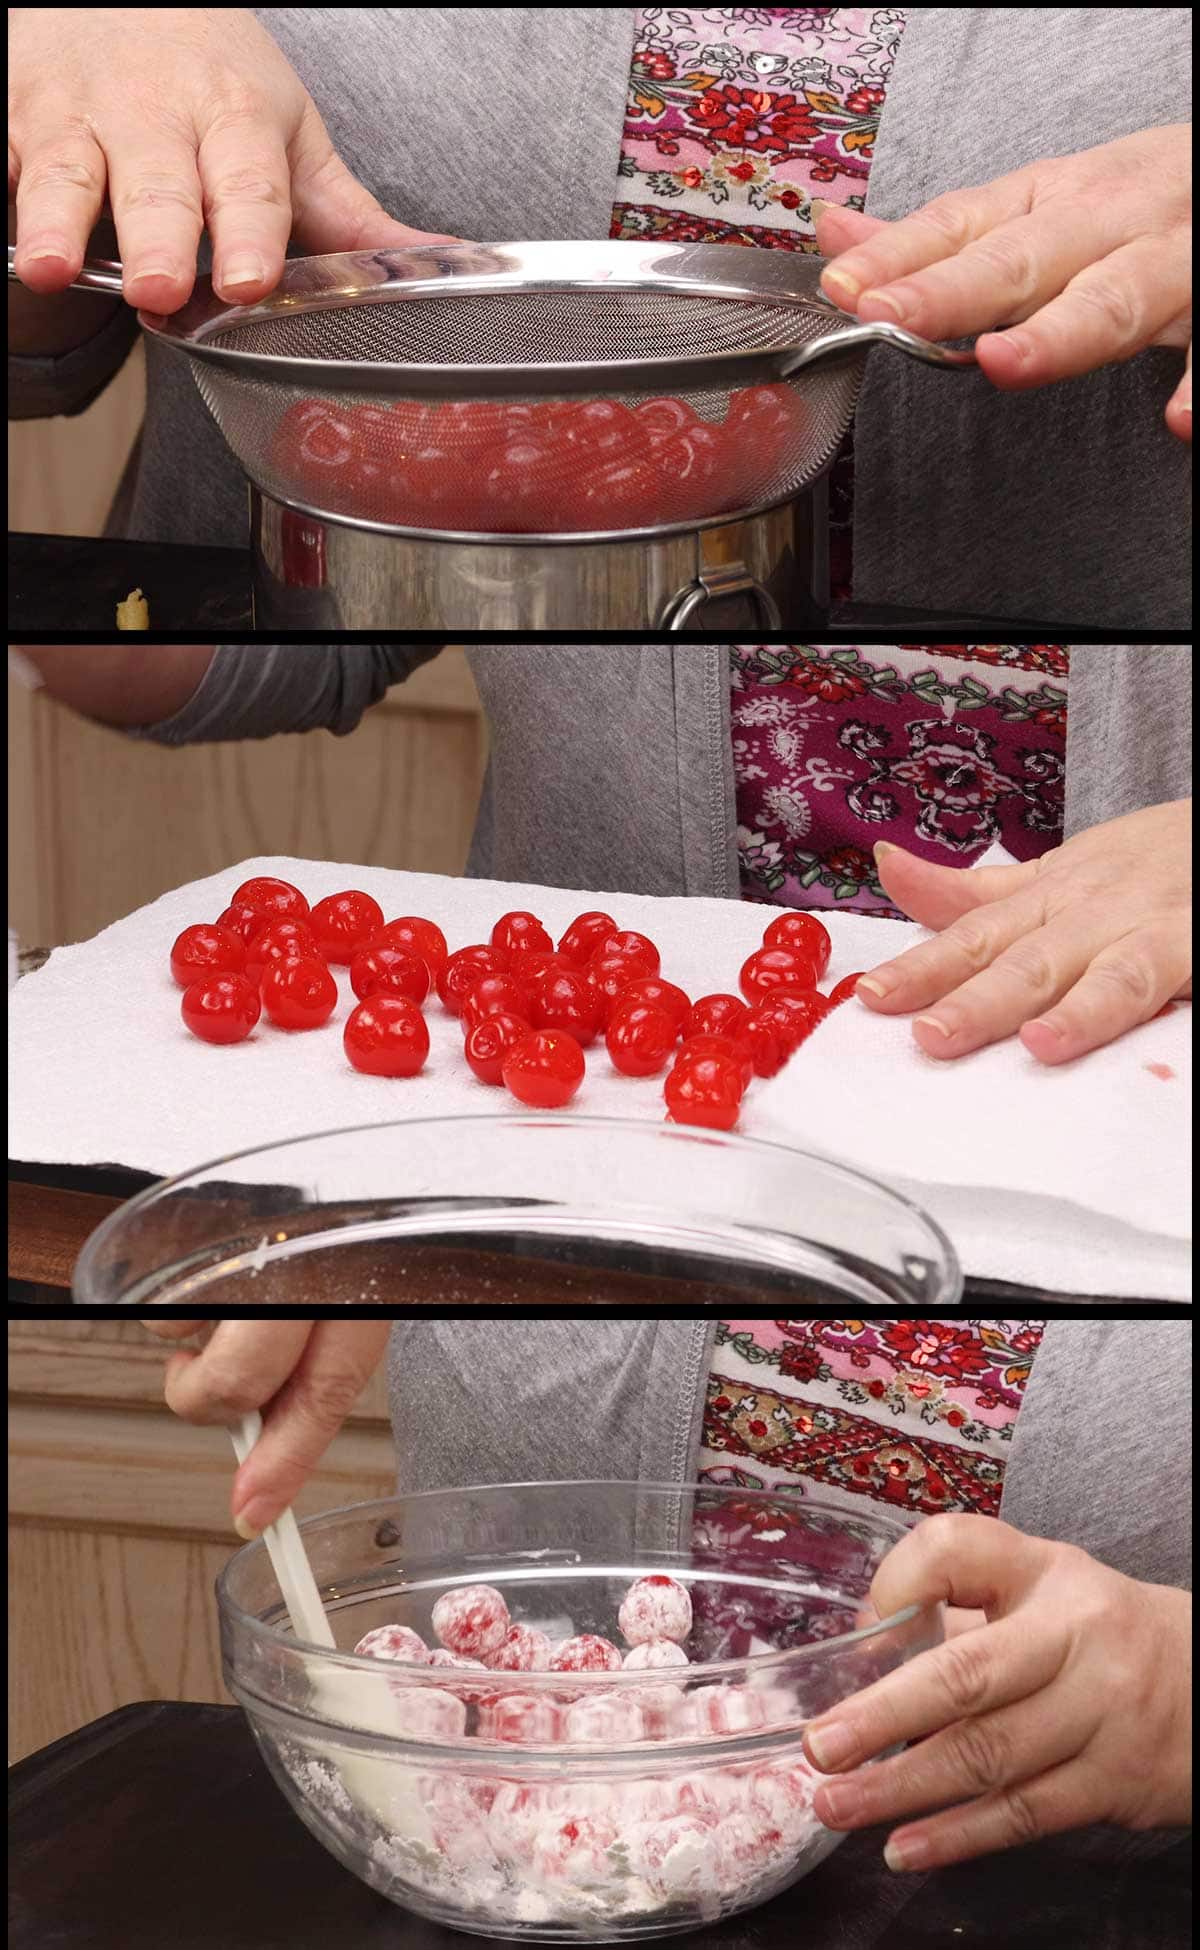
Drain the liquid from the jar of cherries and cut them in half or in quarters. Reserve the cherry juice to make a different recipe or a delicious cocktail.
For the best results, you want the cherries as dry as can be and there are a few ways you can do that. You can dehydrate them, like I did in this recipe for Chocolate Covered Cherries, or you can let them dry on the counter for a few hours and then pat dry with paper towels.
The dryer, the better because any moisture will make it difficult to incorporate them into the dough.
Once the dough is made and the cherries are as dry as you can get them, toss them in about ¼ cup of flour before adding to the dough.
*You can see in these pictures that my cherries were whole, I have UPDATED the recipe to suggest cutting the cherries in halves or quarters to make it easier to incorporate into the bread.
How to Make Brioche Dough
No matter how you are going to bake your bread or what you are going to add to it, making the basic brioche dough is going to be the same.
Proof (or bloom) the Yeast
There are several kinds of yeast on the market. In this recipe, I used instant yeast which does not need to be proofed before adding, but I always do it anyway!
The reason is because I don't want to go to all the trouble of making a loaf of bread that never rises because my instant yeast is old and not working as well as it should. That's just me.
You can use either active dry yeast or instant yeast in this recipe and the amount will be the same. If you use active dry yeast, you must proof it before using. Here is an article that goes over the differences: The differences between Active Dry Yeast and Instant Yeast
When you get the small packets of yeast in the grocery store, each packet is about 2¼ teaspoons. You need 1 full Tablespoon in this recipe.
To proof the yeast add ¼ cup of warm water (the temperature should be around 105-110℉/40-43℃ and should not exceed 115℉/46℃ or the heat can kill the yeast) to a 1 cup size bowl (or larger is fine). Sprinkle 1 Tablespoon of yeast over the top and add 1 teaspoon of white sugar. Stir and let sit for 5-10 minutes while you start to mix up the dough.
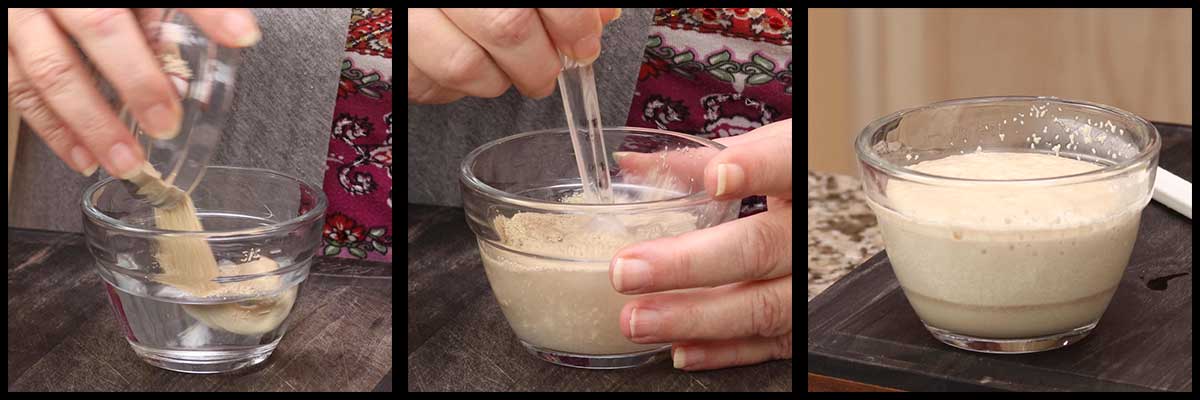
*the total amount of sugar in this recipe is ⅓ cup and the 1 teaspoon of sugar is taken from that measurement.
Mix The Brioche Dough
The easiest way to mix up the dough is in a stand mixer, but if you don't have one, you can use a large bowl and a wooden spoon. I'll give both sets of instructions here.
First, melt the butter so it has time to cool down before adding to the other ingredients.
Stand mixer
Attach the dough hook to the stand mixer. Add 2½ cups of all purpose flour to the bowl of the stand mixer, along with the salt and the remaining ⅓ cup of sugar.
Turn the mixer on low and let it mix while you crack and add the eggs. Add 2 whole eggs and 1 egg yolk, reserve the third egg white for later use.
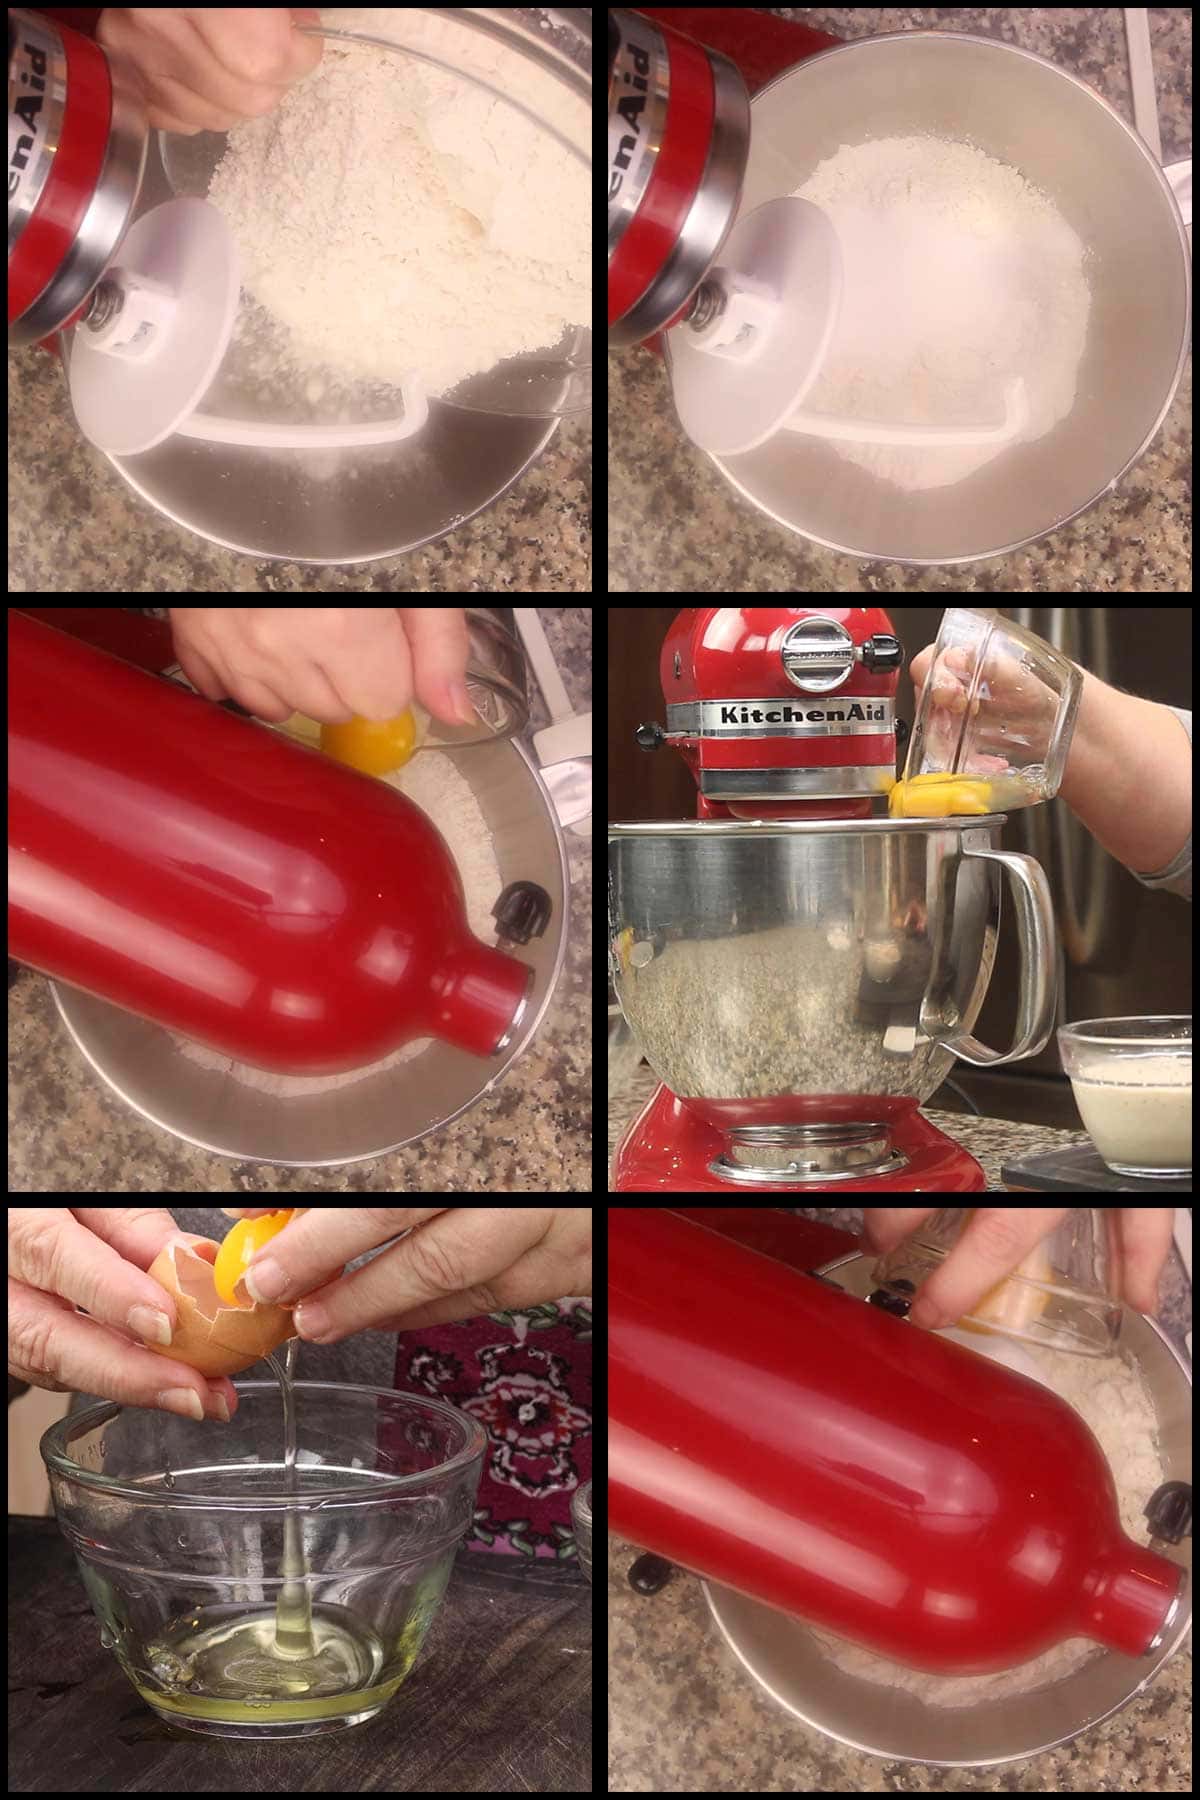
Once the eggs are mixed into the flour, add in the cream and proofed yeast and keep the mixer on low speed. Add in the melted butter, the (affiliate link)cherry emulsion and check the consistency of the dough.
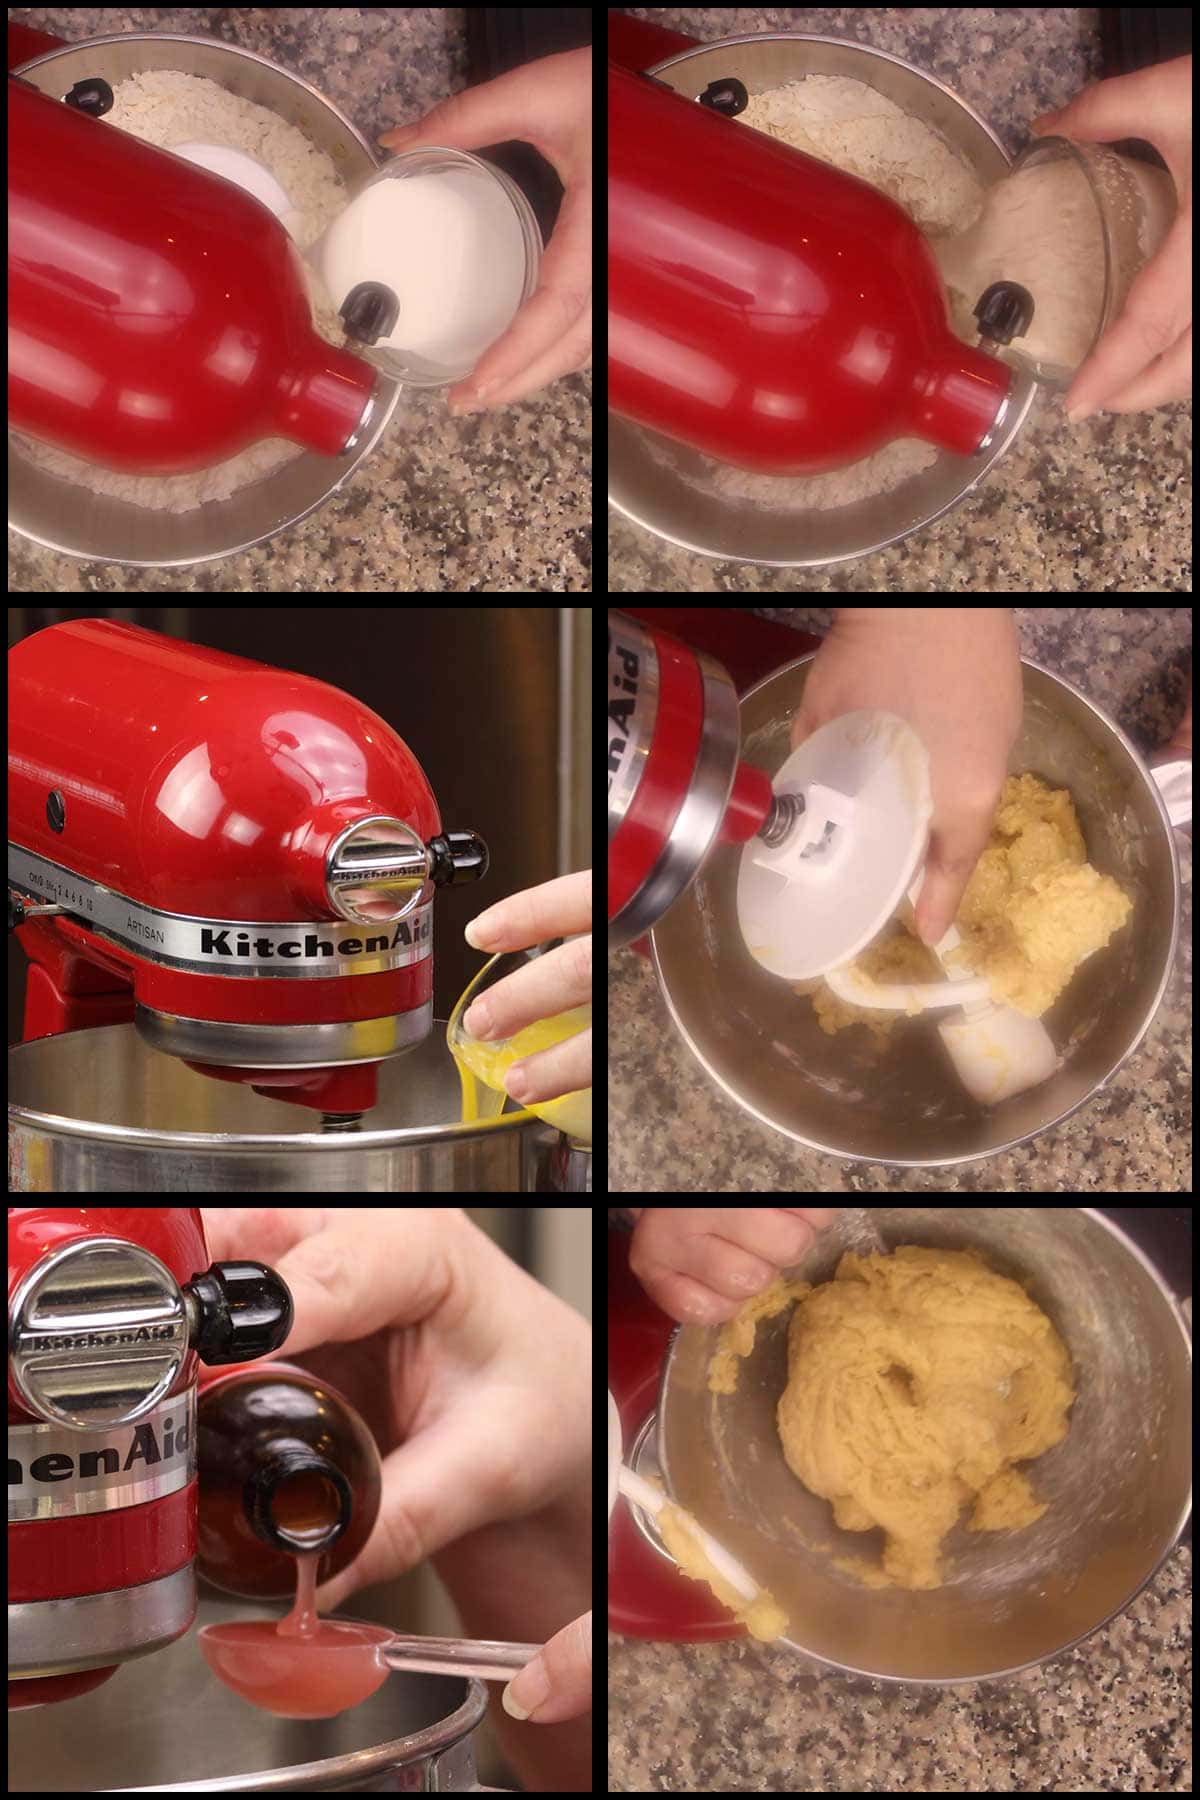
If it is sticking to the sides (which it most likely will be), add ¼ cup of flour and mix on low for a few minutes. Continue adding flour, 1 Tablespoon at a time, until the dough is no longer sticking to the sides or your hands when you touch it.
This usually takes between ¼ - ½ cup of flour (in addition to the 2½ cups added in the beginning), but it may take more or less. Go by the look of the dough more than anything else.
The dough should look shiny and feel very soft and damp, but not stick to your hands.
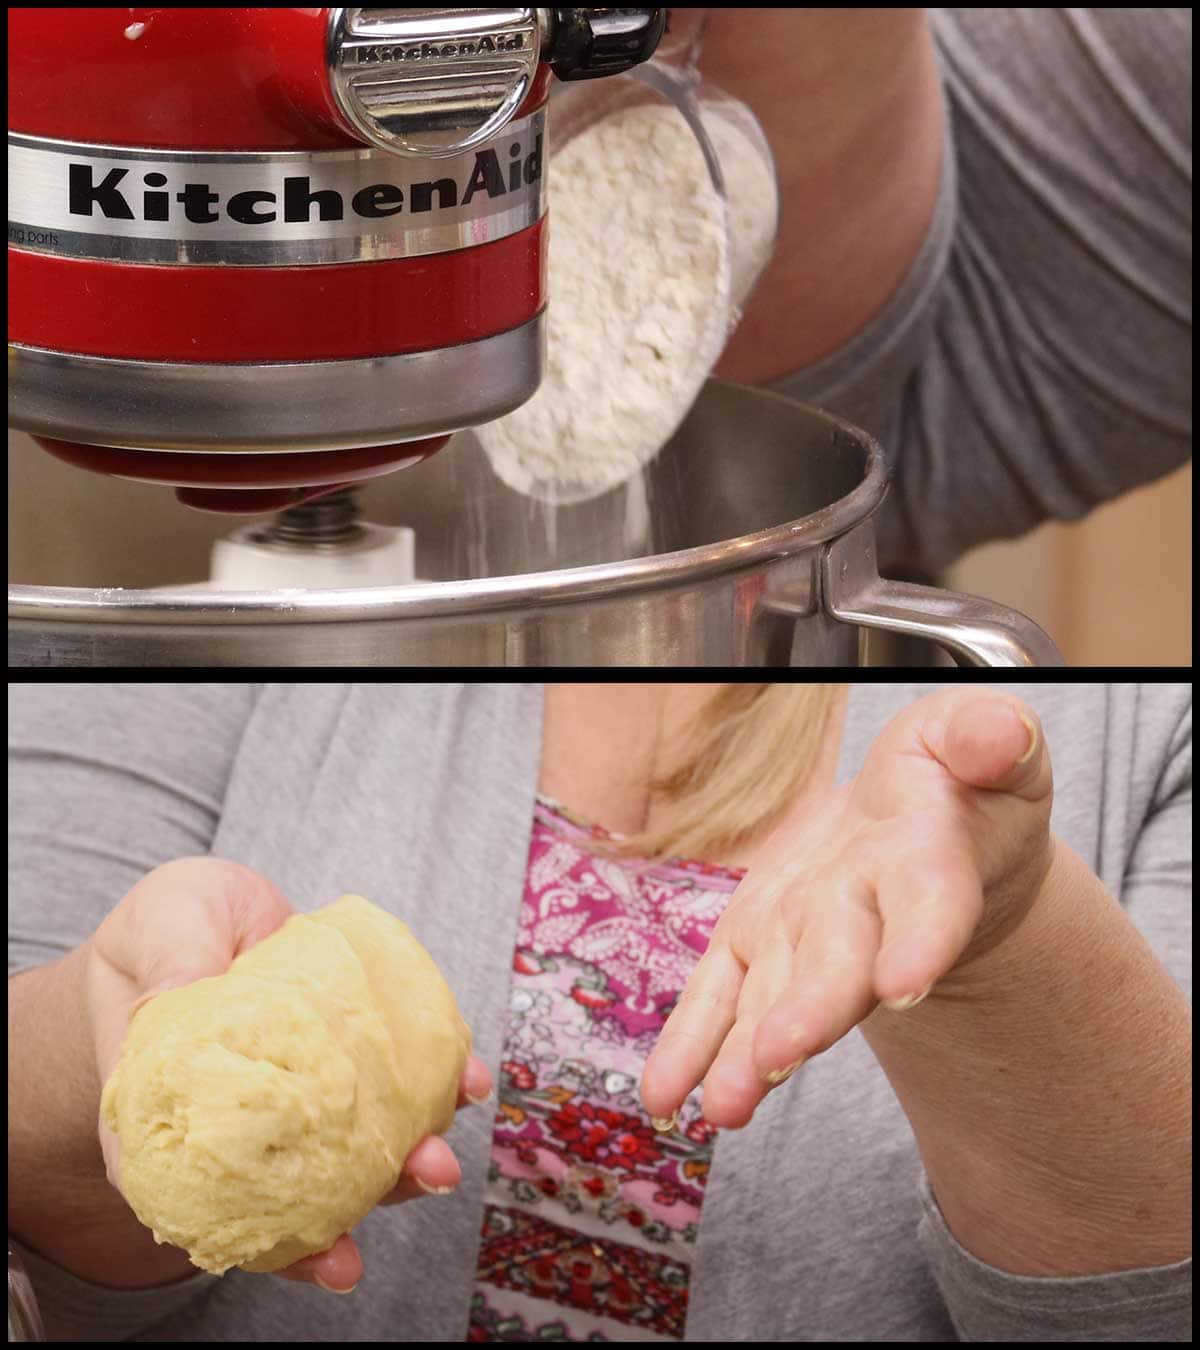
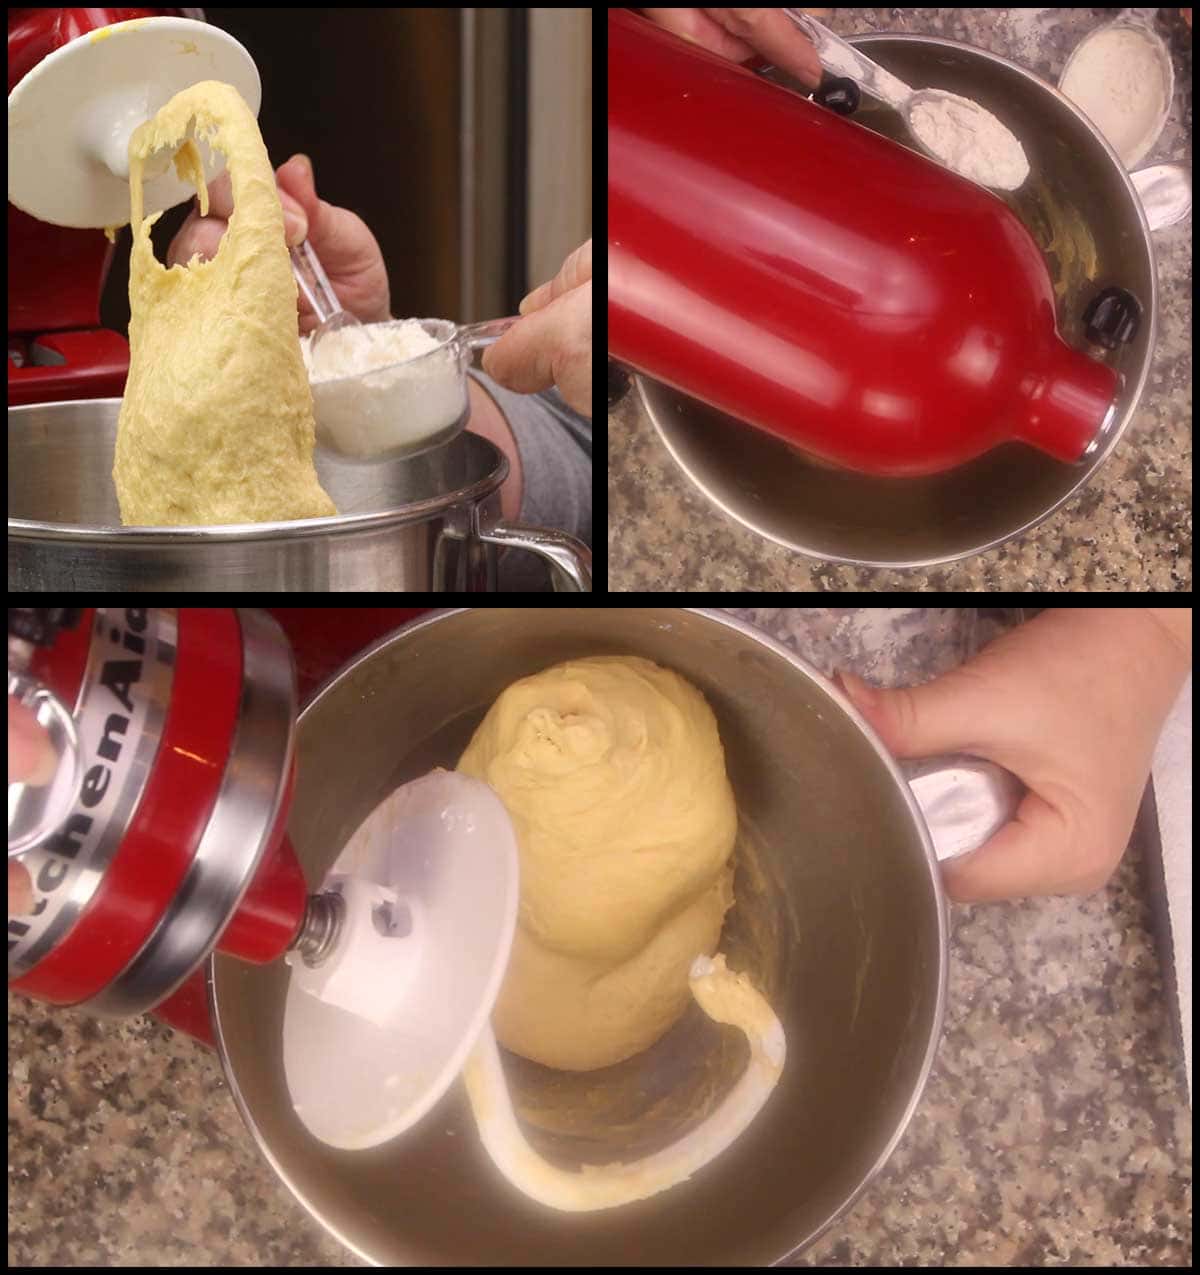
Once the dough is the right consistency, turn the mixer on medium speed and let it knead the dough for 10 minutes. If you see the dough sticking to the bottom too much, add another 1 Tablespoon of flour and continue to mix.
The finished dough should be smooth and very soft.
Making the dough by hand
In a large bowl, add the 2½ cups of flour, salt, remaining sugar and mix to combine the dry ingredients. Whisk the eggs and egg yolk in a separate bowl and add to the dry mix. Stir to combine.
Add in the cream, proofed yeast, cherry emulsion and melted butter. Stir with a wooden spoon until combined. The dough will be wet and very sticky.
Place a about ¼ cup of flour on a work surface and dump the dough onto it. Flour your hands and begin to fold and knead the dough. Add flour as you need to, but don't add more than you absolutely need.
Knead the dough by hand for 15-30 minutes or until it becomes very soft and shiny. Add tiny amounts of flour as needed if it is sticking.
Incorporate the Cherries into the Dough and Allow to Rise
Once the bread dough is the right consistency and the cherries are tossed in flour, turn the dough out onto a clean and lightly-floured work surface and knead the cherries in by hand.
I have tried the stand mixer to do this and it worked once, but really broke up the cherries and when I tried adding the cherries whole, they didn't incorporate at all. So, I recommend doing this by hand.
If the cherries are adding too much moisture to the dough, add very small amounts of flour as needed. You shouldn't need to add more than 1 Tablespoon.
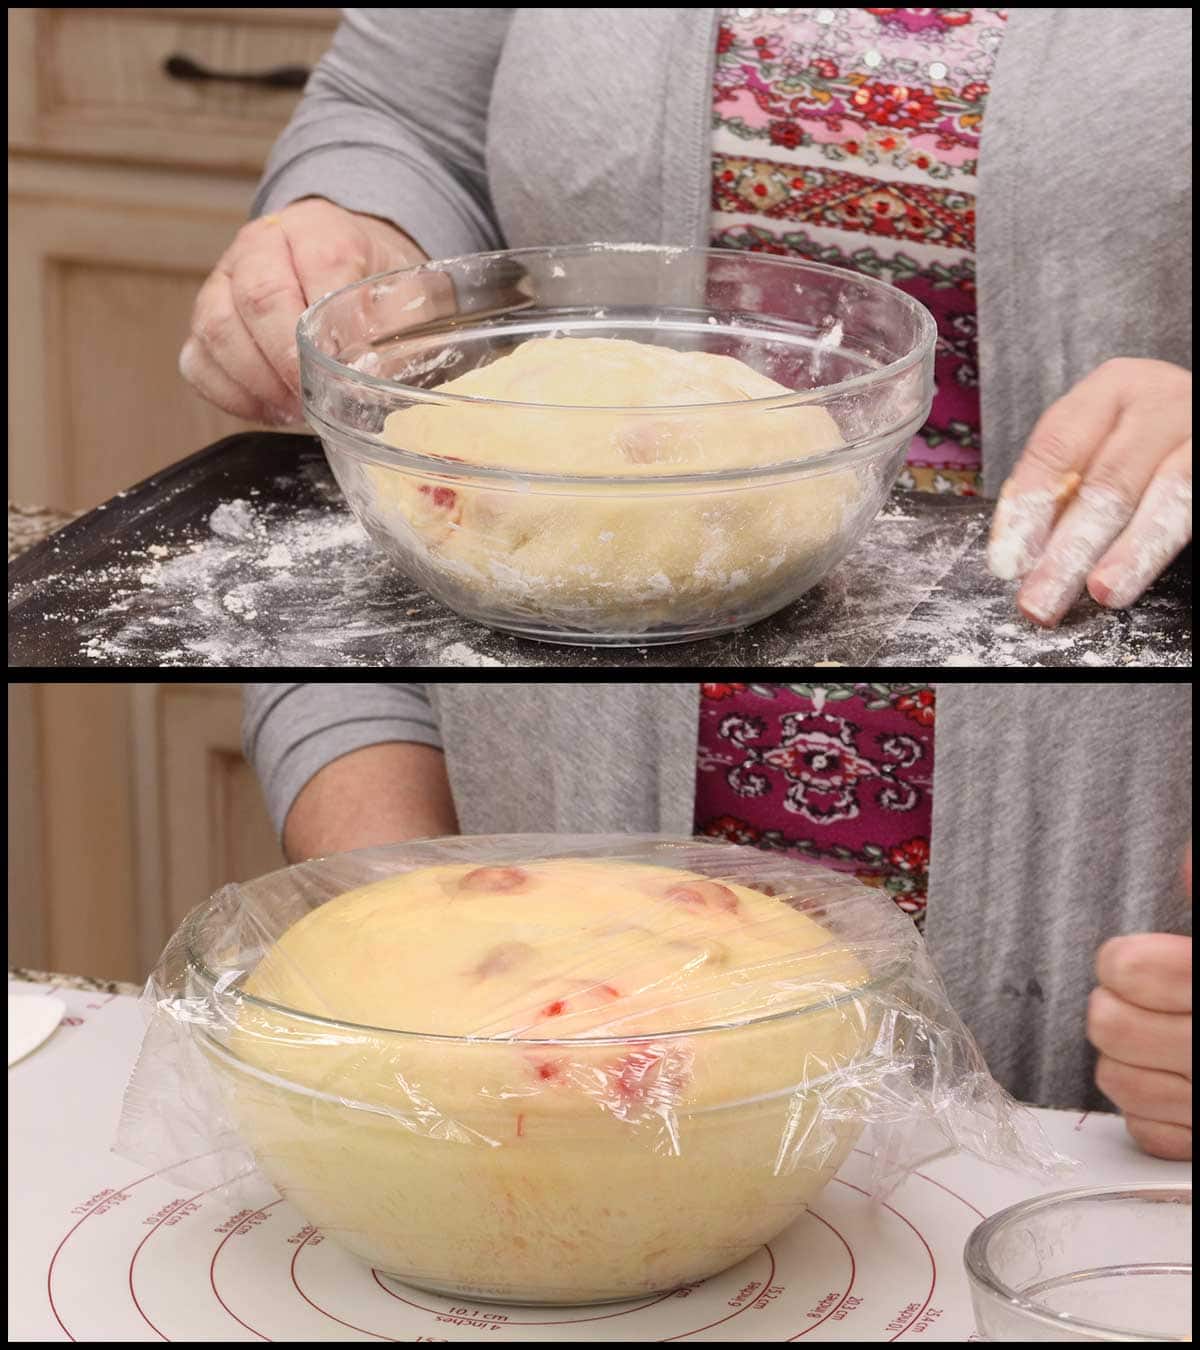
Place the dough into a large mixing bowl and cover with cling wrap. You want to make sure your bowl is at least twice as big as ball of dough so it has room to double in size.
Place the covered bowl in a warm place in your kitchen to rise for about 2-3 hours or until doubled in size. OR, use the Ninja Foodi XL oven or another large dehydrator and use the dehydration function at 105℉/41℃ for about 90 minutes.
You can also use the oven by heating it for about 5 minutes on the lowest setting and then turning it off. Put the bowl in the oven and leave it there until the dough has doubled in size.
Roll & Braid the Brioche Dough
Your dough should weigh around 2 pounds 6 ounces, but don't worry about that unless you want to be absolutely precise with your dough balls. Trust me, it's fine to eyeball it.
If you do want to be precise, weigh the entire ball of dough and separate it into 6 equal weight balls. Otherwise, just cut the dough in half the best you can and separate each half into 3 equal size balls or as close as you can get.
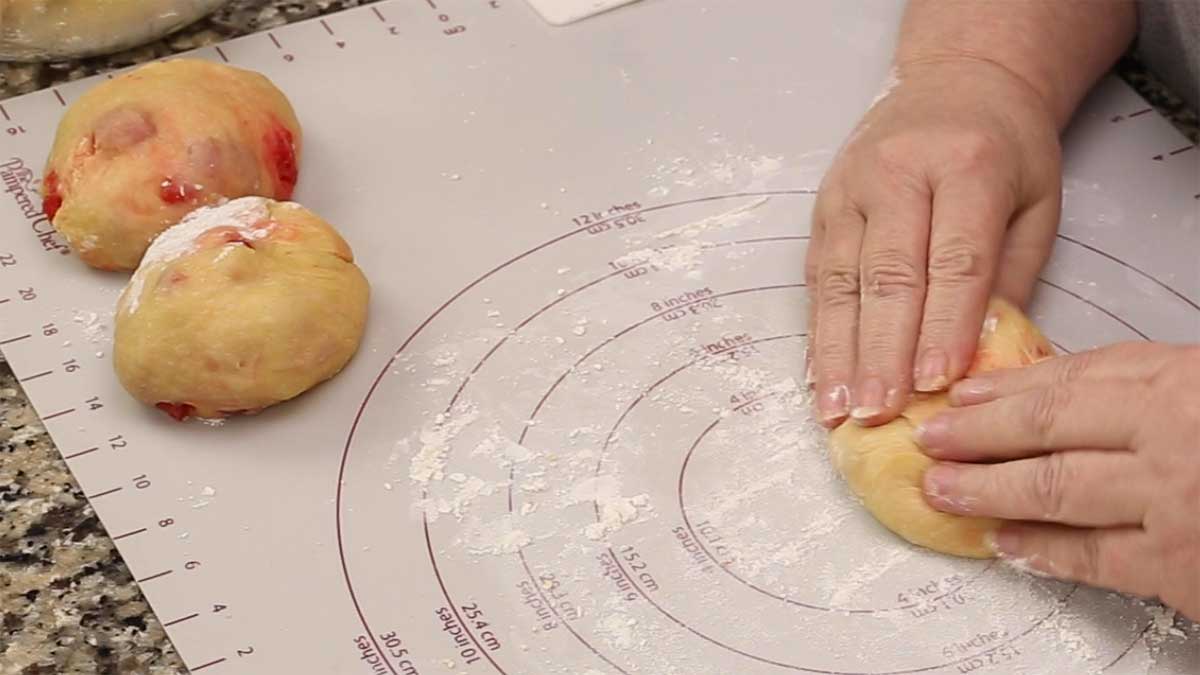
Lightly flour your work surface and roll each ball into about 12-14" ropes or logs. Don't worry the logs are picking up flour, they might end up looking horrible and cracky like mine, but that will fix itself during the second rise.
Whenever I make bread, my go to is this pastry mat from Pampered Chef. It's large enough and has built in measurements to help guide you when rolling out pie dough or in this case the ropes of bread.
Link to Pastry Mat: (affiliate link)Pastry Mat from Pampered Chef
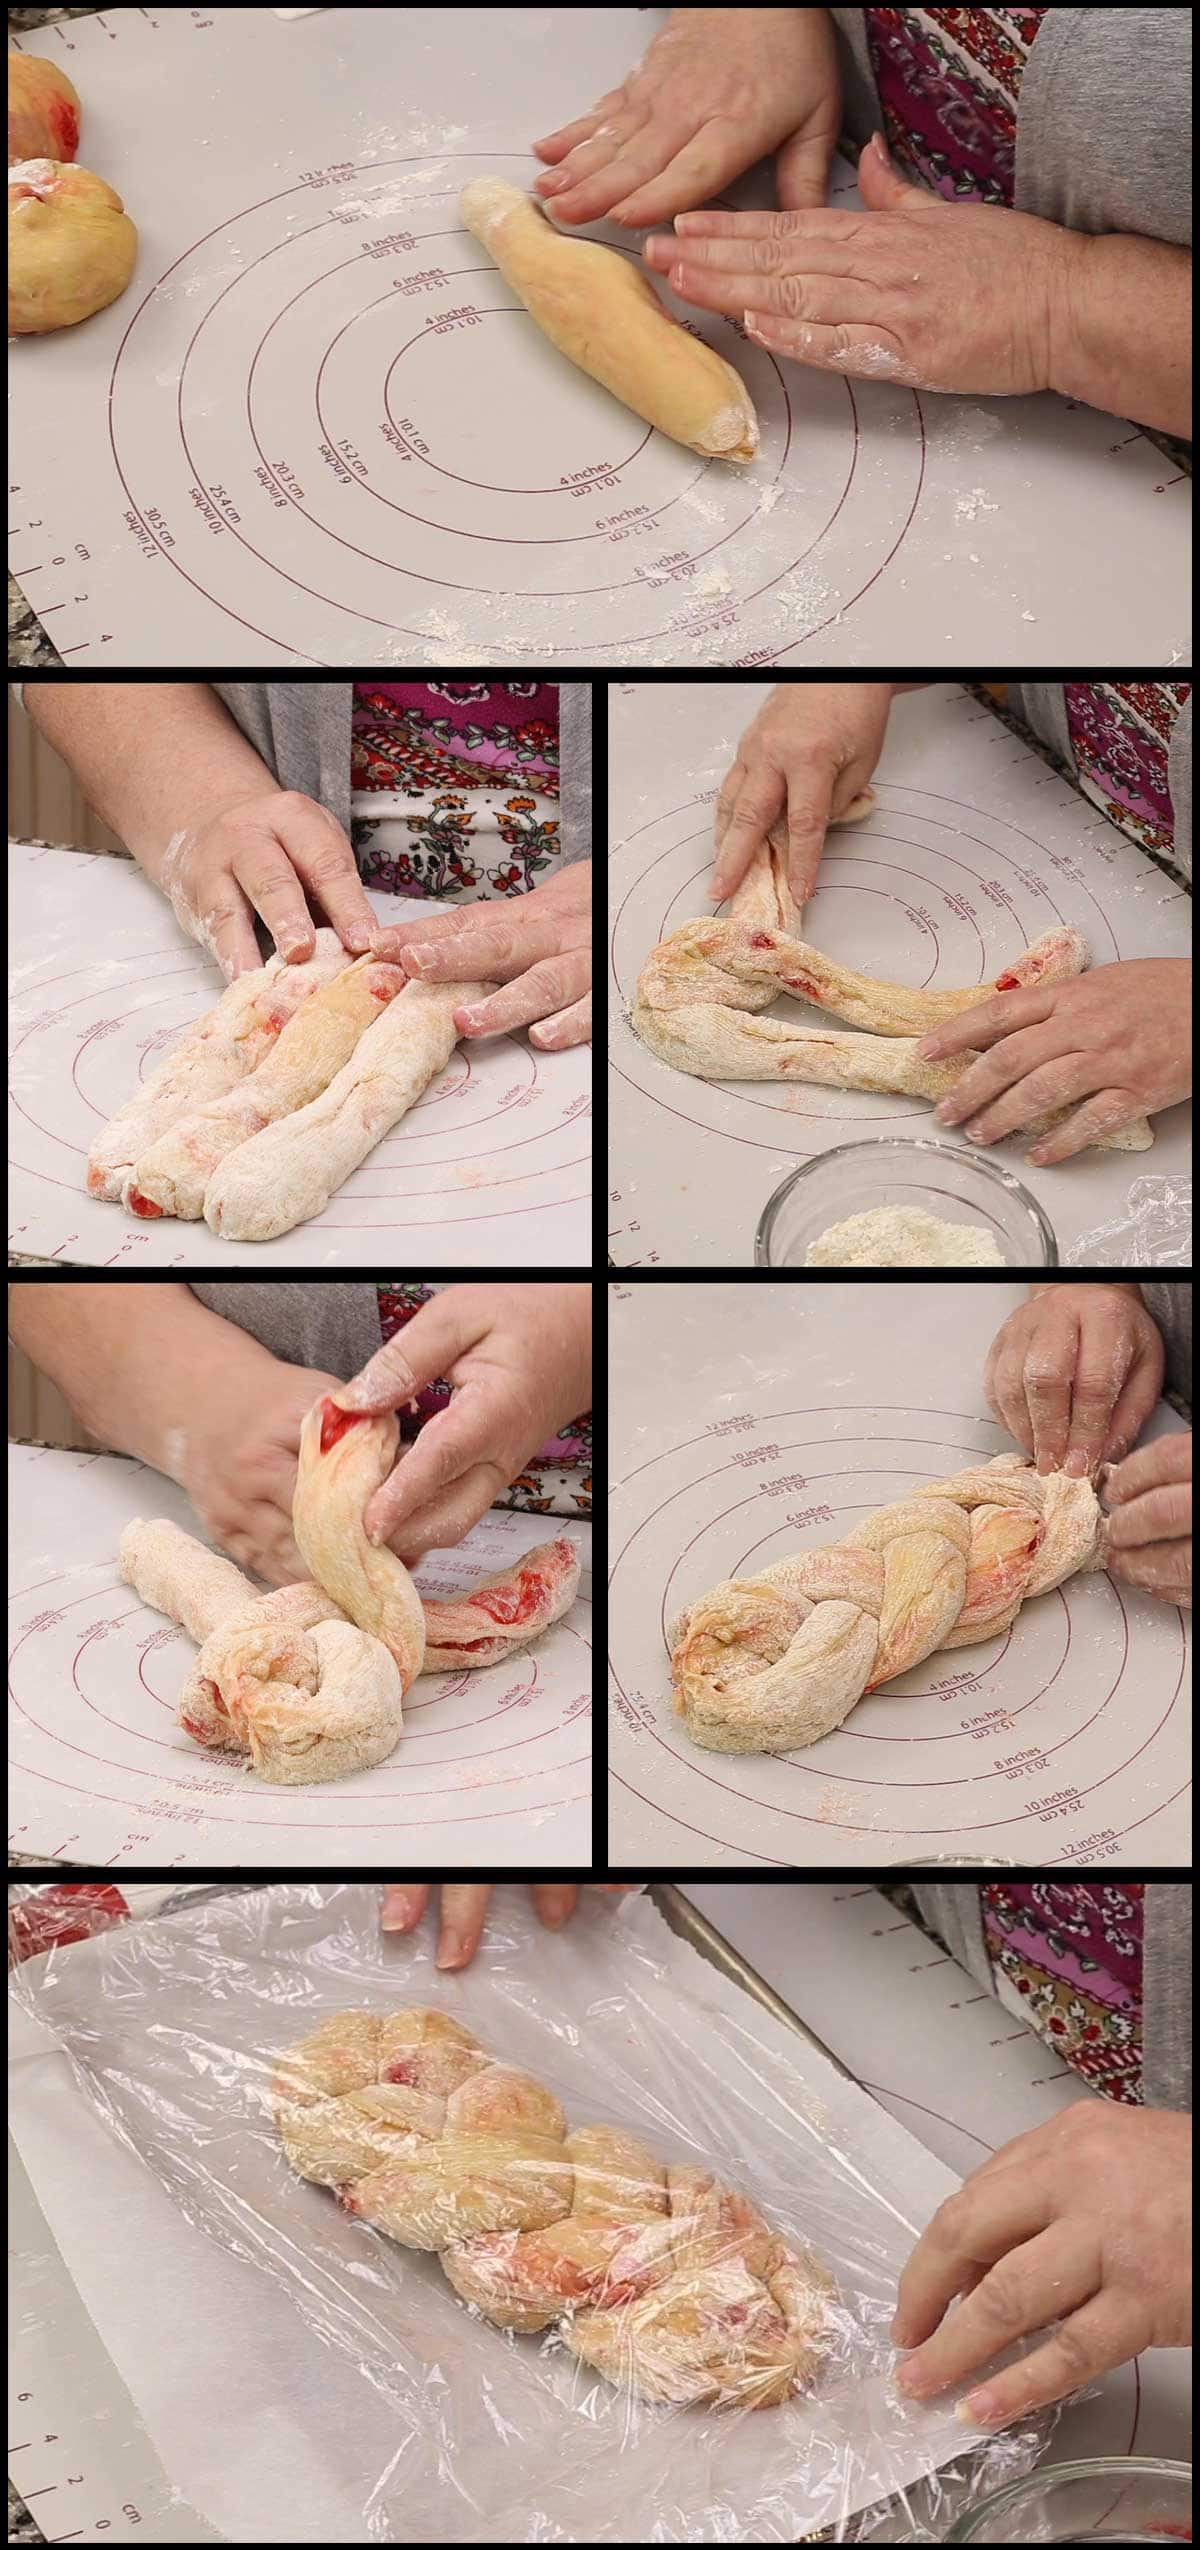
Line 3 of the ropes beside each other and crimp the top together. This is better shown in the video below and in the full YT video I also show you how to fix the ends if they aren't staying together.
Braid the strand of dough by grabbing the rope on the right and placing it over the middle rope. The left side rope then gets placed over the one that is now in the middle (used to be the right side rope) and this process is repeated until the dough is braided.
Secure the ends and place the braided loaf on a parchment lined sheet pan. Loosely cover with seran wrap. Repeat the process for the second set of dough balls.
Video on How to Braid the Brioche Bread
Second Rise
Once the two loaves are braided and placed on parchment lined trays and loosely covered with cling wrap (so they have room to rise), you can either proof them on the counter for a few hours or use the dehydration or oven method as listed above.
OR, you can now place them in the refrigerator for 8-12 hours for a slower rise.
The loaves should double is size and then they are ready to be baked.
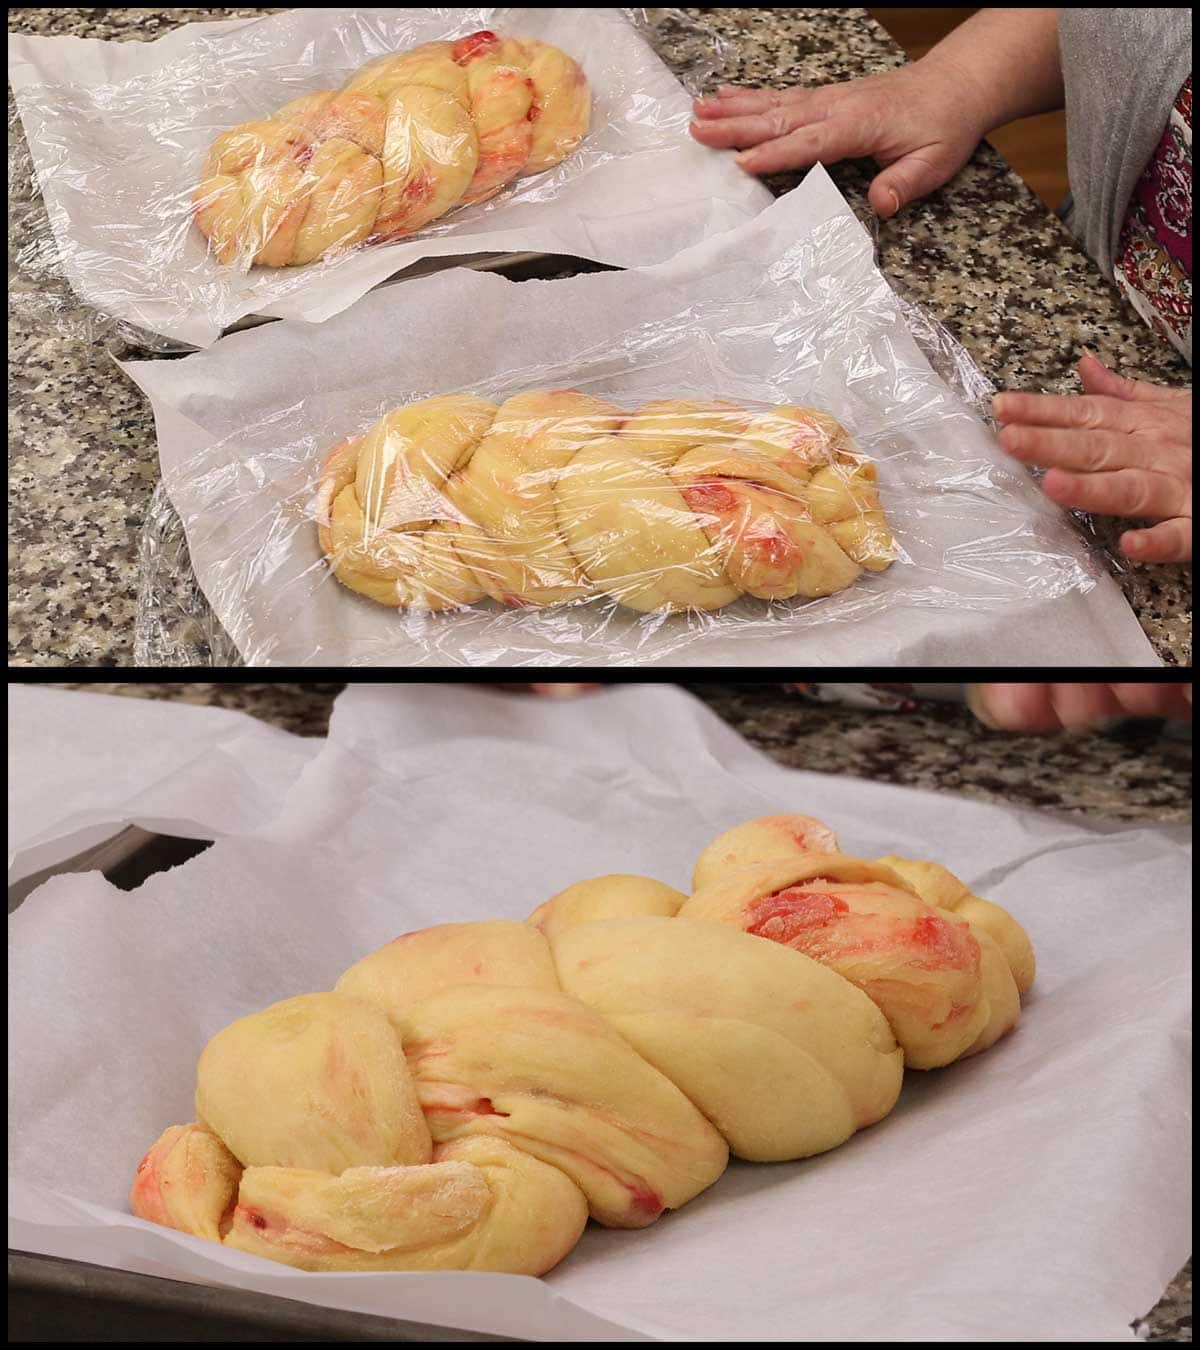
Do not worry about any imperfections at this point, once the second rise is done, do not try to fix the dough or it will collapse. Even if your loaves look horrible, do not worry about it. Once you bake and decorate them, no one will know the difference!

Baking the Braided Cherry Brioche Bread
I used the Ninja Foodi XL oven, which is a convection style oven, but you can use any style of oven and adjust your times and temps as needed.
For non-convection ovens, I suggest increasing the temperature of the oven by 25° and check after 25 minutes to see if the bread needs to cook longer. For convection ovens, follow the times and temperatures as stated.
If you did the second rise overnight in the refrigerator, let the bread sit out for about 30 minutes before baking for the best rise.
Make sure to preheat your oven for a full 10 minutes on 325℉/160℃ for convection ovens and 350℉/175℃ for non-convection ovens. This includes the fast preheating models like the Ninja Foodi XL oven. The short preheat times is not enough to get the oven hot enough to start the bread rising immediately.
You can brush with an egg wash (egg white and water), but I haven't found that necessary. The bread is plenty brown and it's covered with icing anyway.
Bake for 25-30 minutes or until it's golden brown. You can take an internal temperature if you want with an instant read thermometer and it should read between 195-200℉/90-93℃.
Remove from the oven and place the loaves on a cooling rack. Allow to cool for about 30 minutes before glazing.

Making the Almond Glaze
Combine 1 cup confectioner sugar (powdered sugar in the US & icing sugar in the UK) with ¼ cup of heavy cream and 1 teaspoon of (affiliate link)almond emulsion or extract in a small bowl. Whisk to combine.
I much prefer the flavor of bakery emulsions over extracts, but both work. I would probably start with ½ teaspoon of almond extract and increase to taste.
Add in 2 Tablespoons of room temperature butter (salted or unsalted is fine) and whisk to combine. The mixture will thicken as the butter is whipped in.
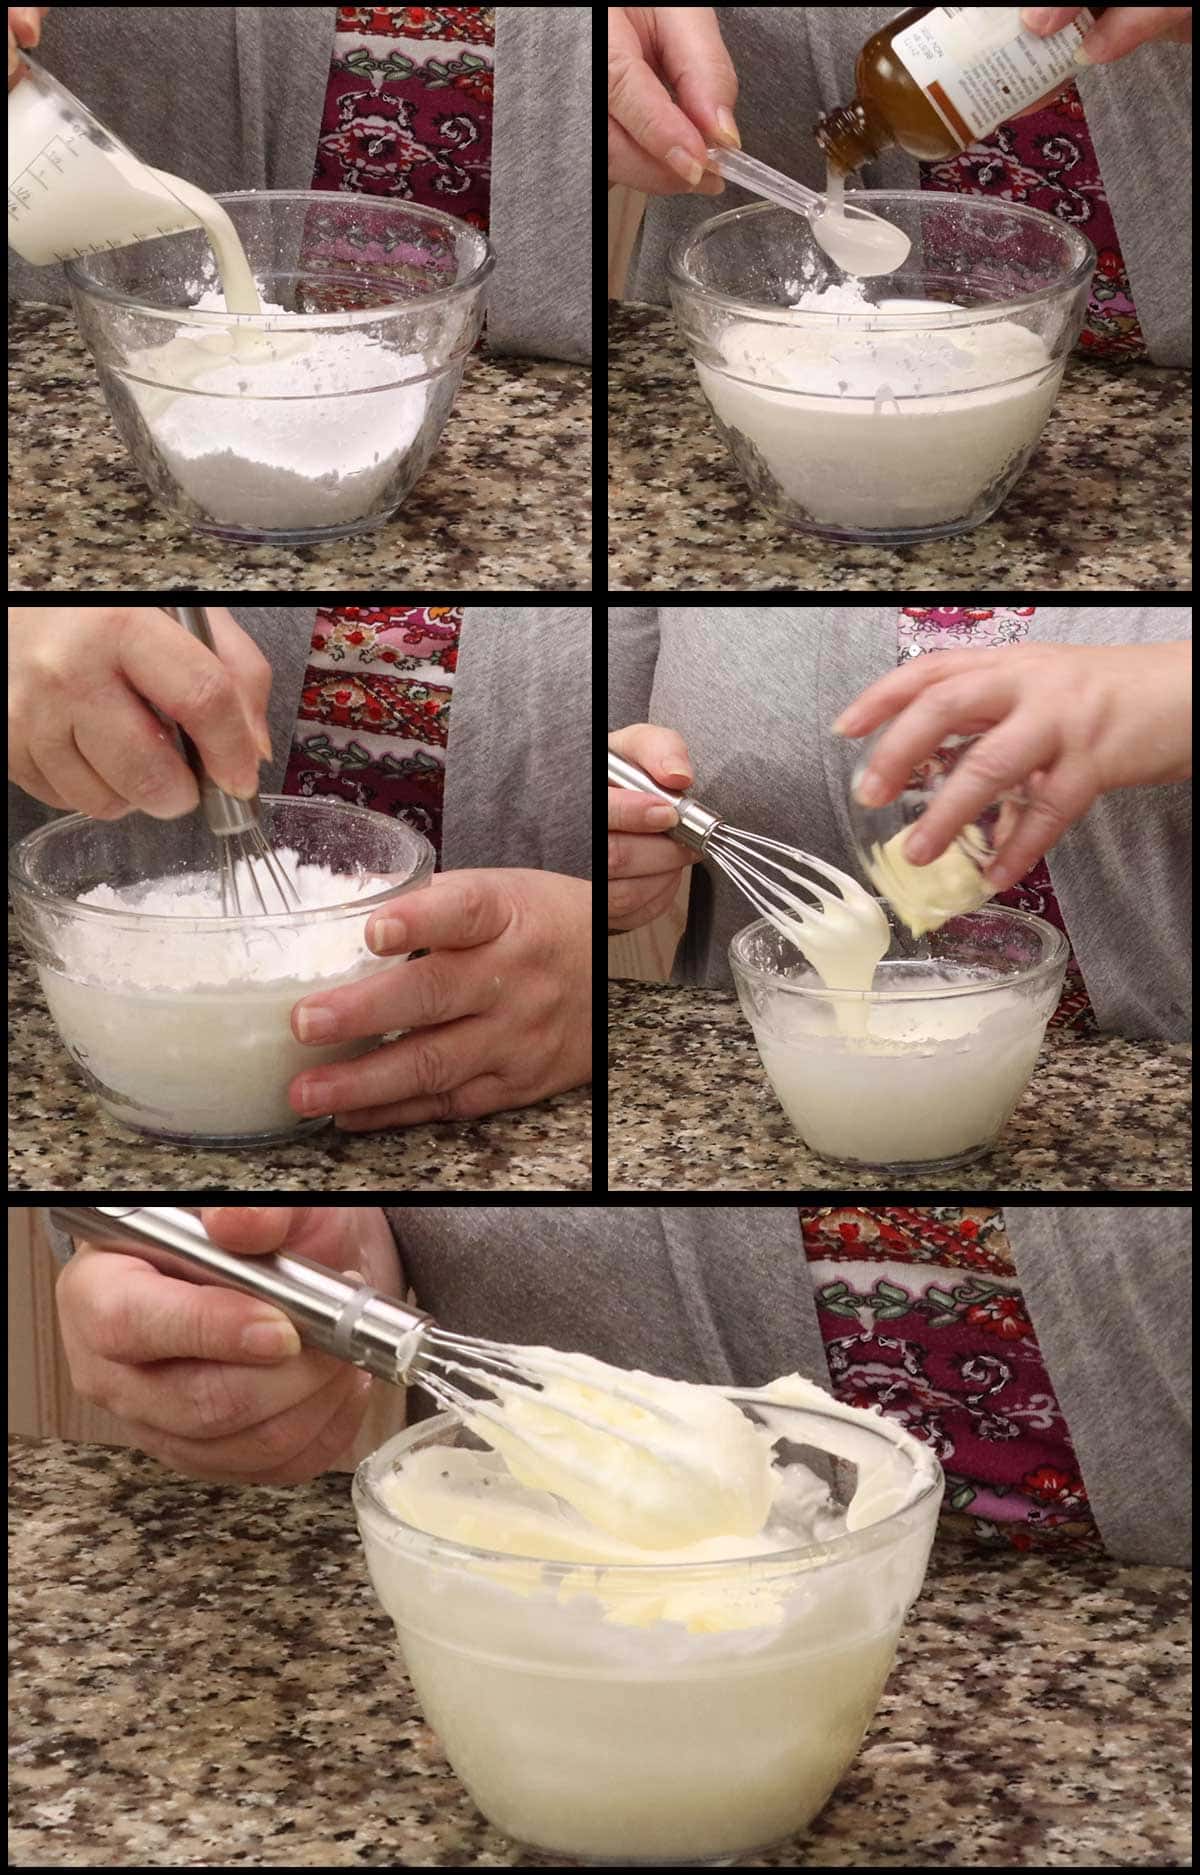
You can thin it out with more cream or even water or thicken it with more confectioners sugar.
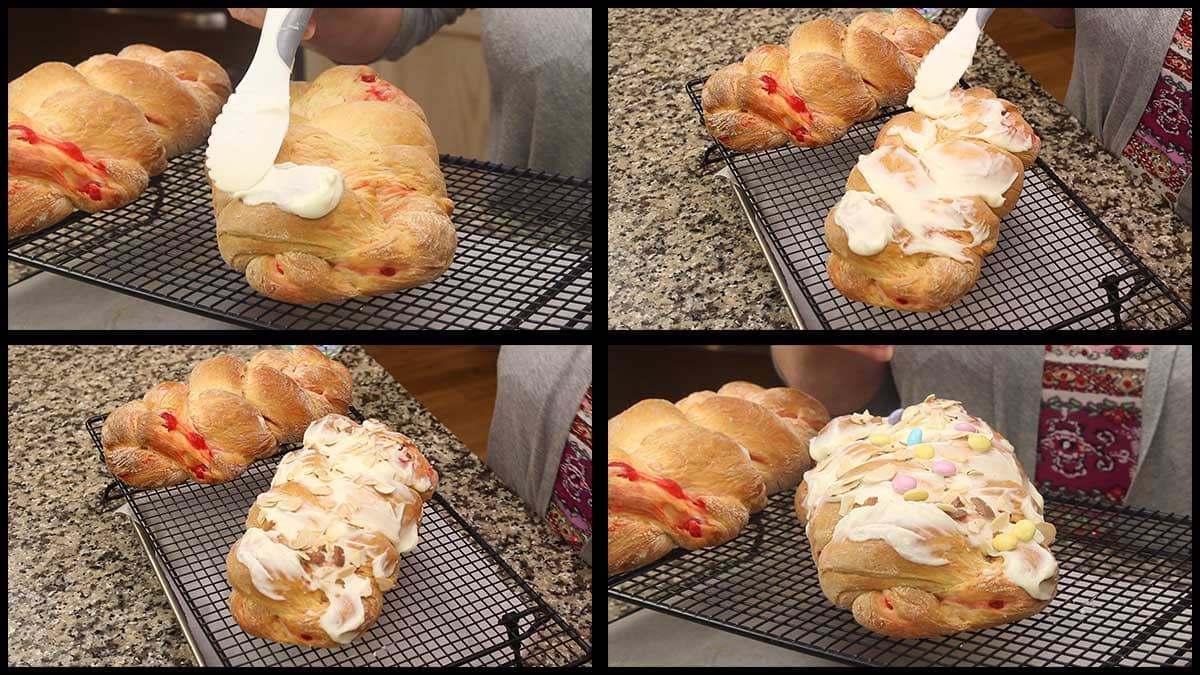
Icing & Decorate the Cherry Brioche Bread
There are tons of different ways to do this, so get creative! I slathered on the icing and put some toasted sliced almonds and pastel M&M's on top, but you can decorate your bread any way you want or don't! It's delicious just as it is, but if I don't decorate it, I do enjoy dipping it in a little icing.
Slice, Serve & Enjoy!

Sweet Cherry Brioche Bread
Ingredients
Bread Ingredients
- 16 ounce jar maraschino cherries drained from liquid (about 2 cups of cherries)
- ¼ cup warm water 105-110°F/40-43°C
- 1 Tablespoon active dry or instant yeast
- ⅓ cup sugar divided in recipe
- 3 ¼ cups all purpose flour divided in recipe
- ½ teaspoon fine grind sea salt use a full teaspoon if using unsalted butter
- 3 large eggs 2 whole eggs & 1 egg yolk
- 2 Tablespoons heavy cream
- ½ Tablespoon cherry bakery emulsion or cherry extract
- ½ cup butter melted
Almond Icing
- 1 cup confectioners sugar
- ¼ cup heavy cream
- 1 teaspoon almond bakery emulsion or ½-1 teaspoon almond extract
- 2 Tablespoons butter room temp, salted or unsalted
Optional Toppings
- ¼ cup toasted sliced almonds
- ¼ cup pastel M&M's
Would you like to save this recipe?
Instructions
Prep the Cherries
- Drain the cherries from the juice, you should have about 2 cups. Cut the cherries into halves or quarters and let them dry for several hours or overnight. Blot dry with paper towels and toss in about ¼ cup of flour just BEFORE adding to the dough.
Make the Brioche Dough
- Proof the yeast by combining ¼ cup warm water with 1 Tablespoon of yeast and 1 teaspoon sugar in a small bowl. Allow to sit for 5-10 minutes.
- Add 2½ cups of all purpose flour to the bowl of your stand mixer along with ½ teaspoon of fine grind sea salt and the remaining ⅓ cup of sugar (1 teaspoon of the ⅓ cup was used to bloom the yeast). Mix with the dough hook on low speed.
- Add 2 whole eggs and 1 egg yolk, reserve the third egg white for later use if needed.
- Once the eggs are mixed into the flour, add in the cream, proofed yeast and keep the mixer on low speed. Add in the melted butter, the cherry emulsion and check the consistency of the dough. If it is sticking to the sides (which it most likely is), add ¼ cup of flour and mix on low for a few minutes. Continue adding flour, 1 Tablespoon at a time, until the dough is no longer sticking to the sides or your hands when you touch it. This usually takes between ¼-½ cup of flour (in addition to the 2½ cups added in the beginning), but it may take more or less. Go by the look of the dough more than anything else. The dough should look shiny and feel very soft and damp, but not stick to your hands.
- Once the dough is the right consistency, turn the mixer on medium speed and let it knead the dough for 10 minutes. If you see the dough sticking to the bottom too much, add another 1 Tablespoon of flour and continue to mix. The finished dough should be smooth and very soft.
- Once the bread dough is the right consistency and the cherries are tossed in flour, turn the dough out onto a clean and lightly floured work surface and knead the cherries in by hand. If the cherries are adding too much moisture to the dough, add very small amounts of flour as needed. You shouldn't need to add more than 1 Tablespoon.
- Place the dough into a large mixing bowl and cover with cling wrap. You want to make sure your bowl is at least twice as big as ball of dough so it has room to double in size. Place the covered bowl in a warm place in your kitchen to rise for about 2-3 hours or until doubled in size. OR, use the Ninja Foodi XL oven or another large dehydrator and use the dehydration function at 105℉/41℃ for about 90 minutes.
Braid the Brioche Bread Loaves
- Divide the bead in half and then each half into 3 equal size balls. The most accurate way to do this is to use a kitchen scale, but if you don't have one, just do the best you can to get the balls equal in size. You will have a total of 6 balls for 2 loaves of bread.
- Lightly flour your work surface and roll each ball into about 12-14" ropes or logs. Don't worry that the logs are picking up flour, they might end up looking horrible and cracky like mine, but that will fix itself during the second rise.
- Line 3 of the ropes beside each other and crimp the top together. If the flour is preventing the ends from holding together, brush a little of the egg white mixed with 2 tablespoon of water on the ends and this will help hold them together.
- Braid the strands of dough by grabbing the rope on the right and placing it over the middle rope. The left side rope then gets placed over the one that is now in the middle (used to be the right side rope) and this process is repeated until the dough is braided. Secure the ends and place the braided loaf on a parchment lined sheet pan. Loosely cover with cling wrap. Repeat the process for the second set of dough balls.
- Once the two loaves are braided and placed on parchment lined trays and loosely covered with cling wrap (so they have room to rise), you can either proof them on the counter for a few hours or use the dehydration method for 90 minutes.OR, you can now place them in the refrigerator for 8-12 hours for a slower rise.
Baking the Bread
- Preheat the oven on 350°F/165°C for non convection and 325°F/162°C.
- Bake the two loaves on the parchment lined tray for 25-30 minutes or until the tops are golden brown. If you want to check the internal temperature to make sure the bread is done, you can and it should read between 195-200°F
- Remove from oven and allow to cool on a cooling rack at least 30 minutes before applying icing.
Almond Icing
- Combine 1 cup confectioner sugar (powdered sugar in the US & icing sugar in the UK) with ¼ cup of heavy cream and 1 teaspoon of almond emulsion or extract in a small bowl. Whisk to combine.
- Add in 2 Tablespoons of room temperature butter (salted or unsalted is fine) and whisk to combine. The mixture will thicken as the butter is whipped in.
Decorating the Cherry Brioche Bread
- Spread the icing over the top and add on any toppings you like. I used toasted sliced almonds and pastel M&M's.
Nutrition
About the Recipe Author, Louise Long
Louise is a full-time recipe creator and food blogger @ The Salted Pepper. She has over 30 years of experience with cooking and recipe development. She owned a restaurant for several years and was a full-time RN until retiring to blog full-time.

She published her first cookbook in the Fall of 2018 and is very interested in writing several more.
Louise is also the creator of an online Ninja Foodi Pressure Cooking Course with over 100 instructional step-by-step videos. People absolutely rave about the course and all the value they have received from it.
Louise has several very active Facebook groups that help people with the basics of cooking and learning more about the appliances they love.
Ninja Foodi Pressure Cooker & Air Crisper 101
Ninja Woodfire Outdoor Grill & Smoker
Louise is also a YouTube creator and you can find most of her recipes in video format on The Salted Pepper YouTube channel.
She is very responsive to messages and eager to help in any way she can. Get more Information about Louise & contact information
I WOULD LOVE TO SEE WHAT YOU ARE COOKING UP IN YOUR KITCHEN! TAG ME @THESALTEDPEPPER ON YOUR FAVORITE SOCIAL MEDIA PLATFORM WHEN YOU MAKE A DISH!
BE SURE TO FOLLOW THE SALTED PEPPER RIGHT HERE ⇓⇓⇓⇓⇓
Robin says
Can you use frozen cherries, thawed and dried?
Louise says
I haven't used frozen cherries, but I don't see why it wouldn't work as long as they were thawed and dry. I hope you enjoy the bread!