Making your own gnocchi isn't hard at all, and this recipe for butternut squash gnocchi only requires a few ingredients and about 30 minutes to make.
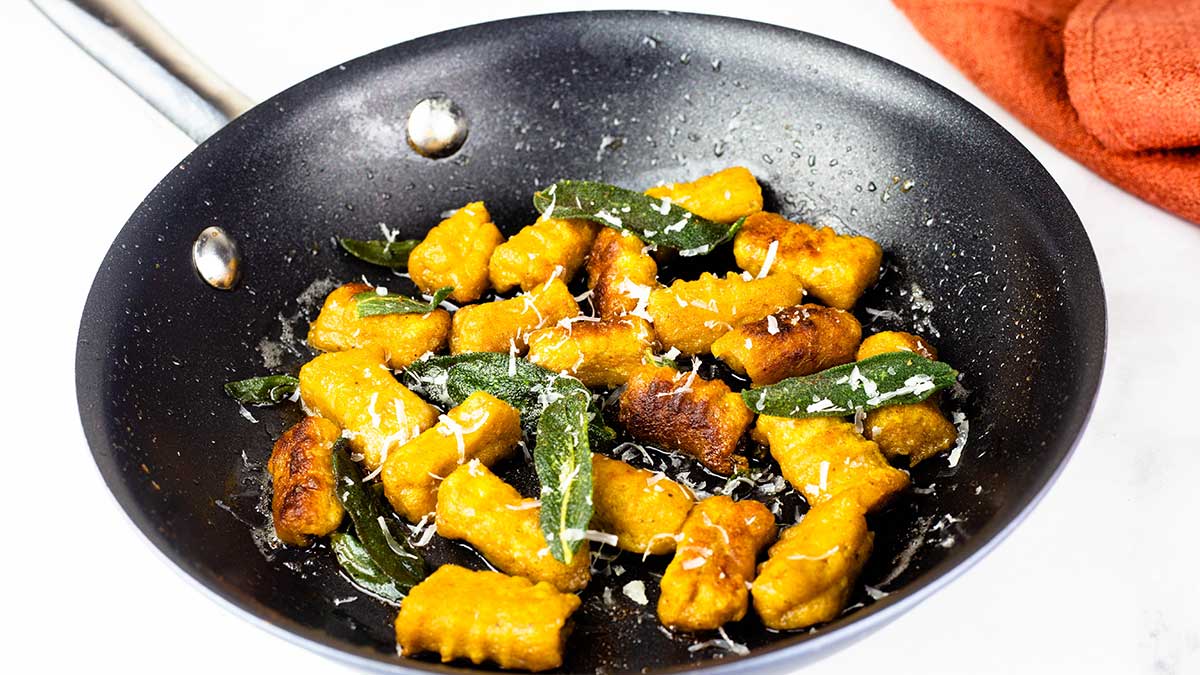
To finish off the butternut squash gnocchi we pan fry it in some butter with whole sage leaves and, oh-my-goodness, is it spectacular.
The gnocchi are pillow soft with just that bit of crunch on the outside from frying in butter and the sage, well... if you haven't tried fried sage leaves, it's a must! This recipe is the very definition of fall comfort food, and it's fancy looking, too!
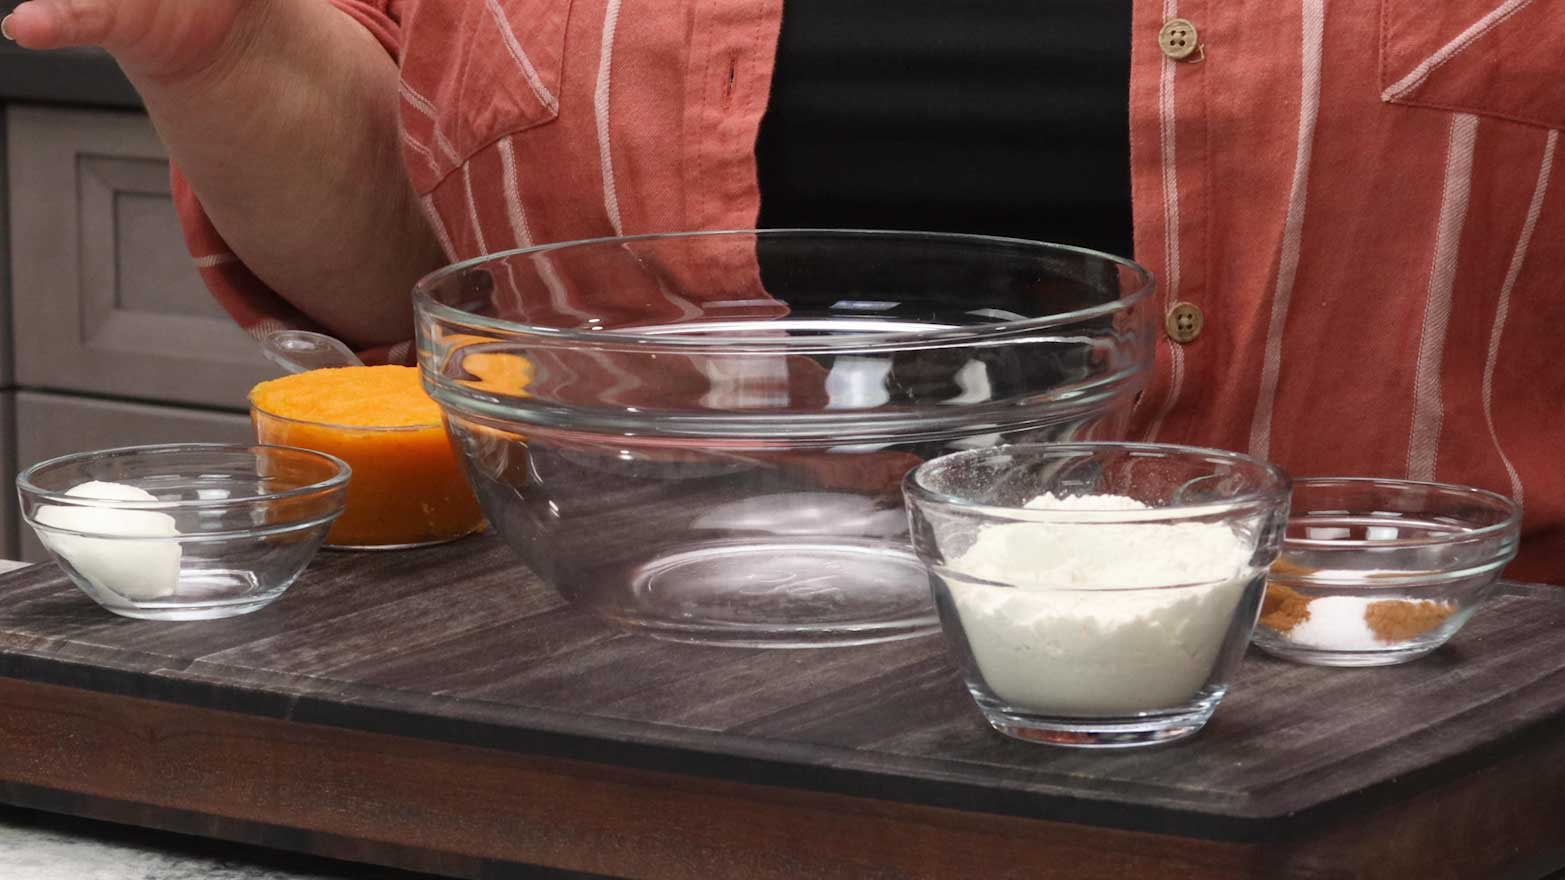
The ingredients are simple and you probably have most of them already. Just grab some whole fresh sage leaves, a butternut squash, and let's get to it!
Traditional potato gnocchi is usually made from potatoes, eggs, flour, and cheese. They are the Italian version of a dumpling. In this recipe, I substitute the potatoes with butternut squash puree and use thick yogurt instead of cheese or ricotta. The result is a very tender homemade gnocchi that is like little pillows of softness that melt in your mouth.
Supplies Needed for Making Gnocchi
Many people use a (affiliate link)gnocchi board to form the dough into a round sphere with ridges. The ridges are what catch the sauce that you serve with them and are an important part of making gnocchi; however, you don't need any special equipment or a gnocchi board to make these little beauties, and this recipe doesn't use anything that you don't already have at home.
- large pot or the Ninja Foodi or Instant Pot to boil the water
- fork
- cooling rack
- frying pan for sautéing the gnocchi
- slotted spoon to remove the boiled gnocchi
- medium or large bowl to mix the dough
- clean work surface or cutting board to roll out the gnocchi
Ingredients & Substitutions
Butternut Squash Puree
I make my own puree using a fresh butternut squash and my Ninja Foodi pressure cooker. It makes it so easy! However, you can also oven bake the butternut squash to get the puree or use canned pumpkin puree instead. Just make sure it isn't pie filling; you only want plain pumpkin. Here is my recipe for the puree: Butternut Squash Puree
You can also switch out the butternut squash for leftover mashed potatoes and make a more traditional version of potato gnocchi. The only changes you may need to make would be to add a little more liquid and/or flour to get the correct consistency of the gnocchi dough. This will depend on how dry or moist your mashed potatoes are. I would also change up the spices of the potato gnocchi depending on what kind of sauce you want to serve with it.
Another great substitution would be sweet potatoes. You could either bake them and scoop out the flesh, pressure cook with the skins on and then remove the flesh, or use leftover mashed sweet potatoes. Just keep in mind what seasonings you used in your mashed sweet potatoes and adjust the seasonings in the gnocchi. For example, if you added cinnamon, nutmeg or other spices to your mashed sweet potatoes, you may only need to add a touch of salt to your gnocchi dough. If you aren't sure how they are going to taste, make up the dough and boil one in salted water, taste, and adjust your seasonings in the remaining dough.
Gnocchi Dough
The dough is made up of butternut squash puree, flour, egg yolk, yogurt, and spices.
For Gluten free Gnocchi, I would try using (affiliate link)potato flour or a (affiliate link)gluten free flour that is a 1:1 ratio for baking. Either of these should have the binding power without altering the taste.
You could also try using corn starch (cornflour) if you have that on hand.
If you want to omit the egg yolk for Vegan gnocchi, I would replace it with 1 Tablespoon of olive oil or avocado oil to help hold the dough together. You could use a soy-based thick plain yogurt instead of the Greek yogurt or omit it all together.
The yogurt I use is a homemade Greek yogurt that I make and strain myself. It's really thick! You can use any plain Greek yogurt or use regular yogurt and increase the flour a bit. Another alternative would be a Tablespoon of cream cheese or sour cream.
Garnishes & Sauces
With butternut squash gnocchi, I love to pan fry them in a butter sauce with fresh sage that is fried and then topped with grated parmesan cheese. This preparation is simple, elegant, and tastes amazing. If you want to spice things up, add some red pepper flakes or even some extra fresh cracked black pepper would be amazing.
If you aren't a fan of sage (although, I really hope you tried the fried sage -- it's like candy), you can omit that and just make a simple brown butter sauce.
You can also pair the gnocchi with your favorite sauce or simply pan fry in some olive oil. The butternut squash gnocchi would be great lightly tossed in curry sauce!
How to Make Butternut Squash Gnocchi
Mise En Place (prep before making gnocchi)
The prep for making gnocchi that you are going to cook right away starts with filling a large pot or the inner pot of the Ninja Foodi with 10-12 cups of water. I usually start off with cold water, but it really doesn't matter. Add 2 Tablespoons of kosher or sea salt and bring to a boil over high heat or sear/sauté on high, if using the Ninja Foodi or Instant Pot.
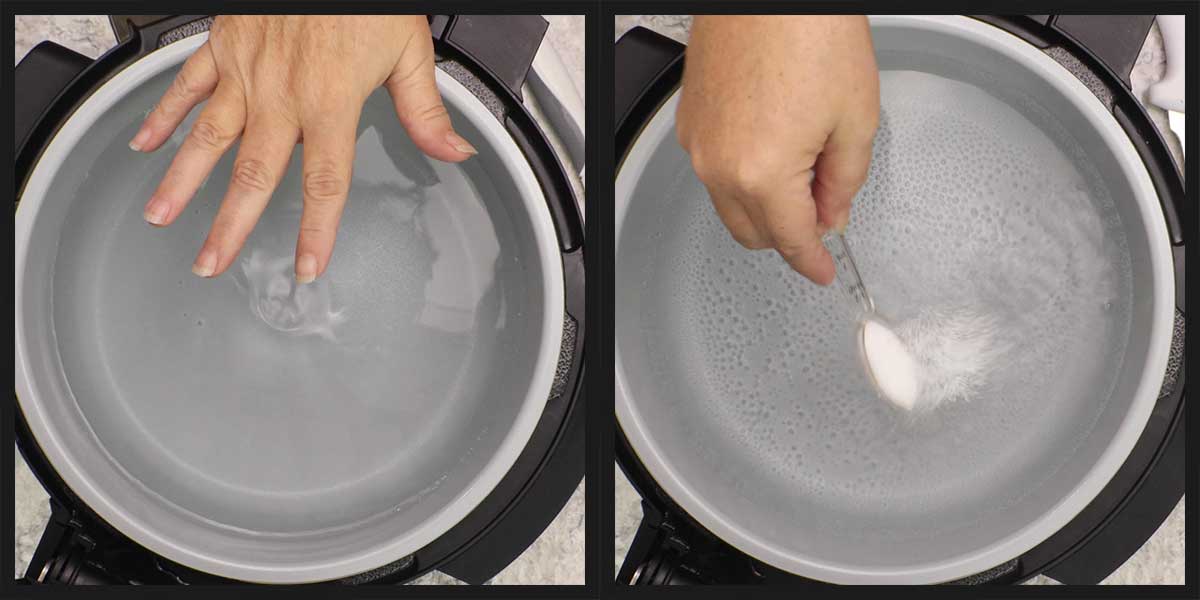
Starting the water to boil now will ensure that it is ready to go when you want to drop your first batch of gnocchi. If it takes you longer to make the gnocchi and the water level starts to drop, just add in some more water and let it come to a boil.
Gather all of your ingredients and measure them out. Make sure to have extra flour for the work surface, as well as adding to the dough if needed. Make sure your butternut squash doesn't have a lot of liquid in it. If you followed my recipe for pureed butternut squash it should be fine, but if it is canned or previously frozen, you will want to strain the excess liquid from it before adding it to the dough.
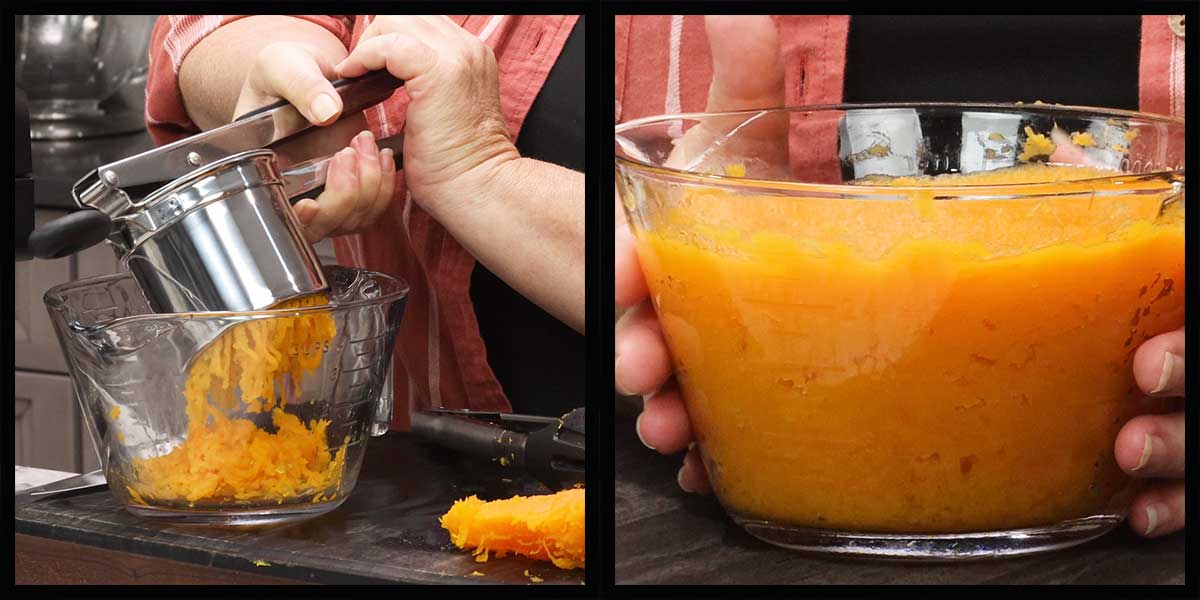
If you haven't processed the butternut squash, but it is cooked, make sure to mash it well with a potato ricer, a potato masher, or an electric mixer. You want the butternut squash to be very smooth like canned pumpkin is.
Making the Dough
This dough comes together so easily, you don't need a stand mixer, electric hand held mixer or a food processor, but you can use any of them, if you prefer. Personally, I like to use a (affiliate link)medium to large glass mixing bowl and a wooden spoon or silicone spatula. I used my (affiliate link)Scoop 'n Spread in the video.
Add the butternut squash puree, spices, egg yolk, yogurt, and flour to the mixing bowl and stir until the dough starts to come together and form a ball. You will still see some flour, and that is okay.
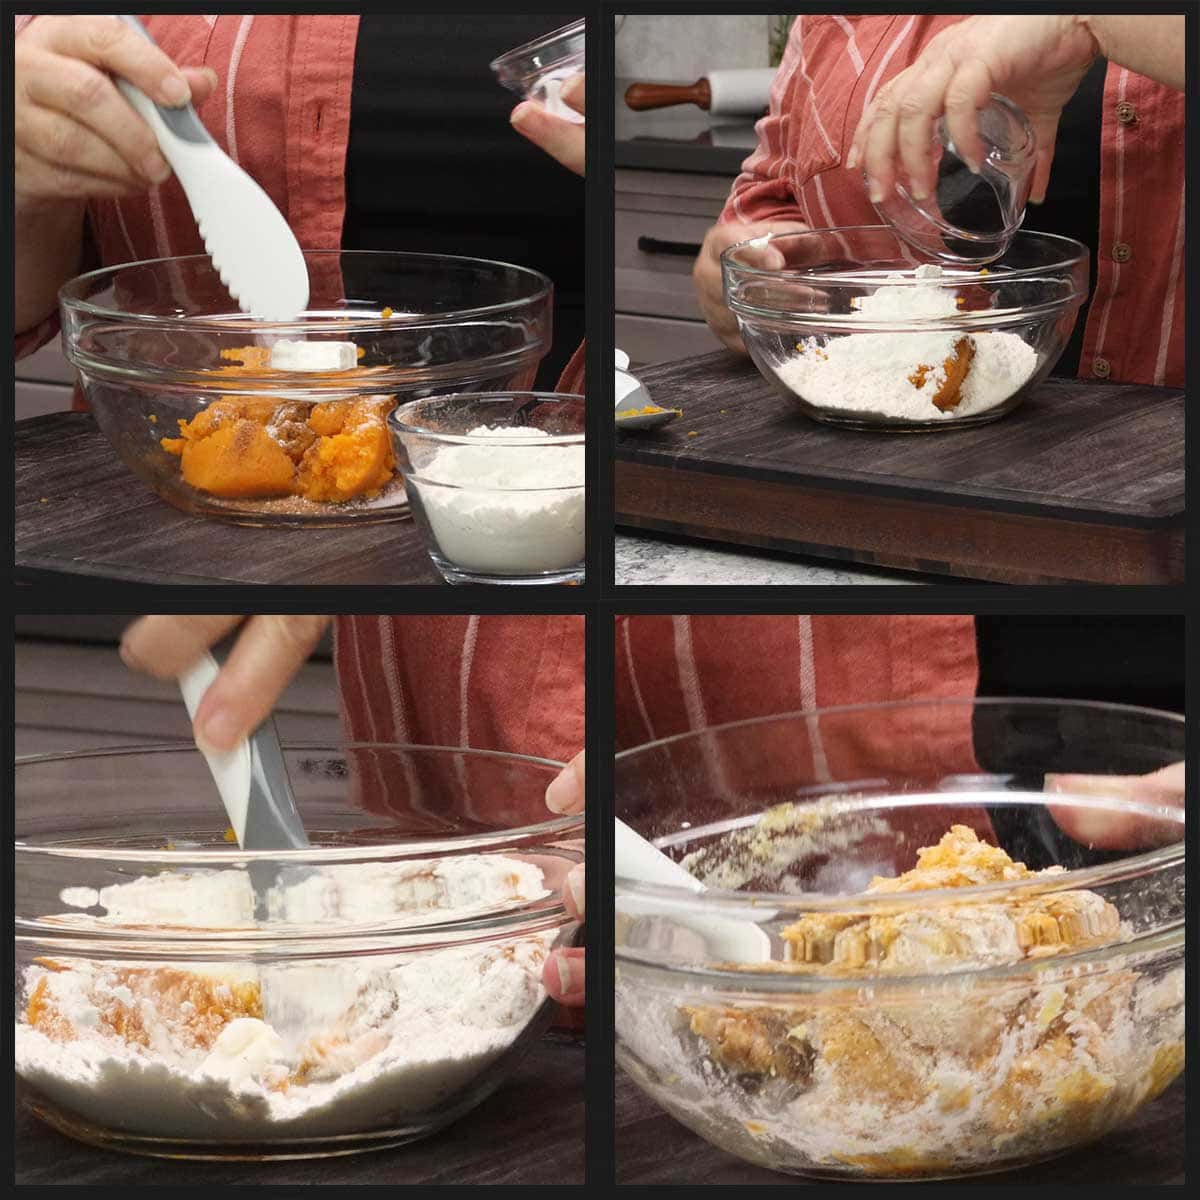
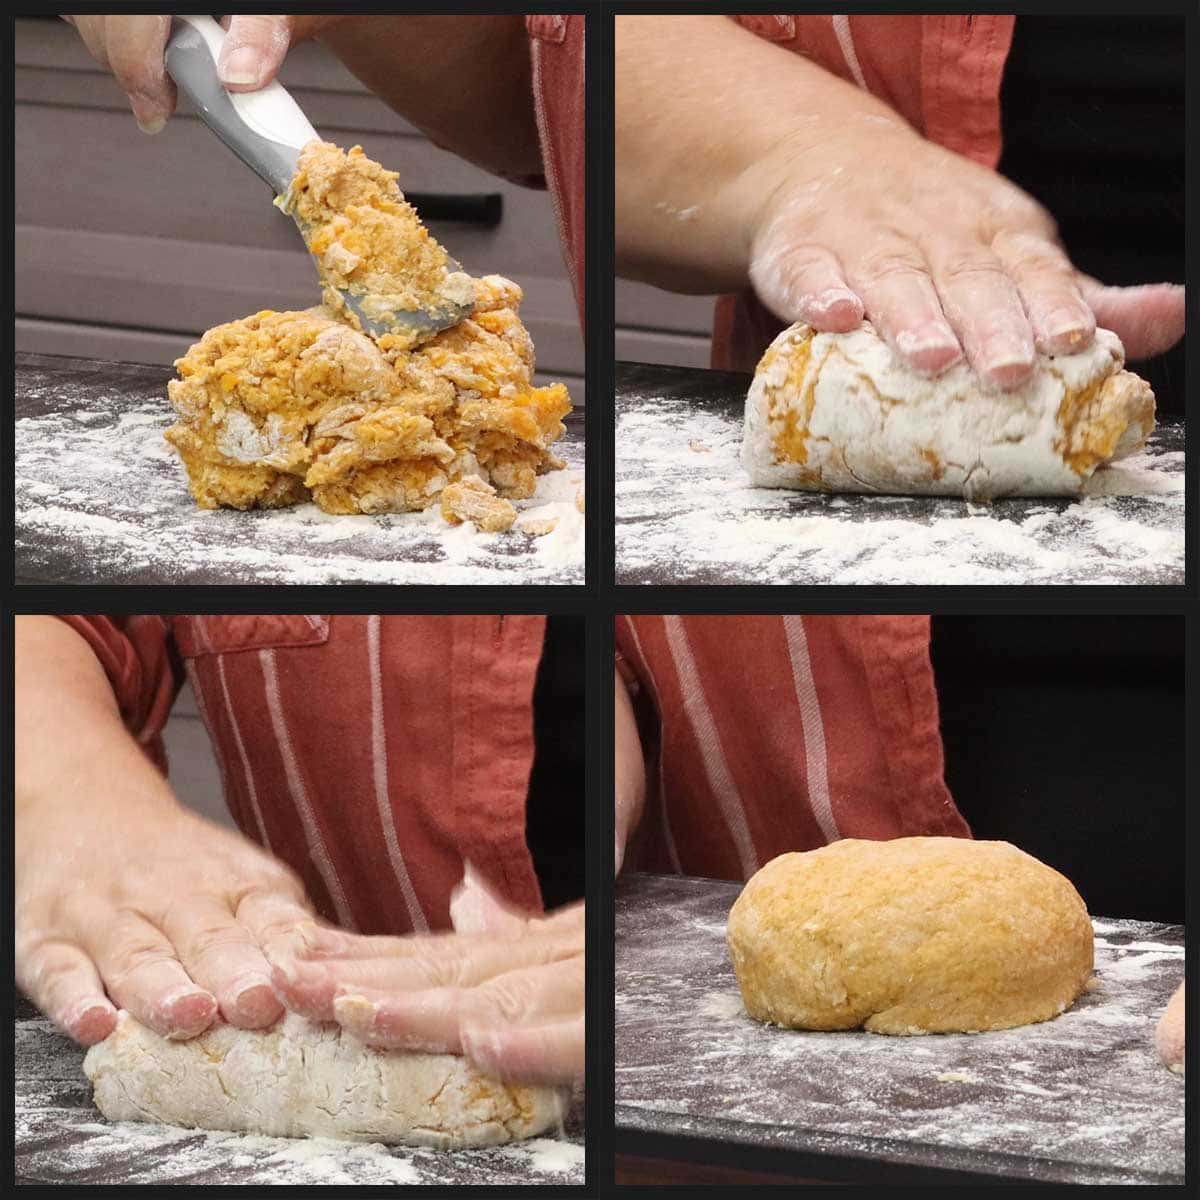
Lightly flour a clean work surface or a large cutting board and turn the dough out onto the surface. Press down and then fold the dough over onto itself like you would if you were kneading bread dough. If the dough is very sticky, sprinkle with more flour.
The dough should be soft and slightly tacky on the surface, but not so sticky that you can't handle it without it sticking to your fingers. One of the secrets to pillow soft and tender gnocchi is not adding too much flour. So, if you need to add more flour to the surface of the dough so you can work with it, that's fine, but the less flour you use, the better.
Rolling the Gnocchi Dough
Divide dough into 4 equal pieces and set 3 pieces aside on a lightly floured surface. Take the piece of dough that you are working with and form a log or cigar shape. Sprinkle some flour on top of the log so it won't stick when you roll it out.
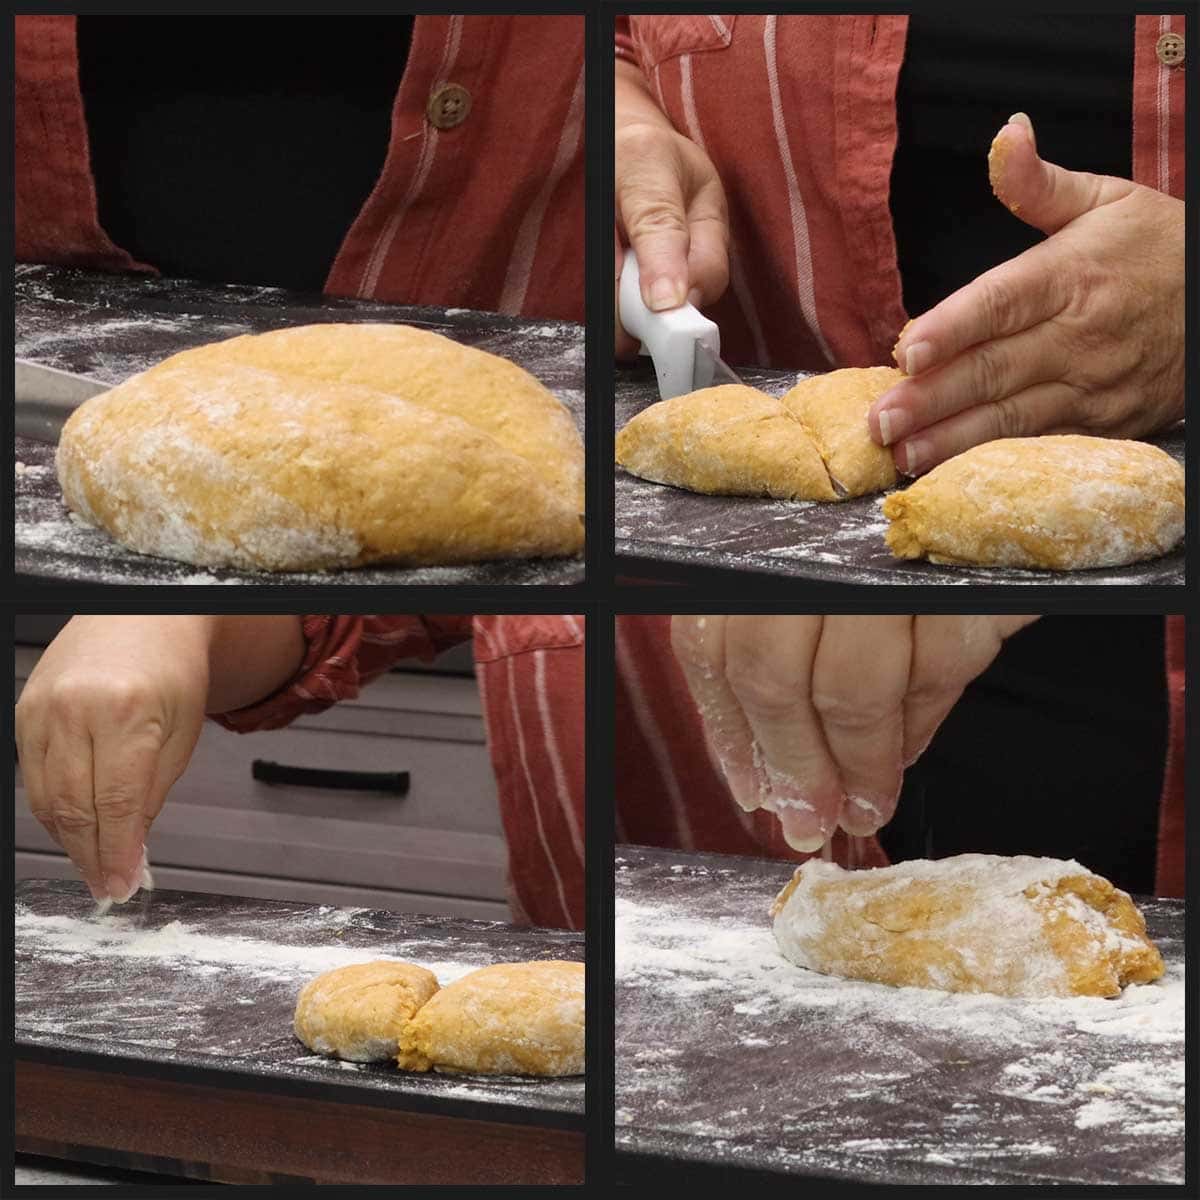
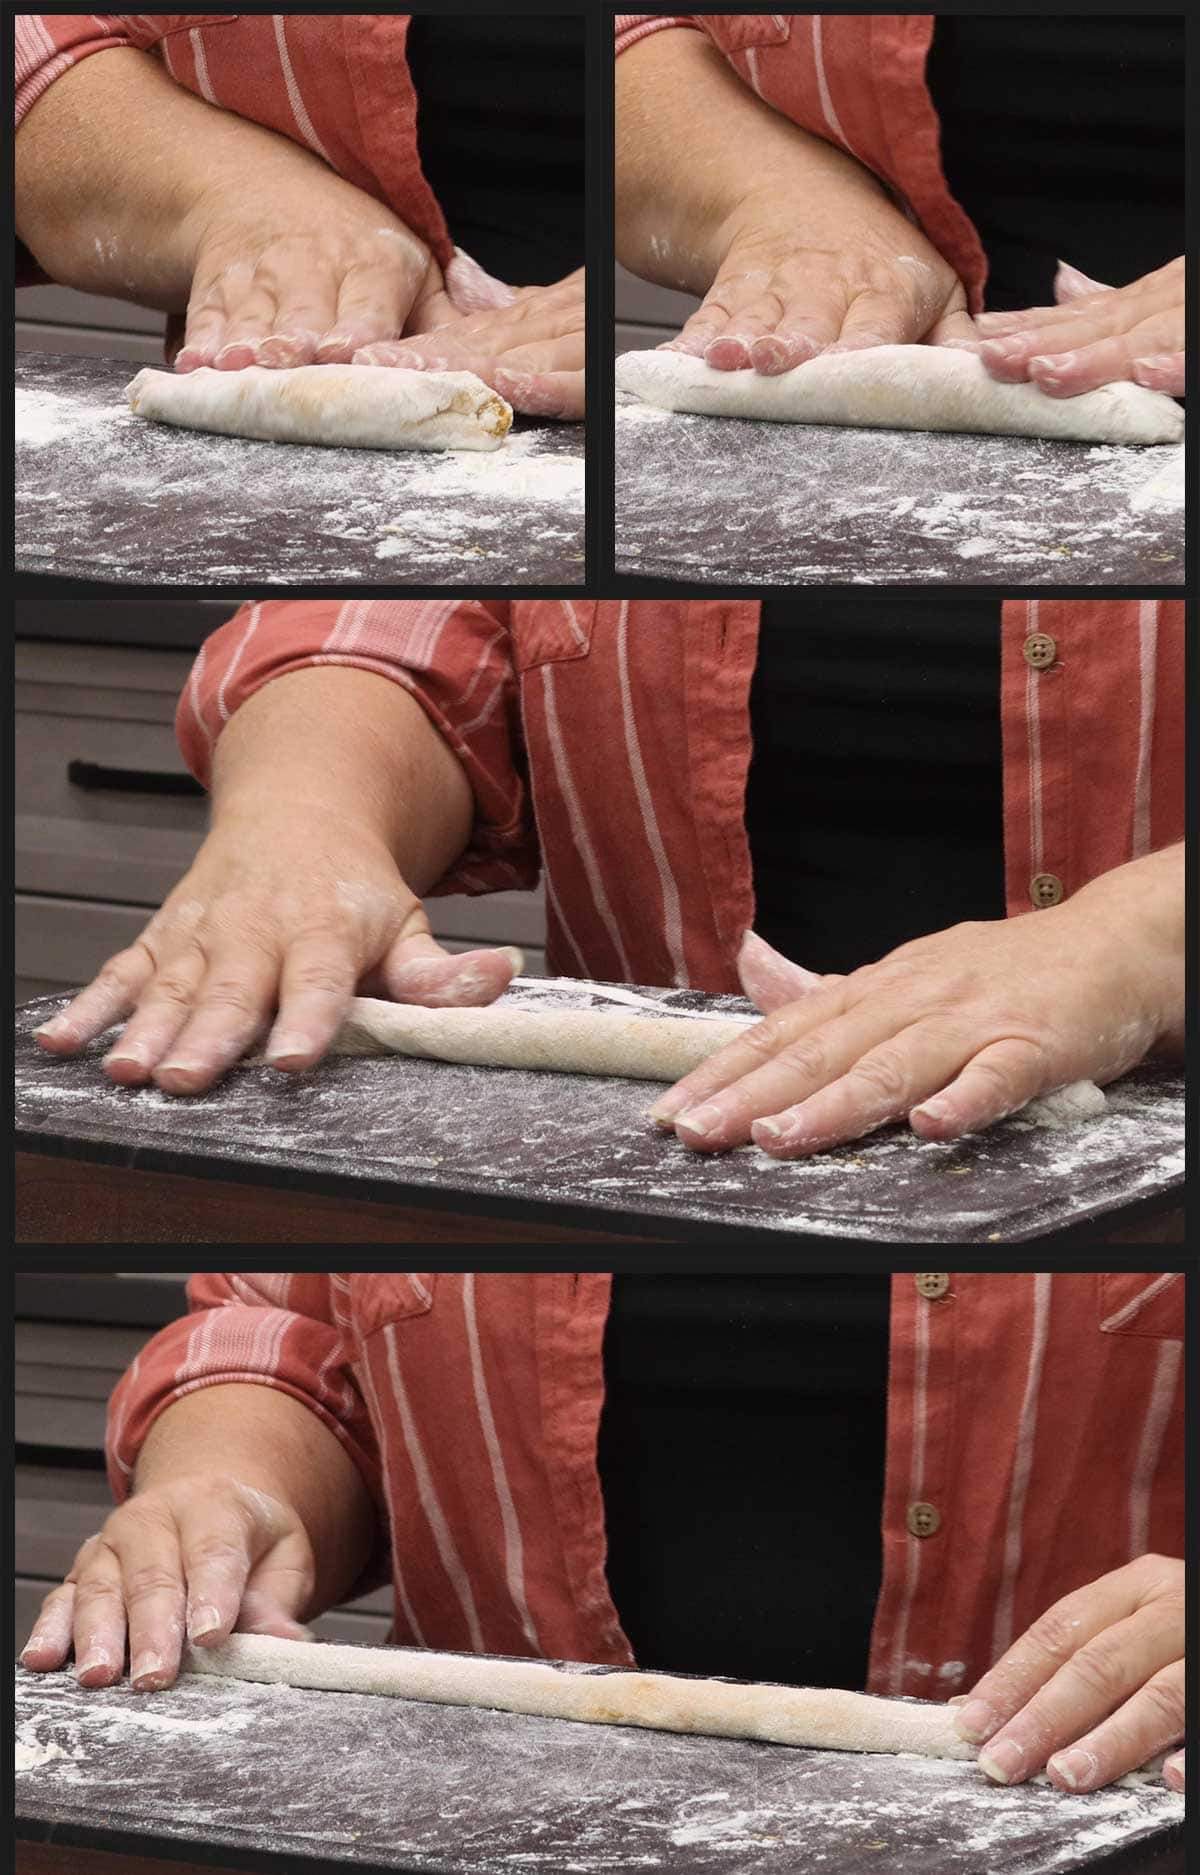
Gently roll the dough on a floured surface, starting at the middle and moving towards the ends to form a rope. You want the rope to be about 12" long and about the size of nickel in diameter.
Cutting the Gnocchi
Once the rope is formed, you can cut the gnocchi into about 1 inch pieces. If you want each gnocchi to be the same size, use a fork as a guide. Place your fork above the rope and use the width of the fork as your cut mark. Once you cut one piece, move the fork along the rope and cut the rest.
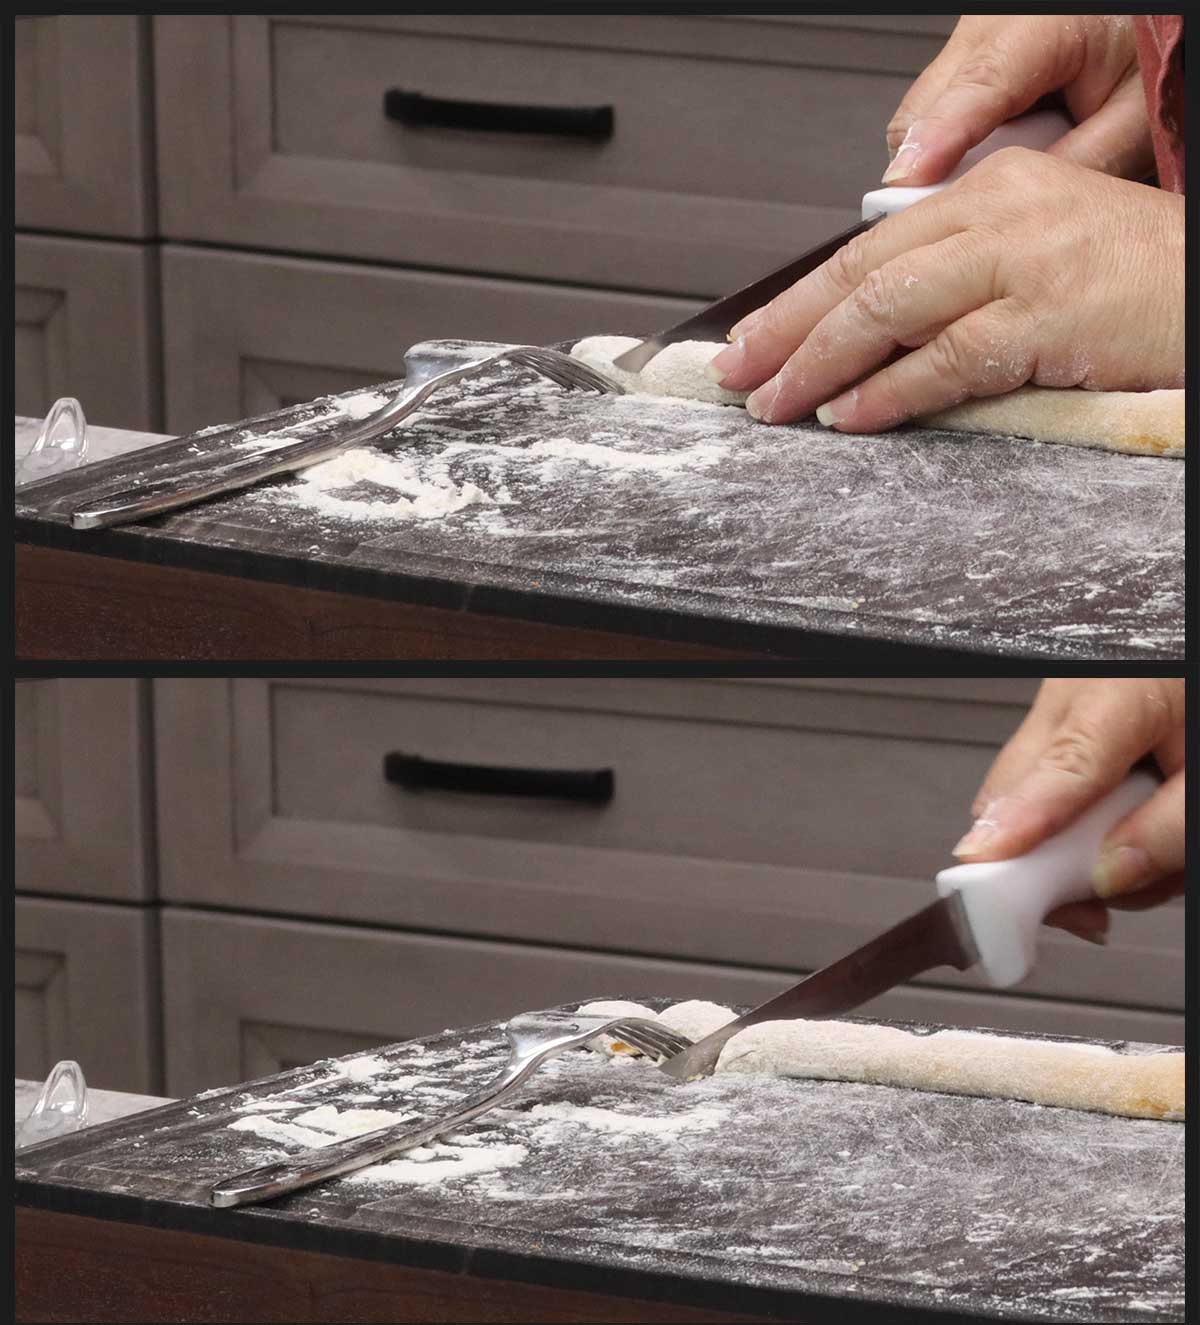
Or, you can certainly just estimate and cut the gnocchi without the help of a guide, which is what I usually do.
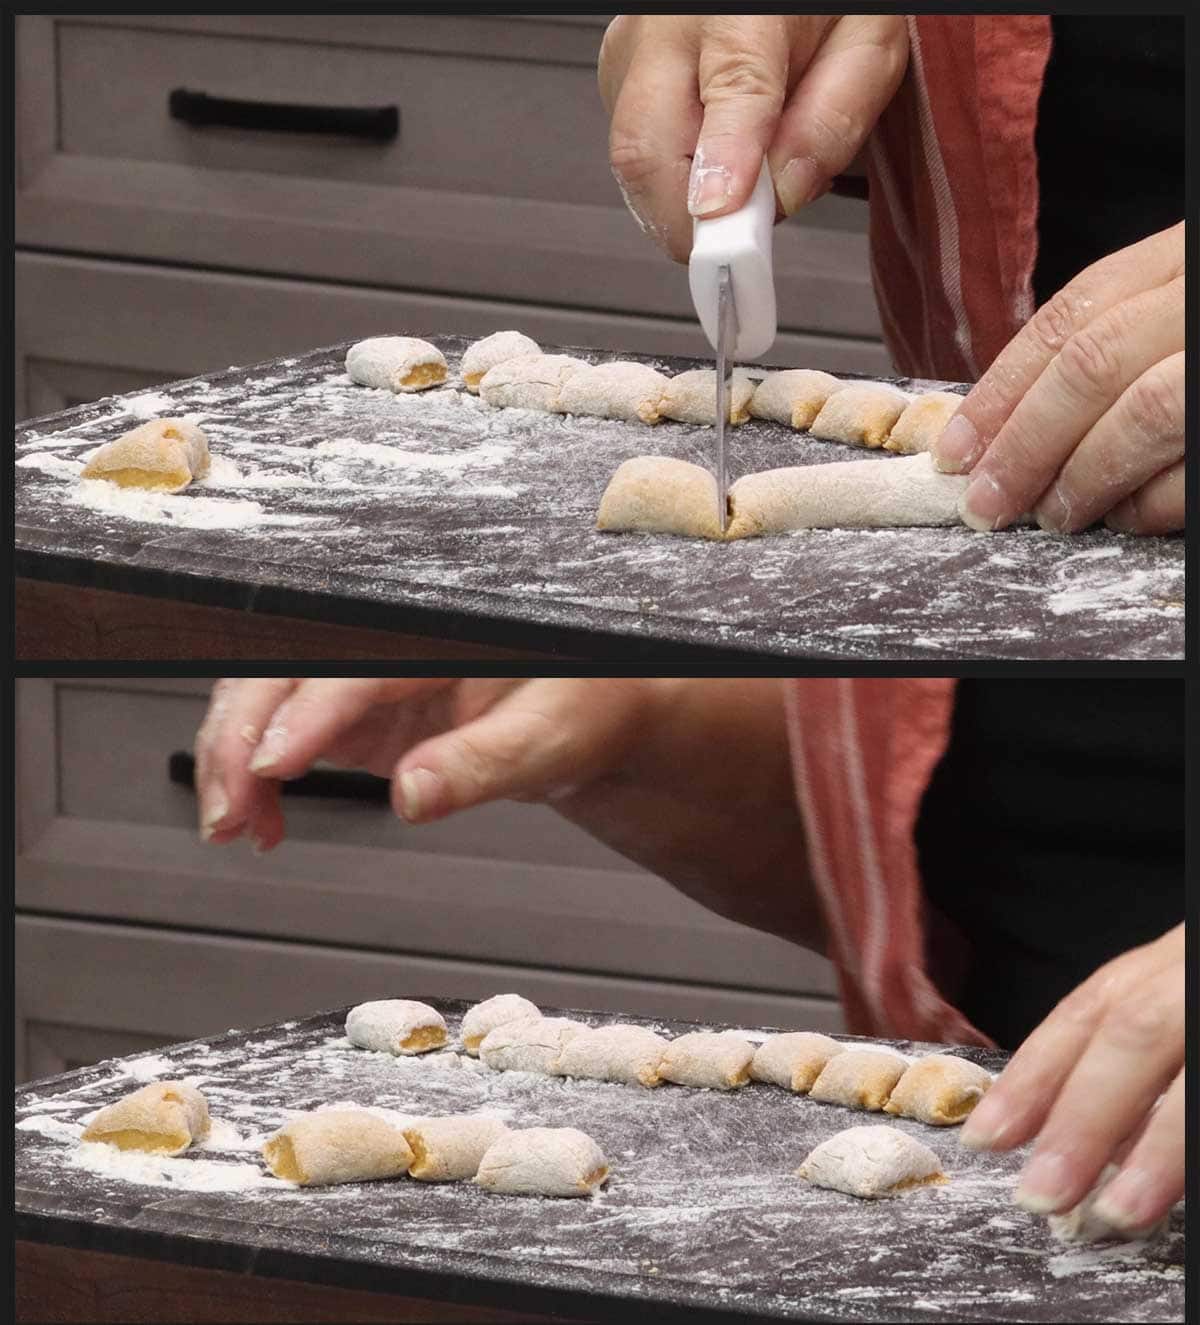
Forming the Gnocchi
Have a small bowl of flour or some extra flour on your cutting board to dip your fork in if you aren't going to use a gnocchi board.
Place the fork so it is resting on the cutting board with the back of the fork facing up. Place one dough piece with the cut sides facing outward. This is important because the cut ends are sticky and won't roll as easily down the tines of the fork.
Gently press the center of the gnocchi piece and then roll down the back of a fork to make the grooves in the dough. Pinch the ends together and place the gnocchi on a floured surface until you are ready to boil the first batch.
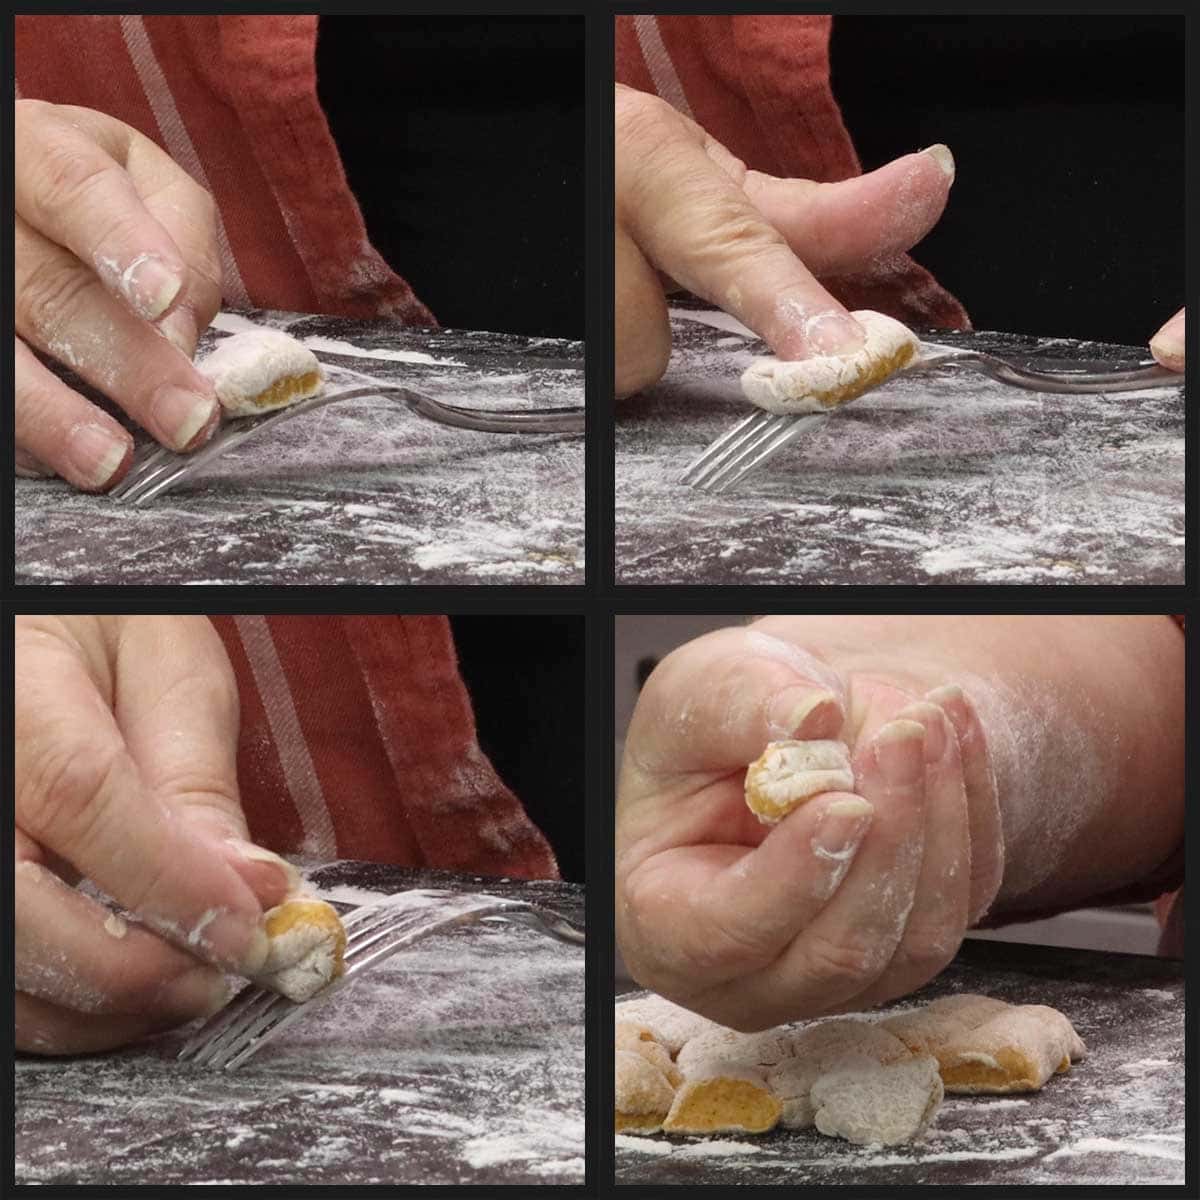
Repeat with the rest of the cut pieces of gnocchi dough.
Take another piece of the divided dough and repeat until all the gnocchi are made. You can certainly cook the first dozen gnocchi if your large pot of salted water is boiling or you can wait until all the pieces are cut.
Here is a short video showing you how I form the gnocchi.
Boiling Gnocchi
Once your salted water is boiling and you have some of your gnocchi cut and rolled into the gnocchi shape, you can start cooking them.
This is best done in batches and I like to do about a dozen at a time. If you add too many gnocchi in at once, your water temperature could drop. You want to cook the gnocchi in boiling water so they cook quickly and don't absorb too much water.
Once you place about a dozen or so gnocchi in the boiling water, gently move them around. They will cook in 1-2 minutes and, when they are done, they will float to the surface.
Remove the cooked gnocchi with a slotted spoon, I like to use this (affiliate link)large scoop 'n drain, and place them on a cooling rack or tray lined with paper towels to absorb the excess water.
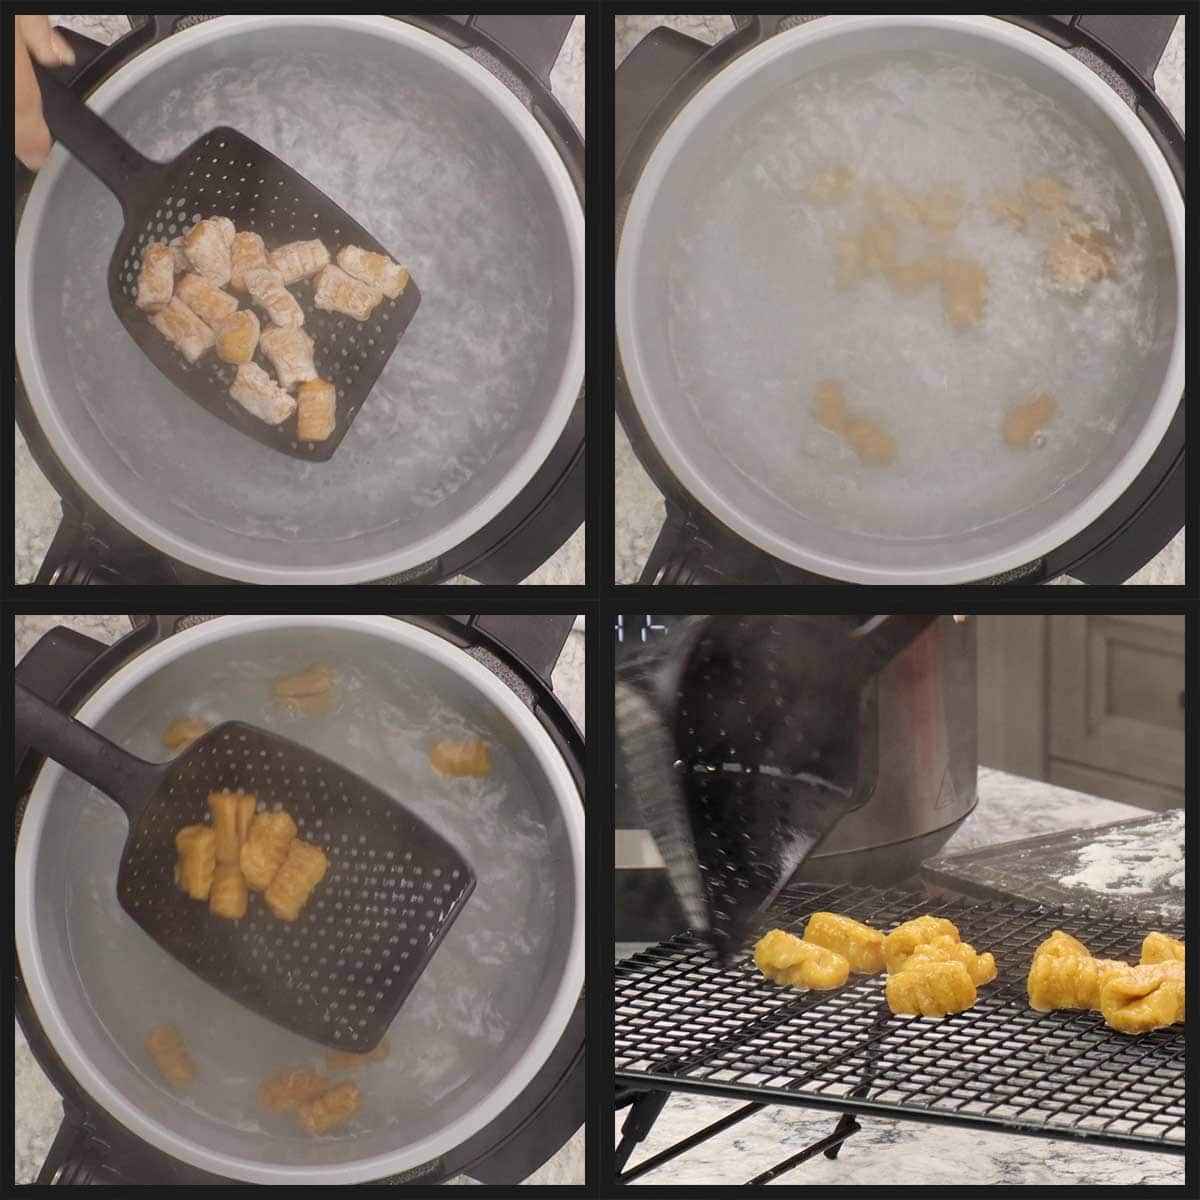
Make sure the water is boiling again before putting in the second batch. Repeat this process with the rest of the gnocchi.
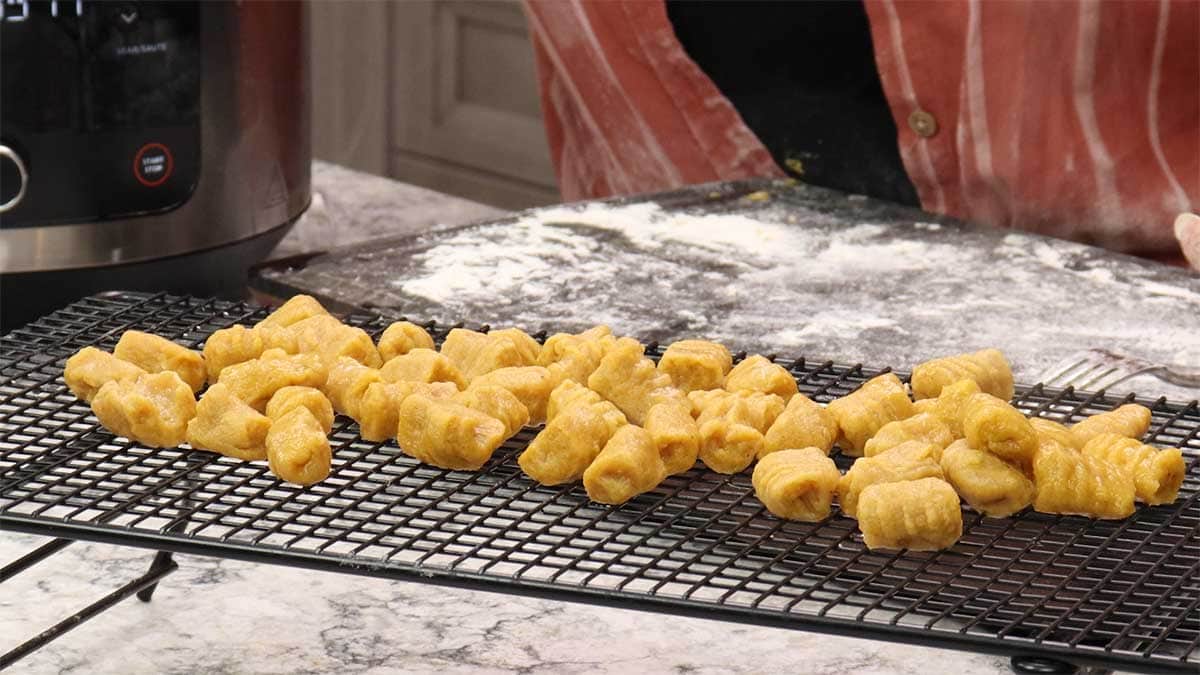
The gnocchi are fully cooked now, and you can eat them or toss them in a simple tomato sauce or melted butter, but I like to brown my gnocchi in a frying pan. I love the texture of the crisp exterior with the soft inside.
Frying Gnocchi
You want to fry the gnocchi just before serving for the best results. You can either make 1-2 servings in a small frying pan or make all of them in a large frying pan.
Place the frying pan on the stove, or you can use the inner pot of the Ninja Foodi on high sear/sauté if you prefer.
Melt about 1 Tablespoon of salted butter per dozen gnocchi and, once the butter starts to melt, add in the (already boiled) gnocchi. The heat should be on medium-high until the butter starts to brown and then you can turn it down to medium so it doesn't burn.
When the gnocchi are browned on one side, flip them over to brown on the other side. Once flipped, add in the whole sage leaves and make sure they are in the butter. This will give a hint of sage flavor to the butter, but more importantly it will fry the sage quickly.
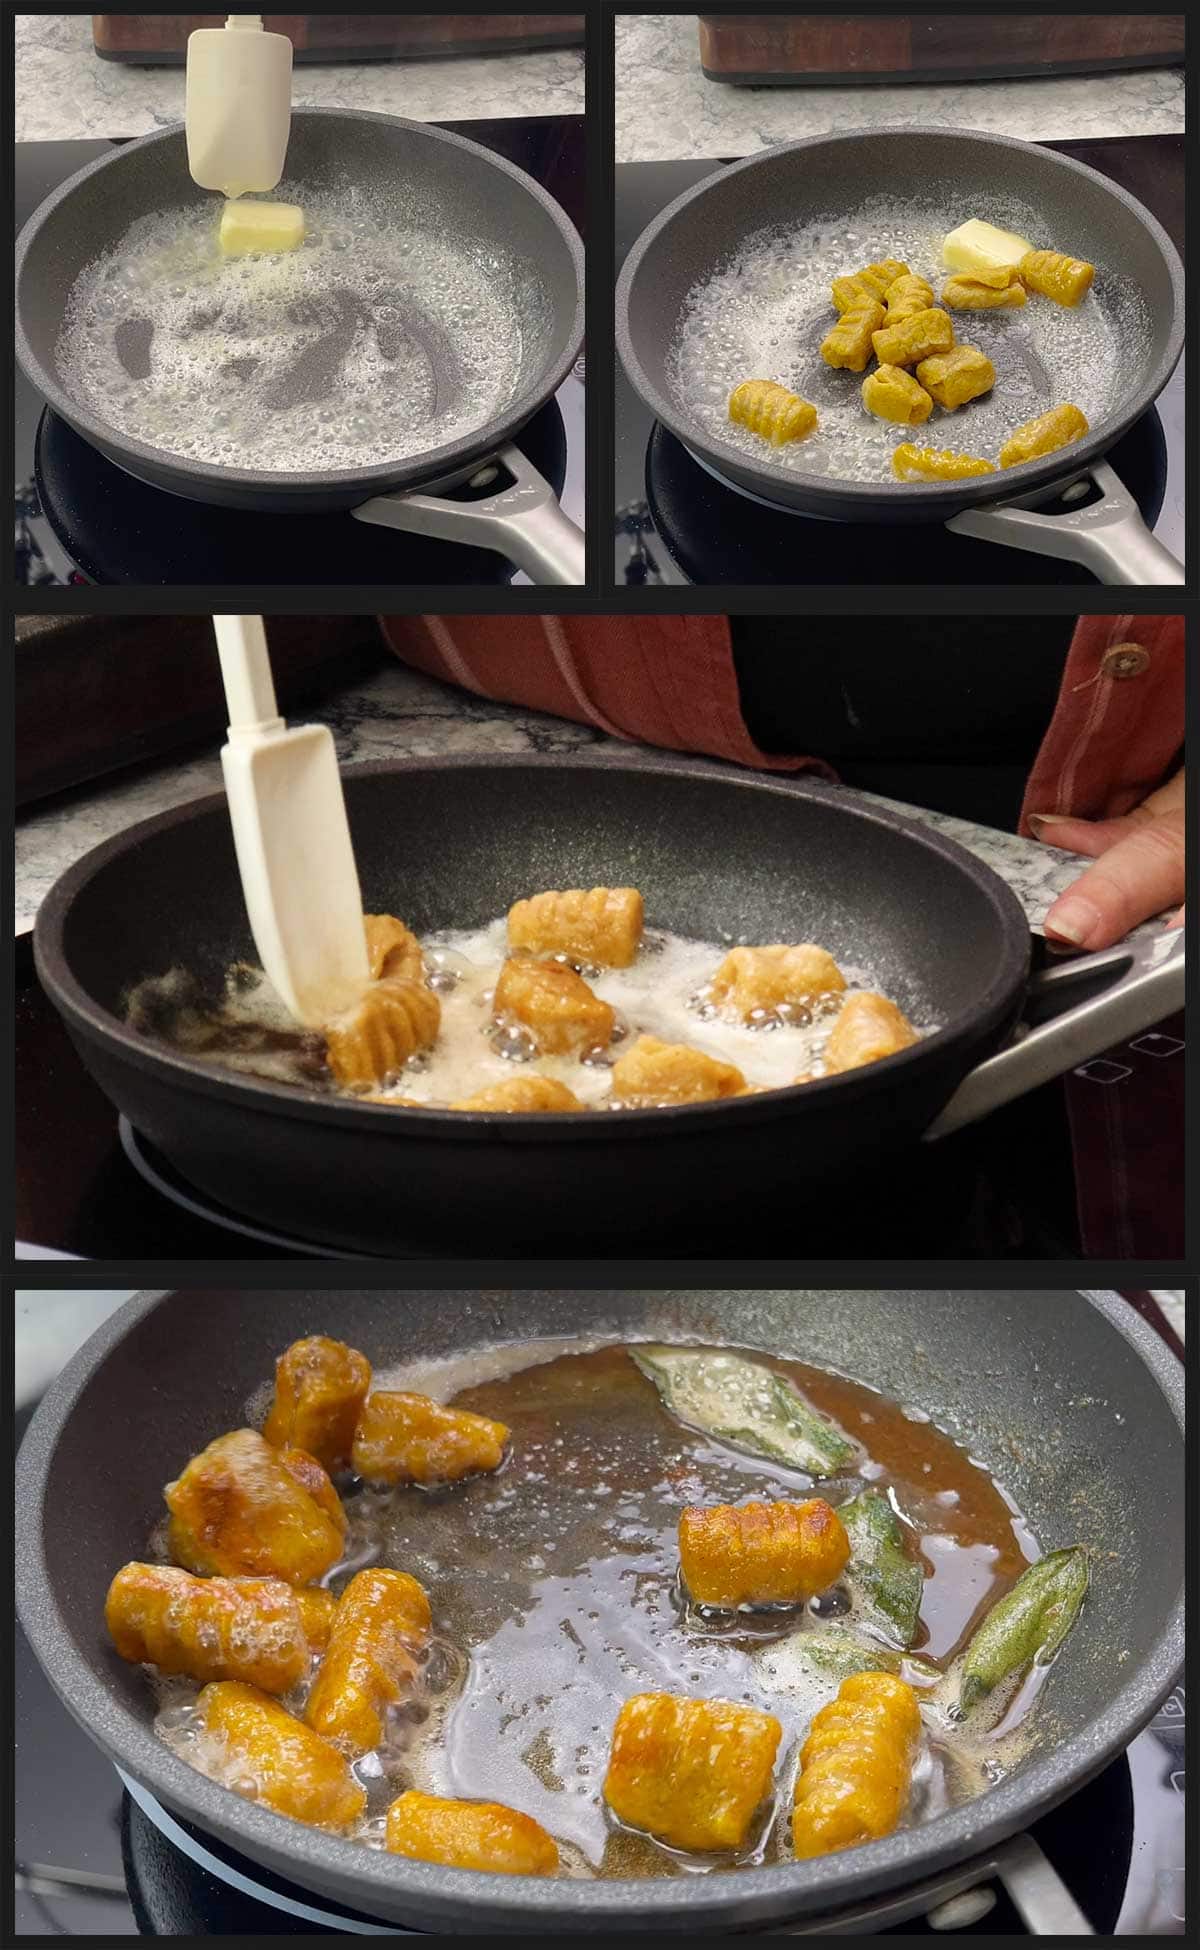
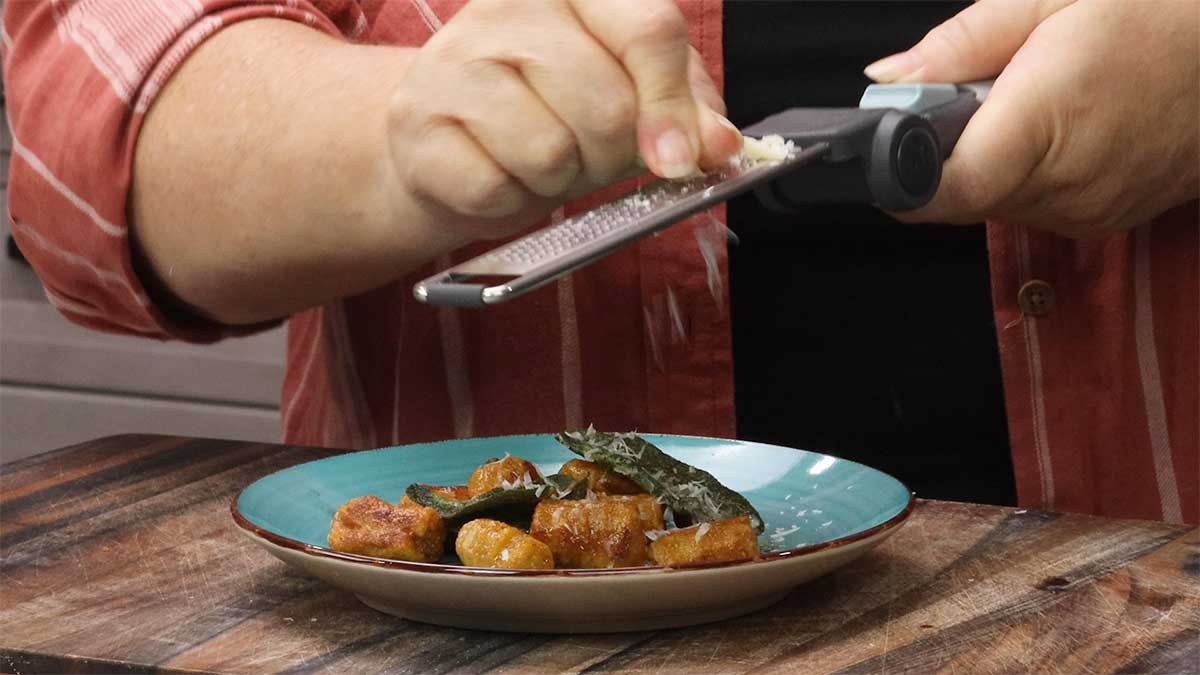
Once the gnocchi are browned, the butter has taken on a light brown color, and the sage is crispy, move the contents of the pan to a serving dish or a plate. Make sure to pour over the sage butter sauce. Top with finely grated parmesan cheese.
Enjoy!
What to Serve with Homemade Gnocchi
Gnocchi can be served as a first course, side dish or part of the main dish; although, I must admit that when testing this recipe, I often ate just the gnocchi in brown butter sauce with the fried sage as an entire meal!
What you serve with your homemade gnocchi depends a lot on what type of gnocchi you make.
What you serve with your homemade gnocchi depends a lot on what type of gnocchi you make.
Here are some suggestions for what to serve with butternut squash or sweet potato gnocchi
- Simple Salad
- Grilled or air fried Mild Italian Sausage or Spicy Italian Sausage
- Roasted Vegetables
- Roasted chicken thighs with a buttery herb sauce
- Vegetable Sides like Brussels Sprouts, green beans or fresh broccoli
- Shake 'N Bake style pork chops
Here are some suggestions for sauces to serve with potato & ricotta gnocchi
- light marinara sauce
- homemade pesto sauce
- garlic butter sauce
- creamy mushroom sauce
- sun-dried tomatoes with pine nuts and a touch of olive oil with grated parmesan cheese and fresh basil on top
- Tossing potato gnocchi in your favorite cheese sauce is a kid friendly way to serve them.
Frequently Asked Questions
Storage depends on what stage the gnocchi are in. You can make up the dough, make the gnocchi and freeze on parchment-lined baking trays. Once frozen, place the uncooked gnocchi into freezer bags or air tight containers and freeze for 3-6 months. You can boil them from frozen.
If you have boiled the gnocchi, let them dry on a cooling rack for several hours. Then freeze them in a single layer on a parchment-lined tray. After they are frozen, put them into freezer bags or an airtight container and freeze for 3-6 months. You can put them into a sauce frozen, or thaw and pan fry before serving.
If you have leftover gnocchi in a sauce, freeze with the sauce in a freezer bag or air tight container for 3-6 months.
Yes, you can make as little or as much of the gnocchi dough as you like by adjusting all the ingredients accordingly.
Butternut Squash Gnocchi Recipe
Ingredients
Butternut Squash Gnocchi
- ⅔ cup pureed butternut squash
- 1 teaspoon fine grind sea salt or kosher salt
- ½ teaspoon ground cinnamon
- ¼ teaspoon ground nutmeg
- 1 large egg yolk
- 1 Tablespoon Greek Yogurt
- ½ cup all purpose flour or 00 flour plus extra for work surface
Fried Gnocchi in Brown Butter Sauce with Crispy Sage Leaves
- 48 boiled gnocchi
- ½ cup butter salted
- 16 leaves fresh sage
- 1 ounce parmesan cheese finely grated
Instructions
Mise En Place
- Fill a large pot with 10 cups of water, and turn the heat on high to boil the water. Season with 2 Tablespoons of sea salt or kosher salt.
- Gather the remaining ingredients and measure them out.
Gnocchi Dough
- Add the butternut squash, seasonings, egg yolk, yogurt, and flour to a medium size bowl and mix together until it forms a loose dough ball.
- Lightly flour a clean work surface with flour and turn the dough out onto the cutting board. Sprinkle the dough with flour and press it down and fold it over onto itself until the flour is incorporated and the dough is soft, but not sticking to your fingers. Add small amounts of flour at a time, you want a soft dough that doesn't stick to your fingers.
- Divide the dough into 4 equal pieces and place three of the sections aside on a floured surface. Take the one piece and form a log. Sprinkle with flour on the outside only and roll into a long rope about 12" in length and about the diameter of a nickel.
- Cut the rope into 1" gnocchi pieces. You should have about 12 gnocchi per rope. Repeat with the other sections of the dough.
Forming the Gnocchi
- You can use a gnocchi board or the back of a fork to form the gnocchi shape. I don't have a gnocchi board, so I use a fork.
- Take a piece of the cut gnocchi and place it in on the back of a lightly floured fork with the cut sides facing out. Having the cut sides out will prevent the stickier dough from sticking to the fork. Press the dough piece into the tines of the fork and then roll the dough down the fork. Pinch the ends closed and place the gnocchi onto the floured cutting board.
Boiling the Gnocchi
- When the salted water has come to a full boil, add in about a dozen gnocchi and give them a gentle stir. Boil for 1-2 minutes and when the gnocchi is done, they will float to the top. Remove the cooked gnocchi with a slotted spoon and place on a cooling rack or a plate lined with a paper towel.
- Make sure the water comes back up to a boil between batches. Repeat for the remaining gnocchi.
Fried Gnocchi in Butter with Crispy Sage Leaves
- Melt ½ cup butter in a large frying pan over medium-high heat. When the butter is almost melted and it's bubbling, add in the boiled gnocchi. Reduce the heat to medium so the butter doesn't burn.
- Cook the gnocchi about 1-2 minutes or until it is browned on one side. Flip the gnocchi over and add in the sage leaves. Make sure each sage leaf is in a single layer in the butter. Cook another 1-2 minutes. The sage should be crispy and the butter should be browned. At any time during the cooking process you can turn the heat down if the butter shows any signs of burning or smoking.
- Place the gnocchi and the brown butter sauce with the crispy sage into a serving bowl or onto individual plates. Garnish with finely shredded parmesan cheese. Enjoy!
Notes
Recipe Yield
This recipe makes about 48 1" gnocchi. 6 Gnocchi is about average for a side dish when you will have other components to the meal. If you are serving the Gnocchi as a main course, increase to about 12 gnocchi per serving.Nutrition
ABOUT THE RECIPE AUTHOR, LOUISE LONG
Louise is a full-time recipe creator and food blogger @ The Salted Pepper. She has over 30 years of experience with cooking and recipe development. She owned a restaurant for several years and was a full-time RN until retiring to blog full-time.

She published her first cookbook in the Fall of 2018 and is very interested in writing several more.
Louise is also the creator of an online Ninja Foodi Pressure Cooking Course with over 100 instructional step-by-step videos. People absolutely rave about the course and all the value they have received from it.
Louise has several very active Facebook groups that help people with the basics of cooking and getting the most out of the Ninja Foodi.
Louise is also a YouTube creator and you can find most of her recipes in video format on The Salted Pepper YouTube channel.
She is very responsive to messages and eager to help in any way she can. Get more Information about Louise & contact information
I WOULD LOVE TO SEE WHAT YOU ARE COOKING UP IN YOUR KITCHEN! TAG ME @THESALTEDPEPPER ON YOUR FAVORITE SOCIAL MEDIA PLATFORM WHEN YOU MAKE A DISH!
BE SURE TO FOLLOW THE SALTED PEPPER RIGHT HERE ⇓⇓⇓⇓⇓


Amber
Yay! I am so glad it's butternut squash season again! This recipe is so darn good! It is fall wrapped up into pasta! The brown butter sage sauce it out of this world, too! Thank you for another amazing recipe. I LOVE this recipe!