
 Yep, that's right! You CAN make yogurt in the Ninja Foodi and it's wonderful! I have made several batches and tested my method over and over... it has worked every time.
Homemade Yogurt in the Ninja Foodi is very easy to make and I'm going to show you exactly how.
This post may contain affiliate links. If you make a purchase after clicking a link, I may earn a small commission. Thank you for your support!
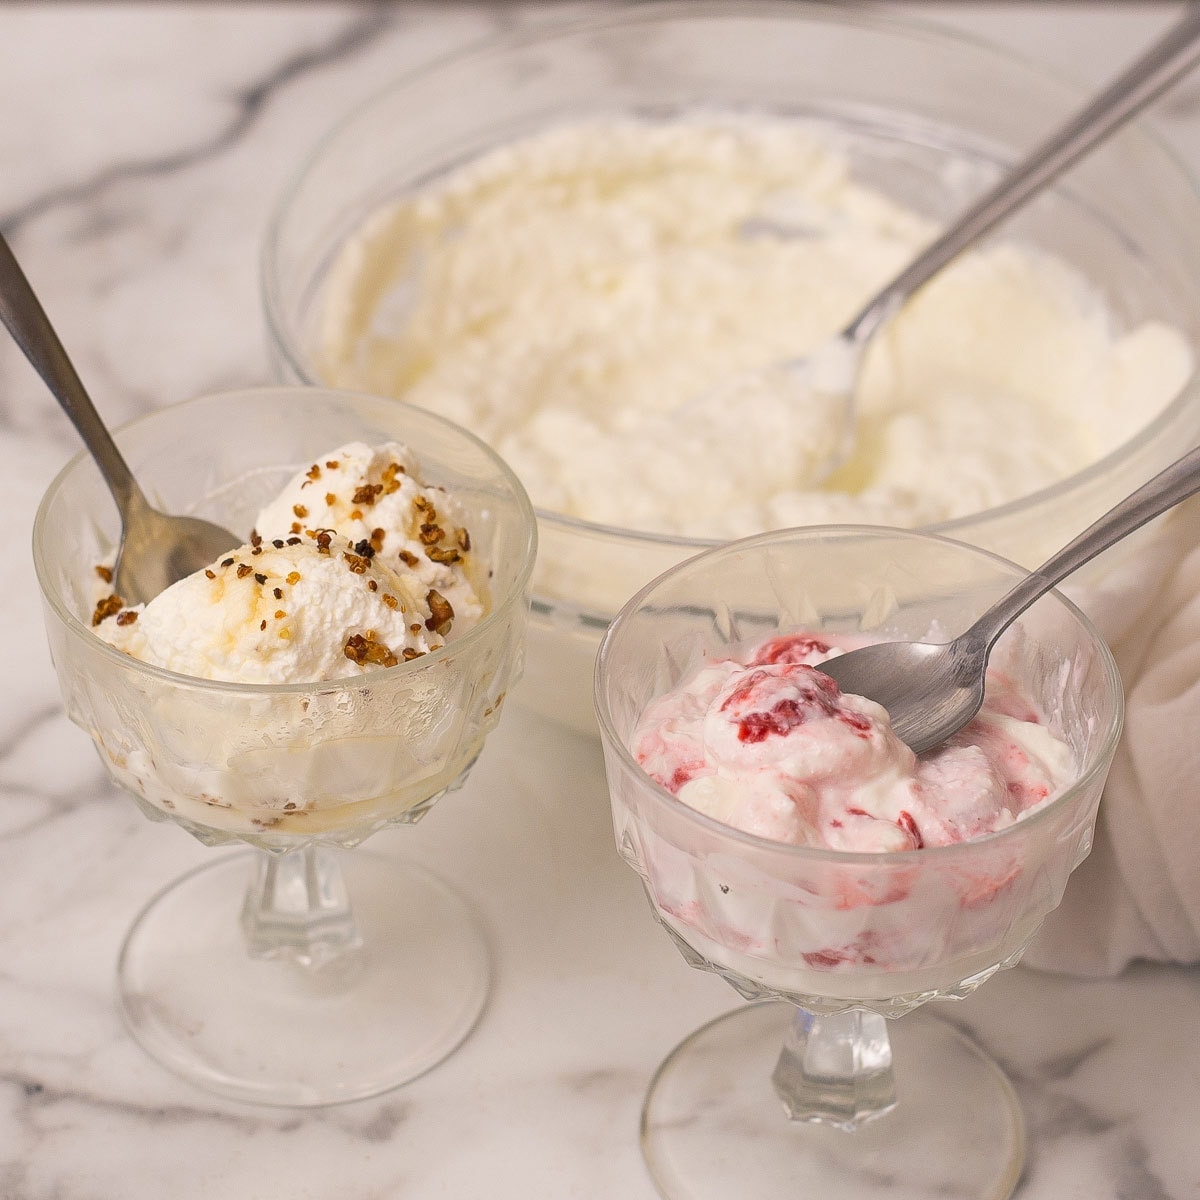
I love making yogurt. At first I thought (after reading a few recipes like this one), this is ridiculous... why would I spend all this time making yogurt, when I can buy it? Then I made some, and realized how delicious yogurt is without all the added sweeteners and artificial ingredients found in most store-bought yogurts. I don't flavor or sweeten my yogurt when I make it. Sometimes, I'll add a bit of honey, berries, or homemade quinoa granola when I serve it; and other times, I just enjoy the wonderful flavor, just as it is.
I've been making homemade yogurt for a few years now and I'm happy to say that I've only had it fail once. My first try with the RockCrok. Back then I was using a RockCrok from Pampered Chef, which is a wonderful slow cooker (and more) type of appliance. The pot that sits in the slow cooker base can go on the stove top, in the oven, in the freezer, and even on the grill. It's pretty amazing and makes searing meats before slow cooking them super easy. It's also great for starting soups/chili/stews on the stove and keeping them warm in the slow cooker base without dirtying another pot; and I was able to make yogurt in it, but it just wasn't controlled enough for me.
Then I starting making homemade yogurt in my Instant Pot. It has a yogurt function, but to be honest it was a little confusing to use and I always thought I had ruined my yogurt. I hadn't, but I felt like I always missed a step.
When I first got my Ninja Foodi, I didn't even try to make yogurt. I was so busy having fun with all the other features, that I used my Instant Pot for yogurt. As I learned more and more about the versatility of the Ninja Foodi, I figured there HAS to be a way to make yogurt. And there is.
The principles of making Homemade Yogurt in the Ninja Foodi
The principles of yogurt making are straightforward and pretty simple: time and temperature. In this recipe we are referring to cow's milk when we talk about milk.
Time
It takes time for the active yogurt cultures to ferment the lactose in milk and produce lactic acid. It is the lactic acid that causes the milk to form the soft gel texture of yogurt. So, yogurt is a not a quick thing to make, but it is mostly hands off; especially when making homemade yogurt in the Ninja Foodi.
Temperature
There are different methods of making yogurt; the cold start method and the traditional boil method. I will briefly explain the cold start method, but the way we will be making homemade yogurt in the Ninja Foodi is with the traditional boil method.
Cold Start Method: When using ultra-pasteurized milk, you can use the cold start method. What this means is that you simply mix the ultra-pasteurized milk with the yogurt starter or plain yogurt that contains active cultures together and push the yogurt button on the machine you are using. Then, the mixture is brought up to a temperature that will allow the active cultures to ferment.
*Avoid milk that has been ultra high-temperature pasteurized. The high temps break down the proteins needed to set yogurt.
Traditional Boiling Method: You can use skim, low-fat, or whole milk to make homemade yogurt in the Ninja Foodi; but the lower the fat content, the thinner your yogurt will be. I always use whole milk to make yogurt and I suggest you start with that at first. With the boiling method of making yogurt, you heat the milk to a temperature between 181° F and 200° F. Despite being called the "boiling" method, your milk won't come to a rolling boil. The boiling temperature for milk is around 212° F, and we are only going to bring the temp up to around 181° F. This is sufficient to kill any bacteria in the milk while not heating it so high that it scorches.
Time & Temperature
The cooling phase: When using the boiling method (as this recipe for homemade yogurt in the Ninja Foodi will show you), the milk has to be cooled after it is brought up to the 181° F - 200° F. We will cool it down until it reaches about 110° F before adding in the yogurt culture. This is very important because, if your milk is too hot, it can kill the active cultures and will not turn into yogurt. I'll explain what you can use for your yogurt culture in the next section.
Incubation: No matter which method you use, it's the incubation time and temperature that make the biggest difference in the outcome of your yogurt.
In order for the active yogurt cultures to ferment the lactose and thicken the milk into yogurt, it should be kept between 110° F and 115° F. Now, if it drops below 110° F, don't panic. In fact, I urge you to set it and forget it once you are finished the boiling and cooling phase. You know that saying "a watched pot never boils?" Well... an over-checked yogurt pot doesn't thicken as quickly. Going above 115° F can be a bit more problematic, because the active cultures can be destroyed by the higher heat. This is why we don't add the culture in before we heat the milk.
What You will Need to Make Homemade Yogurt in the Ninja Foodi
Whole Milk: While you can use lower fat milk, but I suggest you start off with whole milk before experimenting with other types. Whole milk will give you the best consistency with the least amount of effort.
Ninja Foodi with the Dehydration Function: This recipe uses the dehydration function on the Ninja Foodi to incubate the yogurt. I am working on a few other ways for those of you who don't have the dehydration function, but right now the only method that I've tested is using the dehydration mode.
Yogurt Starter: This may seem silly that you need yogurt to make yogurt, but think about it like sourdough bread. You have to have a starter. This starter can be any kind of PLAIN yogurt (Greek or regular) that has active cultures. You only need about ¼ cup to get started and then you can save your own yogurt to act as the starter for future batches.
You can also buy yogurt starters that are freeze-dried, but I have never done this.
Thermometer: I highly recommend using a thermometer when making yogurt to make sure you heat the milk to at least 181° F and cool it to around 110° F.
Time: You can't rush yogurt making. Thankfully, it's one of those great foods that pretty much makes itself... in time. I recommend that you start making yogurt in the evening, about 90 minutes before you plan on going to sleep, or early in the morning. Once the incubation time is up (6-12 hours), you'll want to get it in the fridge.
Okay, let's get to making homemade yogurt in the Ninja Foodi!
How to Make Homemade Yogurt in the Ninja Foodi
First, make sure your inner pot for the Ninja Foodi is sterilized. I run mine through the dishwasher. Take out the yogurt you are going to use as the starter from the fridge. You want it to come to room temp before adding it into the milk. You will add the yogurt starter AFTER you heat and cool the milk.
Place the inner pot into the Ninja Foodi and pour in milk. Set the saute mode to High (you can use a lower setting, it will just take longer) and heat the milk until it reaches at least 181° F, but not more than 200° F. Stir frequently to prevent milk from scorching on the bottom. When the milk is heated to 181° F, turn the Ninja Foodi off. Let the inner pot sit in the Foodi for 5-10 minutes. This isn't necessary, but I've found that it helps with the thickening of the yogurt.
Remove the inner pot and place it on a heat resistant surface. Allow to cool until it cools down to about 110° F. If you let it cool a bit longer and it's 100° F, do not worry. It's fine. Just make sure the temp is below 115° F. before adding the yogurt starter.
Add the yogurt starter (plain yogurt with active cultures) and stir into the milk. You can use a whisk (and I sometimes do), but gently whisk it in.
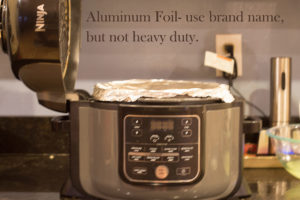
Cover the inner pot with aluminium foil (brand name, but not heavy duty). Place the inner pot into the Ninja Foodi and close the Air Crisping lid. Select the dehydration mode and set the temp to 180° F. No, that's not a typo. Now, you can set the temp lower if you want; however, it's just going to take a lot longer for your milk to thicken into yogurt.
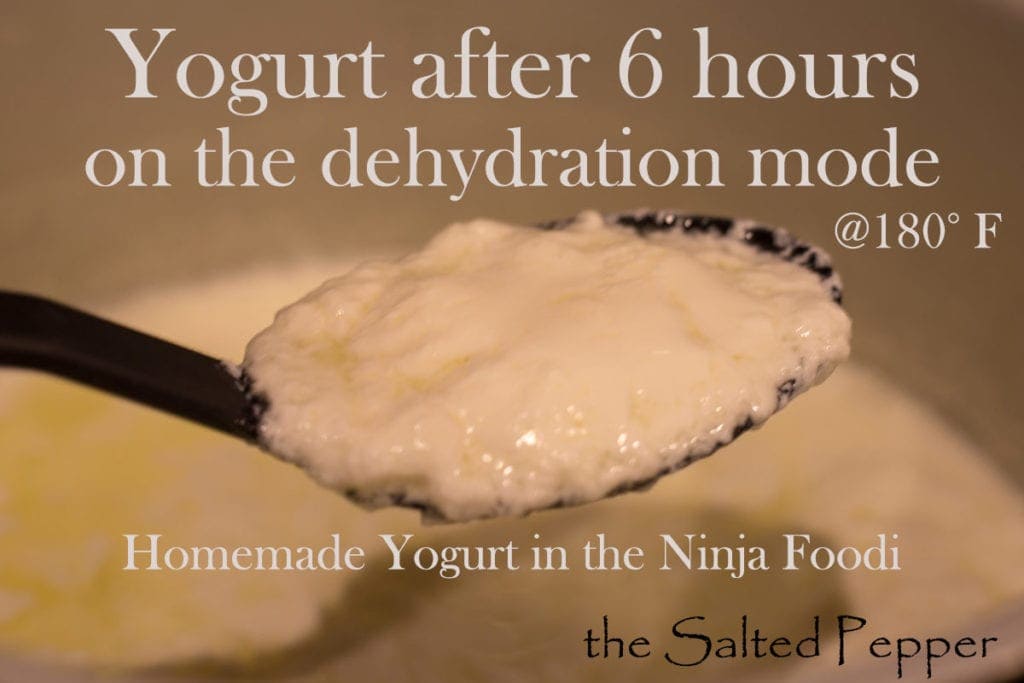
I've tried the lowest dehydration setting up to 180° F and tested the temp of the milk at each. At 180°º F, the milk maintains a temp of between 108° F and 110° F. This is perfect for making yogurt. In fact, I made yogurt in 6 hours. It was a little on the thin side, but since I strain mine for Greek Yogurt it wasn't an issue. I recommend at least 8 hours for a yogurt with a nice consistency without straining.
Allow the yogurt to incubate in the Ninja Foodi with the dehydration setting on 180° F for at least 6 hours. 8 hours is better. 12 hours may not be better depending on how sour you want your yogurt.
Place the inner pot in the fridge for a few hours or overnight to allow the yogurt cool and set.
Strain until you have your desired consistency. This is optional, of course, if the yogurt is how you like it, then you are done. If it isn't thick enough or you want to make Greek yogurt, strain it until the yogurt releases its whey.
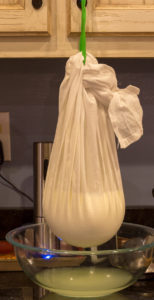
Don't try to squeeze it through the flour sack or cheese cloth, you will cause the actual yogurt to seep out. It is best left alone. The whey will drip out.
I personally like a very thick yogurt, so I strain my yogurt quite a while. There are many ways to strain yogurt, the easiest and most reliable is by placing the yogurt into a clean flour sack and hanging it with straps over a bowl. This allows the whey to drip out, but retains the yogurt. If you don't have flour sacks at home, get them! My mother-in-law introduced me to them many moons ago and I can't live without them. They are the best kitchen rag/towel/strainer I've ever had.
You can also strain your yogurt in the fridge, which I do if I'm not going to be home or if the yogurt is done just before bedtime.
Don't discard the whey! Use it to replace water when making bread. Use it to add protein to smoothies. Add it to your dog's food (check with your vet, please). You can even add it to your bath water. Okay, I haven't done that! Sounds kind of gross... but, that's what I read in this article by Spruce Eats; Many Uses for Whey.
Tips for Making the Homemade Yogurt in the Ninja Foodi
The longer you let the yogurt incubate, the more sour it becomes. I've never had an issue with the taste being too sour, but I love sour cream. I have found that sweet spot for homemade yogurt in the Ninja Foodi is an incubation time of 8-9 hours. Any longer than that, you will have a stronger (sour) tasting yogurt. I happen to like yogurt on the sour end; as I said earlier, I like a thick Greek style yogurt. Not only is it delicious to eat as yogurt, I often use it in salad dressings instead of mayo or sour cream.
I have nothing against either of those two, but I really love when I know exactly what ingredients I'm using in my recipes. Like when I used homemade Greek yogurt to make these delicious and Easy Homemade Biscuits made in the Ninja Foodi!
Be patient. It's hard. You will check on your yogurt (the first time you make it) way too much. You will think you failed. It's not getting thick and you'll be tempted to stop the whole process. Don't. Time and temperature is key. The temperature is taken care of by the Ninja Foodi, your only job is to give it time. It's perfectly fine to check the temp a few times. I suggest that you stick the thermometer through the foil so you don't let the heat out, but go ahead and check the temperature. I did. Every 30 minutes to be exact. Why? So you don't have to. I know the milk doesn't get too hot, I already did the ground work. Now, you just sit and relax or go to bed and let nature and a kitchen appliance make the best homemade yogurt in the Ninja Foodi that you've ever had.
I thought I failed, almost every time I've made yogurt. I really thought I failed the first time I made homemade yogurt in the Ninja Foodi! It looked like milk. Every single time I checked it, milk. I almost threw it away. Seriously. I hate wasting time and I had so many new recipes to develop in the Ninja Foodi for you, I wanted to give up. I'm so glad I didn't. Magic starts to happen around hour five or six. Then it continues to happen. In 8 hours you will have glorious yogurt that YOU made! It's quite amazing. I know I'll never buy store-bought yogurt again.
Tips on Making Homemade Yogurt in the Ninja Foodi on a Regular Basis
I hope once you make your first batch of homemade yogurt in the Ninja Foodi that you are hooked like me. The best way to make your second batch is using the first batch as your yogurt starter.
No need to keep buying plain yogurt at the grocery store, just save ¼ cup of yogurt from your most recent batch to make the next.
There is only one issue with that, right? You might eat it all, go away on a trip, or not make yogurt for a month or two. Yep! That happened to me a few times. I was right back to, why do I buy yogurt to make yogurt? It seemed silly, even though homemade yogurt tastes so much better.
I hate wasting or spending money on something that is so easy to make at home. So, when I looked at how much a new yogurt starter would cost, I said, "nope." I'll make an entire batch of homemade yogurt in the Ninja Foodi and separate it out into ¼ cup portions and freeze it. I didn't know if it would work or not, but I did it. It works great! Freezing the yogurt does not kill the active cultures, but you do want to bring it to room temp before adding into the milk. Once frozen, I put them into a freezer baggie and take one out when I want to make yogurt. I have not had one batch fail. I use this ice cube tray to freeze my yogurt, but you can use any ¼ cup container you'd like.
Sweetened or Unsweetened
I enjoy my homemade yogurt in the Ninja Foodi just like it is. I love the slightly tart taste and the thick texture I get from straining. On occasion, I will add honey when serving and add some fresh fruit or granola.
You can certainly add honey or sugar or whatever sweetener you'd like to the yogurt. You want to do this after it finishes incubating.
You can also add in flavors, vanilla, for example. Gently stir in a teaspoon at a time of vanilla and gently stir until it's the flavor you like.
Don't Be A Stranger
Since you didn't bail after the first twenty paragraphs, you're definitely making this Homemade Yogurt in the Ninja Foodi! Yay! I'm always around to answer questions (unless I'm sleeping), so don't be shy. Join our Facebook groups, they are super informative and the group members are AWESOME! No drama in my groups! Nope. Come say Hi.
Ninja Foodi 101: A Facebook Group for those seeking basic knowledge and recipes for the Ninja Foodi.
Ninja Foodi Fresh & Healthy Meals: A Facebook Group for people who want to cook healthier meals in the Ninja Foodi
Want more instruction?
Head on over to my YouTube Channel @thesaltedpepper. I have a bunch of great videos cooking with the Ninja Foodi, including this one that uses the yogurt you made: easy homemade biscuits in the Ninja Foodi!

Homemade Yogurt in the Ninja Foodi
Ingredients
- 8 cups whole Milk
- ¼ cup yogurt Plain with active cultures
Would you like to save this recipe?
Instructions
- Place the inner pot into the Ninja Foodi and pour in milk. Set the saute mode to High (you can use a lower setting, it will just take longer) and heat the milk until it reaches at least 181° F, but not more than 200° F. Stir frequently to prevent milk from scorching on the bottom.
- Remove the inner pot and place on a heat resistant surface. Allow to cool until it cools down to about 110° F. See post for details
- Add the yogurt starter (plain yogurt with active cultures) and stir into the milk. You can use a whisk (and I do sometimes), but gently whisk it in.
- Cover the inner pot with aluminium foil (brand name, but not heavy duty). Place the inner pot into the Ninja Foodi and close the Air Crisping lid. Select the dehydration mode and set the temp to 180º F.
- Allow the yogurt to incubate in the Ninja Foodi with the dehydration setting on 180º F. for at least 6 hours. The longer you allow it to incubate, the tarter it will become. I found about 8 hours was perfect for me.
- Place the inner pot in the fridge for a few hours or overnight to allow the yogurt cool and set
- Strain until you have your desired consistency.
- Add sweeteners of your liking and what ever mix-ins and Enjoy!
Nutrition
Are you ready for a few more Ninja Foodi Recipes? Here are some of my favorites!


Nicol says
Hi. I have made yogurt 3 times now following this method and was super pleased with the first two attempts. I incubated mine for 7 1/2 hours and after being in the fridge overnight, I strained it because I like it thicker. My recent attempt had a sort of chalky dry-ish feel in your mouth. I’m wondering why. Any suggestions?
Louise says
I have found that sometimes, even when following the same method, that this can happen and I haven't figured out why. I've had mine turn out a little grainy for no reason that I can come up with so I can't really give any suggestions on preventing it.
Carolina says
Hi! I've made this yogurt several times and absolutely love it!!! I recently strained it to get a more dense consistency and I was wondering if I could use 1/4 cup of the whey instead of the 1/4 cup of yogurt as a starter.
Louise says
I have heard that people have done that successfully, but I have not tried it. Please let me know if you try the whey!
Valerie Chase says
Hi there,
My yogurt was no thicker than my milk that I put in. I just put it back in to try again.
HELP!
Louise says
It sounds like the culture was killed by a high heat. This recipe was designed for the two lid Ninja Foodi that doesn't have a yogurt feature, is that what you used?
Kay says
I’ve never made yogurt and this was perfect. Easy to follow. I just love it.
Louise says
I'm so glad to hear that!
COREEN says
Mine turned out great! How long will it last in the fridge now?
Louise says
It usually lasts 5-7 days in my experience.
Sue says
I followed the instructions (on dehydrate function for just over eight hours) and the milk came out barely any thicker than milk. I refrigerated it overnight and still milk. Very disappointed.
Louise says
Which appliance did you use? Did you use heavy duty foil to cover the milk and what dehydrator temp did you use? This recipe does work and has been made by a lot of people successfully, but it was developed for the original Ninja Foodi Pressure Cooker & Air Crisper that did not have a yogurt function. There are so many places during the process where mistakes can be made that don't allow your yogurt to ferment correctly that it is very hard for me to pinpoint what exactly went wrong. I'm happy to help you problem solve via email if you want to send me an email because it will take a bit of back and forth to try to nail down where the issue occurred. My email address is Louise@thesaltedpepper.com