
 Cheesy Meatloaf is one of those recipes where you will ask, "where have you been all my life?" The combination of Pressure Cooking and Air Crisping makes the BEST meatloaf!
Who doesn't like a good meatloaf? Okay, I'm sure there are tons of people who don't like meatloaf, but I'd bet they aren't reading this post! So, for everyone else who does likes a good meatloaf... this one is the BEST meatloaves I've ever had! I kid you not.
This post may contain affiliate links. If you make a purchase after clicking a link, I may earn a small commission.
Meatloaf isn't very complicated to make, but it can be frustrating! I can't tell you the amount of times I've made meatloaf and it was... well, boring. This spices weren't quite right, it was too dry, the texture was too dense. Sound familiar?
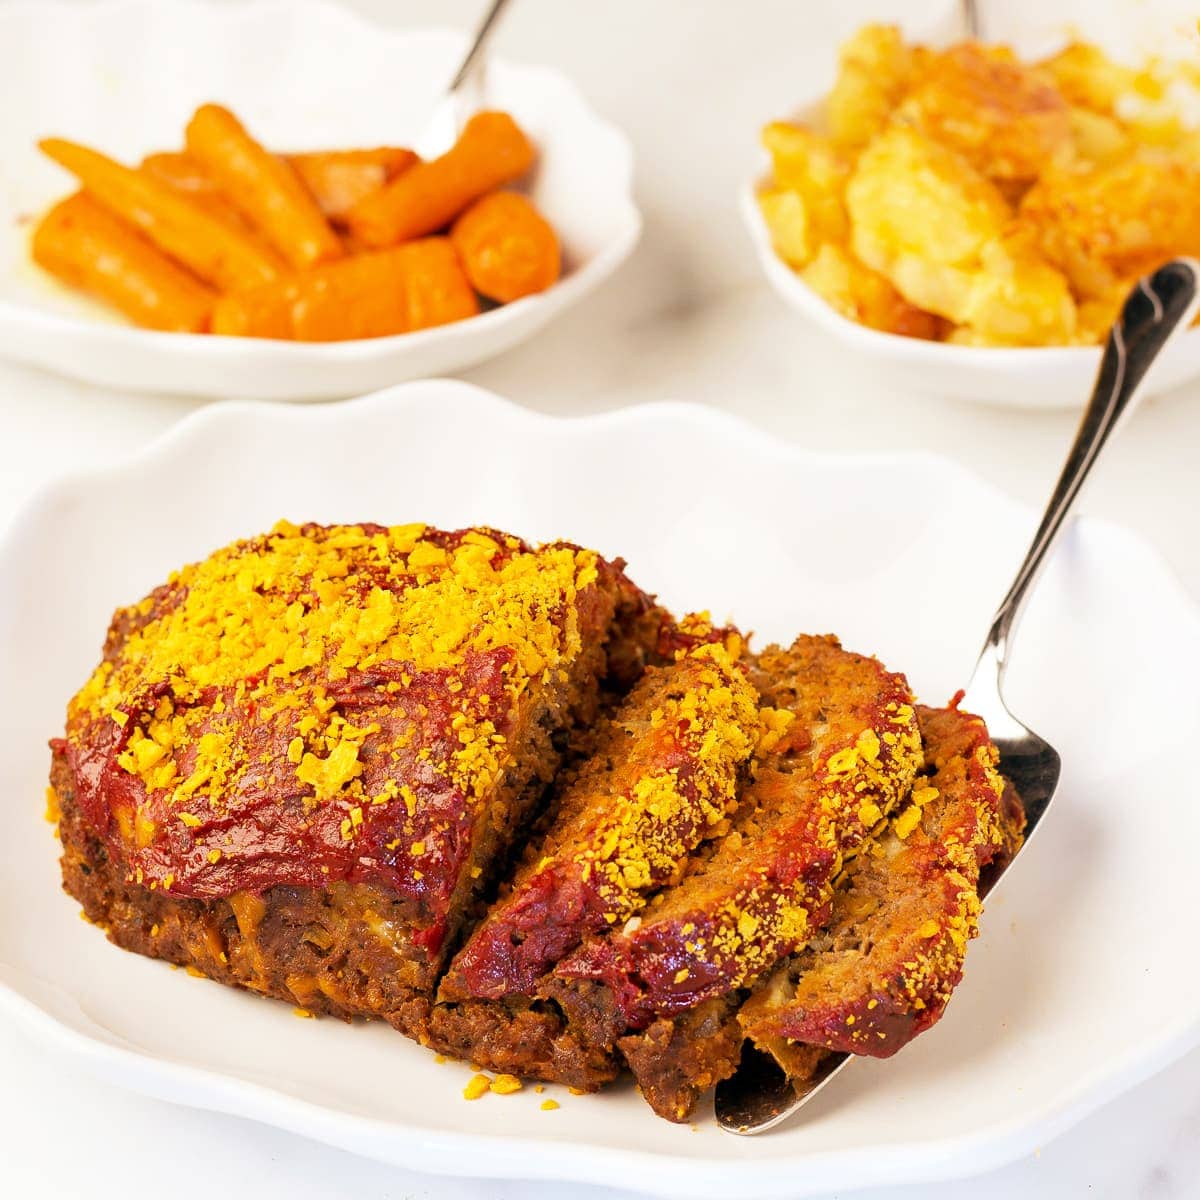
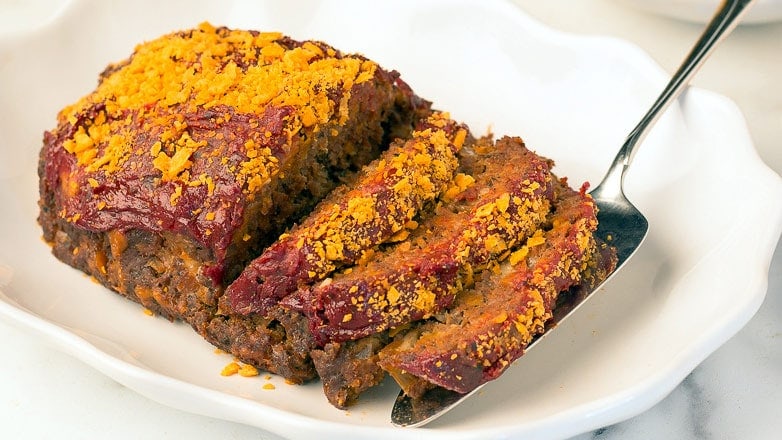
That is all about to change! This cheesy meatloaf is the perfect blend of spices, moist all the way through with a crisp outside, and melt in your mouth delicious!
Do I need a special pan to cook this Cheesy Meatloaf? 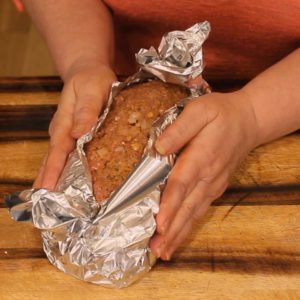
No, not for this recipe. The only thing you will need besides your Ninja Foodi is the rack the Foodi came with.
In this Cheesy Meatloaf recipe, we make a foil "pan" for the meatloaf and it works great!
You can use another type of pan if you like. Just make sure it is pressure safe, oven safe, and it fits in the Foodi.
If you want to use a Bundt pan, you may want to decrease the pressure cooking time to 20-25 minutes. With a Bundt pan, the meatloaf will cook faster because of the density (no middle to cook).
If using a silicone loaf pan, keep in mind that silicone doesn't conduct heat like aluminum or glass, so you will need to increase your cook time.
Can I just form the meatloaf and pressure cook it in the steam/fry basket?
Absolutely! In fact, that is what I did the first time I tested the recipe. The only reason why I chose to use a homemade foil pan instead of the basket, is because the meatloaf didn't stay together as much as I wanted it too.
When cooking under pressure, you are introducing a lot of moisture into the foods you are cooking. This is great because it keeps everything super moist, but with the meatloaf it caused it to separate in places. Not a huge deal, but not the end result I wanted for this recipe.
If you want to learn more about pressure cooking, be sure to check out this article on Pressure Cooking 101. I learned a ton of stuff when doing research for the article.
Can I use Ground Turkey or a Ground Meat Blend?
Of course!
When using a ground meat blend, I would follow the same ingredients & instructions in this recipe.
If you want to use ground turkey instead, I recommend adding an extra egg for added moisture.
Another thing I do a lot when using ground turkey for meatloaf is using extra vegetables that will release water when cooked and keep that turkey moist. Some examples are; very small broccoli florets, red or green bell peppers, grated carrots, finely diced zucchini or squash, and mushrooms.
Just be sure not to add too many vegetables or your turkey meatloaf won't hold together. I wouldn't use any more than 1 cup (including the onions) for 2 pounds of turkey meat.
Can I make this into a ONE POT Full Meal?
Absolutely! I do this on the YouTube video for Cheesy Meatloaf; here is the link:
What you want to think about when adding in other foods to make a complete meal, is the cooking time for the Cheesy Meatloaf. 30 minutes of pressure cooking is a long time and too long for a lot of vegetables.
For example: You would not want to cook spinach under pressure for 30 minutes, so I would not choose that vegetable to pressure cook with the cheesy meatloaf. You could sauté the spinach in the inner pot of the Ninja Foodi while the meatloaf is resting.
There are a few vegetables that can handle a 30 minute cook time. Carrots work perfect in this recipe, especially when wrapped in foil to protect them from the high temperatures of pressure cooking. Another vegetable that would work well is beets.
You can always use quicker cooking veggies and interrupt the pressure cooking midway through to add those in.
I also used potatoes and kept them whole, wrapped in foil, so they did not fall apart during the 30-minute pressure cooking time. Rutabaga, parsnips, sweet potatoes all are good choices for long pressure cooking times.
When using whole potatoes, you can either mash them at the end while the meatloaf is resting or turn them into cheesy potatoes like I did in the video. Another quick idea would be parslied potatoes. Simply slice or dice the cooked potatoes and add butter, salt, and fresh parsley (dried is okay too). Super quick and delicious!
I'll go into detail on how I cooked the potatoes and the carrots below.
Here is how you make Cheesy Meatloaf in the Ninja Foodi with Carrots & Potatoes
Prep your ingredients. Gather the spices needed and the other ingredients. Cube the cheddar cheese into ¼-1/2 inch cubes. Peel the carrots (if using) and cut them in half. You will want to choose carrots that have about a 1" diameter, thin carrots might overcook. You don't want to peel your potatoes until just before you add them to the Ninja Foodi or they may start to brown.
Make the glaze by combining all the ingredients into a medium size bowl and mix well. You can always 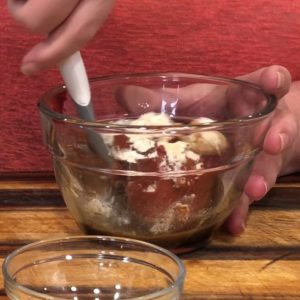 substitute balsamic vinegar for the apple cider vinegar and I'd bet it would be delicious too!
Crush up the 2 ½ cups of cheese crackers - you will end up with about 1 ¼ cup. 1 cup goes in the meatloaf and reserve ¼ cup for the top of the meatloaf I used those little square ones that are super popular, but I used the Walmart brand and I think they were better! The goldfish crackers would work as well, or you can use any crackers you like. I wonder how pretzels would work? I bet they'd be great! If you try it, please let me know!
In a large mixing bowl, combine the ground beef, finely diced onions, Worcestershire sauce, seasonings, an egg, 1 cup of the crushed crackers and ½ of the glaze. Mix well. If you want to test your seasonings, just grab a quarter-size amount of meat and pat it into a flat little patty. Use the sear/sauté function of the Ninja Foodi to cook up the little patty and give it a taste. Adjust spices as desired. If you do this, deglaze the pan with ½ cup of whatever thin liquid you are using, while the pan is still hot. This will remove any brown bits that are stuck to the bottom and avoid a water notice when you go under pressure.
Get a large piece of foil (or your pan, if not using foil) and lay on flat surface. Dump the meatloaf mixture onto the foil and form your meatloaf. When you are shaping the meatloaf, make sure it will fit on the rack.
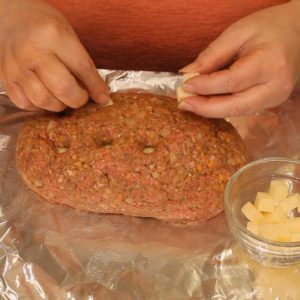 Press the cubes of cheese into the meatloaf about 1-2 inches apart. They should go ½ way into the meatloaf. Close the holes by pressing the meat over the holes.
Wrap the foil around the meatloaf, but leave some of the top open so the steam can penetrate the meatloaf. Poke a few holes in the foil so the grease can drip away from your meatloaf. I like to use my cake tester from Pampered Chef. I find so many uses for that little thing! I love it!
Place the meatloaf on the rack to make sure it fits. Season your carrots with salt and nutmeg if desired. I just sprinkle those two seasonings on the carrots. Wrap two to three carrot halves in a foil packet. Repeat until all the carrots are in foil. Line the carrots around the meatloaf, leaving room for the potatoes. Be sure to not over stack the carrots, especially near the back where the vent and pressure valve are. This can cause some issues with coming to pressure.
Peel your potatoes and leave them whole if you can. If you can't fit them in whole, cut into the biggest (but uniform) pieces you can. Wrap them in foil and fit them around the meatloaf.
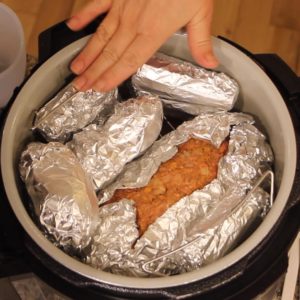
Make sure you have 1 cup of a thin liquid in the inner pot of the Ninja Foodi. I used chicken stock because I used it to make the cheesy potatoes at the end.
Place the rack in the Ninja Foodi and set the pressure to high for 35 minutes. When the time is up, allow the Ninja Foodi to naturally release the pressure for 10 minutes. Then manually release the remaining pressure.
Remove the foil packets and the meatloaf from the Ninja Foodi. Check a temp on the meatloaf and make sure it is 165° F. If it is less than 155°, you may want to put it back under pressure for a few minutes or air crisp it longer. If it is more than 155° F, you can finish cooking it with the air crisp function.
If you want to make the cheesy potatoes, empty all but ¼ cup of the liquid that is in the bottom of the pot. Turn on the sear/sauté to high. Slice the potatoes and layer them in the bottom of the Ninja Foodi. Season with ¼- ½ teaspoon of sea salt. Add in ¼ cup of heavy cream (or half & half/ milk/ sour cream) and 2 tablespoon of butter. Top with about 1 cup of cheddar cheese.
Remove the foil from around the meatloaf. I leave the bottom on, so I don't have to move the meatloaf around too much. Put the remaining glaze on the meatloaf.

If you want to crisp the carrots a bit, remove the foil and place them on the rack with the meatloaf. Place the rack into the foodi on top of the potatoes.
Put down the Tender Crisp lid and set the Ninja Foodi to air crisp on 325° F. Air crisp for about 5-10 minutes. Add the remaining ¼ cup of crushed cheese crackers and Air Crisp on 400° F for another 2-4 minutes. I also brushed the top of the meatloaf with a little of the remaining liquid that we removed earlier.
Remove the carrots and the meatloaf. Allow the meatloaf to rest for at least 10 minutes before slicing. Add a few pats of butter to the carrots and let it melt. You can also add a little more salt and nutmeg or any seasonings you want. Cover the carrots with foil to keep them warm.
If you want the cheese to get a little browner, continue to Air Crisp on 400° F. while the meatloaf is resting.
Serve & Enjoy!

Cheesy Meatloaf in the Ninja Foodi
Ingredients
For the Glaze:
- 6 ounces tomato paste
- 1 tablespoon apple cider vinegar
- 1 tablespoon brown sugar
- ½ teaspoon sea salt
- ½ teaspoon garlic powder
- ½ teaspoon basil
- ½ teaspoon onion powder
- 1 tablespoon Worcestershire sauce
For the Meatloaf
- 2 lbs ground beef or turkey (see post for recommendations)
- 2 ¼ cups whole cheese crackers 1 ¼ cup crushed, divided
- 1 cup onion I used a sweet onion diced ¼"
- 1 egg
- 2 Tbsps Worcestershire sauce
- 2 teaspoon sea salt
- 2 teaspoon basil dried
- ½ teaspoon onion powder
- ½ teaspoon garlic powder
- 1 ½ ounces cheddar cheese ¼" cubes
Would you like to save this recipe?
Instructions
Glaze
- Combine all the glaze ingredients into a medium size bowl and mix well. You will use ½ in the meatloaf mix and ½ for the topping
Meatloaf
- Crush up the 2 ¼ cups of cheese crackers - you will end up with about 1 cup. Cube up the cheese into ¼" cubes
- In a large mixing bowl, combine the ground beef, finely diced onion, Worcestershire sauce, seasonings, an egg, 1 cup of crushed cheese crackers, and ½ of the glaze. Mix well.
- If you want to cook the carrots and potatoes like I did in the video, please see the post for those details.
- Get a large piece of foil (or your pan, if not using foil) and lay on flat surface. Dump the meatloaf mixture onto the foil and form your meatloaf. When you are shaping the meatloaf, make sure it will fit on the rack.
- Press the cubes of cheese into the meatloaf about 1-2 inches apart. They should go ½ way into the meatloaf. Close the holes by pressing the meat over the holes.
- Wrap the foil around the meatloaf, but leave some of the top open so the steam can penetrate the meatloaf. Poke a few holes in the foil so the grease can drip away from your meatloaf.
- Add 1 cup of thin liquid to the inner pot of the Ninja Foodi. Place the meatloaf on the rack and the rack into the Ninja Foodi on the low position. Set the pressure to high for 35 minutes. When the time is up, allow the Ninja Foodi to naturally release the pressure for 10 minutes. Then manually release the remaining pressure. Check a temp on the meatloaf and make sure it is 165° F.
- Remove the foil from around the meatloaf. I leave the bottom on, so I don't have to move the meatloaf around too much. Put the remaining glaze on the meatloaf.
- Return the meatloaf to the Foodi and put down the Tender Crisp lid and set the Ninja Foodi to air crisp on 325° F. Air crisp for about 5-10 minutes. Add the remaining ¼ cup crushed cheese crackers and Air Crisp on 400° F for another 2-4 minutes.
- Let the meatloaf rest for at least 10 minutes before slicing. Serve & Enjoy!
Notes
Nutrition
ABOUT THE RECIPE AUTHOR, LOUISE LONG
Louise is a full-time recipe creator and food blogger @ The Salted Pepper. She has over 30 years of experience with cooking and recipe development. She owned a restaurant for several years and was a full-time RN until retiring to blog full time.
Louise has several very active Facebook groups that help people with the basics of cooking and getting the most out of the Ninja Foodi.
Ninja Foodi Fresh & Healthy Meals
Seeing the need for easy, delicious, and high quality recipes, she is focusing all of her efforts creating recipes specifically for the Ninja Foodi. Her recipes are easy for the home cook to follow and provide step-by-step instructions.
Louise is also a YouTube creator and you can find most of her recipes in video format on The Salted Pepper YouTube channel.
She is very responsive to messages and eager to help in any way she can.
Rachel says
I made the meatloaf after watching the video. It’s very helpful to watch the video. It was delicious and easy to make. Thanks for another great recipe.
Melissa says
Hi so I am 100% new to ninja foodi been wanting one and my bf got it for me for xmas. Now I am hooked I have made a few of your recipes and they were so good I want to try this meatloaf but I have one question I have the ninja foodi with smart lid I do not have a air crisp function is that the same as air fry function thats on my foodi. I see a lot of recipes with that function but not sure if they are the same
Louise says
Yes, they are the same function. I hope you love your new Foodi!
Patricia Stanczyc says
this looks amazing! I have a fear of chomping into foil, though, since I have a mouthful of fillings and I hate that sensation. Have you ever tried using a disposible loaf pan with holes punched in it to release the fat and then cutting it away and leaving the bottom on the bottom?
Louise says
You can do that or simply form the meatloaf and use the basket.
Michelle Green says
Best meatloaf ever. Love your recipes. Can you advise the best way to reheat it please.
Louise says
I'm so glad to hear that! I like to put leftovers in a covered dish and steam to reheat and then use a little AC if needed on the top.
Karla Harkins says
Hi Louise,
I'm new to the one pot meals and using your videos. Can you please let me know if I missed something because I don't see where I can print out the recipes for the cheesy potatoes that you are doing with this meatloaf. I have to have the recipes printed out because although I do have the Samsung Family Hub fridge with the computer screen and can watch the videos on there the screen keeps going dark on me and it is a pain to have to run back and get it back on LOL. I also have to keep referring back to the ingredients and it does the same thing. It is easier just to print the ingredients out.
I do love your recipes though. I'll let you know how this turns out.
Louise says
The cheesy potatoes aren't part of the recipe, but I do go over how to make them in the post. The easiest way to print that info will be to copy and paste it into a word document and then print it.