

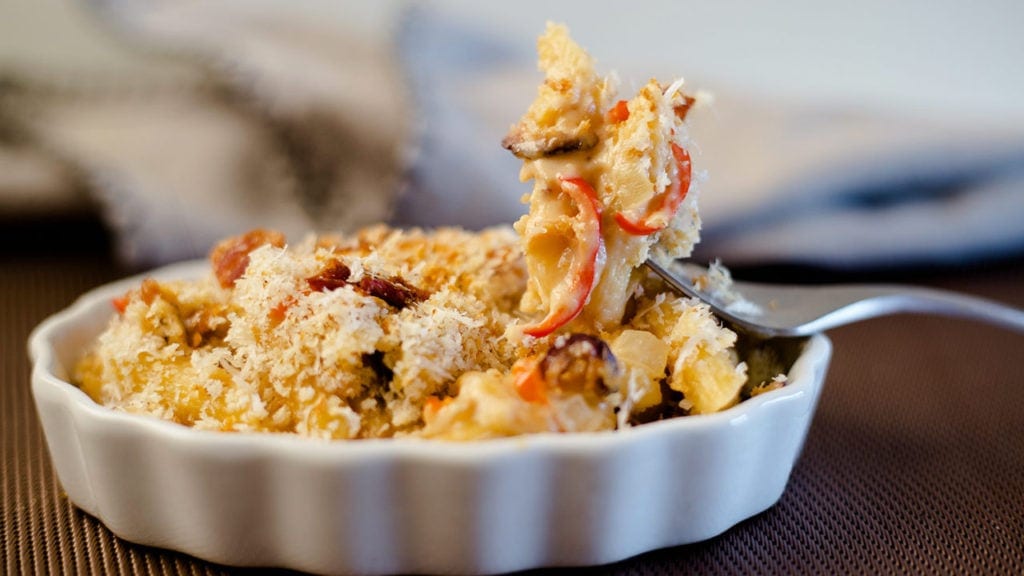
 This is not your ordinary run-of-the-mill creamy mac & cheese recipe. It's not even close! This recipe is like a perfect little black dress! Fancy it up or keep it simple... the choice is yours!
You'll see I chose to be fancy with my ingredients and the final result was spectacular! I encourage you to give it a try, I think you will be very surprised how these flavors come together in perfect harmony.
This post may contain affiliate links. If you make a purchase after clicking a link, I may earn a small commission. Thank you for your support!
Even my husband enjoyed this recipe and he is not a fan of Creamy Mac & Cheese... or any kind of Mac & Cheese for that matter. He is strange that way, I mean really strange. Who doesn't like Mac & Cheese? Especially when it is so easy to make!
Is Mac & Cheese Easy to make in a Pressure Cooker?
Yes, absolutely! It's super easy as long as you understand how and when to add your ingredients.
In this Mac & Cheese recipe, we start out by sautéing onions and red peppers with butter.  We then add flour to make "sort of" a roux. A blonder roux is traditionally made by combining a fat with flour in equal parts and allowing it to cook for a few minutes. The reason I say "sort of" is because we also have the veggies in our blonde roux.
We remove the roux and veggies before pressure cooking and add it back in when the pasta has finished cooking. Why? Because we need thin liquid to create steam in order to build pressure in the Ninja Foodi or other pressure cooker.
If we left the roux in, it would combine with the thin liquid (chicken stock and wine) and thicken the liquid. This impedes the process of building steam needed to bring the pot under pressure.
Pressure cooking cheese and milk products doesn't work well, so you can't just dump in all the ingredients and start cooking. Cheese and milk can separate under pressure and that does not leave us with a nice and creamy mac & cheese, so we add it in at the end.
If you are interested in learning more about how pressure cookers work, check out this article on Pressure Cooking 101. There is a lot of helpful information in this article.
Can I substitute other cheeses and ingredients?
Of course! You can use any kind of cheese blend that you like. I do recommend using a soft cheese, like cream cheese, if you want a super creamy mac & cheese. Other than that... make it yours and add the ingredients you like.
You could use all cheddar, but I would recommend combining both mild and sharp cheddar for a basic creamy mac & cheese. The total amount of cheese you want to use is 7.5 ounces of shredded cheese and 2 ounces of soft creamy cheese.
If you don't like figs, consider using sun dried tomatoes instead. They would go very nicely with the blend of cheeses I use in this recipe.
You can omit the onions, peppers, and figs without changing the recipe at all. The important thing to keep in mind is the ratios of thin liquid to pasta, so if you don't want to use wine, use 2 cups of chicken broth or any other thin liquid you like.
You can also add shrimp or cooked chicken to this recipe and it would be a super delicious meal! I always recommend adding shrimp at the end and let the residual heat from the pasta cook the shrimp. This keeps them nice and tender.
Can I double the recipe?
Yes, of course. To double the recipe, I would double all of the ingredients in the creamy mac & cheese, but don't double the topping ingredients or you will have a very thick layer on top.
If you are using bacon and doubling the recipe, use the 2 tablespoon of bacon grease and add 2 tablespoon of butter with the 4 tablespoon of flour.
Can I use a different pasta?
Yes, but you will have to make some timing changes based on the pasta you want to use. Penne is a thicker pasta and takes longer to cook than some other types.
You could substitute farfalle (bow tie) pasta without making any changes. If you want to use elbow macaroni, I would decrease the pressure cooking time by 1 minute and keep the same NR time.
You can check the back of the box of pasta you want to use and if it takes less than 8 minutes to cook, decrease the PC time by 1 minute.
How do I freeze and reheat leftovers?
I recommend freezing pasta with a little bit of chicken stock or vegetable stock, so that when you reheat it there is extra liquid to combine with the cheeses that will keep the creamy mac & cheese creamy.
If you have put the topping on the mac & cheese, try to keep this layer intact when storing in the freezer or refrigerator. Let the mac & cheese cool completely and then cut it like you would lasagna and place it in an airtight container or baggie to store in the fridge or the freezer.
When reheating from the refrigerator, add a bit of stock/milk/half and half before reheating. You can reheat in the Ninja Foodi by baking on a low temp until it is heated through and then AC the top to crisp it up.
When reheating from frozen (and you have frozen it with stock), cut the bag to remove the frozen block and put it in a 6" or 8" Fat Daddio cake pan. Put 2 cups of water in the inner pot and use the steam function for about 20 minutes to thaw and heat the creamy mac and cheese. Then you can use the AC function if you want to crisp up the top.
Okay, time to get fancy! Let's make this grown up version of Creamy Mac & Cheese!
How to make Creamy Mac & Cheese in the Ninja Foodi
I always recommend having all of your ingredients prepped and ready to go. It really makes things easier when cooking.
The first think you want to do is cook the bacon. The Ninja Foodi makes the BEST bacon! Use 3 strips of thick cut bacon (I used applewood smoked) and place on the rack in the high position.
Put the TenderCrisp lid down and set the AC function to 360°F. Cook for about 12 minutes, flipping three times during the cooking process. You want the bacon to be very crisp so it will crumble easily. Allow to cool on paper towels and then crumble. Keep the grease in the inner pot.
Dice the onion and slice the peppers and figs. You can grate all of your cheeses now or do this while the Ninja Foodi is cooking the pasta.
 Turn the Ninja Foodi on high saute to heat the bacon grease. Add the onions and peppers to the inner pot and saute for 1 minute. Add flour and stir to combine. Cook for 2-3 minutes to cook the flour. Remove from pot and reserve for use later. Keep the Ninja Foodi on high saute.
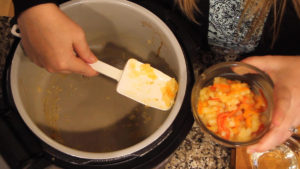
Add in one cup of chicken stock to deglaze 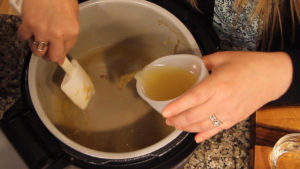 the pot. Use a tool that is safe for non-stick surfaces to scrape the bottom of the pot to loosen any fond (brown bits) on the bottom of the pot. I love using my scoop and spread for this task because it easily removes anything stuck without scratching the pot. This is important to do because when the Ninja Foodi or other pressure cooker heats up to build pressure anything stuck on the bottom can trigger the water notice.
Add in the 1 cup of wine or another cup of chicken or veggie stock, the pasta and the sliced dried figs. Put the pressure lid on and set the vent to seal. Set on high pressure for 3 minutes. When the cooking time is done, allow to natural release for 2 minutes and then manually release the remaining pressure.
Do not worry that the pasta looks a bit underdone, it will continue to cook. Leave the pot on the keep warm function and add in the reserved onion, pepper, grease, and flour mixture. Stir to combine. As the flour absorbs the liquid, the mac & cheese will thicken.
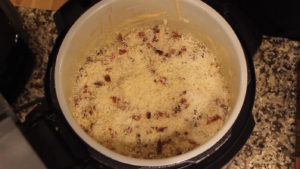
Add in grated cheeses (except the Parmesan) and the half and half. Stir to 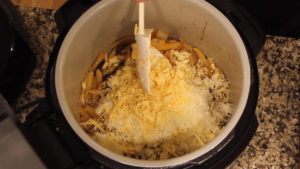 combine. It will look a bit soupy, but don't worry, it will thicken. When all the cheese is melted, close the lid for a few minutes while you combine the topping ingredients.
Combine the panko, bacon crumbles, and grated Parmesan cheese. Mix to blend ingredients together.
 Give the creamy mac & cheese one more stir and spread the topping on top. Close the TenderCrisp lid and AC on 350° F for 5-10 minutes or until the topping has browned to your liking.
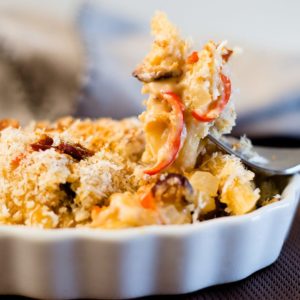
Serve and Enjoy! 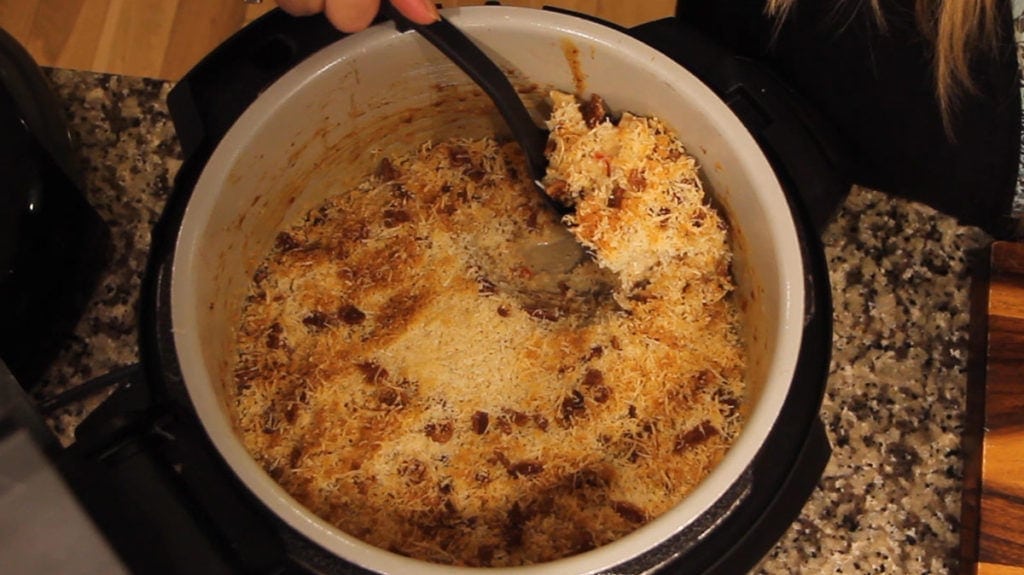
You know what would go perfectly with this Creamy Mac & Cheese? Ribs! I have the BEST recipe for Ribs in the Ninja Foodi with a Raspberry Glaze... be sure to check it out!

Creamy Mac & Cheese
Ingredients
- 2 tablespoon bacon grease or butter
- ½ onion diced
- 2-3 small sweet red pepper (about ¼ cup) sliced into thin strips (or a red bell pepper)
- ½ teaspoon sea salt
- 2 tablespoon flour
- 1 cup chicken stock
- 1 cup white wine
- 3 oz dried figs sliced
- 8 ounces Penne Pasta
- 2 oz cream cheese
- 2 oz Gouda Smoked
- 4 oz cheddar sharp white
- 1.5 oz Asiago
For the Topping
- 1.5 oz Parmesan
- 1 cup Panko
- 3 strips Applewood Bacon thick cut, cooked crisp and crumbled
- ½ cup half and half
Would you like to save this recipe?
Instructions
- Cook the bacon in the Ninja Foodi AC on high rack @ 360° F for 12-14 minutes, flipping once or twice. Cool on paper towels and crumble. Leave the bacon grease in the Ninja Foodi. If you are omitting the bacon, substitute with 2 tablespoon of butter.
- Dice the onion and cut the sweet red pepper or bell pepper into thin strips about 1" long and ⅛th inch thick.
- Turn the Ninja Foodi on high saute and reheat the bacon grease or the butter. Add onions, pepper slices, and salt. Saute for 1 minute and add flour. Reduce the heat to medium and cook for 2-3 minutes, stirring frequently. Remove from the inner pot and reserve for later.
- Deglaze the pot with 1 cup of chicken stock, make sure to scrape the bottom to ensure nothing has stuck. Add the wine.
- Add the Penne Pasta and the sliced figs. Put the pressure cooker lid on and set the valve to seal. Set the pressure to high for 3 minutes. When time is up, allow to natural release for 2 minutes and then manually release the remaining pressure.
- While the Pasta is pressure cooking, grate the cheeses.
- Remove the lid and add in the vegetable/bacon grease/flour mixture and ½ cup of half and half. Stir and add in cream cheese, Asiago, smoked Gouda, and cheddar cheese.
- Combine the panko, Parmesan cheese and crumbled bacon. Spread on top of mac & cheese. Close the TenderCrisp lid and AC on 350°F for 5-10 minutes or until the top has browned nicely. Serve and Enjoy!
Nutrition
About the recipe author, Louise Long
Louise is a full-time recipe creator and food blogger @ The Salted Pepper. She has over 30 years of experience with cooking and recipe development. She owned a restaurant for several years and was a full-time RN until retiring to blog full time.
Louise has several very active Facebook groups that help people with the basics of cooking and getting the most out of the Ninja Foodi.
Ninja Foodi Fresh & Healthy Meals
Seeing the need for easy, delicious, and high quality recipes, she is focusing all of her efforts creating recipes specifically for the Ninja Foodi. Her recipes are easy for the home cook to follow and provide step-by-step instructions.
Louise is also a YouTube creator and you can find most of her recipes in video format on The Salted Pepper YouTube channel.
She is very responsive to messages and eager to help in any way she can.
Lyse says
Hi Louise, apologies for the low rating but I made this last evening and it was so dry. I used elbow macaroni and butter as I didn't have penne or bacon. The crusty panco/parmesan probably dried it up. I did use blending flour because that's what I had at the moment, I'm wondering if that maybe contributed to the failure / learning. Not sure what I did wrong but I, for the first time ever, threw it out. I have the foodi 6.5 qt with smart lid. I did reduce P cooking by 1 minute. I'll be curious about your thoughts.
Everything else of yours I tried, we loved. I haven't started the course yet but it's next on my list
Thanks!
Louise says
It sounds like a couple of things went wrong here. The elbow macaroni may have absorbed more liquid, but even more than that if you substituted blending flour in a 1:1 ratio for the flour, it was too much. Blending flour is finer, so it absorbs liquid a bit differently. You didn't say if you used the figs and the peppers, but the peppers give off liquid as well, so if they were omitted that would be another (very small though) reason it was dry. Personally, I think it was the blending flour. However, you can always add more liquid to get it to the consistency you want. If you used different cheeses, that might play a role in the dryness as well. Or, it could be as simple as it was baked longer than it needed to. It's a shame you threw it out because you can easily fix the dryness with more liquid. I could help more if you let me know what other changes, if any, were made to the recipe.
Michelle says
Louise,
I recently bought a bag of pitted dried dates for another recipe. I have a ton left over! Can I substitute the dates for the figs in this recipe? Do you have any other recipes using dates? Thank you in advance.
Louise says
I have never tried it with dates, but it is always worth trying! I bought dates several months ago, but I still haven't used them. Thinking cap is on! LOL
Deb T. says
One of Your Great Videos You used silicone covers that would seal when pressed on. Please help I can't remember which video it was. You posted a link and I would love to get some. Thank You in advance.
Louise says
Thank you so much and I'm thrilled you are enjoying the videos! The silicone covers I have are from Amazon: (affiliate link) https://amzn.to/38M38r3