
Have you heard of Flanken Style Short Ribs before? If not, you are in for a real treat!
A very popular cut of beef is the short-rib or English Cut Beef Rib, but don't underestimate the little sister, Flanken cut beef ribs! Both are from the same cut of beef and they are very different in looks, but not in taste and texture.
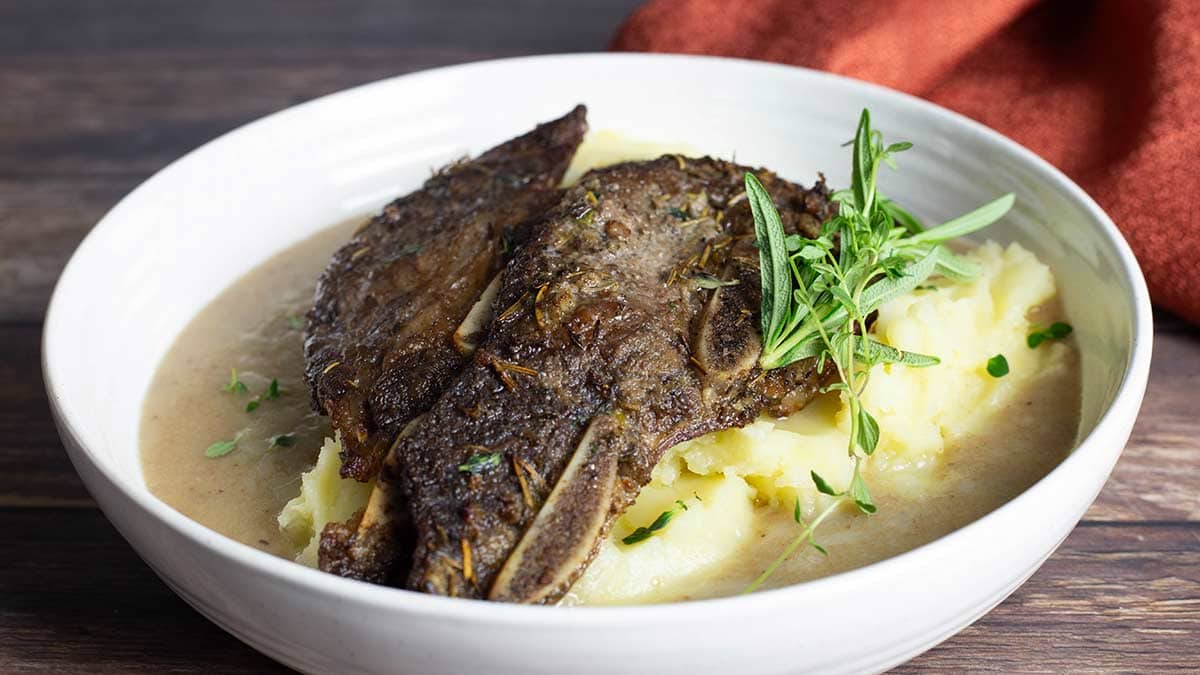
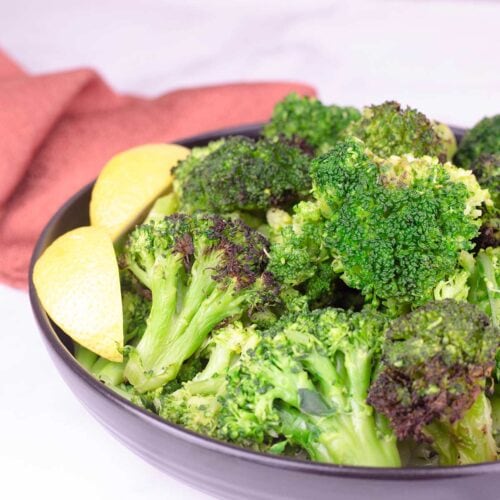
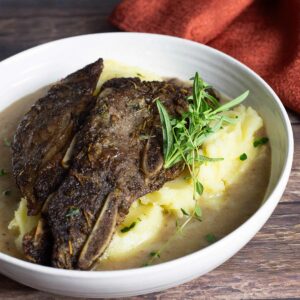
When cooked correctly, Flanken ribs are rich in beefy flavor with just enough fat to be decadent. Pair them with some mashed potatoes and steam & crisped broccoli and you have yourself one spectacular meal!
Would you like to save this recipe?
If you aren't familiar with Flanken cut ribs, they are cut into thin strips of beef instead of a thick cut. Flanken Style Short Ribs are usually used when making Korean style ribs that you find at Korean BBQ restaurants or Tira De Asado, Argentinean grilled short ribs.
The Argentinean grilled ribs are usually cut much thicker, similar to the thickness of English cut short ribs, but they are still cut across the bone into long strips. The Korean bbq ribs have a sweet and spicy sauce baked onto the ribs resulting in a nice sticky rib. They are delicious! I absolutely love making them, however, sometimes I want a different flavor that is more like a steak marinade, so this recipe was born!
The great thing about making flanken style ribs is they are quicker to cook than short ribs, because the meat is much thinner. So, you can have a delicious and easy meal in just a short time. They also go well with so many different flavors that you can use any sauce or marinade and as long as it has enough acid to cut the richness from the fat, they will be delicious!
Pressure cooking followed by air crisping is the perfect cooking combination for these beef ribs. The pressure cooking tenderizes them in just 5 minutes of pressure cooking time and then the air crisping/air frying renders the fat and browns them nicely. Don't worry if you don't have the Ninja Foodi Pressure Cooker & Air Crisper or the Instant Pot Duo Crisp; you can still make the recipe using your pressure cooker and oven.
Ingredients & Substitutions
Flanken Style Short Ribs
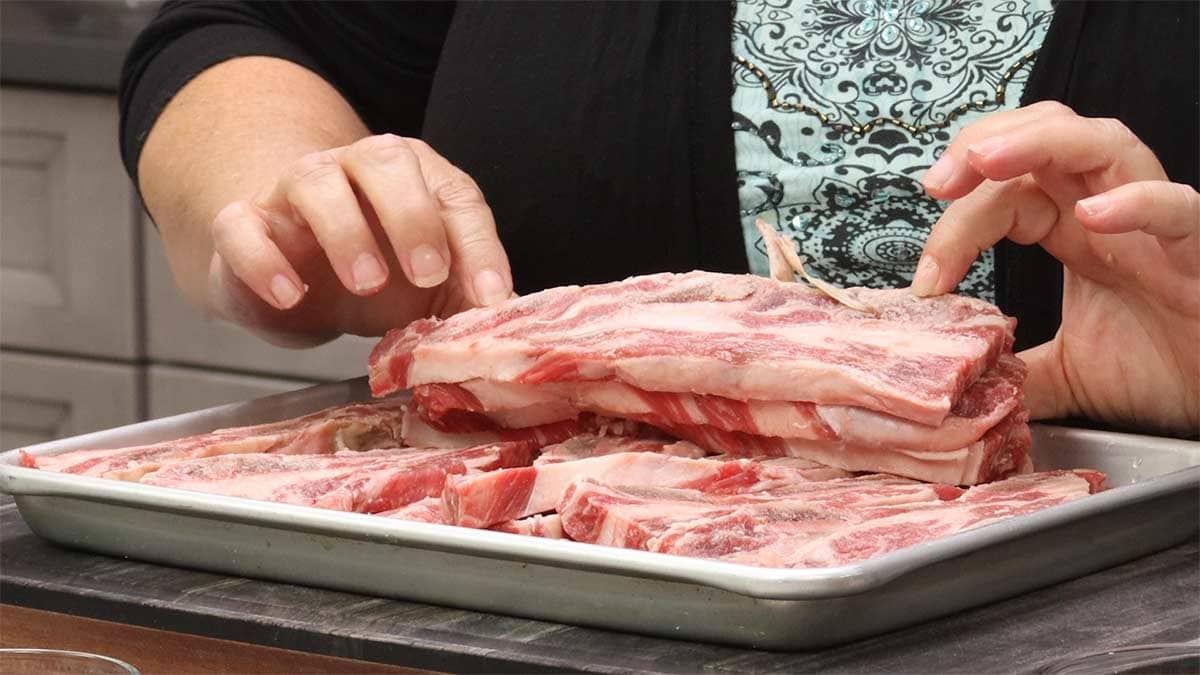
Flanken short ribs are the same meat as regular short ribs, just cut differently. Instead of being cut with the bone into chunks, they are cut across the bone. Most of the meat is along one side, with 3-4 small bones on the other side. There are connective tissues that hold the meat to the bone and usually a layer of fat on the opposite side of the bone from the meat. See the photo below which shows how the English Cut Short Rib would be cut.
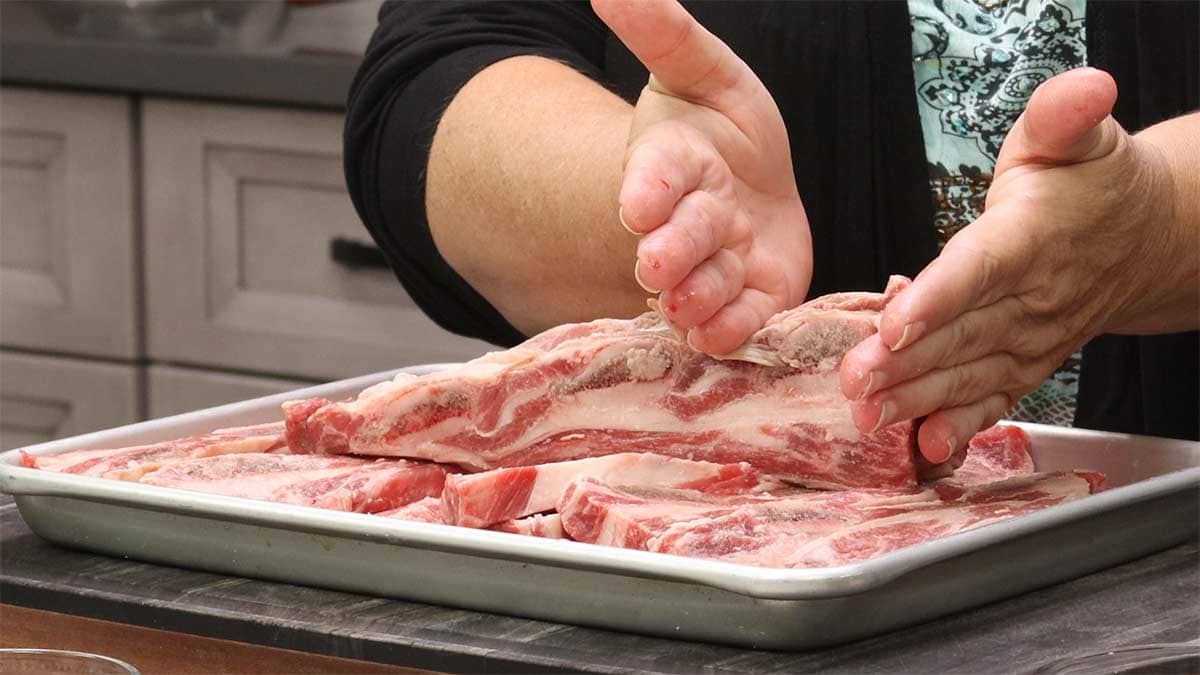
This cut is usually from the chuck end of short ribs and is well-marbled. It can be a tough cut of beef if not cooked properly, and pressure cooking works great for tenderizing it! The long strips of rib meat can easily be separated from the bones for boneless pieces of meat.
Since this recipe is specifically for flanken beef, I don't recommend substituting it with another type of meat without changing the timing.
If you can't find the flanken cut ribs, you can absolutely use the same marinade with Short Ribs, also known as English Cut Beef Ribs. With short ribs, the meat is much thicker and will require a longer pressure cooking time of about 30-45 minutes, depending on how thick they are. English Short Ribs also benefit from air crisping, air frying, or broiling after they pressure cook. I also recommend searing them in hot oil before pressure cooking. After pressure cooking, you will want to air fry on 400℉/200℃ for 15-20 minutes or until the fat crisps up to your liking.
Marinade or Sauce
This is where you can get creative and develop your own favorite flavor of flanken ribs. The marinade I used is the same one I use for a steak marinade and it is based on a recipe that my husband's grandfather used to make all the time.
The only difference between this marinade and the one in this recipe, Grilled London Broil, is I omitted the oil. Because the flanken-style ribs are so fatty, there is no need to add oil to your marinade unless it is for flavor like sesame oil would be in a Korean-style marinade.
I have tried this recipe with both types of marinade/sauce and either one is fantastic, it just depends on what you feel like eating.
The Korean-style marinade usually has brown sugar, soy sauce, fresh ginger, garlic, rice vinegar, chili garlic sauce, and gochujang sauce with sesame seeds and green onions as toppings and I serve it with white rice.
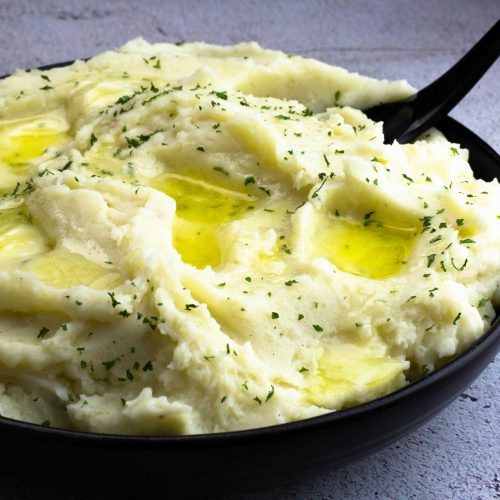
The American-style marinade is made with red wine vinegar, rosemary, thyme, Worcestershire sauce, salt, black pepper, onion powder, and fresh garlic. I like to serve this style of rib with mashed potatoes and garlic green beans!
Other options for seasonings or sauces are endless. You can make a more traditional American BBQ style by using your favorite rub and basting with BBQ sauce during the air frying process. You can marinate them in a citrus-based marinade and pair with your favorite fruit salsa.
These tender and juicy cuts of beef are very versatile and becoming more and more popular and, therefore, easier to find in grocery stores. In fact, stores near me never carry the English cut ribs, so all I can usually get are the flanken style.
How to Make Flanken Short Ribs
This recipe uses the Ninja Foodi Pressure Cooker & Air Crisper, the magical machine that does just about everything and does it well. I'm a huge fan of it and many of my recipes are made using it. The functions I use for this recipe are Pressure Cook, Air Crisp (Air Fry), and Sear/Sauté.
You can absolutely use your Instant Pot and if it doesn't have a crisping lid, you can broil the ribs in the oven for a few minutes per side to get them browned up and more of the fat rendered.
Prep or Mise En Place
Gather the ingredients for the marinade, a large Freezer bag, and take the ribs out of the refrigerator.
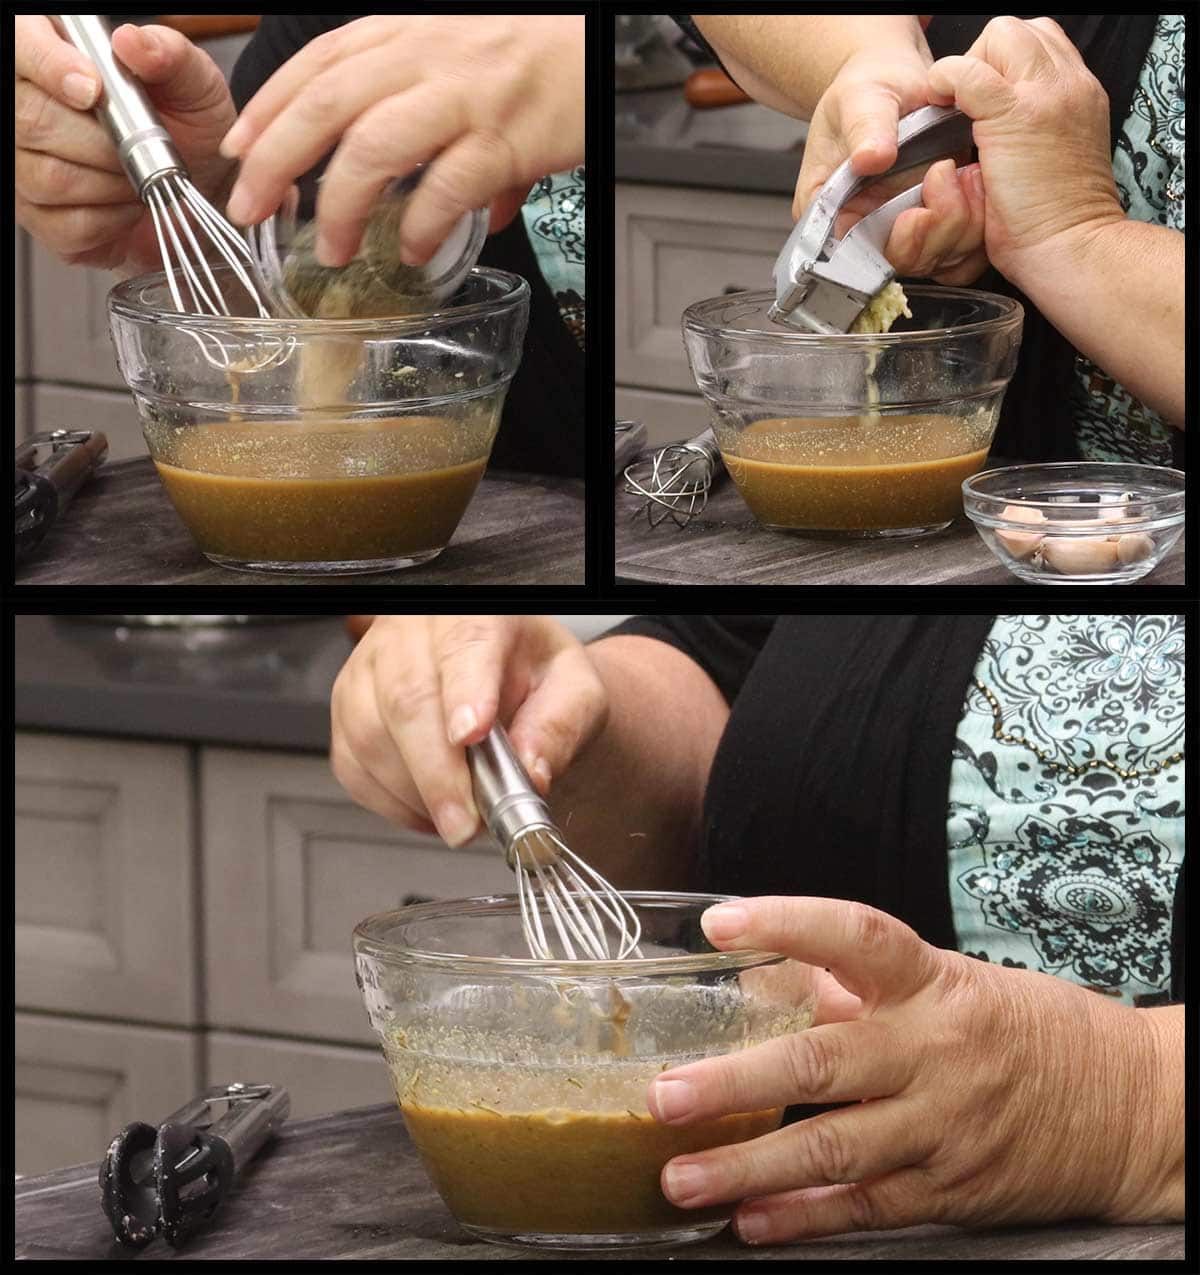
In a small bowl, whisk together the red wine vinegar, Worcestershire sauce, and spicy mustard.
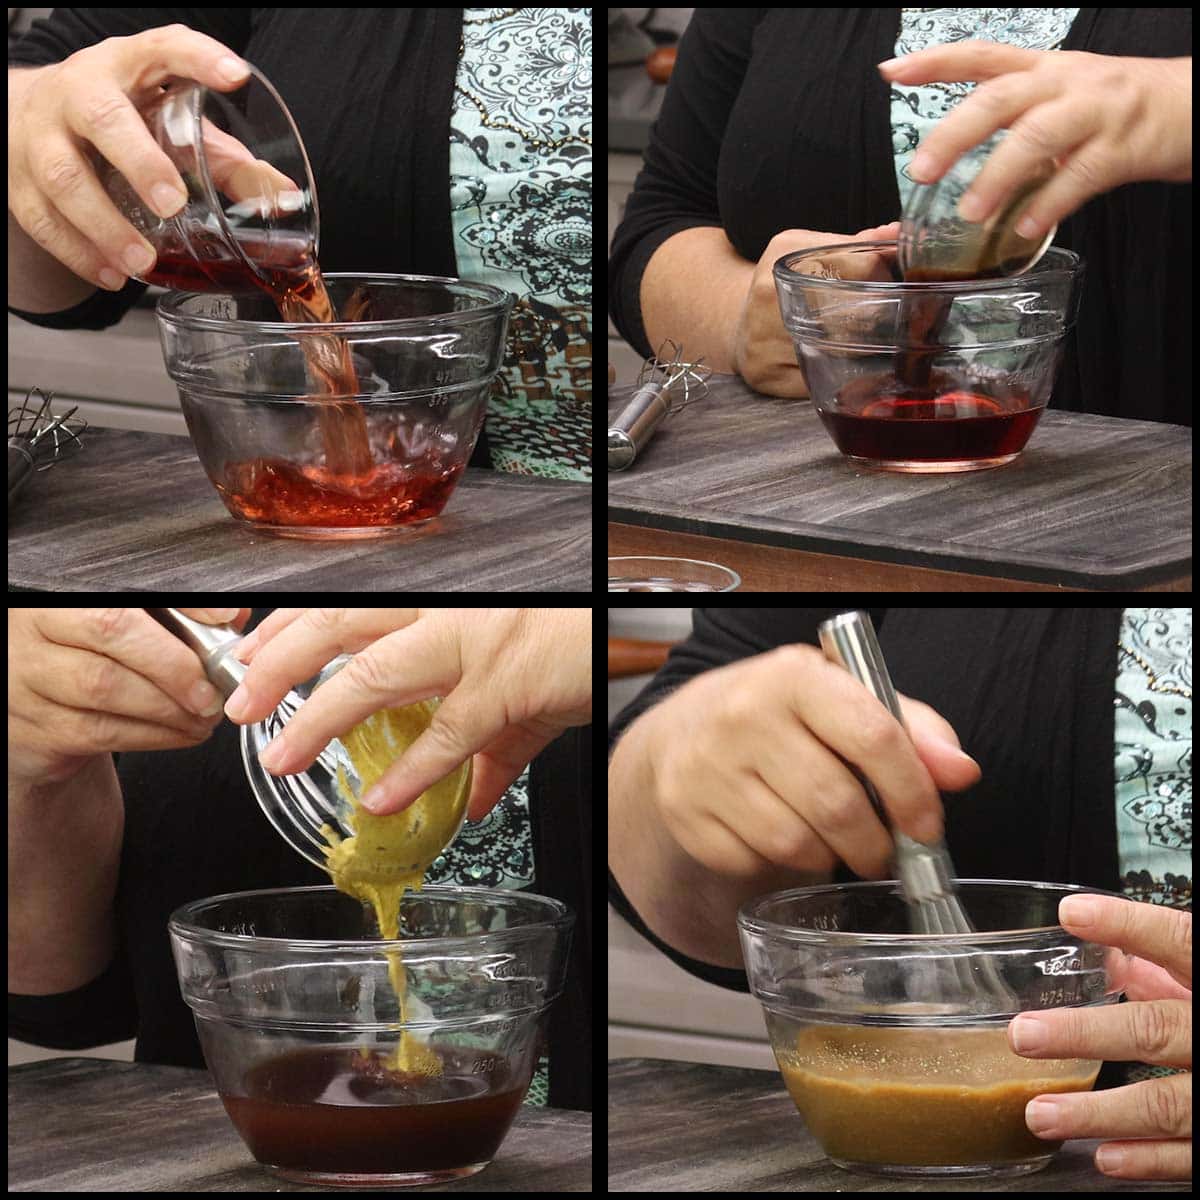
Add the seasoning blend and minced garlic. The amount of garlic that you use is completely up to you, but I used 1 Tablespoon and it was not overpowering. The bulb I had was on the small side and I used almost all of it to make 1 Tablespoon. You can also use garlic paste or jarred minced garlic.
Whisk everything together and set the marinade to the side while you prepare the ribs.
I recommend washing the ribs under cold water before placing them in the bag or container you are using to marinate them. When the flanken style ribs are cut, a saw is used and sometimes there can be some bone fragments on the ribs, washing them quickly removes any so they don't end up in your cooking liquid.
Once they are washed, place them in a single layer in the bag. I can usually fit 3 or 4 in the first layer. Then alternate the next layer so the ribs are running the other way. This allows the marinade to be better dispersed and exposes more of the rib meat. Continue putting them in the bag alternating layers until all of them are in.
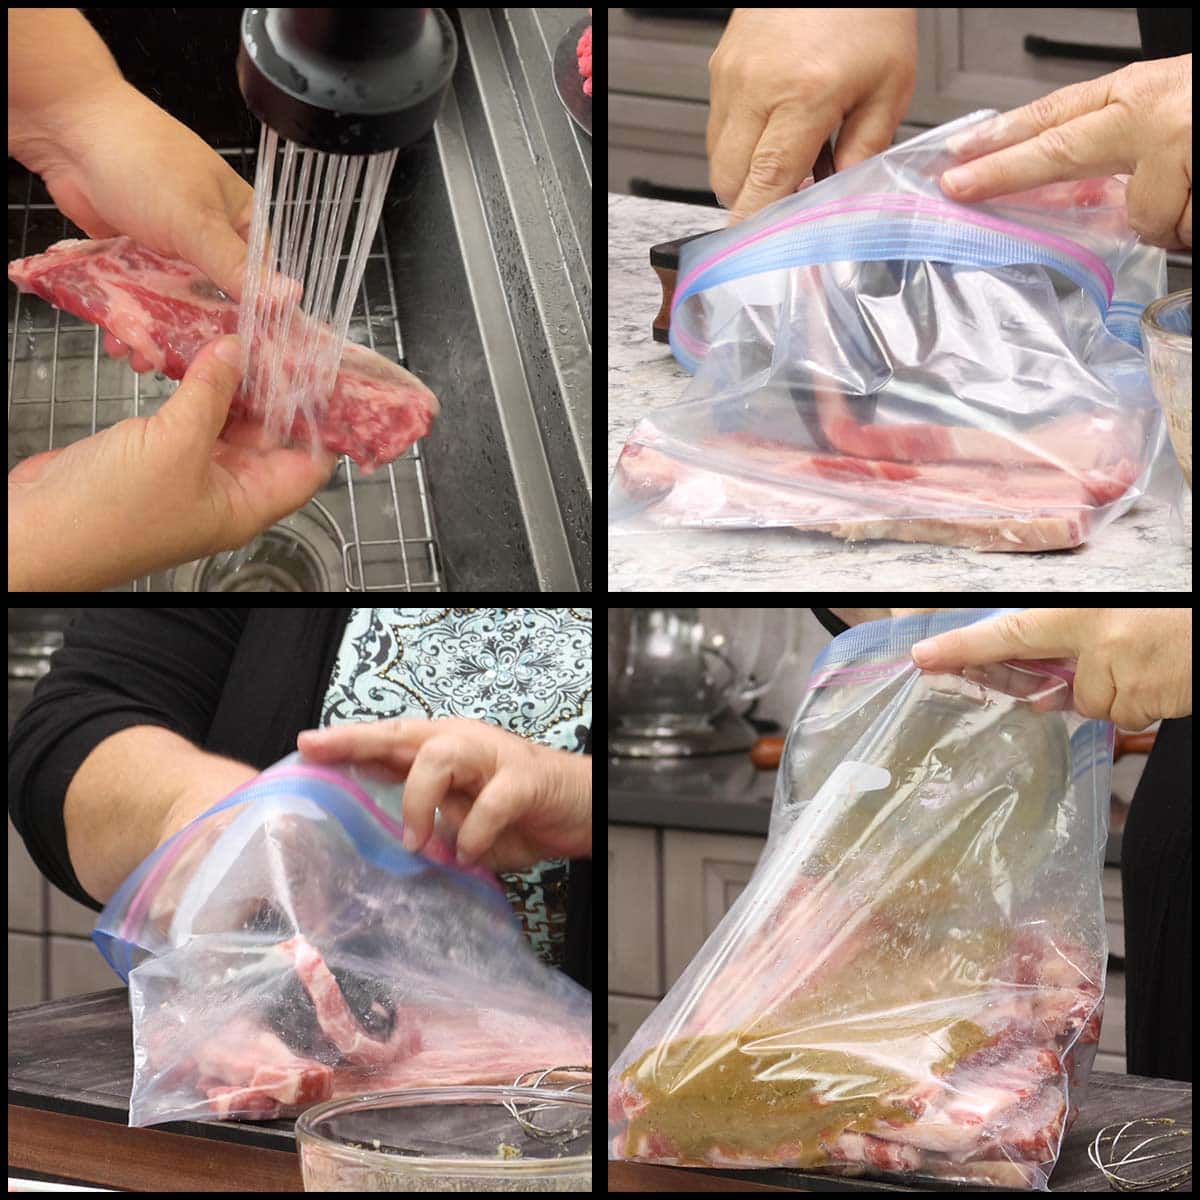
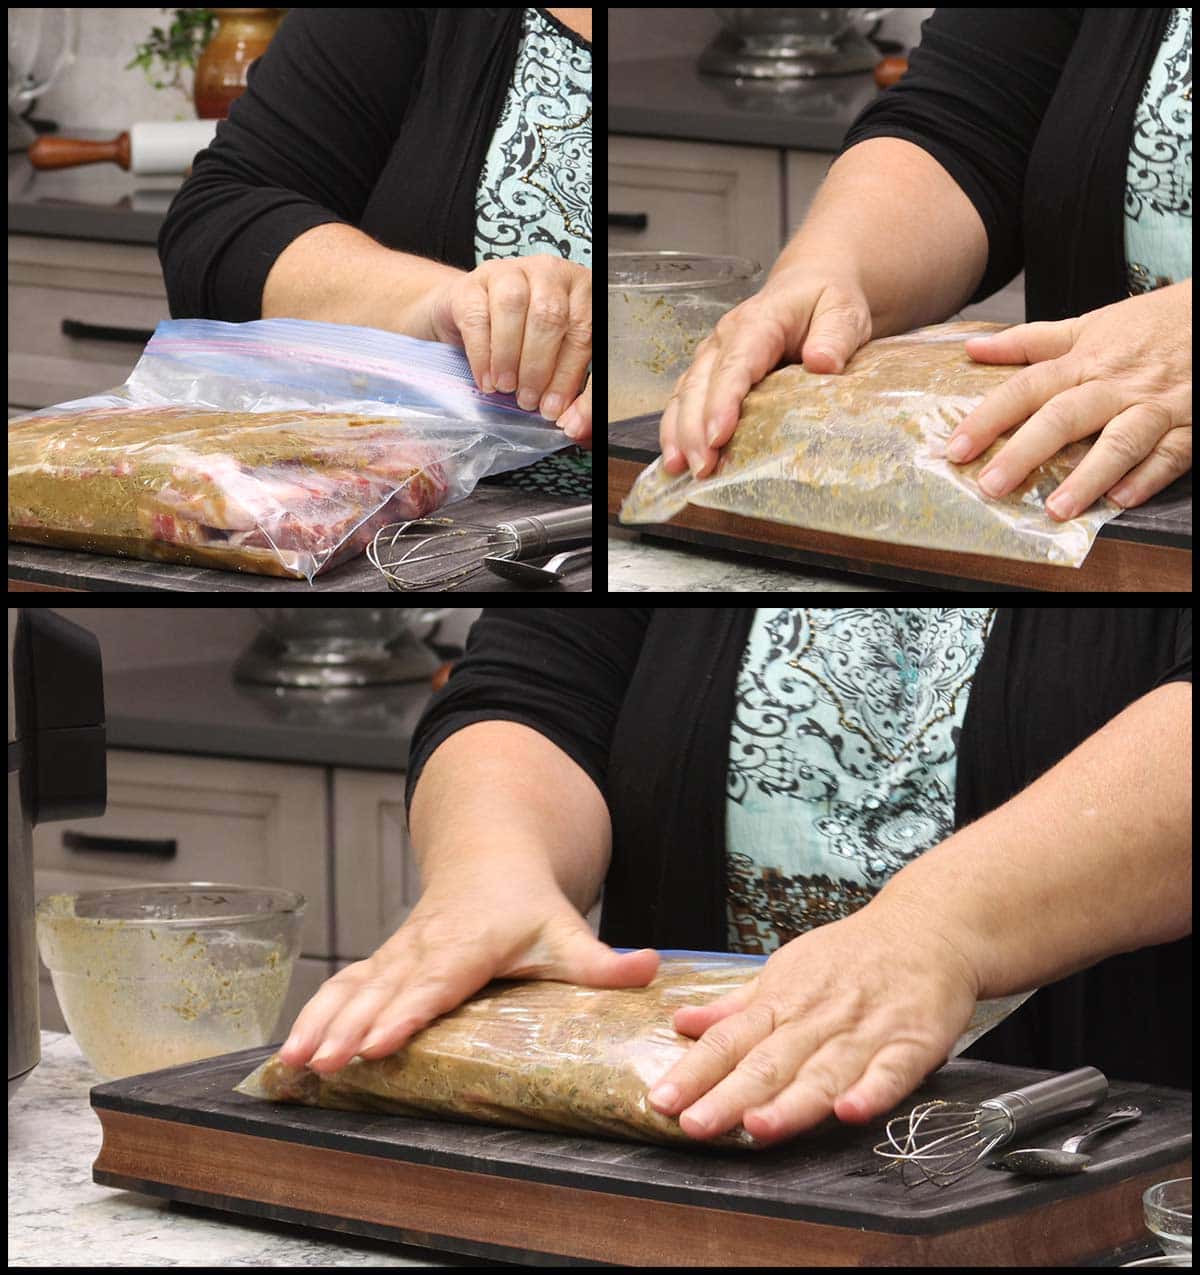
Pour in the marinade and try to get most of the air out as you close it up. Massage the bag so the marinade covers as much of the ribs as possible. Place the bag with the marinade on a tray and refrigerate for at least 4 hours, but overnight is better.
Pressure Cooking the Ribs
Remove the bag of ribs from the refrigerator about 30 minutes before you are ready to cook them. This gives the marinade time to warm up a bit and you'll have more thin liquid this way. I have taken the bag right out of the refrigerator and pressure cooked the ribs and things worked out fine, so if you forget, no worries.
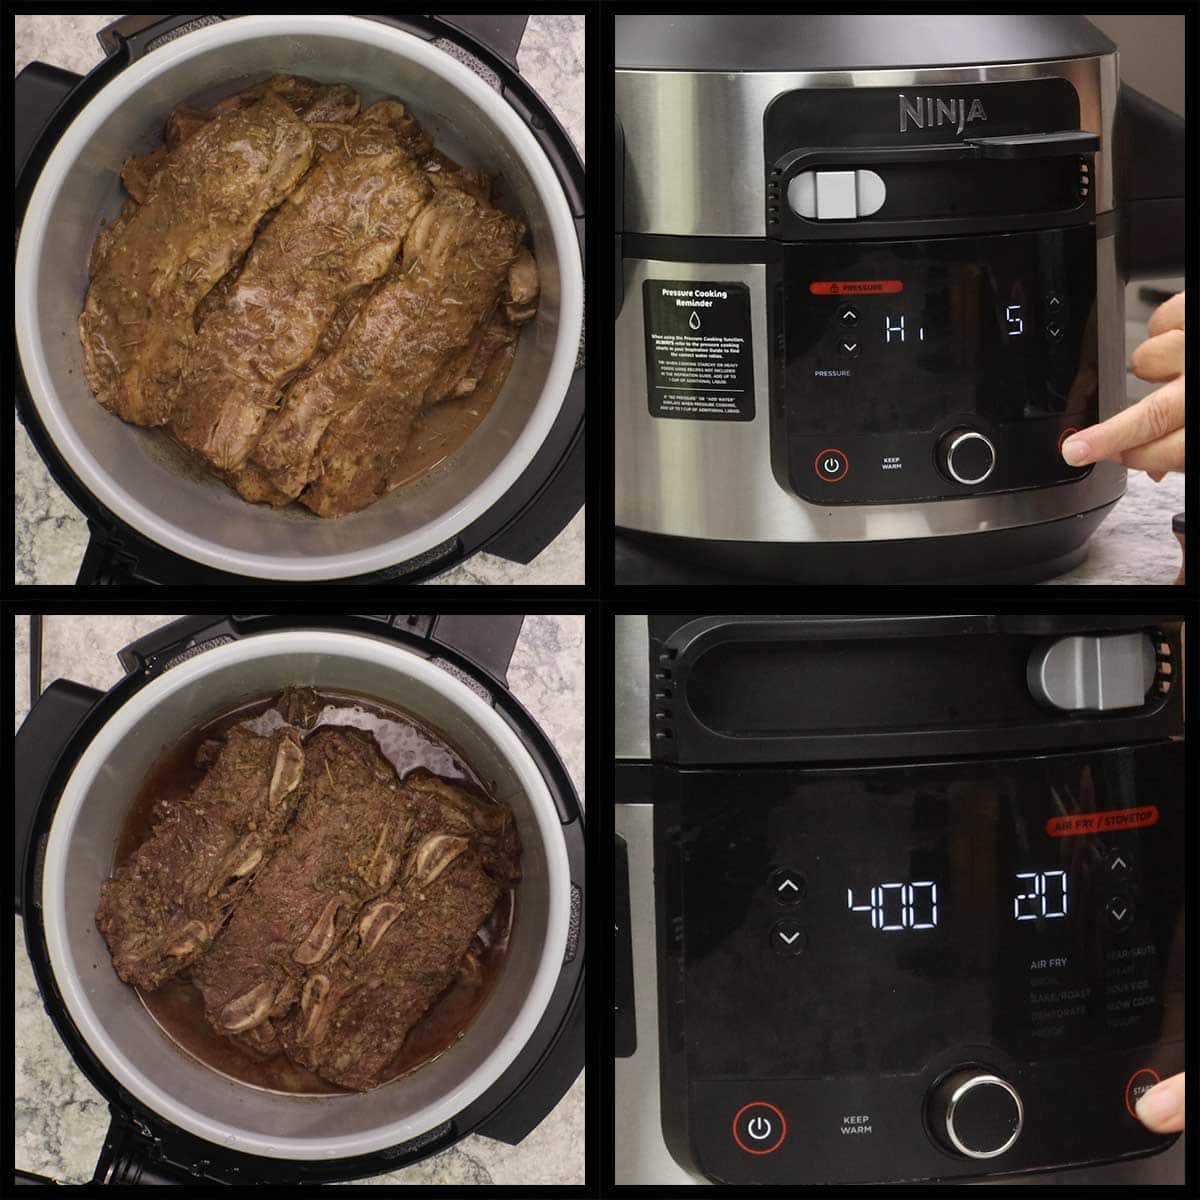
Place the ribs in the inner pot of the Ninja Foodi or whichever pressure cooker you are using and alternate the layers just like you did when putting the ribs in the bag.
Once all the ribs are in, pour the remaining marinade into the pot on the side of the ribs so it reaches the bottom of the pot. This is the only liquid we are using, so it needs to be on the bottom.
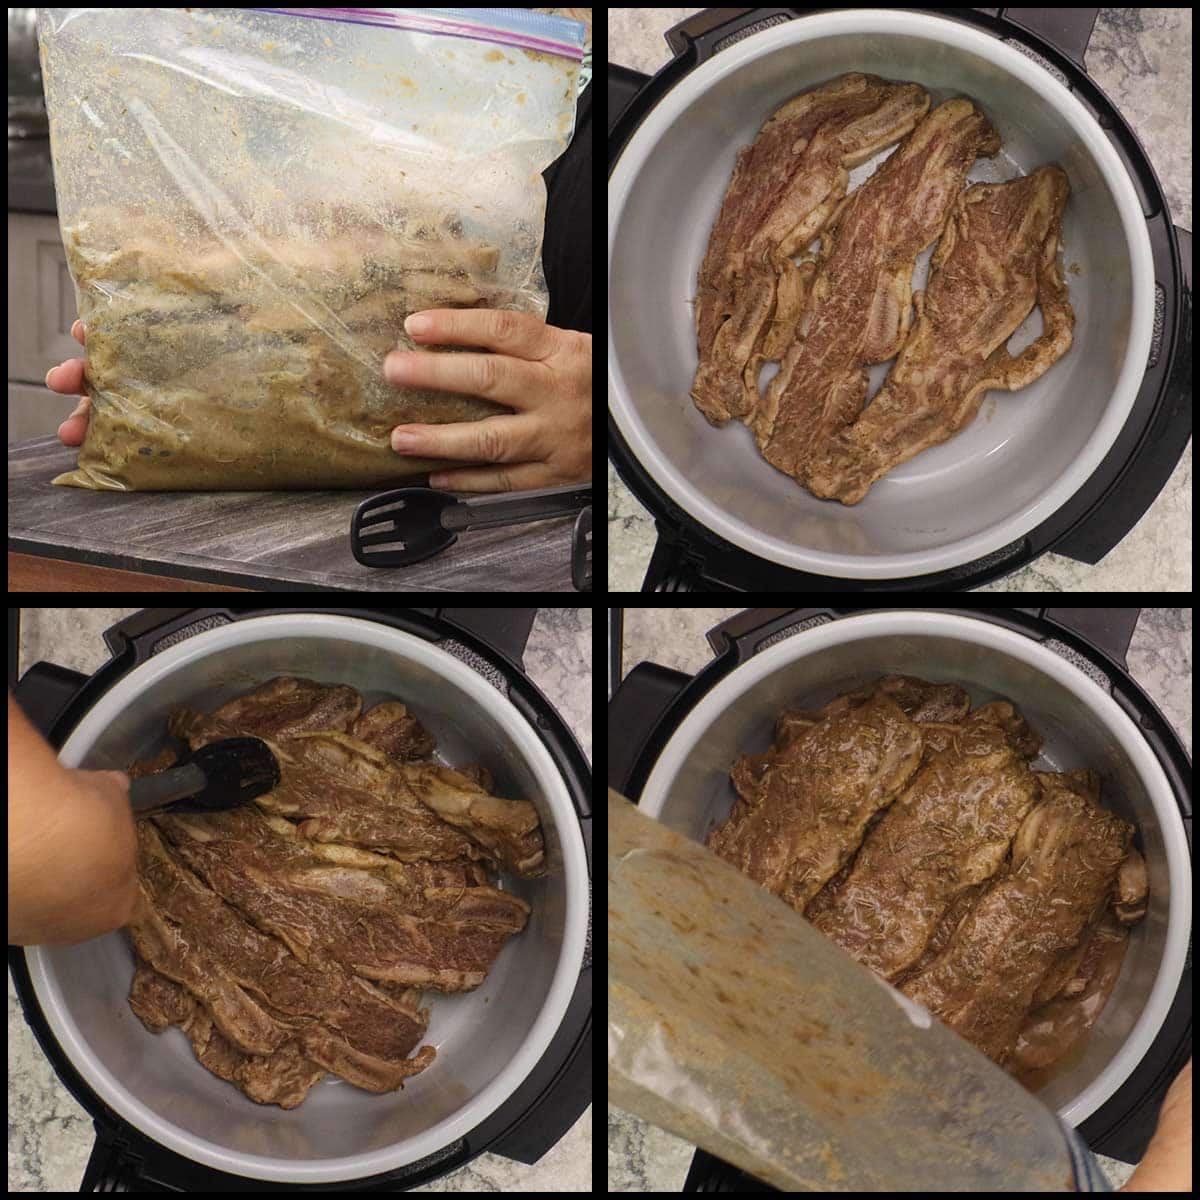
I have tested this recipe 4 times and each and every time the amount of marinade (which can vary from ¼-½ cup) has been enough liquid. If you are using the 8 qt Ninja Foodi and only have ¼ cup of marinade, you can add 1-2 Tablespoons of extra water, but don't add any more than that. As the pot heats up, the marinade on the ribs will also liquify and the ribs give off a lot of fat and juices. You will end up with plenty of liquid, I promise!
Once all the ribs are in the pressure cooker, put the pressure cooker lid on and turn the valve to seal. Pressure cook for 5 minutes. It will take a good 15 minutes for the pot to come to pressure, so don't worry about that.
Once the time is up you can do an immediate release OR wait 10 minutes and then release the pressure. Either one works fine. The reason the immediate release works fine in this recipe is because of a few reasons. One, the ribs are fatty and not lean, and two, they are mostly submerged in liquid at the end of pressure cooking. When meat or any food is submerged in liquid a quick release will not dry it out because the temperature does not change rapidly inside the food like it does if it is above the liquid.
When you open the pressure cooker lid, you will see a lot of liquid in the bottom. You do not need to empty the liquid out before air frying, but you can if you want.
I have made this recipe using a quick release and a 10-minute natural release and both are fine. If you have the extra 10 minutes, go ahead and let the pot naturally release the pressure, and then turn the knob to release any remaining pressure.
Air Frying Flanken Style Ribs
With the Ninja Foodi OL501 which is the style of pressure cooker I'm using, I use the same lid for pressure cooking as I do for air frying. If you have a different model that has a crisping lid that is different from the pressure lid, place the crisping lid on the pressure cooker.
Select Air Fry or Air Crisp and set the temperature to 400℉/200℃ and the time for 20 minutes. Close the lid and air fry the top layer of ribs for about 8 minutes. Then flip and air fry another 3 minutes. Move the ribs around in the pot, exposing as much of the rib meat as you can and continue to air fry until all of the ribs are nicely browned.
You can can remove the ones that are done and put them on a platter. It will take about 20-25 minutes for 4 pounds of ribs to air fry on both sides.
If you do not have a crisping lid, remove the ribs and lay them in a single layer on a sheet tray. Preheat the oven on broil or bake at 500℉/260℃ and place the tray with the ribs in the oven for about 5 minutes or until one side is nicely browned and the fat is starting to render. Flip the ribs and repeat on the other side. You may have to broil in batches if all the ribs don't fit on one sheet pan.
Making the Gravy
The liquid in the pot has a lot of fat in it. If you want to reduce the fat, put the liquid in the fridge until the fat solidifies on top, and then skim some off. You do need some fat to make gravy.
If I'm serving the ribs the same day I make them, I don't worry about removing any of the fat and just proceed with making the gravy.
You can make the gravy several different ways, but the two ways I have tried are using a cornstarch slurry and a flour slurry.
In the video, I did a cornstarch slurry and, while it turned out fine, it really clumped at first. I made the recipe again the next day and used a flour slurry and I was very pleased with the results. So, I recommend the flour slurry and that is what I have in the recipe card below.
If you want to use cornstarch instead, start with 2 Tablespoons of cornstarch mixed with ¼ cup of water and pour it into the pot with the liquid. Turn the sear/sauté on low and stir until it starts to thicken. You can add more cornstarch slurry if it isn't thick enough.
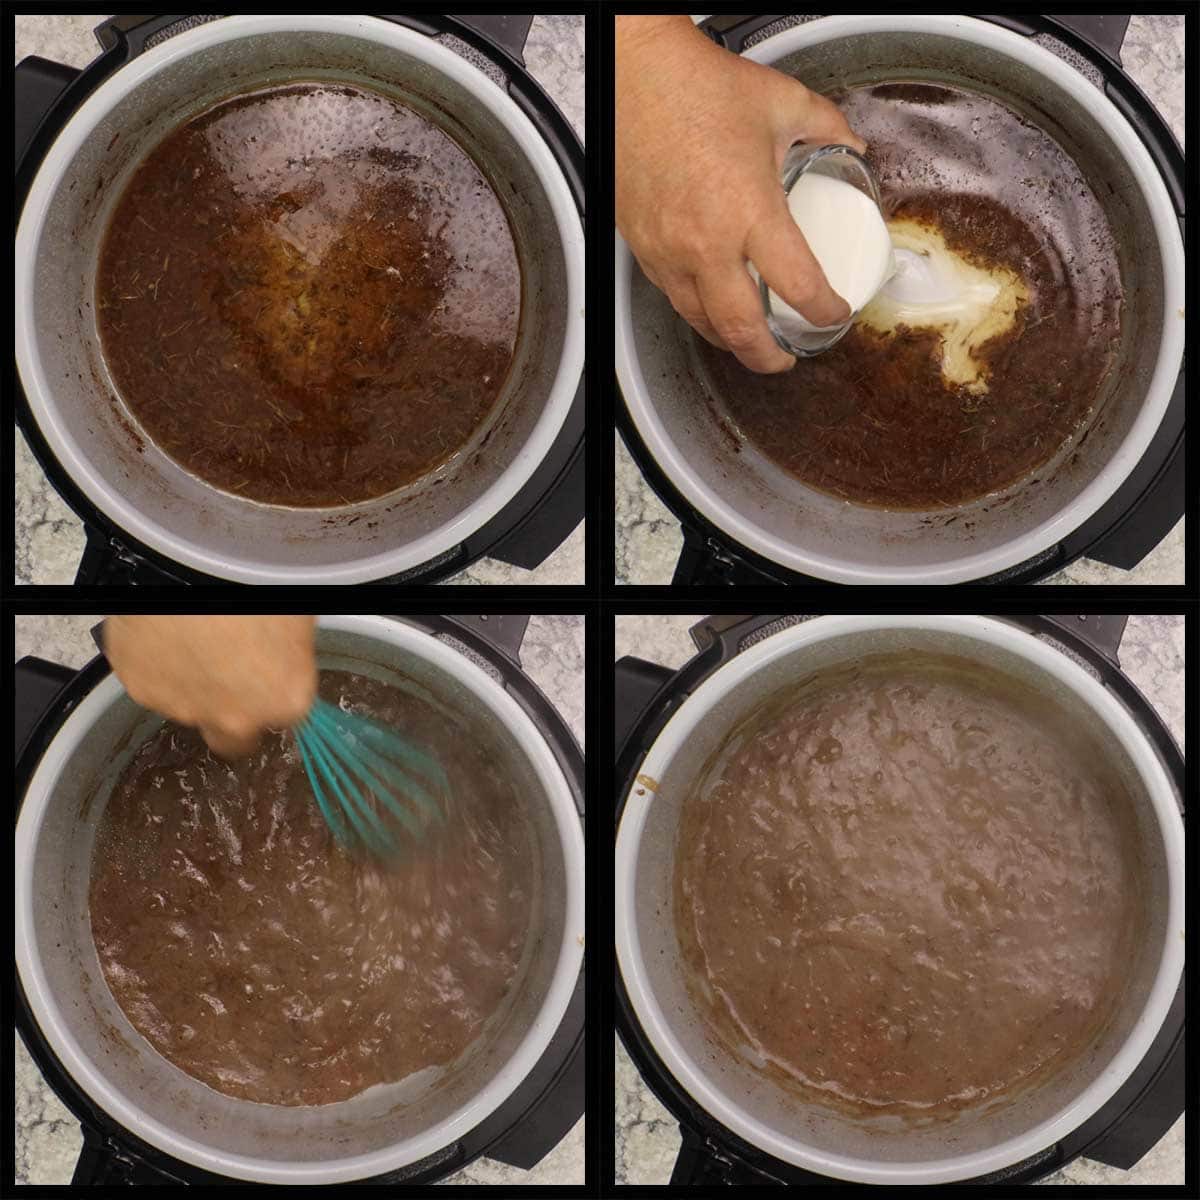
For the flour slurry, mix 3 Tablespoons of flour with ¼ cup of water. If you have a canning jar with a lid, use that, it makes it super easy to shake the flour and water until combined. Make sure there aren't any lumps and pour the mixture into the liquid. Use the sear/sauté function set to medium-low on the Ninja Foodi or Instant Pot to cook the gravy for about 5 minutes, stirring frequently. This will get rid of the flour taste. Taste the gravy and add salt and pepper if needed.
Final Touches
You can either pour the gravy over the ribs or serve it on the side. I do like to sprinkle some fresh or dried parsley or thyme over the ribs to add a little color.
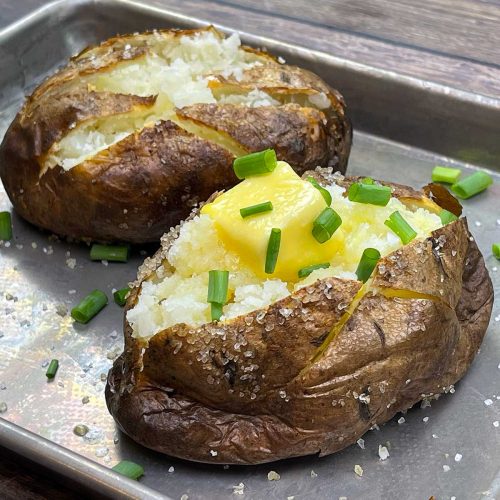
Serve with egg noodles, rice or garlic mashed potatoes, and any green vegetable will round out the meal!
Serve & Enjoy!
Frequently Asked Questions
Absolutely! Make sure the ribs have cooled completely and then place them in a freezer bag or freezer container. You can freeze with or without the gravy. They will stay good in the freezer for up to 6 months if packaged correctly.
Use this recipe! All kidding aside, since flanken ribs are the same cut as short ribs, they do great with braising or pressure cooking followed by a little dry heat to help caramelize the fat and brown the ribs.
Many people grill them over high heat for quick periods of time and, while they are good that way, I don't find them to be very tender. If you wanted to use only dry heat when cooking, like a grill or a smoker, I would cook them over low heat for a long period of time for the best result.
What to serve with short ribs?
Almost anything goes with beef short ribs and I would choose the side dishes based on the flavor profile. For example, if I was making Asian-inspired short ribs with a tangy and sticky sweet and spicy sauce, I would go with wontons, egg rolls, hot & sour soup, or fried rice as side dishes.
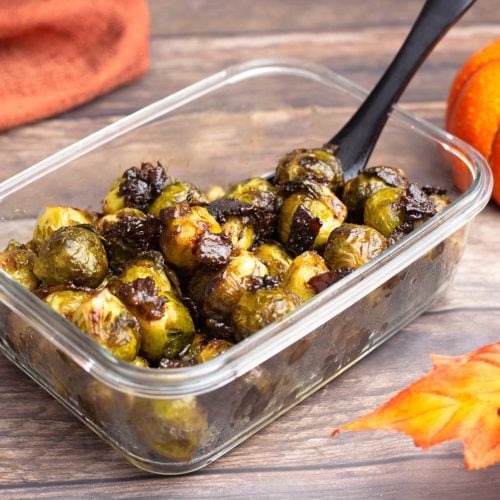
If you are making this recipe with a steak marinade or an American bbq style short ribs, I would serve them with potato salad, mashed potatoes, baked potatoes, asparagus, coleslaw, broccoli or even Brussels Sprouts.
Here are a few of my recipes that would go great with different styles of ribs. You choose your favorites!


Flanken Style Short Ribs Pressure Cooked & Air Crisped
Ingredients
- 3-4 lbs flanken style beef short ribs
Marinade Ingredients
- ½ cup red wine vinegar
- 3 Tablespoons spicy brown mustard or Dijon mustard
- 2 Tablespoons Worcestershire sauce
- 1 Tablespoon minced garlic about 1 small bulb
- 2 teaspoons dried rosemary leaves
- 2 teaspoons onion powder
- 1½ teaspoons dried thyme leaves
- 1½ teaspoons fine grind sea salt or kosher salt
- 1 teaspoon black pepper
Gravy
- juices and fat from cooking the ribs
- 3 Tablespoons all purpose flour
- ¼ cup water
Would you like to save this recipe?
Instructions
Marinating the ribs
- In a medium size bowl, whisk together the ingredients for the marinade and set aside.½ cup red wine vinegar, 3 Tablespoons spicy brown mustard, 2 Tablespoons Worcestershire sauce, 1 Tablespoon minced garlic, 2 teaspoons dried rosemary leaves, 2 teaspoons onion powder, 1½ teaspoons dried thyme leaves, 1½ teaspoons fine grind sea salt, 1 teaspoon black pepper
- Rinse the ribs under cold running water to remove any bone fragments that may be on the ribs. Place the ribs in a freezer bag. I like to place the ribs in a single layer in the bag facing one direction and then place a second layer in the opposite direction so the marinade gets to more of the meat.3-4 lbs flanken style beef short ribs
- Pour the marinade into the bag and squeeze as much air out as you can before sealing the bag. Massage the bag to equally distribute the marinade around the ribs. Place the bag on a tray or in a bowl just in case the bag leaks. Refrigerate in the marinade at least 4 hours, but overnight is best.
Pressure Cooking Flanken Ribs
- Remove the ribs from the refrigerator about 30 minutes before you want to cook them. This allows the marinade to warm up some and you will have more liquid for pressure cooking. If you forget to do this, don't worry about it. I have pressure cooked straight out of the refrigerator and it worked fine.
- Place the ribs into the inner pot of the Ninja Foodi or whatever pressure cooker you are using. I like to layer them alternating just like I do in the bag for marinating. This way they cook more evenly. Pour in the remaining marinade from the bag. You will have between ¼-½ cup of liquid. If you are using the 8 qt Ninja Foodi, you can add an extra 2 Tablespoons of water if you only have ¼ cup of liquid.
- Put the pressure lid on and make sure the valve is in the sealed position. Set the pressure cooker to high pressure and the time to 5 minutes. It will take about 15 minutes for the pot to come to pressure. When the time is up, immediately release the pressure by turning the valve to the vent position. You can also do a natural release for 10 minutes if you prefer, but the ribs are mostly under the liquid so an immediate release does not dry them out.
- Open the pressure lid once all the steam has released and the pin has dropped.
Air Frying the Flanken Ribs
- You do not have to remove the liquid before air frying. Put the crisping down and select the "air fry" or "air crisp" function, depending on your pressure cooker model. Set the temperature to 400℉/200℃ and the time for 20 minutes. Air fry for 8 minutes. Flip the ribs that are browned on top and move them around so as many ribs are exposed to the heat as possible. Air another 3 minutes and move the ribs around again, flipping them over so both sides brown up. Continue this process until all the ribs are nicely browned on both sides. it can take 15-30 minutes depending on how many ribs you have. Make sure to bring the bottom ribs up to the top so they all brown evenly.
- Remove the ribs and place them on a serving platter. You can spoon over some of the juices and serve them as is or you can make gravy with the juices.
Making Gravy
- Whisk together the flour and water until you have a smooth consitency. It's important to have all the lumps out.3 Tablespoons all purpose flour, ¼ cup water, juices and fat from cooking the ribs
- Turn the Ninja Foodi or Pressure Cooker on sear/sauté and select medium low heat. Pour the flour and water mixture into the juices in the pot and whisk together. Whisk while heating the mixture and it will start to thicken. Turn the heat to low and cook the gravy for at least 5 minutes to cook out the flour taste. Taste the gravy and season with salt and pepper if needed. If the gravy is too thick, add some water. If it is too thin, mix together 1-2 Tablespoons of flour in ¼ cup of water and repeat the process.
Final Touches
- You can serve the gravy over the ribs or on the side. I like to add a sprig of fresh rosemary and some fresh thyme to the platter, but if you don't have any, sprinkle some dried parsley over the ribs to give that pop of green to the dish.
- Serve and Enjoy!
Notes
Nutrition
About the Recipe Author, Louise Long
Louise is a full-time recipe creator and food blogger @ The Salted Pepper. She has over 30 years of experience with cooking and recipe development. She owned a restaurant for several years and was a full-time RN until retiring to blog full-time.

She published her first cookbook in the Fall of 2018 and is very interested in writing several more.
Louise is also the creator of an online Ninja Foodi Pressure Cooking Course with over 100 instructional step-by-step videos. People absolutely rave about the course and all the value they have received from it.
Louise has several very active Facebook groups that help people with the basics of cooking and learning more about the appliances they love.
Ninja Foodi Pressure Cooker & Air Crisper 101
Ninja Woodfire Outdoor Grill & Smoker
Louise is also a YouTube creator and you can find most of her recipes in video format on The Salted Pepper YouTube channel.
She is very responsive to messages and eager to help in any way she can. Get more Information about Louise & contact information
I WOULD LOVE TO SEE WHAT YOU ARE COOKING UP IN YOUR KITCHEN! TAG ME @THESALTEDPEPPER ON YOUR FAVORITE SOCIAL MEDIA PLATFORM WHEN YOU MAKE A DISH!
BE SURE TO FOLLOW THE SALTED PEPPER RIGHT HERE ⇓⇓⇓⇓⇓
Bob says
How about just giving a recipe than writing a 10 page essay. Looking somewhere else.
Louise says
Hi Bob! There is a jump to recipe button at the very top of the page that takes you directly to the recipe and you can even print it out. The information above the recipe is helpful information for people who need a little more clarification on certain things. I hope you find the website and recipe that works for you.
Myra says
lol so what I just read is: if you’re not using a ninja into the pot, don’t make this recipe.
Louise says
I have no idea what you mean.
Martin Haworth says
Sorry, but this recipe is a fast track method of ruining your flanken cut short ribs. I thought the 5 minutes pressure cooking seemed short and so gave them 6 minutes in the instant pot. After cooking I allowed 10 minutes natural release and then transferred to my Instant air fryer at 400F for 20 minutes, per the instructions. Luckily I checked after 12 minutes and the ribs were a barely edible jerky. A full 20 minutes would have probably caused a fire. In summary, 5 minutes of pressure cooking will not result in tender meat and 20 minutes at 400F is massively too much. Unless you are happy to guess at the correct times (and temperatures) I would hesitate to call this a recipe - avoid.
Louise says
I'm sorry you had that experience. The instructions state to check and flip the ribs 8 minutes into the air frying time and then every 3 minutes after that until they are nicely browned. It's unclear by your comment if you did that, but I did see that you used a different air fryer and I think that is probably the reason you didn't have great success. Air Fryers come in so many shapes and sizes that it is so important to understand how the different styles cook so you can make adjustments in recipes for your specific appliance. I used a pressure cooker with a crisping lid, so the flanken ribs were pretty far from the heating element. If your air fryer is more compact, your ribs were probably much closer to the heating element which would require a temperature and time adjustment. In the written article above the recipe I give alternatives if you don't have a pressure cooker/air fryer combination cooker and that is to broil them in the oven. I will go back into the article and address stand alone air fryers which will help people avoid the issue you encountered, so I do really appreciate your feedback. The goal of mine is always to provide well tested and delicious recipes that anyone can make and I should have included better instructions for using various air fryers. I do apologize for the oversight.