
Buttery homemade toffee covered in chocolate, what more could we ask for? How about EASY to do! You got it! This recipe takes about 15 minutes of hands-on time and you don't need a thermometer!
Would you like to save this recipe?
Toffee is one of the simplest types of candies to make, in my opinion. While there is the "PERFECT" crunch to a well-made toffee, you will still love the toffee even if it is slightly less than perfect!
This post may contain affiliate links. If you make a purchase after clicking a link, I may earn a small commission. As an Amazon Associate, I earn from qualifying purchases.
I know this because I've made this recipe many times and I didn't always get perfect results, but they were close enough! Funny thing is, the best batch of toffee that I made was when I was filming the video on how to make it and I think I know why!
I talk alot. I know it, my husband knows it, and my friends that watch my YouTube videos know it. So, while I was filming the recipe, I was talking my way through the steps and guess what?
I was talking and let the toffee cook just a tad (and I mean maybe 1 minute) longer than the previous batches and it was PERFECT!
Frequently Asked Questions
When stored properly, toffee will last a long time. At least 3 months in the fridge and longer in the freezer. However, there certain ways that are best for storing toffee and I'll go into detail about that later in the article.
No, you don't. In this recipe we go by the color of the toffee, however, a thermometer is always a useful tool to have in the kitchen. If you want to make a lot of candy, I definitely suggest investing in a good candy thermometer.
There are some recipes for using certain sugar substitutes online, but I cannot vouch for how they turn out because I haven't tried them. I plan on doing that soon!
What's the Difference between Toffee and English Toffee
English Toffee is usually made with brown sugar and butter and doesn't typically have nuts in it.
American Toffee is usually made with white sugar and butter and has nuts, usually almonds in the toffee.
This toffee recipe is an American Toffee without nuts, but you can add them if you like!
What is the Texture of Toffee?
I've read some articles online that say toffee can be soft or hard. This is very confusing to me because caramel is soft and chewy and toffee is harder and will break apart easily, however it is NOT as hard as a brittle.
At the end of the day, it doesn't really matter what the internet says, it matters what you want to make!
The texture of candy is usually a result of the temperature you cook the mixture to and the ingredients used.
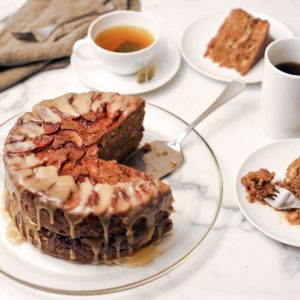
For example, when you want to make a pourable caramel glaze (or icing) that doesn't harden, you don't cook it as long and you add cream. A perfect example is this recipe for Apple Cake.
For a harder caramel, I leave out the cream and cook it longer. This is what I did in my recipe for Caramel Popcorn in the Ninja Foodi. The biggest difference between my caramel popcorn and this toffee is the ratio of sugar to butter and the addition of baking soda. These simple changes result in a completely different flavor and texture.

The homemade toffee has a more pronounced buttery flavor and is a softer texture, while the caramel corn has more of a caramelized sugar flavor and coats the popcorn in a thin hard layer of caramel that is perfectly dry to the touch.
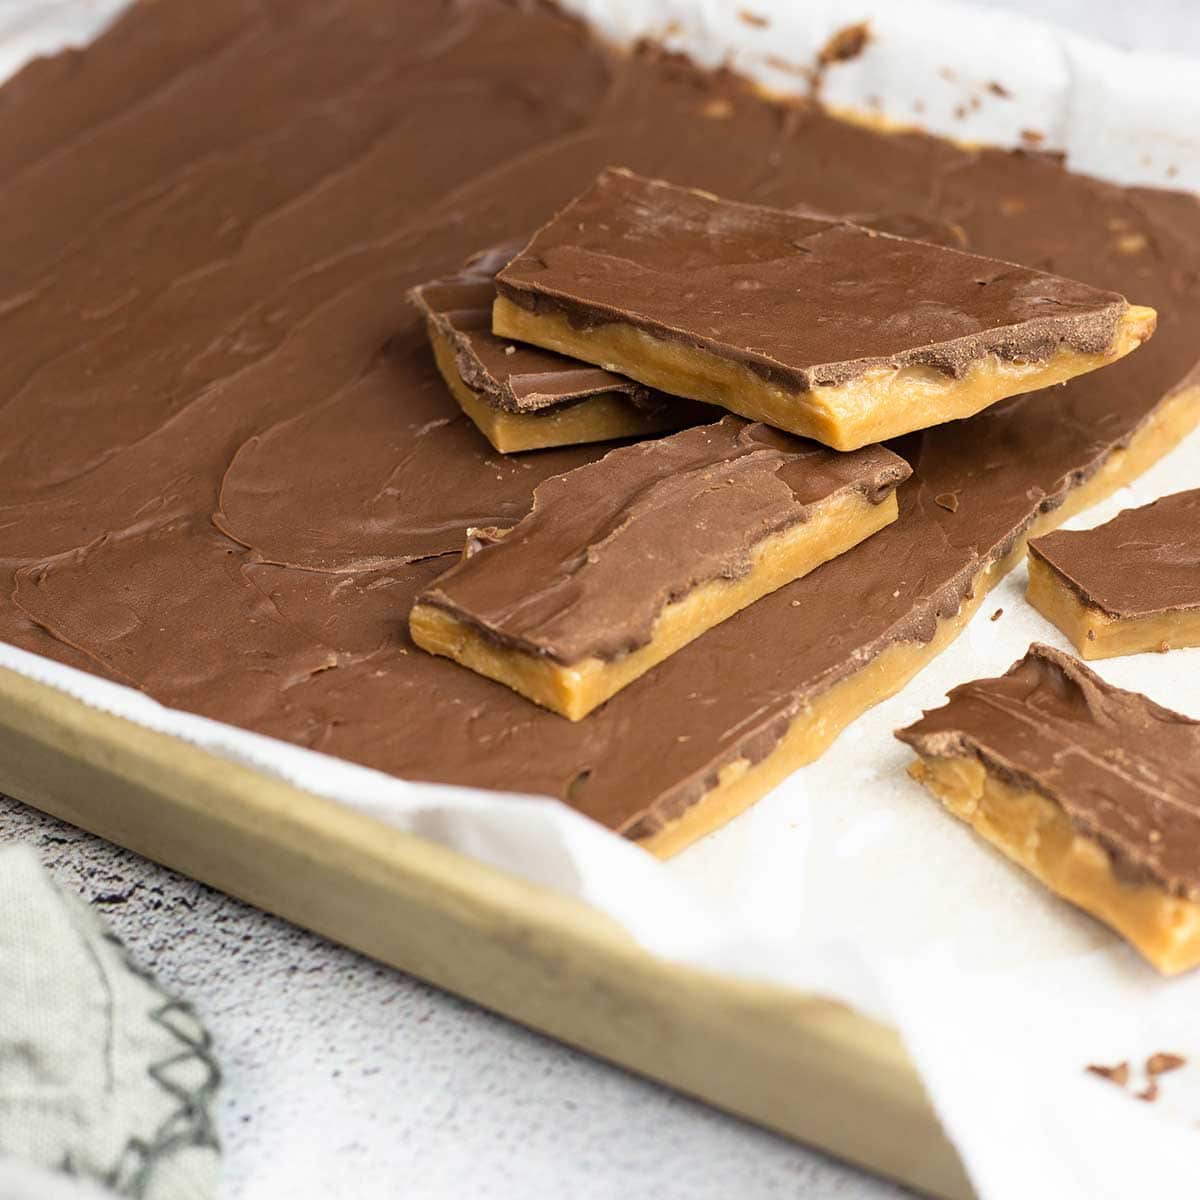
This Homemade Toffee recipe results in the texture of a Heath or a Skor bar. If you have never had either one, you can bite through them with ease and they sort of just melt in your mouth with a buttery deliciousness. YUM!
How do I Store My Homemade Toffee?
Once you chill your toffee for about two hours, remove it from the fridge. This is very important and something I failed to do with one of my batches and it resulted in a stickier toffee.
The refrigerator and sugar aren't friends. The humidity in the fridge will begin to melt the sugar in the toffee and it gets a little sticky and chewy.
I'll never forget the time I made the perfect batch of peanut brittle, it was gorgeous! I put it in the fridge overnight and when I went to get it out, it was a tray of goop. I called my Mom immediately because that is what I do when things go wrong in the kitchen. She is always a great source of experienced knowledge and this is what she said to me:
"Louise, you can't put candy, like brittle, in the fridge. The sugar absorbs the moisture (humidity) in the fridge and softens." Oh! I had no idea, it simply made sense to cool it faster in the fridge!
The same is true with toffee WHEN you put it in the fridge open and on the tray for an extended amount of time, like I did. Don't ask me why I left it in the fridge after my disaster peanut brittle incident, I know better and still did it! It was still delicious, just a little messier to eat!
The batch I left in too long had some melting sugar on the bottom of the toffee, so the toffee was kind of wet and sticky. This is not how you want your toffee to be, so, once it has chilled, remove it from the fridge.
AFTER you break it up into the size pieces you want, you absolutely CAN store it in the fridge IF you put it into sealed containers. This will prevent the humidity from affecting your toffee and it lasts several months in the fridge this way.
You can also store it on the counter for several weeks in a sealed container.
If you want to enjoy your homemade toffee for longer periods of time, you can freeze it, as well. Make sure it is completely cool and break it into the size pieces you want. Then place it in a sealed container (the less air the better) and freeze it. Some people wrap each piece in parchment paper and you can do that. Honestly, I never freeze my toffee because it stays good in the fridge (in a sealed bag or container) longer than it takes to eat it!
How do I Know when My Homemade Toffee has Cooked Long Enough?
Using a candy thermometer is the most precise way to tell when your toffee is done. If you want to use a candy thermometer, you will want to cook the toffee until it reaches about 300℉/149℃.
Personally, I don't use a candy thermometer. I don't even have one (though I should), but have never found a good one that didn't get in the way. I have tried to use an Instant Read, but even though my thermometer is fast to read a temp, I find that I focus too much on taking temps and in that time, the sugar can burn.
Instead, I rely solely on the color, consistency and the smell. It's pretty easy, too! Once the sugar and butter melt and begin to boil, it starts off as a pale yellow and begins to deepen in color until it turns a light mocha color and that is when it is ready.
Some describe the color as being the same as an Almond skin. To me, it resembles my coffee after adding some cream.
There are also changes in the consistency which is best seen in the video below.
Can I add Nuts to My Homemade Toffee?
Of course! You can add whatever type of nuts you want. For the best results I would use toasted nuts that are finely chopped.
Once you prep your pan with the parchment paper, spread the nuts out over the bottom of the pan.
When the toffee is ready, simply pour it over the nuts.
You can also place chocolate chips on the bottom of the pan, pour the toffee over it and then add nuts on top.
Get creative and experiment with different ways of jazzing up your toffee!
Tips for Making Homemade Toffee
The instructions and tips below are the same no matter what appliance you are using to cook your toffee. The process for making toffee in the Ninja Foodi or the Instant Pot is the same as making it in a deep pot on the stove.
Tip #1
Adjust your heat as needed
Heat regulation is important in candy making and if your heat is too high, you could burn the sugar, if it's too low, it will take forever to reach the desired stage.
Using the high sear/sauté on the Ninja Foodi worked perfectly and kept the heat regulated the entire time. I also used the (affiliate link)stainless steel pot and not the ceramic coated pot which will conduct heat differently and you might need to cook a few minutes longer.
If you are making the toffee on the stove, there will be a difference in heat regulation between a gas stove and an electric stove.
Tip # 2
Have all of your ingredients measured out and your pan ready to go BEFORE you start making your toffee.
It might seem like there is plenty of time to get the pan ready while your sugar and butter is melting and if you put your heat on low, there probably is. However, as a rule of thumb, you want to pay attention to the sugar and butter the entire time.
The slightest distraction and you could end up with burnt sugar and that is no fun. You can't fix it if it burns. So, it's much easier to have everything ready to go.
Tip # 3
Use the right size pan to pour your toffee into.
I used a 9x13 pan to pour the toffee into and it gave the perfect thickness to the toffee. For this recipe, try to find a pan about that same size for the best results.
A smaller pan will result in a much thicker toffee and a bigger pan will result in a much thinner toffee, if you spread the toffee out.
You can also pour your toffee onto a parchment lined sheet pan and let it flow free form into whatever shape it wants. This will result in uneven pieces, but many people do it that way.
It can be any material you want as long as it is heat resistant. Glass, metal, stoneware, and even disposable pans will work just fine.
Just keep in mind that the toffee is very hot when it's poured into the pan, so if you are using glass or metal, the bottom will be hot. Use oven mitts when putting it in the fridge to cool.
Instructions for Making Homemade Toffee
I'm detailing the instructions for the Ninja Foodi because that is how I made the recipe, but they are the same no matter which appliance you are using.
Gather your ingredients and prep your pan. I can't stress this enough. When the toffee is done, it's done and if you are scrambling around trying to find your measuring spoon for the vanilla, you could burn the toffee even though the heat is off.
Prep your pan by lining it with parchment paper. This is going to make life much easier when it comes to removing your toffee! I always find that my parchment slips around on me, so I spritz the pan with a little oil and then put the parchment paper over it and it stays in place great.
Turn the Ninja Foodi on High sear/sauté and add the butter and the sugar. I would suggest adding ½-¾ teaspoon of salt if you are using unsalted butter because the salt seems to help keep the fat from separating from the sugar.
*** I use fine grind sea salt, not table salt in this recipe.
I always use salted butter and add the little extra salt at the the end, but you certainly can add the salt in the beginning even if you are using salted butter. Just don't add the vanilla because it will lose its flavor when heated.
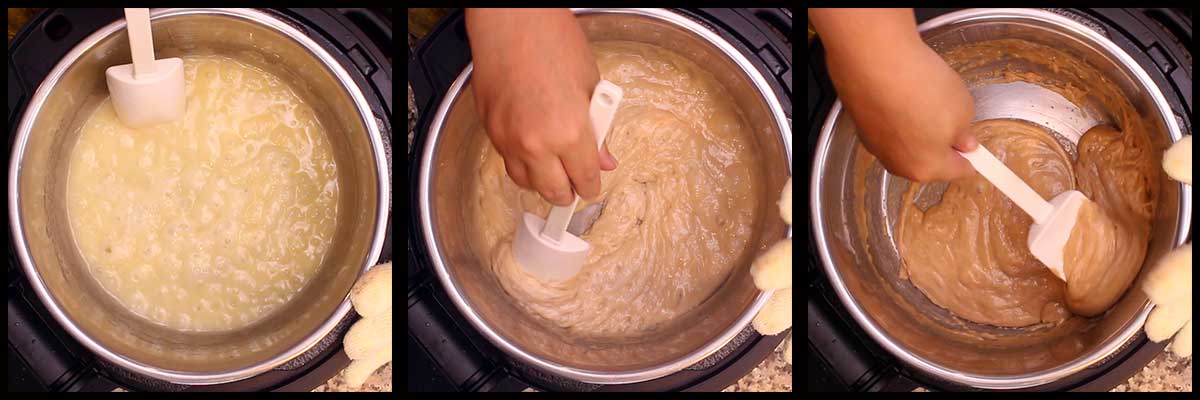
Stir occasionally while the butter and sugar is melting.
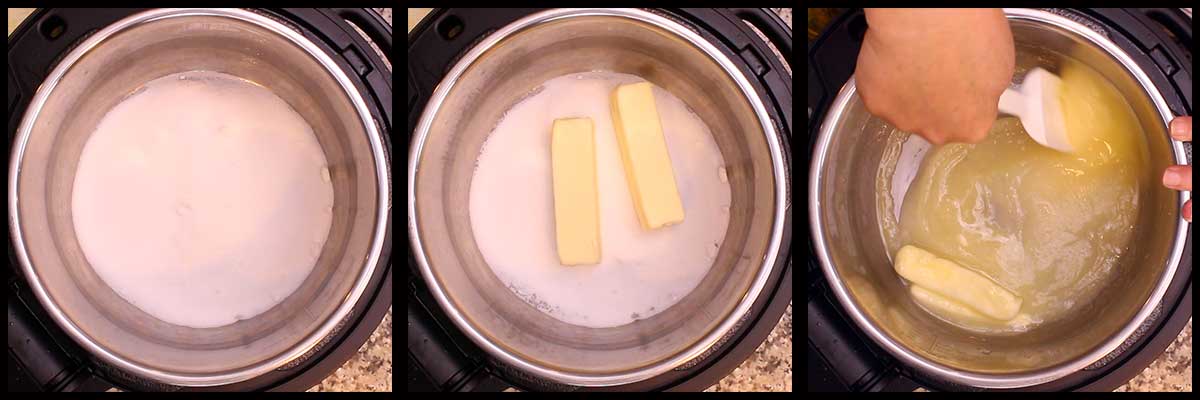
Once the butter and sugar begins to boil, you will want to stir constantly to avoid burning. You can always turn your heat down to medium if you are worried about burning, it will just take longer to reach the desired color and consistency for the toffee.
You will see the bubbles on the top getting bigger and bigger and the mixture will turn from a light yellow to a tan color. Keep stirring. This whole process only takes about 10 minutes and when it turns from light yellow to a light tan, it turns to the slightly darker mocha color in a very short time.
Once it reaches the mocha color, the mixture will be noticeable thicker and the bubbles will be really big. Turn off the Ninja Foodi at this point. You can even remove the pot from the Foodi if you are concerned about carryover heat.
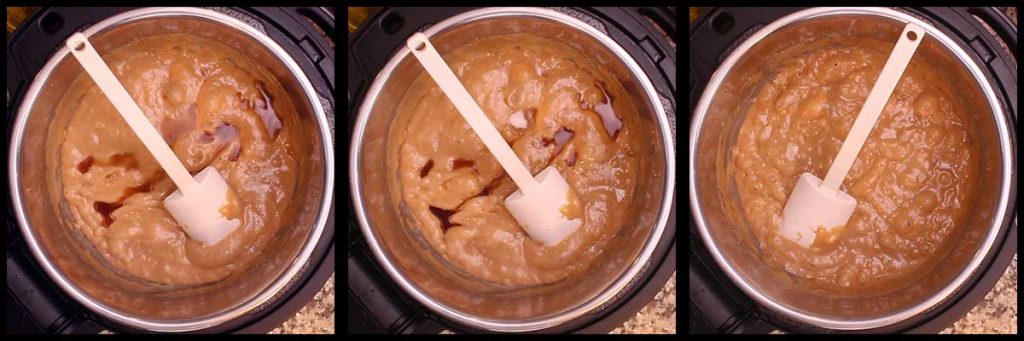
Add in the vanilla and the salt (if you didn't add it earlier) and stir.
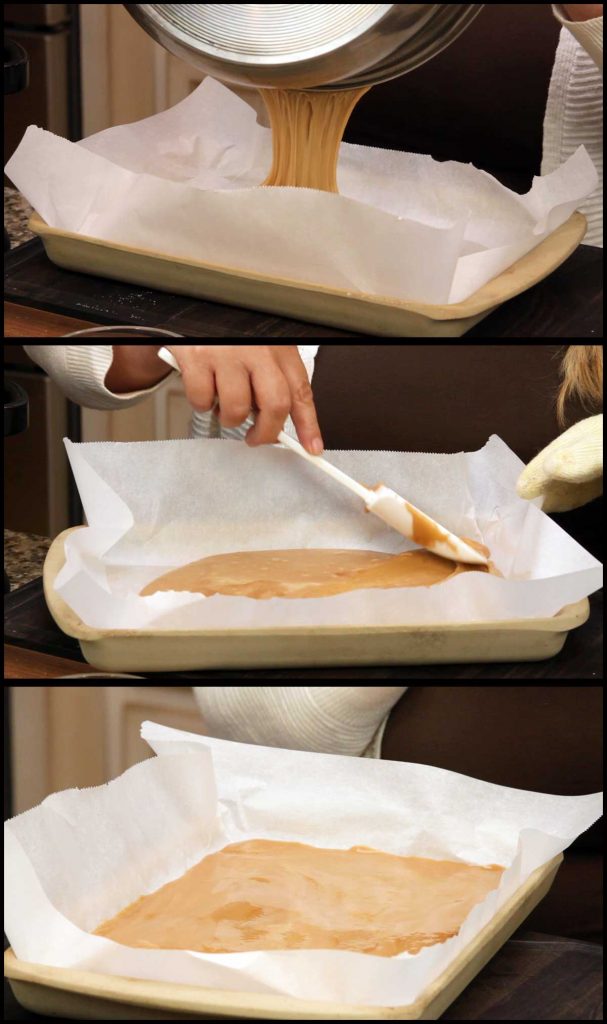
Use heat resistant gloves to pour the toffee into your prepared pan. One of the worst burns you can get in the kitchen is from hot sugar, so definitely wear gloves!
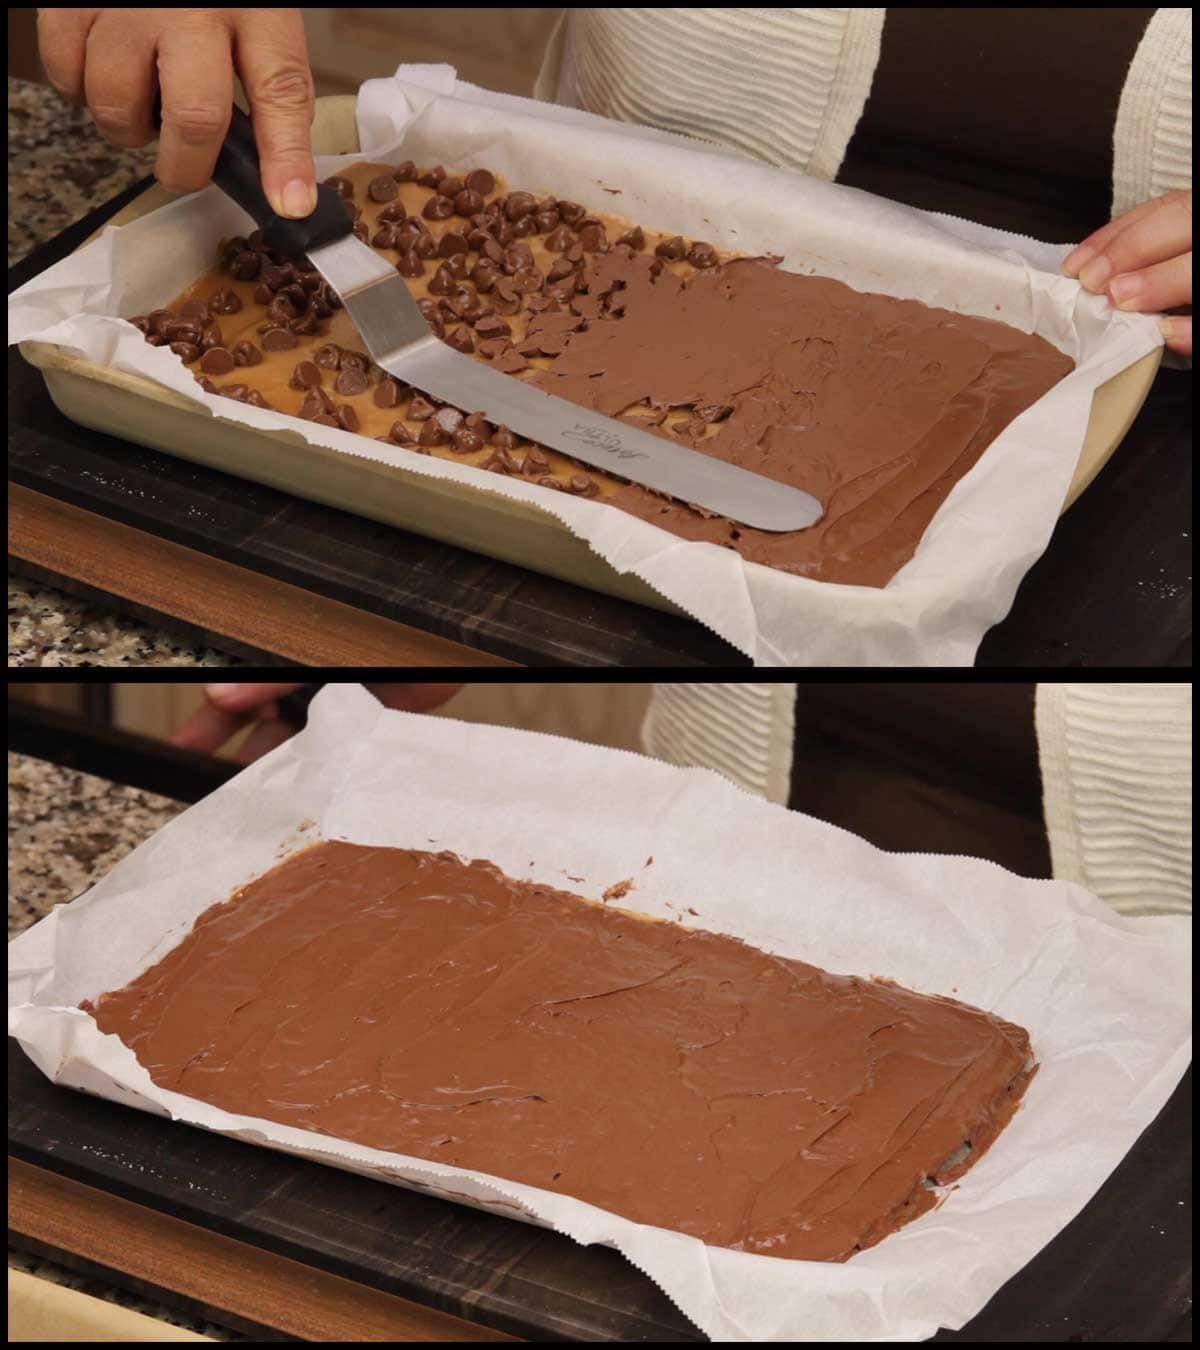
Once all of the toffee has been poured into the pan, spread it out as evenly as you can. If you think you burned any of the toffee on the bottom of the pot avoid scraping the bottom when you pour out the toffee.
Add the chocolate chips by scattering them over the top and immediately cover with foil to trap in the heat and melt the chocolate. After about 10 minutes, remove the foil and spread the chocolate over the top.
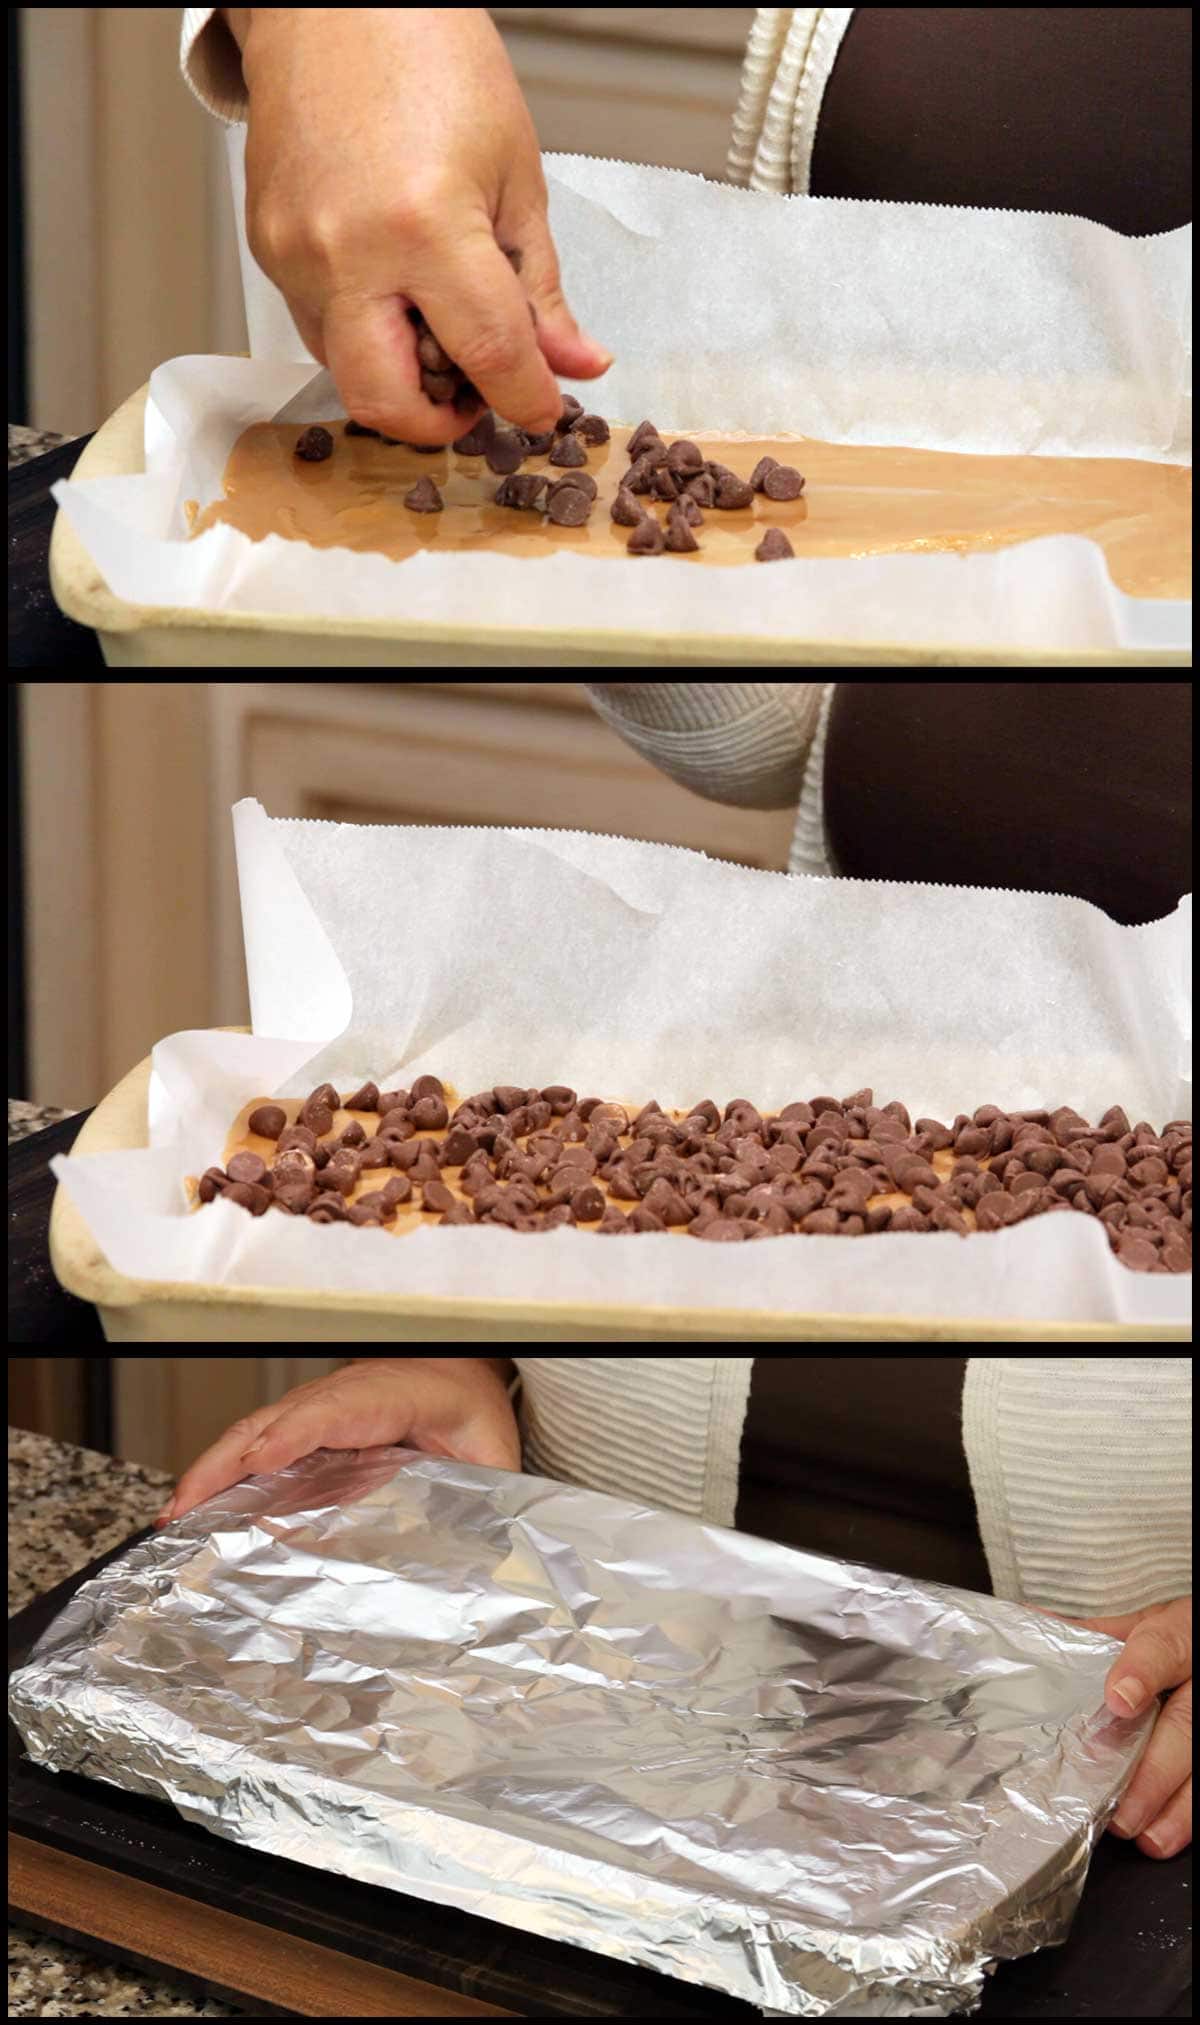
When you first pull off the foil, the chocolate will not look melted. Simply spread with a spatula (or an (affiliate link)offset spatula, which is what I like to use) and if the chocolate spreads easily, it's melted enough. If it doesn't, cover for another 5 minutes.
Now, the hardest part! Let it cool. You can do this at room temp on a wire cooling rack or in the fridge. It will take about 2 hours for the toffee to cool. Leave it uncovered while cooling.
For nutritional purposes, I have based a serving size as 2" x 2" piece of toffee. There are 24 servings in one pan.
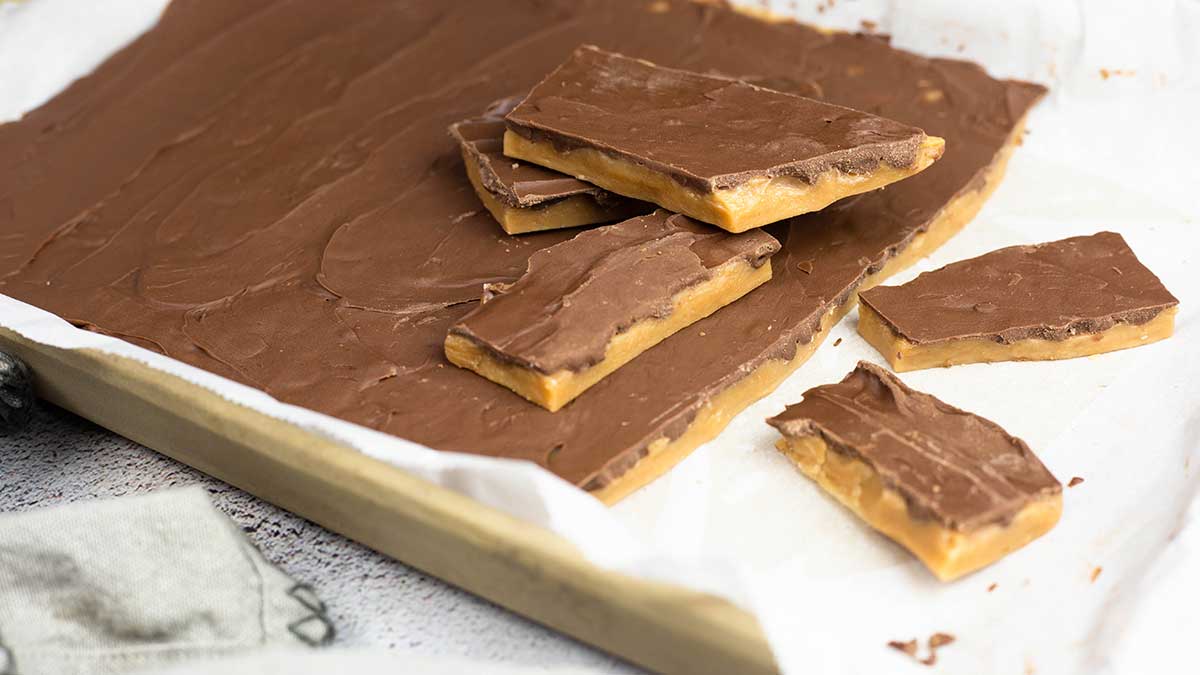
Now, the best part! Lift the parchment from the pan and place on a cutting board or hard surface. Break into pieces. You can make them as big or as small as you want.
Serve & Enjoy!
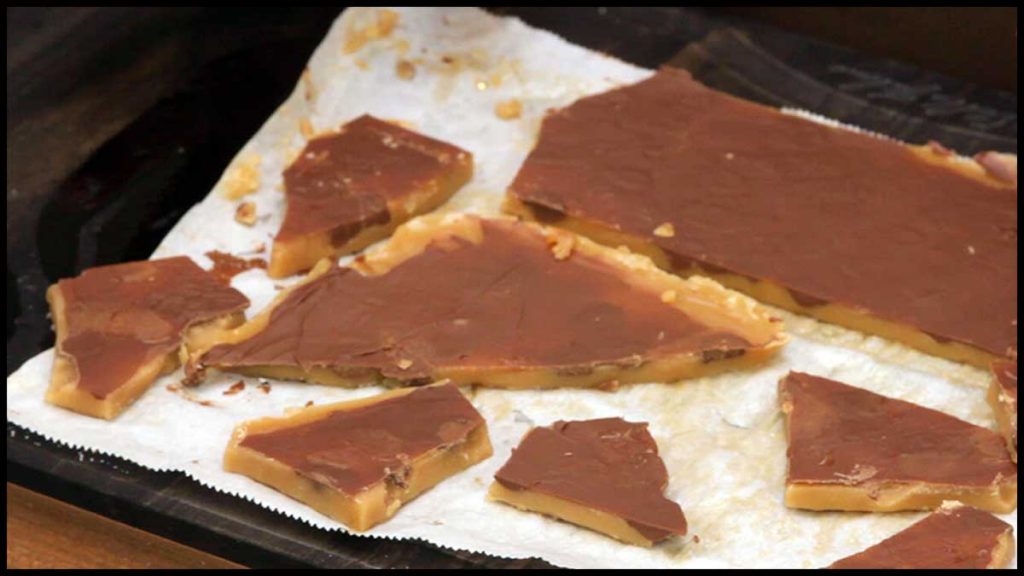
This is the batch I left in the fridge overnight and you can see the sticky sugar on the parchment. The batch that I took out after two hours did not do that.

Homemade Toffee
Ingredients
- 1 cup sugar
- 1 cup butter salted
- 2 teaspoon vanilla
- ½ tsp fine grind sea salt
- 1 cup milk chocolate chips
Would you like to save this recipe?
Instructions
- Measure out all of the ingredients and prep the 9x13 pan by lining it with parchment paper. I usually spritz the pan with a bit of oil to help the parchment stay in place.
- Turn the sear/sauté on high and add in the butter and sugar. If using unsalted butter, see recipe notes. Stir occasionally while the butter and sugar are melting.
- When the butter and sugar begin boiling, you will want to stir constantly. You can decrease your heat if you think you need to, it will just take longer to get to the color and consistency you want.
- You will see the mixture start to form bigger bubbles and it will turn from a pale yellow to a light tan and then it will begin to thicken and even bigger bubbles and turn a light mocha color. This is how you know it's done. Or you can use a candy thermometer and when it reaches 300°F/149°C it is done. Turn off the Ninja Foodi, Instant Pot or Stove.
- Quickly add in the vanilla extract and the salt (if you didn't before). Stir to combine and immediately pour the toffee mixture into your prepared pan.
- Sprinkle the chocolate chips evenly over the top and cover with foil for 10 minutes. Remove the foil and spread the chocolate evenly over the top of the toffee. Place the pan in the fridge for about 2 hours.
- Remove and lift the toffee out of the pan using the parchment paper. Break up into pieces and enjoy!
Notes
Nutrition
About the Recipe Author, Louise Long
Louise is a full-time recipe creator and food blogger @ The Salted Pepper. She has over 30 years of experience with cooking and recipe development. She owned a restaurant for several years and was a full-time RN until retiring to blog full-time.

She published her first cookbook in the Fall of 2018 and is very interested in writing several more.
Louise is also the creator of an online Ninja Foodi Pressure Cooking Course with over 100 instructional step-by-step videos. People absolutely rave about the course and all the value they have received from it.
Louise has several very active Facebook groups that help people with the basics of cooking and learning more about the appliances they love.
Ninja Foodi Pressure Cooker & Air Crisper 101
Ninja Woodfire Outdoor Grill & Smoker
Louise is also a YouTube creator and you can find most of her recipes in video format on The Salted Pepper YouTube channel.
She is very responsive to messages and eager to help in any way she can. Get more Information about Louise & contact information
I WOULD LOVE TO SEE WHAT YOU ARE COOKING UP IN YOUR KITCHEN! TAG ME @THESALTEDPEPPER ON YOUR FAVORITE SOCIAL MEDIA PLATFORM WHEN YOU MAKE A DISH!
BE SURE TO FOLLOW THE SALTED PEPPER RIGHT HERE ⇓⇓⇓⇓⇓
Jennifer Postelnek says
My first batch is in the fridge cooling now. Looks great and everything went just as you described. I made in the IP using Breakstone’s salted butter. I added the sugar slowly as the butter melted all while stirring frequently. I don’t know what the butter breaking means.
Thank can’t wait to taste (did taste little pieces of the toffee that stuck to the pot, yum!) and bring to friends for Christmas.
Thank you for such an easy recipe!
Louise says
I'm so glad to hear that and I hope you love it!
Gene switzet says
I have tried this recipe twice both times the butter separates and I end up with an oily mess. I tried just by color and once with a thermometer it does get hard when it cools but it it is oily or buttery.
Louise says
When the butter splits, it is usually because your temperature is too high and it's approaching the higher heat too quickly before the sugar and butter combine well enough. Try lowering your heat a little and make sure you are using a good pot, if the metal is too thin it heats unevenly.
MrsBrit says
I think the discrepancy online about toffee texture might actually boil down to what is ACTUALLY considered toffee in the UK vs what toffee is in the US. In the UK, despite what we Americans call "English toffee" being akin to a heath bar, toffee in England, and the UK at large, is not at all like that. It is soft, more like caramel, but there is also caramel, so it's weird and confusing. I honestly thing the word is just used interchangeably here...but yeah, British/English toffee is NOT hard crack. It is softer and chewy. Sometimes it is allllmost there and softens to a taffy type texture if you suck on it a while and let the heat of your mouth soften everything up. I do so enjoy "English toffee", though, from an American viewpoint, and its not as easy to find here. We can get Diam bars, which are pretty similar to Heath. They're NOT British, though!
Becky says
Two batches, one in the instant pot one on the stove at a low-medium temperature. Both times the butter broke. What a waste of a pound of butter and 2 cups of sugar.
Louise says
I find it so interesting that I've had 2 people say that happened when they used their instant pot, but another person just messaged me that she used her instant pot and it worked just fine. When the mixture separates like that, it is most likely a temperature control issue. I have tried to force it to happen to me, so I can troubleshoot it for people, but it never has separated. The only thing I can think of is the IP regulates the heat differently from the Foodi. There can be a difference between a ceramic pot and a stainless pot, but I used a stainless pot with the Foodi and that is the most common type of pot that comes with the IP. There are things you can do to bring it back together. Some people have had luck with adding a little water and reheating slowly until it gets up to temp. There are many variables that can affect candy and I am happy to troubleshoot with you if you want to send me an email: louise@thesaltedpepper.com. I know the recip works because tons of people have made it successfully and I tested it many times, but, like I said, candy can be finicky sometimes.
Christine says
I think I figured out the butter breaking. My first batch, I melted the butter first, before pouring in the sugar. It just felt natural to do it this way. BUT, that is definitely NOT how it should be done. It is crucial to add butter and sugar at the same time. That way, the sugar also heats up while the butter melts. I noticed a great deal more butter separation when I added butter separately than when I added butter and sugar together.
Louise says
Yes, they should be melted together. I hope your second batch turned out well!
SWyatt says
I too had this issue so I jumped straight to the comments to see if I was alone in the issue. I think I'll give it one more shot!
patti says
this is so easy to make and soooo delicious! I can't wait to make more for friends and family. it tastes just like a heath bar <3
Louise says
I'm so glad you liked it!
Donna Smith says
I did it exactly as a video and the recipe said. My butter separated from my sugar it wasn’t a high temp I don’t know what possibly went wrong. It’s not an easy no fail recipe by any stretch of the imagination. I’m very disappointed.
Louise says
There are always things that can go wrong when making candy. Most of the time it's temperature control that causes the butter to split and that can be caused by many things. What type of pot did you use and did the sugar and butter have a chance to melt together before it started turning darker? Altitude can also make a difference and sometimes the type of butter used. I've tried to force my toffee to split so I can give guidance on how to bring it back together, but so far it hasn't. It is a mystery to me why 75% of people that make it have a great outcome and about 25% have it split. Trust me, I'm trying to figure it out though. I definitely want to address it in the recipe, there just doesn't seem to be any one thing that is the culprit. It's not the recipe though or it would fail for everyone, so I know the ingredient amounts don't need to be altered. I hope to figure out why it is splitting for some because it really is an easy recipe to make and so delicious.