
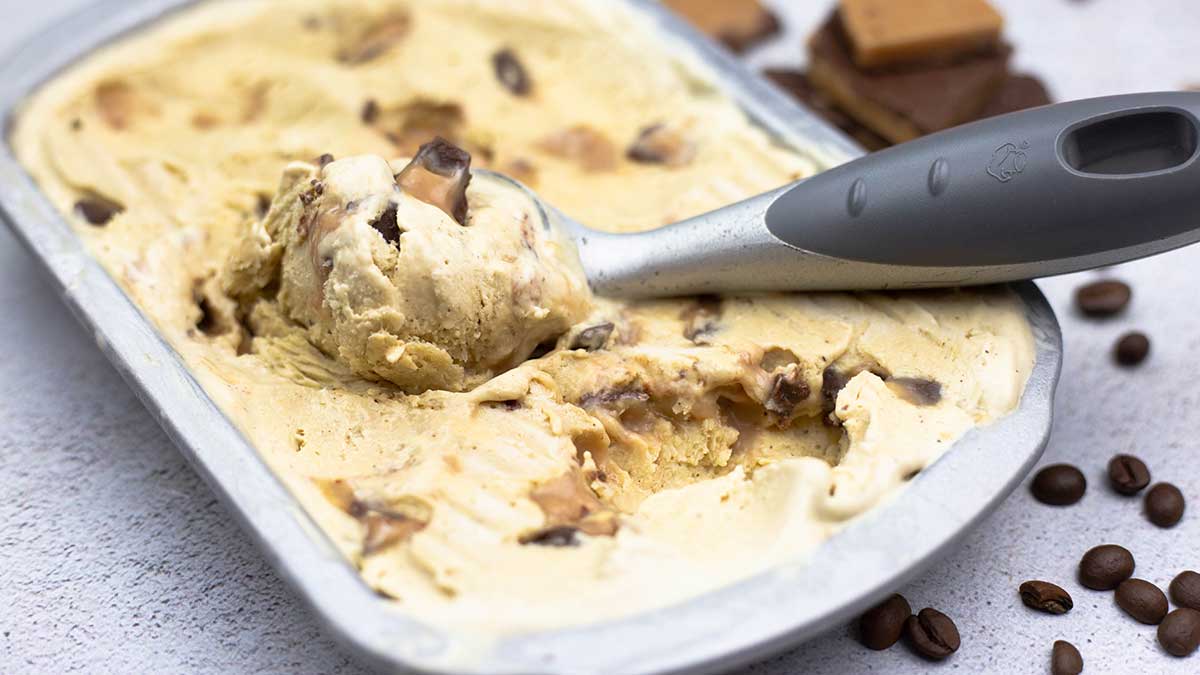
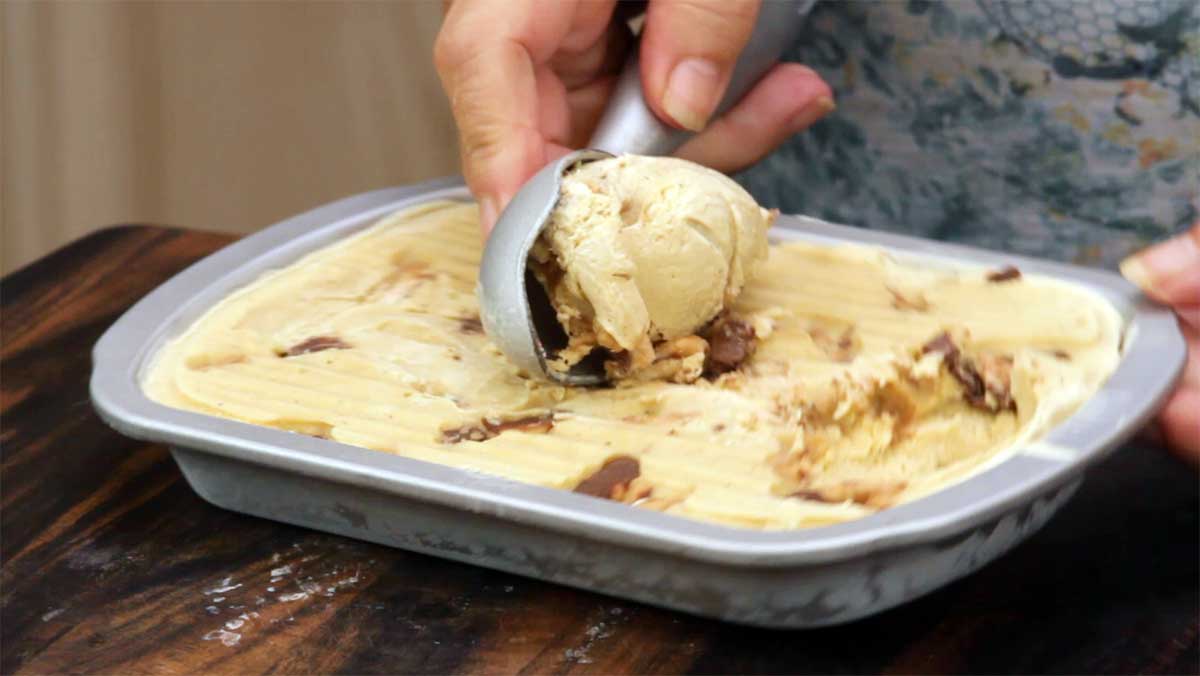
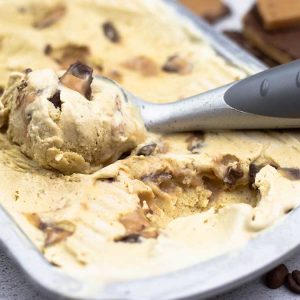
Delicious Coffee Ice Cream with Toffee Pieces that doesn't require an ice cream maker! Just grab your blender, some whole coffee beans, and a few other ingredients and you can whip up a batch in no time at all!
If you've ever had Ben & Jerry's Coffee Heath Bar Ice Cream, that is the inspiration behind this recipe. I wasn't even a coffee fan when I tried this flavor years and years ago. I was hooked!
The coffee flavor is not too strong and it pairs so well with the toffee! Of course, you can leave the toffee out and even boost the coffee flavor if you are a coffee lover.
This post may contain affiliate links. If you make a purchase after clicking a link, I may earn a small commission. As an Amazon Associate, I earn from qualifying purchases.
The blender I use in this recipe is the (affiliate link)Ninja Foodi Cold & Hot Blender because it is able to heat and grind the coffee beans for the perfect infusion of coffee flavor.
You can make this recipe without the Cold & Hot Blender and I will go over how to do that in this article.
Frequently Asked Questions
No, not at all. When followed as written, the ice cream is smooth and creamy after it's frozen. There are variables, just like anything else, that can affect the texture of your ice cream and I go over those a little later in the article.
Yes, if you don't want the coffee flavor, leave the coffee beans out and add in about 2 teaspoon of vanilla extract or some vanilla bean paste AFTER you heat the custard base.
The eggs in this recipe help with the texture of the ice cream, but you can leave them out and increase the xanthan gum to 2-2 ½ teaspoon of xanthan gum.
No, not at all. I saw it just the other day at Walmart. If your local Walmart doesn't carry it, check a health food store. Xanthan gum has been gaining in popularity and it shouldn't be hard to find. You can even order it on Amazon, but I have found it to be a little more expensive there.
What Other Flavors of Ice Cream Can I Make in the Ninja Foodi Cold & Hot Blender?
I've been experimenting a lot with various flavors and haven't found any that don't work. I have had to make adjustments to all of them to get the best outcome, but I encourage you to get creative and make the flavors you love.

Would you like to save this recipe?
So far, I've made a Chocolate Ice Cream that is a chocolate lovers dream! It's so rich and creamy and you can even add this Homemade Toffee to it and make a chocolate butter crunch ice cream!
Or how about adding some peanut butter swirls?
Or nuts and marshmallows for a rocky road ice cream? The sky is the limit with what you can add to make the ice cream flavor that you crave!
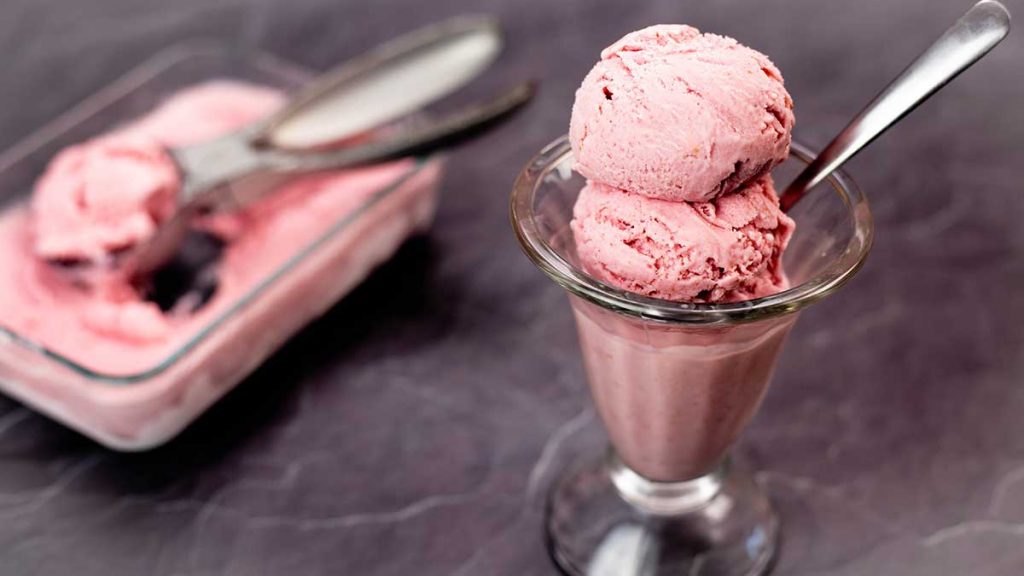
I've also made a Strawberry Ice Cream that turned out spectacular after many trials and errors. I have had some people say that their batch turned out icy and I'm trying to figure out why because mine was smooth and creamy.
If you try the strawberry ice cream, I'd love your feedback!
Some other flavors I'm getting ready to release are; pistachio ice cream, vanilla ice cream, and a banana ice cream. If you have flavor suggestions, leave a comment or send me an email!
Can I use a Sugar Substitute instead of Sugar in this Recipe?
I'm not sure how it would turn out, but I am planning on experimenting with sugar substitutes soon.
I have heard really great things about (affiliate link)Swerve as a 1:1 sugar replacement, so that is where I'm going to start with my testing.
I found a package of Swerve at Walmart and was in shock at the price! It's pricey! It is about the same price on (affiliate link)Amazon, maybe a little less.
Since regular sugar helps to reduce ice crystals, you will probably want to make some adjustments to the recipe you are following so you don't end up with a really icy ice cream.
Since I haven't made one yet using a sugar substitute, I can only give you my suggestions. I would start off by doubling the xanthan gum as well as adding 2-3 tablespoon of a vodka or other liquor to prevent as many ice crystals from forming as possible.
I would also chill the mixture overnight before freezing and use shallow, metal containers for freezing.
Try to avoid opening and closing the freezer while freezing your ice cream. Each time you introduce warm air to the freezer, humidity builds and this can wreak havoc with ice cream and the ice crystals get bigger and bigger.
Please let me know if you try substituting a sugar substitute in place of sugar, I'm very interested in your findings!
What Kind of Toffee Can I use?
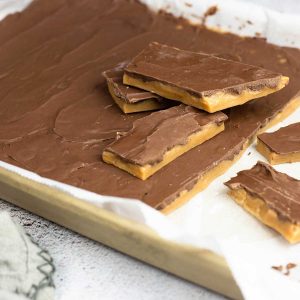
I recommend either making your own homemade toffee or buying 1-2 heath bars or skor bars.
You want a toffee that isn't chewy, but isn't too hard either. I found that making my own was super easy and quick.
If you want to make your own Toffee, give this recipe a try.
Tips for Making Homemade Ice Cream without an Ice Cream Maker
Use xanthan gum as a stabilizer. Until I started experimenting with xanthan gum, the only ice cream I had luck with was the chocolate. All the other flavors were just too icy to be any good.
The amount you need will vary depending on the ice cream type, so start out with 1 teaspoon and see how that does. If you use too much, the texture will be too gummy.
Use egg yolks as a stabilizer. If the ice cream flavor lends itself to using a custard base, then that can really help with preventing ice crystals. That is what I did in this recipe, but a custard base would not be great for a fruit ice cream.
Use Vodka as a stabilizer. 2 tablespoon of Vodka is a great addition to ice cream because you can't taste it. Of course, only do this if kids aren't eating it. You can also use 2 tablespoon of any flavored liquor if the flavor enhances the ice cream. I used banana rum in my banana ice cream and it worked great!
Chill your mixture before freezing. This is especially helpful when you are making an ice cream that is heated before freezing. The quicker your ice cream freezes, the less time the ice crystals have to grow.
Keep the freezer door shut when freezing ice cream. Everytime you open the freezer, you are letting warm air in. When the warm air hits the cold air, it creates humidity and moisture in the freezer. This moisture migrates to the ice cream and will increase the icy texture.
How do I make this Coffee Toffee Ice Cream without the Ninja Foodi Cold & Hot blender?
Here is what I would do. Add the milk, cream, eggs and coffee beans to your blender or food processor and blend just until the beans are broken up some and the eggs, milk, and cream are all blended.
Pour the mixture into a saucepan on the stove or into the inner pot of your Ninja Foodi and heat on medium/low until the mixture reaches 160℉/71℃ and stays there for 3 minutes. Stir occasionally and adjust your heat as needed. Be careful not to get the mixture too hot or you might cook the eggs.
Strain through a (affiliate link)fine sieve strainer to remove the coffee beans. Chill the mixture. *For a more pronounced coffee flavor, chill the mixture with the coffee beans and then strain.
Pour the cold mixture back into the blender or food processor.
Add the sugar/xanthan gum mixture and blend on a high speed for about 1 minute.
Pour into shallow, (affiliate link)metal containers and cover with parchment. Freeze for 6-8 hours.
How to Make Coffee Toffee Ice Cream in the Ninja Foodi Cold & Hot Blender
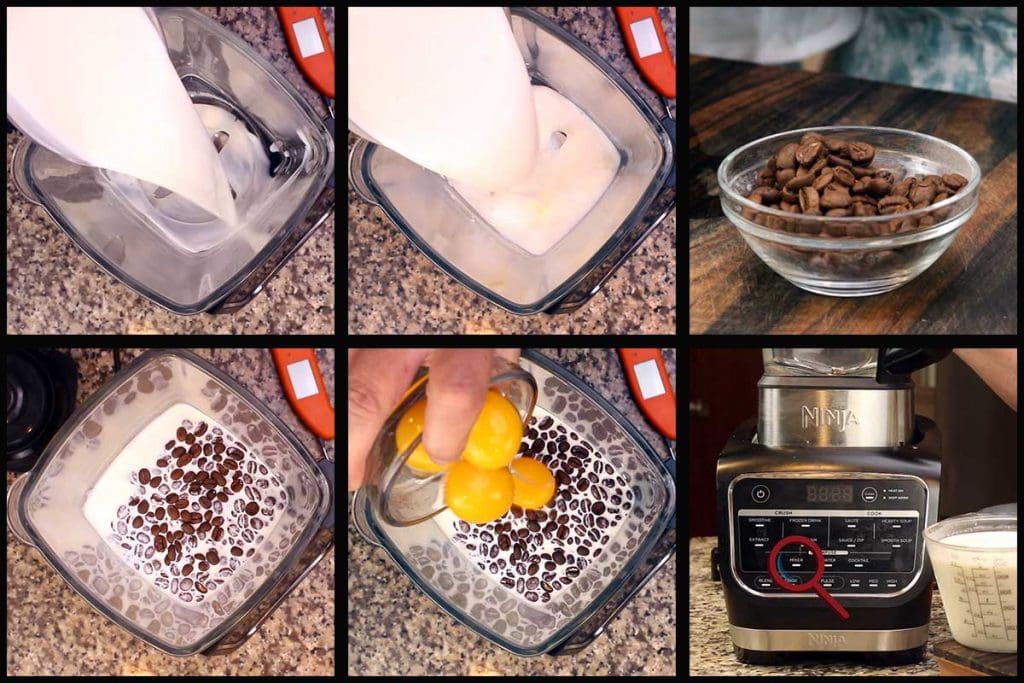
One of the beauties of the Cold & Hot Blender is all the presets that will cook and blend. That comes in handy with this recipe because it makes it super easy to cook the egg yolks and infuse the coffee beans into the cream.
The first thing you want to do is separate the yolks from the whites. You can certainly refrigerate or freeze the egg whites to add to an omelette, but we only use the yolks in this recipe.
Add the cream and milk to the blender. I recommend using whole milk for the best outcome because the fat in it helps keep the ice crystals away. Add the coffee beans and the egg yolks.
You can use any style of roasted coffee bean you like. I used a medium roast that wasn't flavored and it added the perfect touch of coffee flavor without being overwhelming.
Secure the lid on the blender and select the mixer function.
If your blender doesn't have the mixer function, then you can use this guide to determine the best alternative function OR use the manual settings to recreate the mixer function. If using the manual heat function, start on medium and adjust up and down as needed.
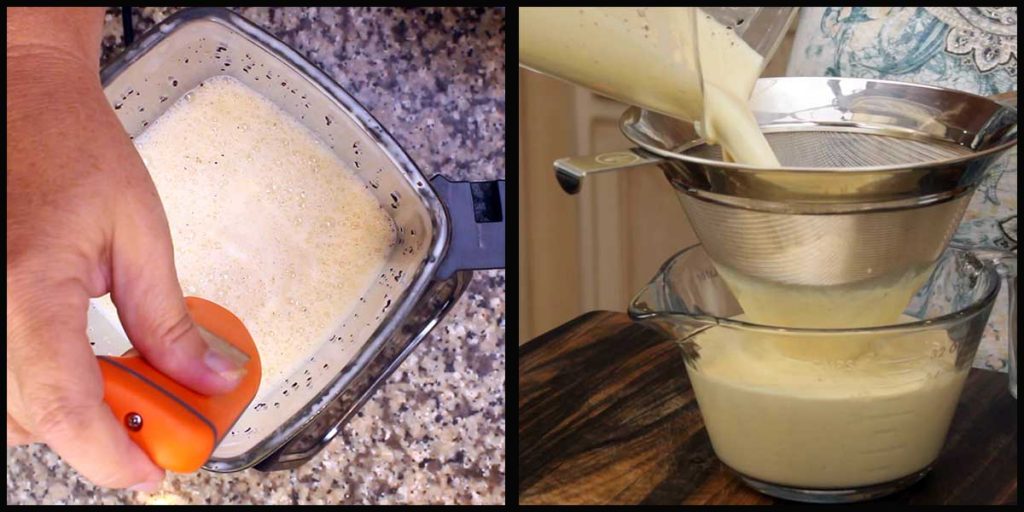
I usually check the temperature with about 4 minutes left on the mixer cycle to make sure it has reached 160℉/71℃ and if it has just let the mixer function finish and move on to straining the coffee beans from the liquid.
In my test batches, I always reached the desired temp, but when I was filming the video, it sat at about 155℉ and I had to use the manual cook mode to get it to temp.
This could happen for various reasons. Cold ingredients are probably the cause in my case. Or, there could be a little cream that sticks to the blender bottom and prevents some of the heat. It doesn't matter what the cause is, but it is important to get the mixture up to 160℉/71℃ and hold it there for 3 minutes. This kills any salmonella that could be present in the egg yolks.
If you didn't want to be bothered with temping the mixture, you can always get pasteurized eggs and that step is already done.
If you have to use the manual heat mode, go ahead and set it to high and give the mixture a good 2 second pulse. Check the temp after 2 minutes and it should be up to 160℉, hold it there for 3 minutes and turn off the blender.
If you really LOVE coffee and want a stronger coffee flavor in your coffee toffee ice cream, then refrigerate the mixture with the coffee beans in it until it has cooled. This will take anywhere from 60 minutes to a couple of hours and the shallower the container, the quicker it will cool.
If you want just a hint of coffee flavor in your ice cream, which is how I like it, strain your mixture through a (affiliate link)fine sieve strainer to remove the coffee beans. A fine sieve strainer is different from a colander, it has smaller holes to trap all the particles of coffee beans. You can also strain it through a coffee filter placed in a colander.
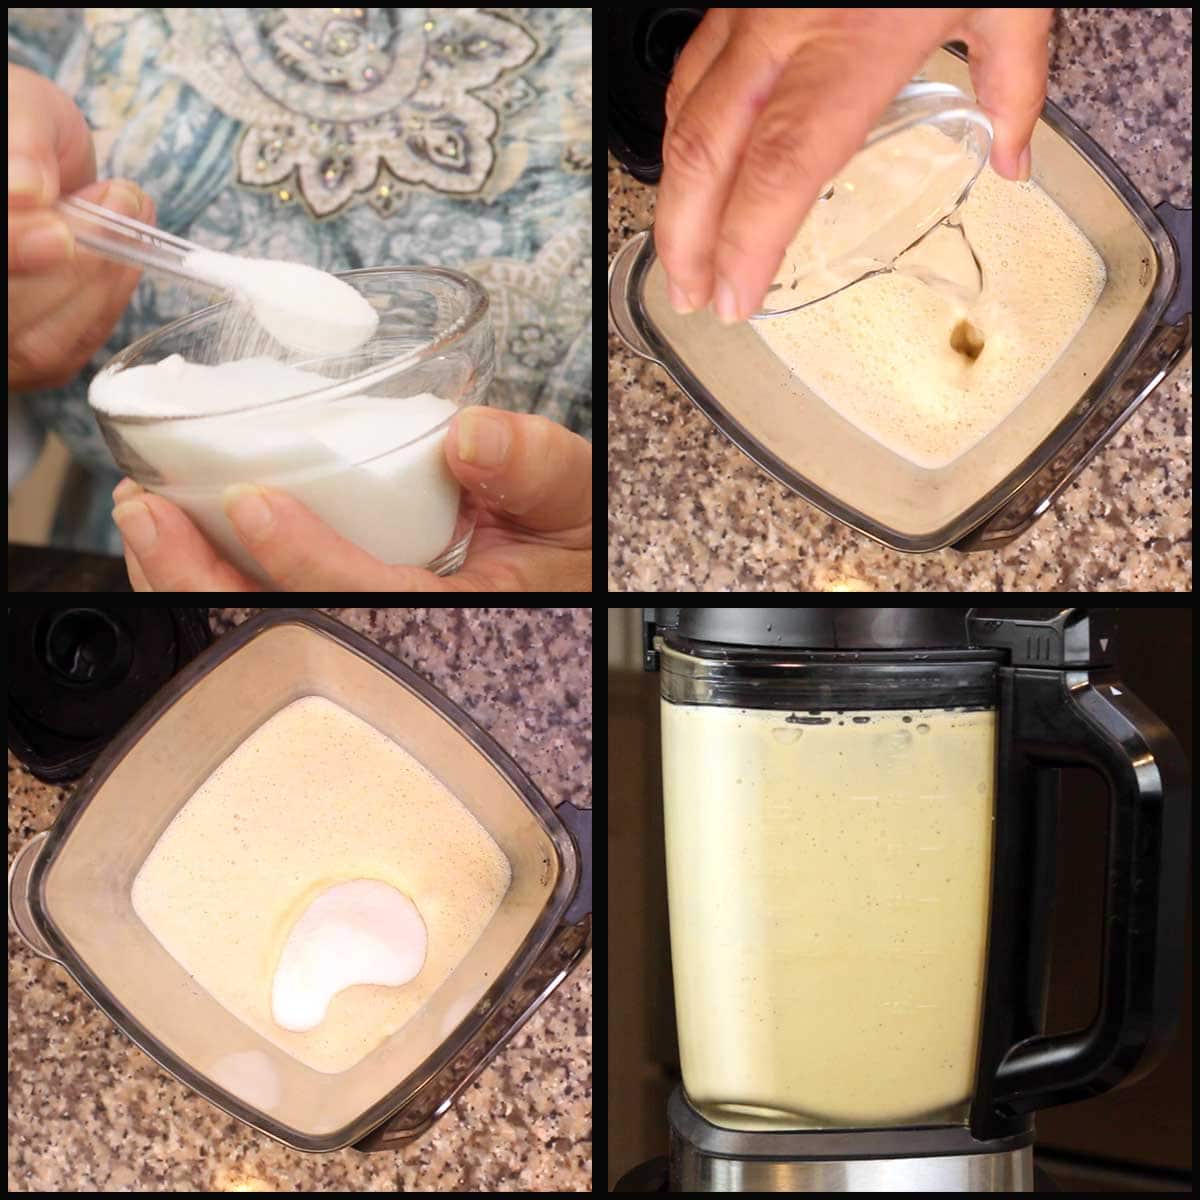
Mix the xanthan gum and the sugar together until well combined. You can't add the xanthan gum to the liquid without it being mixed with the sugar or it will immediately clump and make a mess of your mixture.
Rinse out the blender of any residual coffee bean particles (they don't taste good in the ice cream) and pour the ice cream mixture back into the blender.
Add the vodka and the sugar/xanthan gum and select the ice cream function.
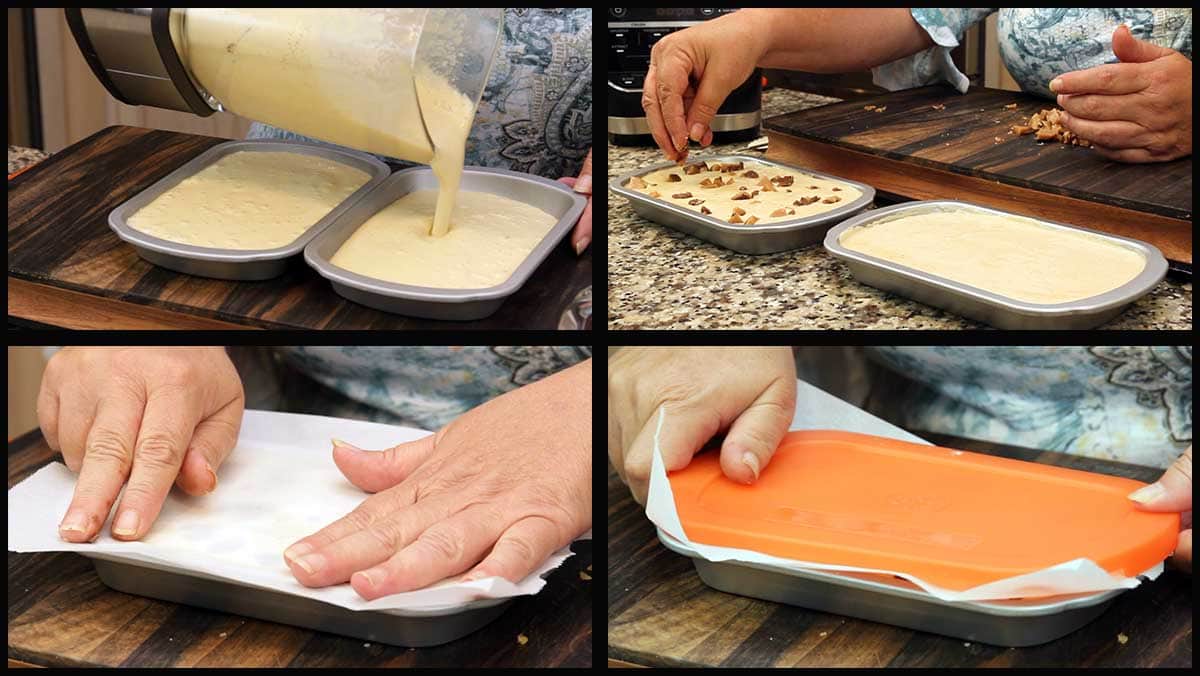
When done, pour into shallow containers. I prefer metal, but other materials work okay. The ones I use are from Pampered Chef and they are pricey, but I like the size and the lid, so it's worth it to me. If you want to check them out, here is the link: (affiliate link)Pampered Chef Freezing & Storage Trays
Break the toffee (either the homemade toffee or grab a heath or skor bar) into small chunks and add to both trays of ice cream.
Cover whatever container you are using with parchment paper and a lid if you have one for that container. Freeze for 6-8 hours.
When you are ready to serve the ice cream, you may need to let it sit out for a few minutes before serving for better scoopability. I found that placing your container on a cooling rack does a better job of even thawing then just sitting it on the counter, especially if you have granite.
Serve & Enjoy!
Coffee Toffee Ice Cream
Equipment
- (affiliate link)Ninja Foodi Cold and Hot Blender
Ingredients
- 1 cup whole Milk
- 2 cups heavy Cream
- 4 egg yolks
- ¼ cup roasted coffee beans
- 2 tablespoon vodka
- ½ cup sugar
- 1 teaspoon (affiliate link)xanthan gum
- ½ cup toffee pieces
Would you like to save this recipe?
Instructions
- Separate the egg whites from the egg yolks. We only use the yolks in this recipe.
- Add the milk, heavy cream, egg yolks, and coffee beans into the pitcher of the Cold & Hot blender. Secure the lid and select the mixer button.
- Check the temp around minute 7 and see if the temp has reached 160°F/71°C, if it has, let the mixer function finish and then continue on with the recipe. If it hasn't, see the recipe notes.
- Strain the coffee beans from the liquid mixture and discard the beans. Mix the sugar and the xanthan gum together to avoid clumping. Rinse the blender out to remove any coffee bean particles because they give the ice cream a gritty texture. Pour the infused cream into the blender, add the vodka and the sugar/xanthan gum. Select the ice cream function.
- Allow the mixture to cool either in the fridge or in the shallow containers until it is below 90°F/32°C, this is so the toffee pieces don't melt and the cooler the mixture going into the freezer, the faster it will freeze and that results in less ice crystals forming.
- Pour the ice cream mixture into shallow containers and break up the toffee on top of the ice cream. Press the pieces of toffee down a little into the ice cream.
- Cover the shallow containers with parchment and a lid if you have one. Freeze for 6-8 hours. Serve & Enjoy!
Notes
Nutrition
About the Recipe Author, Louise Long
Louise is a full-time recipe creator and food blogger @ The Salted Pepper. She has over 30 years of experience with cooking and recipe development. She owned a restaurant for several years and was a full-time RN until retiring to blog full-time.

She published her first cookbook in the Fall of 2018 and is very interested in writing several more.
Louise is also the creator of an online Ninja Foodi Pressure Cooking Course with over 100 instructional step-by-step videos. People absolutely rave about the course and all the value they have received from it.
Louise has several very active Facebook groups that help people with the basics of cooking and learning more about the appliances they love.
Ninja Foodi Pressure Cooker & Air Crisper 101
Ninja Woodfire Outdoor Grill & Smoker
Louise is also a YouTube creator and you can find most of her recipes in video format on The Salted Pepper YouTube channel.
She is very responsive to messages and eager to help in any way she can. Get more Information about Louise & contact information
I WOULD LOVE TO SEE WHAT YOU ARE COOKING UP IN YOUR KITCHEN! TAG ME @THESALTEDPEPPER ON YOUR FAVORITE SOCIAL MEDIA PLATFORM WHEN YOU MAKE A DISH!
BE SURE TO FOLLOW THE SALTED PEPPER RIGHT HERE ⇓⇓⇓⇓⇓
Alice Williams says
Is there a way to make this if you don't have the cold and hot blender?
Tanya says
what function would you use if you dont have the mixer i have the uk version
Kay says
Is there a substitute for the coffee? I don't like coffee ice cream.
Louise says
You can make the vanilla ice cream recipe and add in the toffee. https://thesaltedpepper.com/french-vanilla-bean-ice-cream/
Aprile S. says
Cannot wait to try your Coffee Toffee ice cream and Chocolate ice cream!
Thank you so much! Just love to see what's cookin' on the Salted Pepper!
Louise says
I hope you love them both!