
Making a whole duck can seem a little intimidating at first, but it's just as easy as making a whole chicken when you use the Ninja Foodi!
This Crispy Duck recipe is very easy to make and the results are fabulous without much effort! Roasting a duck is perfect for Christmastime and easy enough for any time of the year!

Would you like to save this recipe?
Have you ever heard about the technique of boiling the duck to render the fat and then crisping the skin? Well, I've tried it and what a mess that is! I'm not saying that it won't work -- great chefs use that technique -- but, it's not for me!
I also tried pressure cooking the duck first and that was a disaster. Then I got to thinking, why not steam it to partial cook and render the fat so the meat stays moist and then use air fryer to crisp the skin! Turns out that works perfectly and it's my favorite way to make a duck! Don't worry if you don't have the new Ninja Foodi that I use in this recipe, you can make it in the older models without the steam & crisp function.
This method also works beautifully with whole chickens and here is my recipe: Steam & Crisped Whole Chicken
Frequently Asked Questions
This recipe uses the Ninja Foodi Pressure Cooker & Air Crisper and I think it would be hard to fit a whole duck in the XL Grill, but if you have the deeper 5-in-1 original grill and get a small enough duck, you can do it that way.
Since there isn't an easy way to steam the duck in the grill, you can either steam it on the stove or skip that part and lower your heat to around 275°F and air fry it for about 40 minutes. Always check on your food when air frying, adjust the temperature if needed and cook to temp, not time.
The USDA recommends cooking duck to an internal temperature of 165°F, same as chicken. However, many restaurants serve duck breast medium rare, which is what I prefer.
I try to cook my duck breast to an internal temp of 145°F, but it's important that you do what's comfortable for you. I will say that my last whole duck reached temperatures above 165°F and it was still juicy and absolutely amazing. I credit that to the moist cooking environment of steaming first.
I recommend separating the duck pieces after cooking a whole duck so that when you go to reheat, you can control the time on each piece of duck. The duck legs can handle a longer reheat time, while the breast tends to dry out.
To reheat the duck, wrap it in aluminum foil or, if you don't like using aluminum foil, use a pan and cover it with a silicone cover. You can either steam it to reheat, which will keep it moister, or use a low temperature in the oven or in your air fryer.
The best way to thaw a frozen duck is in the refrigerator. Allow at least 2 days for the duck to completely thaw. If you are in a hurry, you can place the duck (keep it in the wrapping) in a bowl of cold water and set the bowl in the refrigerator. The water will pull the cold from the duck and thaw it faster.
Ingredients & Substitutions
Duck
I used a 6 pound duck in this recipe and the timing suggestions are for that size. If your duck weighs less, decrease your cooking time by about 10-15 minutes. I'm not sure that a larger duck will fit in the Foodi, especially the 6.5 quart. I always recommend to check the size of the duck with your size Ninja Foodi before you plan on cooking it.
To do this, the duck needs to be thawed because it will be more pliable and more likely to fit. Test the duck out on the rack in the low position and if it sits too high, try using a sling. If you don't have a sling, you can set it on any low surface that allows a few inches of clearance from the crisping lid. You could also use full size potatoes and sit the duck on top of them to cook. Keep in mind that the duck will produce a lot of juices and fat during the cooking process and if it sits in those juices, the skin on the bottom will not crisp up. This is fine to do as long as you don't mind the underside of the duck not being brown and crisp.
Fruits & Vegetables for the Duck Cavity
What you stuff the duck cavity with is completely up to you. You don't even have to stuff it all if you don't want to.
The reason I stuff it is because I like the domed shape of the duck when the cavity is stuffed. Otherwise the duck kind of lays flat. The other reason is flavor and moisture.
Although very mild, the flavors do infuse into the duck. You can use garlic cloves, apples, oranges, onions, celery, rosemary, thyme sprigs, whole bay leaves, onions. Pretty much anything you want. I wouldn't put something like cranberries in the cavity though because they will pop and get their red juice everywhere and I don't think it would be that appealing.
Seasoning Blend
You can use any type of seasoning blend you like or use a simple salt and pepper blend. Warm spices, like cloves, go really well with duck and the seasoning blend I use is very tasty, if you want to stick with that. It also goes well with the cranberry dipping sauce.
I usually only season the top of the duck, but you can season the entire duck if you prefer. If you are using my seasoning blend, double the ingredients to season both the top and the bottom.
Potatoes
I wanted to make a side dish at the same time I was cooking the duck, and fingerling potatoes worked perfectly. They were so flavorful and perfectly cooked!
You can use different types of potatoes, like Russet, Yukon gold, or even new potatoes. Depending on how small your new potatoes are, you might want to leave them whole. If they are bigger, cut them in half or in quarters. For the Russets or Yukon Gold, I would cut them in quarters so they cook fully and absorb all the yumminess from the duck drippings.
You can also use sweet potatoes cut into quarters.
Cranberry Dipping Sauce
You can make any kind of sauce that you like for your duck or skip it altogether.
Fruits like orange, raspberry, cranberry, and plum are perfect with duck. You can also use the packet that comes with with many of the store-bought brands of duck, but I don't know how it tastes because I've never used one.
Plum sauce is very popular to serve with duck and you can do that the same way I made my cranberry sauce, just substitute the cranberries with about 3 plums.
Preparing the Duck Before Cooking
Cleaning the Duck
Make sure the duck is completely thawed. Remove the neck and anything else that is in the duck cavity. I like to rinse out the cavity of the duck with cold water and then season it with salt and pepper. I only use about ½ teaspoons of fine grind sea salt and ¼ teaspoon of black pepper and rub it around inside the cavity.
Piercing the Duck Skin
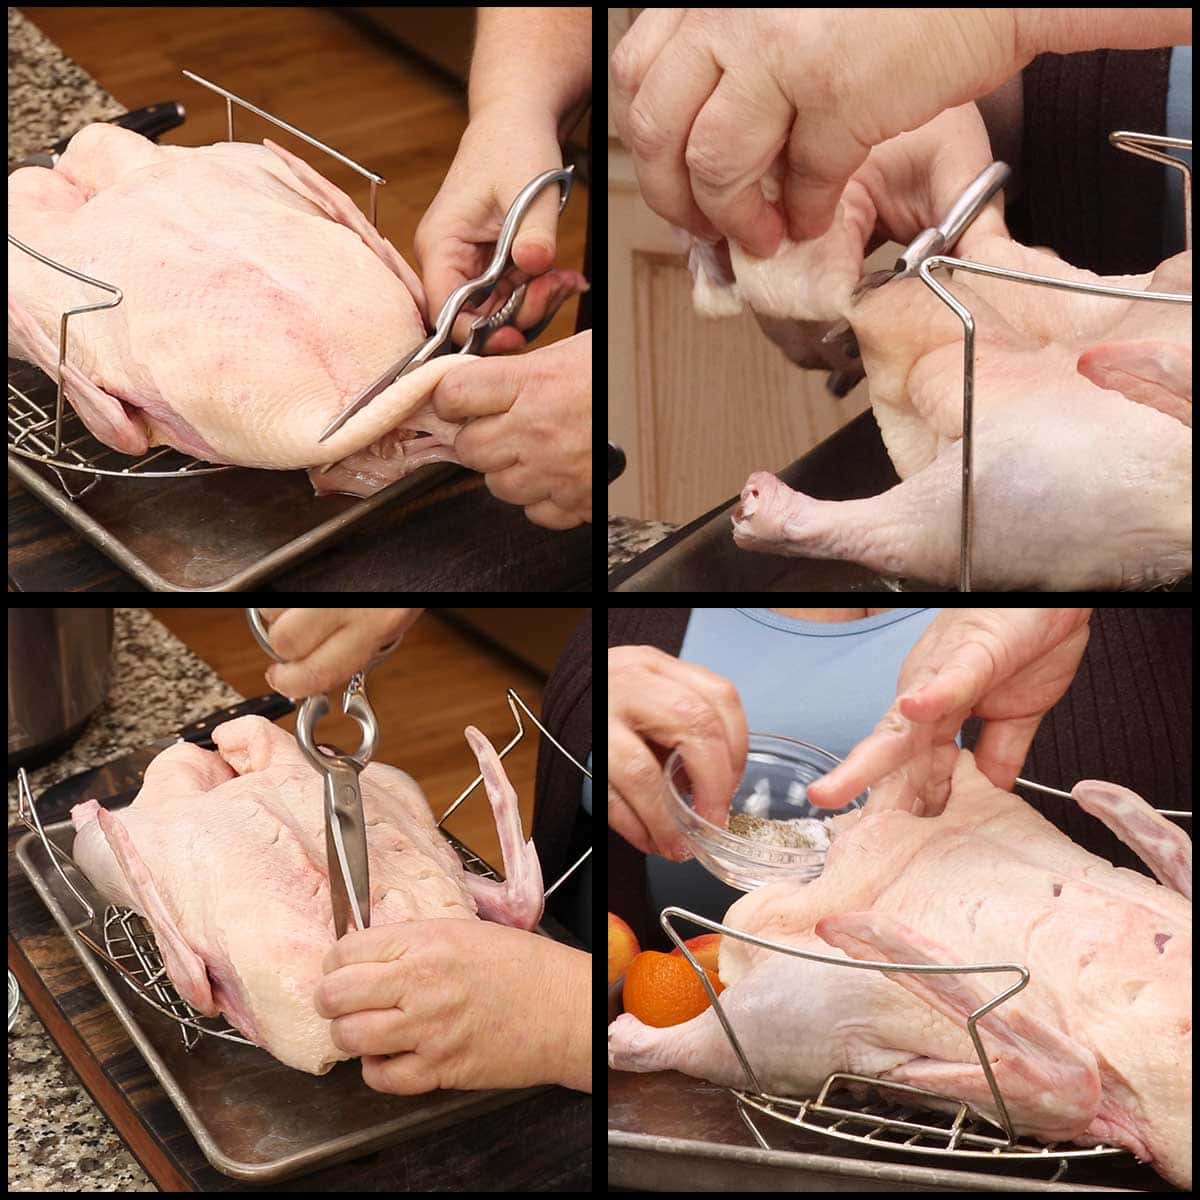
One important thing to do with duck prior to roasting it is to pierce the skin. Ducks have a lot of fat between the skin and the meat and you want most of it to render during the cooking process. Cutting the skin helps the excess fat render out and will result in crisper skin. You want to be careful not to cut too deep because, if you accidentally cut into the meat, it can dry out.
I've tried many methods for doing this and the easiest way for me is using sharp kitchen scissors.
I pull up the skin and snip. That way I know I will not accidentally cut into the meat. It doesn't look as beautiful as using a knife and making pretty patterns, but it's quicker and easier in my opinion.
If you see or feel any prickly parts of the feather stem, grip firmly with your fingers and pull it out. If your duck wasn't plucked well, which happens sometimes with lower cost ducks or wild ducks, it might be easier to get a pair of tweezers to remove the quills.
Stuffing the Duck Cavity
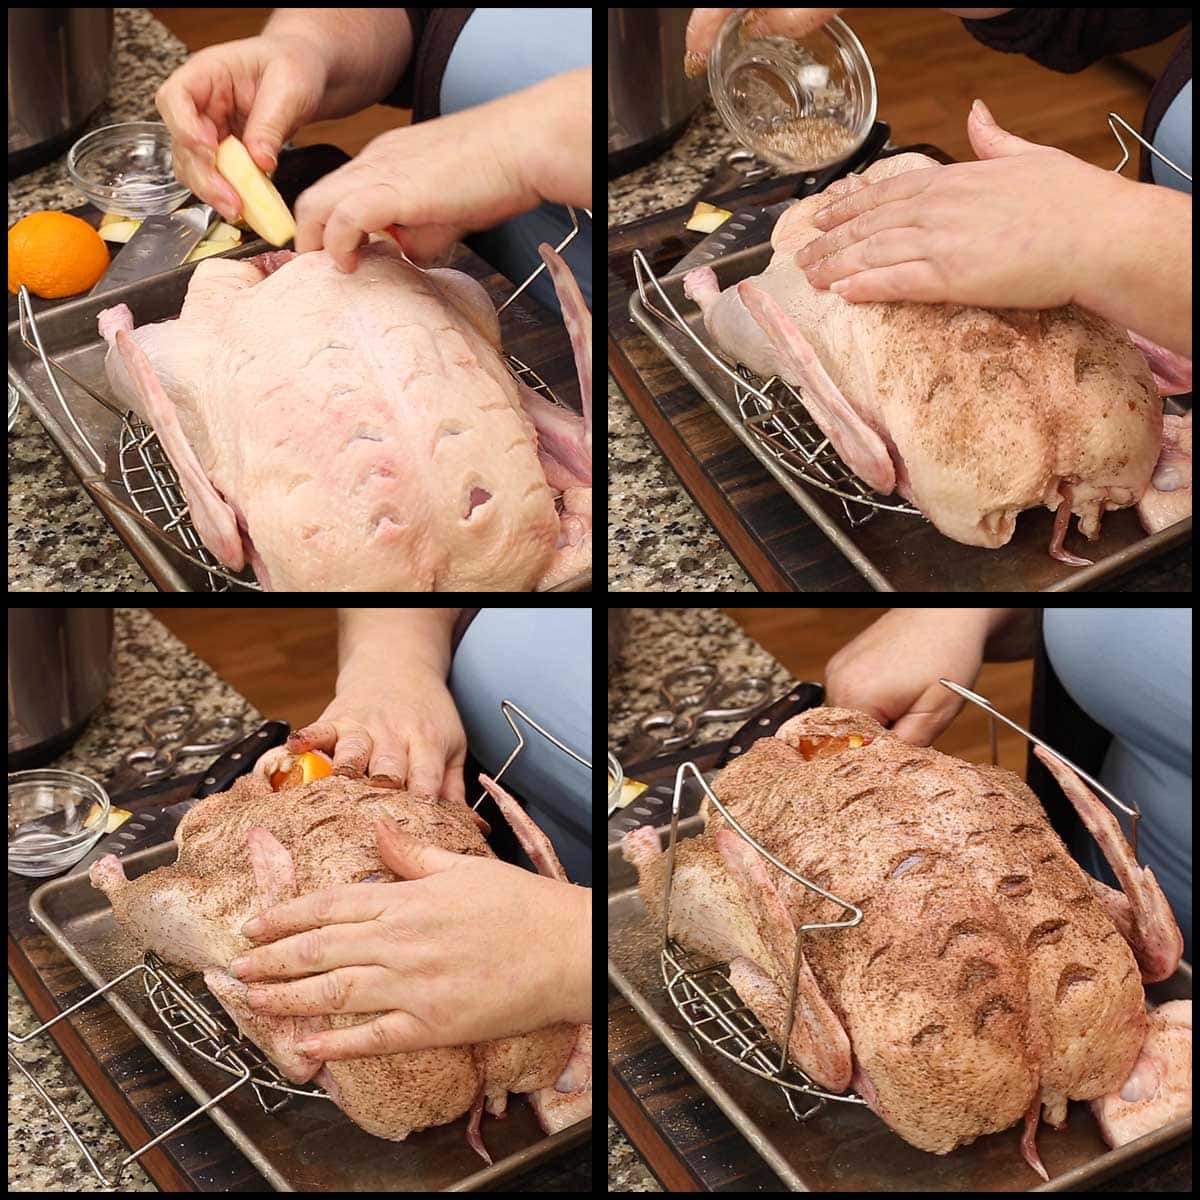
This is completely optional, you don't have to stuff the cavity if you don't want to. I do it to infuse some flavor, provide some moisture from the steam produced by the cooking fruit and because it fills up the cavity and domes the duck breast, which I think makes the finished duck look better.
You can use any kind of fruit or veggies, just pair them so they compliment your seasoning blend. Warm spices, like cloves, allspice, cinnamon, Chinese five spice, or star anise will go really well with apples and oranges.
Herbs like rosemary and thyme will go great with onions, celery, and/or carrots.
Seasoning the Duck
If your duck skin is moist, blot it off with paper towels. Using whatever seasoning blend you like, liberally apply the seasoning to the skin and rub it in. You can do this on the top only or all over the duck.
Let the duck rest on a rack with a baking pan underneath and let it sit for at least 30 minutes before cooking. This is a great time to make your sauce.
Cranberry Dipping Sauce
The cranberry dipping sauce I used is incredibly easy to make and goes so well with the duck. I hope you give it a try.
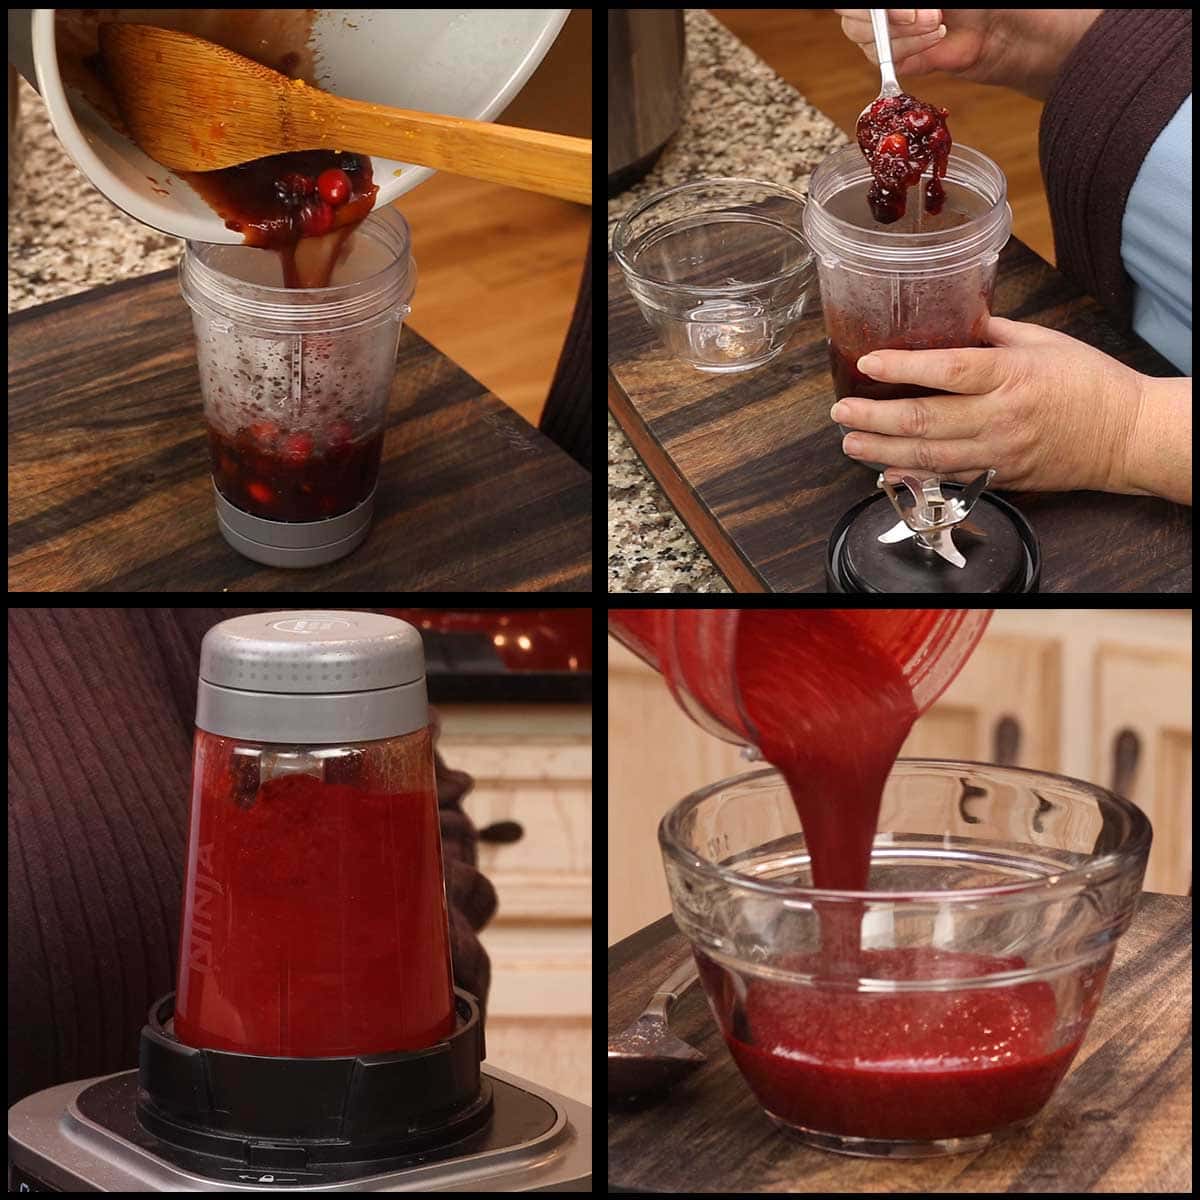
Turn the Ninja Foodi on, select the sauté function on high and select start. Add ¼ cup water, 1 cup fresh cranberries, ¼ cup packed brown sugar, 1 Tablespoon honey, 1 teaspoon chili garlic sauce, 2-3" of ginger grated (about 1-2 teaspoons) 2 Tablespoons soy sauce, ¼ teaspoon ground cloves, ¼ teaspoon ground allspice. Bring to a boil and allow the cranberries to pop open and release their juices. Stir occasionally. This takes about 5 minutes. Zest and juice 1 medium orange and cook until the mixture begins to thicken, about 3-5 minutes.
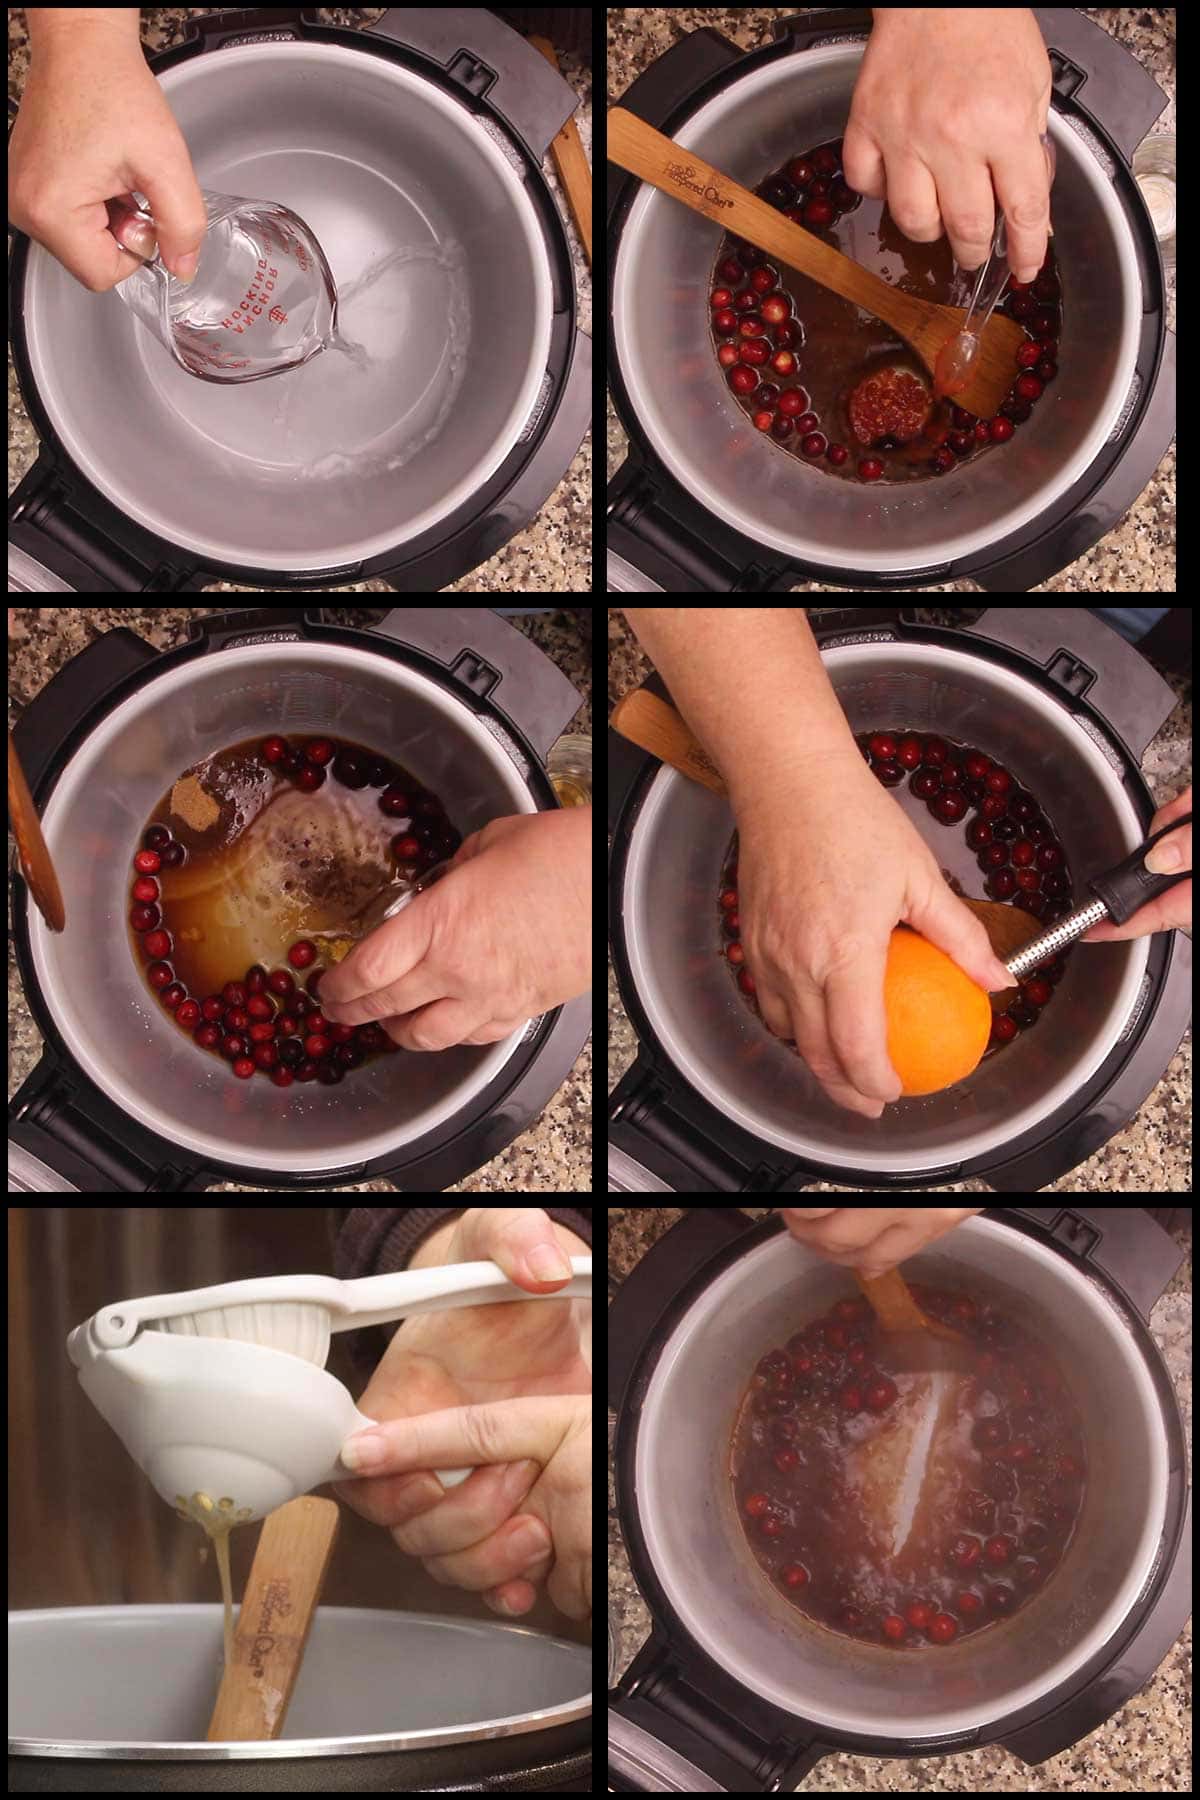
Turn the Ninja Foodi off and pour the chunky sauce into a bowl or into a blender cup/pitcher if you want to blend it smooth after it cools.
When blending, make sure your mixture cools for at least 15 minutes, then pulse blend until it reaches your desired consistency.
Serve the sauce at room temperature.
How to Make Steam & Crisped Whole Duck
Ninja Foodi OL Series Instructions
The new Ninja Foodi OL series comes with a few added features that made this recipe even easier than before.
If you have one of the new OL models of the Ninja Foodi, you can use your steam & crisp function to make the duck, like I did in the video. If you have the one with the probe, you can absolutely use that to monitor the internal temperature. Simply place the probe between the leg and the breast meat and make sure it's not touching a bone or it won't give an accurate reading. The thermometer placement is the same as on a chicken, shown below.
You can make the duck with or without the potatoes under it, that is completely up to you. I used fingerling potatoes and kept them whole. They were perfectly cooked and very flavorful from the duck drippings.
*These instructions are slightly different from the video and I recommend cooking the duck this way for the best results.
Steam & Crisped Duck using one lid and the steamcrisp function
Once your duck is prepared, seasoned, and has sat for at least 30 minutes, it's time to cook it!
You can use the rack in the lower position, crisping basket, or a (affiliate link)silicone sling to rest the duck on. Decide which to use based on how high the duck sits in the pot. You want it to be about 2-3" away from the heating element for the best results.
Place the duck upside down on the rack, sling, or in the air fryer basket. This will allow the underside of the duck to crisp up some. If you don't care about that, it's perfectly fine to set it breast side up like I did in the video.
If you are adding potatoes, add them in now along with salt and pepper and 1 cup of water or chicken broth. If you aren't using the potatoes, you can reduce your water to ½ cup.
Place the duck into the pot. If you want to use the thermometer probe, insert it into the duck between the leg and the breast like you would do with a chicken.
*I kept my duck breast side up as you can see in the picture below, but I do recommend that you start breast side down and flip it breast side up OR keep it breast side the whole time. If you do what I did and start breast side up and flip it over, the steam hits the breast and the skin isn't as crispy on the top of the duck.

Close the SmartLid and move the slider to the middle position. Select the SteamCrisp option and set the temperature for 375℉/190℃ and the time for 27 minutes. Hit start. You do not need to worry about the valve placement, it can be sealed or vented. There are vents inside the lid that will vent the steam.
For the first 8-10 minutes, the pot will heat up the water and create steam which will start to cook the duck. You will see the words "pre" and dashes beside it, indicating that the pot is preheating. This is when the steaming begins. Once the pot is fully heated, it will switch automatically to the crisping mode. When this happens, you may see a lot of steam coming out from the lid. This is completely normal.
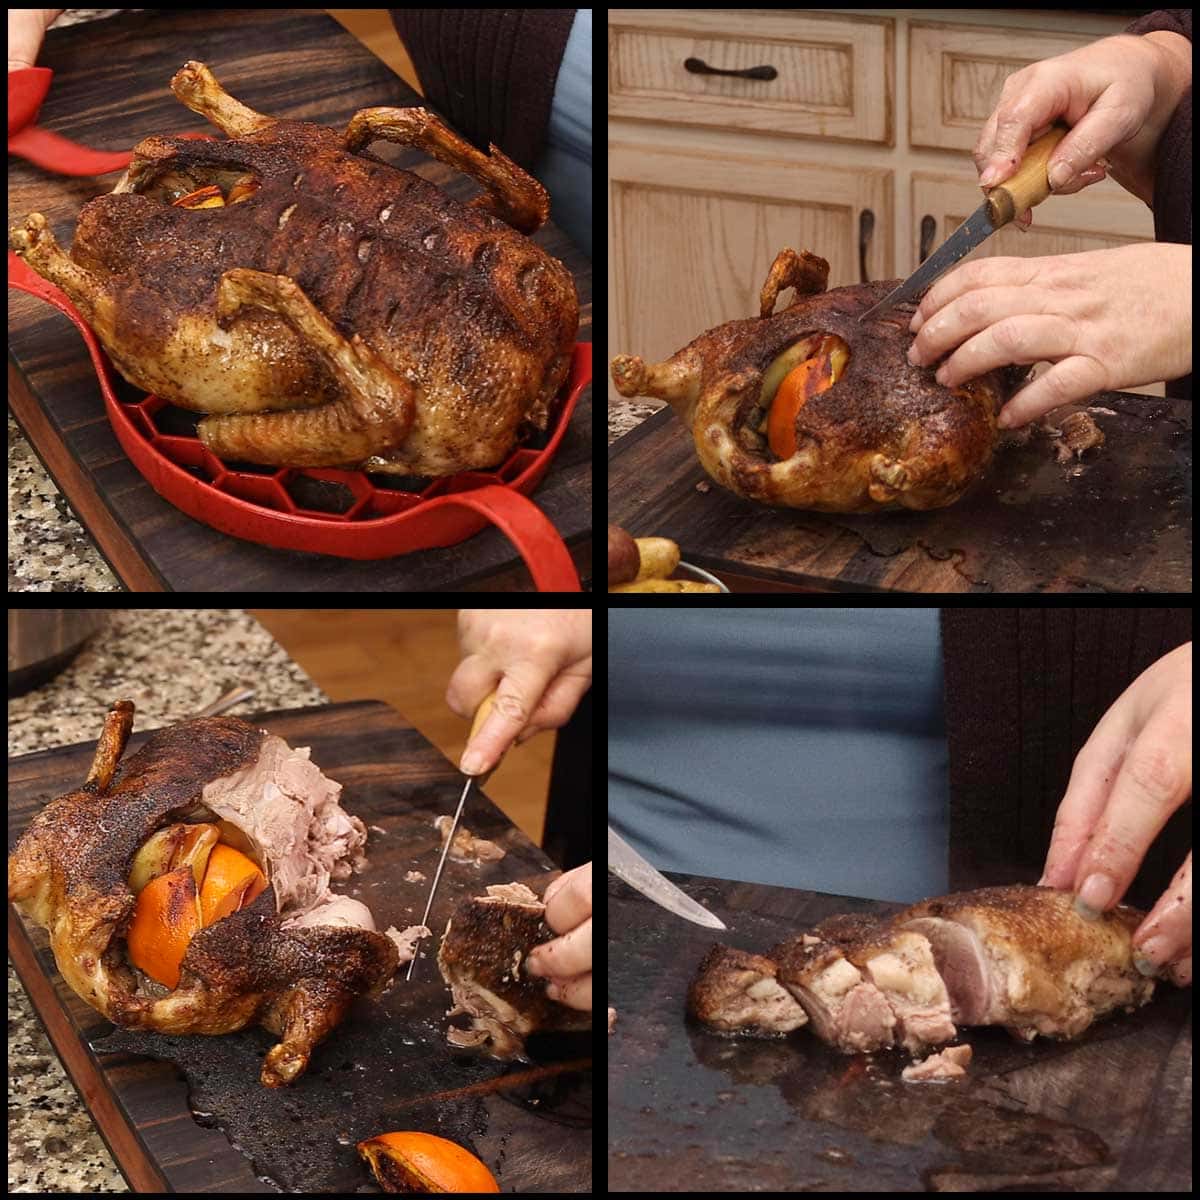
When the control panel counts down to about 15 minutes, open the lid and remove the duck. Flip it over so the breast side is up and return to the pot. Close the lid and resume air crisping until the time is up OR the duck reaches your desired temperature. *You don't have to do this if you started out with your duck breast side up, but I do recommend checking a temperature when you have about 10 minutes left.
Once the duck is cooked to your desired temperature, remove it and let it rest for about 10 minutes before carving.
Remove the potatoes and season with salt and pepper. I also like to remove the juices and refrigerate them, then skim off the fat layer from the top and use as duck fat in other recipes. You can place the chilled duck fat in a freezer bag and freeze for later use. You can also make a duck stock with the juices and add in the neck, liver, kidneys that you removed from the duck cavity along with carrots and celery OR use ginger, garlic, and star anise for an Asian-inspired duck stock.
Carve the duck and serve. I like to remove the wings and then cut the breast off of the breast bone and slice. You can even remove the breast and before cutting it, put it back in the Ninja Foodi and use the air crisp function to crisp the skin more. If you are concerned about overcooking the breast meat, wrap the underside in foil, just exposing the skin or place the breast in a pan to protect from the circulating heat.
Steam & Crisped Duck using the Two Lid Ninja Foodi Models
If you have an older Ninja Foodi with a pressure lid and the attached crisping lid or if you have an Instant Pot Duo or Pro Crisp, you can absolutely make this recipe!
The only changes you need to make is to switch lids and functions. Here are my suggestions.
Prepare your duck the same way as the steamcrisp method. Add the water or broth to the inner pot and add the potatoes, if you are cooking them at the same time. Place the duck into the pot.
You can set the duck on the rack in the low position, a silicone sling, or use the crisping basket or plate. The placement won't matter that much during the steaming time as long as the lid fits on, but when you switch to the crisping lid, you want to make sure there is enough clearance that you won't burn the duck.
Place the pressure lid on and turn the valve to vent. Select the steam function and set the time for 8 minutes. In my video, I suggested 10 minutes and that will work as well, but sometimes the pin pops up and stays up during the steam time and that will delay the time it takes for you to open the lid. To avoid too long of a steam time, I would set the time for 8 minutes to give you that extra wiggle room.
Once the steam time is up and the pin has dropped, open the lid. Close the crisping lid and select the air crisp function. Set the temperature to 375℉/190℃ and the time for 27 minutes.
When there is about 15 minutes left on the clock, open the lid and check on your duck. If you started it breast side down, flip it over now. Close the lid and continue to air fry. I like to start checking a temperature when there is 10 minutes left and make adjustments to the timing as needed.
Always remember that there are variables when cooking. Your time may need to be less or more depending on the size of your duck or the temperature it was when you started cooking. It is always better to cook to temperature rather than time, but use the time of 27 minutes as a guideline.
Once your duck is cooked to your desired temperature, remove it and allow the duck to rest about 10 minutes before carving. 165℉/74℃ is what the USDA recommends, but I prefer my duck to be medium rare and I aim for 145℉/63℃. The duck temperature will increase about 5-10° during the rest period, this is called carryover cooking, so I always recommend removing the duck when it reaches about 10 degrees below your target temp.
Serve & Enjoy!
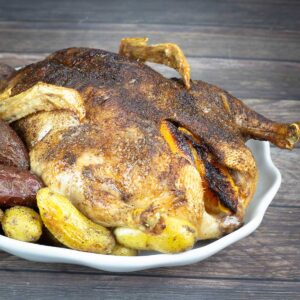
Ninja Foodi Whole Duck with Potatoes
Ingredients
- 6 pound whole duck
- 1 apple
- 1 orange
- ½ teaspoon fine grind sea salt for the cavity
- ½ teaspoon black pepper for the cavity
- 1 cup water or chicken broth
- 24 ounces fingerling potatoes
Seasoning Blend
- 1 teaspoon fine grind sea salt
- 1 teaspoon black pepper
- ¼ teaspoon ground cloves
- ¼ teaspoon ground allspice
Cranberry Dipping Sauce
- ¼ cup water
- 1 cup cranberries
- ¼ cup packed brown sugar
- 2 Tablespoons soy sauce
- 1 Tablespoon honey
- 1 teaspoon chili garlic sauce
- 2-3" fresh ginger grated (about 1-2 teaspoons)
- ¼ teaspoon ground cloves
- ¼ teaspoon ground allspice
- 1 medium orange zested and juiced
Would you like to save this recipe?
Instructions
- Fully thaw your duck. Remove the contents in the duck cavity. Rinse the duck cavity and season with ½ teaspoon salt and ½ teaspoon pepper. Using a knife or scissors, cut into the fat to allow it to render out during the cooking process. You want to be careful that you don't pierce the meat
- Cut up the apple and orange (no need to peel, but I do remove the apple seeds) and stuff them inside the cavity. This is an optional step, but will help fill out the cavity and create a dome effect of the breast like on a chicken.
- Blot the skin dry with paper towels if it wet and then liberally apply the seasoning blend to the top of the duck. If you want to season the bottom of the duck, make double the seasoning blend. Let sit at room temperature for at least 30 minutes. This is a good time to make the cranberry dipping sauce.
- Once the duck has sat for at least 30 minutes, place 1 cup of water or chicken broth in the inner pot along with the potatoes (add salt and pepper if desired) if you are cooking them at the same time. Place the duck, breast side down on the sling, rack, or the basket and place into the pot. I like to make sure there is at least 2-3" of clearance between the duck and the heating coil, so choose which one (sling/rack/basket) allows for optimal clearance.
- If your model of Ninja Foodi has one lid with the steamcrisp option, you will want to use that. Close the lid and move the slider to the center position. Select the steam/crisp setting. Set the temperature to 375℉/190℃ and the time for 27 minutes. Press Start.
- Once the steam time is up, the Foodi will automatically switch to air crisp and begin the countdown.
- If your model of Ninja Foodi has two lids, put the pressure lid on and turn the valve to vent. Select the steam function and set the time for 8 minutes. When the time is up, remove the pressure lid and close the crisping lid. Select air crisp on 375℉/190℃ for 27 minutes.
- For both one lid or two lid Ninja Foodis. Once the countdown time reaches 15 minutes left, open the lid and flip the duck over so it's breast side up. Close the lid and resume the cycle. Check the temperature when there is about 10 minutes left and continue to air crisp until the skin is golden brown and the duck has reached your desired internal temperature.
- Remove and let rest 10 minutes. Carve & Serve!
Cranberry Dipping Sauce
- Using a saucepan on the stove or the inner pot of the Ninja Foodi, add ¼ cup water, 1 cup of cranberries, 2 Tablespoons soy sauce, 1 Tablespoon honey, 1-2 teaspoons grated ginger, 1 teaspoon chili garlic sauce, ¼ teaspoon ground cloves, and ¼ teaspoon ground allspice and turn the stove on high or the Ninja Foodi on high sear/sauté and bring to a boil. Allow to cook for about 5 minutes
- Zest the orange and cut and squeeze the juice into the pot. Continue to cook for another 3-5 minutes or until the sauce thickens. Turn the heat off and transfer to a bowl to cool. You can transfer directly to a blender cup or pitcher to allow to cool if you want to blend it into a smooth sauce.
- Once the sauce has cooled, either serve chunky at room temp with the duck or pulse blend until it reaches your desired consistency and serve room temp with the sliced duck.
Notes
About the Recipe Author, Louise Long
Louise is a full-time recipe creator and food blogger @ The Salted Pepper. She has over 30 years of experience with cooking and recipe development. She owned a restaurant for several years and was a full-time RN until retiring to blog full-time.

She published her first cookbook in the Fall of 2018 and is very interested in writing several more.
Louise is also the creator of an online Ninja Foodi Pressure Cooking Course with over 100 instructional step-by-step videos. People absolutely rave about the course and all the value they have received from it.
Louise has several very active Facebook groups that help people with the basics of cooking and learning more about the appliances they love.
Ninja Foodi Pressure Cooker & Air Crisper 101
Ninja Woodfire Outdoor Grill & Smoker
Louise is also a YouTube creator and you can find most of her recipes in video format on The Salted Pepper YouTube channel.
She is very responsive to messages and eager to help in any way she can. Get more Information about Louise & contact information
I WOULD LOVE TO SEE WHAT YOU ARE COOKING UP IN YOUR KITCHEN! TAG ME @THESALTEDPEPPER ON YOUR FAVORITE SOCIAL MEDIA PLATFORM WHEN YOU MAKE A DISH!
BE SURE TO FOLLOW THE SALTED PEPPER RIGHT HERE ⇓⇓⇓⇓⇓
Kerrie says
I’m wondering how at the top of recipe you say 47 mins to cook, but on the instructions its says to cook for 27 mins with 10 min rest (total of 37) Perhaps it should read, 37 to cook & 10 min rest. One of those pieces of info needs correcting. I’m just going to have to take a stab and guess.
Louise says
When you are using the steam/crisp function there is about 8-10 minutes of preheat time where the steam is building that is included in the total time. You set the time to 27 minutes because the countdown doesn't start until after the 8-10 minute preheat/steam time so the total cook time with the 10 minute rest is 47 minutes on average.
Rose says
Followed the recipe and also had pretty raw duck. Temp came in at 140 degrees F. Put back in AC for another 20 mins and will recheck.
Louise says
Because meats vary in size and shape (and starting temperature), it's always best to cook to temperature and not time. I hope you enjoy your duck!
Gail Craig says
Followed recipe duck was only 47c when finished, needs to be around 74!! I e put it on aircrisp again just now for another 15 mins then will check again……. I’ve got a 2nd duck still to do :/
Louise says
Which model of Ninja Foodi do you have? Also, what temperature was your duck when you started cooking it? I used a room temperature duck and that will make a difference in cook time.
Diana B Sheffer says
How can I steam and crisp drumsticks in a regular Foodi? I just got a rack for 12 and I'm dying to try it. Same times?
Louise says
Drumsticks will cook much faster than a whole duck. I would probably try to set the temp on 375F and steam crisp for about 12 minutes. Check them after 10 minutes and cook to temperature.
Barbara C says
Followed recipe as written. Results.. raw duck. Cooked on AC for another 20 minutes and then bake for another 20 do get it done.
Louise says
That's strange, someone else made it and it turned out perfectly. I tested that recipe many times, so I'm thinking perhaps your duck was larger or colder when it went into the Foodi.