

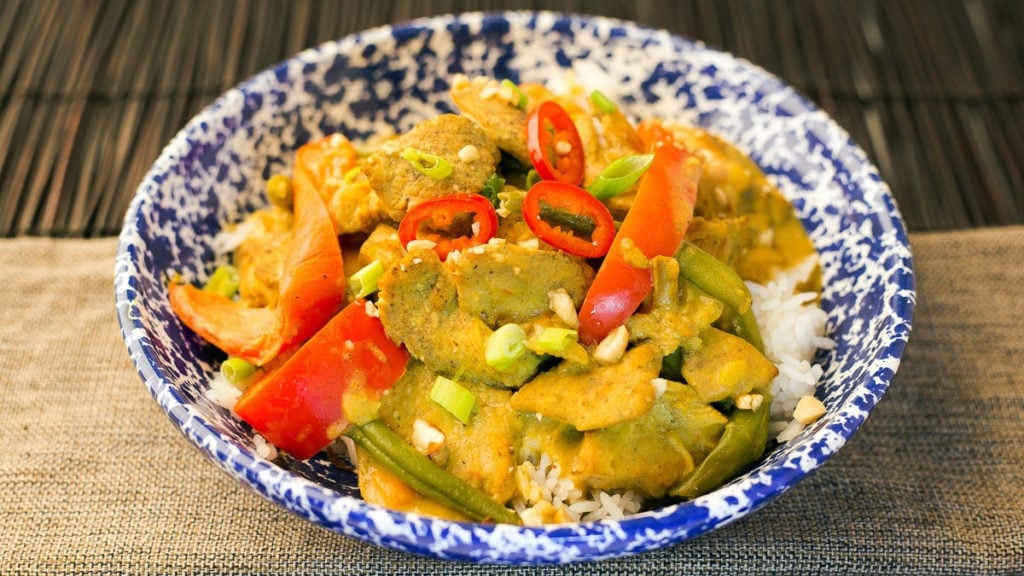
 You simply won't believe how delicious and EASY this Thai Curry Chicken is! It's a one pot meal right in the Ninja Foodi! No joke. We use the PIP method of cooking to cook the rice, the curry, and the veggies all to perfection at the same time!
I think there are three camps when it comes to curry dishes: the I LOVE CURRY camp; the I HATE CURRY camp; and the I USED TO HATE CURRY and now I LOVE CURRY camp.
My husband and I fall into the latter camp. Neither of us would touch anything with curry. Yuck. Gross. Weird Taste. Weird Smell. No, Thank You. Then, something quite magical happened.
This post may contain affiliate links. If you make a purchase after clicking a link, I may earn a small commission. Thank you for your support!
We were out to dinner and decided to order a curry dish. Why? I have no idea. We have always been adventurous diners and enjoy trying all kinds of foods.
We even ordered beef tongue at a Russian restaurant once. I loved it, he hated it. We both thought it was weird that they sliced the tongue in horizontal slices that showed the taste buds. It was a bit off putting, but I enjoyed it. I don't think Jeff could get past the look of it. Anyway, I'm digressing. Back to curry.
So, we ordered this curry dish and devoured it. It was like a switch had gone off in our heads that enabled our taste buds to really enjoy the wonderfully warm spices, with just a hint of sweet & spicy. We then sought out different Asian & Indian restaurants that served curry and tried them all. There were some that we liked more than others and certain things that we liked about some and didn't like about others. I decided it was time for me to make our version of curry exactly the way we liked it, and I did.
Now, I'm sharing that recipe with you. Thai Curry Chicken is the perfect balance of spice  with a touch of sweet and the nuttiness we love. We are a little nutty anyway!
During my initial curry obsession, I developed a recipe for Thai Curry Chili that I entered into several Chili Cook Offs. It won! Several times! Give that a try too!
Is this an authentic curry recipe?
Probably not. Who cares? It tastes delicious and just as good or better than what you get in a restaurant. That is all that matters to me. Right? Right.
I don't have access to some of the specialized ingredients that are used in many curries and my guess is, neither will you. I cheat and use a powdered yellow curry from McCormick instead of making my own. Truth be told, I made my own powdered curry. It took hours to roast each spice and grind into a fine powder and it wasn't that much better than the one I buy. Sometimes it is just easier to buy it pre-made.
I don't use Kaffir Lime Leaves. They are hard to find. I know you can order them, but I never plan ahead. When I want to make curry, I want to make it right then and there, not in 3 days when Amazon can deliver. I don't miss them in this Thai Curry Chicken and I bet you won't either. It's so delicious!
Are there different types of curry?
Yes. A lot of different types. The basics are red curry, yellow curry, green curry, Panang curry and Massaman curry. There are more, many more!
There are Indian curries, Asian curries, Jamaican curries (I'm sure there are more) and then there is also my fusion curry which combines traits of both Indian curries and Asian curries. Now, my curry is authentic. It's authentic fusion and you are going to love it!
The preparation and flavors of various curries are different depending on the region, as well. A Thai curry is going to start off with one of the curry pastes mentioned above and it usually has a thinner sauce due to the coconut milk.
An Indian curry will start with onions, garlic, ginger, and dry spices are added to create the curry.
I have become a fan of all types of curry, or at least the ones I have tried. I would have to say that green curry is my favorite, but I have yet to break the code to make it at home. Anyone have a great recipe? I'm all ears!
Then, there is this Thai Curry Chicken. It is all the best things that I love about all of the above curries, rolled into one dish. The sauce is thick like an Indian Curry, but has the coconut milk found in Thai curry. I use both dry curry powder and a red curry paste. I even add in a little peanut butter because... I like it!
The best thing about this recipe is it a complete meal cooked at the same time using the PIP method of pressure cooking.
What is PIP?
PIP is the abbreviation of pot in pot cooking common when cooking with a pressure cooker. This allows you to have ingredients separated for a complete meal.
In this recipe we cook the Thai Curry Chicken at the same time as the rice and the vegetables.
The key with PIP cooking is to understand how long each component takes to cook and figuring out what time to set for pressure cooking.
With the Thia Curry Chicken, I wanted the rice to be perfect so that was my main focus when deciding on a cook time. Jasmine or white rice takes about 2 minutes and usually calls for an equal ratio of water to rice. You will see in this recipe, I did not follow that ratio and I'll discuss that in the next section.
How to determine times of Pressure Cooking
I get this question all the time and unfortunately, there isn't one simple answer. The first thing I do when determining how long to pressure cook something is to figure out how long it would take using a traditional method of cooking, like stove top or oven.
Then, I cut that time by ⅔. So, if something takes 12 minutes to cook, I reduce the time to 4 minutes. Now, this is only a guideline and some foods such as wild rice will take almost as long to cook in a pressure cooker as it does on the stove. You can see my cooking times for wild rice in this wonderful One Pot Meal: Wild Rice & Chicken with Carrots.
Usually when cooking jasmine or white rice, the water to rice ratio is 1:1. You will see that I did not do that in this recipe and the reason is that you also need to take into account how fast the pressure cooker will come up to pressure. During that time, you are cooking the food. I knew that this was a full pot and was going to take longer than 5-8 minutes to come to pressure. To adjust for this, I decreased the water in the pan with the rice, but left it uncovered. This way the steam that is built during pressure cooking will add the correct amount of moisture to the rice despite the longer than normal time it takes to come to pressure.
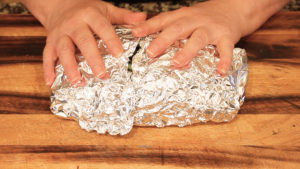
When I have quick-cooking ingredients, like the string beans in this recipe for Thai Curry Chicken, I will use foil or another silicone or metal pot to insulate them from the heat a bit. This will keep them crisper than if you had them in the main pot.
The subject of timing is a complicated one, I recommend you that you join our Facebook Group, Ninja Foodi 101, if you have additional questions. Or you can leave a comment below the recipe and I will try to help the best I can!
What if I can't find some of the ingredients?
There are only two ingredients that may be hard to locate, but don't sweat it! Here are some substitutions that you can make.
Lemongrass Paste: The brand I use is Gourmet Garden and I usually can find it in the produce refrigerated section by the other packaged herbs. The two stores that I have found it in are Kroger and Safeway.
If you can't find lemongrass paste, add in the zest of one lemon. No, this is not the same. Lemongrass is very different from lemon zest, but the zest does brighten up the dish as the lemongrass does.
Red Pepper Chili Paste: This is another Gourmet Garden product and one I have had more trouble finding in Tennessee. Safeway carried it when I lived in Maryland, but I haven't found it locally yet.
 The great news is it is easy to make and here is how:
Pressure cook 1.5 lbs of fresh red chili peppers with 2 cups of water and 1 tablespoon of lemon juice on high pressure for 10 minutes. Allow to natural release for 10 minutes, then manually release the rest of the pressure.
Allow to cool for about 30 minutes and puree in a blender until smooth.
Add ½ teaspoon of salt and 1 tablespoon of Xanath gum to thicken.
You can keep the red pepper paste in the fridge for 3-5 days or in the freezer for 3-6 months. I love having this on hand to make various recipes, like this one for Asian Sticky Wings!
If you can't find chili peppers to make your own red chili pepper paste, then substitute red pepper flakes. Make sure to start out with a small amount as they really pack a punch. Add more until the heat level is where you like it.
You can use the Gourmet Garden Store Locator to see if a store in your area carries their products. Be sure to call the store and double check if the item you are looking for is in stock.
Let's get to making this delicious Thai Curry Chicken!
Mis en place time!
The first thing I recommend is getting all of the prep done. This will make the cooking process quicker and everything will run smoother.
First combine the spices for the blend that is going to go on the chicken. Please note that you will use 1 tablespoon of yellow curry powder in the spice blend and a second tablespoon in the curry itself.
Slice the chicken into ¼" slices. I place them in a large bowl and let them sit on the counter to come to room temp. If you are not making this dish right away (within an hour) go ahead and put the chicken slices in the fridge.
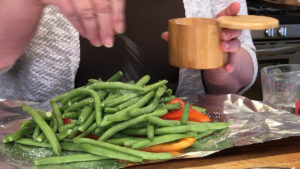
Slice the red bell pepper into ¾" slices. Cut the ends off of the string beans. Dice the potatoes into ½" cubes. Place the potatoes into a bowl of cold water to prevent browning.
Season the peppers and beans with ½ teaspoon sea salt. Place the string beans and red pepper strips into a foil packet.
Rinse the rice with cold water until it runs clear and place in a 6" x 2" cake pan. Don't add the water yet or the rice will begin to absorb it.
Making the Thai Curry Chicken
Turn the Ninja Foodi on Sear/Sauté on High. Add 1 tablespoon olive oil.
While the pan is heating, combine the spice blend with the sliced chicken.
Add chicken slices to the heated Ninja Foodi. Saute for about 1-2 minutes per side or until no pink is visible.
Deglaze the pot with ½ cup of chicken stock. Make sure to scrape the bottom of the 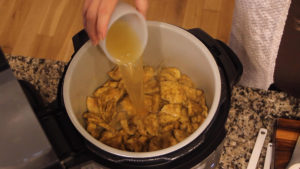 pot to loosen any bits that might be sticking to the bottom. This is important because if the Ninja Foodi detects anything burning on the bottom of the pot, you may get the water notice.
From here on out, do not stir. Add in the coconut milk, chili pepper paste, lemon grass paste, yellow curry powder (1Tbsp), red curry paste. Remember, don't stir.
Layer remaining ingredients. Place diced potatoes on top of curry. Place foil packet on top of the potatoes. Place the rack in the high position and push down so the legs sit on the bottom. Add the 1 cup of water to the rice and place 6" cake pan on rack. Do not cover the rice.
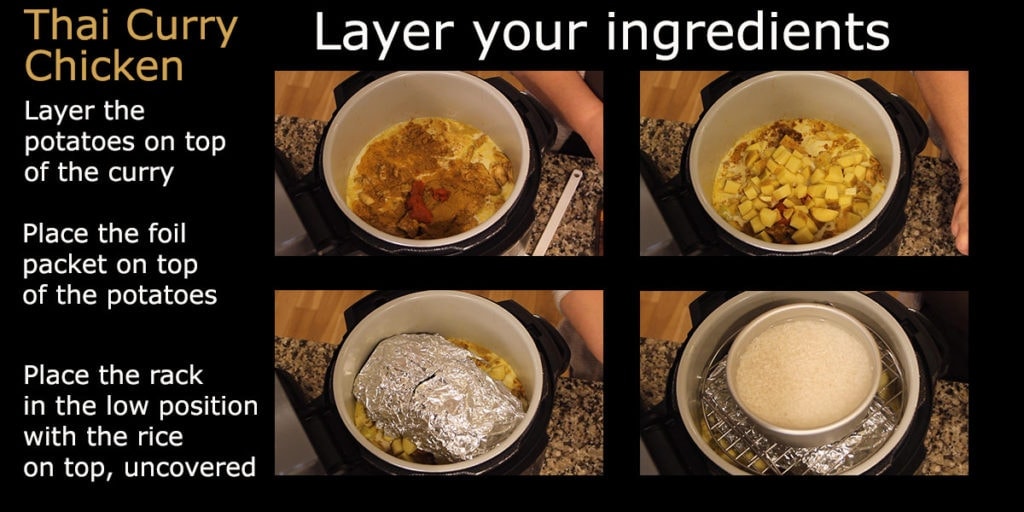
Place the pressure lid on and set on high pressure for 2 minutes. Remember to turn the valve to seal. The Ninja Foodi is going to take about 12-14 minutes to come to pressure, so don't be concerned. When the cook time is done, allow to natural release for 8 minutes, then manually release the remaining pressure.
Remove the rice and cover to keep warm. Remove the rack. Remove the vegetable packet and set to the side. Open the packet to release the steam to avoid over cooking.
Add in the ½ cup of peanut butter and stir to combine. Add in the veggies and give it a stir to combine.
Serve over rice and top with desired toppings. Enjoy!
I hope you enjoy this recipe!

Thai Curry Chicken in the Ninja Foodi
Ingredients
- 2 lbs chicken breast
- 12 ounces string beans fresh
- 1 red bell pepper
- ½ teaspoon sea salt for veggies
- 2 small potatoes yukon gold, about 2 cups
- 1 tablespoon Olive Oil
- 1 13.5 oz coconut milk
- ½ cup chicken stock
- 1 tablespoon lemon grass paste see post for substitutions
- 1 tablespoon yellow curry powder
- 1 tablespoon red curry paste
- 1 tablespoon red chili pepper paste see post for recipe/substitution
- ½ cup peanut butter creamy, is added at the end of ccoking
Spice Blend for Chicken
- 1 tablespoon Yellow Curry Powder
- 1 tsp sea salt
- 1 teaspoon brown sugar
- ½ teaspoon ground ginger
- ½ teaspoon roasted coriander
- ½ teaspoon ground cardamon
For the Rice
- 1 ½ cups jasmine rice or white rice, rinse well
- 1 cup water
Optional Toppings
- chopped cilantro
- chopped peanuts
- chopped green onions
Would you like to save this recipe?
Instructions
Prep for Thai Curry Chicken
- Slice chicken breast into ¼ slices. In a small bowl, combine the spices in the spice blend. Slice the red pepper into ¾ inch strips and cut the ends off of the string beans. Dice the potatoes into ½" dice and place in cold water until ready to use.
- Season the veggies with ½ teaspoon sea salt. Place the string beans and red pepper strips into a foil packet. Rinse the rice with cold water until it runs clear and place in a 6" x 2" cake pan.
- Turn the Ninja Foodi on Sear/Saute on High. Add 1 tablespoon olive oil. While the pan is heating, combine the spice blend with the sliced chicken.
- Add chicken slices to the heated Ninja Foodi. Saute for about 1-2 minutes per side or until no pink is visible.
- Deglaze with ½ cup of chicken stock. Make sure to scrape the bottom of the pot to loosen any bits that might be sticking to the bottom.
- From here on out, do not stir. Add in the coconut milk, chili pepper paste, lemon grass paste, yellow curry powder (1Tbsp), red curry paste. Remember don't stir.
- Place diced potatoes on top of curry. Place foil packet on top. Place the rack in the high position. Add the 1 cup of water to the rice and place cake pan on rack. Do not cover the rice.
- Place the pressure lid on and set on high pressure for 2 minutes. Remember to turn the valve to seal. The Ninja Foodi is going to take about 12-14 minutes to come to pressure, so don't be concerned. When the cook time is done, allow to natural release for 8 minutes, then manually release the remaining pressure.
- Remove the rice and cover to keep warm. Remove the rack. Remove the vegetable packet and set to the side. Open the packet to release the steam to avoid over cooking.
- Add in the ½ cup of peanut butter and stir to combine. Add in the veggies and give it a stir to combine.
- Serve over rice and top with desired toppings. Enjoy!
Paula says
Thanks Louise! Should I have done something different since I did not include rice? I used 1/2 inch cubed chicken thighs instead of breast and fresh lemongrass instead of paste, but otherwise followed the recipe and unfortunately got the add water message. I added another 1/2 cup broth and it came to pressure shortly after that. It is still so incredibly delicious. My kids did not want peanut butter so theirs is a little on the liquidy side, but when I added peanut butter in into the grown ups portion the textture was perfect. Thanks so much for this amazing recipe.
Paula says
Hi Louise, I only have brown jasmine rice. Do you think it would still work? If not I'll just make the rice in a rice cooker.
Louise says
Brown rice is going to take a lot longer, so I would do that in the rice cooker.
Michelle says
I used this receipe and substituted the yellow curry paste for mussaman as I couldn’t source the yellow anywhere . It was delicious as good as any I’ve had in a Thai restaurant
Louise says
Thank you so much! I'm so glad you enjoyed it!
Stefanie Warren says
Just curious... why the instructions not to stir the coconut milk and spice pastes when you add them? I'm looking forward to making this dish!
Louise says
To avoid thickening the liquid to much and potentially getting the water notice.
Theresa Upton says
I’ve made several Thai curry dishes using my wok. This one was just as good as any! One difference was the ease of this one...I will definitely be making this again...and again!
Louise says
I'm so glad you enjoyed it!