

Yep, that's right! You can make a delicious apple pie in 10 minutes. This recipe is perfect when you want to make a no-fuss apple pie OR want to make more of a homemade apple pie, but do the prep ahead of time.
Would you like to save this recipe?
Never in my wildest imagination did I think it would be so easy to make an apple pie! I love apple pies, but can't stand making them because they take all day. From slicing the apples to baking the pie, hours at least!
Not anymore! With this recipe, you can assemble and bake your apple pie in 10 minutes. It's amazing.
This post may contain affiliate links. If you make a purchase after clicking a link, I may earn a small commission. As an Amazon Associate, I earn from qualifying purchases.
What's the catch? I know you are asking that right now. This can't be possible. Those of you that know me pretty well, know that I choose to make my own pie crust and pie filling and that DOES take longer than 10 minutes, but you don't have to make your own if you don't want to.
If you use a prepared crust and doctor up store-bought apple pie filling, you absolutely CAN make this pie in 10 minutes.
Or, you can do it like I have and break things out into steps and make the crust and the filling ahead of time and on the day you want to serve it, simply assemble it, bake it, and it's ready in 10 minutes.
I broke this apple pie into 4 stages: making the pie dough; pre-baking the crust; making the apple pie filling; and then assembling and baking. You can go the homemade route or the quicker route with the first 3 steps and I'll go over all of that right now.
The time estimate, including prep for the entire pie made start to finish would be about 90 minutes, depending on how fast you are at peeling apples.
By breaking the pie down into stages, you can choose which stages you want to do with the homemade version or save time with store-bought.
You can also make everything in advance, so on the day you want to serve your pie, simply fill the baked pie shell, make up the crumb topping, bake and serve. That takes about 10 minutes!
Pie Dough for Apple Pie
Making the dough from scratch: 15 minutes
Buying the refrigerated dough: 0 minutes
I know a lot of people have trouble making homemade pie dough, I did too! For years and years I bought the Pillsbury refrigerated pie dough and you know what? It works just fine.
I definitely prefer the refrigerator version over the pie shells you can get frozen.
The winner, though, is homemade. It takes less than 15 minutes to make the pie dough from scratch and the flavor and flakiness just can't be beat.
Here is the recipe for making your own pie dough, with step by step directions and a video demonstration:
Homemade Pie Dough
Making the pie dough only takes about 15 minutes of hands-on time and it can be refrigerated for 15 minutes while you make the filling.
If you want to save the time by purchasing the refrigerated dough, that is perfectly fine. You can start with phase two.
If you are making the dough from scratch, let it sit in the refrigerator while you move on to phase two.
You can make your pie dough well in advance, and then either refrigerate it for 1-2 days or wrap it really well and put it in the freezer.
Apple Pie Filling
Making the Apple Pie Filling from Scratch: 20 minutes
Buying Apple Pie Filling and adding spices: 5 minutes
No matter if you made your pie dough from scratch or bought it already made, I suggest making the pie filling next so it can cool while you pre-bake your pie crust.
Making your own apple pie filling takes about 20 minutes and is well worth it! The flavor simply can't be beat and YOU get to control the ingredients!
Here is the recipe for my apple pie filling.
Homemade Apple Pie Filling
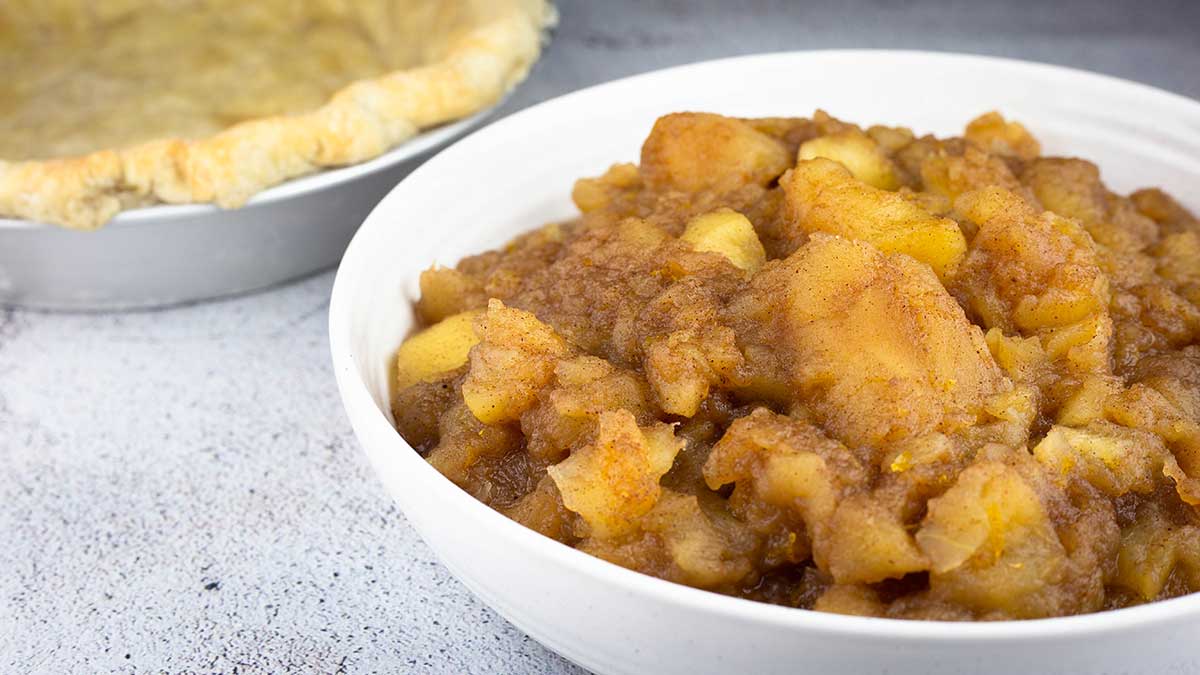
After you make your pie filling, put it in a shallow container to cool while you move on to forming your pie crust and pre-baking it.
If you do decide to purchase a store-bought filling, you will need about 40 ounces, or 2 cans. I suggest giving it a taste and adding seasonings as desired. To do this, I would warm it up in the inner pot of the Ninja Foodi on low and then mix in your added spices. Set it aside to cool and move on to phase three, pre-baking your crust.
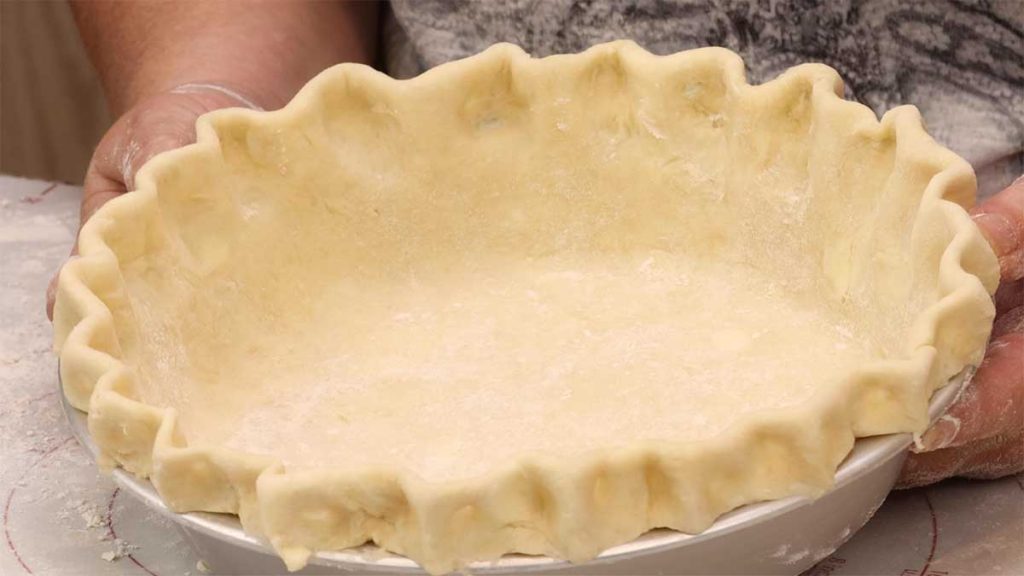
Forming & Prebaking Your Pie Crust
Rolling out and forming the pie shell: 15 minutes
Pre-baking the pie crust: 30 minutes
While it is not absolutely necessary to prebake your pie crust before making an apple pie, I think it gives the crust a better texture.
To save even more time, you can buy ready-to-use graham cracker crusts that don't require baking before hand. Personally, I like my apple pie to have a pie dough crust.
Whether you buy refrigerated pie dough or make your own, you will want it to sit out for a few minutes before rolling and forming your pie shell.
The only pie pan that I have found so far that fits perfectly in the Ninja Foodi is the (affiliate link)Fat Daddio 9" pie pan, but you can make smaller pies using disposable pie tins.
I give steps on rolling and forming the pie crust in my recipe for Homemade Pie Crust.
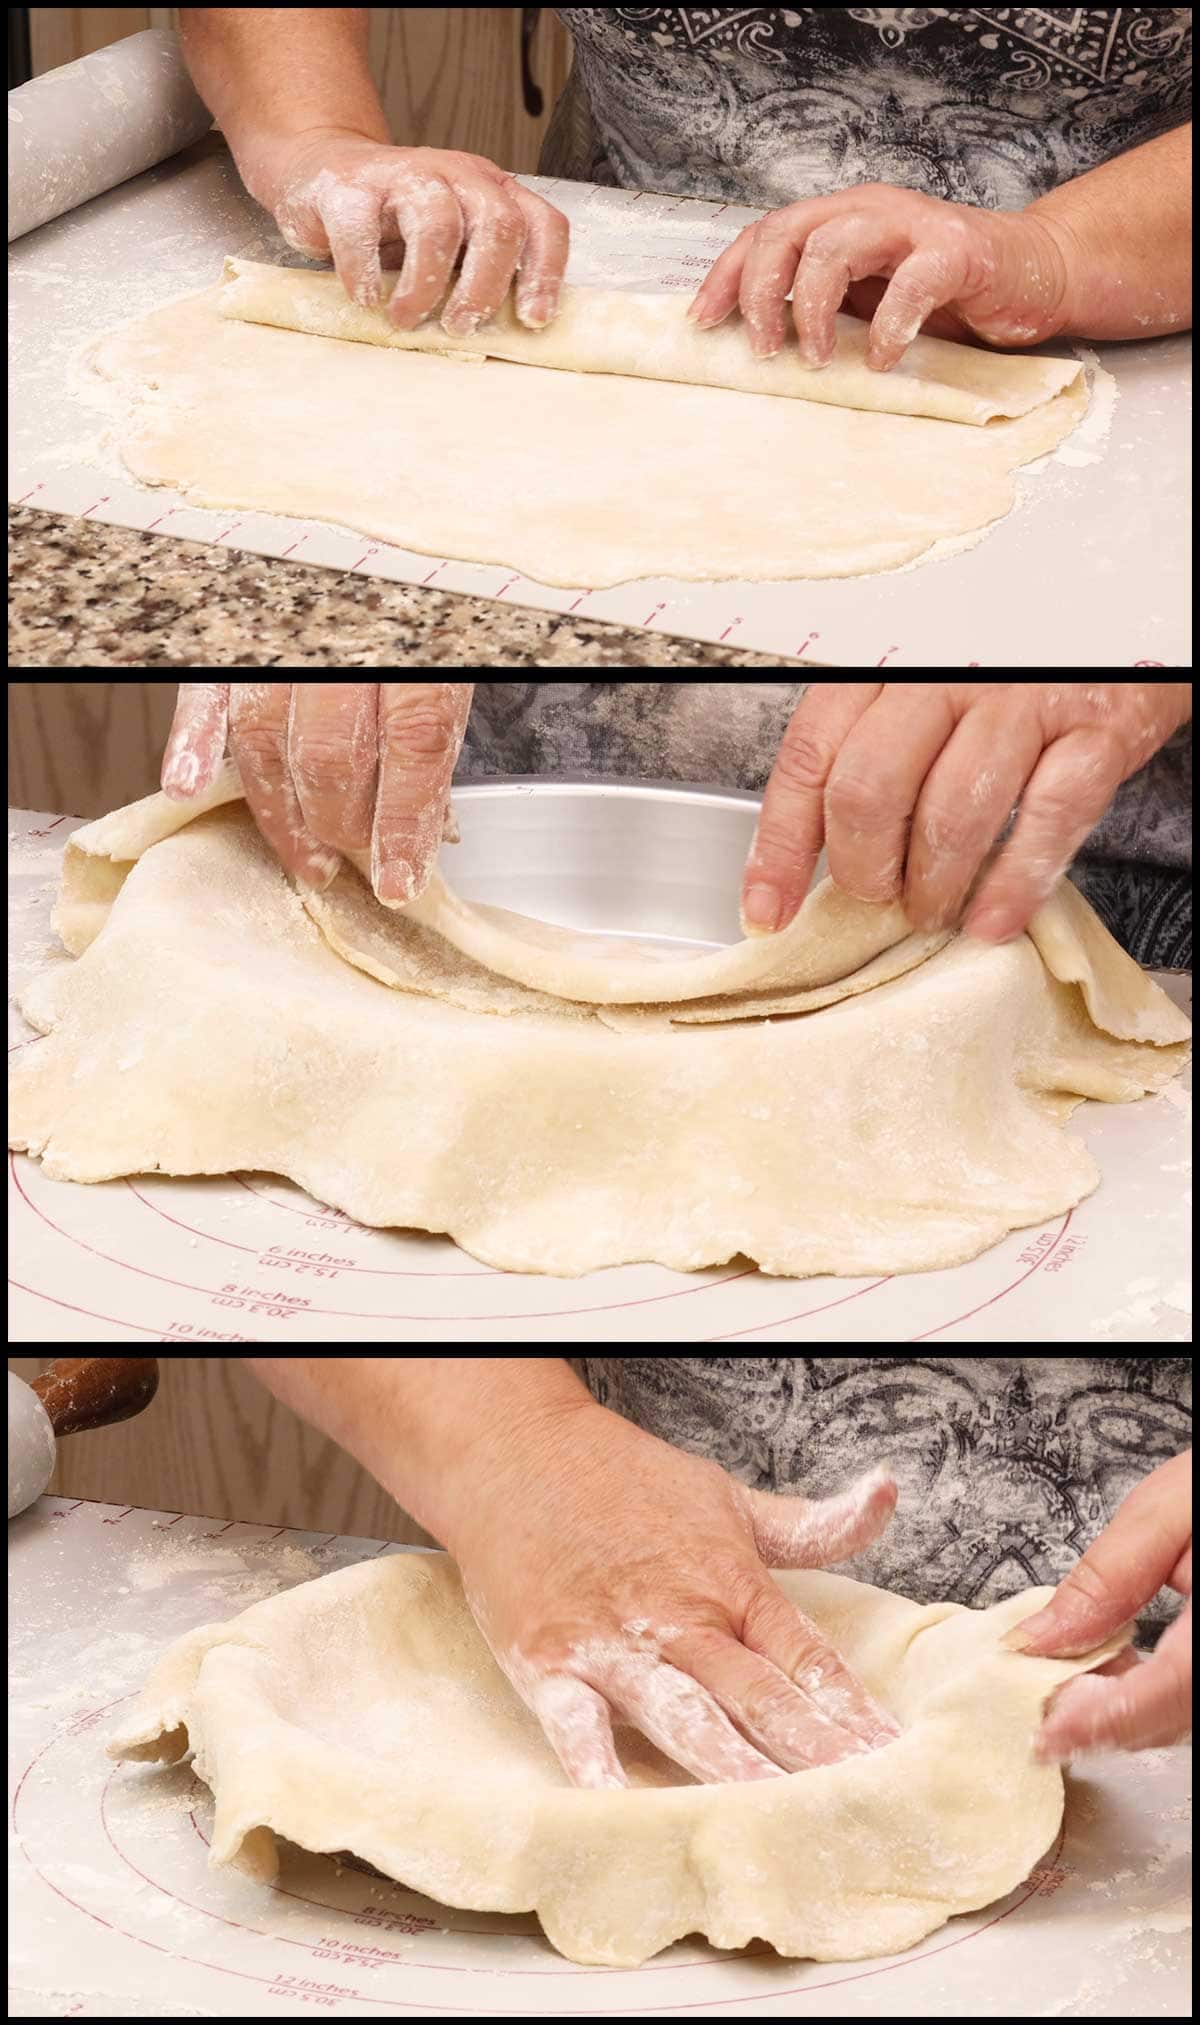
Or you can watch this video to see how I made the scalloped edges:
You can form and pre-bake your pie shell 1-2 days in advance.
Making the 10-Minute Apple Pie
Whether you make the components of your apple pie in advance, the day of, or choose to buy store-bought crust and filling to save time, when you are ready to make and serve your apple pie, it's done in 10 minutes!
This is such a time saver when you are entertaining on a large or small scale and by breaking up the steps, it is not nearly as overwhelming of a task.
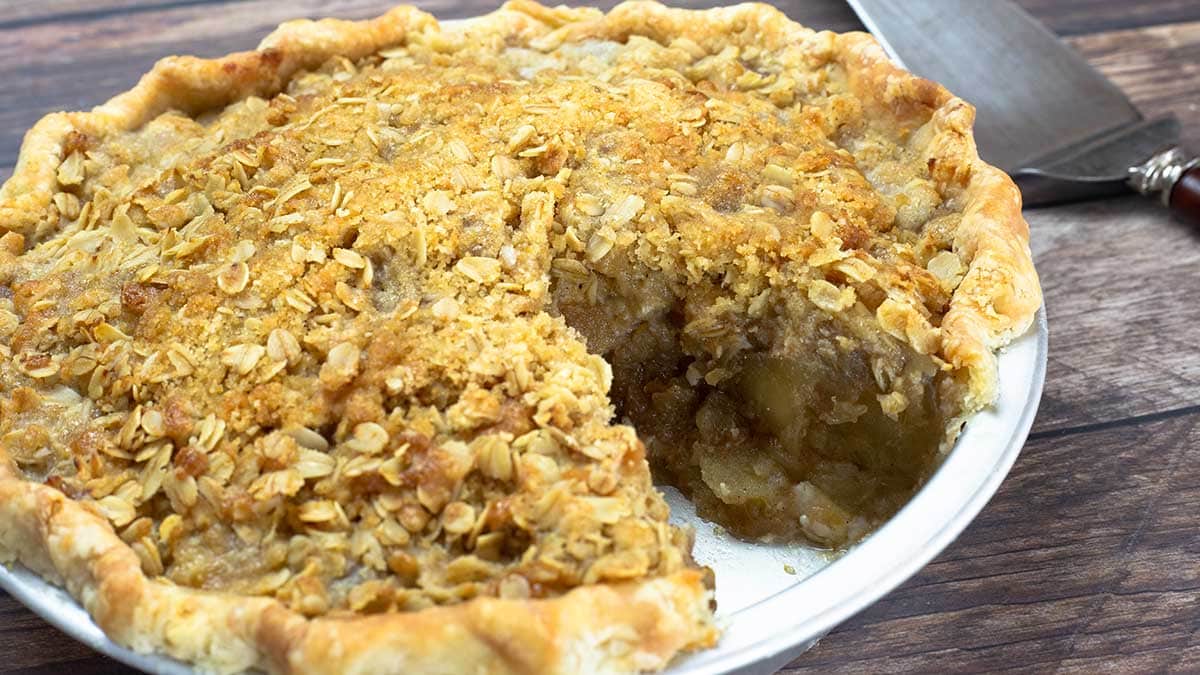
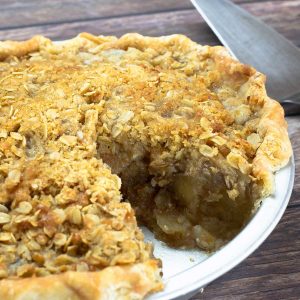
The crumb topping pairs perfectly with a pre-baked crust and a delicious apple pie filling and is the BEST apple pie I've ever tasted. I kid you not! Everything about the pie I made was perfect.
Prepare the Crumb Topping
To make the crumb topping, you only need a medium size bowl and a fork or, to make it even easier, a (affiliate link)pastry blender like I use. You can even use a stand mixer to combine all the ingredients.
Start by preheating the Ninja Foodi on Air Crisp at 375℉/190℃ while you make the crumb topping.
Add the oatmeal, sugar, flour, and salt. Mix to combine.

Add in small slices of the cold butter and cut the butter into the mixture until small pebbles form.
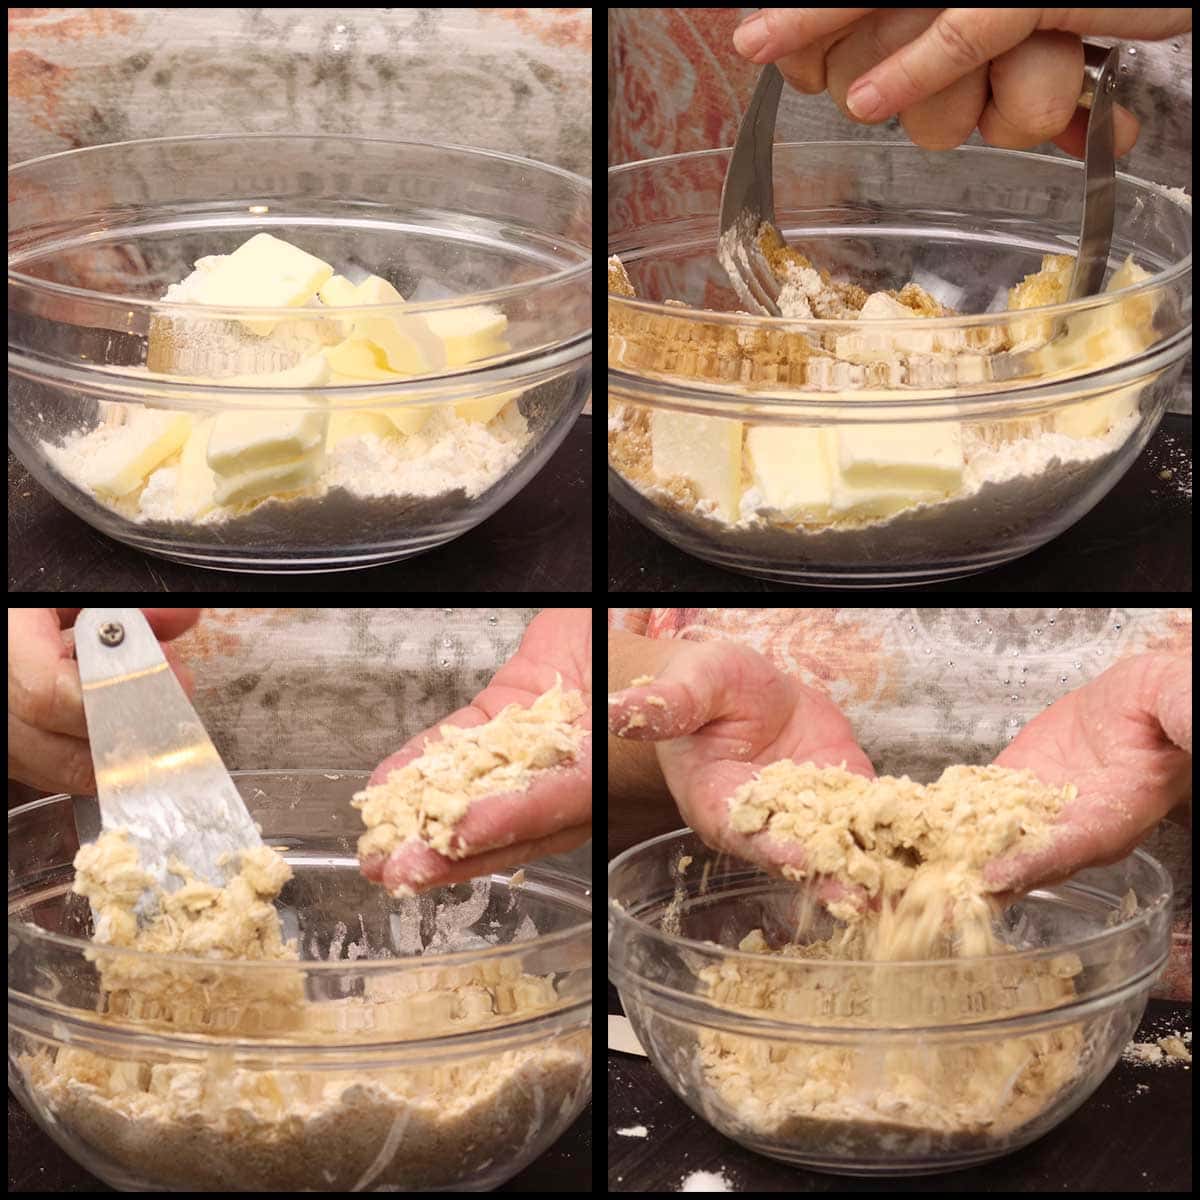
Make sure you don't have a lot of loose flour that isn't combined with the butter or your top will look floury and dry. You can add a little more butter if needed.
I don't add any seasoning (except salt) to my crumb topping, but you certainly can add spices if you like.
You can make the crumb topping ahead of time and store it in an airtight container for several days in the refrigerator or freeze it.
Assembling the Apple Pie
Adding the filling and crumb topping: 3 minutes
Baking the Apple Pie: 7 minutes
Pour the apple pie filling into your pre-baked pie shell and smooth the top down.
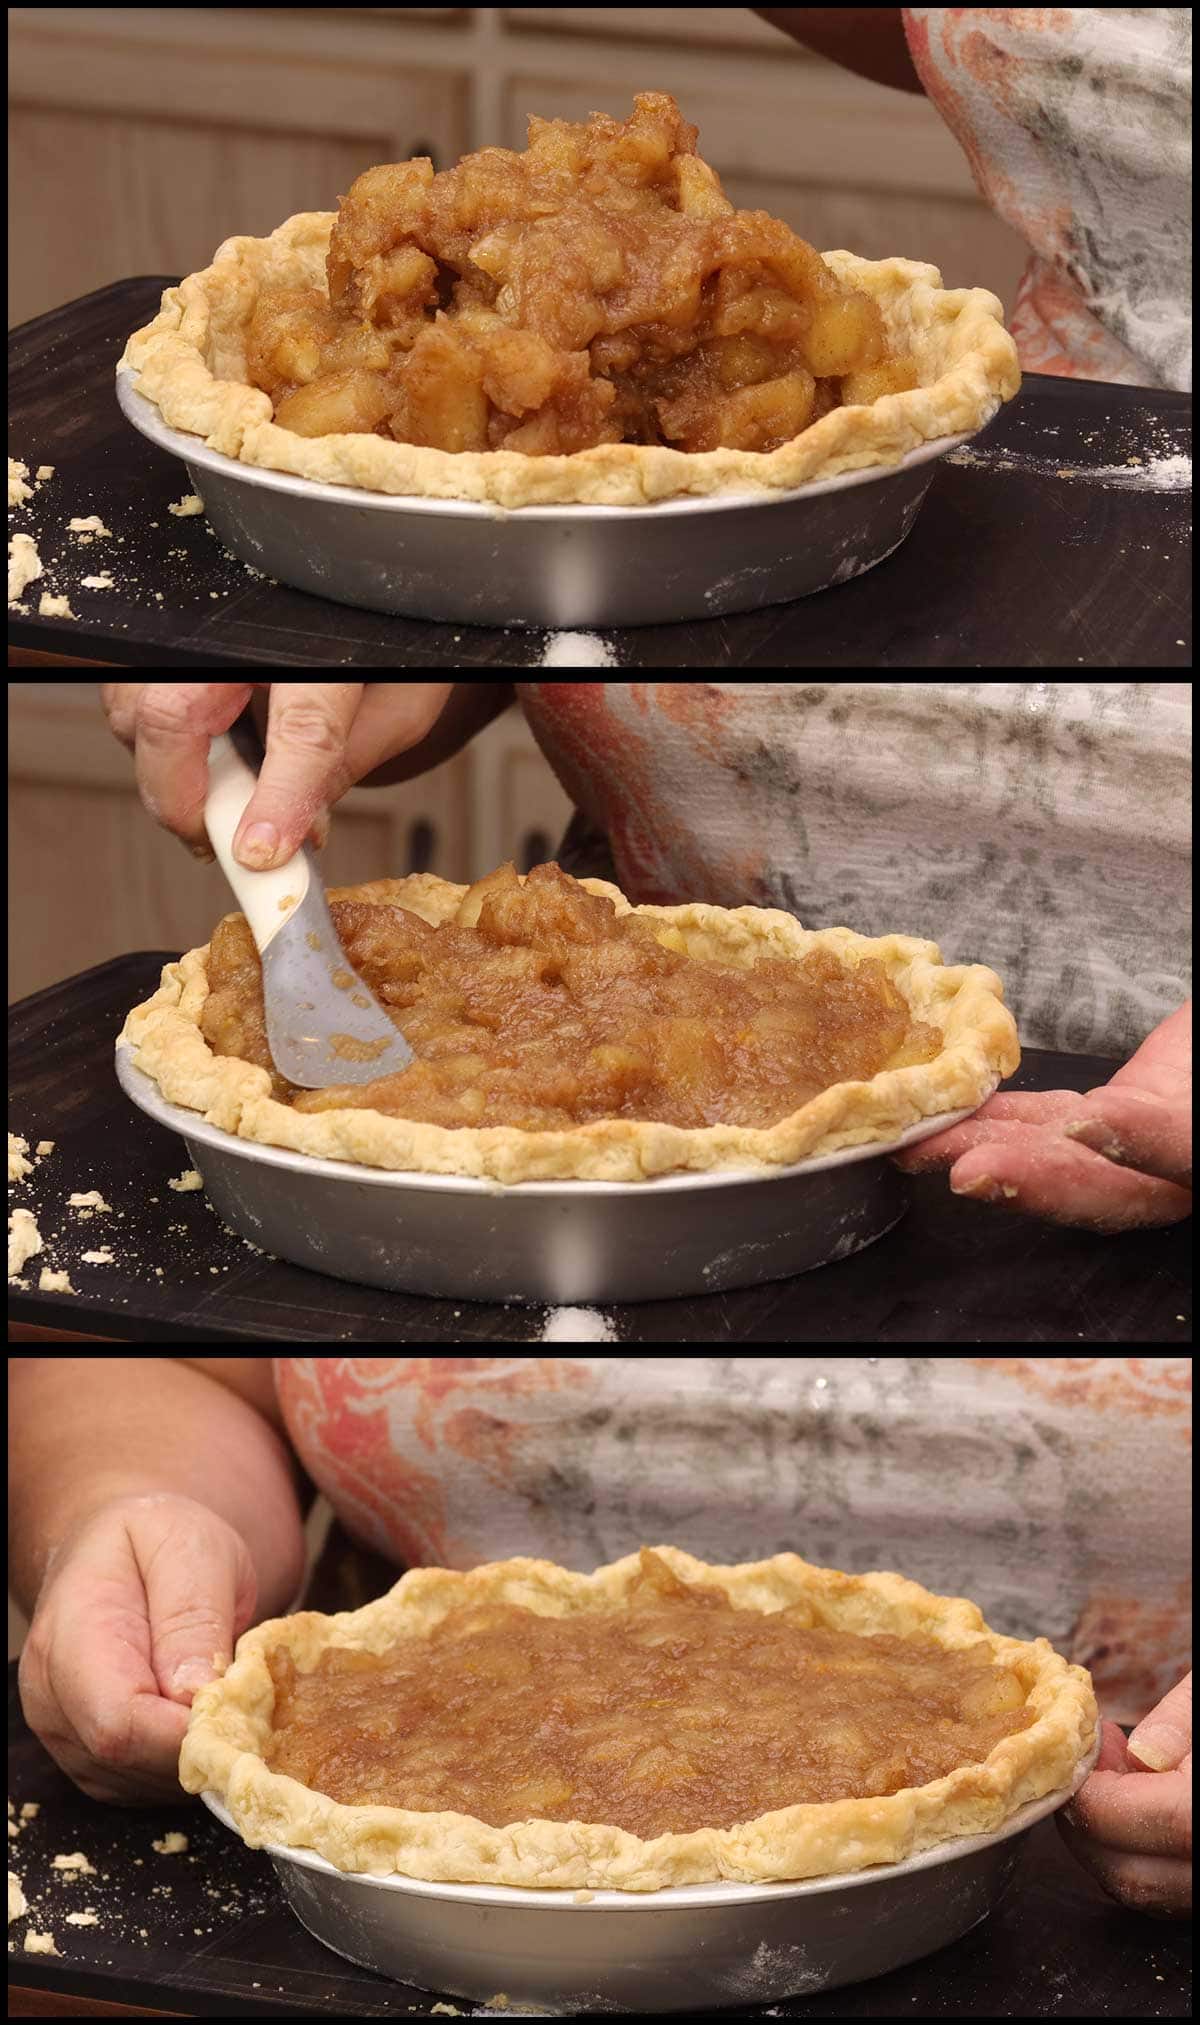
Spread the crumb topping over the filling in an even layer.
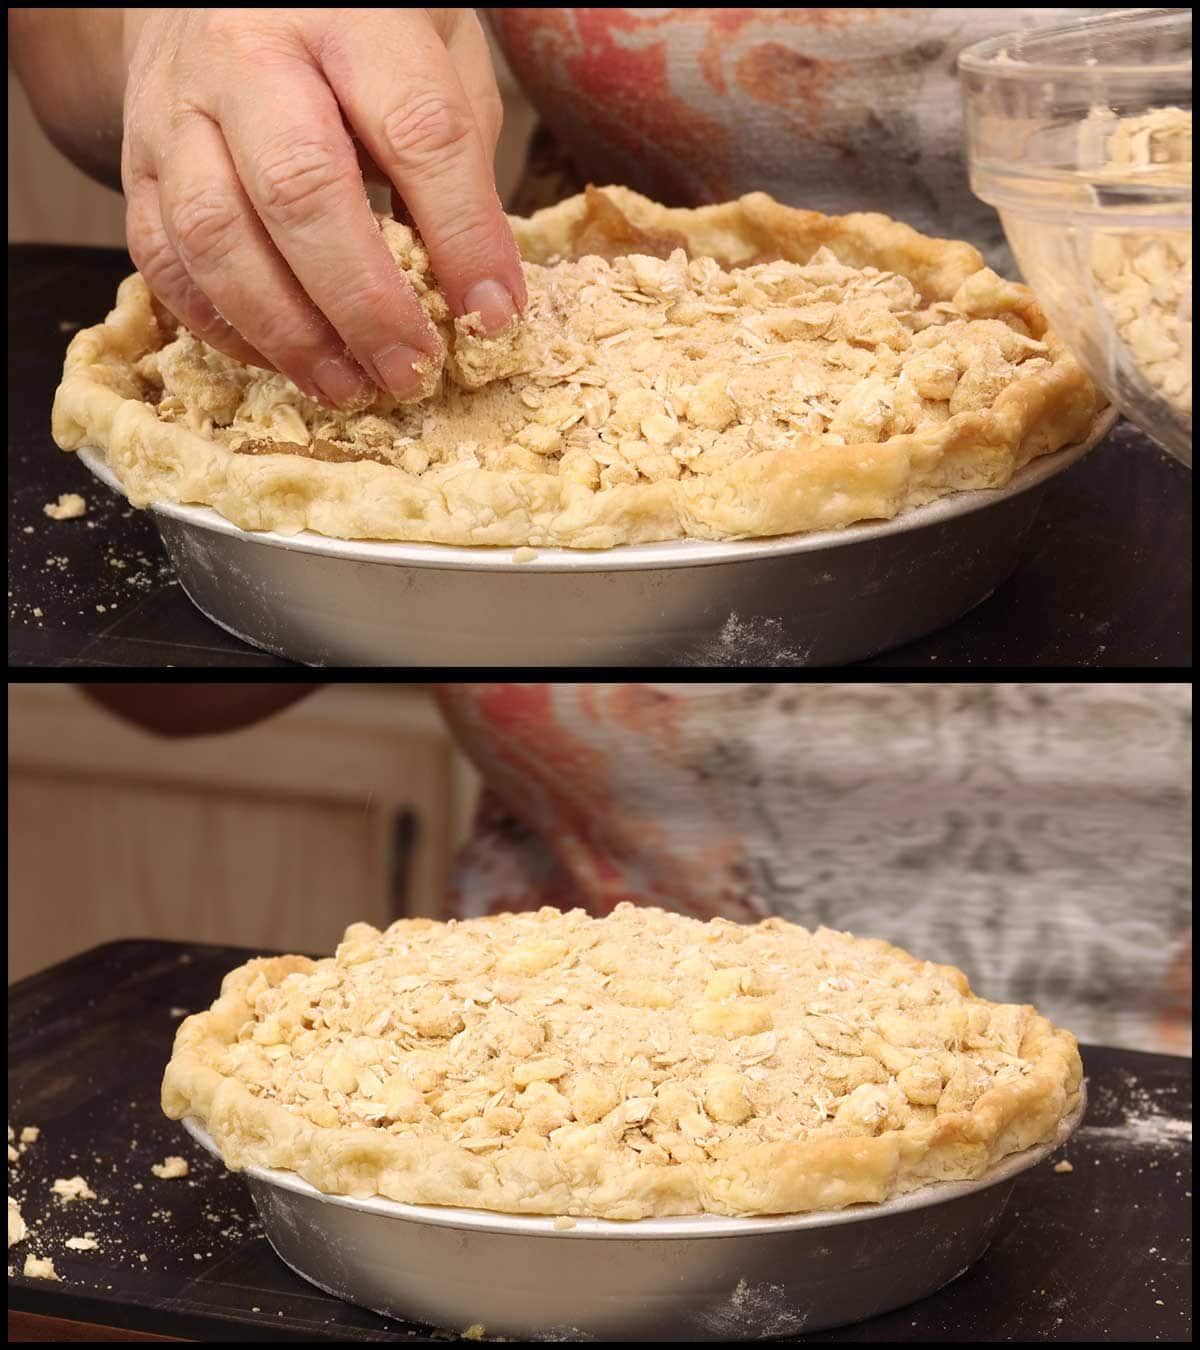
Place the pie on the reversible rack in the low position and close the TenderCrisp lid. Air Crisp on 375℉/190℃ for 6-8 minutes or until the crumb topping is nicely brown.

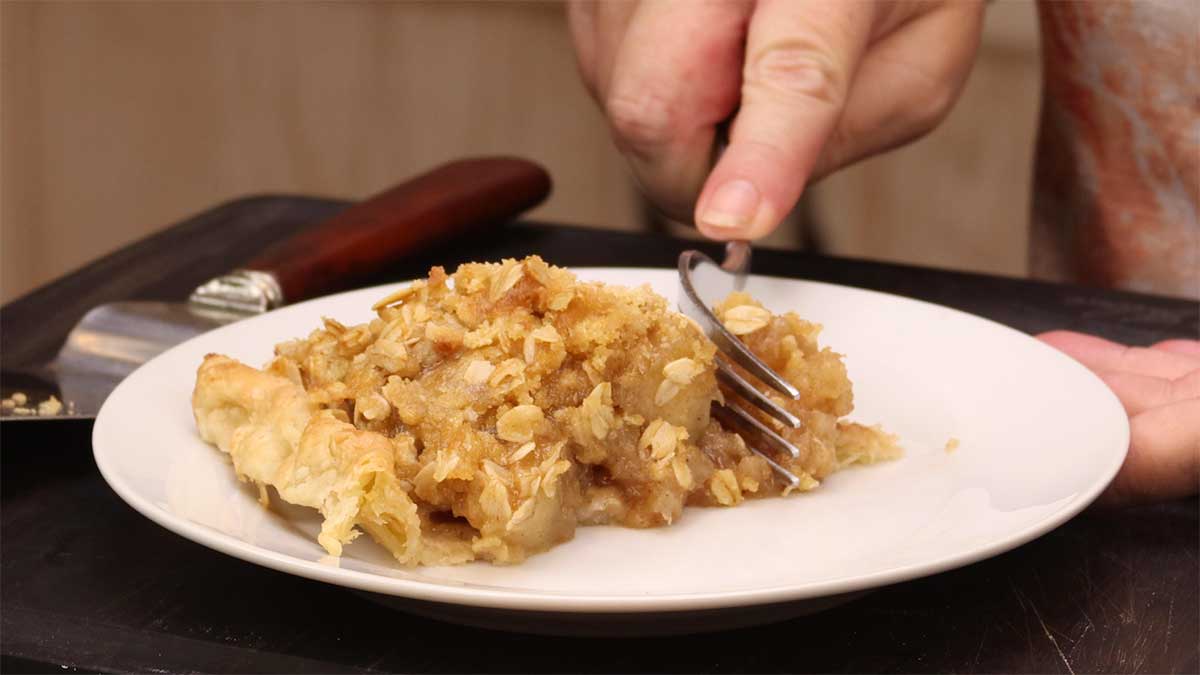
Remove and let sit for a few minutes. Cut and Serve!
10-Minute Apple Pie
Ingredients
Apple Pie
- 1 prebaked pie crust
- 4 cups apple pie filling
Crumb Topping
- ½ cup oatmeal Old Fashioned Oats
- ½ cup packed brown sugar
- ⅓ cup flour
- ¼ teaspoon fine grind sea salt
- ⅓ cup butter cold
Would you like to save this recipe?
Instructions
- Preheat the Ninja Foodi on Air Crisp at 375°F/190°C while you make the crumb topping and assemble the pie.
- Combine the oatmeal, brown sugar, flour, and salt in a medium size bowl. Mix to combine.
- Slice the very cold butter into teaspoon size slices and add to the dry mixture. Cut the butter into the dry mixture using a fork or a (affiliate link)pastry blender. You can also use a stand mixer if prefered.
- The butter will combine with the dry ingredients and form small pebbles. If you have loose flour after cutting in all the butter, you can add more cold butter. I have not had to do that though.
- Pour the apple pie filling into the pre-baked pie crust and smooth out the filling.
- Spread the crumb topping over the top of the apple pie and place the pie on the reversible rack in the low position.
- Place the rack into the Ninja Foodi and close the TenderCrisp Lid. Air Crisp on 375°F/190°C for 6-8 minutes or until the topping is nice and brown.
- Remove and let sit for a few minutes. Cut & Serve!
Notes
Nutrition
About the Recipe Author, Louise Long
Louise is a full-time recipe creator and food blogger @ The Salted Pepper. She has over 30 years of experience with cooking and recipe development. She owned a restaurant for several years and was a full-time RN until retiring to blog full-time.

She published her first cookbook in the Fall of 2018 and is very interested in writing several more.
Louise is also the creator of an online Ninja Foodi Pressure Cooking Course with over 100 instructional step-by-step videos. People absolutely rave about the course and all the value they have received from it.
Louise has several very active Facebook groups that help people with the basics of cooking and learning more about the appliances they love.
Ninja Foodi Pressure Cooker & Air Crisper 101
Ninja Woodfire Outdoor Grill & Smoker
Louise is also a YouTube creator and you can find most of her recipes in video format on The Salted Pepper YouTube channel.
She is very responsive to messages and eager to help in any way she can. Get more Information about Louise & contact information
I WOULD LOVE TO SEE WHAT YOU ARE COOKING UP IN YOUR KITCHEN! TAG ME @THESALTEDPEPPER ON YOUR FAVORITE SOCIAL MEDIA PLATFORM WHEN YOU MAKE A DISH!
BE SURE TO FOLLOW THE SALTED PEPPER RIGHT HERE ⇓⇓⇓⇓⇓
Roslyn morrissey says
Hi, the 9” pie pan link goes to the 10 and 12” pans. Is the 9” just missing from the page at present?
Louise says
It looks like it is sold out right now and that is why it isn't showing.
Sue says
Can you use cherry pie filling?
Louise says
Sure!
Suzanne Schatzle says
Hi Louise! I want to make this for my family. Can you suggest something other than oats for the top? My husband is allergic. I was thinking I could make a crumble top with flour?
Allan Levine says
Louise, apple pie looks good......question: what do think about using a top crust rather than crumb topping?
Thanks
Allan Levine
Louise says
When you pre-bake a bottom crust, you really can't get the top crust to adhere to the bottom like it does when both are raw and cooked at the same time. You certainly can give it a try and just put the raw crust up to the edges, but it will shrink back some and might look a little funny. I tried to cut circles out of pie dough and put them on top of the pie and it worked, but I'm far from an artist and it looked a little haphazard to me, so I went with the crumb topping.
Marilyn Eggleston says
Can you use a glass pie plate .? And do you have a Rice pudding recipe
Louise says
Yes, if it fits, you can. I have a jasmine rice recipe, but you can switch up the flavors and use the times and liquid amounts to make a different one: https://thesaltedpepper.com/jasmine-rice-pudding/