
- Ninja Foodi or air fryer that fits a small mixing bowl
- Small mixing bowl, about 4 inches wide and 4 inches deep, for shaping the tortilla
- Crisping plate or air fryer rack
- Oil sprayer or spritzer
- Parchment paper (optional)
- Wooden Spoon or Silicone Spatula
- Slotted spoon
- Small mixing bowl for the seasoning blend
- Small bowl for the crema dressing
If you have ever skipped the tortilla shell on a taco salad because the molds are a hassle and the deep-fried versions are messy, that will all change with this easy technique for making them in your air fryer!
These taco salad bowls start with flour tortillas, a little oil and a small mixing bowl, no special molds needed. Once the bowls are nice and crispy, they get loaded up with seasoned ground beef, refried beans, fresh toppings, and the easiest creamy Mexican crema dressing that is definitely better than plain sour cream. It's a fun, restaurant-style dinner, that tastes like it took a lot more work than it did. And, perfect for a taco bar party!
The whole dinner comes together in about 60 minutes, including the time to crisp up four tortilla bowls one at a time, and you can prep the bowls a few days ahead to make a busy Taco Tuesday weeknight dinner come together in a flash.
Would you like to save this recipe?
I have tested these tortilla bowls in the Ninja Foodi and the (affiliate link)Ninja Combi using the same little upside-down mixing bowl trick, and I have tested countless taco seasoning blends to land on a balance of warm spices, paprika, and Mexican oregano that is leagues better than any prepared packet. Below you will find everything you need to make this whole meal, plus my best tips for tortilla bowl troubleshooting, make-ahead prep, and how to use what you already have in your kitchen to make the crispy bowls.
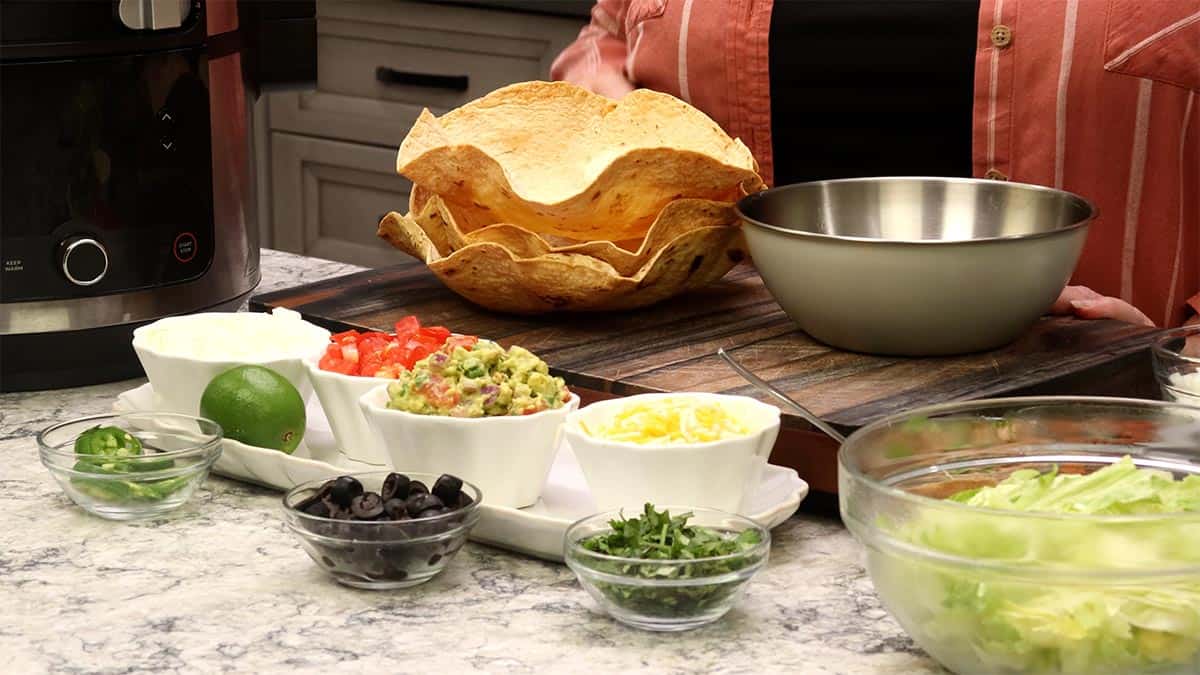
Suggested Kitchen Tools for Taco Salad Bowls
- Ninja Foodi or air fryer that is wide enough to fit a small mixing bowl inside the cooking pot. The Ninja Combi works great for this recipe.
- Crisping plate or air fryer rack that comes with the Ninja Foodi
- (affiliate link)Small mixing bowl, about 4 inches wide and 4 inches deep, for shaping the tortilla
- (affiliate link)Oil sprayer or spritzer (a brush also works)
- Parchment paper (optional, for easy cleanup)
- Wooden spoon or silicone spatula
- Slotted spoon for transferring the cooked taco meat
- Small bowl and whisk for the crema dressing
- Heat-safe tool for lifting the air fryer rack and tortilla bowls
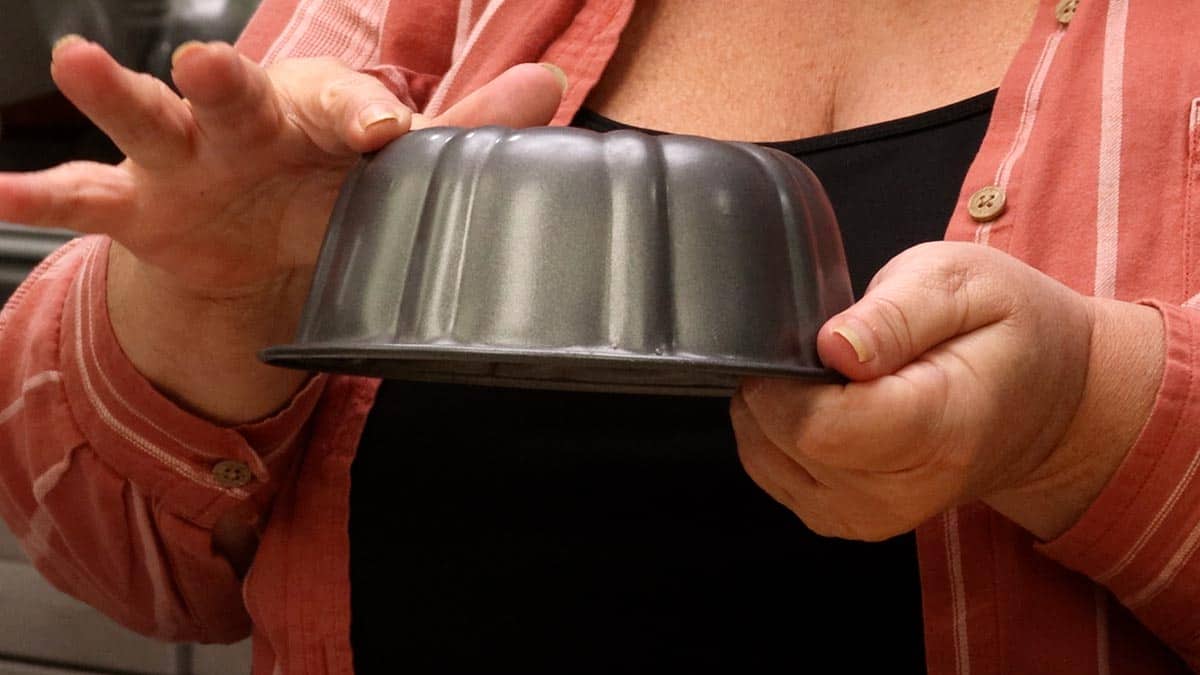
Before you go out and purchase a bowl to use, look around your kitchen because you probably have something that will work. A small bundt pan or any heat safe bowl will be fine, but keep in mind that glass does not transfer heat as well, so you may have to cook longer or at a slightly higher temp.
Personally, I did not have great luck using glass, so I do recommend some kind of metal bowl for the best results.
Ingredients & Substitutions
This recipe includes the crispy tortilla bowl, the seasoned ground beef taco meat, and a generous list of toppings to load them with.
Flour Tortillas
Used in Recipe: Four 10-inch (burrito size) flour tortillas form the crispy tortilla bowls.
What it Does: The tortilla drapes over an upside-down mixing bowl in the air fryer and crisps into a perfect bowl shape. The 10-inch size gives you a generous restaurant-style bowl with room for a layer of beans, lettuce, taco meat, and all your favorite toppings.
Substitutions: Stick with store-bought flour tortillas for this recipe. Homemade tortillas don't have the even thickness or uniform size needed to drape and crisp evenly. For smaller, kid-size or appetizer portions, use a medium-size flour tortilla and a smaller bowl mold. Corn tortillas don't work for the inverted bowl method because they crack as they drape.
Neutral Oil
Used in Recipe: About 2 to 3 teaspoons of avocado oil per tortilla, sprayed lightly on both sides.
What it Does: A light coating of oil on both sides is what gives you a crisp golden bowl without any greasy residue. Spritzing is the easiest way to get even coverage with the smallest amount of oil, but you can also brush it on.
Substitutions: Avocado oil is my favorite, but any neutral oil like canola, vegetable, or grapeseed works. Avoid olive oil with a strong flavor since the flavor will be imparted into the tortilla.
Homemade Taco Seasoning Blend
Used in Recipe: 1 teaspoon fine grind sea salt, 1 teaspoon onion powder, 1 teaspoon garlic powder, 1 teaspoon chili powder, 2 teaspoons paprika (smoked or regular), 1 teaspoon Mexican oregano, 1 teaspoon ground cumin, and an optional pinch of cayenne or chipotle for heat.
What it Does: This homemade taco seasoning is the secret ingredient and is so much better than any packet at the grocery store. The cumin and chili powder are the backbone, paprika adds depth and color, and Mexican oregano gives it that distinct south-of-the-border flavor you can't get from Italian oregano. Making your own at home means you control the salt, you control the heat, and you can mix up a big batch to keep on hand.
Substitutions: Use Mexican oregano, not Italian. They are completely different herbs and Italian oregano will throw off the flavor. If you don't have Mexican oregano, leave it out altogether. For the heat, pair smoked paprika with cayenne or regular paprika with chipotle so you don't double up on smokiness. If you'd rather use a pre-made packet, one packet usually replaces this whole blend for one pound of meat.
Ground Beef and Onion
Used in Recipe: 1 pound of 80/20 ground beef, and ½ cup of chopped yellow onion (optional).
What it Does: Ground beef gives you a juicy, flavorful taco meat with great fat content for richness. The chopped onion adds a little sweetness and depth.
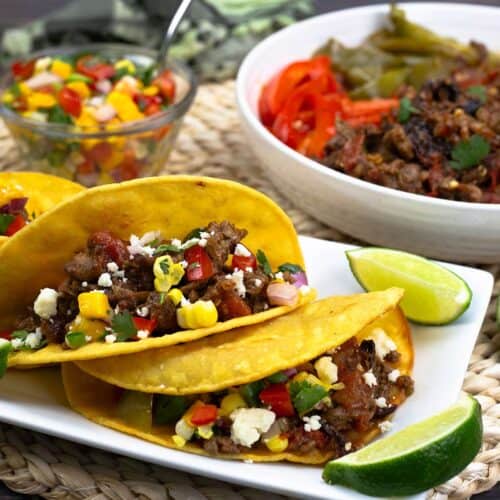
Substitutions: Leaner ground beef, ground turkey, ground chicken, or ground pork all work as substitutions, just add a teaspoon of neutral oil to the pot since these are leaner. For a steak taco salad, use thinly sliced grilled steak, carne asada, or shredded beef. Here is my recipe for Carne Picada Tacos with tender shredded beef that you can swap in for the ground beef when you want a heartier steak-style salad bowl. The onion is optional and can be left out if you don't like them.
Bowl Toppings
Used in Recipe: 1 cup warmed refried beans, 1 cup shredded cheese (Mexican blend, cheddar, or Monterey Jack), 4 cups shredded iceburg lettuce, diced tomatoes or pico de gallo, guacamole, sliced black olives, pickled jalapeños, fresh cilantro, and a squeeze of lime.
What it Does: The toppings turn a simple taco salad into a loaded restaurant-style dinner. Refried beans on the bottom act as a creamy buffer between the crispy tortilla and the wetter ingredients. Cheese gets layered twice (once on the beans and once on top) for richness in every bite. The fresh toppings give every forkful color, crunch, and brightness.
Substitutions:Romain lettuce or a 50/50 romaine and iceberg blend works in place of all iceburg. Black beans (warmed with a little onion and seasoning) can be used in place of refried beans. Any favorite taco salad ingredients work, swap in corn, sliced avocado, sour cream, or any other toppings you like.
Here is my recipe for Homemade Guacamole that comes together in minutes and is the perfect creamy topping for these taco salad bowls.
If you want to mix things up, my Mango Corn Salsa brings a sweet and spicy twist that pairs beautifully with the seasoned taco meat in these bowls.
Mexican Crema Dressing
Used in Recipe: ½ cup (affiliate link)Mexican crema, 1 to 2 tablespoons Cholula or your favorite hot sauce, and 2 to 3 tablespoons of fresh lime juice (about 1 squeezed lime).
What it Does: Mexican crema is the difference maker. Unlike a thick blob of sour cream that sits on top, the crema thins beautifully with the lime juice and pours over the whole salad so every bite gets a little of the dressing. The Cholula adds a gentle heat that ties everything together, and the lime brings the brightness that cuts through the richness of the beef and cheese. Cholula is my favorite hot sauce for the crema dressing because it adds a gentle warmth without overpowering the lime and crema.
Substitutions: Mexican sour cream is thicker than crema and won't pour as nicely, so go with crema if you can find it. In a pinch, thin sour cream with a little milk and lime juice. Any favorite hot sauce can stand in for Cholula, or skip the hot sauce and stir a teaspoon of the homemade taco seasoning into the crema for a different flavor. A chipotle ranch (½ cup ranch dressing whisked with a tablespoon of chopped chipotle in adobo) is another delicious option.
How to Make Taco Salad Bowls in the Air Fryer
From start to finish, this whole dinner takes about 15 minutes of prep and 25 minutes of cooking. The tortilla bowls go first since they take the longest, then the taco meat comes together quickly while you prep the toppings and the crema dressing.
Shape and Crisp the Tortilla Bowls
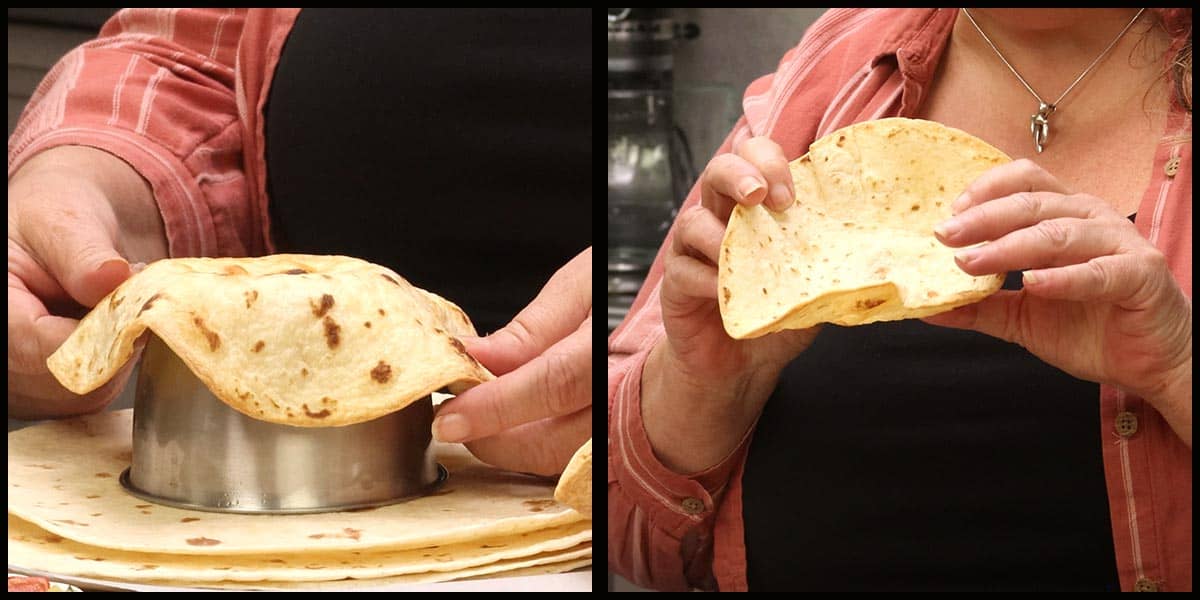
Ninja Foodi Directions: set the small mixing bowl upside down in the inner pot. Take one tortilla, lightly spritz both sides with avocado oil (about 2 to 3 teaspoons total), and lay it flat on top of the upside-down bowl. The tortilla will be stiff and look like it isn't draping, that is normal. Once it warms up in the air fryer, it relaxes and forms beautiful little folds.
Quick Tip
Do not preheat the air fryer for the tortilla bowls. Starting in a cold pot lets the tortilla warm up gradually, drape into shape, and crisp up evenly. If you go in too hot, the tortilla bubbles up before it has a chance to settle around the bowl. If you do see an air bubble forming mid-cook, prick it with a toothpick to release the steam and gently press the tortilla back down around the bowl.
Set the crisping plate or the rack on top of the tortilla and bowl. This is important, because without it the tortilla will fly up against the heating element and burn instantly.
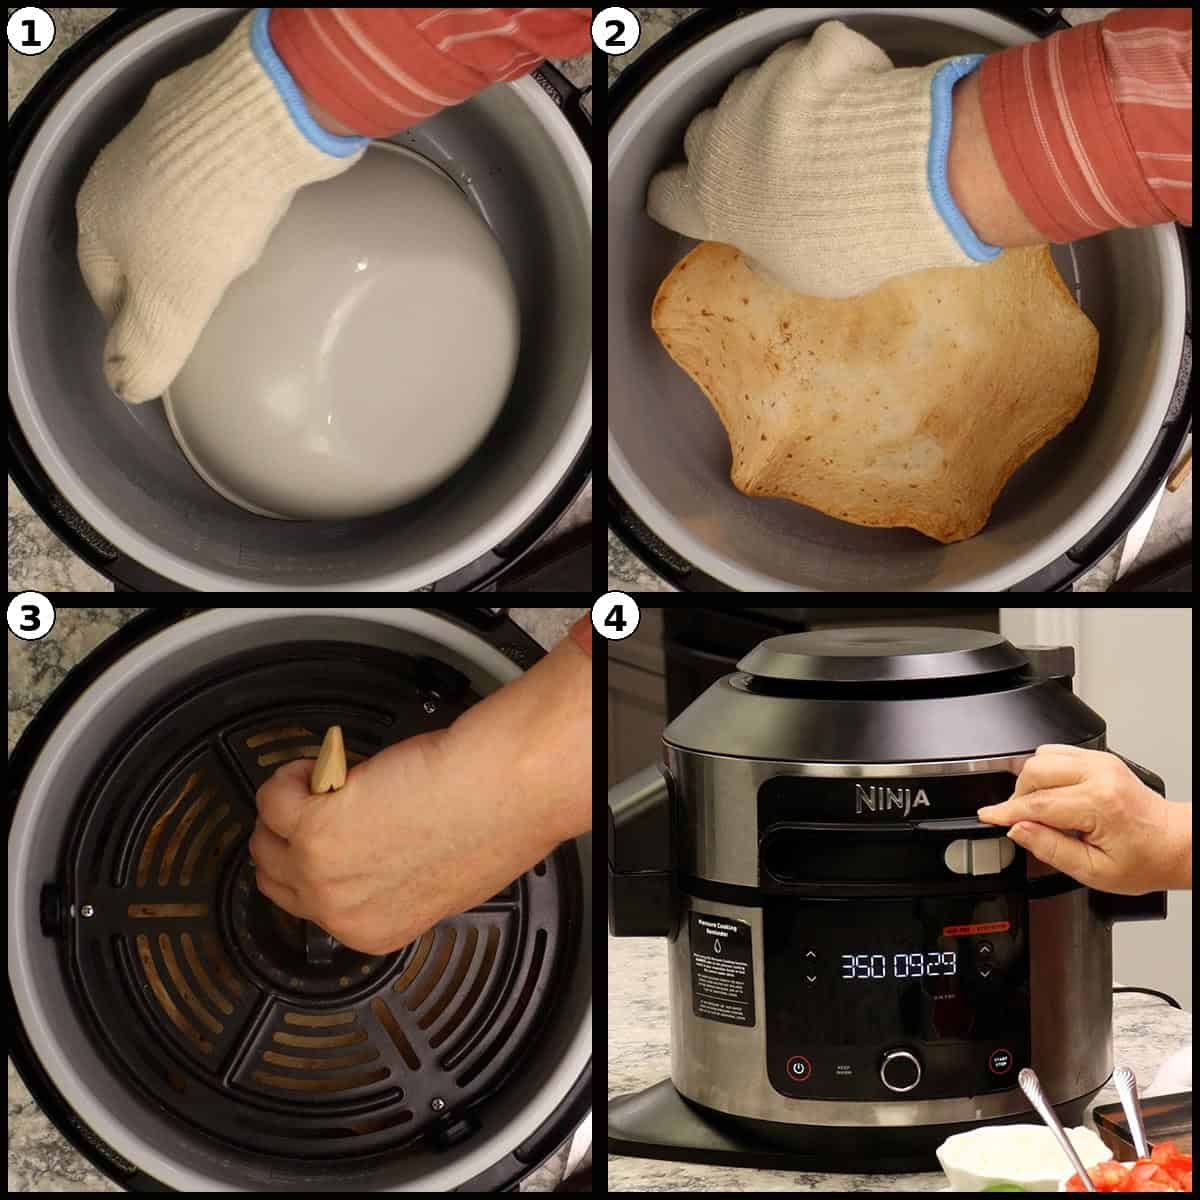
Close the air fryer lid and set the temperature to 350℉/175℃ and the you can leave the time at 20 minutes even though it will not take that long.
After about 3-4 minutes, open the lid, take the top rack off.
Spritz any areas that look dry and stiff. Gently press the warmed tortilla down around the bowl with a heat-safe tool so it drapes nicely. Replace the rack and continue air frying for another 6 to 7 minutes until the bowl is crisp and golden.
After 10 minutes, meaning the display is reading 10 minutes left from the defualt 20 minutes at the start, lift the lid and remove the rack. Lightly tap on the tortilla shell and it should sound crispy. If it is soft or if you can bend the flour tortilla, it is not done and you will want to air crisp until it is a formed bowl and nice and crispy.
Once it is crispy on the outside, we are going to flip it to air fry the inside for just a few minutes. This step is optional, but since the inside of the tortilla was against the bowl, it will not be as crispy as the outside, so I air fry it for 1-2 minutes.
- Remove the rack
- Check for crispness
- Remove the tortilla shell and set it to the side
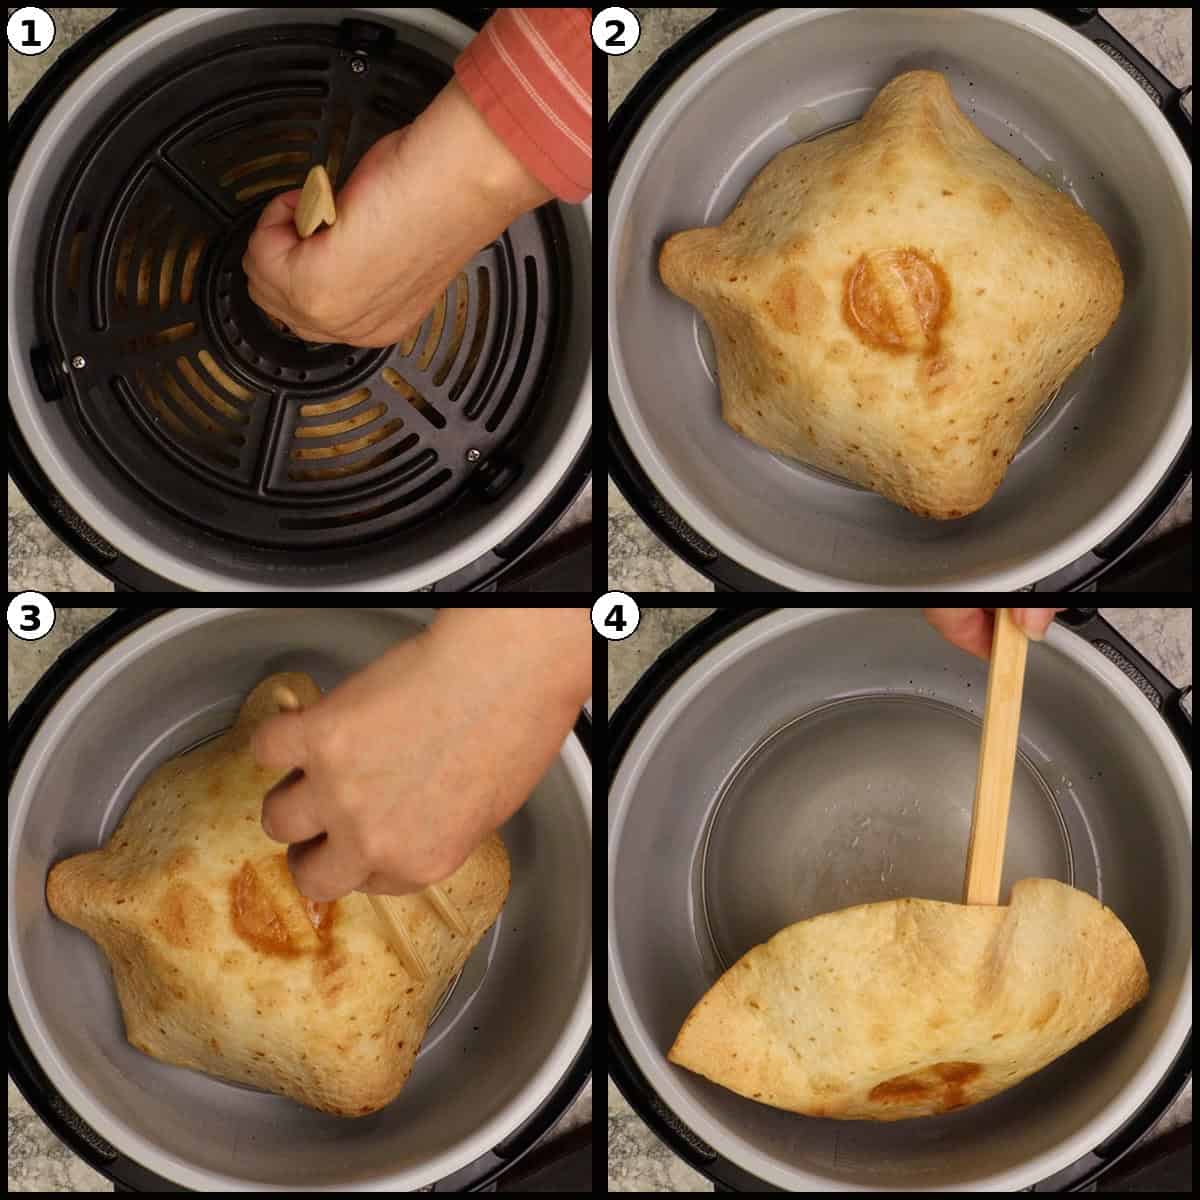
- Remove the bowl
- Place the taco shell into the bottom of the pot right-side-up
- Put the rack back on top (very important or it will fly into the heating coils
- Air Crisp for 1-2 minutes.
Repeat with the remaining tortillas. They can be made up to two days in advance and stored at room temperature in a loose bag.
Cook the Taco Meat
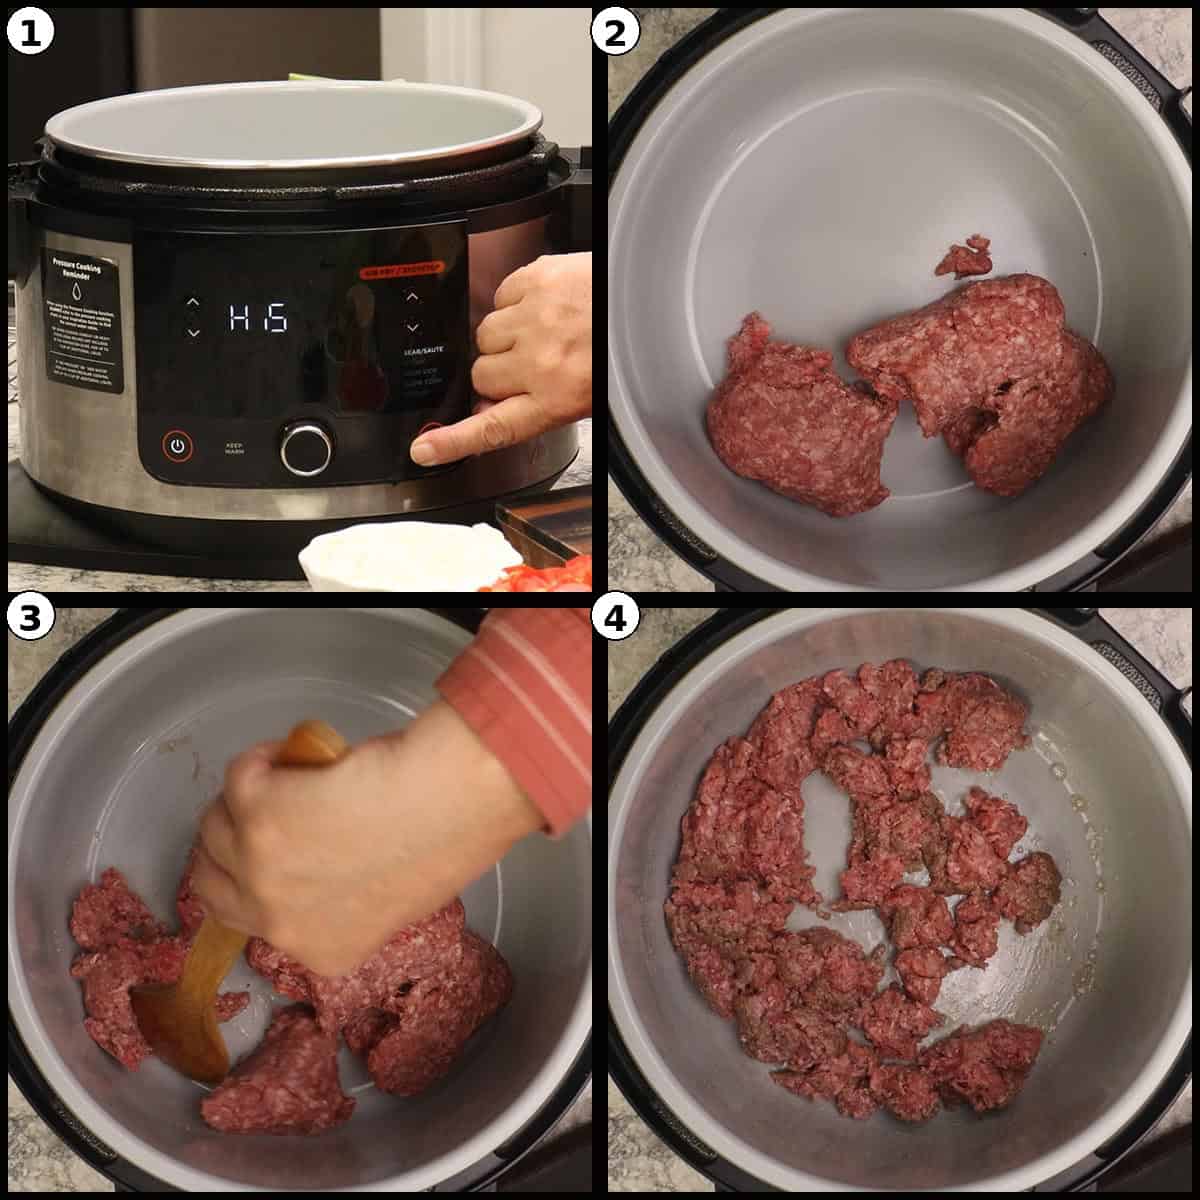
Set the Ninja Foodi to Sear/Sauté on High and press Start to heat the pot. Add 1 pound of 80/20 ground beef. With 80/20, no oil is needed since the meat renders enough fat as it browns. If you are using leaner beef, ground turkey, or ground chicken, add a teaspoon of neutral oil to the pot first. Break up the meat with a wooden spoon. You can make the meat as chunky or as fine as you like.
Some people like to add a splash of water and that is fine, but I never do.
Quick Tip
You can drain the fat before adding the seasoning blend, but if you do, I recommend adding 1-2 Tablespoons of water or beef broth before adding the seasonings. I find that leaving the fat in the taco meat keeps it moist, tender and full of flavor.
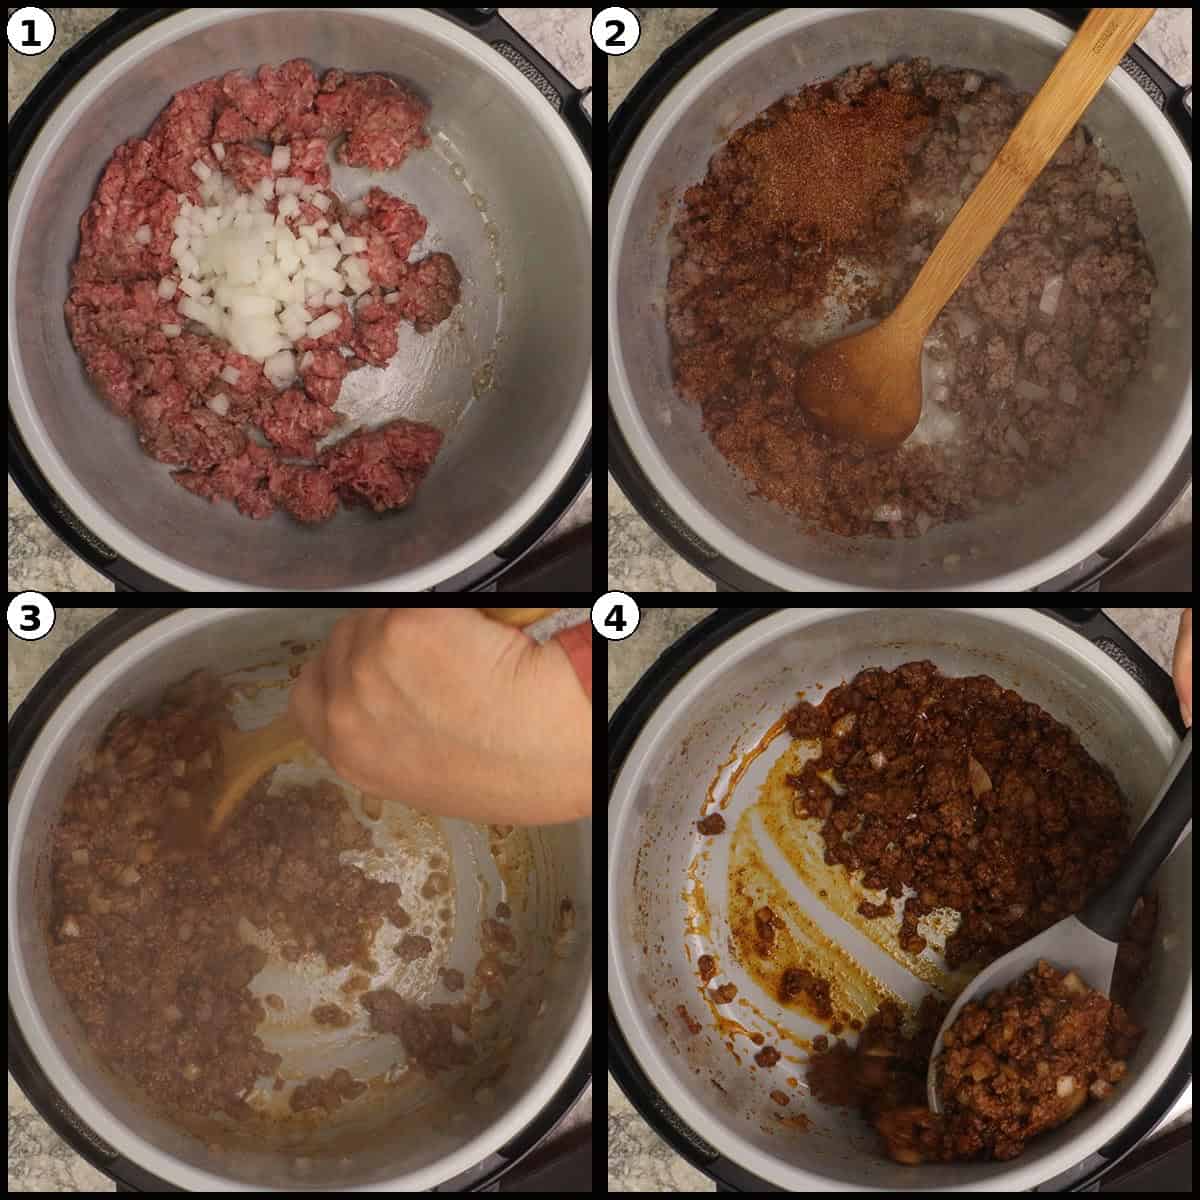
Add the onions and the homemade taco seasoning blend over the meat and stir to coat. Continue cooking until the beef is completely cooked. Turn the Ninja Foodi off and use a slotted spoon to transfer the taco meat to a serving bowl.
Make the Crema Dressing
In a small bowl, whisk together ½ cup Mexican crema, 1 to 2 tablespoons of Cholula or your favorite hot sauce, and 2 to 3 tablespoons of fresh lime juice (about 1 squeezed lime). Whisk until smooth and pourable. Adjust the amount of hot sauce and lime to taste, and set aside until you are ready to drizzle.
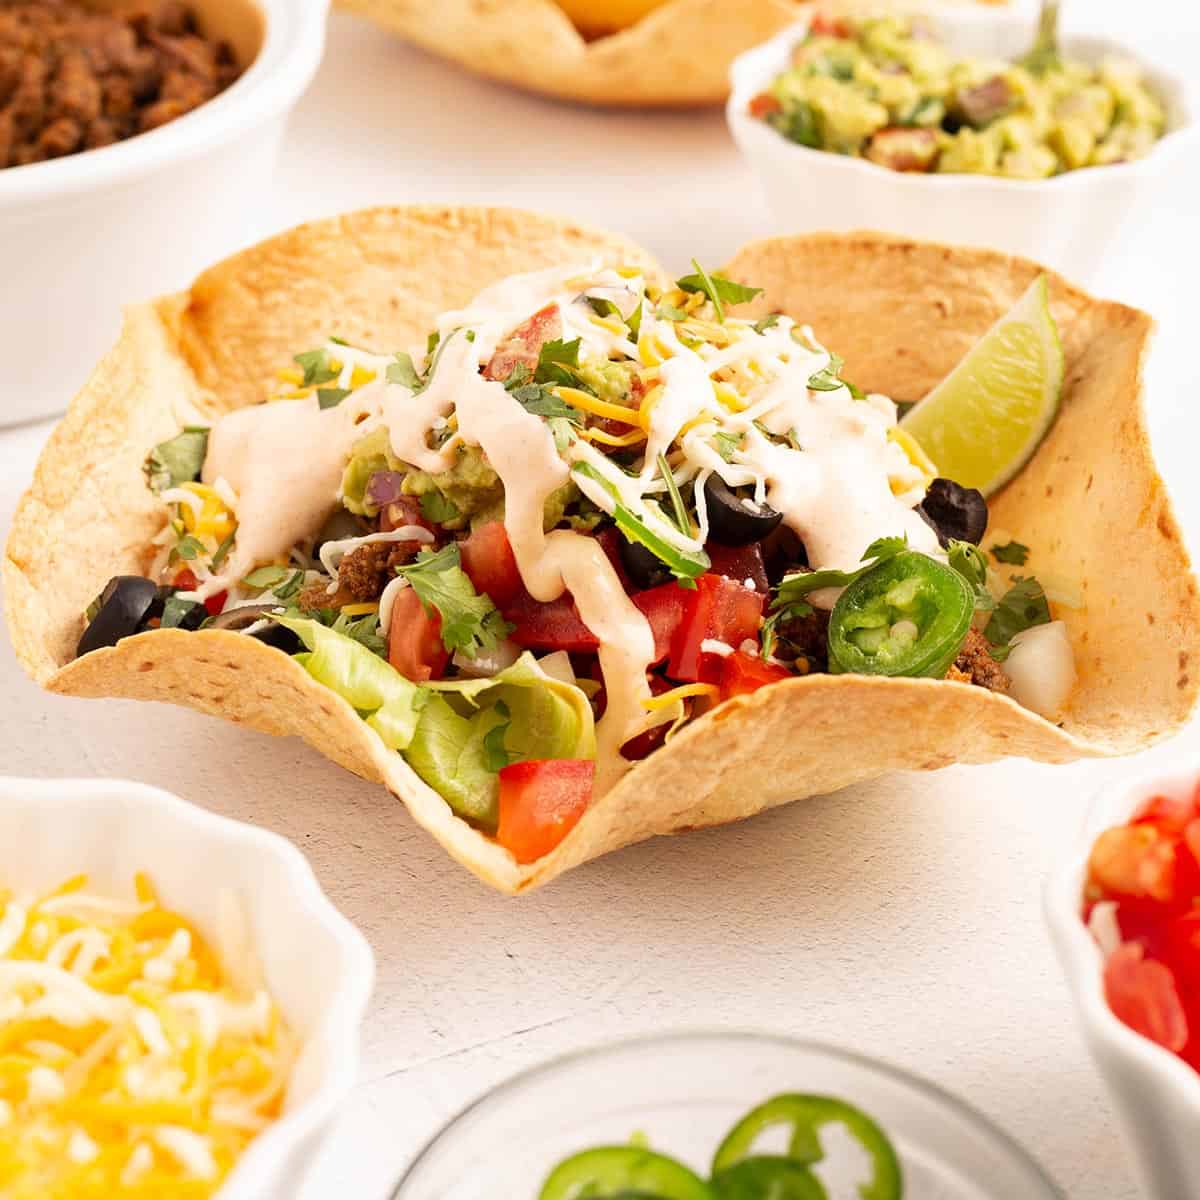
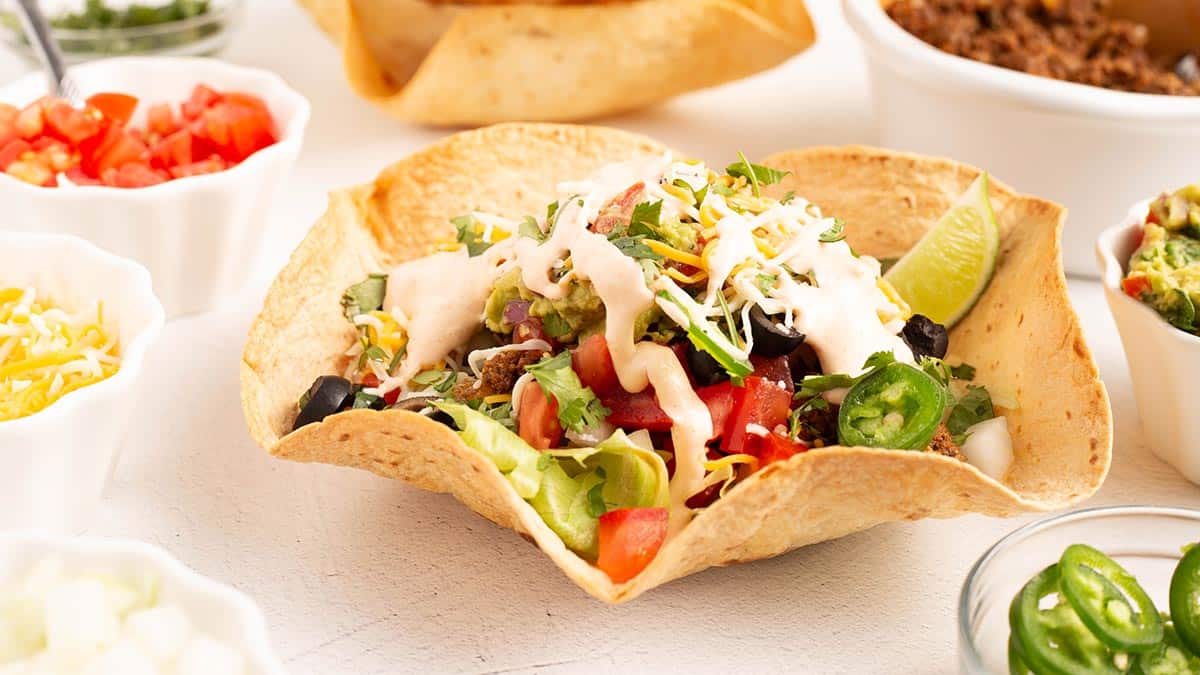
Build the Taco Salad Bowls
Set a crisp tortilla bowl on a serving plate. Spread a thin layer of warm refried beans on the bottom, then add a sprinkle of shredded cheese over the beans so it melts a bit.
Add a bed of shredded lettuce, then spoon about 4 ounces of warm taco meat over the lettuce.
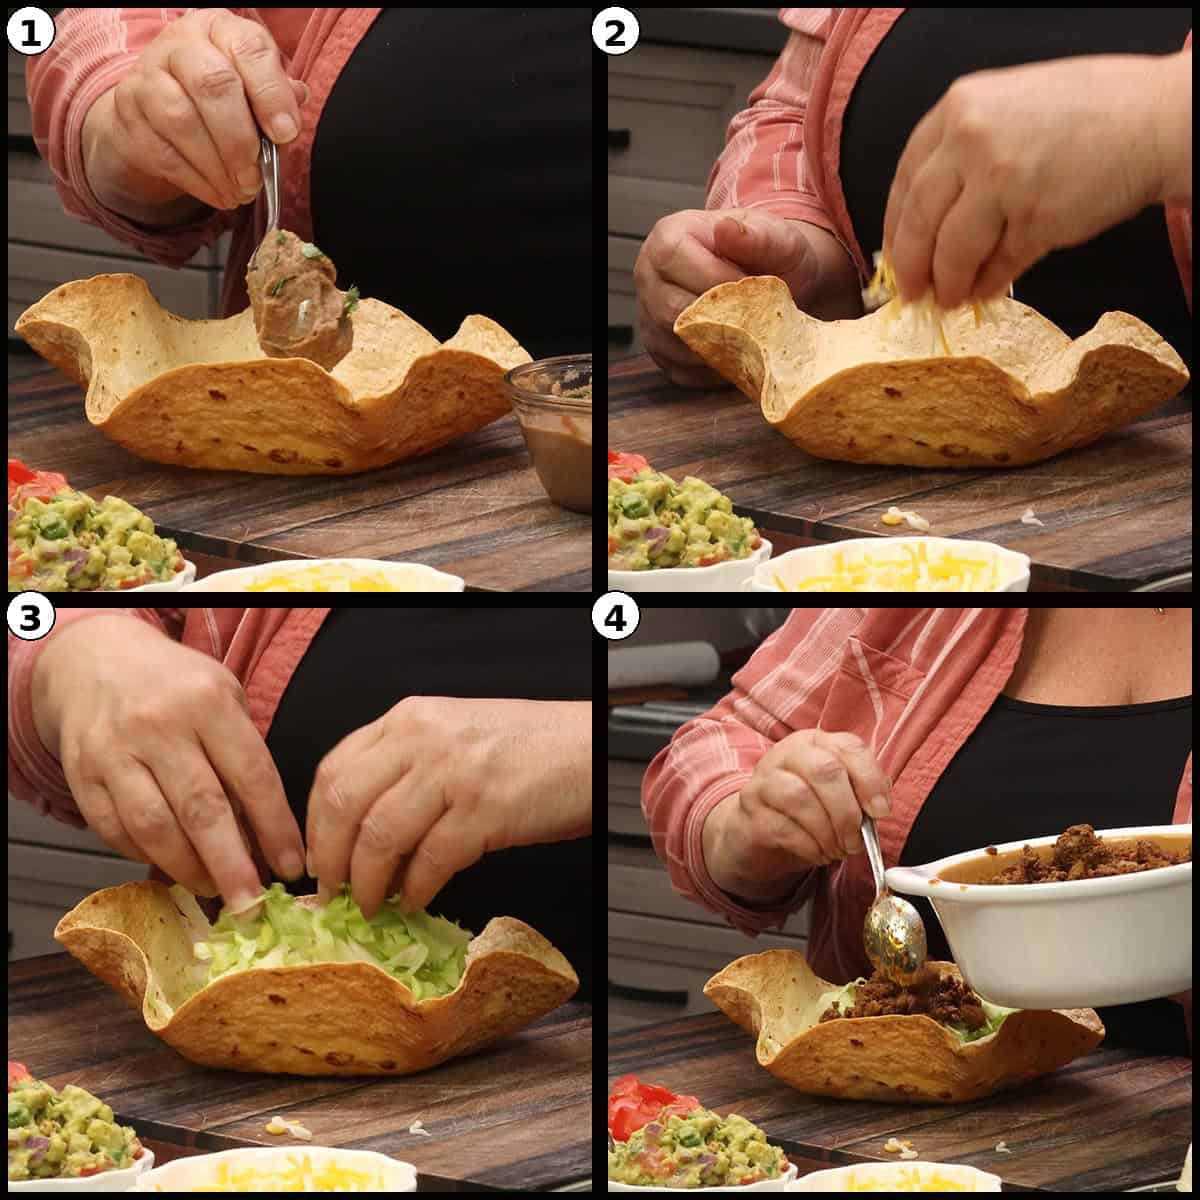
Top with diced tomatoes or pico de gallo, a generous scoop of guacamole, sliced black olives, sliced jalapeños if you like a little heat, a second sprinkle of cheese.
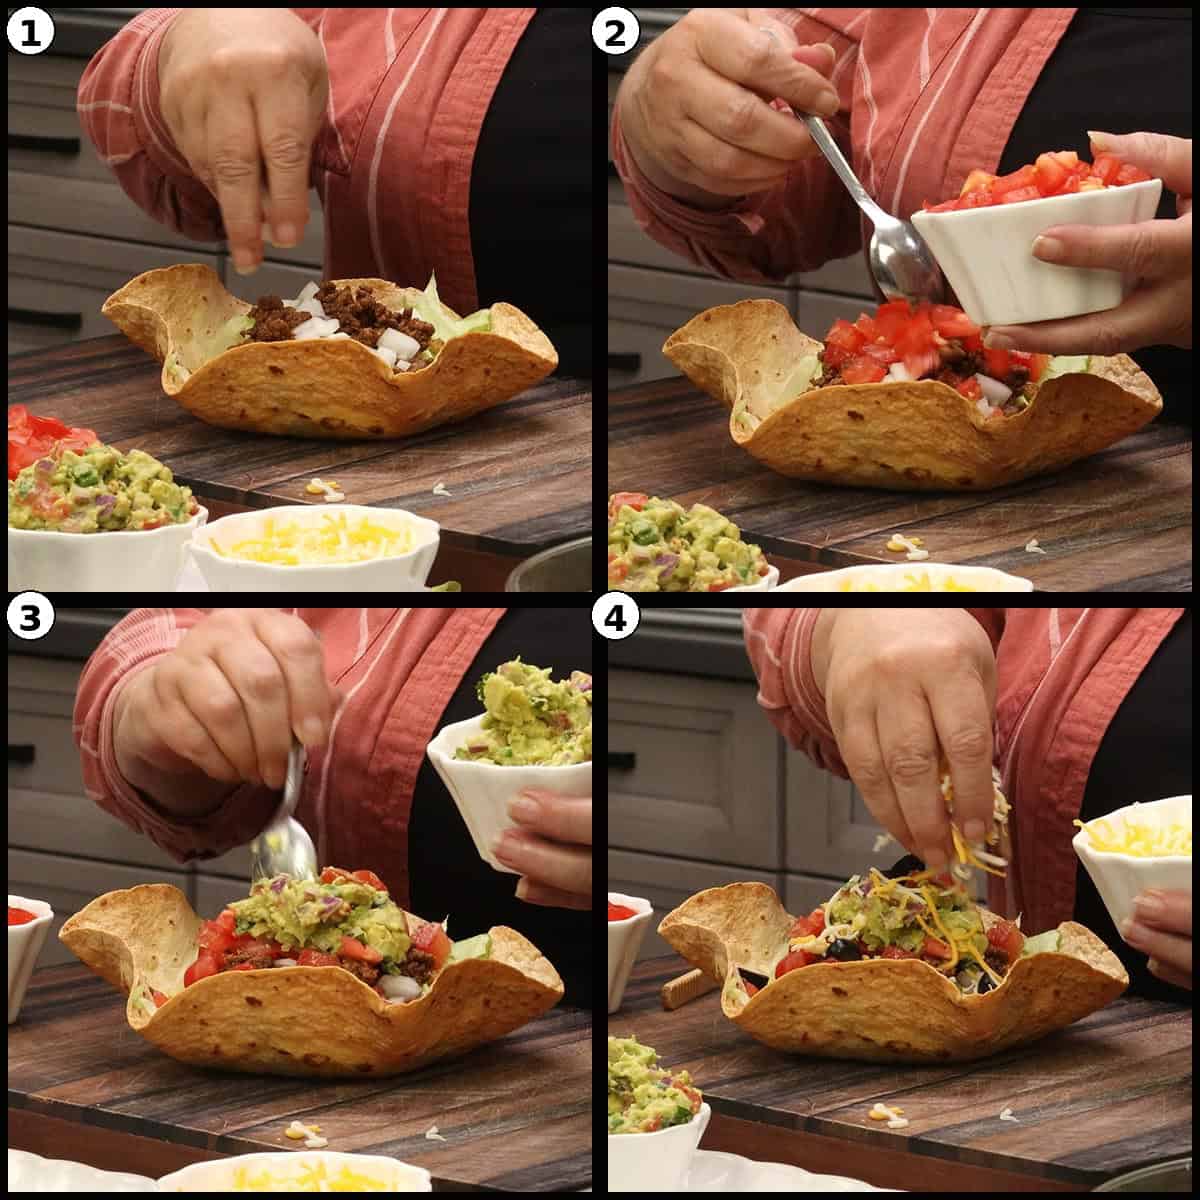
Finish with fresh cilantro, a squeeze of lime, and a generous drizzle of the crema dressing right before serving.
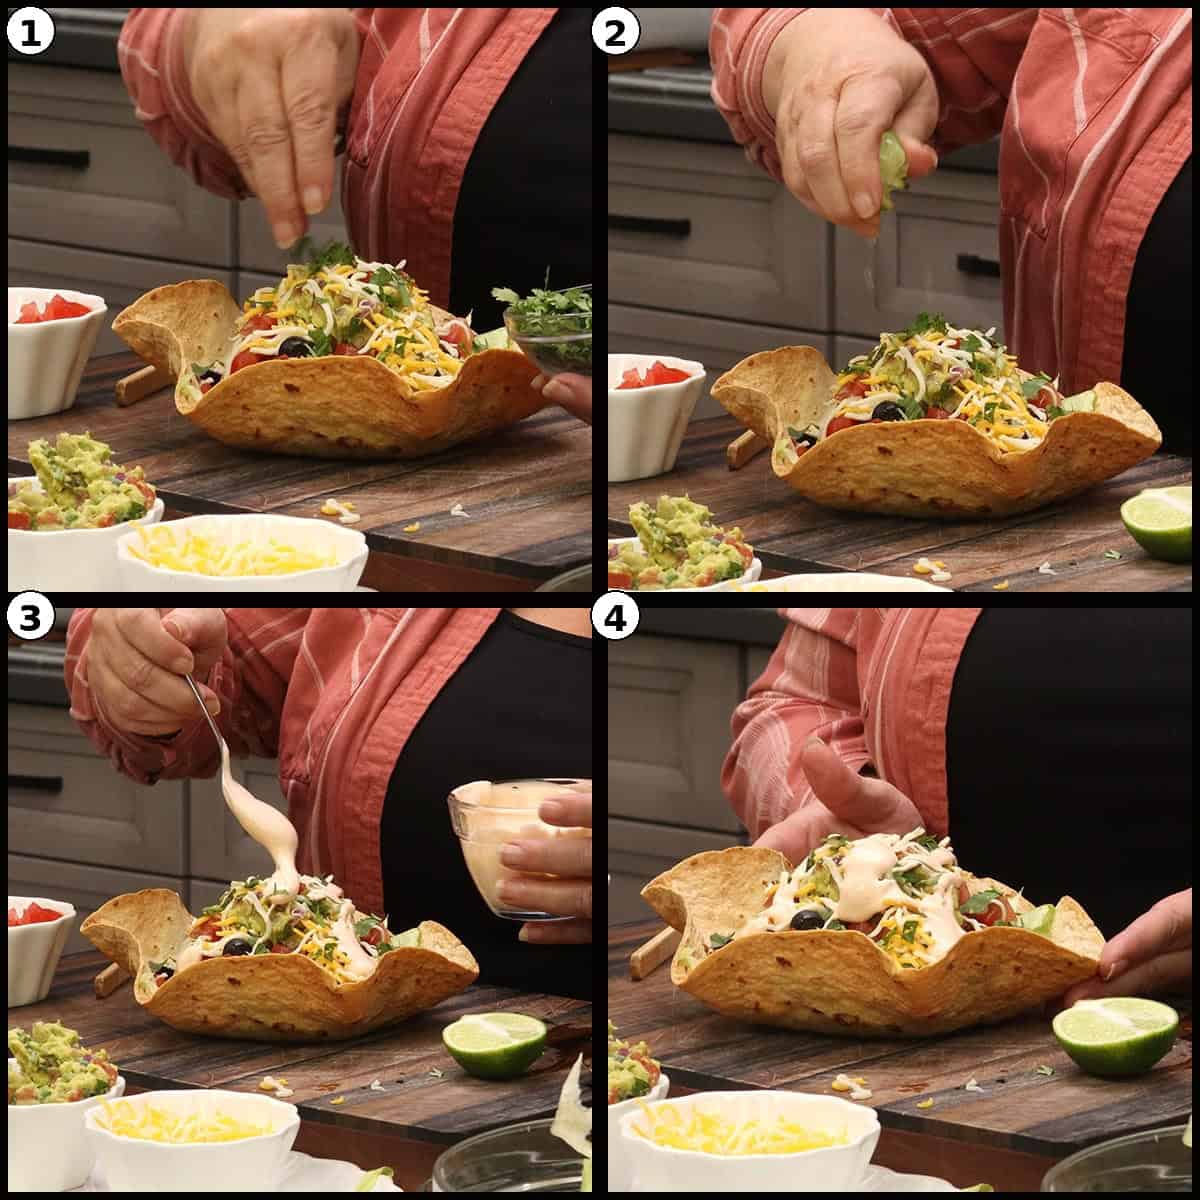
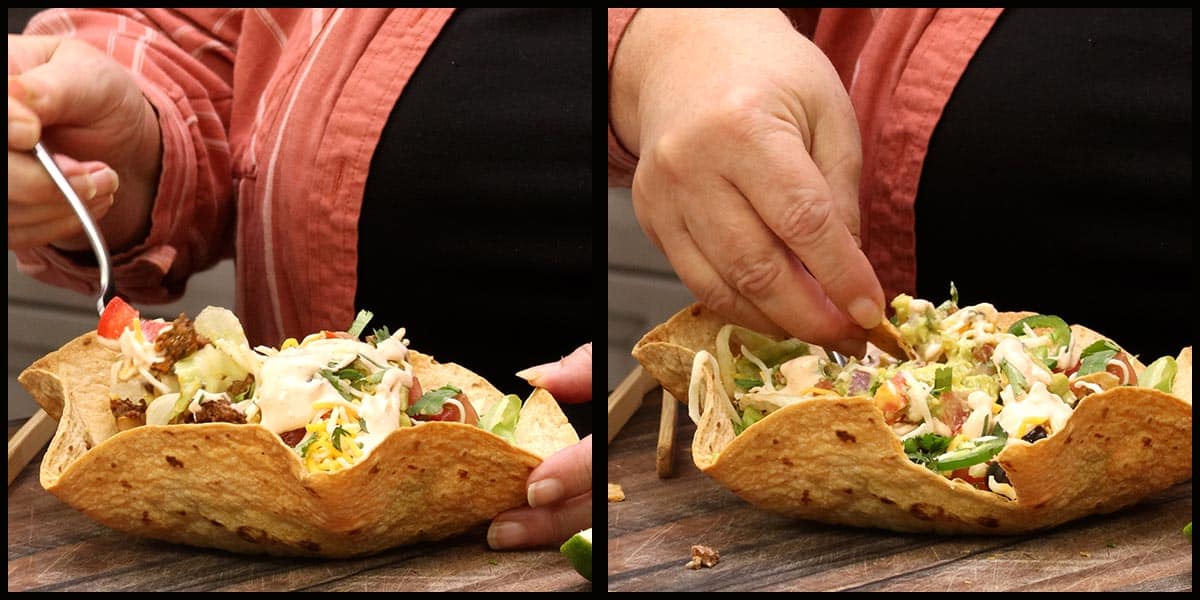
Serve & Enjoy! And, use that crispy bowl as a chip to scoop up the salad!
Ninja Combi Taco Bowl Instructions
The instructions are pretty much the same for the Combi, except you do not need to use a rack on top of the taco bowl.
Use the rectangular cooking pot (not the Dutch oven) and set the bowl upside down directly inside the pot. Place the lightly oiled flour tortilla shell over the bowl and air fry on 350℉/175℃ for about 3 minutes. Open the door and pull the tray out.
Press the sides down on the tortilla bowl if needed. Continue to air fry for another 7 minutes or until the outside of the taco bowl is nice and crispy.
Remove the tortilla shell from the bowl, remove the bowl and place the tortilla shell back into the pot right-side-up and air fry for another minute or so.
When I was testing the recipe in the Combi, I did not have to use the air frying rack to hold the tortilla shell down, but if you notice that it is lifting up at any point in the air frying process, you can certainly set the rack on top to keep it in place.
You can also make the taco meat in the Combi by using sear/sauté and following the instructions above or in the recipe card.
Storage & Reheating Instructions
How to Store Leftover Taco Salad Bowls
Taco salad bowls do not store well once they have been assembled and dressed. Store the components separately and assemble fresh each time for the best texture.
- Tortilla Bowls: Once fully cooled, store the crispy tortilla bowls in a loose paper or plastic bag at room temperature for up to 3 days. Do not seal them in an airtight container as the trapped moisture will soften them.
- Refrigerator (taco meat and toppings): Store leftover taco meat in an airtight container in the refrigerator for up to 4 days. Keep chopped toppings (lettuce, tomatoes, onions, olives, cheese) in separate airtight containers for up to 3 days.
- Freezer (taco meat only): Freeze cooled taco meat flat in a freezer-safe bag for up to 3 months for an easy family meal lifesaver on a busy night. Thaw overnight in the refrigerator before reheating.
- Crema Dressing: Whisk it together and store it in an airtight container in the refrigerator for up to 5 days. Whisk again to recombine before using.
Quick Tip
Setting up a build-your-own taco salad bar for guests? Make a stack of crispy tortilla bowls a day or two ahead, keep the warm taco meat in a slow cooker on Keep Warm, and set out all the toppings in small bowls. Friends and family love getting to build their own bowls, and you get to actually enjoy your own food instead of running back and forth to the kitchen.
How to Reheat Leftover Taco Salad Bowls
- Taco meat (skillet): Reheat leftover taco meat in a skillet over medium heat with a small splash of water or broth to loosen the meat back up. Heat just until warmed through.
- Taco meat (microwave): Place leftover taco meat in a microwave-safe bowl, cover loosely, and heat in 30-second intervals, stirring between each, until warm.
- Tortilla bowls: If a tortilla bowl has softened a bit, return it to the air fryer at 350℉/175℃ for 1 to 2 minutes to bring back the crisp texture. Cool briefly before filling.
- Assembly: Always build the salad fresh after the meat is reheated. Add the crema dressing right before serving so the bowl stays crisp and the lettuce stays crunchy.
Frequently Asked Questions
Corn tortillas don't work well for the bowl-in-bowl method. They are too thin and brittle to drape over the mold without cracking. Stick with 10-inch flour tortillas for this recipe. If you need a corn-based option, use a baked tostada shell as a flat base or layer crumbled corn tortilla chips at the bottom of a regular bowl.
Any air fryer that is wide enough and tall enough to fit a small mixing bowl plus a draped tortilla on top will work. The Ninja Foodi and the Ninja Combi both fit comfortably. Smaller basket-style air fryers may struggle to fit a 10-inch tortilla, in which case use a medium-size flour tortilla and a smaller mold instead.
Yes, the bowls keep nicely for up to 3 days at room temperature. Once they are fully cooled, store them in a loose paper or fabric bag on the counter. Do not seal them in an airtight container, the trapped moisture will soften them and undo all that crisping work.
Layering order matters. Putting a thin layer of refried beans and cheese helps protect the bottom of the bowl, then add the lettuce, then the meat and the other wet toppings. Add the dressing at the very last moment, right before serving. If you are meal prepping, keep the dressing in a separate container and dress the salad just before you eat.
Iceberg or Romaine. It is sturdy, holds up to warm taco meat without wilting, and gives every bite a satisfying crunch.
Absolutely. Skip the flour tortilla bowl and serve the loaded salad in a lettuce cup or a baked cheese cup made from shredded Mexican blend cheese. Replace the refried beans with cauliflower rice or extra lettuce. The taco meat, crema dressing, and toppings are all naturally keto-friendly so the rest of the recipe stays the same.

Crispy Air Fryer Taco Salad Bowls
Equipment
- Ninja Foodi or air fryer that fits a small mixing bowl
- Small mixing bowl, about 4 inches wide and 4 inches deep, for shaping the tortilla
- Crisping plate or air fryer rack
- Oil sprayer or spritzer
- Parchment paper (optional)
- Wooden Spoon or Silicone Spatula
- Slotted spoon
- Small mixing bowl for the seasoning blend
- Small bowl for the crema dressing
Ingredients
Tortilla Taco Shell Bowls
- 4 burrito size flour tortillas 10-inch; store-bought works best for even thickness
- 2-3 teaspoon avocado oil per tortilla or any neutral oil; for spraying both sides
Taco Meat
- 1 lb ground beef 80/20 recommended
- ½ cup yellow onion, chopped optional
- 1 teaspoon fine grind sea salt
- 2 teaspoon paprika smoked or regular both work
- 1 teaspoon onion powder
- 1 teaspoon garlic powder
- 1 teaspoon chili powder
- 1 teaspoon ground cumin
- 1 teaspoon Mexican oregano skip the oregano altogether if all you have is Italian oregano
- ¼ teaspoon cayenne or chipotle powder optional, for heat; pair cayenne with smoked paprika or chipotle with regular paprika
Taco Bowl Dressing
- ½ cup Mexican crema not Mexican sour cream; flows over the salad rather than sitting in a blob
- 2-3 Tablespoons Fresh Lime Juice about 1 squeezed lime; thins the dressing and brightens the flavor
Toppings
- 1 cup refried beans, warmed homemade or canned
- 4 cups shredded iceberg lettuce
- 1 cup shredded cheese Mexican blend, cheddar, or Monterey Jack; divided
- 1 cup diced tomatoes or pico de gallo or your favorite salsa
- 1 cup guacamole homemade or store-bought
- 1 cup diced red or yellow onion
- ½ cup sliced black olives optional
- 1 fresh jalapeño sliced
- 1 bunch fresh cilantro, chopped
- 1-2 fresh limes, cut into wedges
- 1-2 tablespoon Cholula or favorite hot sauce
Would you like to save this recipe?
Instructions
Tortilla Taco Bowl Shells
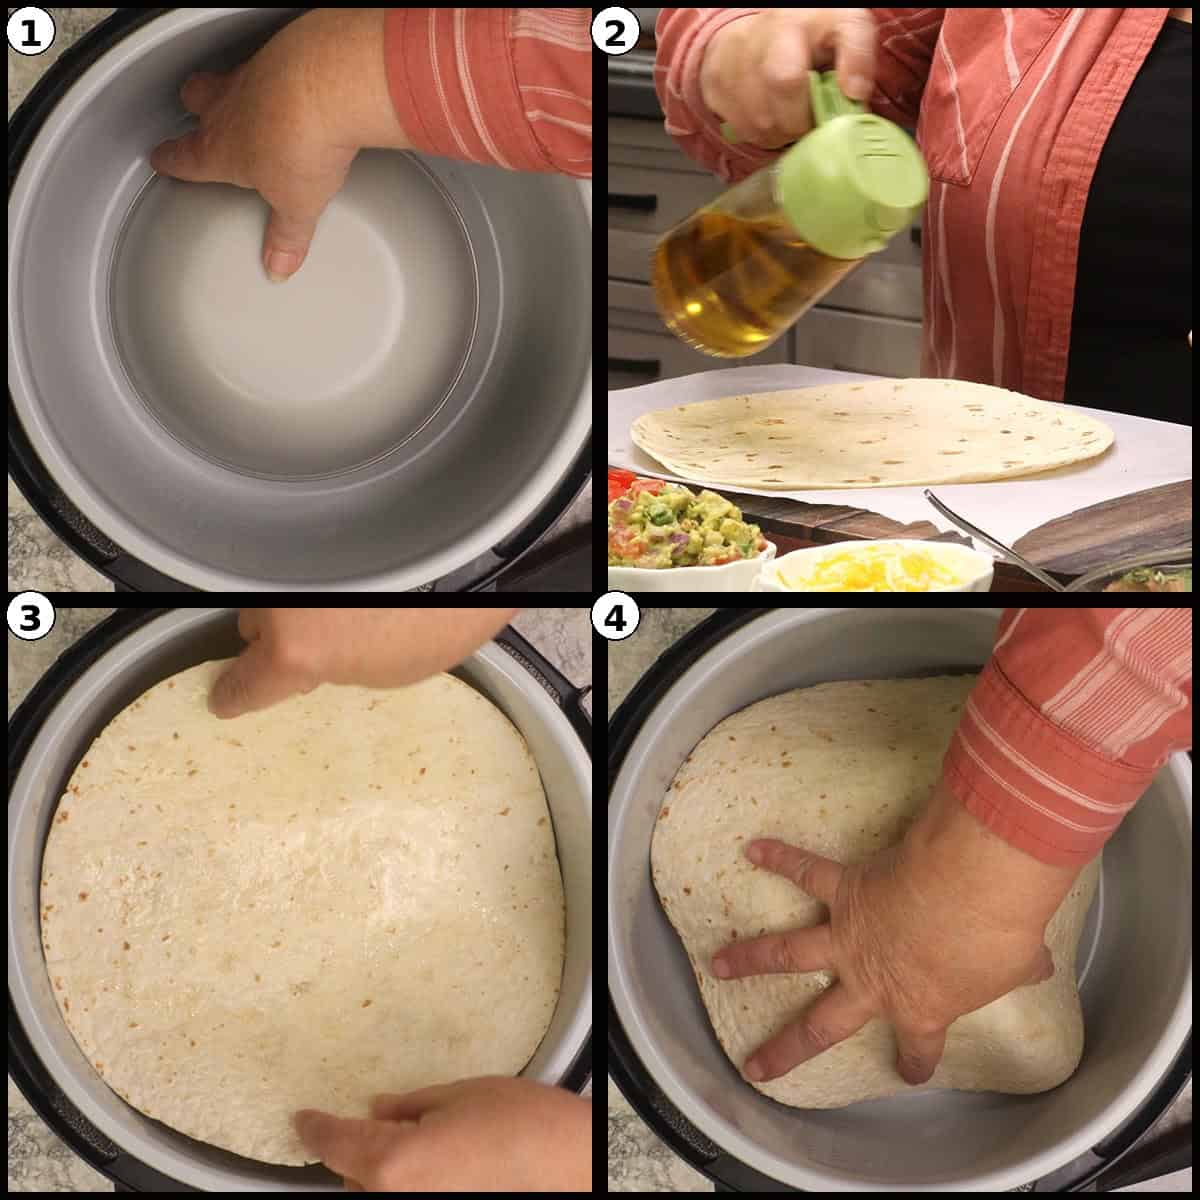
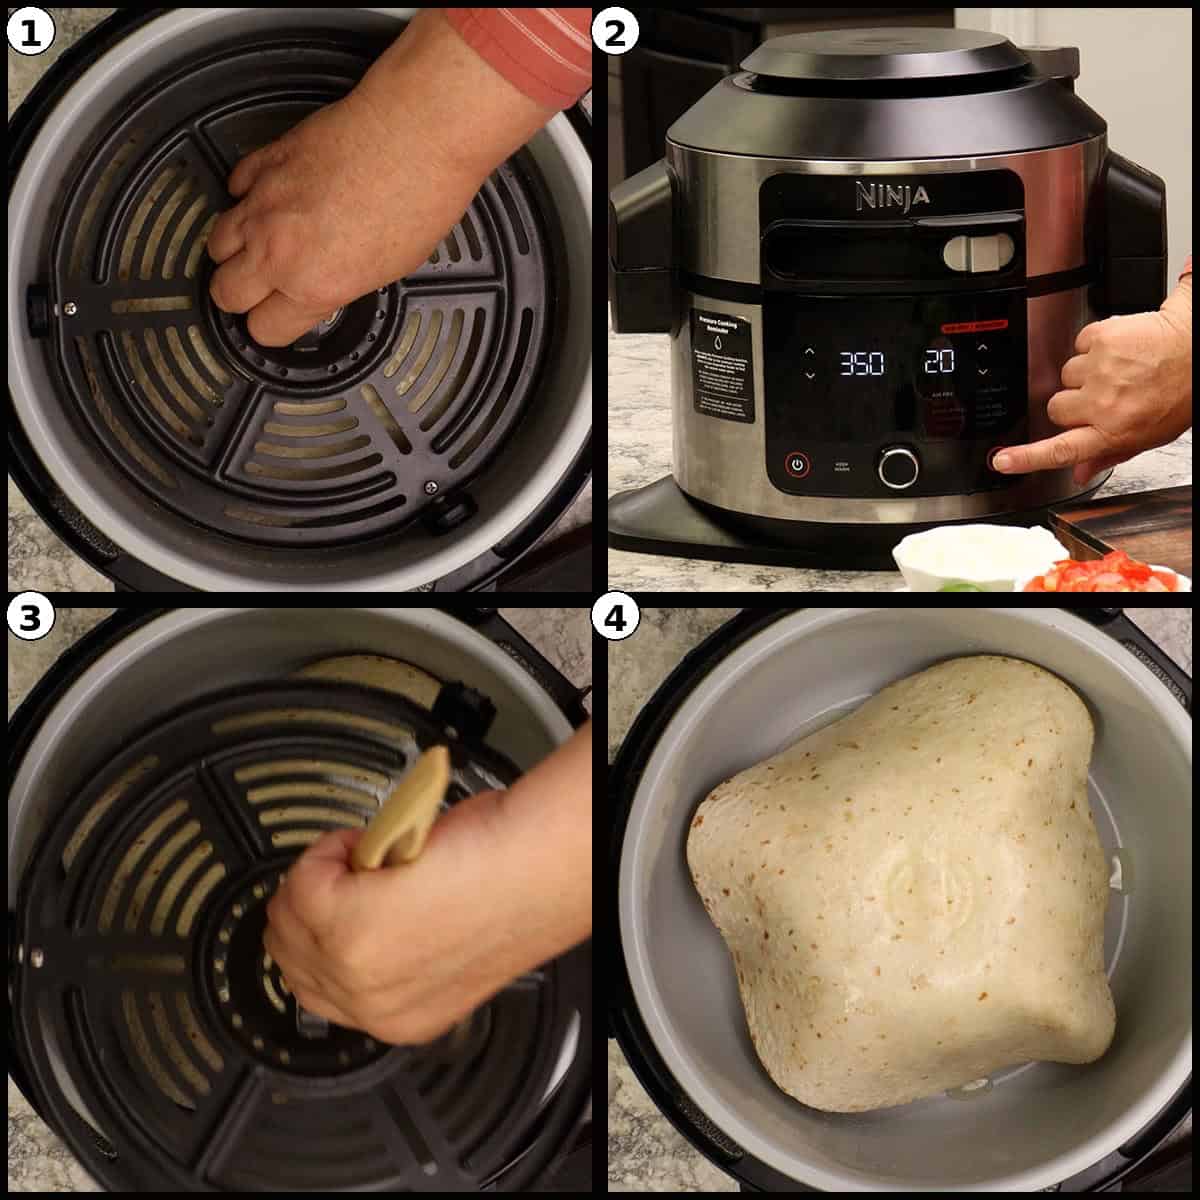
- Place a small mixing bowl (about 4 inches wide and 4 inches deep) upside down in the bottom of the Ninja Foodi pot or directly in the air fryer liner pot. Do not preheat the air fryer for the tortilla bowls.
- Lay one 10-inch flour tortilla flat on a piece of parchment paper and lightly spritz both sides with avocado oil, about 2 to 3 teaspoons of oil per tortilla total. Center the tortilla over the upside-down mixing bowl. The tortilla will look stiff and not drape much at first, that is normal.4 burrito size flour tortillas, 2-3 teaspoon avocado oil per tortilla
- Set either the crisping plate or the rack on top to keep the tortilla from flying up against the heating element. Close the air fryer and set it to Air Fry at 350℉/175℃ for 20 minutes.
- After about 3½ minutes, pause the cycle, remove the top rack, and gently push the warmed tortilla down around the bowl so it drapes nicely and forms little indents. If any spots look dry or stiff, give them another light spritz of oil. Replace the rack and continue air frying for another 6 to 7 minutes, until the tortilla bowl is set up and crisp to the touch.
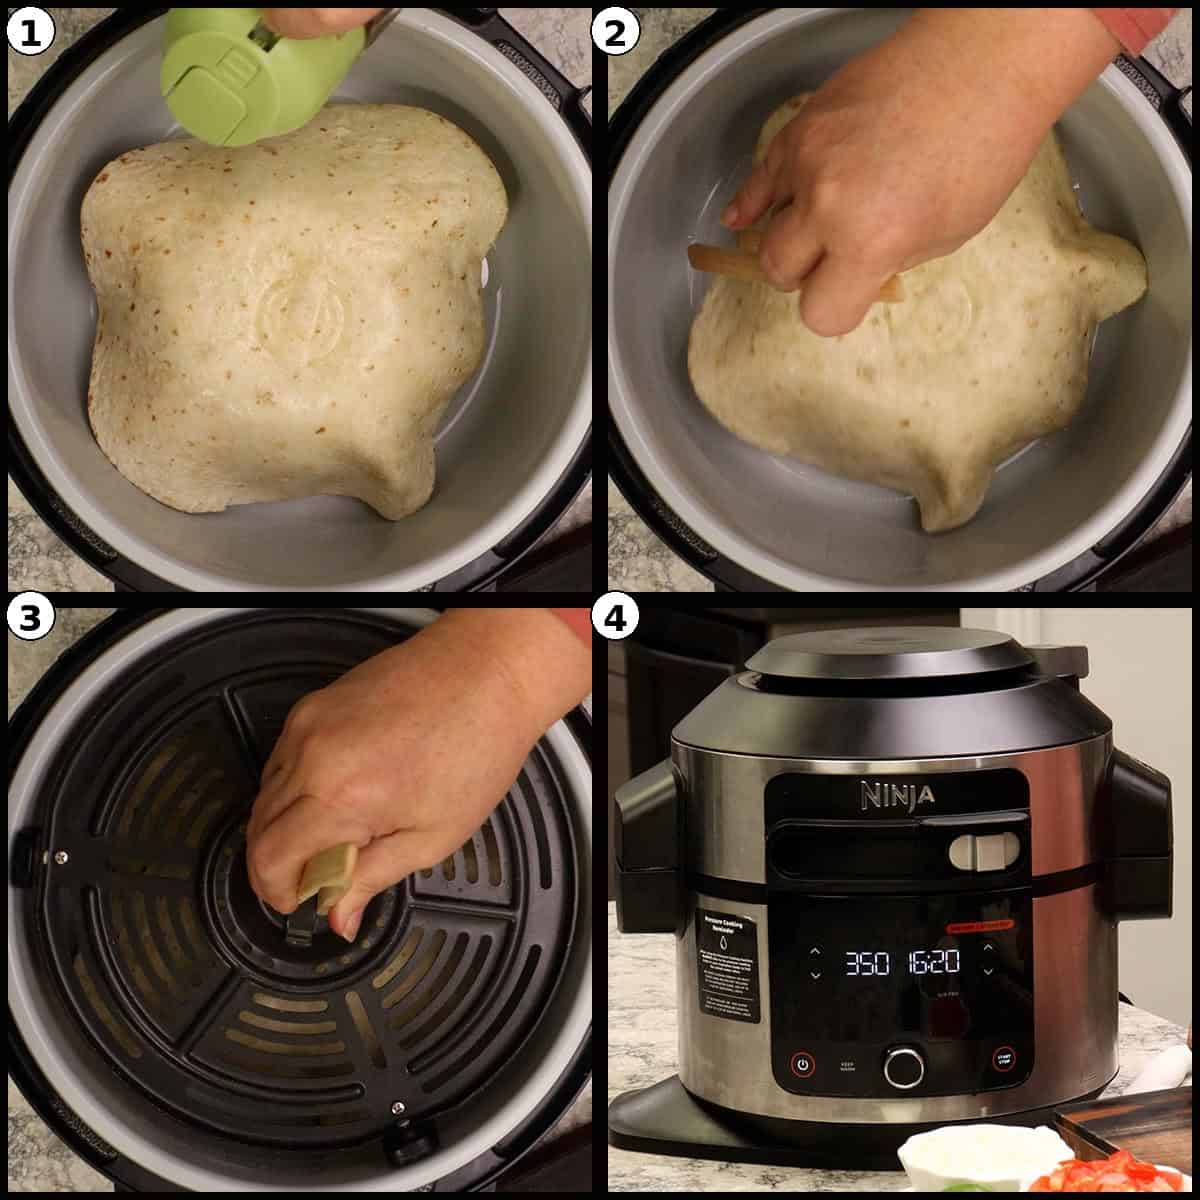
- Carefully lift the crisp tortilla bowl off the mixing bowl using a heat-safe tool. Remove the inner mixing bowl from the air fryer and drop the tortilla bowl right-side-up into the cooking pot. Place the rack back on top so the tortilla cannot fly up. Air fry for 1 to 2 more minutes to crisp up the inside. Transfer the finished bowl to a wire rack to cool. Repeat with the remaining tortillas, working through them one at a time.
Taco Meat
- In a small mixing bowl, combine 1 teaspoon fine grind sea salt, 1 teaspoon onion powder, 1 teaspoon garlic powder, 1 teaspoon chili powder, 2 teaspoons paprika, 1 teaspoon Mexican oregano, 1 teaspoon ground cumin, and ¼ teaspoon cayenne or chipotle powder if you want a little heat. Stir to combine. This is enough seasoning for 1 pound of meat. If using more meat, scale the seasoning up proportionally.1 teaspoon fine grind sea salt, 2 teaspoon paprika, 1 teaspoon onion powder, 1 teaspoon garlic powder, 1 teaspoon chili powder, 1 teaspoon ground cumin, 1 teaspoon Mexican oregano, ¼ teaspoon cayenne or chipotle powder
- Set the Ninja Foodi to Sear/Sauté on High and press Start to heat the pot. With 80/20 ground beef no oil is needed. If using leaner beef, turkey, or chicken, add a teaspoon of neutral oil to the heated pot.
- Add 1 pound of ground beef to the hot pot and break it up with a wooden spoon. Once the meat starts to break apart, stir in the chopped yellow onion if using.1 lb ground beef, ½ cup yellow onion, chopped
- Sprinkle the homemade taco seasoning over the meat and stir to coat and breaking the meat up to your preferred size. Continue to sauté until the beef is fully cooked and the seasoning has formed a juicy coating, about 5 to 7 minutes.
- Turn the Ninja Foodi off. Use a slotted spoon to transfer the seasoned taco meat to a serving bowl, leaving any excess fat behind in the pot.
Building the Taco Salad Bowl
- In a small bowl, whisk together ½ cup Mexican crema, 1 to 2 tablespoons Cholula or your favorite hot sauce, and 2 to 3 tablespoons fresh lime juice. Adjust the lime juice to thin the dressing to a pourable consistency.½ cup Mexican crema, 2-3 Tablespoons Fresh Lime Juice
- Set a crisp tortilla bowl on a plate. Spread a layer of warm refried beans across the bottom, then sprinkle in a small handful of shredded cheese. Add a generous bed of shredded lettuce.1 cup refried beans, warmed
- Spoon about 4 ounces of warm taco meat over the lettuce. Top with diced tomatoes or pico de gallo, a scoop of guacamole, diced onion, sliced black olives, and pickled jalapeños to taste.
- Finish each bowl with a second sprinkle of cheese, a shower of fresh cilantro, and a generous drizzle of the crema dressing. Serve with a fresh lime wedge on the side and dig in right away while the tortilla bowl is still crisp.
Ninja Combi Tortilla Bowl Directions
- The temperature and timing for air frying the tortilla bowls is the same as above, the only difference is you set the bowl and the tortilla directly in the Combi pan and you don't need a rack or crisping plate to weight it down. However, you can use the crisping insert if desired. Just lay it on top to weigh them down.
Notes
• Make the tortilla bowls first, before the taco meat, so the meat stays warm for assembly. Each bowl takes about 10-12 minutes in the air fryer, so plan accordingly when serving a crowd.
• You can make the tortilla bowls a few days ahead. Once cooled, store them in a loose paper or fabric bag at room temperature on the counter. They stay nice and crisp.
• Use store-bought 10-inch flour tortillas for these bowls. Homemade tortillas don't have the even thickness or uniform size that this method needs to drape and crisp evenly.
• Drain or use lean beef if you'd rather have less fat in the finished meat. With 80/20, no oil is needed in the pot. TORTILLA BOWL TIPS
• Do not preheat the air fryer for the tortilla bowls. Starting with a cold pot keeps the tortilla from puffing up or cooking unevenly.
• If your tortilla puffs up like a balloon partway through cooking, prick the bubble with a toothpick and gently press it back down with your tool.
• A crisping plate works better than a rack , but either will get the job done
• For smaller bowls, use a medium-size flour tortilla and a smaller mold. If the smaller tortilla isn't heavy enough to keep it from flying up against the heating element, weigh it down with a small ramekin. NUTRITIONAL DISCLAIMER
Nutritional information provided is an estimate based on typical ingredient values and standard portion sizes. Actual nutritional content may vary significantly depending on specific brands used, ingredient substitutions, preparation methods, portion sizes, and individual cooking techniques. For precise nutritional information tailored to your specific ingredients and preparation, please consult with a registered dietitian or use laboratory analysis. This information should not be used for medical nutrition therapy or to manage medical conditions without professional guidance.
Nutrition
Variations
- Chicken or turkey taco salad: Swap the ground beef for ground chicken, ground turkey, or ground pork using the same homemade taco seasoning blend. Add a teaspoon of neutral oil to the pot before browning since these leaner meats don't render as much fat.
- Steak taco salad: Use thinly sliced grilled steak, carne asada, or shredded beef in place of ground beef. Toss the cooked steak with a tablespoon of the taco seasoning while it is still warm to season it through.
- Vegetarian taco salad bowls: Skip the meat and use a can of seasoned black beans, pinto beans, or a mix of sautéed peppers and onions in place of the ground beef. Toss the beans with a tablespoon of the taco seasoning and warm them in a small skillet so the flavor is built in.
- Low-carb / keto taco bowls: Skip the flour tortilla bowl and serve the loaded salad in a bed of romaine, a baked Parmesan crisp cup, or a baked cheese cup. Use cauliflower rice or extra lettuce in place of the refried beans for a delicious keto-friendly version.
- Smaller, kid-size bowls: Use medium-size flour tortillas and a smaller bowl mold for individual portions that work great for kids or as a fun appetizer.
- Taco salad bar for a crowd: Make a stack of crispy tortilla bowls, set out all the toppings in small bowls, and let everyone build their own. This is the easiest way to feed a crowd at a party or for next Taco Tuesday.
More Mexican Recipes You Will Love
If you love these crispy taco salad bowls, here are a few more Mexican favorites to add to your dinner rotation. Each one is full of bold flavor, simple to put together, and the kind of recipe that earns a spot in the regular weeknight lineup. Give them a try and let me know which one becomes your next family favorite.
About the Recipe Author, Louise Long
Louise is a full-time recipe creator and food blogger @ The Salted Pepper. She has over 30 years of experience with cooking and recipe development. She owned a restaurant for several years and was a full-time RN until retiring to blog full-time.

She published her first cookbook in the Fall of 2018 and is very interested in writing several more.
Louise is also the creator of an online Ninja Foodi Pressure Cooking Course with over 100 instructional step-by-step videos. People absolutely rave about the course and all the value they have received from it.
Louise has several very active Facebook groups that help people with the basics of cooking and learning more about the appliances they love.
Ninja Foodi Pressure Cooker & Air Crisper 101
Ninja Woodfire Outdoor Grill & Smoker
Louise is also a YouTube creator and you can find most of her recipes in video format on The Salted Pepper YouTube channel.
She is very responsive to messages and eager to help in any way she can. Get more Information about Louise & contact information
I WOULD LOVE TO SEE WHAT YOU ARE COOKING UP IN YOUR KITCHEN! TAG ME @THESALTEDPEPPER ON YOUR FAVORITE SOCIAL MEDIA PLATFORM WHEN YOU MAKE A DISH!
BE SURE TO FOLLOW THE SALTED PEPPER RIGHT HERE ⇓⇓⇓⇓⇓
Leave a Reply