


These Make-Ahead Breakfast Burritos in the Ninja Foodi are easy to make, they freeze & re-heat easily, and they taste delicious!
This post may contain affiliate links. If you make a purchase after clicking a link, I may earn a small commission. Thank you for your support!
Making Breakfast Burritos in the Ninja Foodi is EASY!
I remember the first time I had a breakfast burrito. I fell in love with all those delicious breakfast flavors of sausage, egg, potatoes, & cheese all wrapped up in a crispy flour tortilla.
A friend of mine had made and served them for a brunch I attended. I knew right away that these would be on my breakfast menu often... except that didn't happen.
Why? Because after I made them once, I never wanted to make them again. Way too much time and WAY too many dishes! Sound familiar? I love to cook and I even like complicated dishes, but I'm sorry... breakfast needs to be tasty and EASY!
Now, it's possible to make these breakfast burritos in the Ninja Foodi and it's all done in one pot and couldn't be easier! Thanks, Ninja Foodi!
Easily Customize your Breakfast Burritos in the Ninja Foodi
Want to use bacon instead of sausage?
No problem. Cut up the bacon into small pieces and saute on medium high until the fat has rendered and proceed with the recipe. I would decrease the salt to ½ teaspoon since bacon is a bit saltier than sausage.
Want to make an all veggie breakfast burrito?
No problem. Skip the meat and add 1 Tablespoon of olive oil or butter to the inner pot of the Ninja Foodi and saute on medium your veggies of choice until they are just becoming soft. Proceed with recipe.
What to spice things up?
No problem. Add whatever spices you like!
The sky is the limit when putting together your perfect breakfast burrito!
Tips for Making Breakfast Burritos in the Ninja Foodi
Soak your potatoes for at least 30 minutes. This might seem like a waste of time, but I have found that soaking the potatoes really helps them keep their shape and texture after the cooking, freezing and re-heating process. If you are going to make and serve them right away, you can probably skip this step.
Bring your tortillas to room temp. It is much easier to roll a tortilla that is room temp than straight out of the refrigerator, so I recommend taking them out at least 1 hour before you make your breakfast burritos in the Ninja Foodi. Or you can pop them in the microwave for a few seconds to warm them.
Don't add too much filling. I suggest using no more than ½ cup of filling for each 8" burrito. Over-filling them makes it difficult to roll them into burritos. If you want more filling in each burrito, try using a 12" flour tortilla.
How to Freeze your Breakfast Burritos
Would you like to save this recipe?
You can either freeze the breakfast burritos before you air crisp them in the Ninja Foodi or after. The process is basically the same, but if you want to air crisp the burritos before freezing, make sure they are completely cooled before wrapping. If they aren't, steam build-up could leave moisture inside the wrapping, resulting in ice crystals or freezer burn.
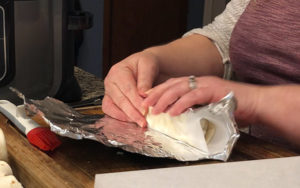
Use a square sheet of parchment paper and wrap each burrito in the paper followed by wrapping in aluminum foil. Then place in a sealable freezer bag until ready to use. You can see exactly how I do this in the video: Breakfast Burritos in the Ninja Foodi.
How to re-heat your Breakfast Burritos
Already air crisped, but still frozen
- Microwave on 50% power for 2 minutes, then increase the power to 100% and heat in 30 second intervals until heated through. *The microwave will not retain the crispy outside.
- Oven: Pre-heat the oven to 400° F and bake for 20 minutes with the wrapping still on. Remove wrapping and increase the heat to 425° F until the outside has crisped up.
- Ninja Foodi: This is my favorite method and produces great results. Place the unwrapped burrito in the basket of the Ninja Foodi and Air Crisp on 325° F for 20 minutes.
Already air crisped and thawed
- Microwave on full power in 30 second intervals until heated through.
- Oven: Place on sheet pan in Preheated 400° F oven for 10 minutes, flip half way through to crisp both sides.
- Ninja Foodi: Air Crisp on 300° F for 10 minutes, then increase the heat to 375° F for 2-5 minutes or until you get the crispy exterior you want. *Mine were fine after the 10 minutes of AC on 300° F.
Not air crisped and still frozen
- Microwave: This method with not produce a crispy exterior, but sometimes it's the only way we have to reheat. Heat on 50% power for 3-6 minutes or until the center is warmed through.
- Oven: Pre-heat the oven to 400° F and bake for 20 minutes with the wrapping still on. Remove wrapping, brush with olive oil or butter and increase the heat to 425° F. Bake until the outside has crisped up.
- Ninja Foodi: Air Crisp or bake on 300° F for 15 minutes. Then brush with olive oil or butter and increase the heat to 375° F for 5-10 minutes or until you get the crispy exterior you want.
Not air crisped, but thawed
- Microwave on full power in 30 second intervals until heated through.
- Oven: Brush with olive oil and place on rack in preheated 400° F oven for 15-20 minutes or until heated through.
- Ninja Foodi: Brush with olive oil or butter. Air Crisp on 350° F for 10 minutes, then increase heat to 375° F for a few minutes or until the exterior is crunchy.
Tips for rolling and baking a Breakfast Burrito in the Ninja Foodi
Keep all the filling on one side. Imagine the center of the flour tortilla and keep all the filling to one side of the center line. This will allow you to roll the burrito and have all the ends tucked in nicely.
Don't overfill. While it's tempting to load the tortilla up, you will have the best results by using about ½ cup of filling per 8" tortilla. Going over ½ cup your filling might overflow and you won't be able to wrap the burrito as well.
Place seam side down. When placing your burritos on the rack or in the basket, place the seam side down first to allow the heat to seal the seam for you. This is especially important when cooking in the Ninja Foodi where the fan might blow the tortilla seam open.
Are you ready to make Breakfast Burritos in the Ninja Foodi? Let's get to it!
First, let's get the ingredients prepped. Cut and dice your medium sized Russet potato into ½ inch dice. If you want to see how I cut a potato, check out this video on Ninja Foodi Fresh Cut Fries. I don't peel my potatoes, but it is totally up to you if you do or not. Soak your diced potatoes in cold water for at least 30 minutes. I soaked mine for 60 minutes. This will remove some of the starch and keep your potatoes from falling apart during the cooking process.
Add 1 teaspoon of olive oil to the inner pot of the Ninja Foodi and turn the sauté mode to high. Add in 1 lb of breakfast sausage and break up with a utensil like the Mix N Chop, just make sure whatever you use is approved for non-stick surfaces. Sauté the sausage until it is about ½ way cooked and the fat begins to render out. This will take about 5-7 minutes.
Add the diced and drained potatoes, along with 1 teaspoon salt and ½ teaspoon of pepper (or whatever spices you want to add) and sauté just until you can easily pierce the potato, but it is still firm. This takes about 5-7 minutes.
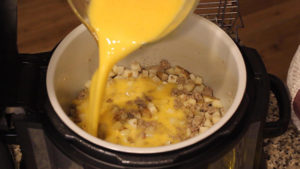
While the potatoes and sausage are sautéing, lightly scramble your eggs. Break all the eggs into a mixing bowl (I show a tip for breaking eggs in the recipe video at the end of this post), add 1 teaspoon salt and ½ teaspoon pepper and lightly scramble. Don't add water. I know some people (me included, sometimes) add water to their eggs, but when I did this the first time I made them, the eggs stayed too runny and did not have a great texture. If you add milk or cream, only add a tiny amount.
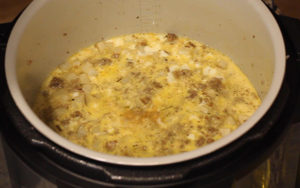
Move the potatoes and sausage around so they cover the entire bottom of the inner pot of the Ninja Foodi. Pour in the scrambled eggs and turn off the Sauté mode.
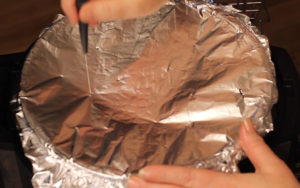
Cover the Inner Pot with aluminum foil and punch at least 10 small holes in the top to allow some air flow, but not the full force of the fan. This step is optional and I have not tried it without the foil because I was concerned the eggs would get done too fast on the top and dry out with the fan blowing air directly on them. I'd love to hear from you if you try it without the foil! Select the Bake function and set the temp to 325° F and the time for 20 minutes.
After 15 minutes, remove the foil and allow to bake the remaining 5 minutes. Remove burrito filling from the inner pot and place into a mixing bowl.
Place the rack or basket into the Ninja Foodi and set the Air Crisp to 375° F to pre-heat. I used the rack in the high position because I was able to get 4 on the rack at a time and felt this allowed for the best air circulation. I also like my breakfast burritos really crispy, but if you want a softer burrito you can use the rack in the low position or the basket and I'd decrease the temp to 325° F.
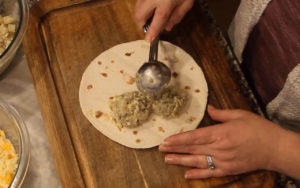
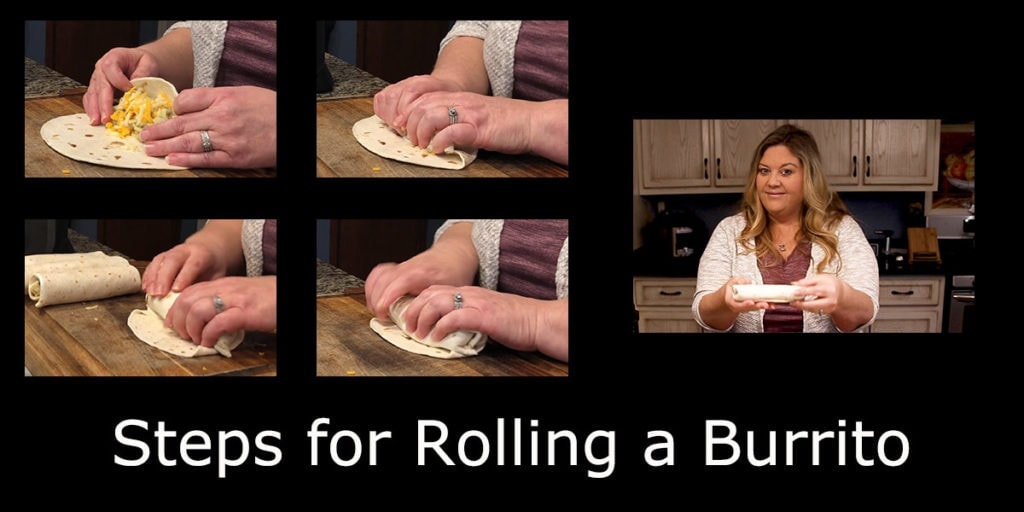
Assemble your breakfast burrito. Add ½ cup of filling onto one side of the tortilla shell and top with about 1 -2 Tbsps of shredded cheese. Begin rolling your burrito by folding the side with the filling over onto the side without the filling. Tuck in the ends of the tortilla as you roll, then cup your hands around the tortilla where the filling is and press towards you to get a tight roll. Make the next turn and you should have a perfectly rolled tortilla. If you aren't familiar with how to roll a burrito, I encourage you to watch the video on YouTube or at the end of this recipe post.
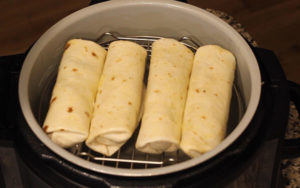
Brush with olive oil or butter. My favorite tool for brushing on olive oil or butter for Air Crisping in the Ninja Foodi is this Silicone Pastry brush, it lasts forever and is heat resistant, plus you will never get bristles in your food! Place up to 4 burritos seam side down onto the rack or in the basket of the Ninja Foodi and Air Crisp at 375° F for 10 minutes, flipping half way through.

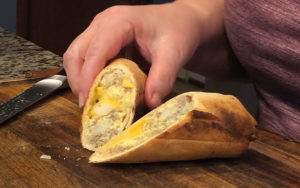
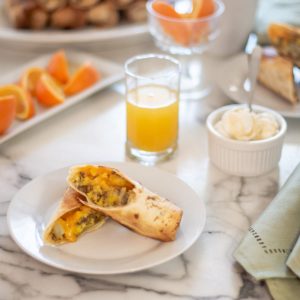
Serve and Enjoy! I really enjoyed my breakfast burritos with freshly squeezed orange juice and a cup of Homemade Yogurt that I made in the Ninja Foodi.
Breakfast Burritos in the Ninja Foodi
Ingredients
- 1 tsp olive oil
- 1 lb breakfast sausage
- 1 medium russet potato about 2 cups
- 2 teaspoon sea salt divided
- 1 teaspoon black pepper divided
- 10 large eggs
- 3 cups cheese shredded
- 12 8" flour tortillas
Would you like to save this recipe?
Instructions
- Cut and dice your medium sized Russet potato into ½ inch dice. Soak your diced potatoes in cold water for at least 30 minutes.
- Add 1 teaspoon of olive oil to the inner pot of the Ninja Foodi and turn the sautè mode to high. Add in 1 lb of breakfast sausage & sautè the sausage until it is about ½ way cooked and the fat begins to render out. This will take about 5-7 minutes.
- Add the diced and drained potatoes, along with 1 teaspoon salt and ½ teaspoon of pepper (or whatever spices you want to add) and sautè just until you can easily pierce the potato, but it is still firm. This takes about 5-7 minutes.
- While the potatoes and sausage are sautèing, Lightly scramble your eggs with 1 teaspoon salt and ½ teaspoon pepper.
- Move the potatoes and sausage around so they cover the entire bottom of the inner pot of the Ninja Foodi. Pour in the scrambled eggs and turn off the Saute mode.
- Cover the Inner Pot with aluminum foil and punch at least 10 small holes in the top to allow some air flow, but not the full force of the fan. Select the Bake function and set the temp to 325° F and the time for 20 minutes. After 15 minutes, remove the foil and allow to bake the remaining 5 minutes.
- Remove burrito filling from the inner pot and place into a mixing bowl. Place the rack or basket into the Ninja Foodi and set the Air Crisp to 375° F to pre-heat.
- Assemble your breakfast burrito. Add ½ cup of filling onto one side of the tortilla shell and top with about 1-2 tablespoon of shredded cheese. Roll into a burrito. See post for tips on rolling the burrito
- Brush with olive oil or butter. Place up to 4 burritos seam side down onto the rack or in the basket of the Ninja Foodi and Air Crisp at 375° F for 10 minutes, flipping half way through. Serve and Enjoy! See post for tips on freezing and re-heating.
Nutrition
About the Recipe Author, Louise Long
Louise is a full-time recipe creator and food blogger @ The Salted Pepper. She has over 30 years of experience with cooking and recipe development. She owned a restaurant for several years and was a full-time RN until retiring to blog full-time.

She published her first cookbook in the Fall of 2018 and is very interested in writing several more.
Louise is also the creator of an online Ninja Foodi Pressure Cooking Course with over 100 instructional step-by-step videos. People absolutely rave about the course and all the value they have received from it.
Louise has several very active Facebook groups that help people with the basics of cooking and learning more about the appliances they love.
Ninja Foodi Pressure Cooker & Air Crisper 101
Ninja Woodfire Outdoor Grill & Smoker
Louise is also a YouTube creator and you can find most of her recipes in video format on The Salted Pepper YouTube channel.
She is very responsive to messages and eager to help in any way she can. Get more Information about Louise & contact information
I WOULD LOVE TO SEE WHAT YOU ARE COOKING UP IN YOUR KITCHEN! TAG ME @THESALTEDPEPPER ON YOUR FAVORITE SOCIAL MEDIA PLATFORM WHEN YOU MAKE A DISH!
BE SURE TO FOLLOW THE SALTED PEPPER RIGHT HERE ⇓⇓⇓⇓⇓
Kim says
How would the instructions change if using frozen or thawed shredded hash brown potatoes?
Ron Goff says
Just made your burritos using chorizo
Also added 1/2 chopped onion.
Came out great after 8 minutes. A little spicier than the hamburger.
Louise says
I'm so glad you enjoyed them!
Ron Goff says
I'm going to try your recipe using chorizo. Have you considered using chorizo?
Silvia says
I made them today for the first time, we liked them but we didn't enjoy them air fryed.