 If you've ever had a good Chicago Style Deep Dish Pizza, I'll bet you crave the buttery and flaky crust. Now you can make your own... Ninja Foodi style!
And, guess what? You can make TWO of them at the same time! One of the ONLY downsides to the Ninja Foodi or any other air fryer that I've noticed is you don't have enough surface area to make multiple pizzas at once. Until now!
I'm so excited to share this accessory with you, it literally turns your Ninja Foodi fry basket into a double layer basket! I LOVE it.
This post may contain affiliate links. If you make a purchase after clicking a link, I may earn a small commission. As an Amazon Associate, I earn from qualifying purchases.
What is Chicago-Style Deep-Dish Pizza?
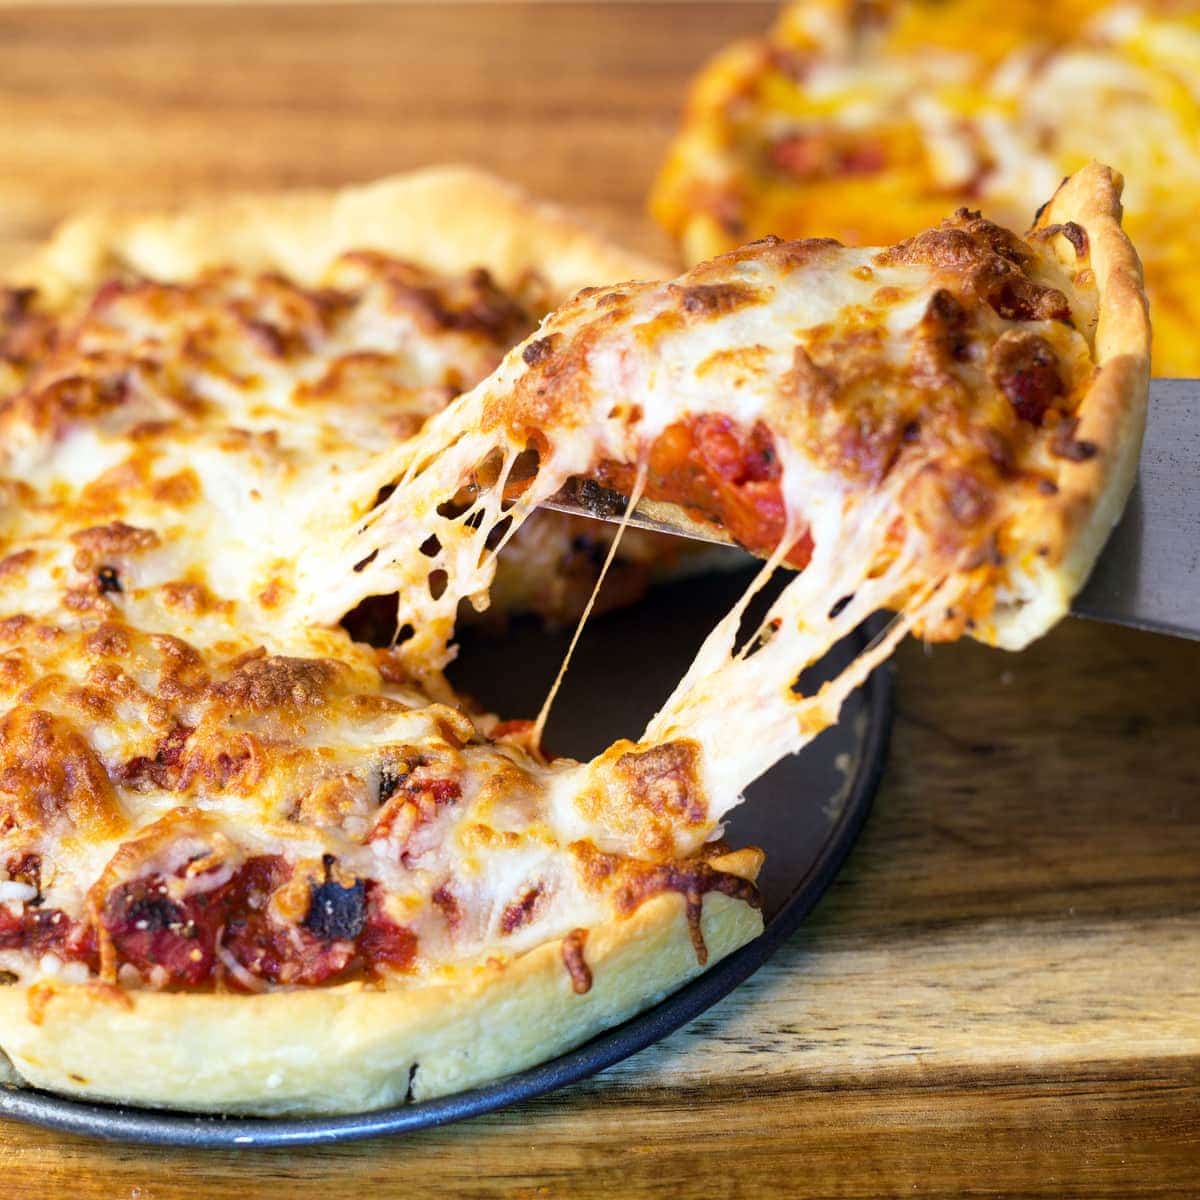
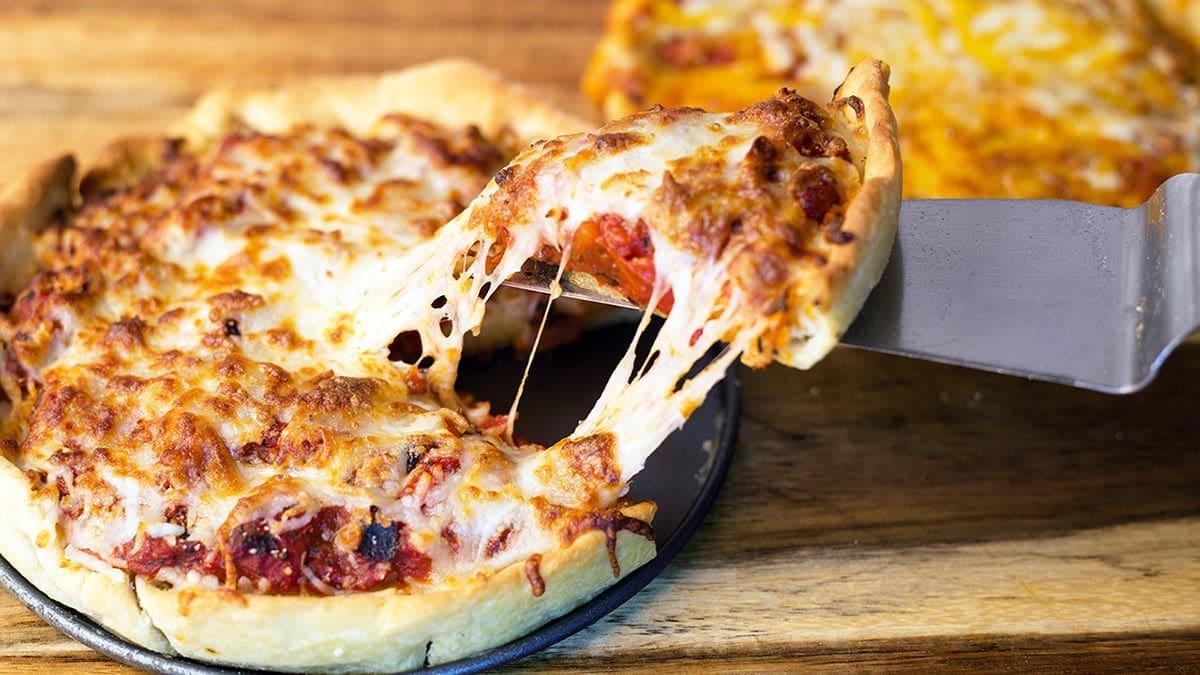
The Chicago-style deep-dish pizza also referred to as a pan pizza has a deep crust that allows for lots of room to pile on those toppings!
Despite the deep crust, a good Chicago-style deep-dish pizza should not have a super thick crust. In fact the crust should be thin to medium with a flaky texture and a buttery flavor. This is not always easy to achieve, but I have unlocked the secret and I'll be sharing it with you!
If you want to read more about the history of the Deep-Dish Pizza you can check out this article; The History of the Deep-Dish Pizza.
What is the difference between a New York-Style Pizza and a Chicago-Style Deep Dish?
The Chicago-style deep-dish pizza takes a little longer to cook than a thinner style pizza, so the order of ingredients is a little different.
The cheese goes on the bottom! So do the toppings! I know... crazy right? This, honestly, is more than I can bear. I have a real aversion to eating a slice of pizza and only seeing red sauce.
If you are the same way, no worries... in this recipe, cheese is added on top too! Just not in the beginning. Since it takes a little longer to cook a deep-dish pizza, the cheese would burn before the crust was done. Not good... so we add it at the end!
The other major difference is in the sauce. A traditional Chicago-style deep-dish pizza has a chunky and slightly sweet tomato sauce while a New York-style sauce is much thinner.
Don't worry though, if you like a thinner pizza sauce, use a thinner sauce and add more toppings!
Which is better... New York Style or Chicago-Style Deep-Dish?
This one depends on who you ask, for sure! Personally, I've always been a fan of a thin crust pizza... but only if it's crunchy.
I don't like a doughy pizza crust no matter what style it is. I always thought this eliminated a deep-dish pizza for me, until I had a good one!
Contrary to what many people think, a Chicago-Style deep-dish pizza is not supposed to have a super thick or doughy crust. It's just supposed to be deep. Achieving this can be somewhat difficult and requires a few extra steps, but the end result is so worth it!
A good deep-dish pizza has a crust that has a buttery taste, flaky texture, and is not something you will soon forget. It should have a slight crunch and then just melt in your mouth. I'm super excited about this dough recipe because it does just that!
The secret is in the olive oil. If you've ever had a good focaccia bread, deep-dish pizza crust has a similar taste/texture. Although we put butter in the dough, it's actually the olive oil that creates that crisp and buttery crust.
As far as which one is better, I don't think one is better than the other; they are just different.
Cornmeal or no Cornmeal in a Chicago-Style pizza crust?
Some say no cornmeal, some say cornmeal. There is no definitive right or wrong answer that I can find.
Sometimes cornmeal is used on a pizza peel to allow the crust to slide off into the oven with ease. Since a deep dish pizza is made in a pan and doesn't go directly into oven like a New York-style pizza, there is no need to use it for this reason.
Some say cornmeal adds crunch to the dough and people add it in with the flour when making their pizza dough. I tried this and honestly, I think it did add some extra crunch. It also changed the flavor ever-so-slightly.
I tested this recipe both with cornmeal and without and decided to not include the cornmeal.
How Can I Make 2 Pizzas in the Ninja Foodi at once?
This is the exciting part. For the record, I used a Ninja Foodi 6.5 quart when testing this recipe. So, this is possible to do with either size (6.5 qt or 8 qt).
 All you need is this little canning rack that you can find on The Salted Pepper's Amazon Store.
For either size Ninja Foodi, you will want to get the one that is 7.9" in diameter and has 2" legs. There are several options, so be careful when ordering to ensure you get the correct one.
The canning rack sits in the basket that came with the Ninja Foodi to create a second level. It's pretty cool and can be used for all sorts of things, like making 4 burgers at once or a double order of wings. I just love it!
A few things to know when using the canning rack. The legs of the canning rack can fall into holes of the basket. I fixed that issue by using these oven guards on the feet of the rack. The rack is also incredibly hot, so be careful when removing it. One last thing is that the canning rack can be difficult to remove because there aren't any handles. I'm working on a permanent fix for this, but until then I find using a fork to remove it is the easiest way.
How to Make a Deep-Dish Pizza from Scratch
The first and most important thing is making the dough. I really encourage you to make the dough yourself, but if you don't have the time I recommend the pre-made pizza dough in the refrigerated section of the grocery store that is in a bag, not a can.
I tried to use canned pizza dough and it didn't work for deep dish pizza. You might have better luck than me, so if you do try the canned dough and it works be sure to leave me a comment!
Tips for a more flavorful pizza crust
Making the dough for a deep-dish pizza is fairly straightforward, but there is one thing you can do to deepen the flavors.
Making the dough 2 days before you plan to use it is always my recommendation. Your bread will proof in the refrigerator over the period of a couple of days and tons of flavor is developed during this time. This is how the good pizzerias do it and it is possible to get that same taste at home. Patience and Planning, of which I lack both.
Refrigeration also allows those layers of butter to firm up and since we aren't doing a warm proof of the bread, the butter stays solid when it's cooked. Then, like a pie crust, when heated those pockets of butter release steam and create flaky layers.
I realize that most people will want to make the dough and use it right away, so this recipe is written for dough use right after making it and proofing it in the Ninja Foodi. If you decide you want to wait a few days, just place the dough ball in a sealable baggy and let sit in the fridge for a couple of days. You may need to release some air from the bag every day. Then bring the dough to room temperature and proceed with forming pizza crust.
How to Make a Deep Dish Pizza in the Ninja Foodi
The first thing you want to do is make the dough.
Gather your dough ingredients and clean off a good sized work surface for kneading the dough later.
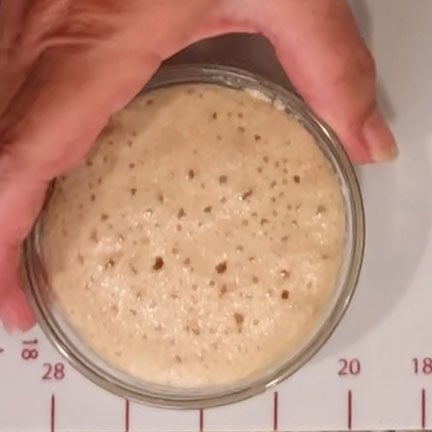 Proof the Yeast: Combine 2 tablespoon (of the total ⅔rds cup) of warm (104° -110° F) water with the sugar and the yeast. Stir and allow to sit for 5-10 minutes or until the yeast mixture becomes foamy.
You do not have to do this step if you are using instant yeast, but I almost always do it anyway.
I like to know my yeast is working, so I always bloom my yeast before using.
If you don't have a thermometer and can't measure the temp of the water, here is a little tip.
If you put your finger into the water and feel the need to immediately pull it out, your water is too hot. When the water reaches the correct temp, it will be about the temperature of bath water.
Mix the rest of the dough ingredients
In a medium size bowl, combine the flour & salt with the proofed yeast. Stir in 2 Tablespoons melted butter. Make sure it is not too hot. Then add the remaining water. Mix to combine and it should form a very shaggy looking dough ball. I do this by hand, but you can use a stand mixer with the dough hook.
Turn the dough out onto a floured clean work surface. I like using my pastry mat from Pampered Chef, but any clean surface will work.
Knead the dough
Begin kneading the dough by pushing down and away from you. Turn the dough 90 degrees and push down and  away from you. You can see how I knead the dough in this recipe video on YouTube or you can find the video below.
You may need to add more flour if the dough is sticky, but just add a little at a time.
You only need to knead the dough for a few minutes.
Add some butter
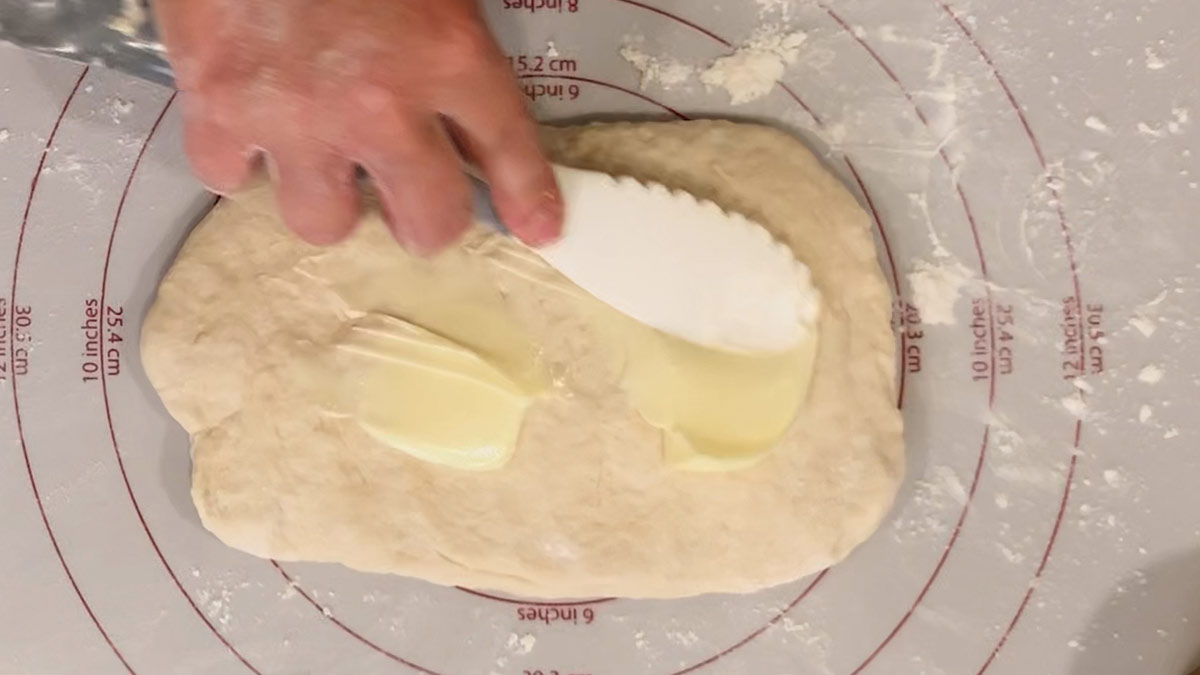 This is completely optional, but I like to think it boosts that buttery flavor we want in a deep dish-style pizza crust. Press the dough out into a rectangle and spread the remaining 2 tablespoon of butter on the dough. Fold into thirds. Turn 90 degrees, press into a rectangle again and fold into thirds. Repeat this process one more time for a total of three times.
Form the dough into a ball. Then cover it with a moist towel and let it rise until double in size.
Proofing the dough
There are several ways you can proof the dough for this recipe. You will develop the most flavor if you proof the bread in the refrigerator for a couple of days. Then bring to room temp and form the crusts.
If you just can't wait, here is how to proof with the Ninja Foodi Dehydration function:
Place some oil in the bottom of the Ninja Foodi, rub the top of the dough in the oil and then turn right-side up and cover with a damp cloth. My favorite towel to use is a flour sack. They are also great for making Homemade Yogurt in the Ninja Foodi.
Set the dehydration to 105° F and let the dough proof in the Ninja Foodi for about 30 minutes or until it has doubled in size.
If you don't have the dehyration function, don't worry there is a work around. Preheat the Ninja Foodi on 250° F for 5 minutes while you are mixing up the dough. Then open the lid for about 1-2 minutes while you are kneading the dough. Close the lid until you are ready to proof the dough.
Place the dough in a cake pan on the rack in the low position. Put the rack into the Ninja Foodi, cover the dough with a damp towel and close the lid. Leave the Ninja Foodi off, the residual warmth will proof the dough in about 30-40 minutes.
Lastly, you can proof the dough on the counter, in a bowl, covered with a damp towel and place in a draft free spot. This will take about 1 hour on an average day. The warmer your house is, the faster the dough will rise.
Making the Pizza Sauce
Add the cup of pizza sauce and cup of fire roasted tomatoes along with the seasonings to the inner pot of the Ninja Foodi. The sauce will heat up as we par-bake the pizza crusts.
Form & Par-bake the Pizza Crusts
Usually Deep-Dish Pizzas are cooked in pan that has a raised edge. Because we want to cook two crusts at the 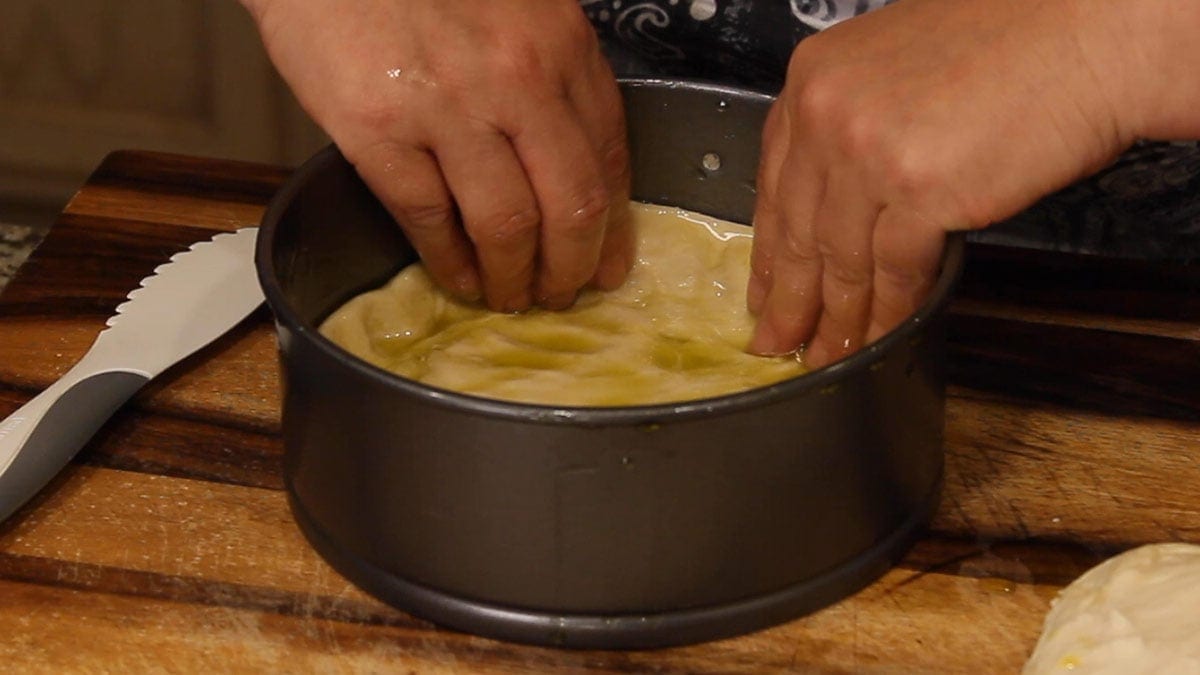 same time, we are going to pre-cook each formed pizza crust for about 5-10 minutes in a 7" springform pan.
Preheat the Ninja Foodi to 400° F on the Bake/Roast function.
Split the dough in ½ and form 2 discs about the size of the bottom of the springform pan.
Add 1-2 tablespoon of olive oil to the 7" springform pan and place disc of dough into bottom. Gently press the dough to the edges and up the sides about 1"-1 ½".
Place the springform pan on the rack in the low position and bake at 400° F for 5-10 minutes or until the pizza crust is about ½ way cooked. Remove and allow to cool on a rack. Let the springform pan cool off before forming the second crust. Repeat with the second pizza crust.
Make up the Deep-Dish Pizzas
Top each pizza with ½ cup of shredded cheese on the bottom, then top with your toppings of choice. Put 1 cup of sauce on each pizza. I love getting creative with pizza toppings and I used a ricotta/cream cheese blend instead of a tomato sauce when I made my pizza. You can see what I added to my pizza in the video below.

What are your favorite pizza toppings? I LOVE caramelized onions! Leave me a comment and let me know your favorite!
Bake/Roast at 400° F for 10-15 minutes. When the crusts looks done, top the pizza on top with ½ cup shredded cheese and bake/roast or A/C on 400° for a few minutes until the cheese is melted and bubbly. Remove top pizza and place on rack to cool.
Add cheese to bottom pizza and bake/roast or A/C on 400° F until cheese is melted and bubbly. Serve & Enjoy!
Serve & Enjoy!
Chicago-Style Deep-Dish in the Ninja Foodi
Ingredients
Pizza Dough
Pizza Sauce for 2 pizzas
- 1 cup pizza sauce or spaghetti sauce
- 1 cup fire roasted tomatoes
- 1 teaspoon basil dried
- ½ teaspoon salt
- ½ teaspoon sugar
- ⅛ teaspoon red pepper flakes optional
For the Pizzas
- ¼ cup olive oil divided
- 2 cups cheese any kind you like
- Your toppings of choice
Would you like to save this recipe?
Instructions
- Combine the warm water, sugar, & yeast in a small bowl and let sit for 5-10 minutes for it to proof. The yeast should begin to bubble and foam.
- Combine the flour and the salt, mix in the proofed yeast and the melted butter. Make sure the butter has cooled before adding. Mix in the remaining water and mix to form a shaggy dough ball.
- Flour a clean work surface and place dough ball on surface. Begin to knead the dough by pushing down and away from you, turn the dough 90° and push down and away from you. Repeat this process for about 5 minutes. Add flour if the dough is too sticky. The dough will become a smooth ball and will no longer be sticky.
- Press the dough into a rectangle and spread the remaining 2 tablespoon room temperature butter onto the rectangle. Fold the dough into threes and then press it back out and repeat two more times.
- Form a ball with the dough and swirl 1 tablespoon olive oil in the inner pot. Cover the top of the dough with oil and place in the bottom of the inner pot. Cover with a moist dish towel. Turn the dehydrating function on 105° F and allow to proof for 30 minutes.
- When the dough has doubled in size, remove it from the inner pot and split into two. Form a flat disc about the size of the bottom of the springform pan.
- Preheat the Ninja Foodi on bake/roast for 5 minutes on 400° F.
- Add 1-2 tablespoon of olive oil to the 7" springform pan and place disc of dough into bottom. Gently press the dough to the edges and up the sides about 1"-1 ½". Bake at 400° F for 5-10 minutes or until the pizza crust is about ½ way cooked.
- Remove sides of the springform pan and place pizza crust on rack to cool. When the springform pan has cooled, repeat with the second dough disc.
- Top each pizza with ½ cup of shredded cheese on the bottom, then top with your toppings of choice. Put 1 cup of sauce on each pizza.
- place one pizza on the bottom of the basket and put the 7.9" canning rack on top to make a second layer. Place second pizza on top of rack and set into the Ninja Foodi. See post for details.
- Bake/Roast at 400° F for 10-15 minutes. When the crusts looks done, top the pizza on top with ½ cup shredded cheese and bake/roast or A/C on 400° for a few minutes until the cheese is melted and bubbly. Remove top pizza and place on rack to cool.
- Add cheese to bottom pizza and bake/roast or A/C on 400° F until cheese is melted and bubbly. Serve & Enjoy!
Nutrition
ABOUT THE RECIPE AUTHOR, LOUISE LONG

Louise is a full-time recipe creator and food blogger @ The Salted Pepper. She has over 30 years of experience with cooking and recipe development. She owned a restaurant for several years and was a full-time RN until retiring to blog full time.
Louise has several very active Facebook groups that help people with the basics of cooking and getting the most out of the Ninja Foodi.
Ninja Foodi Fresh & Healthy Meals
Seeing the need for easy, delicious, and high quality recipes, she is focusing all of her efforts at this time creating recipes specifically for the Ninja Foodi. Her recipes are easy for the home cook to follow and provide step-by-step instructions.
Louise is also a YouTube creator and you can find most of her recipes in video format on The Salted Pepper YouTube channel.
She is very responsive to messages and eager to help in any way she can.
Nan says
Wow! What a great recipe. We both loved our custom pizzas (his with tomato based sauce, mine with cream sauce). I chose to make my crust dough and let it proof in the fridge for 48 hours. Realized I didn't know what to do after that -- should I try to cook it cold or take it out to let it warm (which I forgot to do), so I got it close to room temp by using the dehydrate setting on my Foodi. Turned out perfect.
A somewhat fussy recipe, but well worth the time. Thanks for sharing!
Louise says
I'm so glad you enjoyed it!
Sheila says
I just found this recipe on YouTube. Looks super yummy!! I like Italian sausage and cheese on my pizza. Would you suggest I fully cook the sausage or partially cook it first?
Louise says
I would fully cook it.
Karen says
Which size canning rack fits the 8 qt Foodi? I will still use a 7” springform pan.
Do you have a written recipe for the ricotta pizza, both ingredients and instructions? It looks delicious!
Louise says
You can get the 7.9" or the 8.25" and they both will fit. Since this recipe was put out, I have switched to the 8.25" because it fits better in the basket. I'm not sure what ricotta pizza you are referring to. Did I mention that in the post somewhere?
Kay says
Where can I get the 7.9 inch canning rack?
Louise says
I would get the 8.25" it fits better in the Ninja Foodi Basket. I didn't know it came in this size when I wrote the recipe, so I'll have to update it. Here is my Amazon affiliate link for the rack: https://amzn.to/3fiRIDC
Seasons01 says
Do I adjust anything to make this for the oven??