
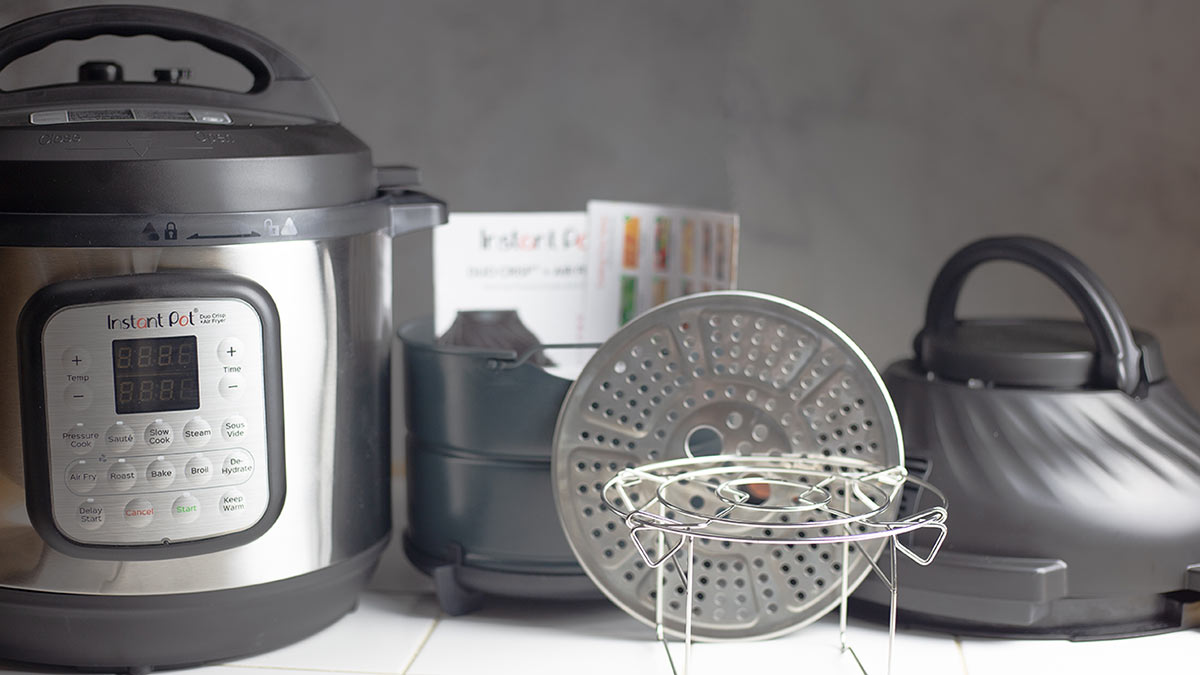
The Instant Pot Duo Crisp is the newest IP to hit the market and it has an added feature! The Air Fryer lid. Let's delve into this appliance and find out about all the features and how they work.
Would you like to save this recipe?
It's here! The newest Instant Pot and it air fries, too! The Ninja Foodi has been around for a while now and the folks over at Instant Pot decided to get in the game with this new Instant Pot Duo Crisp. Will it measure up to the Ninja Foodi? Let's find out!
If you take a look around my website, you will see that I have been creating recipes specifically for the Ninja Foodi for quite some time and many consider me an expert on all things Ninja Foodi Pressure Cooker & Air Crisper. I have used the Ninja Foodi PC & AC to cook and create every single recipe for 12 months straight. No joke, my friends. Every. Single. One. So, I know a thing or two about how these appliances work and I will go over all the features on the Instant Pot Duo Crisp and compare them to the Ninja Foodi.
This post may contain affiliate links. If you make a purchase after clicking a link, I may earn a small commission. As an Amazon Affiliate, I earn from qualifying purchases.
I want nothing more than for everyone to be happy with the purchases they make and I am not affiliated with SharkNinja or Instant Pot. I was not given either appliance, so this review is 100% my honest opinion and based on experience. Let's get to it!
What is the Instant Pot Duo Crisp?
The Instant Pot Duo Crisp is a kitchen appliance that has multiple functions, including; pressure cook, steam, slow cook, dehydrate, sous vide, sauté, air fry, roast, bake, broil, and keep warm. The basic design is very similar to other Instant Pots, it has a base, a inner pot, and a pressure lid.
Where it differs from other Instant Pots is it also has an air fryer lid. This air fryer lid allows you to air fry foods in the same inner pot that you pressure cook in.
This can be wonderful when pressure cooking meats or other dishes that you want to crisp up at the end. No more transfering your meal to the oven for melting cheese or crisping up dishes.
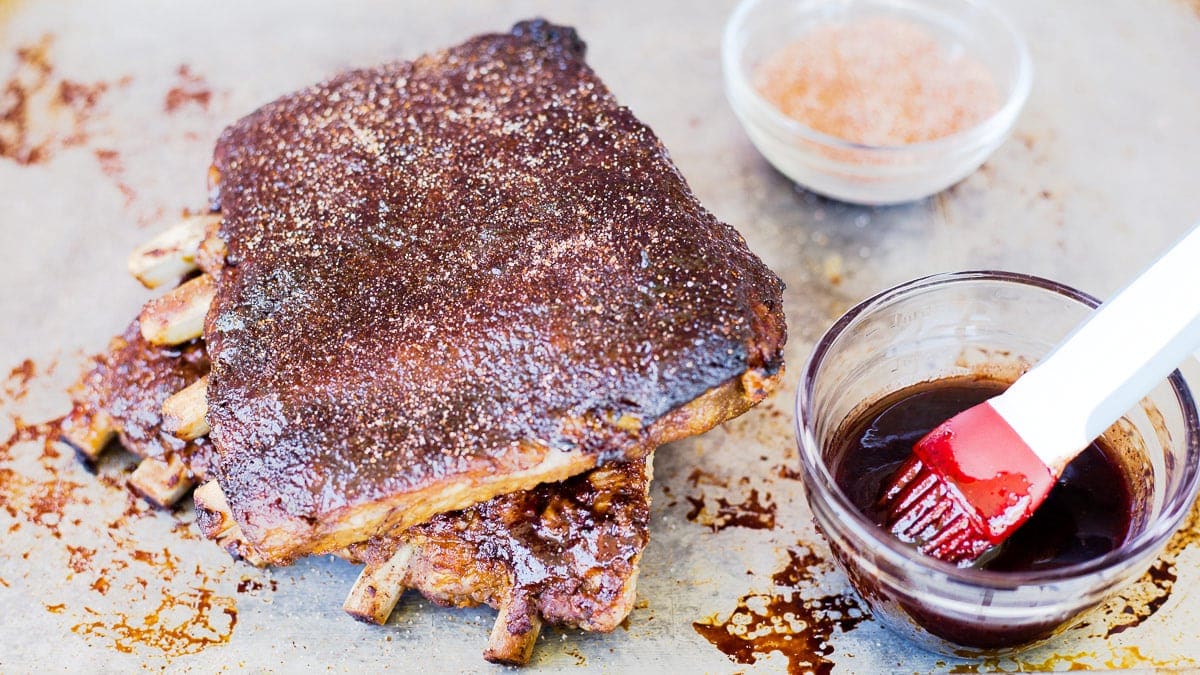
One example of how you can use the pressure cooker followed by the air fryer is with ribs. Ribs are so quick to make in the pressure cooker, but in order to be perfect, they have to be crisped up after pressure cooking to develop that outer crust we love so much. Here is a recipe that you can take a look at so you can see just how beautiful the ribs turn out!
Ribs with a Raspberry Glaze
I made these ribs in the Ninja Foodi, but the Instant Pot Duo Crisp will do the same thing. First you pressure cook the ribs until they are done to your liking, then you can either air fry them or even broil them right in the same pot that they were pressure cooked in.
Another example would be Shepherd's Pie. You can make the Shepherd's Pie or Cottage Pie right in the inner pot of the Instant Pot Duo Crisp and then put the air fryer lid on and melt the cheese on top.
I can't begin to tell you how many wonderful recipes I've made in the past year using both lids. It's a very convenient way to make one pot meals for sure!
Let's go over what comes with Instant Pot Duo Crisp and break down the various features.
What comes with the Instant Pot Duo Crisp?
In the box, is your appliance base. This base is used for all functions on the Instant Pot Duo Crisp.
A pressure lid that is used for pressure cooking, steaming, and slow cooking.
An 8-quart stainless steel liner pot that is used anytime you are using the Duo Crisp.
An air fryer lid that is used when air frying, baking, roasting, broiling, and dehydrating.
An air fryer lid protective pad and storage cover that is used any time you remove the air fryer lid.
A multi-level air fry basket that can be used with all the functions on the Duo Crisp.
An air fryer basket base that is used any time you are using the air fryer basket.
A Multi-functional rack that can be used in two levels, low and high, and can be used with any of the Duo Crisp functions. There is also a broil/dehydrating tray that sits inside the multi-level air fry basket to create two levels in the basket. You can use this with any of the duo crisp functions.
There is also a getting started guide, a one-page cooking time table for pressure cooking certain foods, and a safety, maintenance, and warranty booklet. There are not any recipes included.
How does this compare to what comes with the Ninja Foodi Pressure Cooker and Air Crisper?
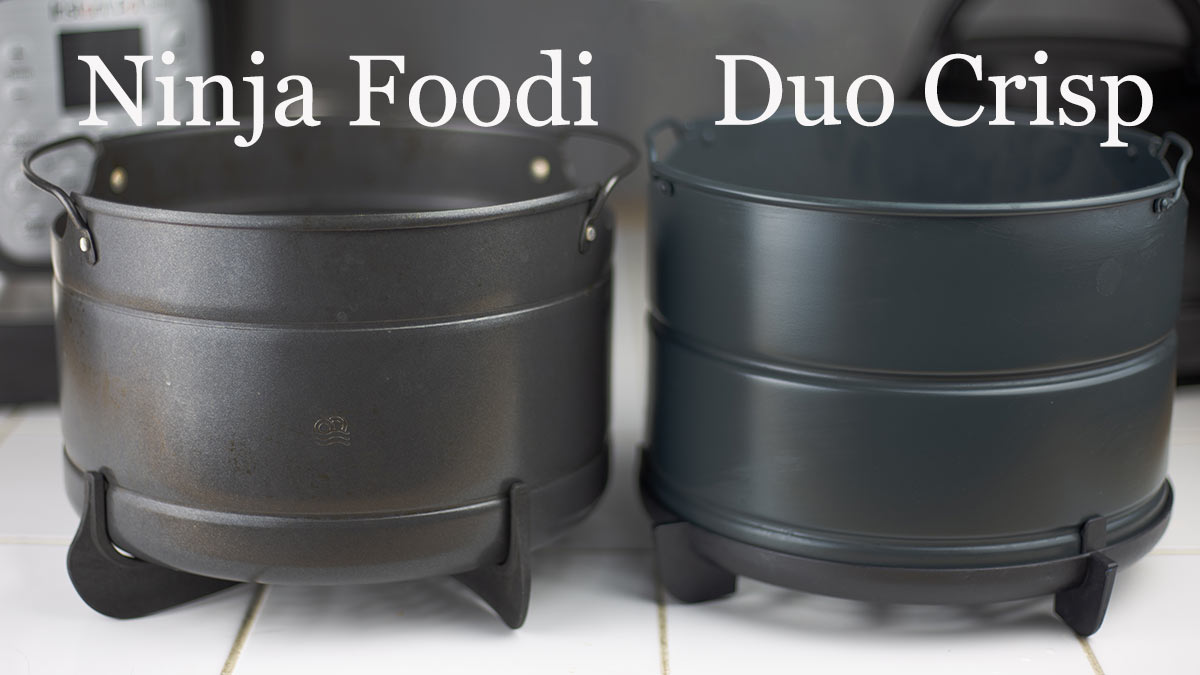
In order to compare apples to apples, I will be referencing the Ninja Foodi OP401 model in this comparison. The (affiliate link)Ninja Foodi OP401 has a price tag very similar to the Instant Pot Duo Crisp and they are both 8 quarts.
Appliance Base: The base on the Ninja Foodi is wider than on the Instant Pot Duo Crisp and it is heavier. While some might see the weight of the Ninja Foodi as a disadvantage, I see it as an advantage. When I was putting on and off either lid on the IP Duo Crisp, the base moved all around on my counter and that made me uncomfortable for safety reasons. The Ninja Foodi stays put. Of course, you can put the Duo Crisp on a heat-resistant grippy mat and correct this easily.
Inner Pot: We have all been begging for a stainless steel inner pot for the Ninja Foodi and the Instant Pot Duo Crisp has that! YAY! That is a huge plus in my opinion because I love cooking with stainless steel. Others will see this as a disadvantage because the ceramic-coated inner pot of the Ninja Foodi is MUCH easier to clean, especially when cooking certain foods.
Air Fryer Basket: The baskets are very similar in design. The Ninja Foodi air fryer basket is ceramic-coated, but I could not find any details about the material used for the Instant Pot Duo Crisp basket. If you know, leave me a comment and let me know. The one thing I want to point out is the bottom where the holes are. The Ninja Foodi has more holes and they go further to the edge. I believe this is an advantage over the Duo Crisp because it will allow for more air flow and better crisping when using the air fryer lid.

Air Fryer Basket Base: These are the legs that fit on the bottom of the basket to raise it slightly for air flow. You can see the design is different and I'm going to have to give the advantage to the Ninja Foodi on this one. It sits a little higher, which will help with heat distribution and the base doesn't cover the edges, allowing for more air flow. The basket legs on the Duo Crisp doesn't cover any of the holes, but like I said earlier, the holes are further away from the edges.
Multifunctional Rack: This is perhaps the second biggest difference between the Ninja Foodi and the Instant Pot Duo Crisp. Let me start off by saying that I'm not a fan of the rack that comes with the Ninja Foodi and I honestly thought it was a huge drawback, then I tried to use the rack that comes with the Duo Crisp and realized that, once again, SharkNinja did a better job with the design.

As you can see by the picture, both racks have a high and low position. The Instant Pot Duo Crisp rack is much smaller in diameter than the Ninja Foodi rack. This, alone, does not cause the problem. It's the legs that cause the big issues.
When in low position you cannot use any pan larger than 7" (maybe 7 ½") in diameter or the legs won't go around it to lower it into the inner pot. I made it work with an 8" Fat Daddio pan and I have a nice scratch on my inner pot now. It's just too tight to do without scratching your pot all up.
When in high position, you can fit an 8" pan on the top, but the legs are inset so much and there is so much room left in the inner pot that the rack moves around a lot. This would create issues if you wanted to bake a cake and have it even. The rack just doesn't sit correctly on the bottom and it leans to one side.
The bigger issue is with the design of the Duo Crisp rack is the lack of room underneath the rack because of the way the legs are inset. You can put food on the bottom of the inner pot, but 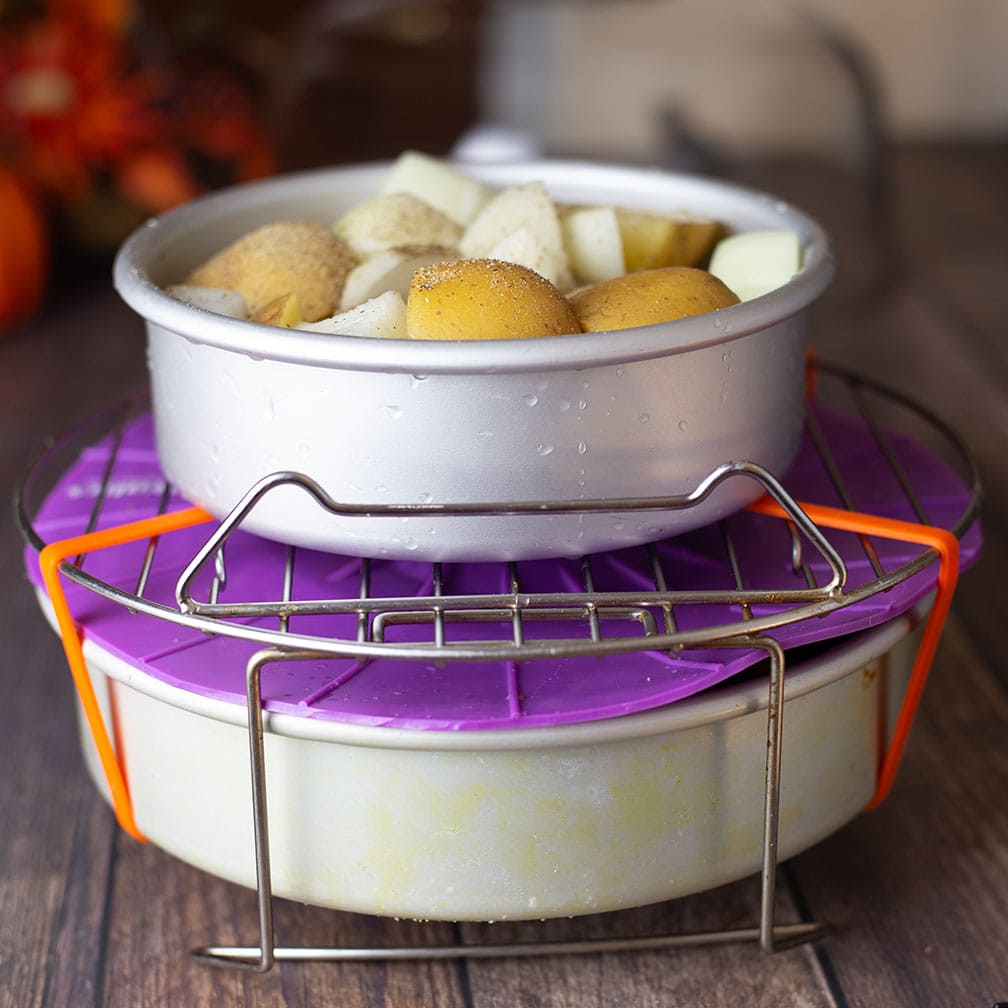 you can't layer a pan under the rack.
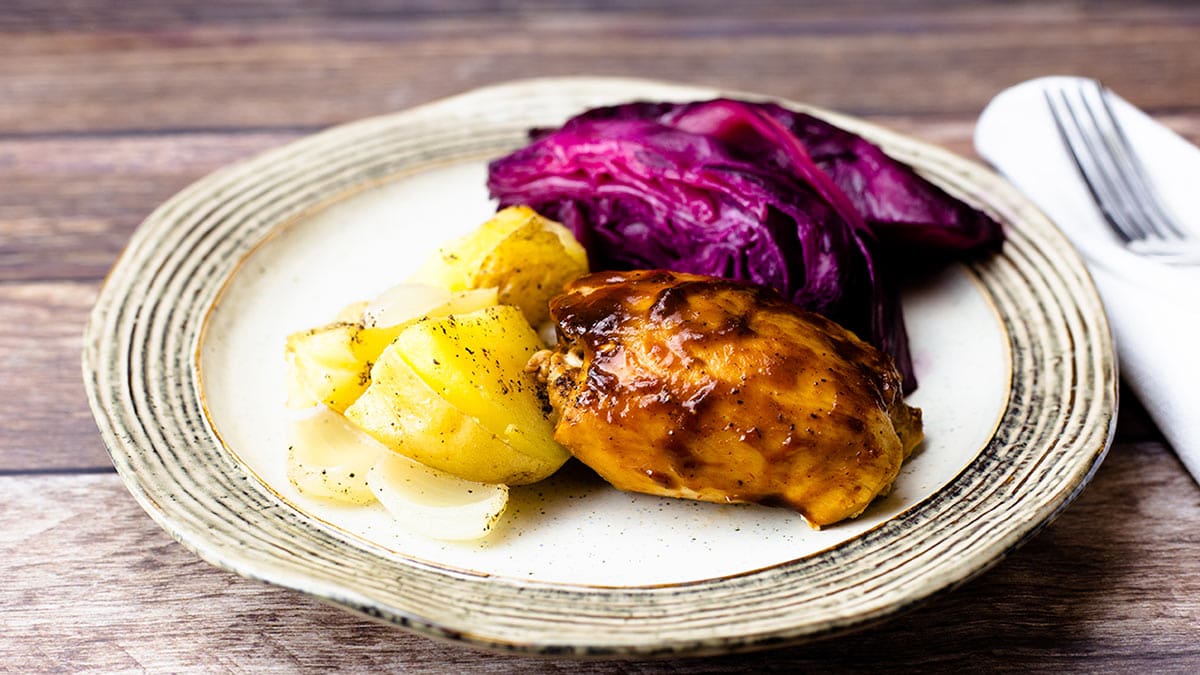
Here is an example of how I utilize the Ninja Foodi rack to do 360 meals. I have 3 layers of food cooking at the same time in this recipe for 360 BBQ Chicken Dinner. This will not be possible with the Duo Crisp rack. In the Ninja Foodi, I put the cabbage in the inner pot, the chicken in the (affiliate link)8' Fat Daddio pan under the rack covered with a (affiliate link)Walfo's silicone lid and then potatoes on top in a (affiliate link)6' Fat Daddio pan.
Now, all is not lost if you decide to go forward with the Instant Pot Duo Crisp! You can buy the Ninja Foodi reversible rack and it does fit inside the Duo Crisp inner pot. That runs about $17.00 plus shipping through SharkNinja. You can even buy the deluxe version that has two levels, but I have not tested that to make sure it fits.
Pressure Lid: The basic design of the pressure lids are the same and they both have the safety features that we find on all newer pressure cooking lids. The biggest difference is the way the pressure is released. With the Ninja Foodi, you turn the valve to vent and the steam is released. On the Instant Pot Duo Crisp there is a button that is pushed to release the steam. This is very convenient for sure. The other advantage to the pressure lid on the Duo Crisp is it is automatically sealed when the lid locks into place. This is great for pressure cooking, but you do have to remember to push the button if you are steaming or slow cooking. I have to give the advantage to the Instant Pot Duo Crisp on this one. I like the pressure lid!
Air Fryer Lid: This is, by far, the biggest difference between the Ninja Foodi and the Instant Pot Duo Crisp. The air fryer lid, which is called the TenderCrisp lid on the Ninja Foodi is attached. When the Ninja Foodi first came out everyone was begging for a lid that was not attached. The Duo Crisp delivers on that. The air fryer lid comes of off the Duo Crisp. Don't jump up and down with joy yet!
The air fryer lid on the Duo Crisp is kind of heavy, weighing in at about 6 pounds. This might not seem like much, and if you are average height and have decent upper body strength, you can lift it on an off without issue. I'm 5'2" and, while I can lift it, I have to lift it above eye level when the Duo Crisp base is sitting counter height. It feels pretty heavy then, not to mention that the underside is very hot and you have to be careful.
You also have to keep the protective pad on your counter to set the lid on. This may not seem like a big deal, but it does take up valuable space. When you are air frying, you check the food quite often and I found that lifting the lid off and putting it back on 3 times while making french fries was a pain.
The other issue is the time it takes. When you open the lid on the Ninja Foodi, you can toss the food around and close the lid in seconds. It takes a bit longer with the Duo Crisp and, the longer the lid is off, the more the heat escapes. That isn't ideal when air frying, baking, or broiling.
This is probably one of the biggest deciding factors in your decision to get the Duo Crisp or the Ninja Foodi and it certainly boils down to your personal preference. For me, I like the attached TenderCrisp lid on the Ninja Foodi better.
Manuals & Books: Both come with a manual and safety guides, although I think the Ninja Foodi manuals have more information. You can access a complete manual for the Duo Crisp on the Instant Pot site and here is the link: Instant Pot Duo Crisp Full Manual
The Ninja Foodi comes with a cookbook, but I don't really see that as a huge advantage because a lot of the recipes aren't working well for people.
Both come with some cheat sheets with timing for various foods. The Ninja Foodi guide is more comprehensive than the Instant Pot guide, but I'm not one to put much faith in time tables because there are so many variations with cooking and often times these suggested times are not accurate.
Let's get into the features!
What are the features on the Instant Pot Duo Crisp and what do they do?
Let's start with the functions that use the pressure lid.
Pressure Cooking: You can set the pressure cooking function to low or high depending on what you are cooking. The low setting is around 6 PSI and the high setting is around 12 PSI. If you want more information on understanding PSI and how it works with pressure cooking, check out this article: Pressure Cooking 101.
The time defaults to 35 minutes, but you can set it anywhere from zero minutes to 4 hours.
Pressure cooking is a great way to cook food in fraction of the time of conventional methods, like stove top or in the oven. The amount of time saved varies based on what you are cooking, but the rule of thumb is that you decrease your cook time by ⅓ of what you would do in the oven or on the stove. Keep in mind that there is a time to pressure and sometimes a natural release time, so I think it balances out to be about 50% less time. There are exceptions of course.
Slow Cook: You can set the slow cook function to low or high. The minimum time setting is 30 minutes and the maximum is 24 hours for both settings. What I found interesting is the maximum temperature is 208° F for both high and low settings, so the only difference between the low and high setting is the amount of time it takes to get to 208° F. On the low setting it takes 4.5 hours to reach 208° F and on the high setting it takes 3.5 hours to reach 208° F. After the max temp is reached, it maintains that temperature for the duration of slow cooking. When slow cooking, you make sure the pressure release button is pushed down on the pressure lid and the vent is vented. Remember on the Duo Crisp pressure lid, it automatically seals when the lid locks into place, so you have to manually push the button to vent the steam.
Slow cooking is a great way to throw your ingredients into the pot and let the food cook low and slow. This is a great way to cook tough cuts of meat. I recently did some experimenting with the slow cook function on the Ninja Foodi and you can see how long it takes to reach temperatures in this post for Overnight Breakfast Casserole.
Sous Vide: This is a feature that has many people excited, but I would caution everyone to test the function out and make sure it is holding the correct temps. Usually, part of sous vide cooking is water circulation and that does not happen in the Duo Crisp. I tested this out with just water and I left the lid off so I could take frequent temps. It never quite reached the temp of 140° F, but this may have been because of the lid not being on. I will have to do some further testing to see how accurate this feature is. According to the manual, you put the pressure cooking lid on to use this function and it does not say to vent it. I'm very curious about this because I would think it would need to be vented. The minimum time you can set is 30 minutes and the maximum is 99 hours. The minimum temperature you can set is 70° F and the maximum is 200° F.
Sous Vide cooking is definitely something worth looking into because it cooks your food to a precise temperature throughout and holds it there without overcooking. While I'm not sure how great the function on the Duo Crisp is going to work, I certainly think it is worth giving it a try! You can sous vide a steak and then broil it using the air fryer lid.
Steam: The steam function is one of my favorite functions on the Ninja Foodi and I use it all the time to reheat leftovers. I was pretty shocked when I read in the directions for the Instant Pot Duo Crisp that you leave the lid sealed for steaming. This does not make any sense to me. In fact, I would debate that this is correct practice. Especially when the manual shows the default temp/pressure exactly the same as pressure cooking. So, it would only make sense that if we are sealing the lid and trapping in the steam, we are going to go under pressure. In order for steam to be produced the water has to boil and if it can't escape, pressure will build. Folks, I think they may have gotten this wrong and I would suggest venting the pressure lid while steaming. The minimum time you can set for steaming is zero minutes and the maximum is 4 hours.
The steam function is supposed to steam food. Pretty basic, right? Steam is a lower heat than pressure cooking, so it is a wonderful option for delicate foods like eggs, fish, and other seafood. I recently did a recipe for Chocolate Pot De Creme and I used the steam function. Steaming is also a great way to re-heat food that you don't want to dry out. Like pasta for example. I always reheat leftover pasta dishes using the steam function. I put the portion in a Fat Daddio Pan and cover with a silicone cover, add 2 cups of water to the inner pot and steam for 15-20 minutes. This does not overcook the pasta, but everything is nice and hot.
Keep Warm: I have not used this feature, but I'm guessing it is similar to the Ninja Foodi. Once the time is up, it will automatically go into the keep warm function. The keep warm lasts for 10 hours and then will shut off. *Keep warm does not come on when using the sous vide function.
Keep Warm is a great default function because when you naturally release your food after pressure cooking, the keep warm will pop on until you are ready to eat. This keeps everything warm without overcooking it. The one thing I do want to note is the Low setting says it holds a temp of 133° F. The recommended safe holding temps for hot food is 140° F, so, be careful when using this function on low. The high setting says it holds a temp of 165° F, which is a little on the hot side for some foods and they might overcook.
Now, let's look at the functions that use the Air Fryer Lid
Air-Fry: The temperature range you can select goes from 180° F to 400° F and the default temp is 400° F. The minimum time is 1 minute and the maximum time you can set is 1 hour. It defaults to 18 minutes. There is a message that comes on the screen prompting you to turn your food, if you ignore this it goes away after about 10 seconds.
Roast: The temperature range you can select goes from 180° F to 400° F and the default temp is 380° F. The minimum time is 1 minute and the maximum time you can set is 1 hour. It defaults to 40 minutes.
Bake: The temperature range you can select goes from 180° F to 400° F and the default temp is 365° F. The minimum time is 1 minute and the maximum time you can set is 1 hour. It defaults to 30 minutes.
I do like the lower temp setting of 180° F on these functions on the Duo Crisp. The Ninja Foodi's lowest setting is 200° F on bake/roast. So, there is a slight advantage that the Duo Crisp has with these settings, although I'm not sure how often you would need to use that low of a temperature.
*It is unknown, to me at least, if there is any difference between these functions. Based on my experience with the Ninja Foodi, I would guess that they all cook exactly the same and the only difference is based on the temperature you set. I would love to get clarification on this both from Instant Pot and Ninja Foodi, but to date I have not been able to.
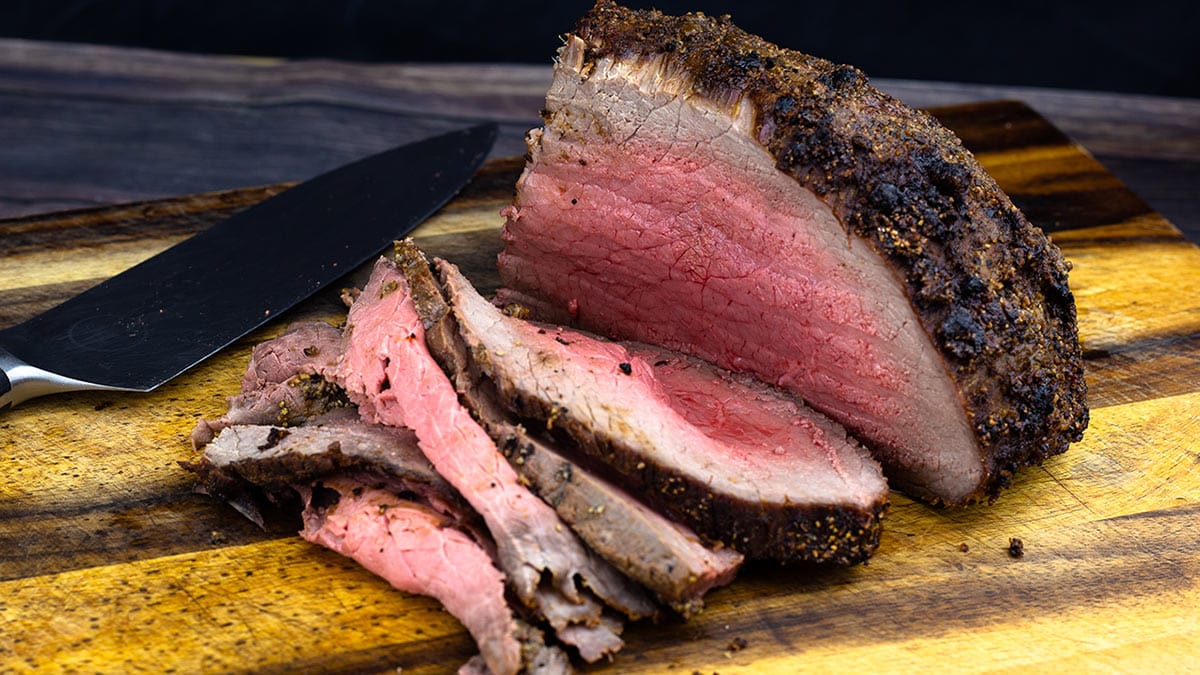
Broil: There is not any way to adjust the temperature on broil. It is set at 400° F. This is lower than the Ninja Foodi which, they say, reaches 450° F, but in my testing the broil setting on the Ninja Foodi stays around 425° F. I use the broil feature a lot and like the higher temp on the Ninja Foodi, it does a great job at searing steaks and cooking hamburgers. In fact, I just made a delicious Roast Beef using the broil setting on the Ninja Foodi. I have to say that the Ninja Foodi has the advantage over the Duo Crisp on this one.
Dehydrate: You can set dehydration function on the Duo Crisp from 105° F up to 165° F. The minimum time is 1 hour and the maximum time you can set is 72 hours. The Ninja Foodi has a wider range of temps, going from 105° F up to 195° F, but I'm not sure how important that is since most foods are dehydrated at 165° F or below.
I will say that if you want to dehydrate a lot of foods, neither appliance is going to be convenient for bulk dehydrating. There just isn't enough space.
You can purchase a (affiliate link)dehydration rack for the Ninja Foodi and it will fit the Duo Crisp. This rack gives you 5 layers of space for you to use when dehydrating. Of course, the top layer will get done before the rest because it is closer to the heating element. Usually, I'll just remove the top rack, let the second rack finish, remove it and keep going until they are all done. The racks can be a pain to deal with, but it is the best option to date.
Sauté Function
Sauté Function: The sauté function is used in almost all of my recipes in one way or another. Usually, I use it to sauté vegetables or sear meat before pressure cooking. I've also used it to make delicious homemade caramel for my Apple Cake with Caramel Glaze. Let's just say that this setting is very important to me and I was quite shocked that there are only 2 temperature settings on the Instant Pot Duo Crisp, low or high. There are 5 different temperature settings on the Ninja Foodi's sauté function so, I guess I'm quite spoiled.
I'm sure you can replicate almost any recipe with just these two temperature settings, but I did want you to be aware of it. I do like the fact that Instant Pot tells us what temperatures the high and low setting are, so there is a point of reference. The low sauté setting is 220° F and the high sauté setting is 335° F.
Another feature I really like about the sauté setting on the Duo Crisp is the display will turn from on to "Hot" when the pot has heated up and it's time to add your food. That is very helpful for searing. If you add food before the "Hot" displays on the screen, it is fine, but you may not ever see the "Hot" notice.
The minimum time you can set for sauté is 1 minute and the maximum time is 30 minutes. You do not use a lid when sautéing.
I think this one is a toss up between the Ninja Foodi Pressure Cooker & Air Crisper and the Instant Pot Duo Crisp. I really like the multiple heat settings on the Ninja Foodi, but I also like that the Duo Crisp will let you know when the pot has heated up to temperature. I'd probably lean towards having more temperature control, but that is just my personal preference.
Side-by-Side Cooking Test: Instant Pot Duo Crisp vs Ninja Foodi Pressure Cooker & Air Crisper
At the end of the day, all that really matters is how the food comes out! I would have loved to do a comparison between the Ninja Foodi and the Duo Crisp using the pressure cook function followed by the air crisping or air frying function, but my Duo Crisp was delivered with a huge dent in the side. I have no way of knowing if this has damaged any of the safety features on the pressure cooking side of things, so it is not safe for me to use it as a pressure cooker.
If you want to see the Ninja Foodi and the Duo Crisp side-by-side and in action, take a look at this YouTube video I did: Instant Pot Duo Crisp Review with Pros & Cons
I do have to say that Kohl's has been wonderful to work with. The Duo Crisp is out of stock, but they refunded my money right away.
This isn't the end of the world, I'm pretty confident that Instant Pot knows how to make a good pressure cooker and I'm sure it works as well or better as the Ninja Foodi.
So, I decided to do hand-cut fries as my test. I used two Russet potatoes about the same size. Cut them and soaked them in water for 1 hour. This helps to remove the starch and results in a crispier fry.
I preheated both appliances on broil for 10 minutes. Keep in mind that the Ninja Foodi will get hotter on broil because it reaches a temperature of about 425° F, where the Duo Crisp only reaches 400° F.
I spritzed the hand-cut potatoes with olive oil and seasoned with salt, and then added equal amounts of the potatoes to the air fryer baskets of both appliances and Air Fried on 390° F for a total of 15 minutes. I did toss around the fries twice during the cooking time.
The results
Both sets of fries looked very similar coming out of the fry baskets. The Ninja Foodi fries were slightly crunchier, but really just slightly. I think another couple of minutes in the Instant Pot Duo and they would have been the same.

Final Thoughts about the Instant Pot Duo Crisp
To be fair, I have not worked with the Instant Pot Duo Crisp enough to really know the functions and how well they work. I'm sure they work just fine and I don't think you will go wrong if you decide to purchase the Duo Crisp model.
It really boils down to what features are important to you and if you want a air fryer lid that comes off or stays on.
While I prefer the Ninja Foodi Pressure Cooker & Air Crisper, the Instant Pot Duo Crisp is certainly a great option as well!
If you would like more information or valuable tips and recipes, feel free to join our Facebook groups for both appliances.
Ninja Foodi 101
Instant Pot Duo Crisp Recipes and Tips
I certainly hope you found this article informative and helpful and if you ever have any questions, please feel free to email me: Louise@thesaltedpepper.com
If you want to read all about the Ninja Foodi and its features and uses, please check out this article: How to Use the Ninja Foodi
Thank you and if you choose to purchase either one of these appliances, I know you will be thrilled!
All My Best,
Louise
ABOUT THE RECIPE AUTHOR, LOUISE LONG
Louise is a full-time recipe creator and food blogger @ The Salted Pepper. She has over 30 years of  experience with cooking and recipe development. She owned a restaurant for several years and was a full-time RN until retiring to blog full-time.
Louise has several very active Facebook groups that help people with the basics of cooking and getting the most out of Pressure Cooking.
Ninja Foodi Fresh & Healthy Meals
Instant Pot Duo Crisp Recipes and Tips
Seeing the need for easy, delicious, and high quality recipes, she is focusing all of her efforts creating recipes specifically for the Ninja Foodi. Her recipes are easy for the home cook to follow and provide step-by-step instructions.
Louise is also a YouTube creator and you can find most of her recipes in video format on The Salted Pepper YouTube channel.
She is very responsive to messages and eager to help in any way she can.
I WOULD LOVE TO SEE WHAT YOU ARE COOKING UP IN YOUR NINJA FOODI! TAG ME @THESALTEDPEPPER ON YOUR FAVORITE SOCIAL MEDIA PLATFORM WHEN YOU MAKE A DISH!
BE SURE TO FOLLOW THE SALTED PEPPER RIGHT HERE ⇓⇓⇓⇓⇓
Linda says
I found the very informational. thank you, it helped me to make he right choice for me.
It will be the Ninja Foodie Smart lid.
One of my favorite things to make in my old Ninja is steak, pork, and chicken bites,
I put the 8 in cake pan in the crisping basket season my bites and air fry them about 6 mins.
now they are ready to eat Yummm., can be used so many ways.
JB says
Louise
Did I miss something, your site would be going back to pubic around November 18, 2020 at 8:19 am.
It's January 23, 2021 & went to link and would not let me view info. What did I do wrong, I don't join any social media, but enjoy being able to get some much needed "public" help info occasionally.
Thanks
Louise says
Are you sure you typed it in correctly? What link were you using? Everything is fine on my end as far as I know.
oh dear says
Felt a bit disappointed to spend all this time reading the article only for you to declare you hadn't even used it at the end. It takes me time to read and was such a waste of my time. Please declare it at the top of your article so readers can make a choice.
Louise says
I have no idea why you would feel disappointed, the article is 100% factual and accurate. I have used the IPDC plenty of times, I just haven't used it to pressure cook because the manufacturer advised me not to. I do not need to use the IPDC as a pressure cooker to discuss its functions and go over the differences from the Ninja Foodi, which I did in the article. Anyone trying to decide between the Ninja Foodi and the IPDC will get tons of information from this article so they can make the choice that is right for them.
oh dear says
It is because I wanted to see how the pressure cooking features hold up and so I thought it was a full review - I kept reading with that assumption. Maybe just declare it at the top of your review that it won't be commenting on the pressure cooker features due to the reasons you stated.
You made such an absolute statement on the steaming method and how it doesn't make sense, quoting, "Folks, I think they may have gotten this wrong" - so does that mean you tried it? I can't even tell if you tested that yourself seeing as it's also pressurised. I went and looked at some videos which demonstrated on other IP models and their veg looks deliciously steamed.
Hence, I am disappointed as I spent around 30 minutes to read it and left feeling unsure of your deductions - but it's a lesson for me that research across many platforms is always best. If that is an affront, so be it, but thank you for your review.
Have a good evening.
Louise says
The pressure function works just fine. I'm not sure why you would think the pressure cooking features wouldn't hold up, Instant Pot is the leader in electric pressure cookers and there would be no reason for it not to work just as well as any of their other pressure cookers. Yes, I tried the steaming function and it is exactly like I said. The pot seals during the steam function which is not true steaming. There is only 1 IP model that vents during steaming. I didn't realize this until it sealed and I depressurized it by opening the vent, but then it doesn't count down the time and would be inconvenient to use the function while venting. It's not that you can't cook your vegetables with the valve sealed and have them turn out, it's just not true steaming. I'm not sure how you could feel unsure of my deductions when the article is 100% factual and based completely on what each function does. It's not like I'm making things up. I have no agenda here at all, except for providing people with helpful information so they can make an informed decision. When I state an opinion, I specifically say it's my opinion. I'm really confused about what kind of a review you are looking for if it isn't one based on facts. Did you just want to read a glowing review of how great it is and not learn about the various functions? You should always take into consideration as many reviews and opinions as you can find when researching what product is best for you and joining a Facebook group for the IPDC will give you the opportunity to ask a lot of IPDC owners what they think. Most love the IPDC, but I will say of the people I know who have the IPDC and the Foodi, they prefer the Foodi because of the functional differences. If you already have an Instant Pot, you can also get a crisping lid for it and those work pretty well from what I hear. At the end of the day, you can't go wrong with any of the three purchases. It is so wonderful to be able to utilize one appliance in so many ways. Take a look at my website and you will see that you can make pretty much anything with the combination of pressure cooker and air fryer. Have a great night and I hope you find what you are looking for.
Cathy says
I found this article VERY helpful and thorough. Thank you! I wanted to watch your youtube video, but it looks like it is now marked private. Regardless, thank you for ALL the time you put writing this review!
Louise says
Thank you Cathy! I am about to put that video back to public. The hateful comments I received were really getting to me and I needed a break. It's such a shame that some people think honesty is being biased. I absolutely have nothing against the IPDC and it is a great fit for many people, but I think the older Ninja Foodi's have more to offer. I am not thrilled with the newest model 6.5qt though.