
- Stand mixer or hand mixer
- Large Mixing Bowl
- Small mixing bowl
- Cup blender (personal or bullet style blender)
- Light colored metal baking sheet
- Silicone spatula
- Metal spatula
- ¼ cup and ⅓ cup dry measuring cups
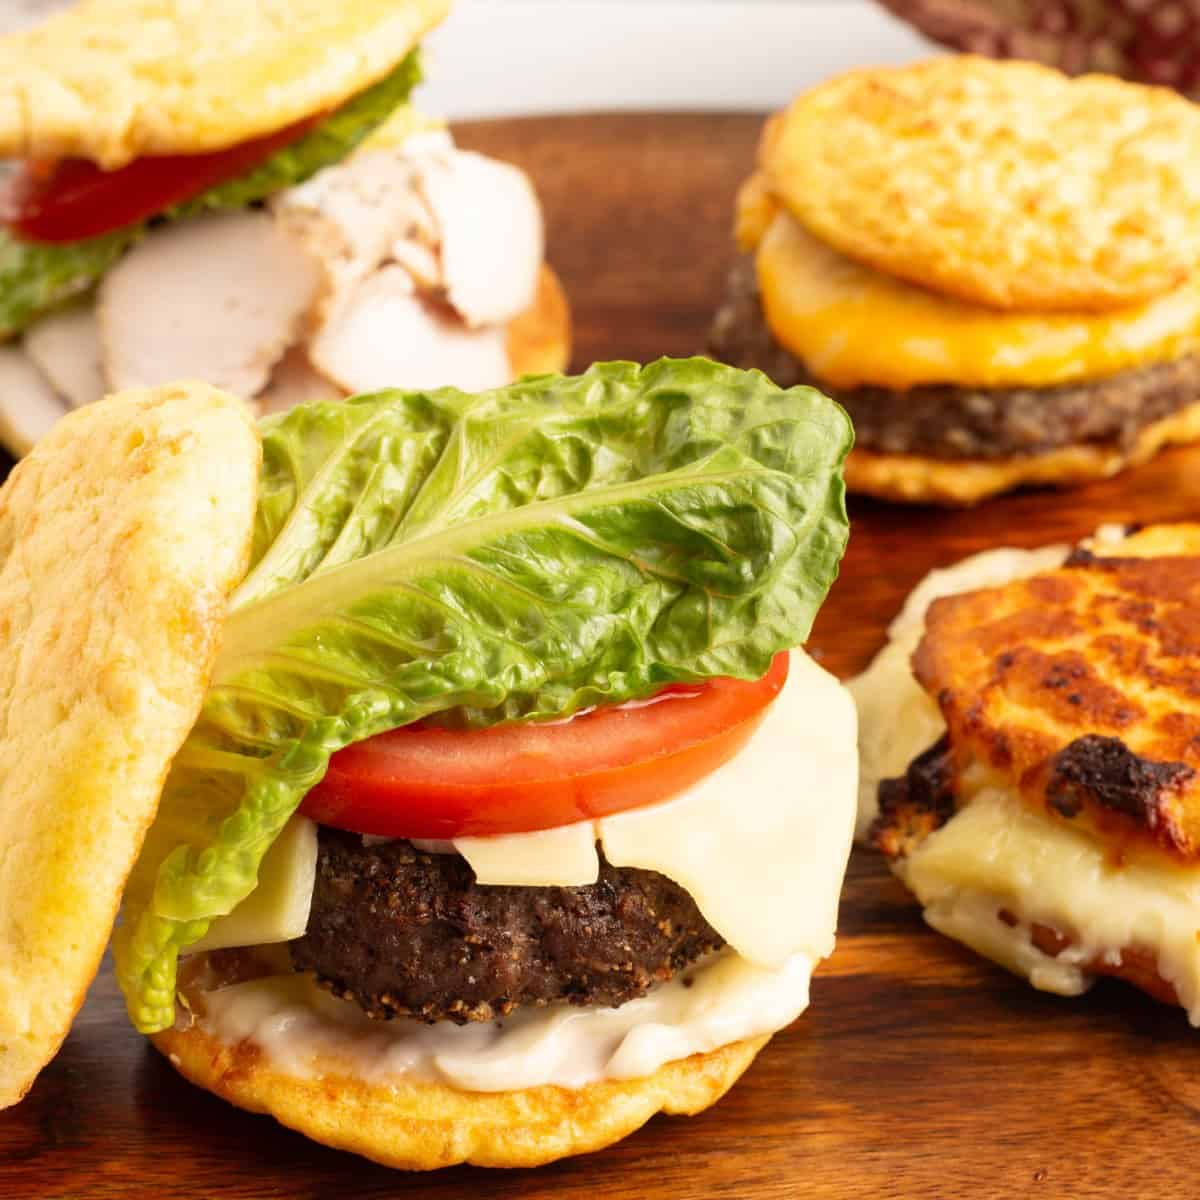
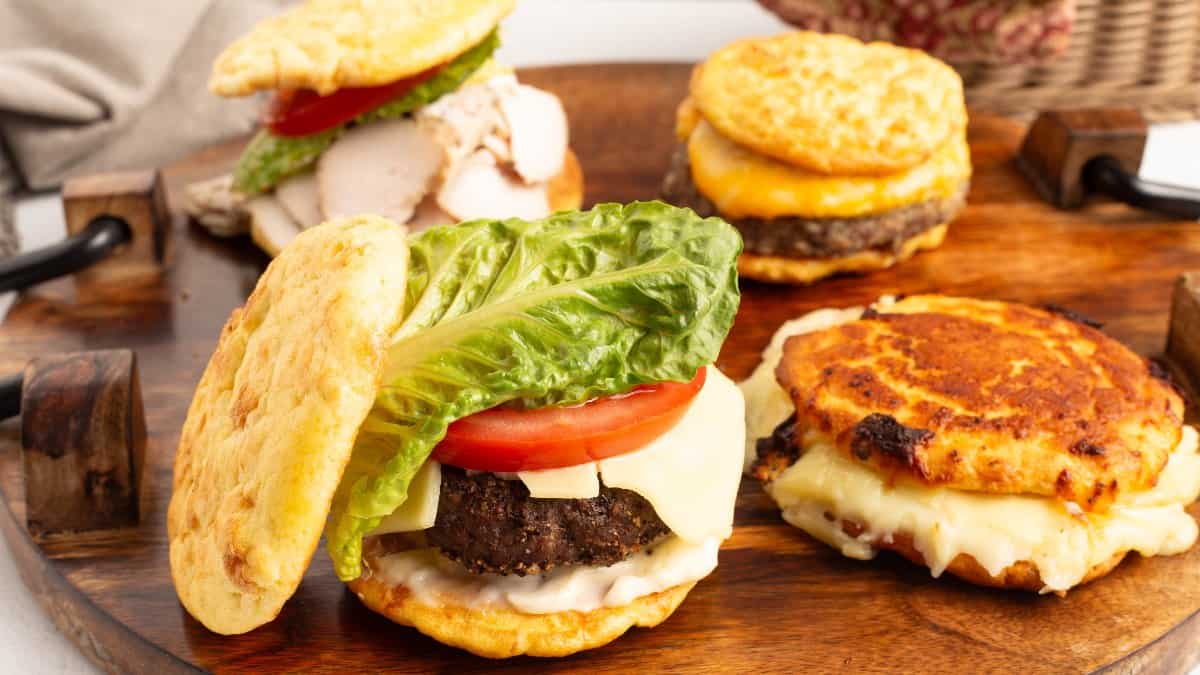
If you eat low carb, bread is usually the thing you miss the most. These Low Carb Burger Buns are my reinvented version of cloud bread, and they finally solve that problem. The original cloud bread never worked for me. It tasted eggy, it did not hold up to anything, and I honestly wrote it off as a gimmick. So when I started eating low carb again, I went back and reworked it with a few added ingredients, and the result is a bun sturdy enough to hold a juicy burger without any eggy flavor. You can even make grilled sandwiches with it!
Would you like to save this recipe?
The lift comes from whipped egg whites, and the structure comes from almond flour, a small amount of coconut flour, and shredded cheese. That combination is what turns cloud bread into something that actually behaves like bread. You blend the base in a cup blender, fold it into the whipped whites, scoop it onto a hot pan, and bake for 10 minutes. Start to finish it is about 25 minutes.
You can size these however you need them. A ¼ cup scoop gives you breakfast sandwich buns, and a ⅓ cup scoop gives you full burger buns. The first time I made these and ate a burger like an actual burger, it changed how I eat low carb. I make them all the time now, and I think you are going to feel exactly the same way.
Suggested Kitchen Tools for Low Carb Burger Buns
- Stand mixer or hand mixer (for whipping the egg whites)
- Large mixing bowl (for the egg whites)
- Small mixing bowl (for the yolks)
- Cup blender, personal blender, or bullet style blender
- Light colored metal baking sheet
- Silicone spatula (for folding)
- Metal spatula (for lifting the baked buns)
- ¼ cup and ⅓ cup dry measuring cups
Ingredients & Substitutions
This recipe uses just a handful of low carb staples, and each one is doing a specific job. Let's take a closer look at each ingredient.
Eggs
Used in Recipe: You need 4 large eggs total. Three get separated, with the 3 whites whipped for lift and the 3 yolks going into the blender. The 4th egg goes into the blender whole.
What it Does: The whipped whites are the entire reason these buns rise and hold their shape, and the yolks and whole egg add richness and bind the batter. Room temperature eggs separate more easily, though cold eggs work fine. Be careful not to let any yolk slip into the whites, because even a trace of fat will keep them from whipping up properly.
Substitutions: Stick with whole large eggs here. There is no good substitute, since the whipped whites are what make this recipe work at all.
Almond Flour
Used in Recipe: 6 tablespoons of almond flour go into the blender with the other dry ingredients.
What it Does: Almond flour is the main structure in these buns. It gives them enough body to slice and hold a burger without adding many carbs, and it keeps the texture tender rather than rubbery.
Substitutions: Blanched fine almond flour gives the smoothest texture. Almond meal will work but produces a coarser, more speckled bun. Sunflower seed flour can be used for a nut free version, though the buns may take on a slight green tint from a natural reaction with the eggs.
Coconut Flour
Used in Recipe: Just 1 tablespoon of coconut flour goes in with the almond flour.
What it Does: This small amount is what gives the buns body and a real bread-like texture. Coconut flour absorbs a lot of moisture, so a little goes a long way. I promise these do not taste like coconut at this amount, but if you add more they absolutely will.
Substitutions: Do not increase the amount or swap in more almond flour to replace it, because the texture will suffer. If you have to leave it out, expect a softer, more delicate bun. Oat fiber is the closest substitute if you have it on hand.
Shredded Cheese
Used in Recipe: ¼ cup of shredded cheese goes into the blender with the wet ingredients.
What it Does: Cheese adds structure, flavor, and a little fat, which keeps the buns from tasting flat or eggy. It is one of the additions that separates these from traditional cloud bread.
Substitutions: Sharp cheddar, a Fiesta blend, or mozzarella all work well, so use whatever you have. I would stay away from parmesan, since it does not give the same body to the finished bun.
Salt and Water
Used in Recipe: ¼ teaspoon of fine grind sea salt and 2 tablespoons of water go into the blender.
What it Does: The salt keeps the buns from tasting flat, and the water loosens the batter to about the consistency of a runny cornbread batter so it folds smoothly into the whipped whites without deflating them.
Substitutions: Kosher salt works at the same measurement. If you only have table salt, cut the amount in half since it is finer and packs more salt per teaspoon.
Optional Toppings
What it Does: Toppings give the buns that finished, bakery style look and add a little texture on top. Purely optional, but they make a real difference in how the buns look on a plate.
Substitutions: Everything bagel seasoning, poppy seeds, dried minced onion, or a little flaky sea salt all work beautifully.
How to Make Low Carb Burger Buns
From start to finish these take about 15 minutes of prep and 10 minutes of baking. The technique matters more than the ingredient list here, so here is everything you need to know!
Get Everything Ready and Separate the Eggs
- Set out 4 large eggs. Room temperature eggs separate more easily.
- Measure out 6 tablespoons of almond flour, 1 tablespoon of coconut flour, and ¼ teaspoon of fine grind sea salt.
- Shred or measure ¼ cup of cheese.
- Measure 2 tablespoons of water.
- Have your cup blender, a large mixing bowl, a small bowl, and your hand mixer or stand mixer ready.
- Have a ¼ cup or ⅓ cup measuring cup ready for scooping, depending on what size buns you want.
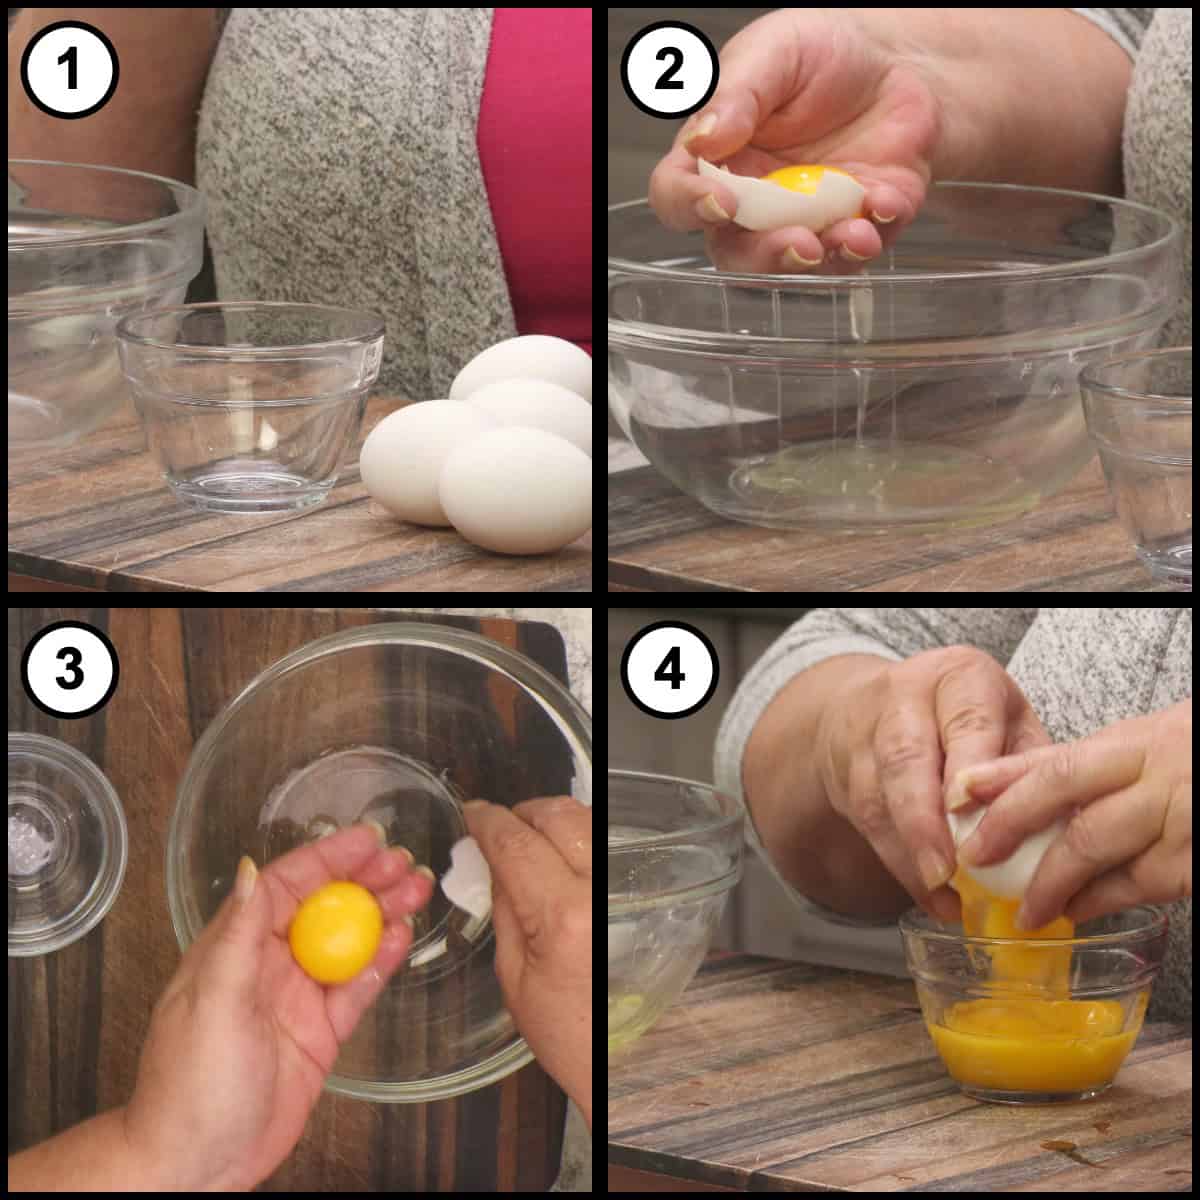
Once everything is measured out, separate 3 of the 4 eggs, putting the 3 whites into a large mixing bowl and the 3 yolks into a separate small bowl. Crack the 4th egg into the bowl with the yolks, whole. Work carefully so no yolk gets into the whites. Even a small amount of fat will keep the whites from whipping up, and that is the whole foundation of this recipe.
Whip the Egg Whites to Stiff Peaks
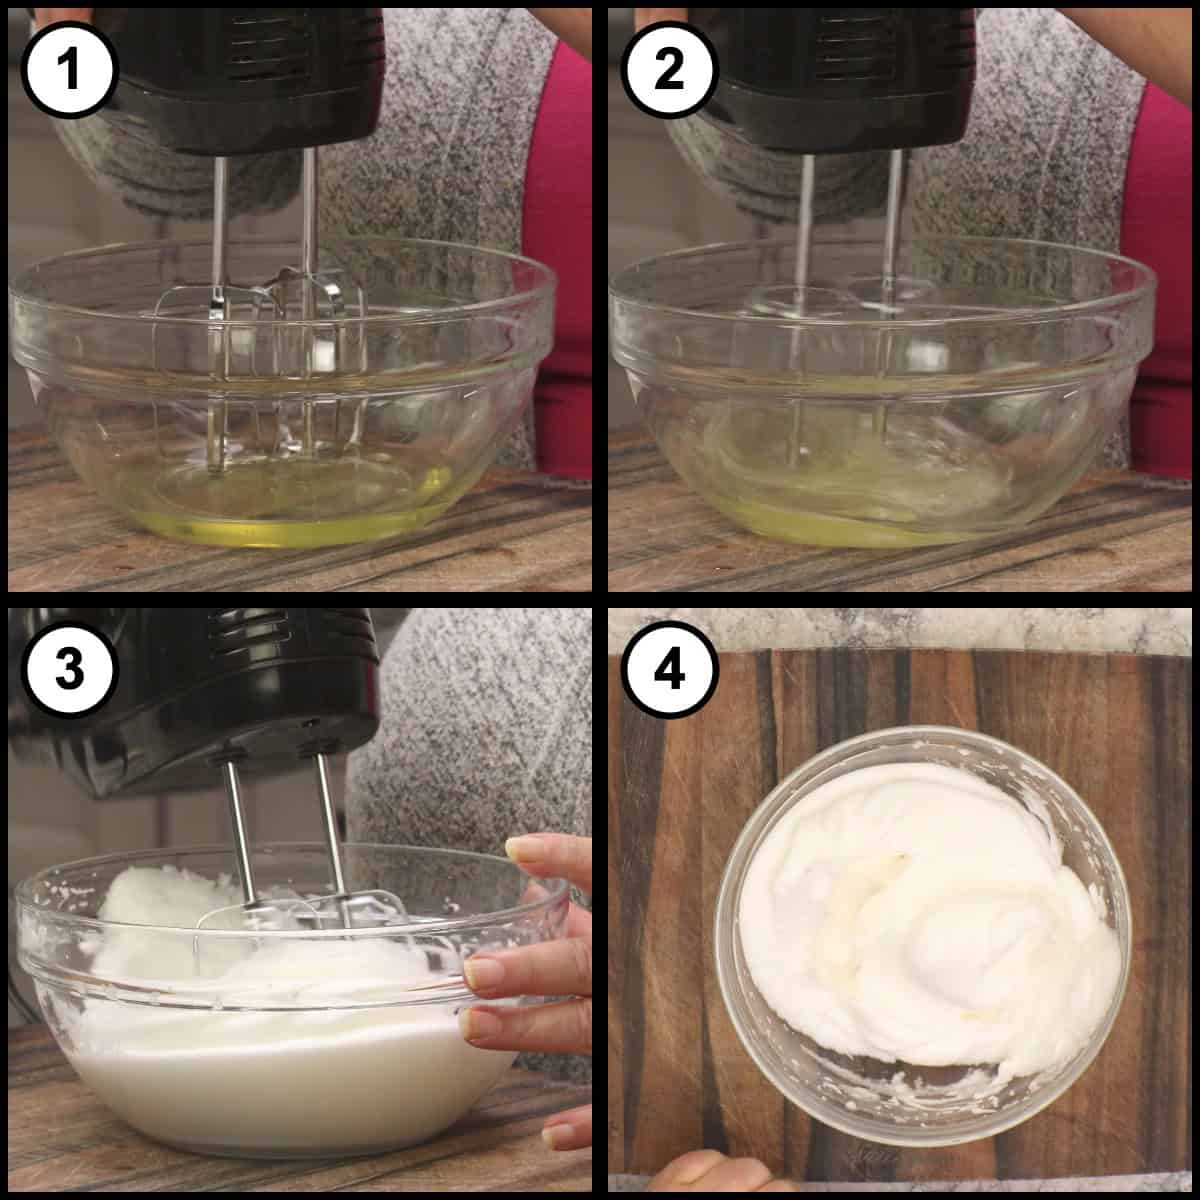
Using a stand mixer or a hand mixer, beat the 3 egg whites until they hold stiff peaks. Start on low and work your way up to high. You will watch them go from loose and liquid, to foamy, to thick and glossy. It only takes a few minutes. You will know they are ready when they stand up on the beater as you lift it out. They do not need to be super stiff or dry. Set the whipped whites aside.
Quick Tip
Make sure your bowl and beaters are completely clean and dry before you start. Any trace of fat or water will keep the whites from whipping up, and that is the number one reason this recipe fails for people. Glass or metal bowls work better than plastic here, since plastic holds onto oils.
Preheat the Oven and the Pan
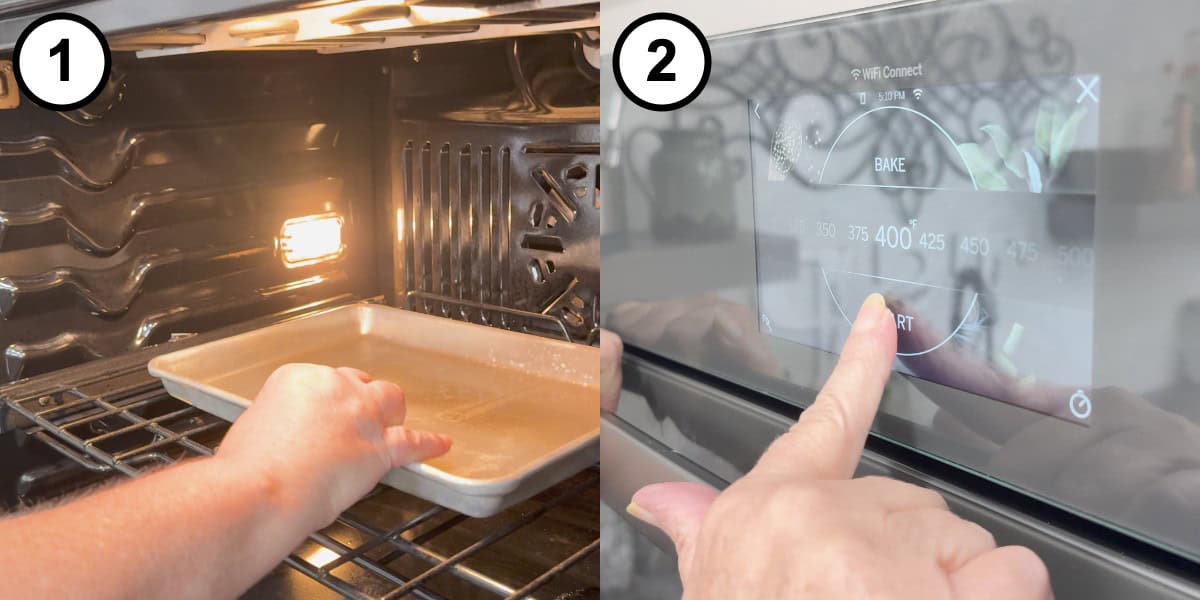
Preheat the oven to 400℉/205℃ and put your baking sheet in the oven while it heats. I like to use a light colored metal tray and bake directly on the pan with no parchment paper. Preheating the pan helps the bottoms set the moment the batter hits it, which gives you a better shaped bun.
Add the Ingredients to the Blender Cup
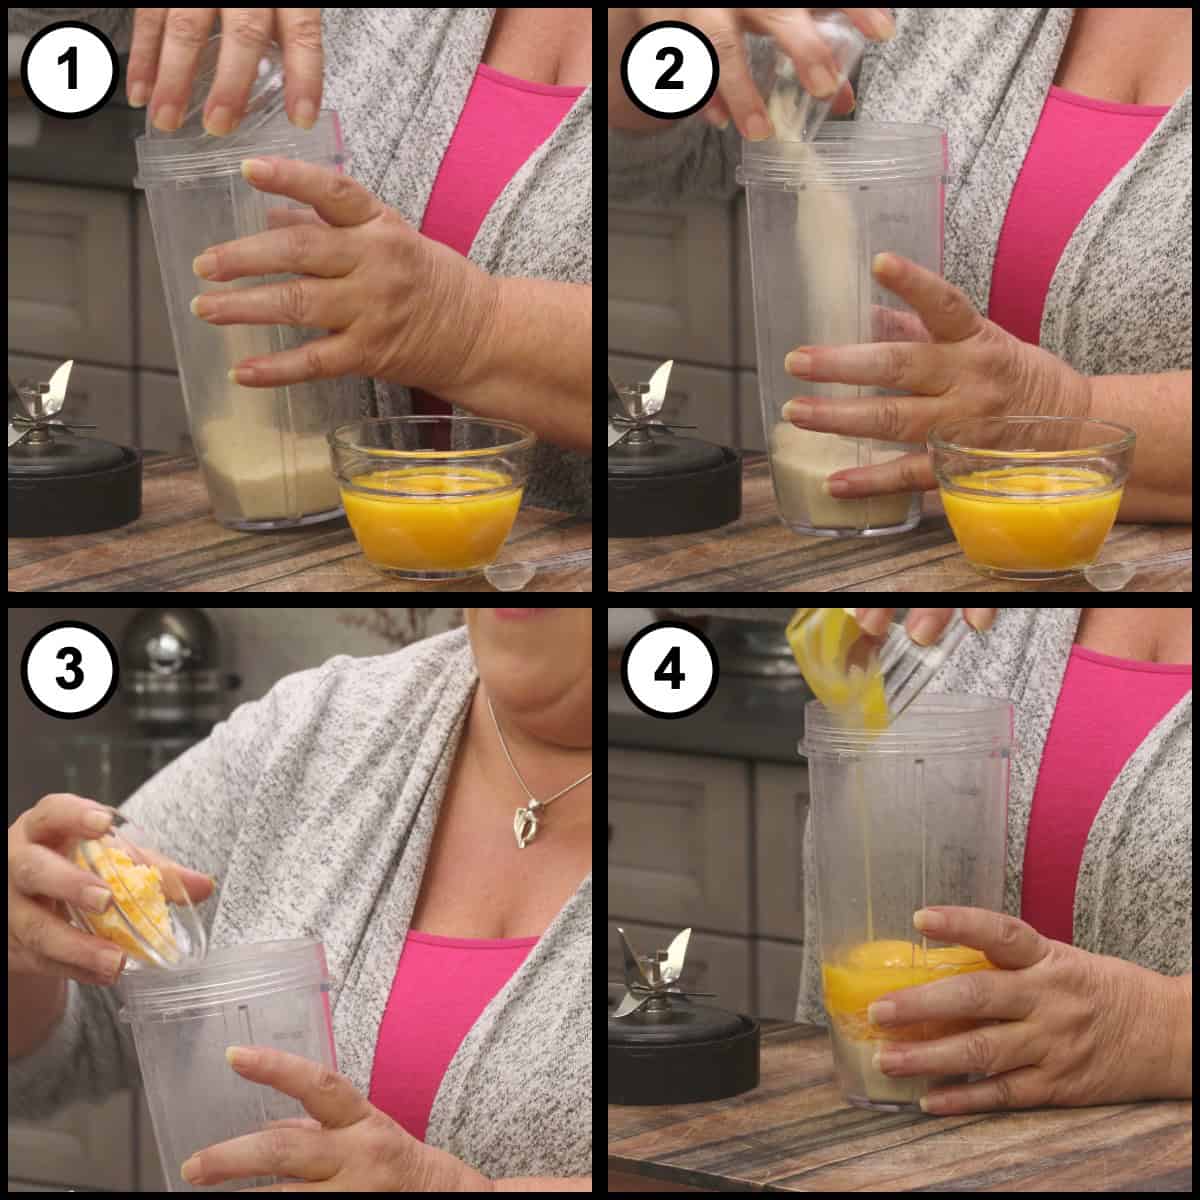
Add everything to a cup blender in this order so nothing gets stuck around the blade: dry ingredients first, then the cheese, then the eggs, then the water. So that is 6 tablespoons of almond flour, 1 tablespoon of coconut flour, ¼ teaspoon of sea salt, ¼ cup of shredded cheese, the 3 reserved egg yolks, the 1 whole egg, and 2 tablespoons of water.
Quick Tip
Layering the blender in this order really does matter. If you put the wet ingredients in first, the dry ingredients pack down around the blade and you end up scraping the blender instead of blending. Dry on the bottom, cheese next, then eggs, then water on top.
Blend and Pour into the Egg Whites
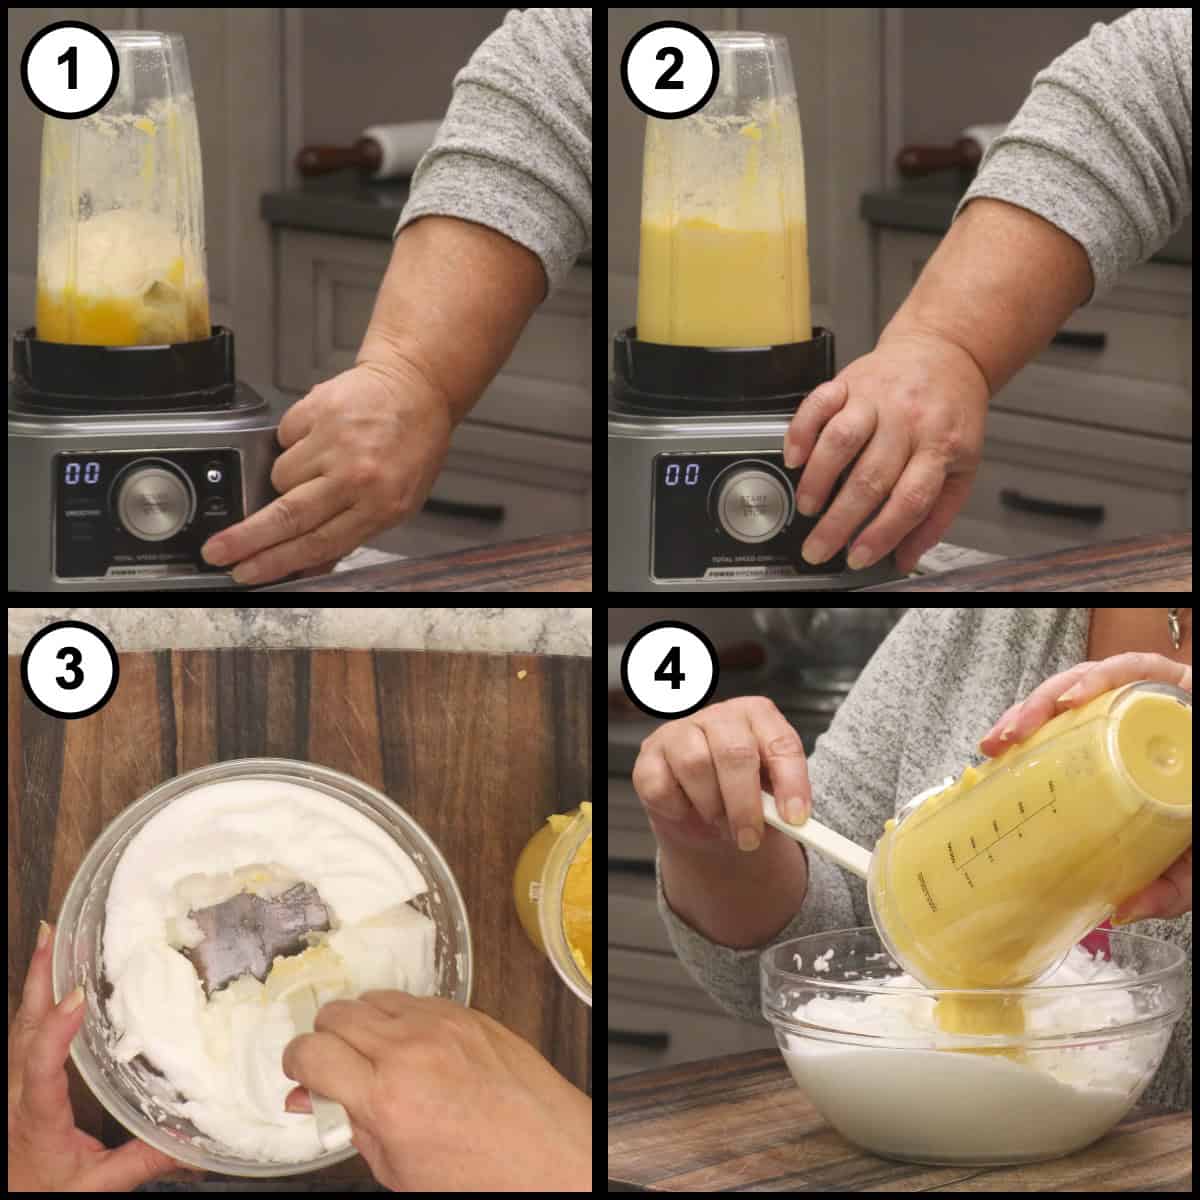
Pulse blend just until combined. It will look like a slightly runny cornbread batter, which is exactly what you want. Instead of dirtying another bowl, make a small well in the center of the whipped egg whites and pour the blended mixture right into that opening. Do not dump it over the top or you will deflate the whites immediately.
Fold the Batter into the Egg Whites
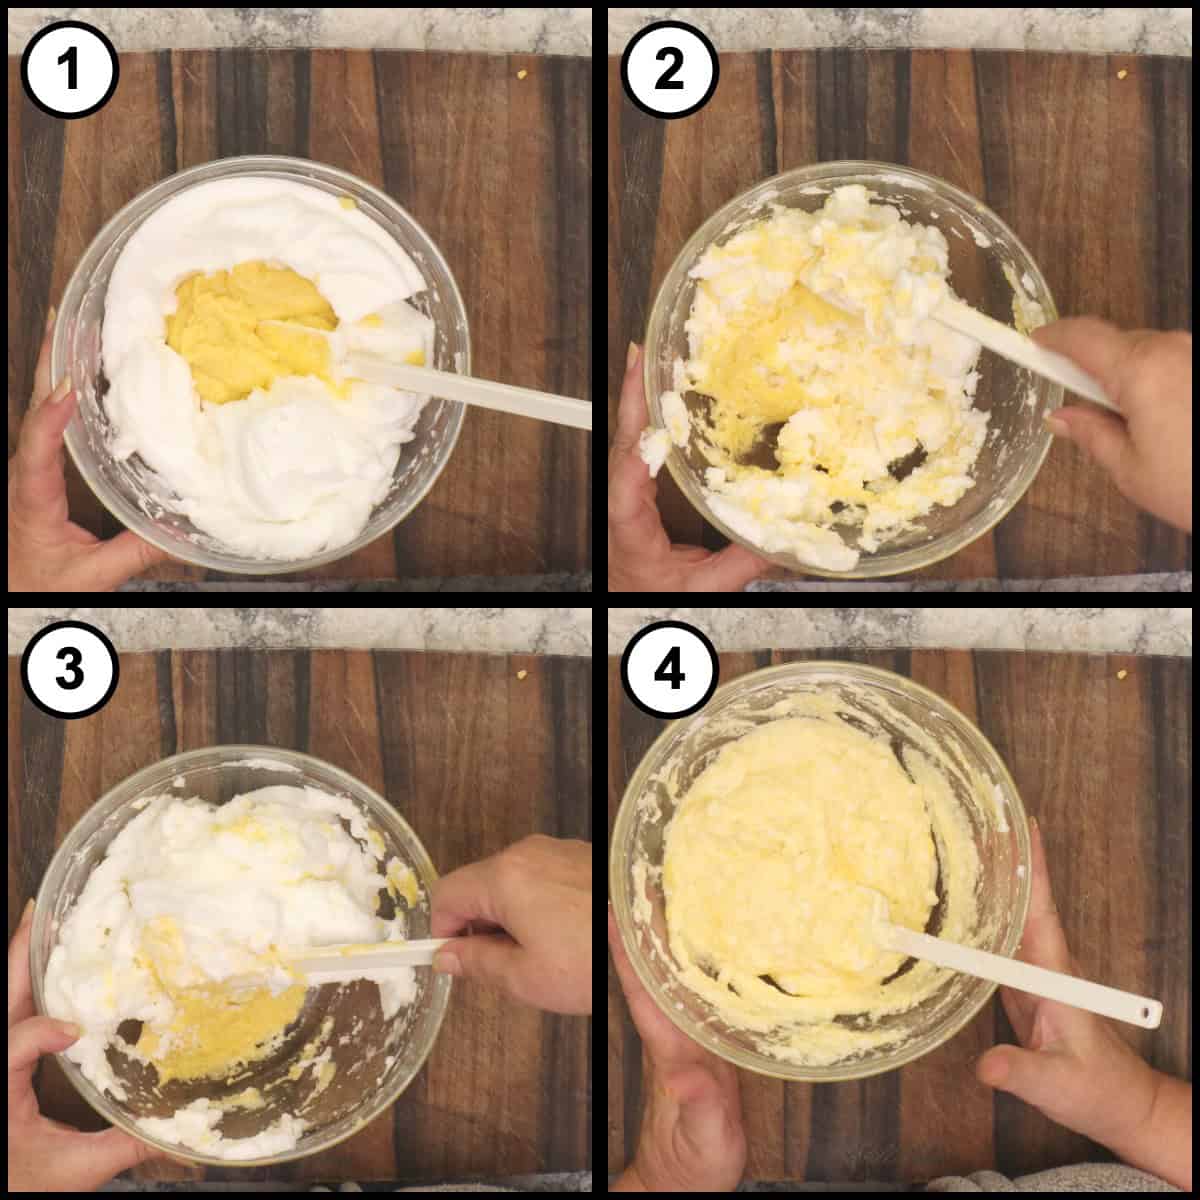
This is the part that matters the most, so go gently. Fold by going down to the bottom of the bowl, lifting up, and bringing the mixture back over. Repeat gently until the streaky yellow batter turns into a smooth pale batter and most of the whites are worked in. A few light streaks are perfectly fine. You are trying to keep as much air in those whites as possible.
Scoop and Bake the Buns
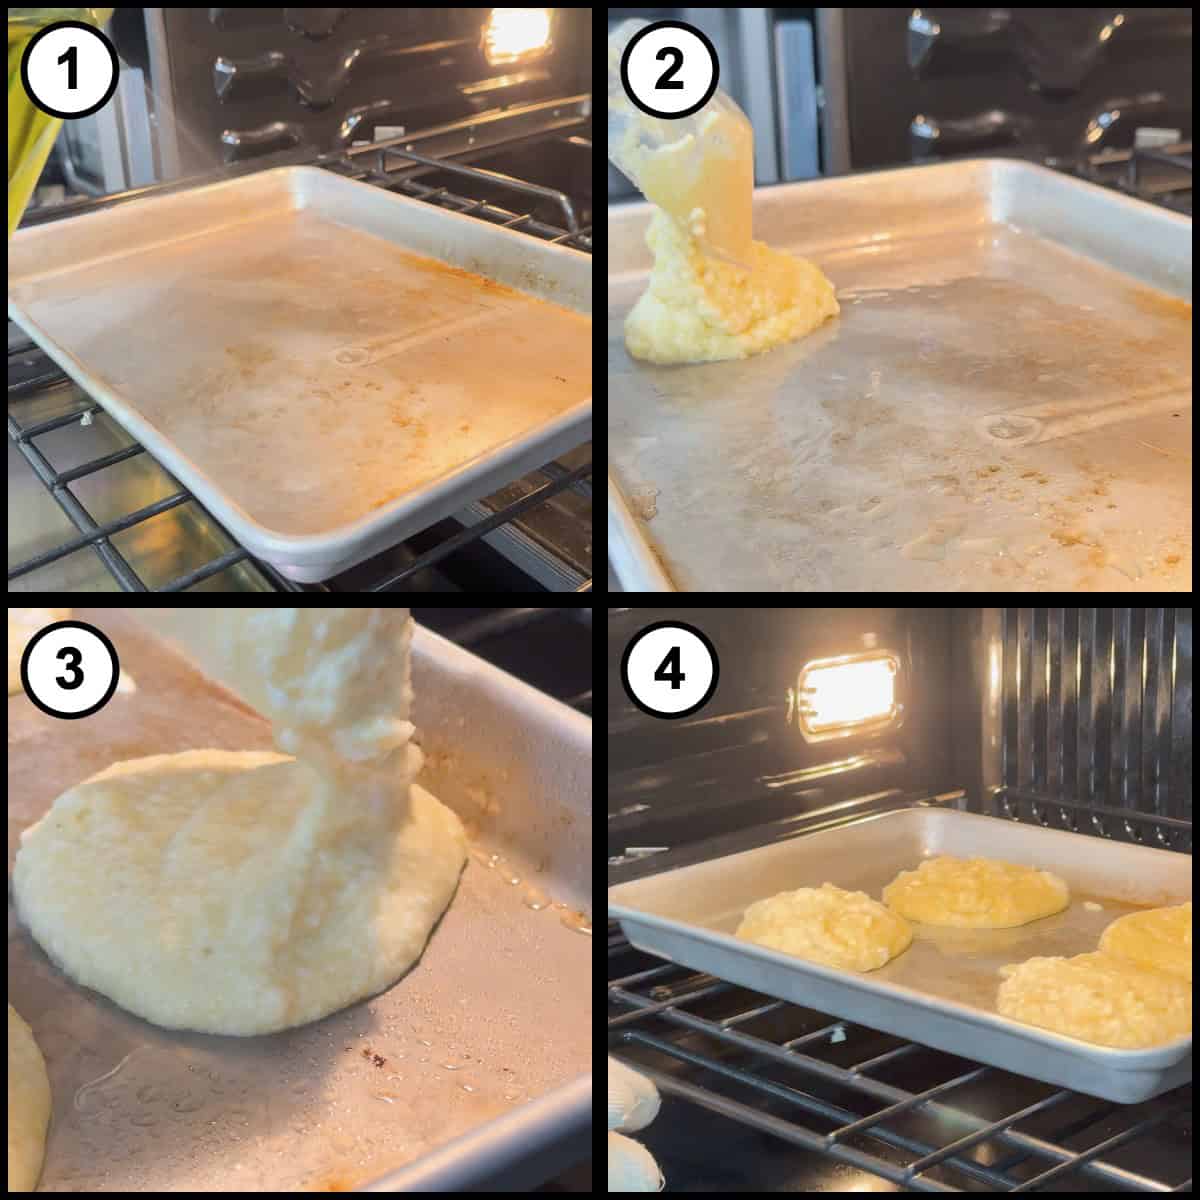
Carefully take the hot pan out of the oven and lightly grease it. Scoop the batter onto the pan, leaving space between each one, and let each scoop settle into a round bun shape. Use a ¼ cup measure if you are making breakfast sandwich or small sandwich size buns, or a ⅓ cup measure if you want full burger buns. Sprinkle on sesame seeds or any topping you like now, before they go in the oven. Bake for 10 minutes.
Cool the Buns on a Rack
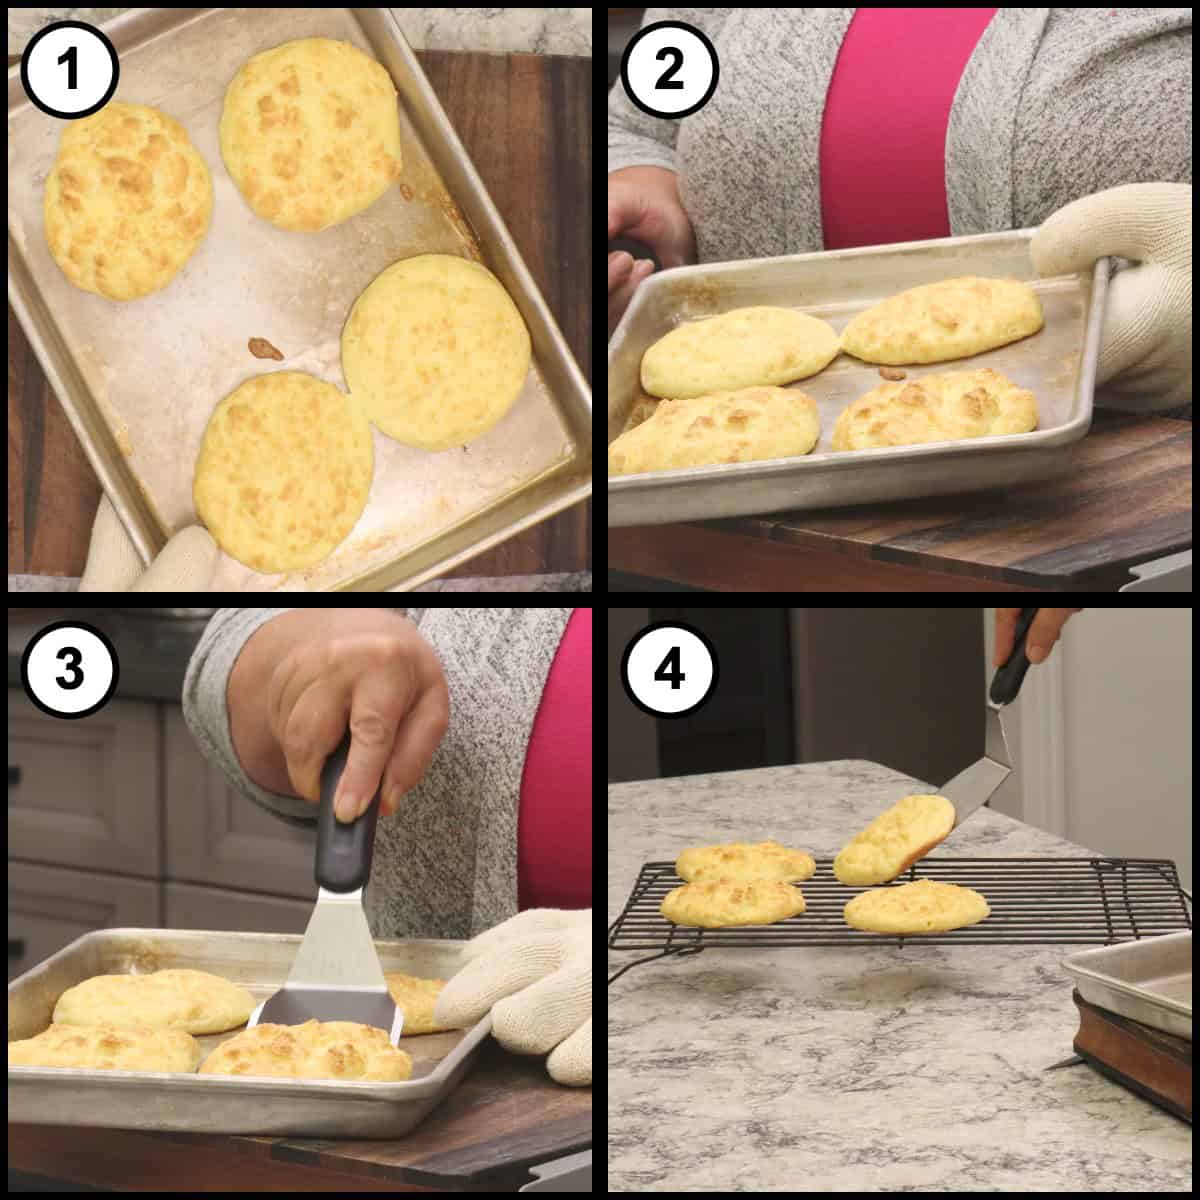
Take the pan out of the oven when the buns are golden. Slide a metal spatula underneath and lift the buns right off the pan. They release beautifully. Move them to a wire rack and let them cool for a few minutes before slicing, because cooling is what lets them set up and firm into a sturdy bun.
Build Your Burger
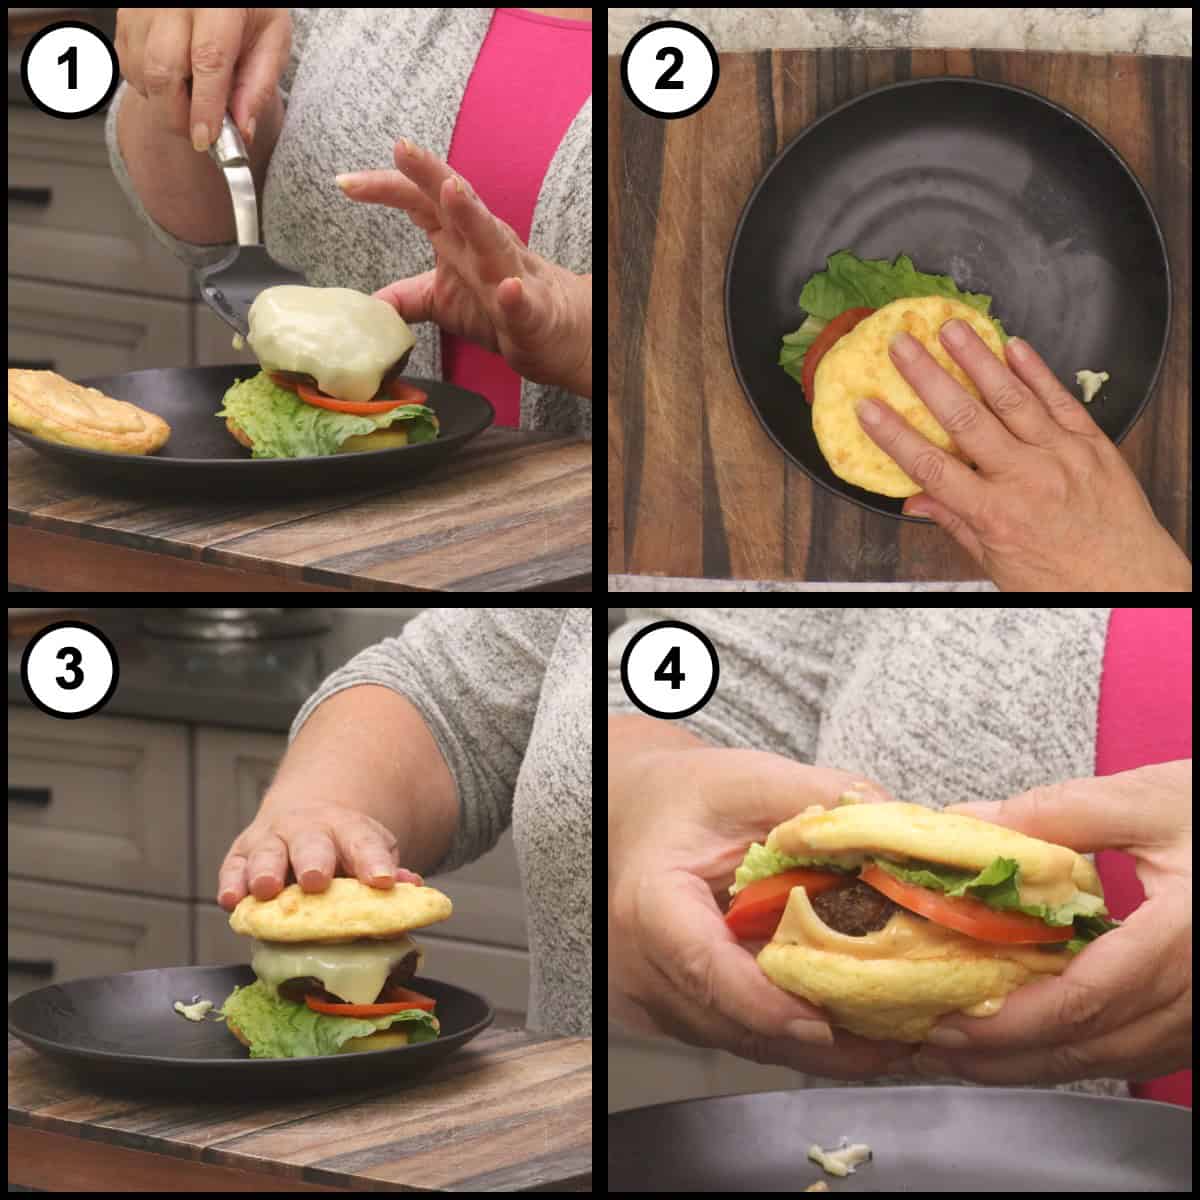
build your burger with 2 "buns" a hot patty, melted cheese, lettuce, tomato, pickles, onions, and whatever special sauce you love. Press the top bun on and pick the whole thing up to eat it like you would any burger with a "bread based bun and that is the part I think you are going to love most.
Alternate Cooking Instructions
- Stovetop: You can cook these in a skillet over medium heat, flipping them partway through like a pancake. They work, but they come out noticeably flatter, with both the top and the bottom flattened out. If you want a taller bun that looks like a real burger bun, the oven is the better choice.
- Ninja Combi: The Combi does a great job with these. I use the Toast function rather than a bake setting so the bottom pan is cooking the bottom and then the upper element switches on to cook from the top down. I also preheat the pan by letting the toast function run for a few minutes before adding the bun batter. I use medium toast for about 8 minutes, but timing can vary.
- Toaster oven or countertop oven: Follow the oven method exactly, preheating both the unit and the pan to 400℉/205℃ and baking for 10 minutes. Smaller countertop ovens can cook faster so start checking at 8 minutes.
- Different shapes and sizes: The batter is flexible. Make them smaller for sliders or dinner rolls, or shape them long and narrow so they wrap around a sausage or hot dog. Adjust the bake time down slightly for smaller portions.
Storage & Reheating Instructions
How to Store Leftover Low Carb Burger Buns
Let the buns cool completely before storing so they finish setting up and do not steam themselves soft in the container.
- Refrigerator: Store cooled buns in an airtight container in the refrigerator for up to 4 days.
- Freezer: Freeze the cooled buns in a single layer first, then transfer them to an airtight container or freezer bag for up to 2 months. Freezing them flat first keeps them from sticking together.
- Room Temperature: These are best refrigerated because of the eggs and cheese, but they will hold at room temperature for a few hours if you are serving them the same day.
Quick Tip
Slice the buns before you freeze them. That way you can pull out exactly what you need and drop the halves straight into the toaster without waiting for the whole bun to thaw. It makes a weekday breakfast sandwich about a two minute job.
How to Reheat Low Carb Burger Buns
- Oven: Warm the buns in a 300℉/150℃ oven or toaster oven for 3 to 5 minutes until heated through.
- From frozen: Let the buns thaw at room temperature first, then toast or warm them using either method above.
Frequently Asked Questions
Traditional cloud bread is really just whipped egg whites and a little cream cheese, which is why so many people find it eggy and floppy. I added almond flour, coconut flour, and shredded cheese, and those three additions are what give these buns actual body and a bread-like texture. They hold up to a full burger without falling apart, which regular cloud bread never did for me.
Fat prevents egg whites from whipping up properly. Even a small amount of yolk will keep the whites from reaching stiff peaks, and since the whipped whites are what give these buns all of their lift and structure, the whole recipe depends on getting that step right. Separate each egg into a small bowl first and then transfer the white over, so one broken yolk does not ruin the whole batch.
I would not do either. That 1 tablespoon is what gives these buns body and the texture of real bread, so leaving it out gives you a much softer, more delicate bun. Adding more is worse, because coconut flour absorbs a lot of moisture and at higher amounts the buns will actually start to taste like coconut. At 1 tablespoon they do not taste like coconut at all.
Whatever you have on hand. I have used sharp cheddar and a Fiesta blend, and mozzarella works well too. The one I would steer you away from is parmesan, because it does not give the same body to the finished bun. Any standard shredded melting cheese will do the job.
It depends on what you are building. A ¼ cup scoop is perfect for a breakfast sandwich or a smaller sandwich. If you want a full burger bun, go up to a ⅓ cup measure per bun. You can also make them smaller for sliders or shape them longer so they wrap around a sausage.
You can, and they will taste the same, but they come out much flatter. When you cook them in a skillet and flip them, both the top and the bottom end up flattened. The oven gives you a taller, more rounded bun that looks and functions more like a real burger bun, which is why I prefer it.

Low Carb Burger Buns
Equipment
- Stand mixer or hand mixer
- Large Mixing Bowl
- Small mixing bowl
- Cup blender (personal or bullet style blender)
- Light colored metal baking sheet
- Silicone spatula
- Metal spatula
- ¼ cup and ⅓ cup dry measuring cups
Ingredients
- 4 large eggs, divided ( 3 separated and 1 whole) room temperature eggs separate more easily; save the yolks for the blender
Dry Ingredients
- 6 tablespoon almond flour blanched fine almond flour works best
- 1 tablespoon coconut flour do not add more; too much will make the buns taste like coconut
- ¼ teaspoon fine grind sea salt or kosher salt
Cheese and Wet Ingredients
- ¼ cup shredded cheese sharp cheddar, a Fiesta blend, or mozzarella all work; avoid parmesan
- 3 large egg yolks the yolks reserved from separating the eggs above
- 1 large egg whole egg, added on top of the 3 separated eggs
- 2 tablespoon water
Optional Topping
- sesame seeds or everything bagel seasoning, poppy seeds, or flaky salt
Would you like to save this recipe?
Instructions
- Set out 4 large eggs. Room temperature eggs separate more easily, though cold eggs straight from the refrigerator are fine too. Separate 3 of the eggs, putting the 3 whites into a large mixing bowl and the 3 yolks into a separate bowl. Crack the 4th whole egg in with the yolks. Be careful not to let any yolk slip into the whites, because even a little fat will keep them from whipping up.4 large eggs, divided ( 3 separated and 1 whole)
- Using a stand mixer or a hand mixer, beat the 3 egg whites until they hold stiff peaks. Start on low and work your way up to high. This only takes a few minutes. The whites are ready when they stand up on the beater; they do not need to be super stiff. This step is what gives these buns their lift and their bread-like structure, so do not skip it or rush it. Set the whipped whites aside.
- Preheat the oven to 400℉/205℃ and put the baking sheet you plan to use in the oven while it heats. A light colored metal sheet works best here, and you want to bake directly on the pan with no parchment paper. Preheating the pan gives the bottoms a better set the moment the batter hits it.
- Add the ingredients to a cup blender in this order so nothing gets stuck around the blade: dry ingredients first, then the cheese, then the eggs, then the water. Add 6 tablespoons of almond flour, 1 tablespoon of coconut flour, ¼ teaspoon of fine grind sea salt, ¼ cup of shredded cheese, the 3 reserved egg yolks, the 1 whole egg, and 2 tablespoons of water.6 tbsp almond flour, 1 tbsp coconut flour, ¼ tsp fine grind sea salt, ¼ cup shredded cheese, 3 large egg yolks, 1 large egg, 2 tbsp water
- Pulse blend just until combined. The batter will look a little like a runny cornbread batter. That is exactly right.
- This next part matters the most, so go gently. Make a small well in the center of the whipped egg whites and pour the blender mixture right into that center rather than dumping it over the top, which would deflate the whites. Fold by going down to the bottom of the bowl, lifting up, and bringing the batter back over. Repeat gently until most of the whites are worked in. A few light streaks are fine. You are trying to keep as much air in the whites as possible.
- Carefully remove the hot pan from the oven and lightly grease it. Scoop the batter onto the pan, leaving room between each one. Use a ¼ cup measure for breakfast sandwich or small sandwich size buns, or a ⅓ cup measure for full burger buns. Sprinkle with sesame seeds or any topping you like.sesame seeds
- Bake for 10 minutes, until puffed and golden.
- Slide a metal spatula underneath and lift the buns right off the pan. They release easily. Let them cool for a few minutes before using them.
Notes
• Let the eggs come to room temperature if you have time. They separate more easily and the whites whip to a better volume.
• Separate each egg into a small bowl first, then transfer the white to the mixing bowl. That way one broken yolk does not ruin the whole batch.
• Make sure your mixing bowl and beaters are completely clean and dry. Any trace of fat or water will keep the whites from whipping properly.
• Preheat the baking sheet in the oven while it is preheating. The batter sets faster on a hot pan and the bottoms come out better. EGG WHITE TIPS
• Start the mixer on low and gradually increase to high. Going straight to high makes larger, less stable bubbles.
• Stiff peaks means the whites stand up on the beater when you lift it out. They do not need to be dry or over beaten.
• Fold, never stir. Go down to the bottom of the bowl, lift up, and fold the mixture over. Stirring knocks the air out and gives you flat buns.
• Pour the blender mixture into a well in the center of the whites instead of over the top. Dumping it on top deflates them immediately. COOKING TIPS
• Use a light colored metal baking sheet and skip the parchment paper. Parchment keeps the bottoms from setting the way you want.
• A ¼ cup scoop makes breakfast sandwich size buns. A ⅓ cup scoop makes full burger buns.
• Leave space between the scoops. They spread a little as they bake.
• Add sesame seeds or any topping before the buns go into the oven, not after.
• Let the buns cool for a few minutes after baking. Cooling is what lets them set up and firm into a sturdy bun. STORAGE
• Refrigerator: Store cooled buns in an airtight container in the refrigerator for up to 4 days.
• Freezer: Freeze cooled buns in a single layer, then transfer to an airtight container or freezer bag for up to 2 months. NUTRITIONAL DISCLAIMER
Nutritional information provided is an estimate based on typical ingredient values and standard portion sizes. Actual nutritional content may vary significantly depending on specific brands used, ingredient substitutions, preparation methods, portion sizes, and individual cooking techniques. For precise nutritional information tailored to your specific ingredients and preparation, please consult with a registered dietitian or use laboratory analysis. This information should not be used for medical nutrition therapy or to manage medical conditions without professional guidance.
Nutrition
Variations
- Change the cheese: Sharp cheddar gives the most flavor, mozzarella gives the mildest and stretchiest result, and a Fiesta blend adds a little color and a touch of spice. Skip the parmesan.
- Everything bagel buns: Sprinkle everything bagel seasoning over the tops before baking for a bun that tastes like an everything bagel.
- Sausage wraps: Shape the batter long and narrow instead of round so the finished bread wraps around a sausage or hot dog.
- Slider size: Use a heaping tablespoon per portion for slider buns or low carb dinner rolls. Start checking them a couple of minutes early since they bake faster.
- Herb and garlic: Add ¼ teaspoon of garlic powder or a pinch of dried Italian herbs to the blender for a savory dinner roll style bun.
- Breakfast size batch: Use the ¼ cup scoop and make a double batch on the weekend so you have breakfast sandwich buns ready all week.
More Low Carb Recipes
These buns are built to carry a burger, so the obvious pairing is a great patty with lettuce, tomato, pickles, onions, and your favorite special sauce. They are just as good holding a breakfast sandwich with egg, cheese, and bacon or sausage. If they are making low carb feel a whole lot easier, here are a few more recipes from The Salted Pepper that I come back to again and again. Give them a try and let me know which one becomes your favorite!


About the Recipe Author, Louise Long
Louise is a full-time recipe creator and food blogger @ The Salted Pepper. She has over 30 years of experience with cooking and recipe development. She owned a restaurant for several years and was a full-time RN until retiring to blog full-time.

She published her first cookbook in the Fall of 2018 and is very interested in writing several more.
Louise is also the creator of an online Ninja Foodi Pressure Cooking Course with over 100 instructional step-by-step videos. People absolutely rave about the course and all the value they have received from it.
Louise has several very active Facebook groups that help people with the basics of cooking and learning more about the appliances they love.
Ninja Foodi Pressure Cooker & Air Crisper 101
Ninja Woodfire Outdoor Grill & Smoker
Louise is also a YouTube creator and you can find most of her recipes in video format on The Salted Pepper YouTube channel.
She is very responsive to messages and eager to help in any way she can. Get more Information about Louise & contact information
I WOULD LOVE TO SEE WHAT YOU ARE COOKING UP IN YOUR KITCHEN! TAG ME @THESALTEDPEPPER ON YOUR FAVORITE SOCIAL MEDIA PLATFORM WHEN YOU MAKE A DISH!
BE SURE TO FOLLOW THE SALTED PEPPER RIGHT HERE ⇓⇓⇓⇓⇓
Leave a Reply