
- Instant Pot
This Triple Chocolate Cheesecake is a chocolate lover's dream! It's easy to make right in the pressure cooker and tastes absolutely amazing!
Would you like to save this recipe?
The first time someone asked me to make a chocolate cheesecake, I was really on the fence about it. Chocolate and cream cheese just didn't sound good to me at all. I'm not a huge fan of cheesecake in the first place, but this combination of flavors was odd to me.
This post may contain affiliate links. If you make a purchase after clicking a link, I may earn a small commission. As an Amazon Associate, I earn from qualifying purchases.
I'm so glad that I gave it a try anyway, because it is fantastic! It reminds me a little of a chocolate mousse covered in ganache. It's rich, it's chocolatey, and it's fun to make!
What are the Benefits to Making Cheesecake in a Pressure Cooker?
Making cheesecake in a pressure cooker might seem like an odd choice, but it actually works very well and does same some time and a whole lot of hassle.
The best cheesecake recipes that are designed for the oven will call for a water bath, also called bain-marie. This will give the best results and prevent overbaked sides, curdled filling, and those cracks on top of your cheesecake.
This is because steam is produced which envelopes the cheesecake pan and helps regulate the heat around the cheesecake. It is a gentler cooking process than just dry heat.
To bake cheesecake in a water bath, you wrap your cheesecake pan in foil and set it into a large roasting pan. Fill the roasting pan with HOT water until it is about halfway up the sides of the cheesecake pan and then bake.
I've done it plenty of times and it's a hassle. So, I use the pressure cooker as the bain-marie or water bath and get the same great results in less time.
Tips for Making the BEST Cheesecake
Don't overbeat the batter!
This is probably the biggest mistake people make and it often leads to those dreaded cracks on top of your cheesecake.
Over beating or beating on too high of speed adds more air to the filling. While this might not sound like a big deal because what's wrong with an airy filling? The problem is the air rises to the top of the cheesecake as it cooks and ends up cracking the top of your cheesecake. Not the end of the world if you plan on covering it up with a decoration, but if you want a smooth top, don't overbeat the batter and mix on low or medium speed.
Use Room Temperature Ingredients!
All of the ingredients in your cheesecake filling need to be room temperature. This includes the eggs, cream cheese, sour cream if using, and in this Triple Chocolate Cheesecake, the chocolate needs to be melted and cooled slightly before using.
I've seen tons of suggestions for warming up cream cheese when you forget to take it out in advance and that is a recipe for disaster when it comes to cheesecake. If you try to warm your cream cheese in the microwave or even in a hot water bath, it will not all warm to the same temperature and you do not want to use hot or runny cream cheese. Inconsistently warmed cream cheese or cold creamed cheese can lead to a lumpy batter. The only way to fix that is over-beating and we already know that leads to cracks.
Make sure to take your cream cheese out at least 3-4 hours before you want to make your cheesecake. Do the same with the eggs and any other cold ingredients you are using.
If you forget to take your eggs out, you can put them in a bowl of hot water (not boiling) for about 30 minutes and that should do the trick.
Don't Overcook!
In the pressure cooking world, I often see cooking times that are way longer than they need to be.
When pressure cooking something delicate like this triple chocolate cheesecake, you want to use the least amount of pressure time as possible to have the cheesecake gently cooked.
It should be wobbly when it is removed from the pressure cooker and it continues to cook as you let it cool on the counter. Then it is placed in the refrigerator to chill completely.
Oftentimes, people think their cheesecake is underdone because the center is wobbly, so they pressure cook it longer. This can result in overcooked and tough edges, cracking, and a rubbery texture.
Follow the tested recipe times as long as you are using the same size pan.
Using the Wrong Pan!
The best pan for a cheesecake is a springform pan. There are a few styles of a springform pan, some push up from the bottom and some have a clasp on the side that is released when you want to get your cheesecake out.
Using a regular cake pan makes it very difficult to get the cheesecake out, but it can be used if you don't care about presentation. Make sure the cake pan has high enough sides to accommodate the cheesecake as it rises.
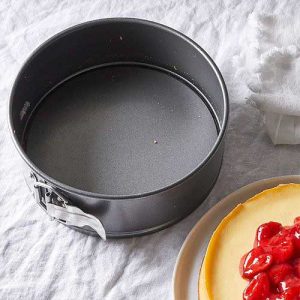
The size, quality, and material of the pan make a difference as well. The best cheesecake pan I've found that has held up after a full year of hard use, is from Pampered Chef. If you want a good quality springform pan that is the perfect size for electric pressure cookers, this is it!
(affiliate link)Pampered Chef Springform Pan
I used to make cheesecakes for a resturant I owned and I've tried the cheapos and they bent or rusted after a few uses. If you want a good pan that will last a long time, invest in the one from Pampered Chef or another high quality pan.
I haven't used the push up kind, so I can't say how well they work, but that is another option.
Since the color and materials of the pan also make a difference in cooking, you will want to pay attention to this and make the necessary adjustments.
If your pan is very thin and on the flimsy side, it will not insulate the cheesecake as well and cooking will vary. While I can say exactly what the adjustments should be, I would probably switch to low pressure instead of high pressure and increase the the time by a couple of minutes. If you use high pressure, you might want to decrease the time by a few minutes and do a full natural release so the the edges don't overcook.
Darker pans cook faster, so if you have a light-colored, heavy-duty springform pan, you may need to increase your PC time by a few minutes.
For more tips on baking and the differences between pan materials, please see this article below.
Tips & Tricks for Baking in the Ninja Foodi
The one thing to always keep in mind when choosing the right pan for your Triple Chocolate Cheesecake is the size. I used a 7.25" springform pan in this recipe and the ingredients are calculated based on that size.
If your springform pan is larger and you use the same amount of ingredients, your cheesecake will not have the height that this one does and it will also cook faster, so make sure to decrease your PC time by about 5 minutes.
You can also adjust the ingredients based on the size of your pan, for an 8" springform pan, I would increase all the ingredient amounts by 1½ and also adjust the PC time. I would probably switch to low pressure and PC for 27 minutes with a full NR. Keep in mind that I have not tested this recipe that way, so I am only estimating.
You can also do a Google search for a pressure cooker cheesecake that is using the same size springform pan as you have and use that as a guide.
Some 9" springform pans also fit in the pressure cooker and I would double the recipe for that size pan and also increase the time based on researching other cheesecake recipes made in the pressure cooker that use that size pan.
Is there a difference between using the Ninja Foodi Pressure Cooker & the Instant Pot Pressure Cooker?
I used the Ninja Foodi Pressure Cooker & Air Crisper in this recipe because it is my most favorite small appliance of all time! If you look at the recipes on my website, you can probably figure that out!
For the most part, you can use pressure cooker recipes in either the Ninja Foodi Pressure Cooker or any other electric pressure cooker and they will work just fine. There are some differences in PSI of various pressure cookers, but it's usually pretty minimal.
If you want to learn more about PSI and how that affects pressure cooking, please read this article: Pressure Cooking 101
It has also been said that each pressure cooker seems to cook slightly differently, I'm not sure how true this is, but there is definitely some variation in cooking the same recipe several times with the same pressure cooker and it's probably due to the gazillion variables with pressure cooking.
Not only does the size of the pan make a difference, the temperature of the water makes a difference as well. I see many people advising to heat the water that is added to the inner pot before pressure cooking to speed up the time to pressure.
While this may not make enough of a difference in a long cooking pork shoulder, it certainly does if food that is fast cooking like hard boiled eggs, pasta or rice. Time to pressure is cook time, so your food is cooking while the pot is coming to pressure.
If you start with hot water, the time to pressure is shortened and that means the overall cook time is shortened. In this recipe for Triple Chocolate Cheesecake, I suggest using cold water from the sink or room temperature water.
Another thing to keep in mind is if the recipe calls for 1 cup of water, don't add more than that. If you start with 2 cups of water because that is what you are used to doing, your time to pressure will increase and you might overcook your cheesecake.
How to Use Your Ninja Foodi or Instant Pot as a Double Boiler
The Ninja Foodi and Instant Pots are way more than just for pressure cooking! They can accomplish so many different things and becoming the perfect double boiler is one of them.
By using a combination of sear/sauté and the keep warm function, you can maintain the perfect temperature for melting chocolate and keeping it in the perfect state for dipping candy or using for decorating any kind of sweet treats.
I have a double boiler insert that I use most of the time when melting chocolate, but I can't seem to find one that is the same size as the one I have. If you get one that is too small, it won't do the job effectively, but the good news is you can use a glass mixing bowl instead!
The best size bowl is one that fits on the lip of the Ninja Foodi or Instant Pot inner pot, but my mixing bowl wasn't big enough, so I made some modifications and it worked great.
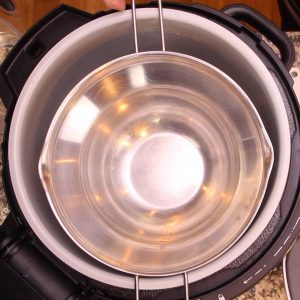
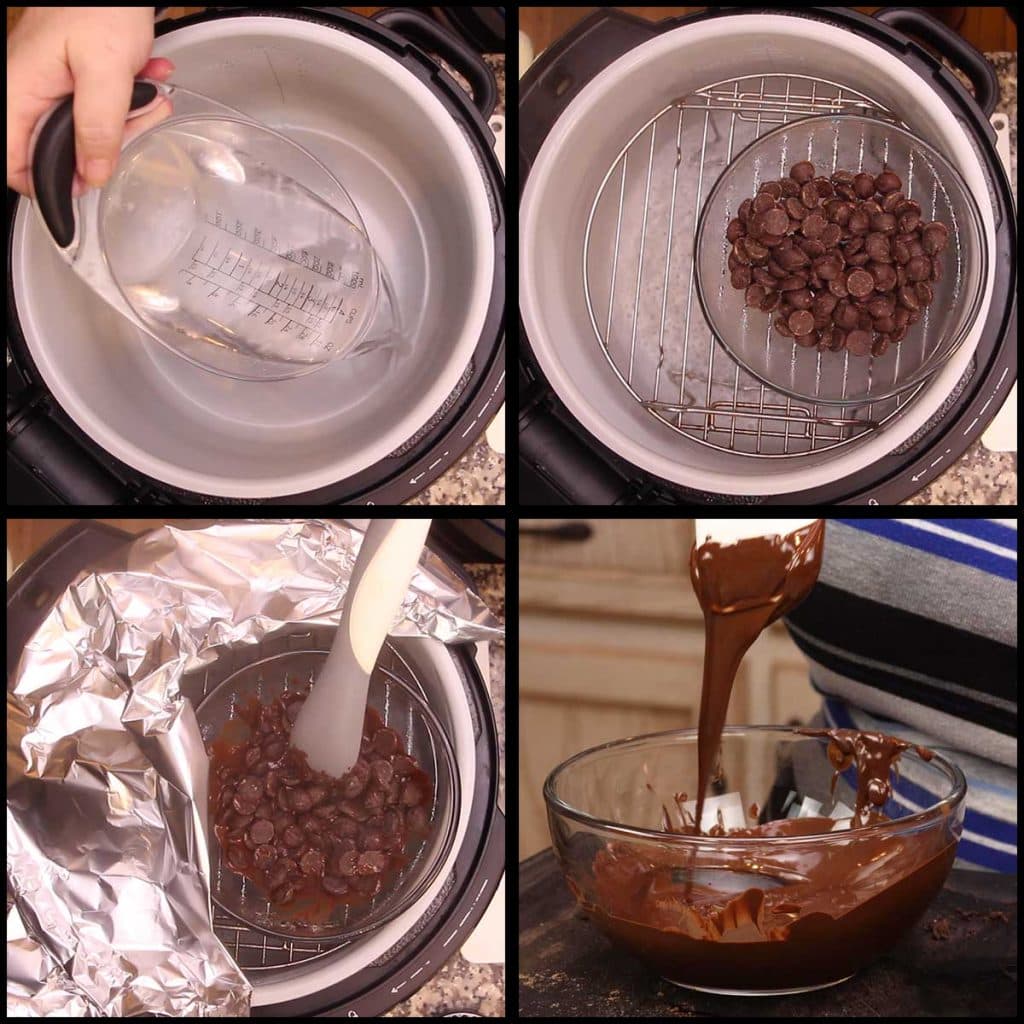
Place 2 cups of water into the inner pot and set the rack or trivet in the pot. I use the reversible rack in the high position. You want to make sure your bowl is not sitting in the water or the chocolate can overheat.
Use some foil to cover the gaps between the bowl and the inner pot and you have a double boiler!
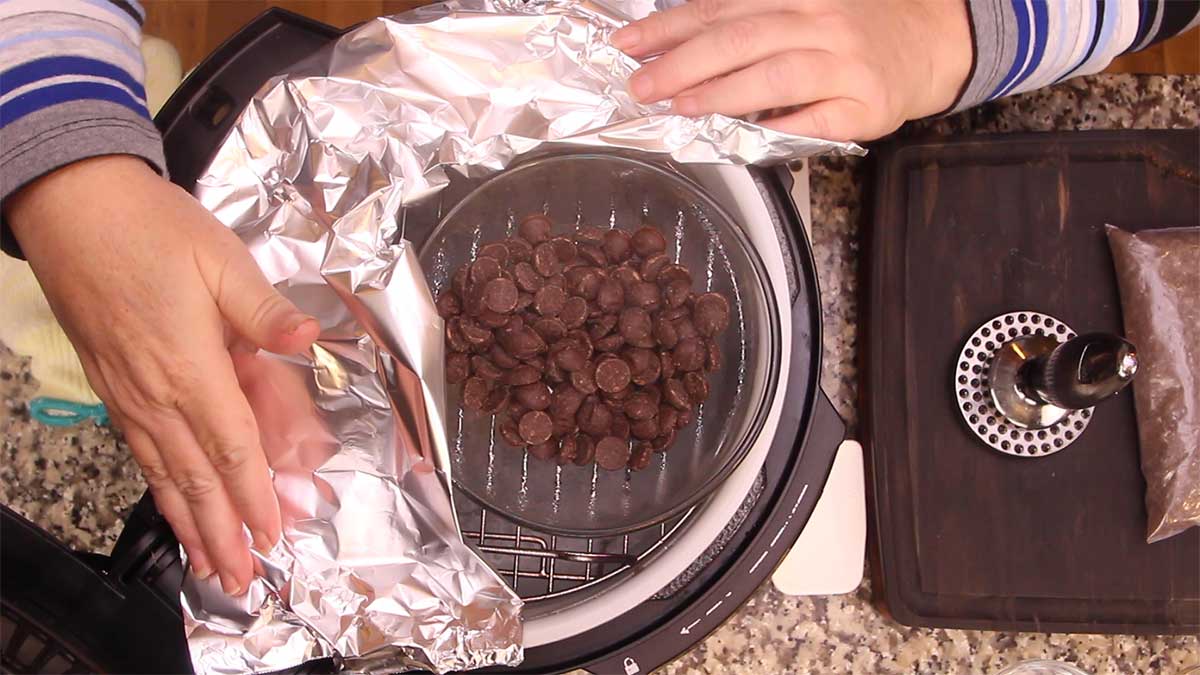
I usually heat the water on medium or high sear/sauté, and then once the steam starts to build, reduce it if needed. The most important thing is not to get any drops of water in the chocolate or it can seize up and become chalky and not usable.
If you are dipping a lot of chocolate, once the chocolate is melted and stirred, turn on the keep warm function and this will keep your chocolate the correct temperature for the duration of use. It's perfect and super easy!
Can I make Triple Chocolate Cheesecake without a Pressure Cooker?
Absolutely! The instructions and ingredients remain the same for preparing the crust and filling. You simply switch to baking instead of pressure cooking.
Once your crust is pressed into the springform pan, bake it in a preheated oven at 400℉/200℃ for about 5-7 minutes or until the crust has set. Be careful not to burn it. Remove and allow to cool.
Pour the filling into your springform pan. Remember the size matters, so if you are using a larger springform pan that's 7¼" diameter, you will want to adjust your ingredients accordingly or your cheesecake will be very thin.
The best way to get a perfectly cooked cheesecake is to use a water bath. To do this I suggest placing a double layer of foil around the base of your cheesecake pan. Pour in the cheesecake batter and place the pan into a roasting pan that fits in your oven and can be filled to about halfway up the springform pan.
It is much easier to place the roasting pan with the cheesecake into the preheated oven (preheat to 325℉/160℃) before filling with water. Slowly add HOT water until the water level reaches halfway up the springform pan.
Bake for about 50-60 minutes. I always check on my cheesecakes about 40 minutes in to see how they are doing. If the edges look like they are getting too done, lower the heat in the oven.
Your cheesecake is done when the edges are set, but the middle is still jiggly. Remove from the oven and allow to cool for about 30-60 minutes on the counter. Refrigerate for at least 4 hours, but overnight is better.
Then make up the ganache and finish up your cheesecake as written in the instructions below.
How to Make Triple Chocolate Cheesecake in the Ninja Foodi or Instant Pot
Before you start, make sure your cream cheese and eggs are room temperature.
The first thing I like to do is melt the chocolate for the cheesecake filling, this allows enough time for it to cool slightly before adding to the cheesecake batter. I usually do this using the Ninja Foodi as a double boiler as described in a previous section above, but you can also melt it in the microwave by heating for 15-30 seconds, stirring, and repeating just until 75% of the chocolate is melted. Stir well and the residual heat of the chocolate will melt the remaining chocolate.
Here is the double boiler set up that I used in the video.
Set aside until needed. If the chocolate starts to harden again, simply pop it back into the microwave for 15 seconds and stir before using. I haven't needed to do that when I melt the chocolate using a double boiler.
While the chocolate is melting, I mix up the crust. Using a food processor, process the chocolate animal crackers or whatever cookies or crust ingredient you want to use until they are coarsely chopped. You don't want powder, but you also don't want large pieces.
You can also do this by hand, which is what I did in the video, but it does take longer and I really should have used a gallon bag. The positive side of crushing the cookies by hand is you can really control the size of them and you simply throw the bag away at the end, so one less thing to clean!
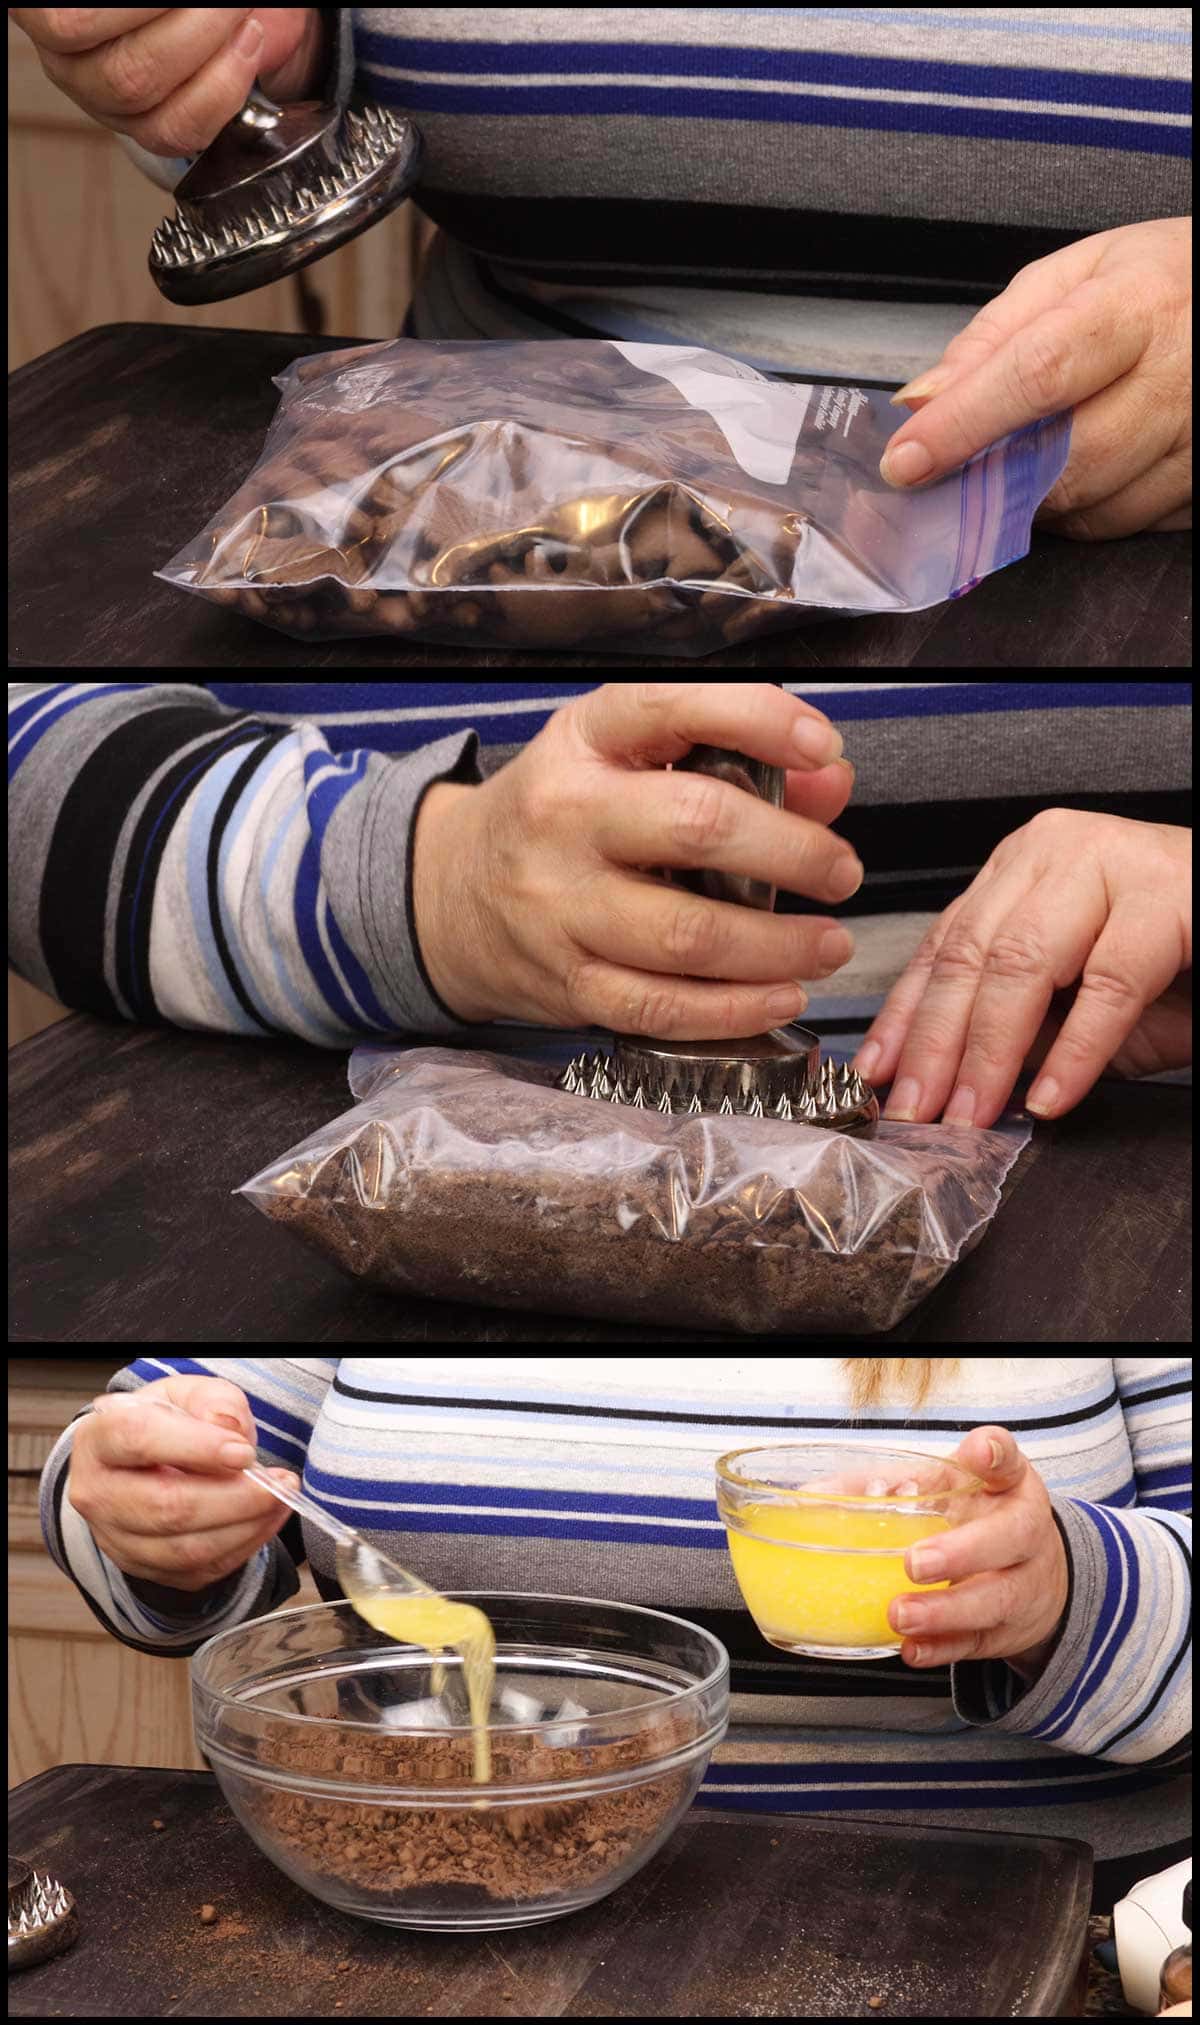
Melt 1 stick (½ cup) of butter and add 4 Tablespoons of melted butter to the dry cookie crumbs. Mix with a fork. Continue to add 1 Tablespoon of butter at a time until the mixture is moistened and if you squeeze some together in the palm of your hand, it holds together. I used 7 Tablespoons of the 8.
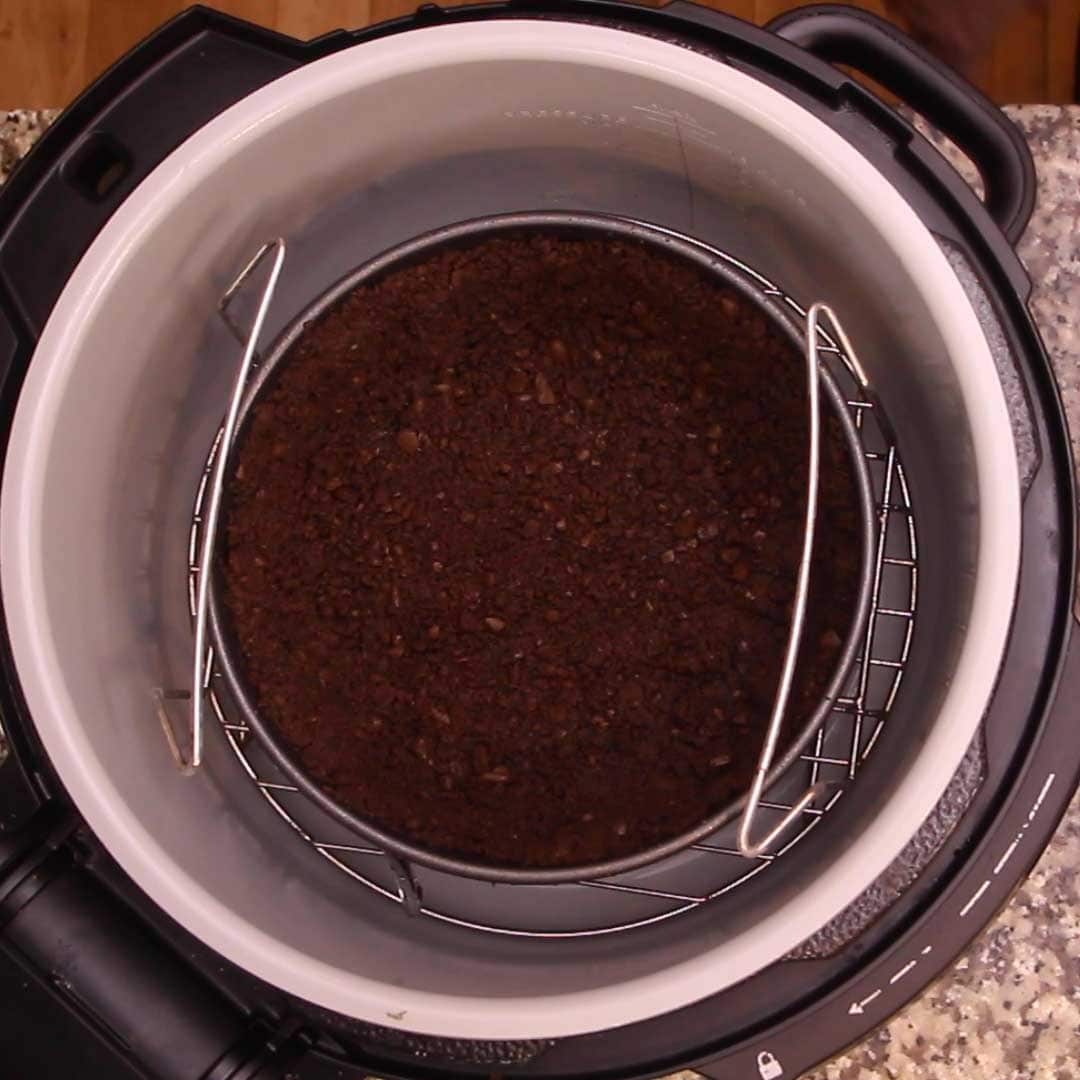
One thing that you may want to do and I always forget is to put a parchment round on the very bottom of the springform pan. This can make it easier to remove the cheesecake from the bottom of the pan when you go to serve it.
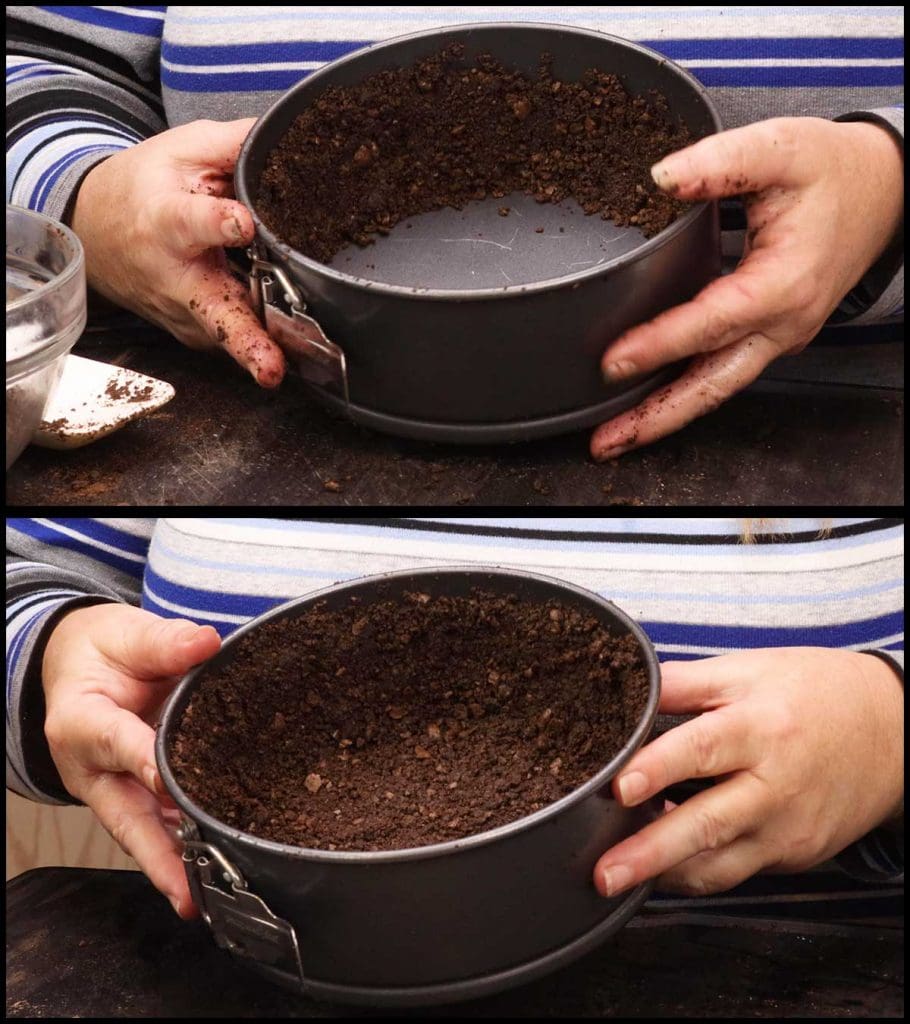
Line the sides and the bottom of the springform pan with the cookie/butter mixture and press. I do the sides first and press while rotating the pan around. If the cookie mixture falls from the sides easily, it is not moist enough. Pour it back into the bowl and add some more melted butter.
In this recipe, I made the bottom slightly thicker than the sides and I really liked the end result of the triple chocolate cheesecake. The crust even had some crunch to it, which isn't always the case when pressure cooking.
I took the cookie crust almost all the way up the sides because I wanted to make sure it extended past the ganache topping.
Here is a quick video showing how to press the cookie crust into your springform pan.
Once the crust is in the pan, you want to bake it so it sets before adding the filling. This helps the crust stay in place during the pressure cooking time. No need to preheat for this, simply place the springform pan on the rack in the low position, close the crisping lid and bake on 325℉/165℃ for 5 minutes.
I usually make up my cheesecake filling while the crust is baking, but you will want the crust to cool before pouring in the cheesecake filling.
To make the filling, add the cream cheese and the sugar to a medium size mixing bowl. Using a stand mixer or a hand mixer on medium speed, beat the mixture until the sugar has incorporated with the cream cheese.
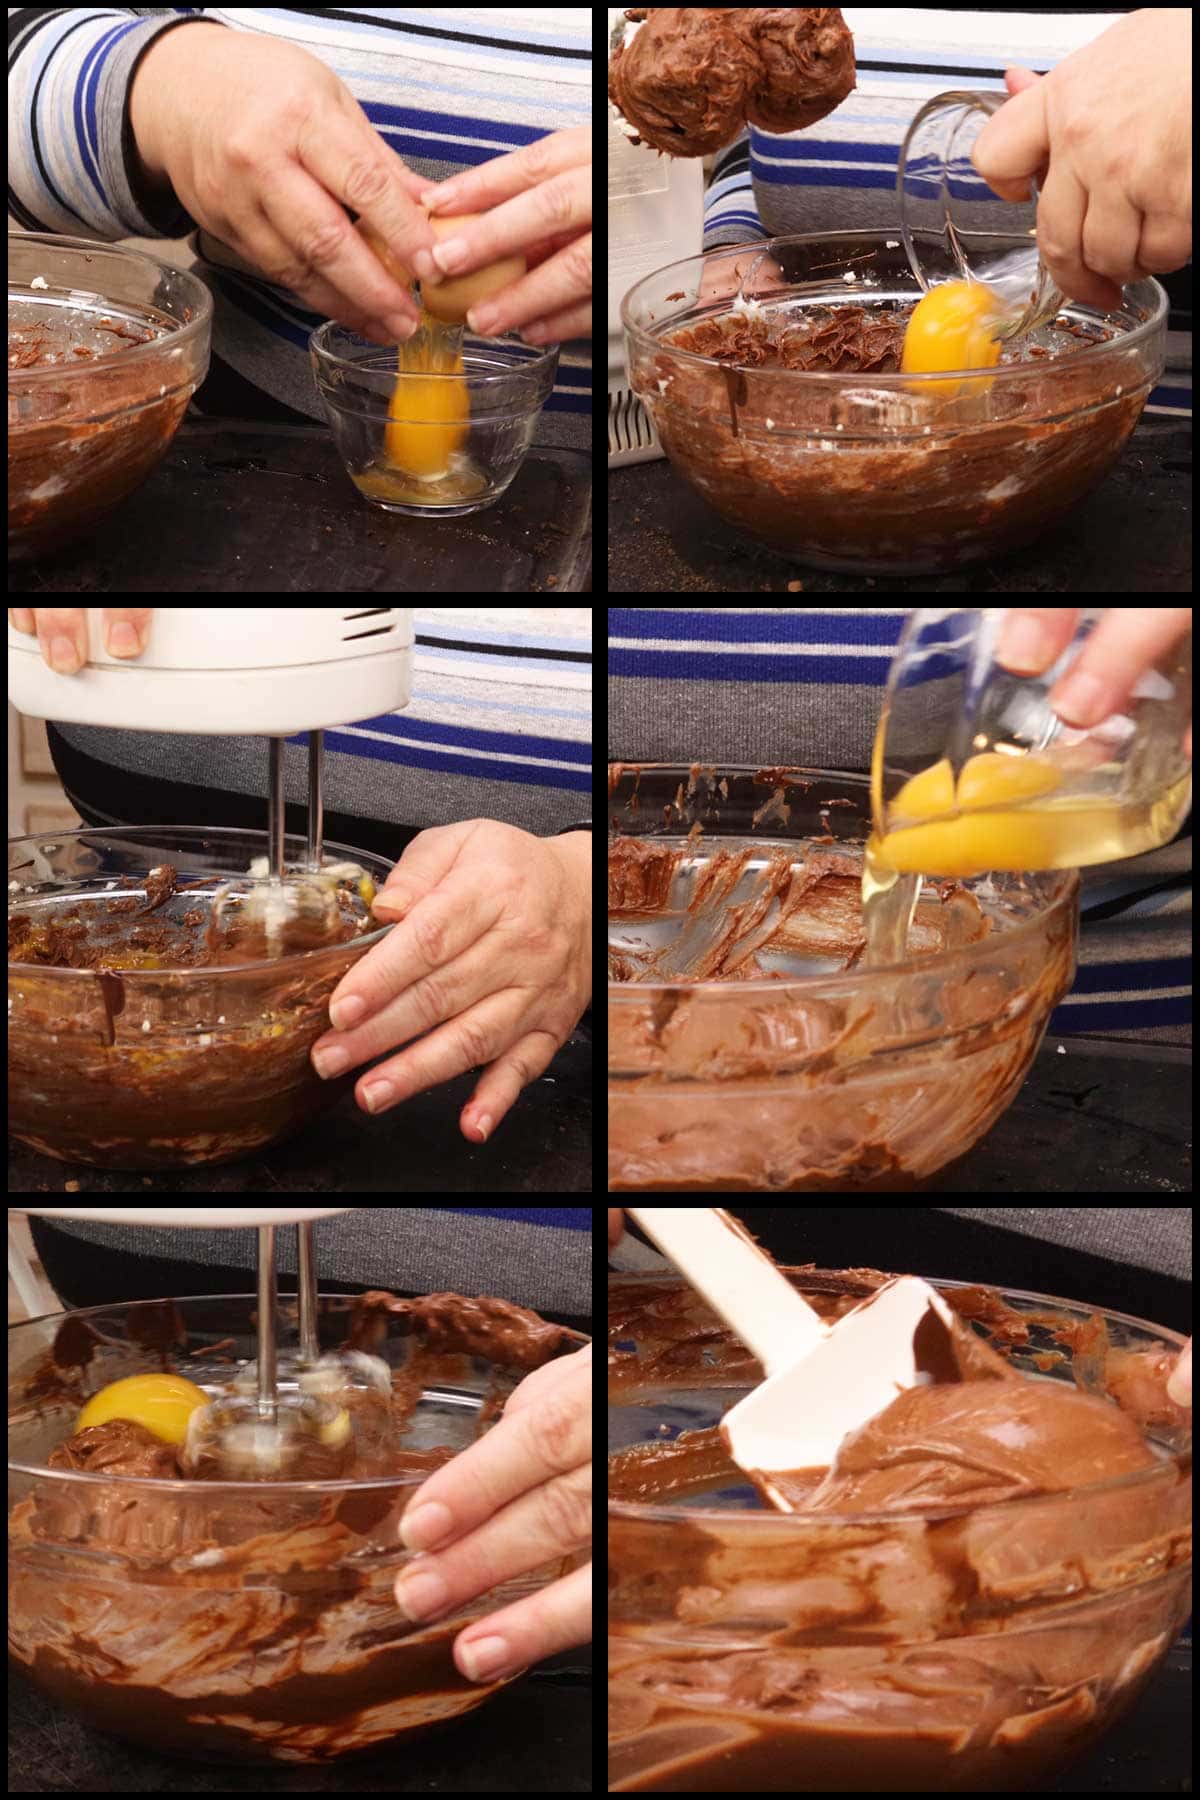
Pour the melted, but cool chocolate into the cream cheese/sugar mixture. Add the espresso powder, salt, and vanilla and beat on medium speed just until incorporated.
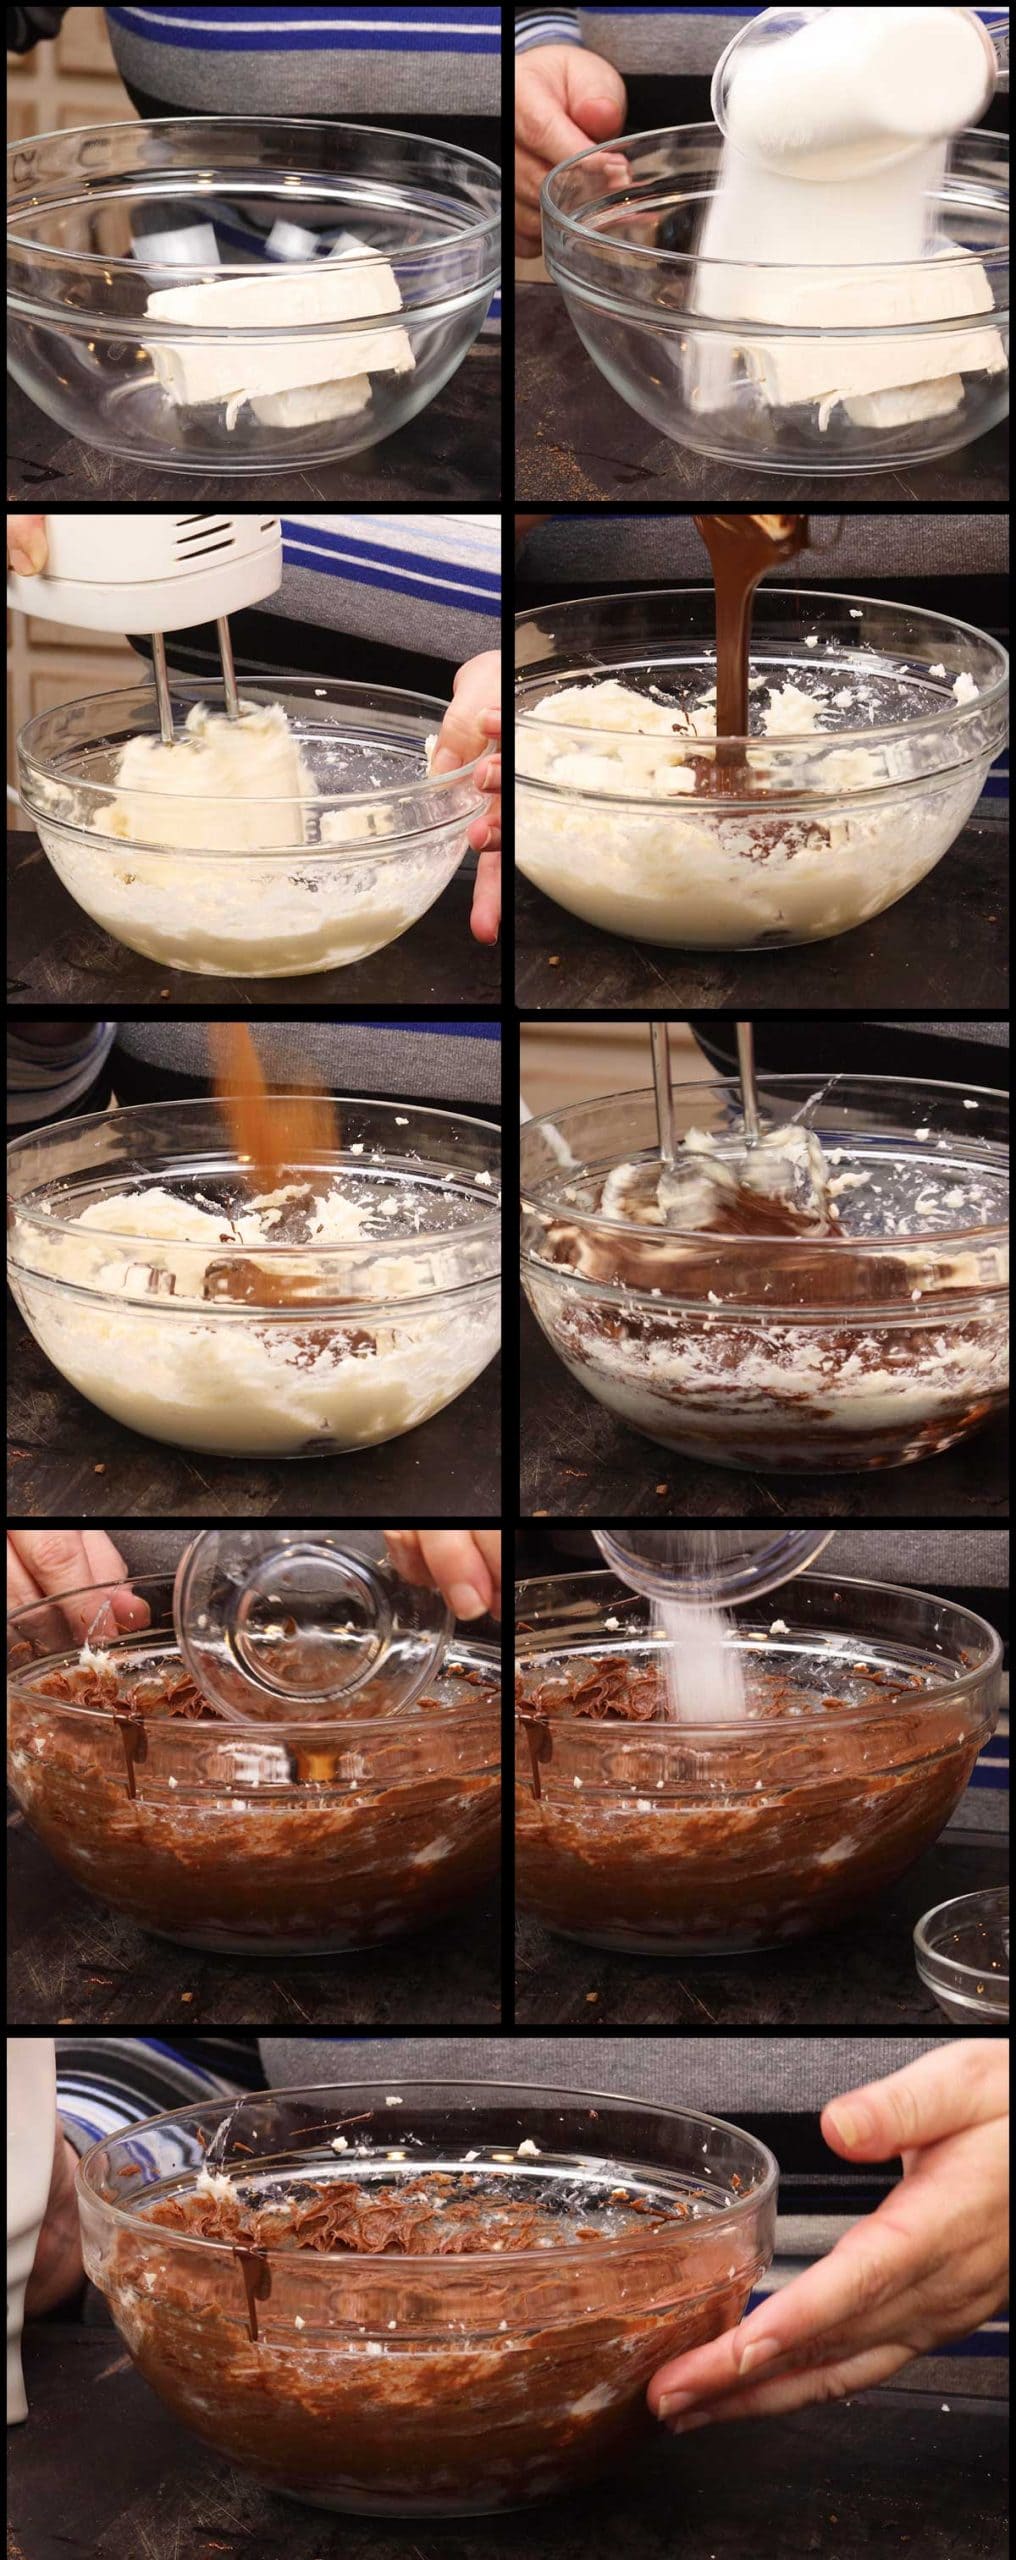
Add 1 large egg and beat on low-medium speed until the egg is fully incorporated. Add the second egg and repeat. Do not beat faster than medium speed and do not overbeat or you can add too much air into the batter and cause the top to crack during the cooking process.
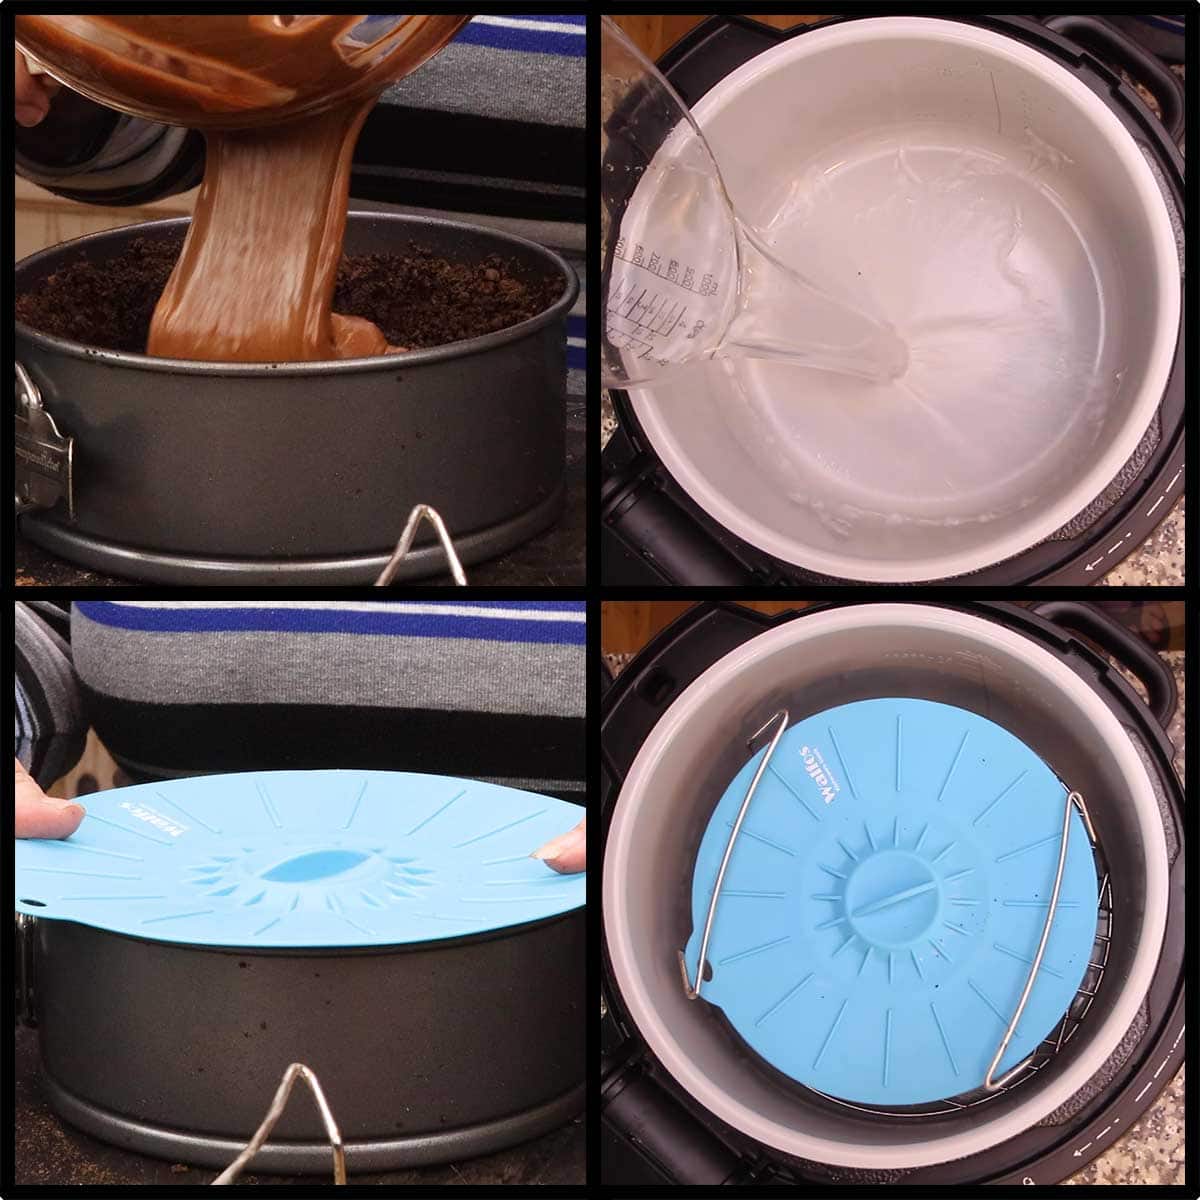
When the crust has cooled, pour the cheesecake batter into the crust. Cover with a (affiliate link)silicone cover or foil.
I love using these silicone covers from Walfos, they work great for all kinds of pressure cooking and baking in the Ninja Foodi.
(affiliate link)Silicone Covers from Walfos
Pour 1 cup of water into the inner pot and place the cheesecake on the rack in the low position. Put the pressure lid on and turn the valve to seal. Set high pressure for 25 minutes. When the time is up, allow the pot to natural release for 10 minutes.
Remove the cheesecake and blot the top with paper towels. Remove the cover and allow to cool on the counter for at least 30 minutes. The center should be jiggly, don't worry it will continue to cook from carryover heat and then fully set up in the refrigerator.
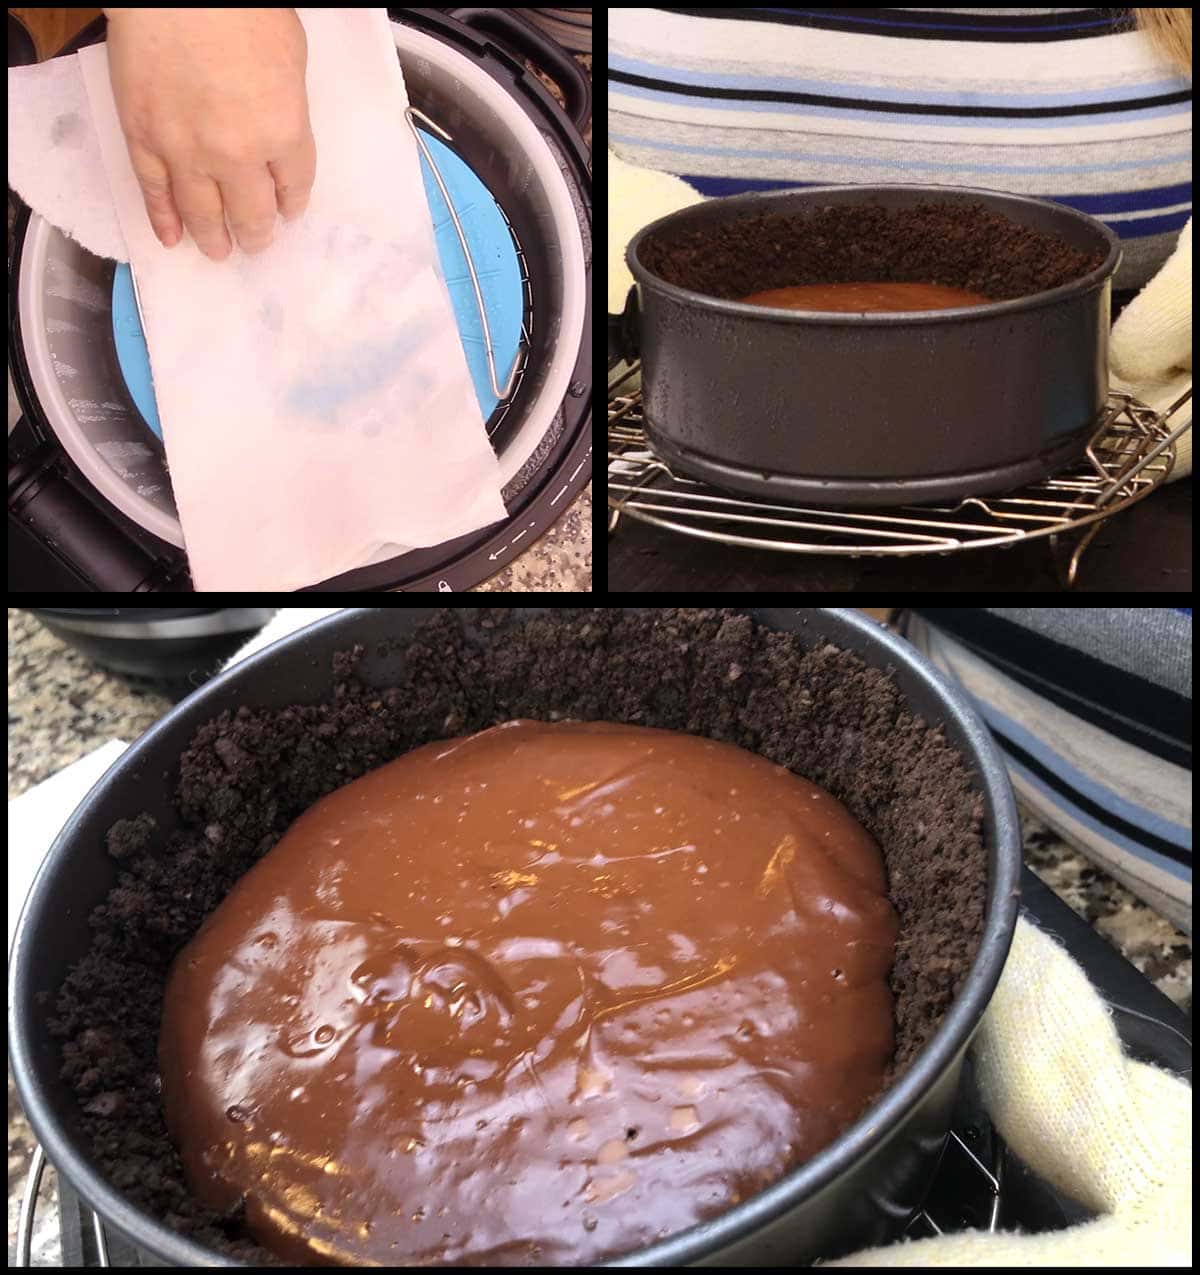
Cover again and refrigerate for at least 4 hours, but 8 is better.
Once the cheesecake is completely chilled, you can remove the sides of the pan now or you can leave them on until after you fill with ganache.
I removed the sides before adding the ganache and it worked out fine for me. You may also want to put your cheesecake on the platter you plan to serve it on at this time.

Let's make the ganache and put the final touches on your triple chocolate cheesecake!
How to Make the Ganache for your Triple Chocolate Cheesecake
The type of ganache that you want to make to make for this recipe is a basic 1:1 ratio of chocolate to heavy cream.
You can use dark chocolate (which is my favorite), semi sweet, or milk chocolate. You can even use unsweetened chocolate if you prefer. I would not use white chocolate with a 1:1 ratio, but you certainly can use white chocolate, but I would find a specific recipe for white chocolate ganache because white chocolate is a bit more finicky.
In this recipe I used 1 cup of heavy cream and 1 cup of Ghirardelli Dark Chocolate Chips. I only ended up using about ¾ of the ganache, but you can certainly use it all for a thicker layer. It's super delicious!
I'm writing the recipe for ¾ cup of heavy cream and ¾ cup of dark chocolate chips so there isn't any waste.
Put the chocolate chips into a medium size mixing bowl. The one I used was a little small, so definitely go up a size.
Place the ¾ cup of heavy cream into the inner pot of the Ninja Foodi or in a small sauce pan on the stove and heat it over medium-high heat just until you start to see bubbles forming. You do not want to boil the cream.
You do need to use heavy cream to make ganache; half and half or whole milk will not work.
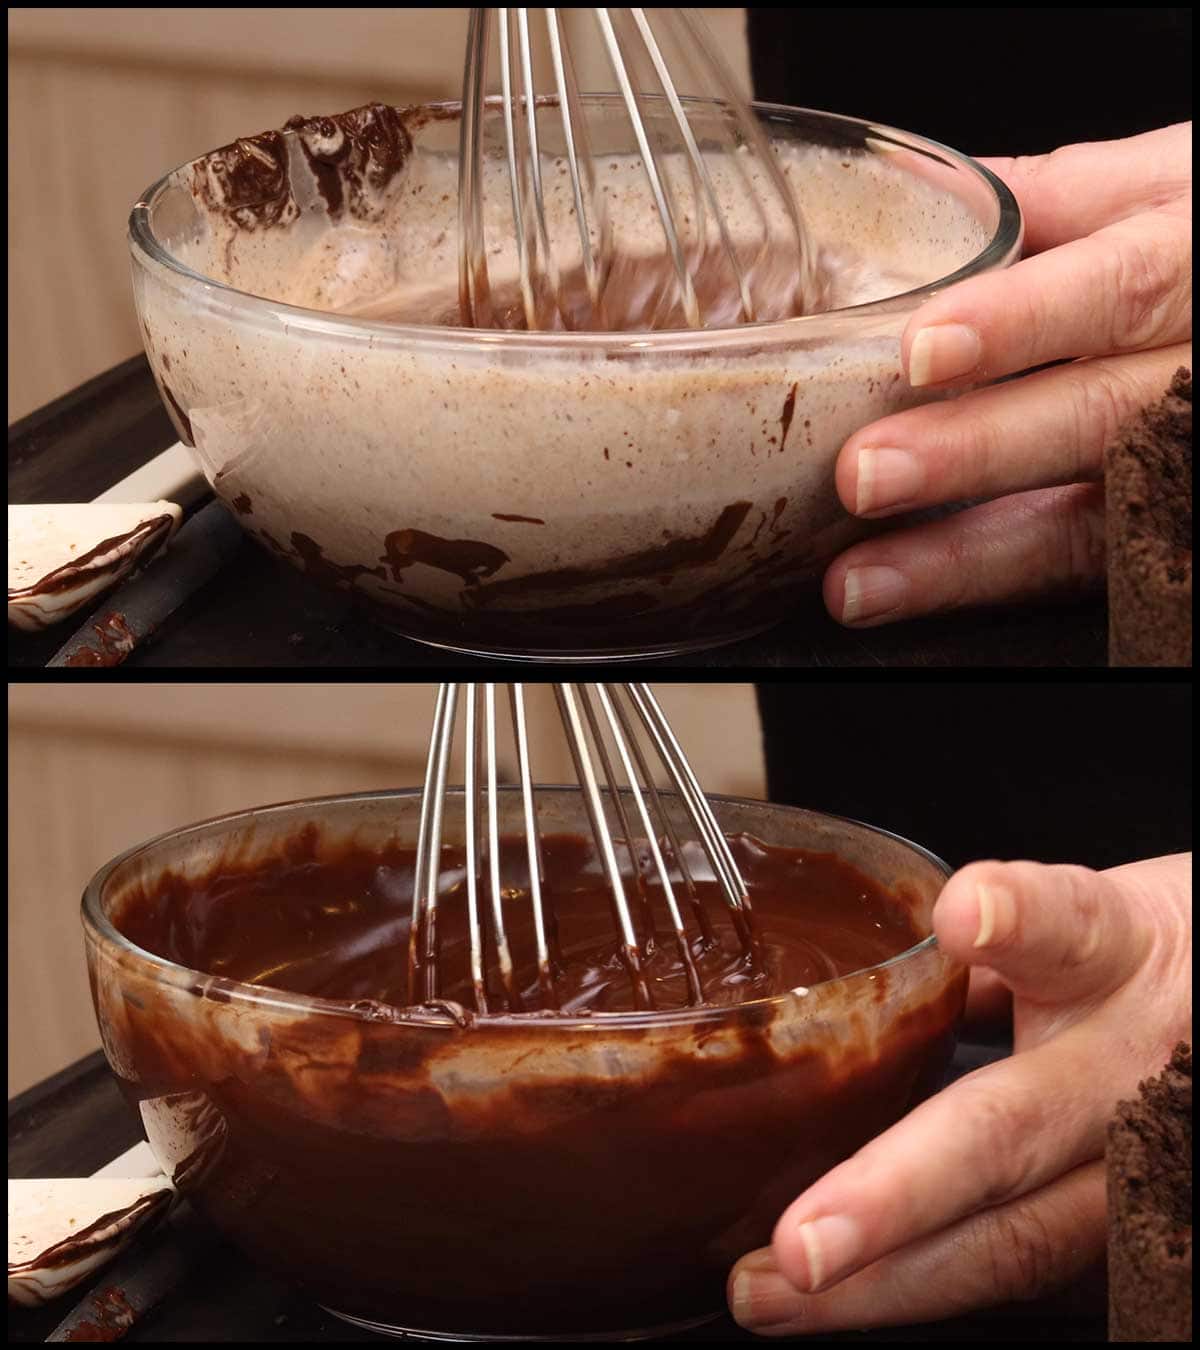
Remove from the heat and pour the hot cream over the chocolate chips and let sit for about 5 minutes.
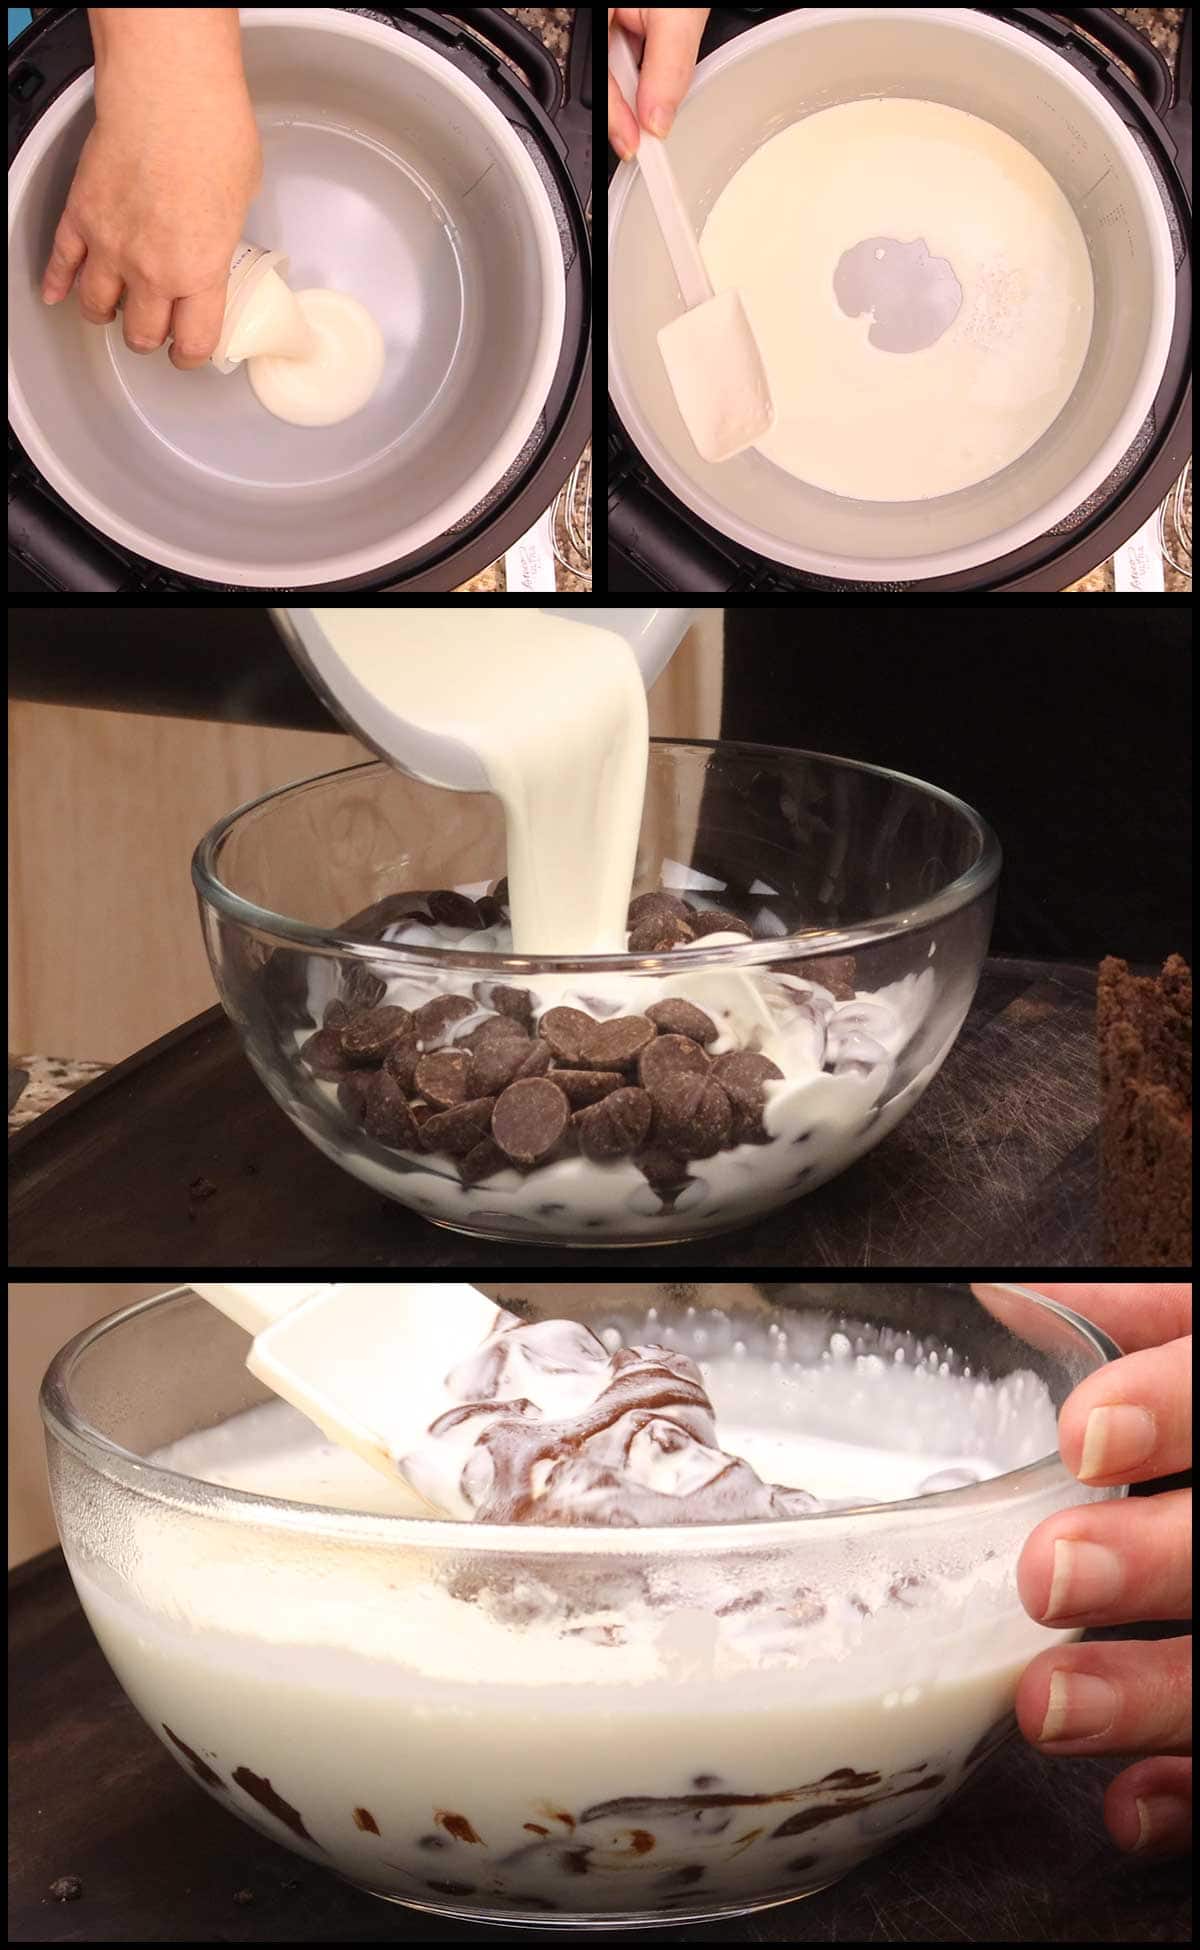
Then whisk to combine and as the cream incorporates with the melted chocolate the mixture will thicken. It starts out looking grainy like it isn't going to come together, but as you whisk it together it magically turns into a glossy beautiful bowl of chocolate ganache.
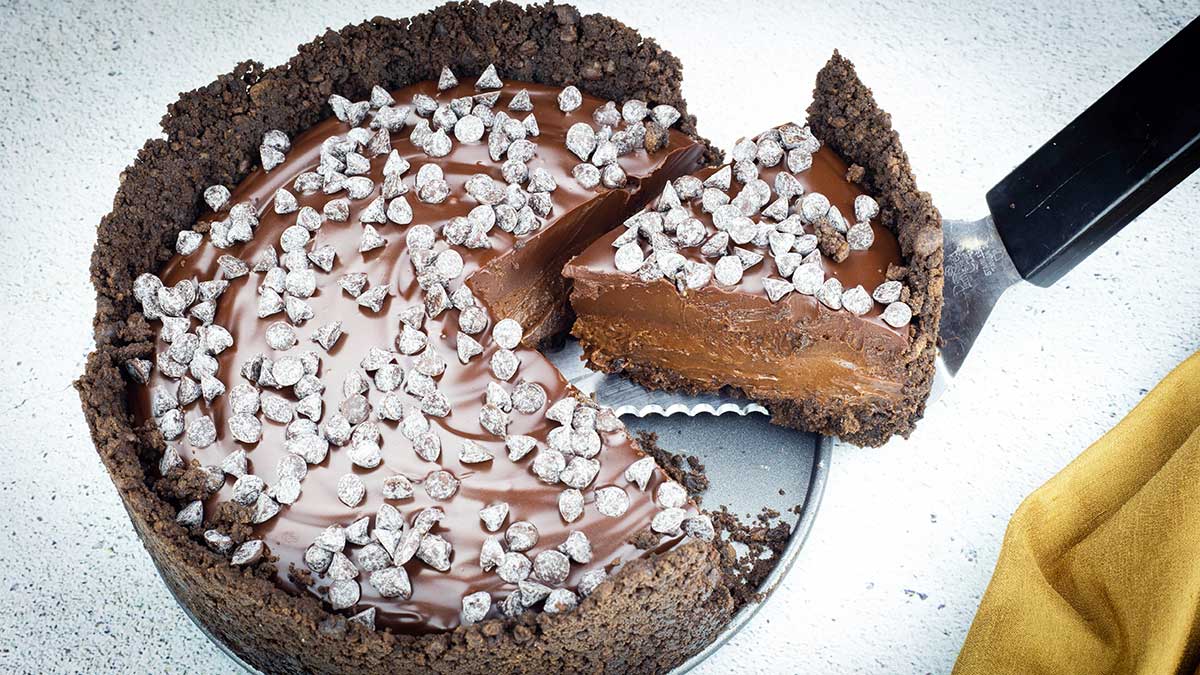
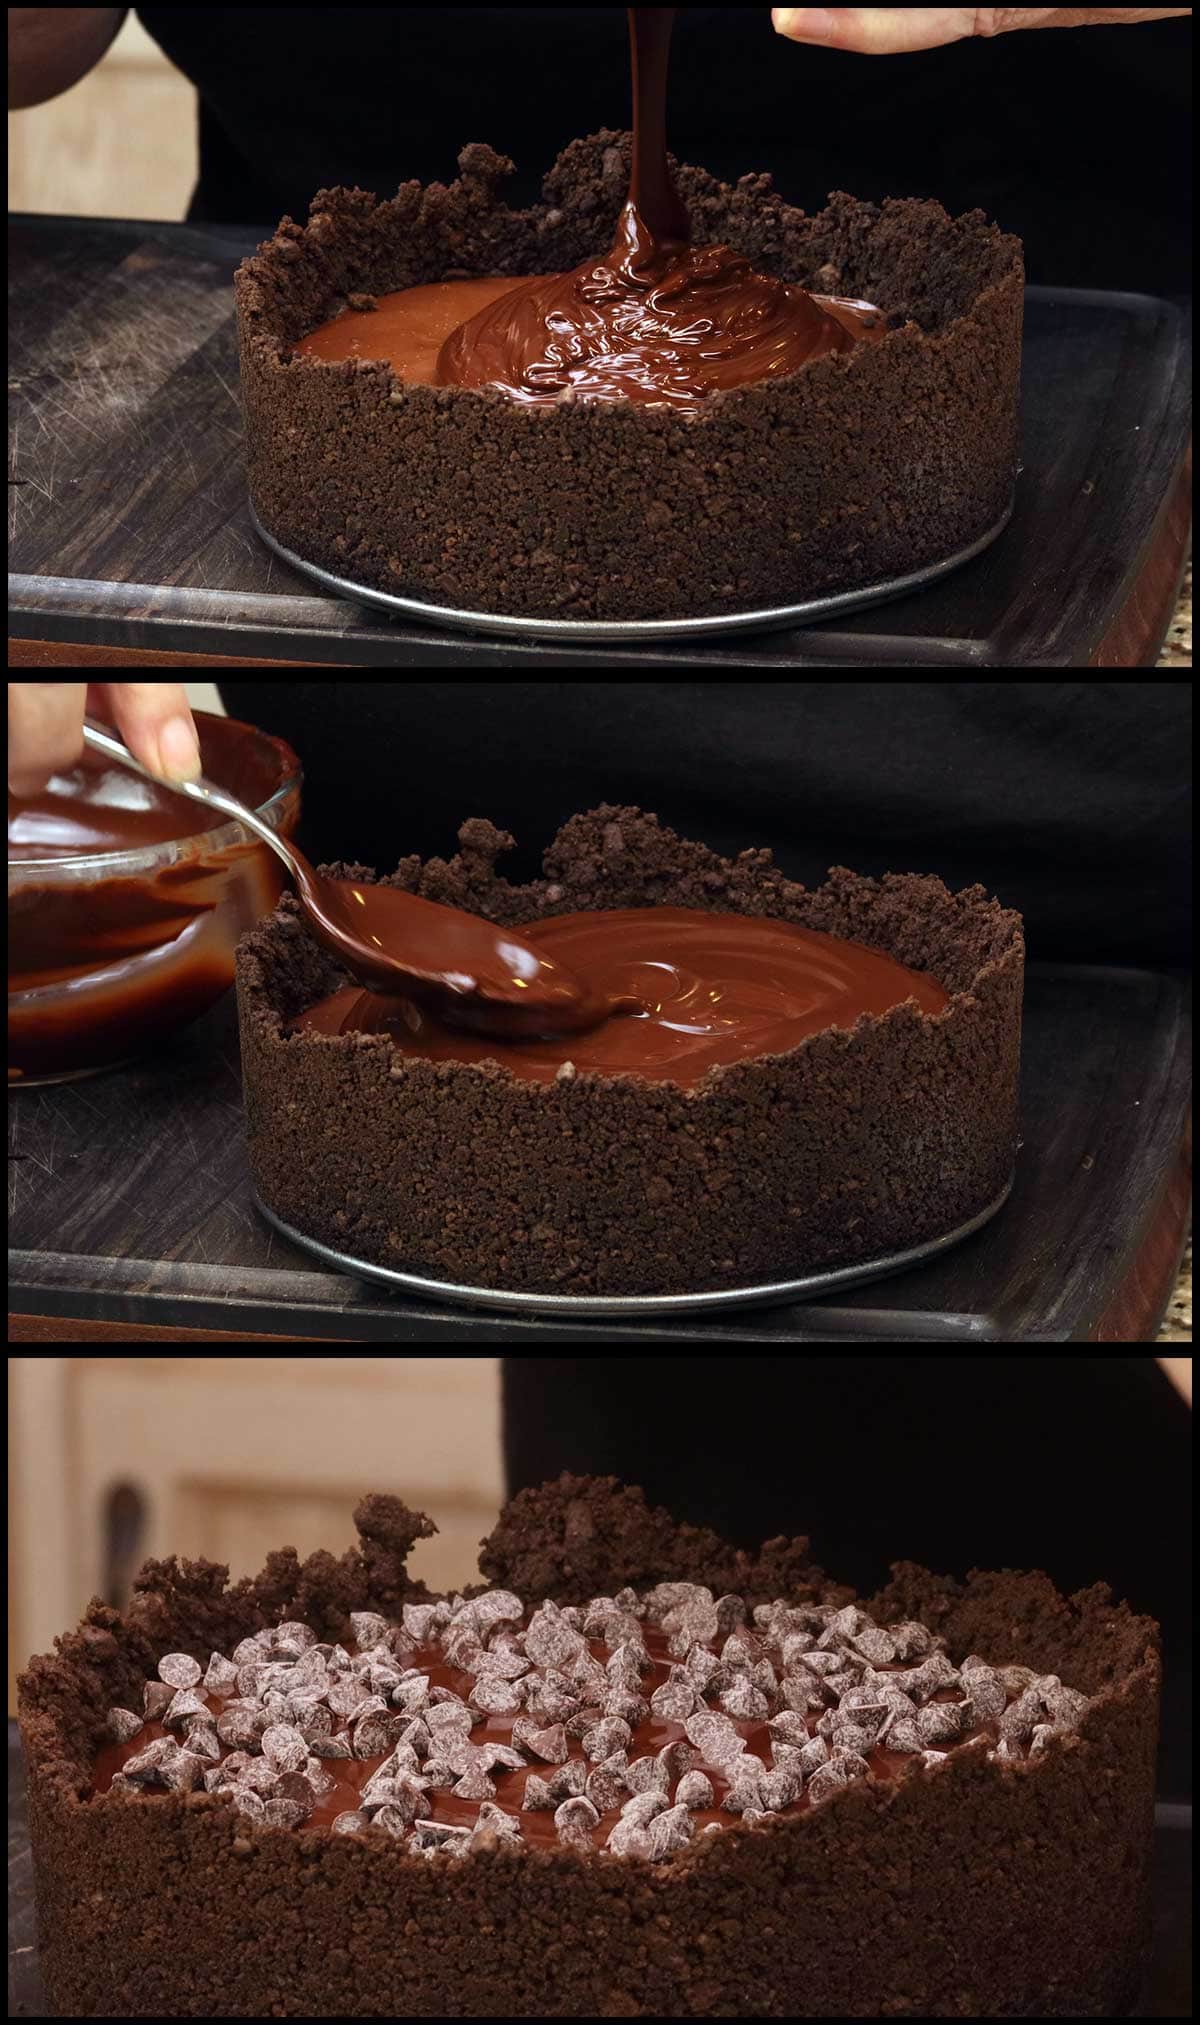
Pour it over the chilled cheesecake. I like to pour it right in the middle and let it naturally spread out. Then I smooth the ganache outward with the back of a spoon and top with about ½ cup of mini chocolate chips. Place in the refrigerator for about 30 minutes or so to let the ganache harden.
Slice & Enjoy your Triple Chocolate Cheesecake!
You might also like these other Cheesecake Recipes!
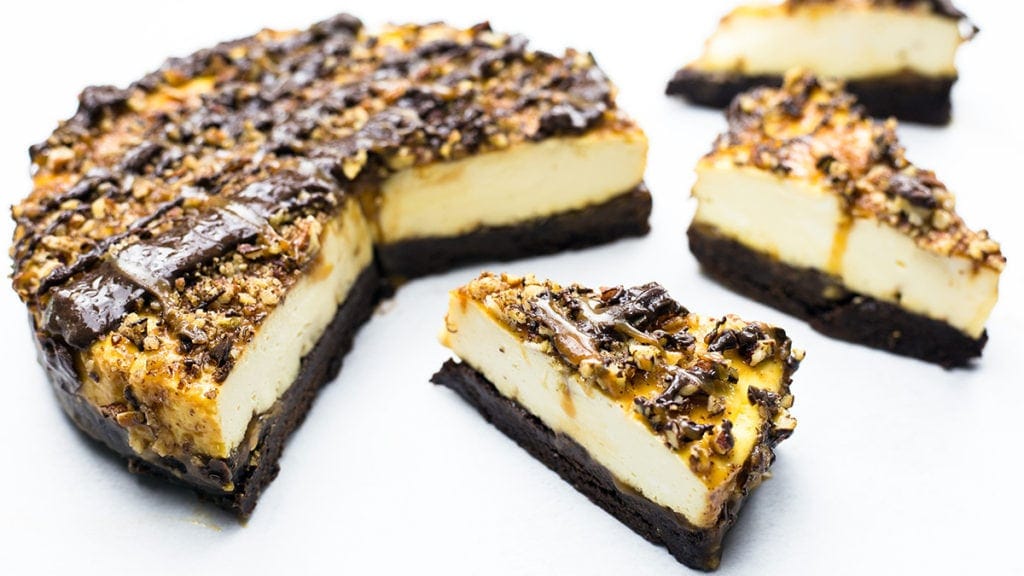
Turtle Cheesecake
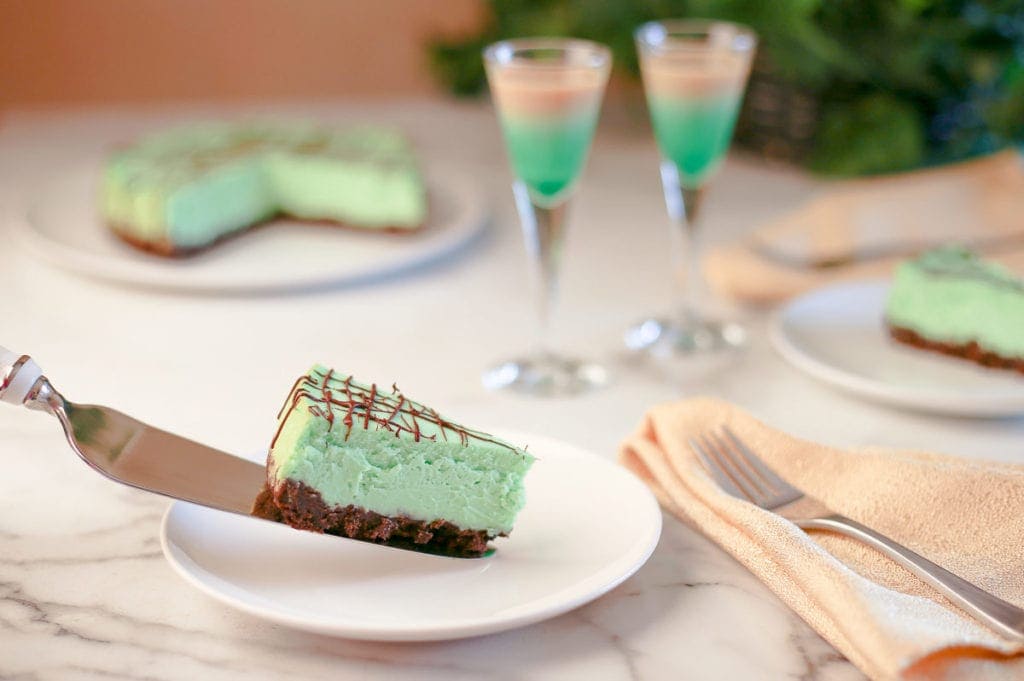
Mint Chocolate Cheesecake
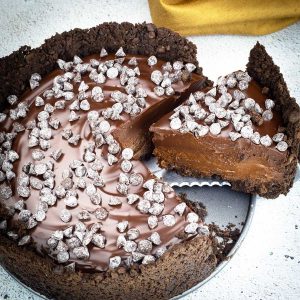
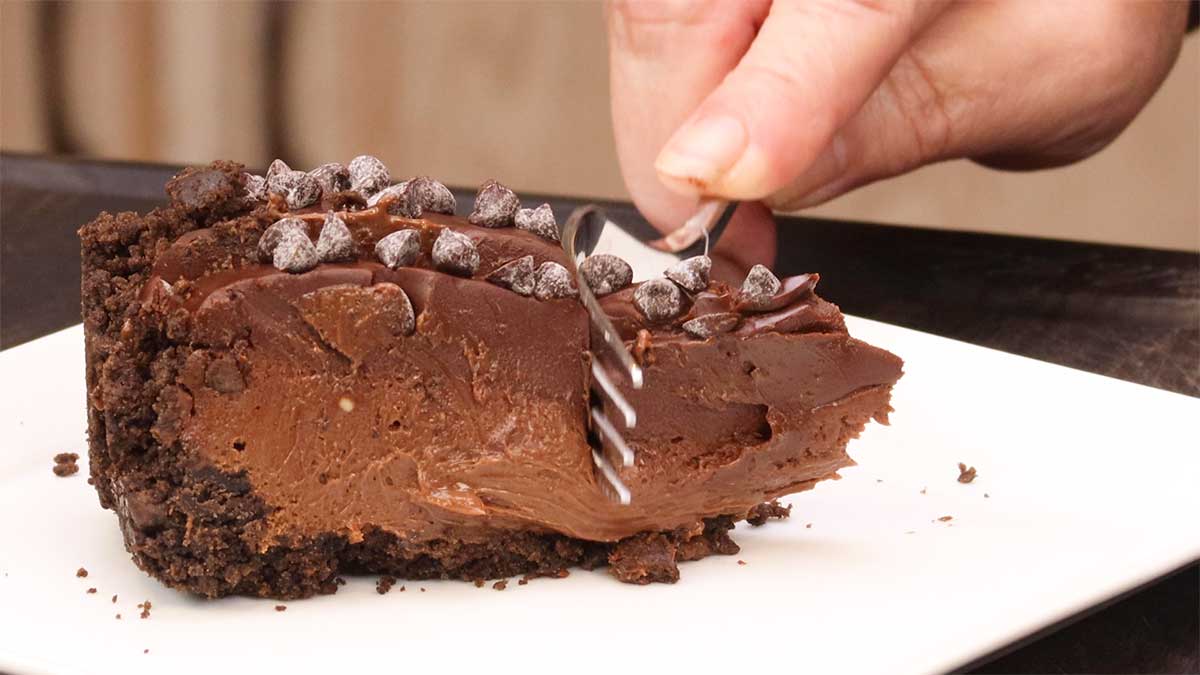
Triple Chocolate Cheesecake
Equipment
- Instant Pot
Ingredients
Cheesecake Crust
- 6 ounces chocolate animal crackers 3 cups whole
- 7 tablespoon butter salted or unsalted
Chocolate Cheesecake Filling
- ⅔ cup dark chocolate chips Ghirardelli preferred
- 8 ounces cream cheese room temperature
- ½ cup white sugar
- 1 teaspoon instant espresso powder optional
- ½ teaspoon fine grind sea salt
- 1 teaspoon vanilla extract
- 2 large eggs room temperature
Ganache & Topping
- ¾ cup heavy whipping cream
- ¾ cup dark chocolate chips Ghirardelli preferred
- ½ cup mini chocolate chips any kind is fine
Would you like to save this recipe?
Instructions
Cheesecake Crust
- Melt the butter in the microwave or on the stove. Crush the 3 cups of chocolate animal crackers using a food processor or by hand until they are coarsely ground.
- Place the chocolate animal crackers in a medium size mixing bowl and add the butter. Stir to combine. The mixture should be moist and able to hold together when squeezed in your hand.
- You may want to place a round of parchment paper on the bottom of the pan before pressing in the crust if you want to transfer your cheesecake to a serving platter. This will make it easier.
- Press the cookie mixture onto the sides and the bottom of the 7¼" springform pan. If you are using a larger pan, you may need to mix up a little more of the cookie/butter mixture to get the entire pan covered. I take the cookies almost all the way up side of the springform pan in this recipe, but you will want to at least go ¾ of the way up the sides.
- Place the springform pan with the crust on the rack of the Ninja Foodi in low position and place into the inner pot. Close the crisping lid and bake at 325°F/160°C for 5 minutes. No need to preheat. Remove and allow to cool.
Cheesecake Filling
- Melt the chocolate using a double boiler or the microwave and stir until smooth. Set aside.
- Add the sugar and cream cheese to a medium size mixing bowl and beat with a stand or hand mixer on low or medium speed until the sugar is incorporated into the cream cheese.
- Add in the melted chocolate, espresso powder (if using) and beat on medium speed until the chocolate is incorporated. Add the salt and the vanilla extract and beat on medium speed just until incorporated. Don't over mix the batter or you can introduce too much air which can lead to cracking on the top of your cheesecake.
- Add in one egg at a time and beat on medium speed until incorporated. Add the second egg and beat on medium speed until incorporated.
Pressure Cooking the Cheesecake
- Pour the filling into the cooled crust and cover with foil or these (affiliate link)silicone covers. Pour 1 cup of water into the inner pot. Place the covered cheesecake pan on the rack in low position and put the pressure lid on. Turn the valve to seal. Set the pressure to high for 25 minutes. When the time is up, allow the pot to natural release for 10 minutes.
- Blot any excess water off of the top of the cover with a paper towel and remove the cover. All the cheesecake to cool on the counter for about 30 minutes. Cover again and refrigerate for at least 4 hours. 8 hours or overnight will give the best results.
Chocolate Ganache & Topping
- Place ¾ cup of chocolate chips in a medium size mixing bowl.
- Heat the heavy cream in the bottom on the inner pot or a small saucepan on the stove. You do not want to boil the cream, but bring it to a simmer where you just start to see bubbles forming on the top.
- Pour the hot cream over the chocolate chips and let sit for 5 minutes.
- Whisk the cream and melting chocolate until it becomes a glossy pourable chocolate.
- Remove the sides from the cheesecake and place the cheesecake on the serving platter or plate. Pour the ganache into the center of the cheesecake and allow it to flow towards the outer edges. Use the back of a large spoon to smooth out the ganache and make sure it spreads to the edges.
- Sprinkle the mini chocolate chips on top of the ganache and refrigerate the cheesecake for about 30 minutes so the ganache sets up completely.
- Slice, Serve, & Enjoy!
Notes
Nutrition
About the Recipe Author, Louise Long
Louise is a full-time recipe creator and food blogger @ The Salted Pepper. She has over 30 years of experience with cooking and recipe development. She owned a restaurant for several years and was a full-time RN until retiring to blog full-time.

She published her first cookbook in the Fall of 2018 and is very interested in writing several more.
Louise is also the creator of an online Ninja Foodi Pressure Cooking Course with over 100 instructional step-by-step videos. People absolutely rave about the course and all the value they have received from it.
Louise has several very active Facebook groups that help people with the basics of cooking and learning more about the appliances they love.
Ninja Foodi Pressure Cooker & Air Crisper 101
Ninja Woodfire Outdoor Grill & Smoker
Louise is also a YouTube creator and you can find most of her recipes in video format on The Salted Pepper YouTube channel.
She is very responsive to messages and eager to help in any way she can. Get more Information about Louise & contact information
I WOULD LOVE TO SEE WHAT YOU ARE COOKING UP IN YOUR KITCHEN! TAG ME @THESALTEDPEPPER ON YOUR FAVORITE SOCIAL MEDIA PLATFORM WHEN YOU MAKE A DISH!
BE SURE TO FOLLOW THE SALTED PEPPER RIGHT HERE ⇓⇓⇓⇓⇓
Eve Lamarche says
just did this yesterday it is the best chocolate cheesecake I've ever had !!!! Merci Louise for this recipe !
Louise says
That is so awesome! I just made it for a special family dinner the other night and everyone loved it!
Leslie says
Can this be made without a crust? I tried reducing the butter in the crust to save calories and the crust crumbled (totally my fault) but the cheesecake was so good I wondered if I could just skip the crust. Do you think the filing would drip out of the bottom? Also, I used the 6 inch Daddio cheesecake pan so I had to cook it a lot longer but that was fine since it was a narrower pan, the filing was thicker. The total time was 40 minutes, in case anyone was wondering.
Louise says
If you wanted to line the springform pan with parchment that should work to keep the filling from leaking through. Or, you can use a regular pie pan that fits in the Foodi. I just did one and used a 9" disposable pie pan and put the pan on the basket legs turned upside down and it worked fine. Kind of a pain to get in and out of the pot, but I managed. You could even wrap a foil sling around the pie pan to make it easier.
John Albers says
This is a fat guys dream here... I made it for thanksgiving for my mom.. It was awesome to say the least. !!!
Thanks Louise
Vikki says
Had a lot of ganache left from recipe but used it for dipping strawberries. Yummy! Cheesecake was best ever!! Creamy and absolutely sinfully delish!!
Louise says
I'm so glad you enjoyed it!
Amber Meyer says
Holy wow!!!!! This triple chocolate cheesecake is a decadent and perfect dessert! I would serve this at my classiest dinner party. It is rich and not too sweet. It tastes like a combination of chocolate mousse, brownie and a fudge!!! This is sure to be a crowd pleaser. A must make!!!