
Slow Cooker Sirloin Tip Roast is an economical and flavorful cut of meat that is perfect for a family dinner or a special occasion. Slow Cooking allows the meat to absorb the flavors of the seasonings and tenderizes this tougher cut of meat and the results are melt-in-your-mouth delicious!
Would you like to save this recipe?
Slow Cooking is definitely my favorite way of preparing this cut of beef for a pot roast, but you can also roast it like I do in my roast beef recipe or sous vide it like I do in this recipe for sous vide sirloin tip roast and cut it thinly against the grain for roast beef sandwiches. If you make it that way, don't skip this Alabama White Sauce when you make your sandwiches.
If you haven't tried a Sirloin Tip Roast yet, definitely give it try!
Ingredients & Substitutions
Meat & Vegetables
I made a one-pot meal consisting of the beef roast, onions, carrots, potatoes, and mushrooms; however, you can change these ingredients in a multiple of ways. Any vegetable you don't like, leave it out. If you want to add in different veggies, that is fine, just make sure they will cook at the same time it takes for the roast to cook. Heartier veggies work best.
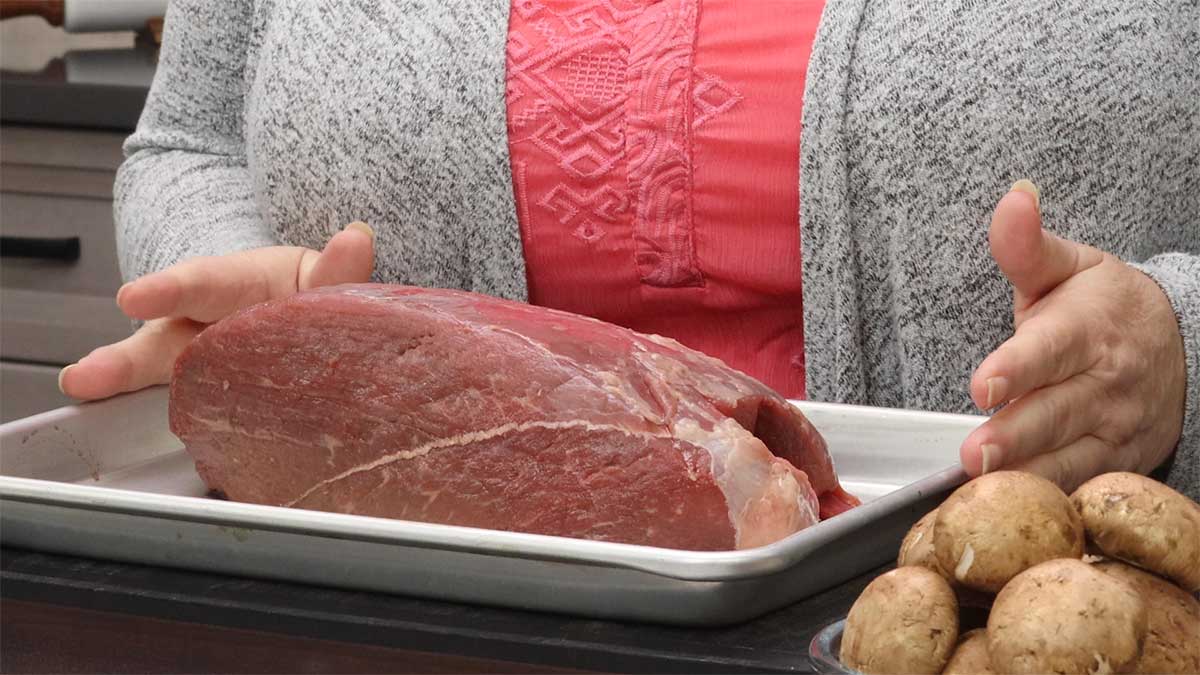
Beef Roast
I used a beef sirloin tip roast in this recipe, which is sometimes called a knuckle roast or a topside roast. It is different from a round roast in that it has more marbling for a richer flavor. I find it to be one of the most flavorful cuts of beef when cooked properly.
It can be a tough cut of meat and the best way to make it mouth tender is slow cooking, braising, or pressure cooking.
The size of your roast, as well as the starting temperature of it, will determine the cooking time. If your roast is 1-2 pounds, it will take about 3-4 hours.
Vegetables
I used onions, carrots, potatoes, mushrooms, and garlic in this recipe, but you can omit or add other vegetables according to your preference. You could use rutabaga, parsnips, cabbage, or any other hearty vegetable you like. Quick cooking vegetables like spinach and broccoli are best cooked separately and served as a side.
Keep in mind the cook times are based on the type and size of the vegetables. I used the small company potatoes in this recipe, so if you wanted to use larger potatoes, you would want to cut them into chunks about 3" big.
I also keep the carrots whole so they don't cook too fast. If you want to cut up your carrots, I would wait to add them until the last 2-3 hours of the slow cooking time. Same with smaller chopped potatoes.
The mushrooms do great slow cooking and you can make them any size you like and add them at the beginning. If you don't like mushrooms, simply leave them out.
Seasoning Blend
I used a simple seasoning blend of salt, black pepper, garlic powder, onion salt, dried rosemary and dried thyme leaves to rub on my roast.
You can use simple salt and pepper or any other combination of spices that you love.
I seasoned my roast right before browning it in olive oil, but it can be seasoned 1-2 days in advance and refrigerated until you want to cook it. Seasoning large roasts a day or two ahead of time really allows the salt to penetrate and dissolve into the meat which helps to tenderize it and flavor the meat. Unfortunately, I'm not a great planner, so I never remember to do this! If you are the same way, no worries, the roast was delicious even being seasoned just before cooking, although I did add a touch more salt when serving.
Liquids & Gravy
When slow cooking roasts, keep in mind that the roast will give off liquid as it cooks and you may have to thicken the liquid after cooking to get the consistency of gravy you like. I don't recommend starting out with really thick liquids or even using gravy packets when slow cooking a roast because the thicker the liquids, the longer the roast and veggies take to cook. I know a ton of recipes call for adding gravy packets and that's fine, but plan on another 1-2 hours of cook time.
Personally, I like to start off with a simple roux of flour and butter and then add in some tomato paste for richness. This gets thinned out with beef broth and I also add a touch of red wine vinegar and Worcestershire sauce. I found this combination to be perfectly balanced, but if you don't want to add the tomato paste, skip it. Or, you can add in a little tomato juice if that is what you have on hand. I didn't add in any diced tomatoes, but you certainly can.
The vinegar is an acid that helps balance the richness of the gravy, but it also helps to break down the connective tissues and makes the meat more tender. If you didn't want to use red wine vinegar, you can certainly use any kind of vinegar you like and have on hand. The only one I would be careful when using is balsamic vinegar because it will definitely impart a different flavor into your gravy. You can also use red wine in place of the vinegar and I would recommend using about ½-1 cup and decrease the beef broth by the same amount. The recipe will still work just fine if you skip the vinegar/wine.
Worcestershire sauce is completely optional, but I love the flavor it gives to the gravy. You could also use soy sauce if you prefer.
As long as you start out with about 1-2 cups of thin liquid, you can change what else you use to best suit your preferences. Some people like adding some apple juice to the mix and that is perfectly fine.
Depending on how many juices your roast gives off during the cooking process, you may end up with a thin au jus sauce or a thinner gravy than what you want. You can definitely thicken the gravy at the end of cooking either using a flour slurry, a cornstarch slurry, or even with xanthan gum like I do in this low carb pot roast recipe.
Tips for Making a Sirloin Tip Roast
- Sear the roast before slow cooking: This step is optional but it helps to add flavor and lock in the juices. Sear the roast on all sides in a hot pan with oil before placing it in the slow cooker.
- Use the right amount of liquid: Add enough liquid to cover the bottom of the slow cooker, but don't add too much as the roast will release its own juices as it cooks.
- Don't lift the lid: Resist the temptation to lift the lid while the roast is cooking, as this will cause heat to escape and could result in an unevenly cooked roast.
- Let the meat rest: Once the roast is done cooking, let it rest for at least 10-15 minutes before slicing to allow the juices to redistribute throughout the meat.
- Choose the right vegetables: Potatoes, carrots, onions, and mushrooms are all great vegetables to cook alongside a sirloin tip roast in the slow cooker.
- Use vegetables similar in size: The vegetables should be somewhat similar in size so they cook at the same time. Leaving the vegetables whole in this recipe allows them to cook at the same rate as the roast.
- Check the vegetables halfway through cooking: Check the vegetables halfway through the cooking time and stir them gently to ensure they cook evenly.
How to Slow Cook a Sirloin Tip Roast
Seasoning & Searing the Roast
You can season your roast 1-2 days ahead of time and wrap in plastic wrap until about 30-60 minutes before you want to sear it. OR, if you forget like I always do, season it right before searing and it will still be delicious!
If you see a lot of fat or sinewy tissue on your roast, give it a trim before seasoning.
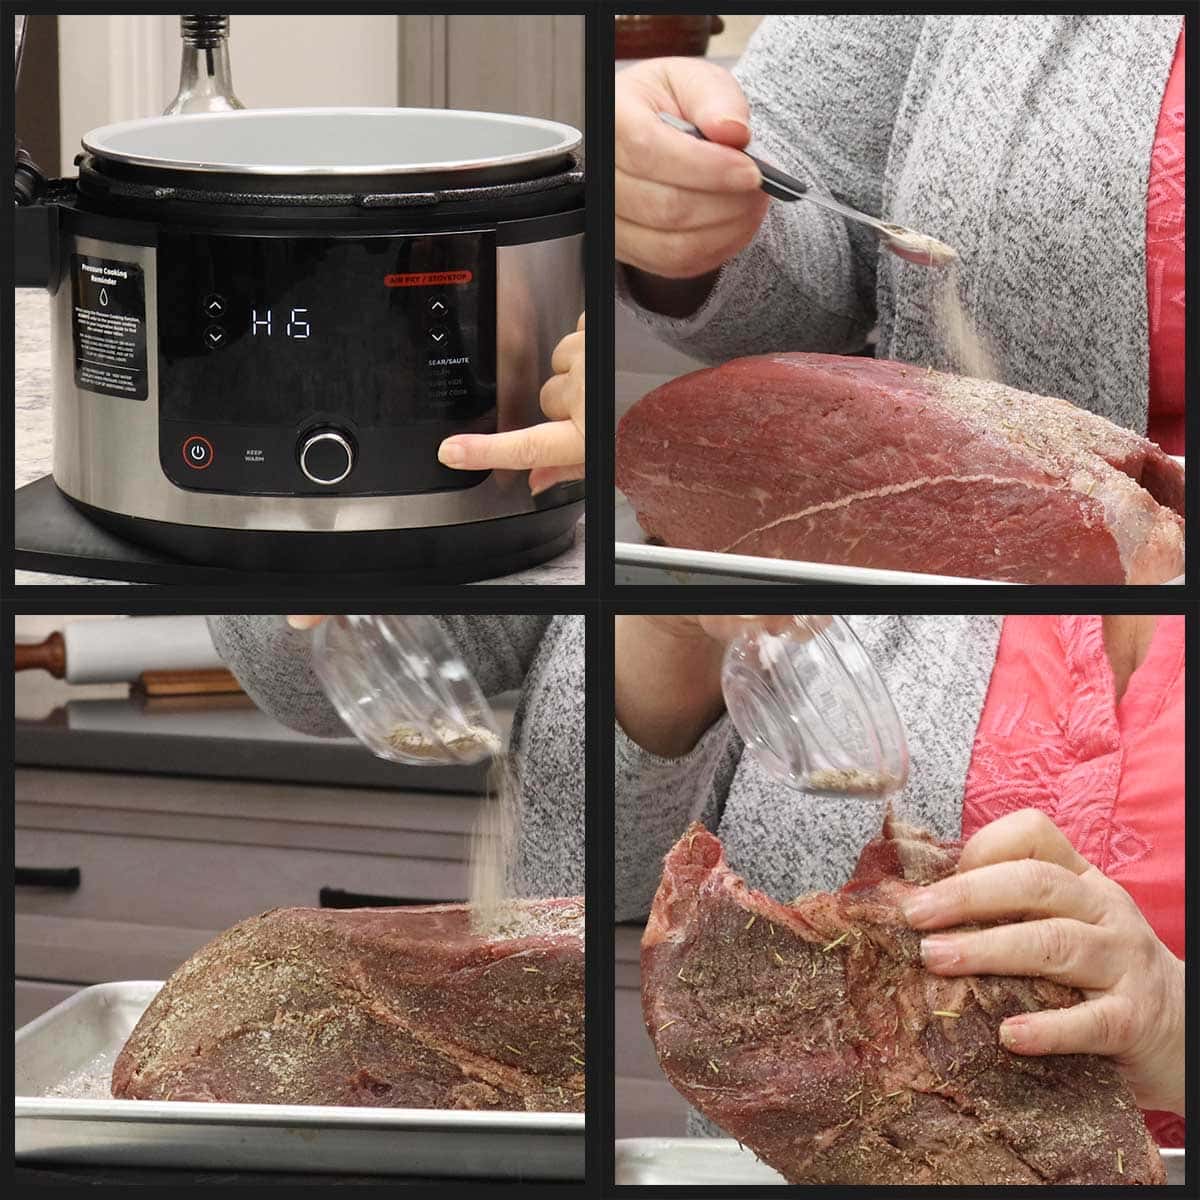
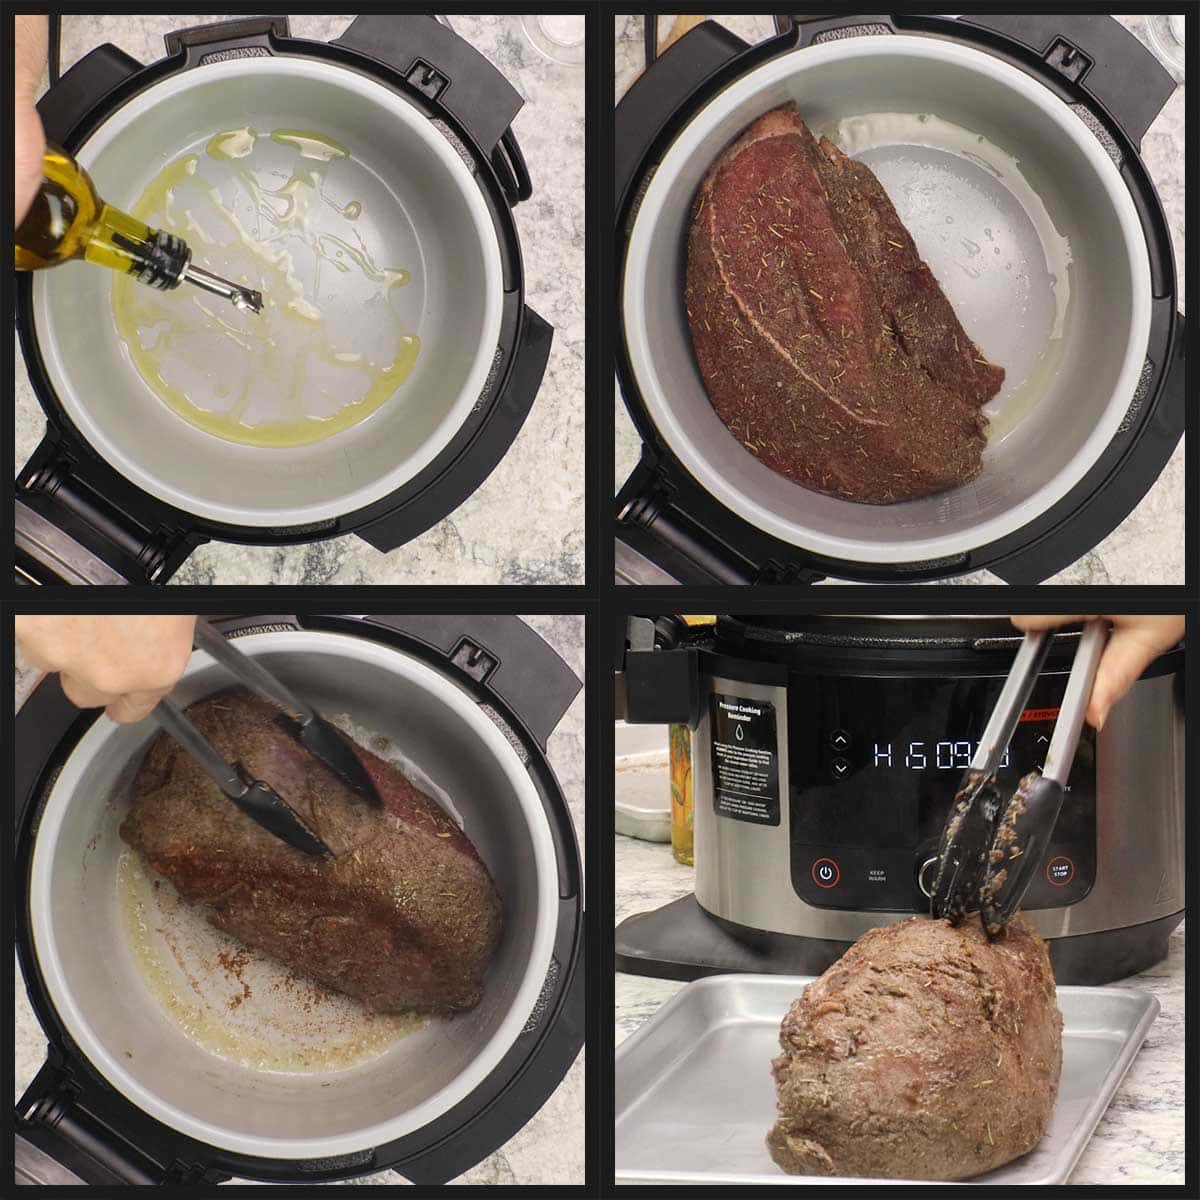
Turn the Ninja Foodi on high sear/sauté to allow the pot to heat up before adding in the oil. Or, you can heat a large skillet on the stove.
While the pot heats up, liberally apply the rub all over the beef roast if you haven't already seasoned it.
If you are using the Ninja Foodi Pressure Cooker & Air Crisper to make this recipe, you can sear the roast directly in the pot using high sear/sauté. That is one of the MANY reasons why I love this appliance!
If you are using a different slow cooker that doesn't have the capability of searing, then you can use a large skillet on the stove for the first few steps of the recipe.
Allow the pot or pan to heat up for several minutes, then add in about 2-3 Tablespoons of olive oil or whatever oil you want to use. Allow the oil to become hot, but not smoking.
Sear the roast on each side for about 2-3 minutes. You will know when the roast is done searing on that side when it releases easily from the pot. If it is sticking, allow it to sear longer.
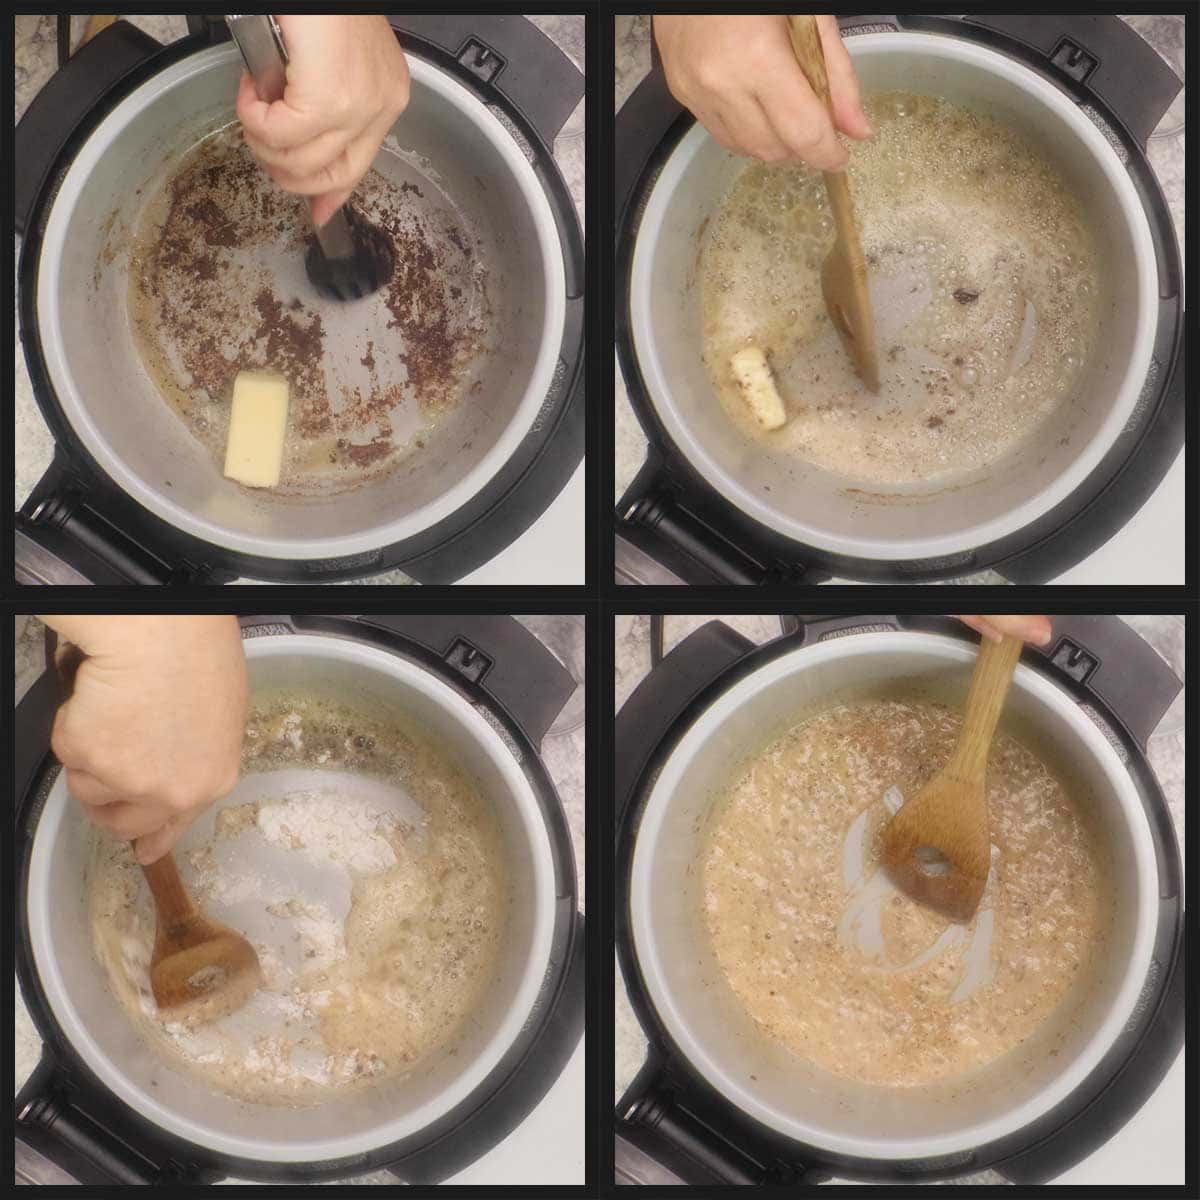
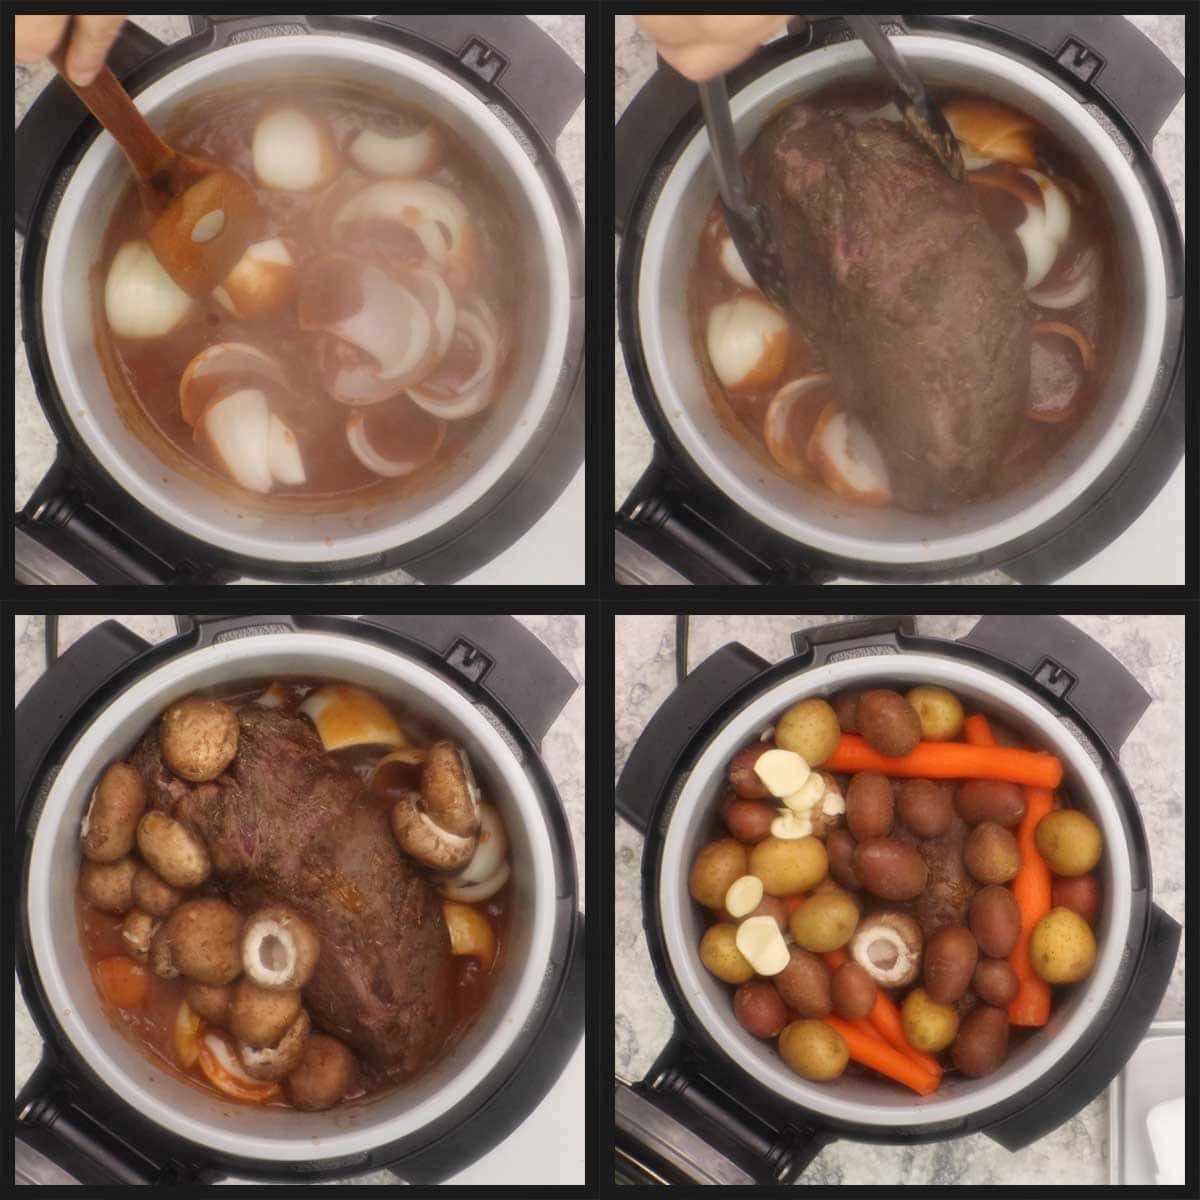
Once it's seared on all sides, remove the roast. I leave the heat on high, but if you are going to take a while to move to the next step of making the roux and starting the gravy, then turn the heat down or turn it off so the brown bits on the bottom don't burn.
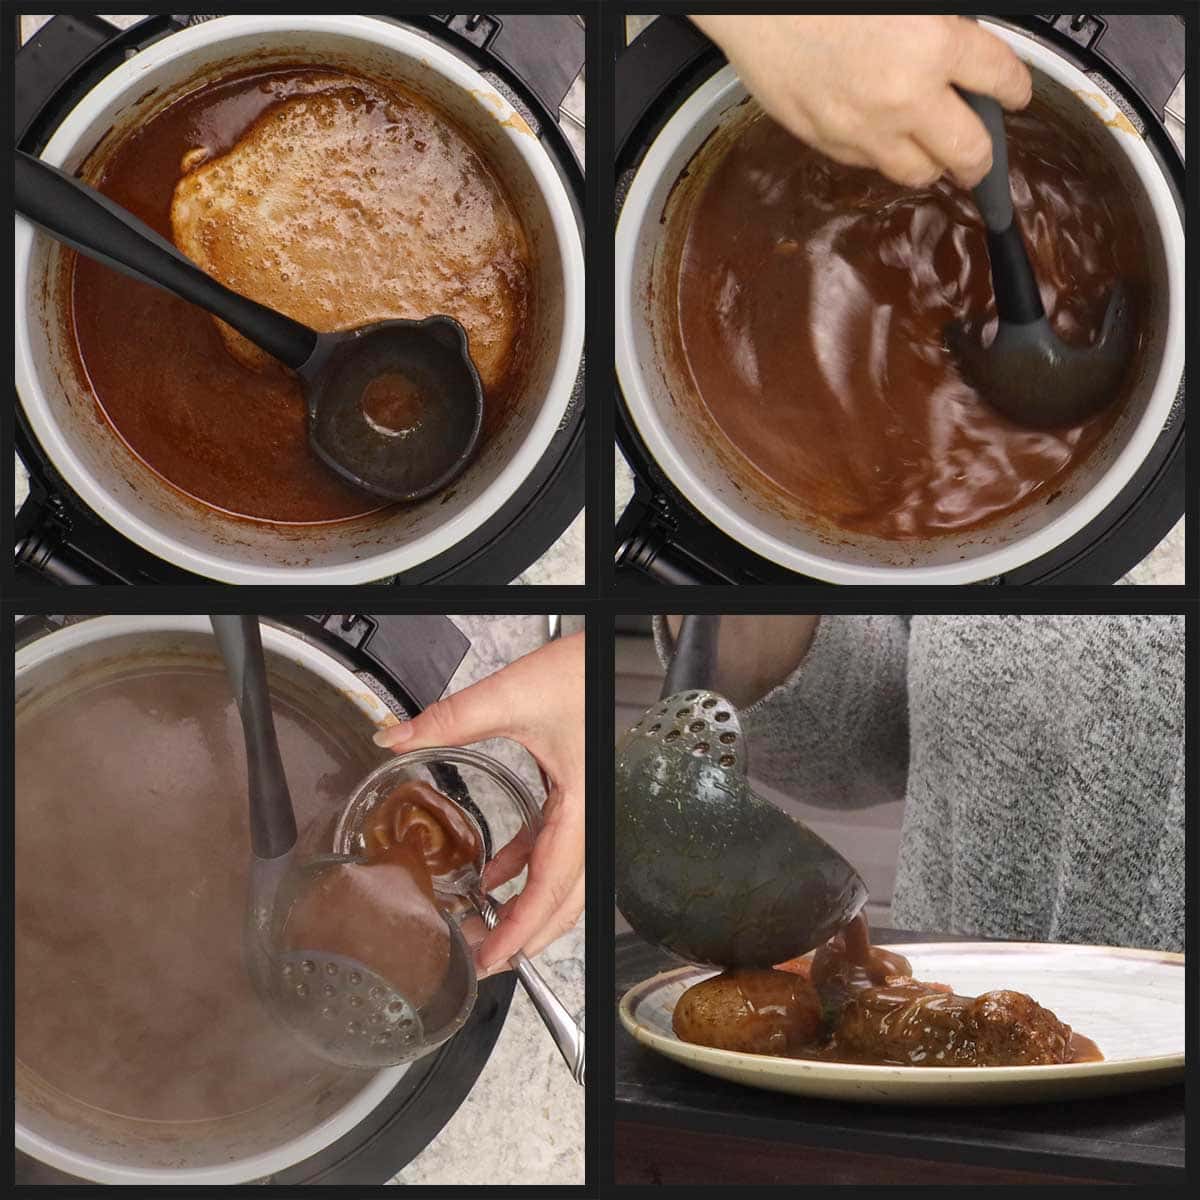
Making the Roux
I start off by making a simple flour roux with equal parts butter and flour. This step is optional though. If you want to skip the roux and thicken the gravy completely at the end, you can simply deglaze the pot with the beef broth or stock and start adding in the roast and veggies.
Add in 4 Tablespoons of salted or unsalted butter and allow to melt. While the butter is melting scrape along the bottom of the pot to loosen the browned bits (fond). These bits are full of flavor and you want them in your gravy.
At any time that you think the butter is getting too brown or is about to burn, turn the heat down. I was able to make the roux while staying on high sear/sauté, but that may not work best for you. Definitely turn the heat down to medium or medium high if you are using a different material pot or pan, like stainless or cast iron.
Once the butter has melted and the brown bits are off the bottom of the pot, add in the 4 Tablespoons of flour. I used all purpose flour or plain flour.
Stir the flour into the melted butter until a loose paste is formed. Cook for 2 minutes to remove the flour taste. This is called a blonde roux and it's all we need to do for this recipe. You can cook the roux longer and it will become darker, which does add flavor and is very common in Cajun and Creole cooking, but it isn't necessary here.
Once the flour/butter mixture has turned a light tan color, I like to add in the tomato paste and cook it for an additional minute or so. The tomato paste is completely optional, but I love the flavor and richness it brings to the gravy. I hope you try it!
Once the tomato paste is cooked with the roux for a minute or two, add in the beef broth or stock. Stir to combine.
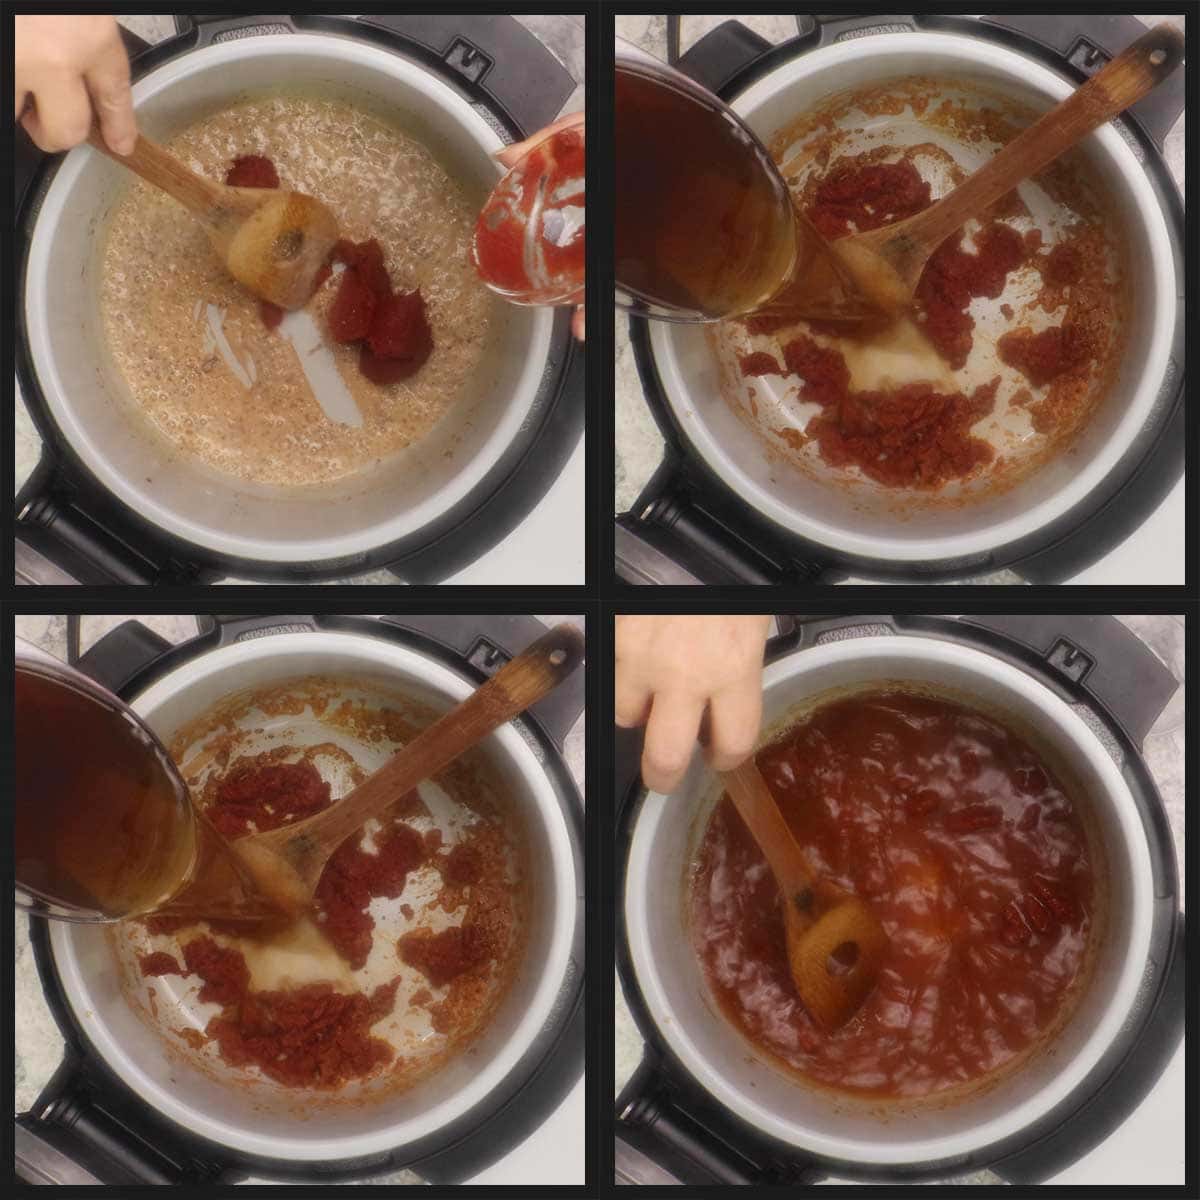
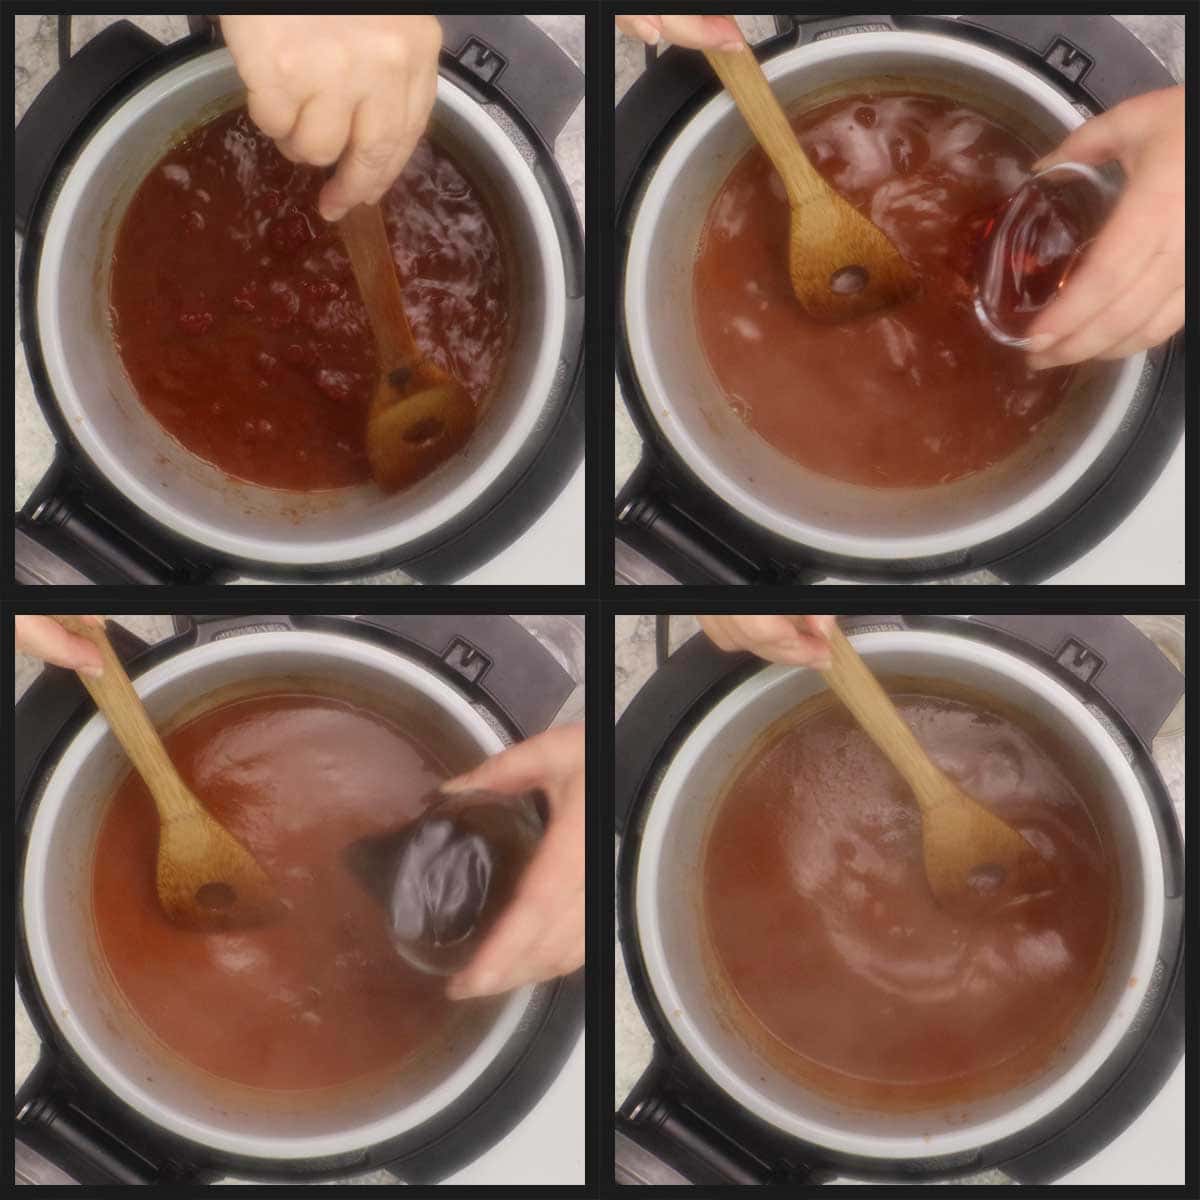
Add in the vinegar and Worcestershire sauce if you are using them. Stir to combine.
Layering the Pot Roast Ingredients
There are two schools of thought on how to layer ingredients when slow cooking. Many people suggest the veggies on the bottom and the roast on top. This ensures the vegetables are covered with the liquid so they cook through.
However, I do it a little differently. I put the quartered onions on the bottom, then the roast, then the other vegetables. In my experience, starting the roast near the bottom starts it cooking quicker and results in a more tender roast. Halfway through the cooking time, I move things around. This worked perfectly in this recipe, but if you aren't going to be home while it's slow cooking, then you may want to put all the vegetables on the bottom.
Slow Cooking the Roast & Vegetables
Put the lid on your slow cooker.
If you are using the two lid Ninja Foodi, put the pressure lid on and turn the valve to vent or you can use a glass lid.
With the one lid Ninja Foodi, lower the lid and keep the slider to the far right.
Select Slow Cook and the temperature should be set for high. The time is 6 hours. I have not tested this recipe using low slow cook, but if you want to try it, I would set it for 8 hours at least.
If you put the roast on the bottom like I did, check it in 3 hours and flip the roast. Push the vegetables down into the liquid so they cook in the remaining 3 hours. You will notice that you have a lot more liquid now that the roast is partially cooked.
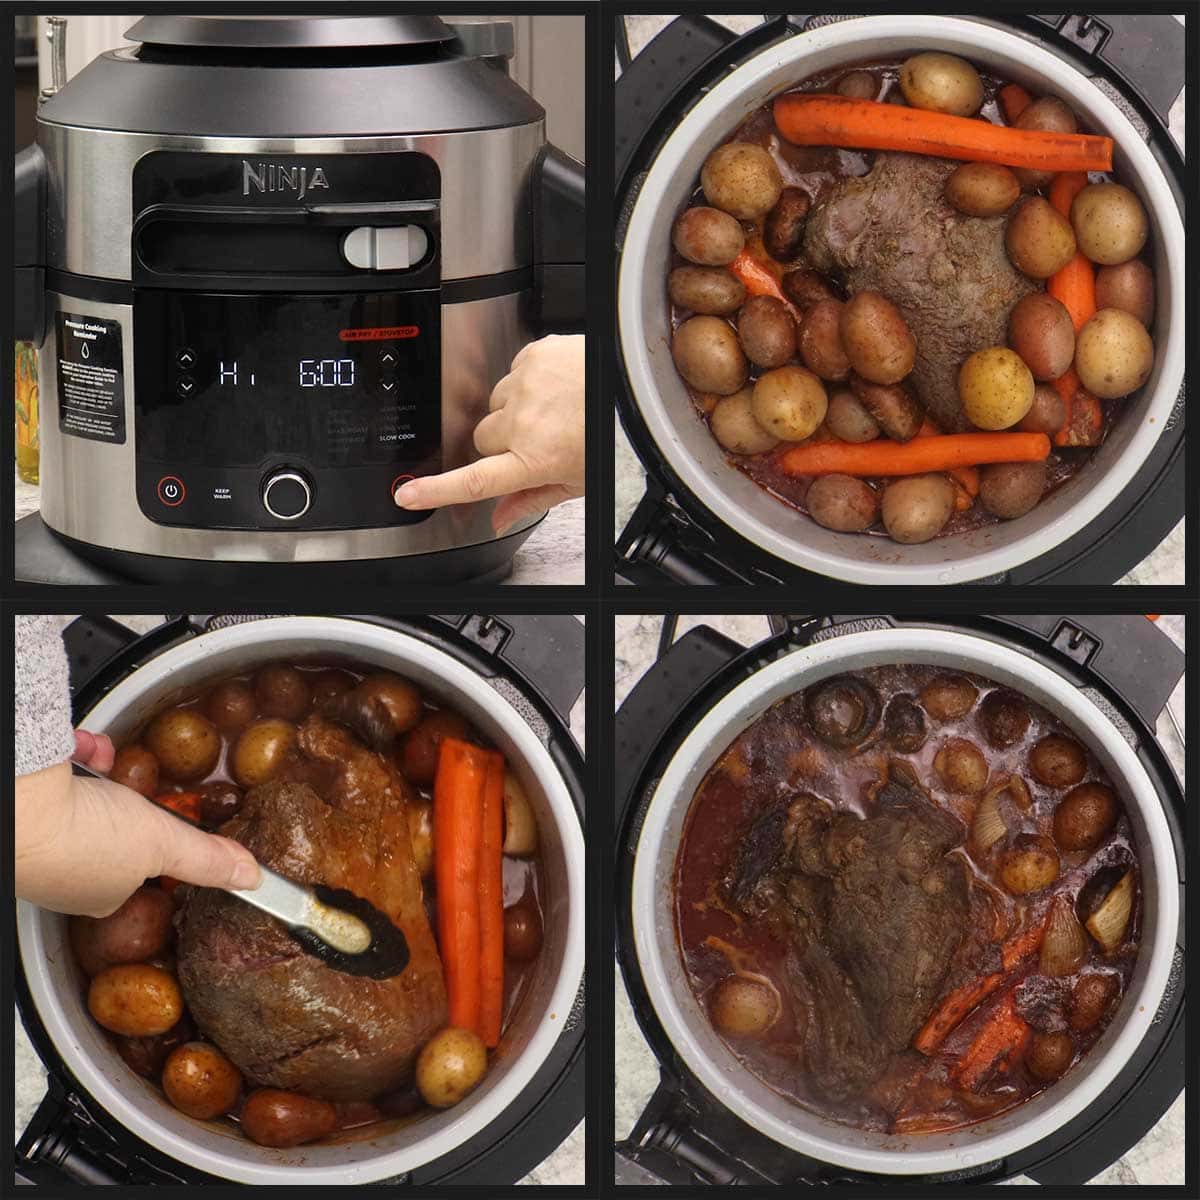
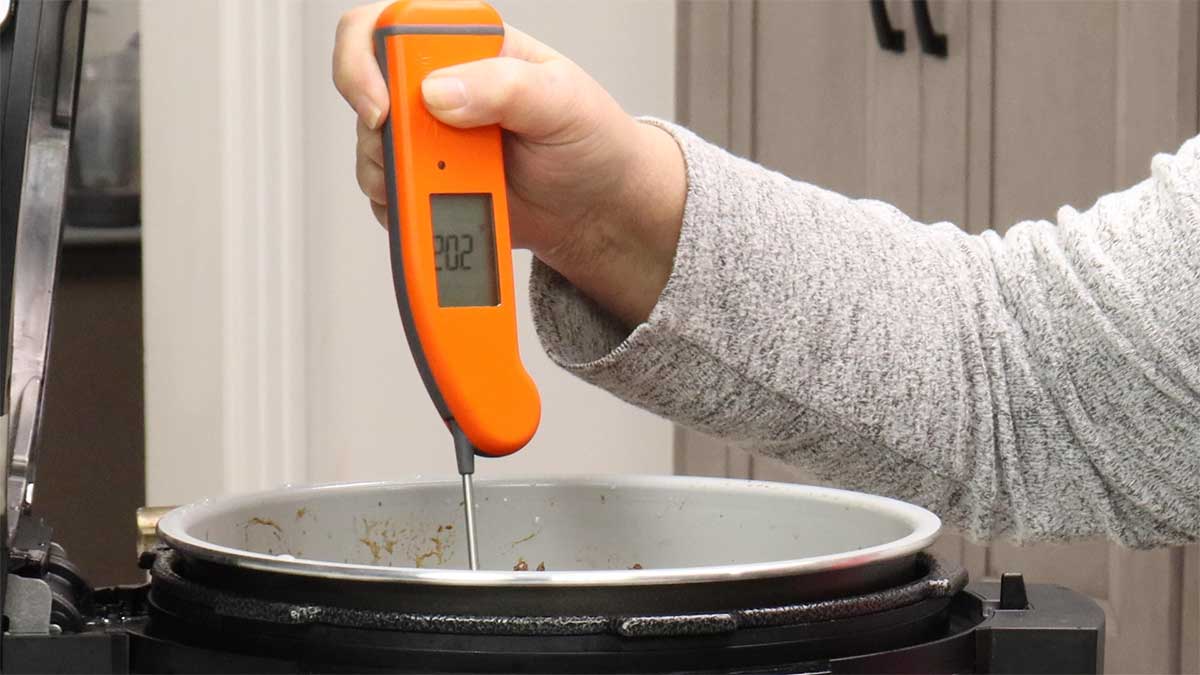
Put the lid back on and cook on high slow cook another 3 hours OR until the roast temperature is around 200℉/93℃. The carrots and potatoes should also be around 200℉/93℃. If the vegetables aren't done to your liking, you can remove the roast and use sear/sauté to simmer the veggies in the juices until they are cooked the way you like them.
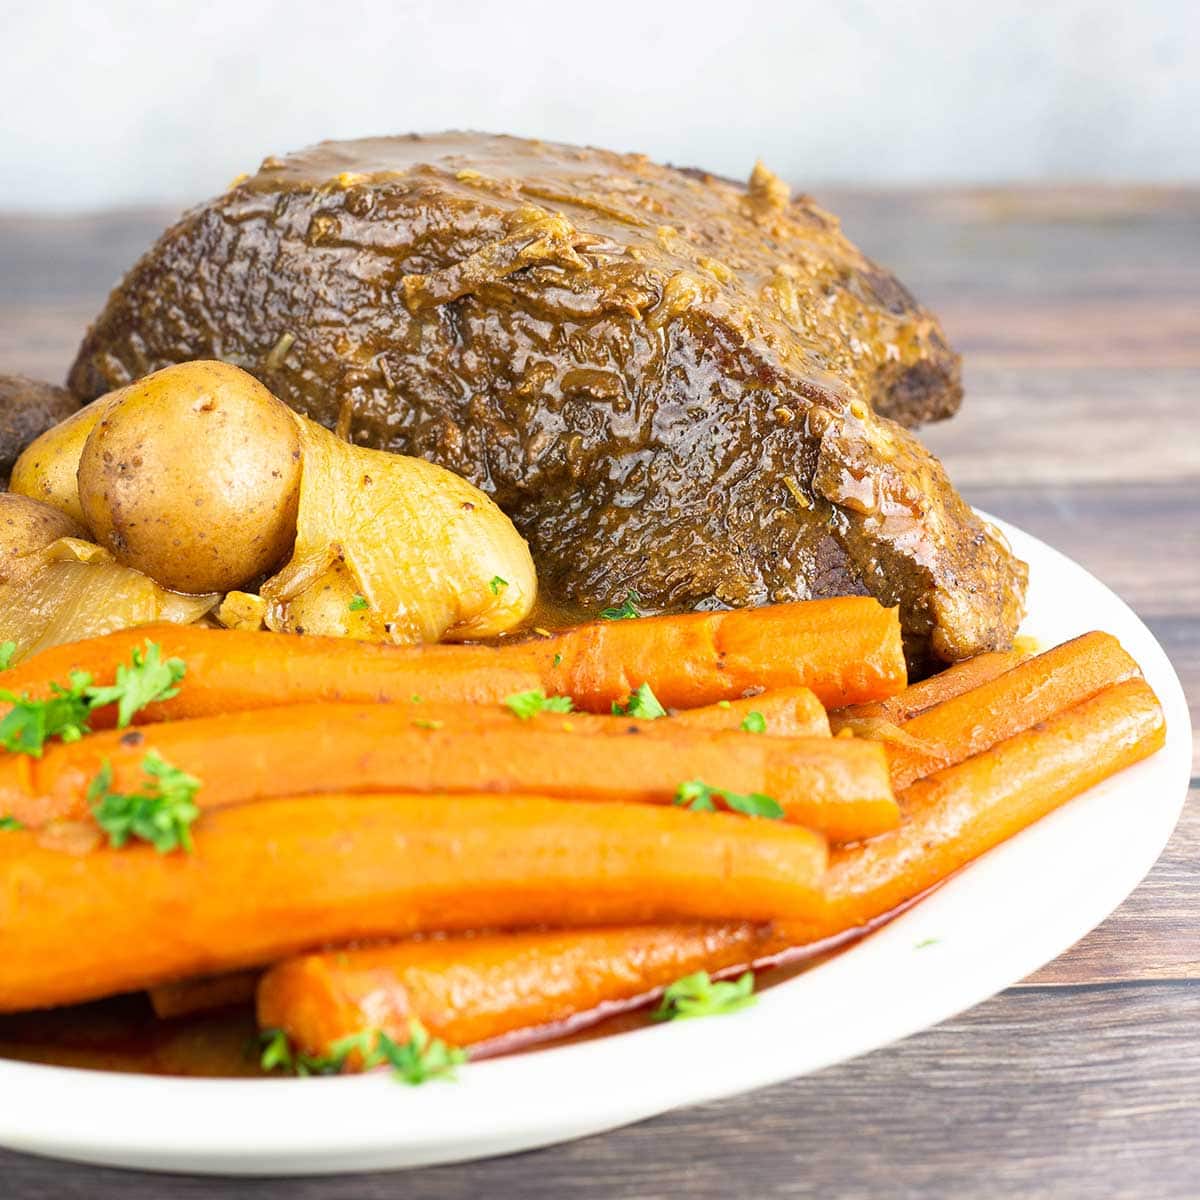
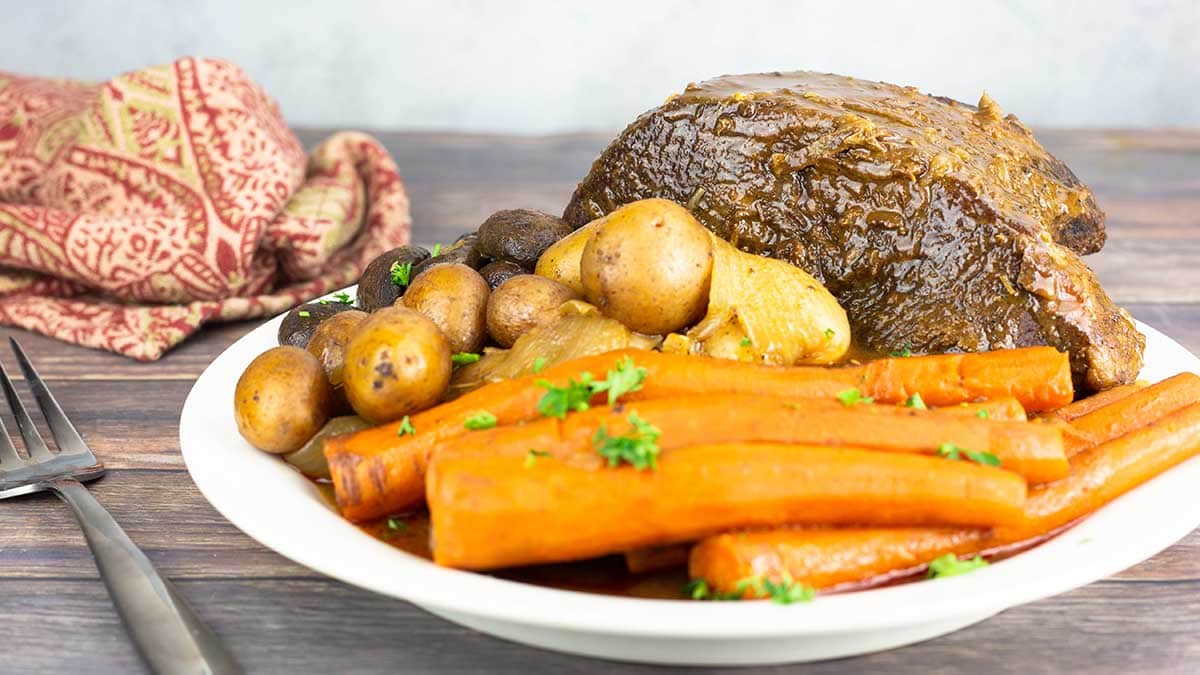
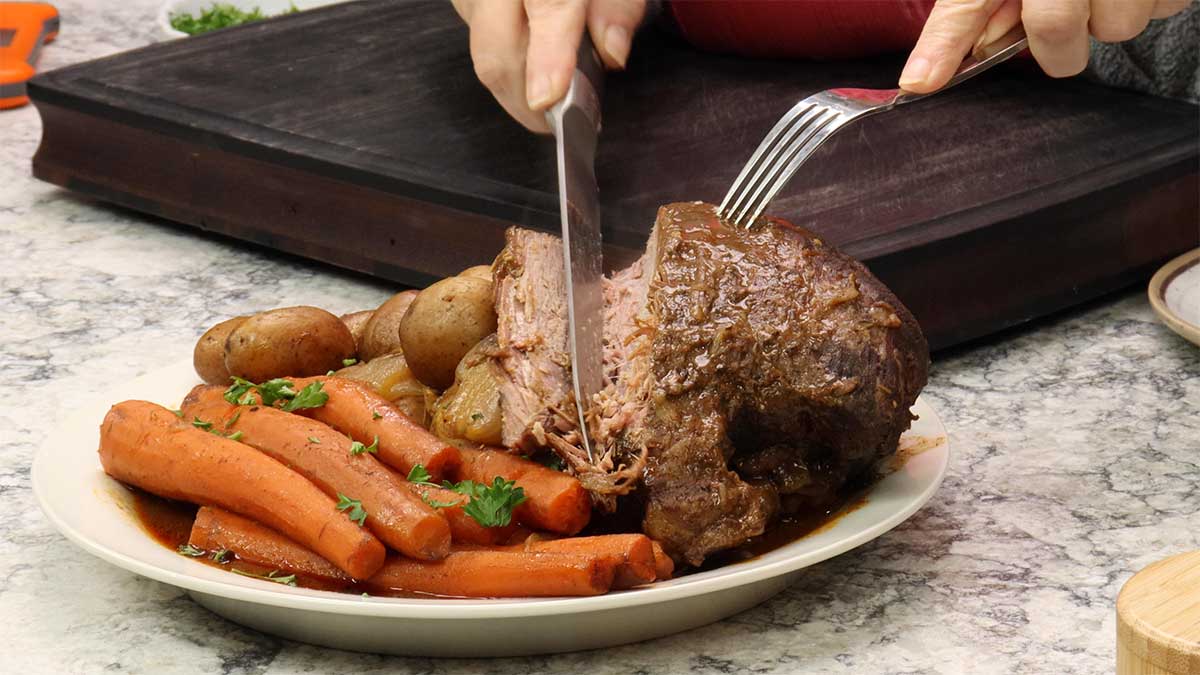
Remove the roast and the vegetables and place them on a platter for serving. You can garnish with fresh or dried parsley, if desired.
Taste the juices/gravy and season with salt and pepper as needed. If you want to thicken the gravy, proceed to the next step. If not, ladle the juices over the roast and serve.
Thickening the Gravy
Depending on how you like your gravy and how much juices the roast release, you may find that you want to thicken the gravy.
There are a few ways you can do this, but I chose a flour slurry.
Combine 2-3 Tablespoons of flour with about ½ cup of beef broth or even water. You want the liquid to be cold or room temperature so the flour blends smoothly and doesn't clump.
I like to use a mason jar with a lid, but any container with a lid will work just fine. Shake the flour and liquid until well combined and free of lumps.
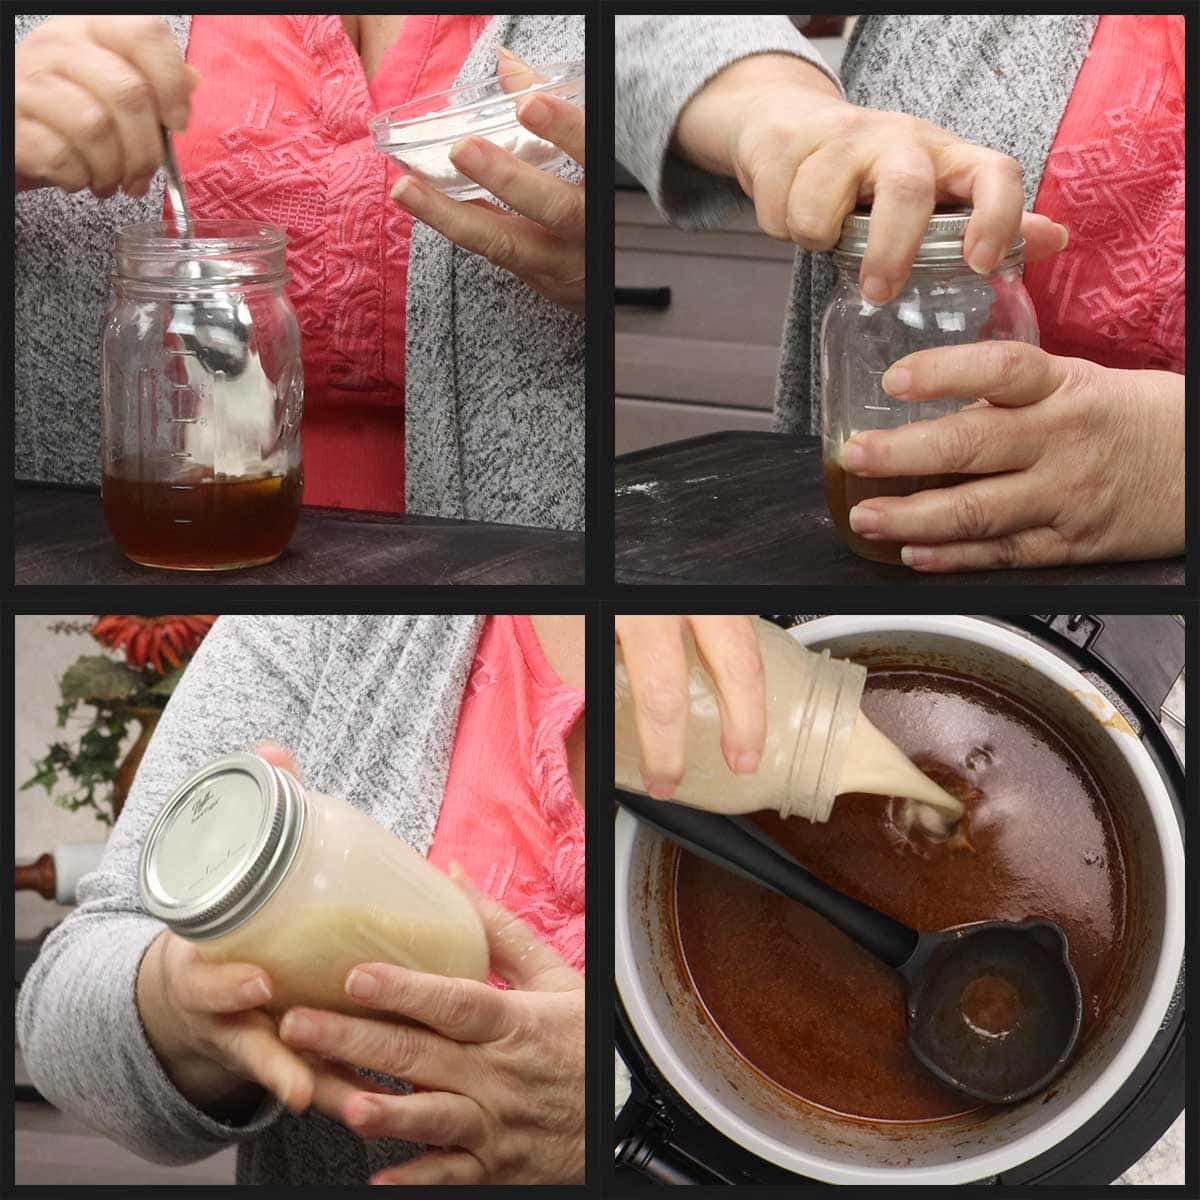
Pour into the juices in the pot and turn on sear/sauté on high. Bring the mixture to a boil and then you can reduce to a simmer and cook for about 3-5 minutes. The mixture will thicken almost immediately, but you definitely want to cook it for several minutes to cook off the flour taste.
You can add more flour mixed with broth, if needed. Once the gravy is your desired consistency, give it a taste for seasonings. Add salt and pepper, if needed.
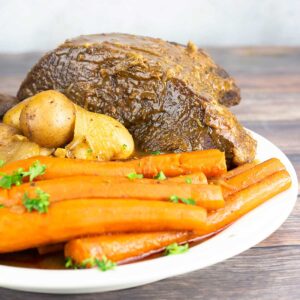
Serving Sirloin Tip Pot Roast
Once the roast and vegetables are on a platter, cut the sirloin roast against the grain in nice thick slices.
Serve with potatoes, carrots, onions, and mushrooms. Top with the delicious brown gravy and Enjoy!
Frequently Asked Questions
Yes, you can. The rule of thumb for converting recipes to pressure cooking are to decrease the cooking time by two thirds. This rule should work just fine if you want to pressure cook instead of slow cook. I would PC on high for 90 minutes with a full natural release. Between the time to pressure and the natural release time, you will be at around 2 hours of cooking time. You can even speed this up even more if you want to follow my recipe timing for Quick and Easy Pot Roast.
For the best results I recommend starting with a thawed roast so that it cooks evenly through; however, you can slow cook a frozen roast.
I recommend brushing a little oil on the roast and seasoning it liberally with whatever spice blend you want to use. You can skip searing it since it won't have the same results as a thawed roast does.
Put the roast in the bottom of the slow cooker and add the thin liquid. The thinner the liquid, the faster the roast will thaw and begin to cook so I would skip any thickening agents like a roux or gravy packets.
Use about 2 cups of thin liquid and slow cook on high for about 2 hours. Then you can add in the vegetables and any thickening agents you want to use and slow cook on high for another 6 hours or until the internal temperature of the roast is around 200℉/93℃
The timing of a slow cooker roast depends on a multitude of things; like size of the roast, type of slow cooker, starting temperature of the roast, and desired doneness of the roast.
The best way to know if it is done is by using an accurate thermometer. You can use an instant read or a probe thermometer to monitor for doneness.
If you want a medium rare rare roast that you plan on slicing thinly across the grain, shoot for a temperature of around 135℉/57℃ to 140℉/60℃.
If you want a fall-apart tender roast, shoot for a temperature around 200℉/93℃ to 205℉/96℃.
Comfort Food Recipes
I consider a perfectly tender pot roast with tender vegetables in a rich brown gravy to be the ultimate comfort food, but there are plenty of other foods that are also high on my list.
If you are in the mood for some delicous comfort food, try out any of these recipes!


Slow Cooker Sirloin Tip Roast Recipe
Equipment
- Slow Cooker or Ninja Foodi PC & AC
Ingredients
Seasoning Blend
- 2 teaspoon fine grind sea salt
- 1 teaspoon black pepper
- 1 teaspoon onion powder
- 1 teaspoon garlic powder
- ½ teaspoon dried rosemary leaves
- ½ teaspoon dried thyme leaves
Sirloin Tip Roast with Vegetables and Gravy
- 4 pounds sirloin tip roast
- 2-3 Tablespoon olive oil
- 4 Tablespoon butter salted or unsalted
- 4 Tablespoon all purpose flour
- 3-4 Tablespoon tomato paste
- 2 cups beef broth
- 2 Tablespoons red wine vinegar
- 2 Tablespoons Worcestershire sauce
- 8 ounces mushrooms whole
- 2 large onions sweet or yellow, quarterd
- 1½ pounds carrots whole
- 1½ pounds small potatoes
- 1 bulb garlic 6-8 cloves peeled and left whole
Thickening the gravy
- ½ cup beef broth
- 2-3 Tablespoons all purpose flour
Would you like to save this recipe?
Instructions
- Take the sirloin roast out of the refrigerator 30-60 minutes before slow cooking if possible.
- Mix the seasoning blend together and liberally apply it to all sides of the roast. You can do this 1-2 days before you plan on cooking the roast if you want and keep in in the refrigerator until 1 hour before you plan on cooking it.2 teaspoon fine grind sea salt, 1 teaspoon black pepper, 1 teaspoon onion powder, 1 teaspoon garlic powder, ½ teaspoon dried rosemary leaves, ½ teaspoon dried thyme leaves
Searing the Roast
- Turn the Ninja Foodi on high sear/sauté and let the pot heat up for a few minutes. Once the pot is hot, add in the oil and let it heat up for a few minutes. If you are using a different slow cooker that doesn't have the ability to sear, you can use a heated skillet on the stove to sear the meat before adding it to the slow cooker.2-3 Tablespoon olive oil
- When the oil is hot, but not smoking, add in the seasoned beef and sear it on all sides for about 2-3 minutes each side. Once the roast is seared, remove it from the pot and set it aside.4 pounds sirloin tip roast
Starting the Gravy
- Add the butter to the hot pot. I keep it on high sear/sauté, but if you can turn the heat down if your butter is browning too much. As the butter melts, scrape the fond (browned bits) off the bottom of the pot so they incorporate with the butter. Once the butter is melted, add in the flour and stir to combine. Cook for 2 minutes.4 Tablespoon butter, 4 Tablespoon all purpose flour
- Add in the tomato paste if using and stir to combine. The mixture will become thick. Cook for 1 minute. If you aren't using the tomato paste, skip to adding the beef broth.3-4 Tablespoon tomato paste
- Add in the beef broth and stir to combine. You can also use a combination of red wine and beef broth if desired. Just make sure you have a total of 2 cups.2 cups beef broth
- Add in the red wine vinegar and Worcestershire sauce. Stir to combine. If you have seared the meat and added the liquid to a skillet on the stove, transfer the liquid over to your slow cooker now.2 Tablespoons red wine vinegar, 2 Tablespoons Worcestershire sauce
Slow Cooking
- Add the quartered onions to the broth. Place the sirloin roast on top and then add in the remaining vegetables. I like to start off with the roast on the bottom and vegetables on top and 3 hours into slow cooking, flip the roast and get the vegetables under the liquid. If you aren't going to be home to do this, put all the vegetables on the bottom and then add in the sirloin roast.8 ounces mushrooms, 2 large onions, 1½ pounds carrots, 1½ pounds small potatoes, 1 bulb garlic
- Put the lid on the slow cooker. If you are using the Ninja Foodi with 2 lids, use the pressure lid vented or a glass lid that fits. If you are using the Ninja Foodi with 1 lid, the slider should be to the right and you will select the slow cook function on high. On the one lid models It doesn't matter if you have the valve set to vent or seal, the vents are open in the lid itself.
- Slow cook on high for a total of 6 hours or until the internal temperature of the meat reaches around 205°F/96°C. At the 3 hour mark, I flip the roast and push the vegetables down into the liquid.
- If for some reason your meat is done, but the vegetables aren't soft enough, you can slow cook longer or remove the roast and use sear/sauté to finish cooking the vegetables in the liquid.
- Remove the roast and vegetables and place them on a serving tray.
Thickening the Gravy
- The gravy will be on the thin side from all the juices released from the roast. You can serve it like it is or thicken it.
- To thicken with a flour slurry. Add ½ cup cold beef broth to a mason jar or another container with a lid and add 2-3 Tablespoons of flour. Shake until combined and pour into the pot with the other liquid. Turn on the sear/sauté on high and bring to a boil, cook for about 3-5 minutes. If your slow cooker doesn't have the ability to sauté, you can make a roux on the stove by combining equal parts butter and flour and stir together until the butter melts and combines with the flour. Cook for 2 minutes and then add it into the hot liquid in the slow cooker and stir to combine. The sauce should thicken.½ cup beef broth, 2-3 Tablespoons all purpose flour
- To thicken with a cornstarch slurry. Add 2 Tablespoons of cornstarch to ¼ cup of water or beef broth (cold) and stir together. Add to the hot liquid in the pot and bring to a boil. The sauce will thicken.
Serving
- Slice the roast across the grain for the most tender beef. Garnish the plate with fresh or dried parsley if desired. Serve with gravy. Enjoy!
Nutrition
About the Recipe Author, Louise Long
Louise is a full-time recipe creator and food blogger @ The Salted Pepper. She has over 30 years of experience with cooking and recipe development. She owned a restaurant for several years and was a full-time RN until retiring to blog full-time.

She published her first cookbook in the Fall of 2018 and is very interested in writing several more.
Louise is also the creator of an online Ninja Foodi Pressure Cooking Course with over 100 instructional step-by-step videos. People absolutely rave about the course and all the value they have received from it.
Louise has several very active Facebook groups that help people with the basics of cooking and learning more about the appliances they love.
Ninja Foodi Pressure Cooker & Air Crisper 101
Ninja Woodfire Outdoor Grill & Smoker
Louise is also a YouTube creator and you can find most of her recipes in video format on The Salted Pepper YouTube channel.
She is very responsive to messages and eager to help in any way she can. Get more Information about Louise & contact information
I WOULD LOVE TO SEE WHAT YOU ARE COOKING UP IN YOUR KITCHEN! TAG ME @THESALTEDPEPPER ON YOUR FAVORITE SOCIAL MEDIA PLATFORM WHEN YOU MAKE A DISH!
BE SURE TO FOLLOW THE SALTED PEPPER RIGHT HERE ⇓⇓⇓⇓⇓
Hope Corbin says
Would you cook to the same internal temp for a smaller roast?
Louise says
Yes, the internal temp remains the same based on how you want the roast cooked, but the timing may be a little less for a smaller roast.
Greg says
Serving dinner guests, one of which does not care for onions. Can I simply place the sirloin tip roast on the bottom to begin with?
Louise says
Yes, that should be fine.