It seems like all the fancy restaurants offer a classic crème brûlée on the dessert menu and my husband orders it every single time. There is something about this simple dessert that is so appealing.
Is it the smooth custard or the hard sugar on top? Is it the delicate flavor of vanilla or is it the fancy ramekin decorated with a few berries? No matter what is most appealing to you, this dessert is so easy to make and uses basic ingredients that you probably have on hand.
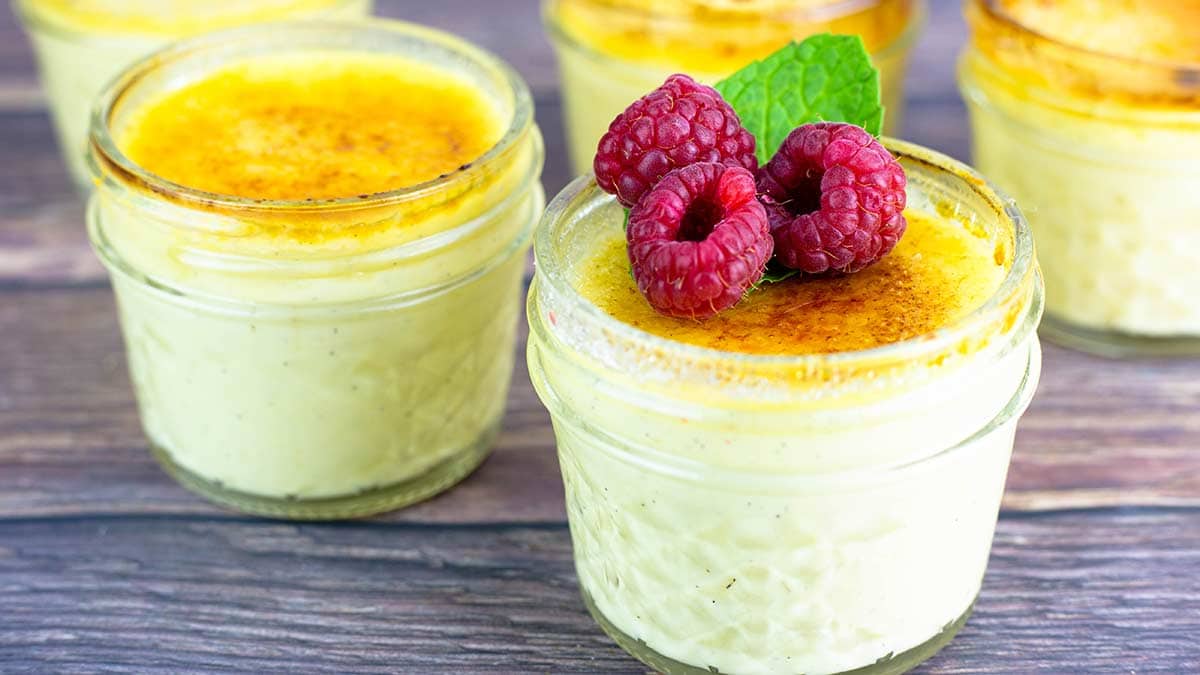
Having a creme brulee aficionado in the house with me means that I have made a lot of creme brulee, but I haven't always had perfect results. Although the dessert is very easy to make, it was kind of a pain to bake them in the water bath and getting the perfect brulee was something I wasn't sure I would ever master. Then sous vide cooking came into my life and it's the perfect way to make creme brulee that turns out perfectly every time.
I also came up with a technique using a kitchen torch and granulated sugar to create the hard sugar topping and I'm thrilled to be able to share it with you. I can pretty much promise you that if you follow this sous vide method and my tips for the brulee topping, you will be serving up the perfect sous vide creme brulee in no time at all!
Ingredients & Substitutions
Creme Brulee only uses a few ingredients, so there isn't a whole lot of room for substitutions because each of the ingredients work together to create this creamy dessert. However, I have tried a few different ingredients and I'll share my results with you.
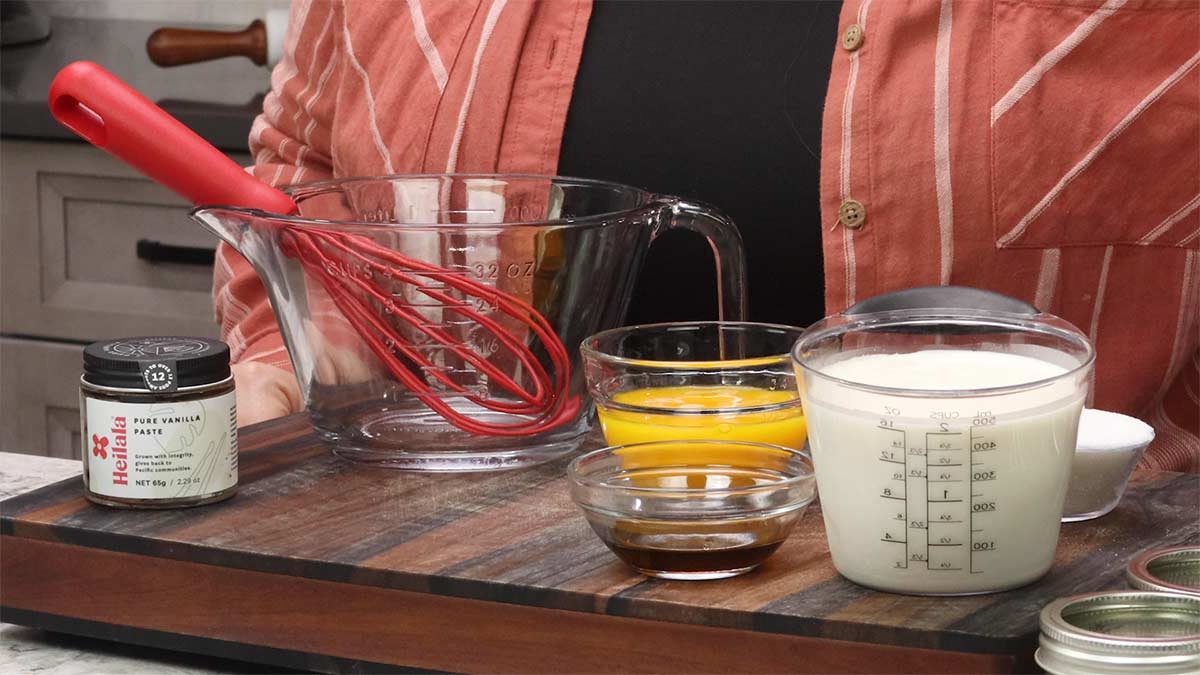
Cream
Heavy Cream is used in this recipe and I have not tried making it with anything else. I have read that you can substitute whole milk for the cream, but the custard won't be as rich and most likely will be a little thinner. If you want to cut the calories, but still have great results, try using part heavy cream and part milk instead of all milk. I would suggest going up to 25% milk to 75% cream. For this recipe that would be 1½ cups heavy cream and ½ cup milk. You may be able to push that a little further, but the first time you make it, don't go more than 1¼ cream and ¾ cup whole milk or you may be disappointed.
I have also read that you can use full fat coconut milk, the kind in the can that also has the coconut cream, if you want a dairy free version. I have not tried this myself, but it should work out okay.
Eggs
This recipe only uses the egg yolks, so you will need to seperate the whites from the yolks. The yolks add the stability and richness that is typical in creme brulee. I have read that you can use other thickeners and stabilizers like agar flakes and possibly even xanthan gum in place of the eggs, but I have not tried this so I'm not sure how it will turn out. If you want to make a vegan version of creme brulee, I would look up a vegan recipe that is well tested and has good reviews.
Sugar
This is one ingredient where I did some experimenting and instead of using granulated sugar, I used a sugar substitute. It worked and the custard set up fine, but I couldn't get past the tingling sensation from the Swerve sugar substitute and it ruined the experience for me. Swerve doesn't usually bother me like that, but because there are so few ingredients in the creme brulee it was very noticeable. If you aren't one of those people who gets the tongue tingling sensation with artificial sugar, then by all means substitute 100% of the sugar with the sugar substitute and you will have a low carb and keto friendly dessert.
You can also only substitute a portion of the sugar with a sugar substitute and see if that gives you the flavor you are looking for without using all sugar.
Vanilla
Classic creme brulee is a vanilla flavored custard topped with a crisp sugar coating and that is what this recipe is for. You can use all vanilla extract, vanilla bean paste, fresh vanilla beans steeped in the heavy cream, or any combination of vanilla flavoring you like and have on hand.
Vanilla beans are a little pricey and, although I had some, I decided to skip them in this recipe. If you want to use fresh vanilla beans, I would cut the vanilla bean in half lengthwise and put it with the two cups of cream and heat it over low heat until it just starts to simmer. Remove from the heat and let sit for 30-60 minutes. Remove the vanilla bean pod and strain the cream so the mixture is very smooth. Then scrape out the vanilla seeds into the cream and refrigerate it for a few hours before using in the recipe.
What I found worked great is using half vanilla extract and half vanilla bean paste. It gave a great vanilla flavor and the specks of vanilla were noticeable and the cost was much less than using fresh vanilla bean.
If you want to introduce a different flavor into the creme brulee, you can use different flavors of extracts or even replace 1 Tablespoon of the cream with your favorite liqueur. Amaretto or Chambord would be great choices.
Brulee Topping & Garnishes
I have tried many different styles of sugar, including a sugar substitute to make the brulee topping and plain granulated sugar works best for me. The sugar substitute didn't work at all, so if you are going to make a low carb version, sprinkle some cinnamon mixed with artificial sweetener on top and enjoy the custard without the brulee topping.
Some people say fine sugar works better than granulated sugar, but in my test batches I preferred working with granulated sugar.
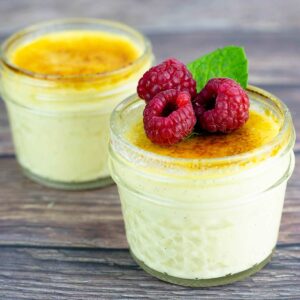
Garnishes are optional, but there is something very elegant about topping each dessert with a mint leaf and a few fresh berries.
Supplies Needed for Sous Vide Crème Brûlée
The basic supplies you will need for sous vide creme brulee are:
- Immersion Circulator or Sous Vide Machine
- Small Canning Jars
- Kitchen Torch or Blow Torch
- Large Bowl or Large Measuring Cup (4 cups or larger)
- Whisk
Sous Vide Machine
I used the Ninja Foodi Pressure Cooker & Air Crisper with the Sous Vide function, but you can use any type of appliance that has the sous vide function. Immersion circulators work great and some Instant Pots also have the sous vide function.
The difference between the Ninja Foodi or Instant Pot Sous Vide functions and stand-alone sous vide circulators is that the Ninja Foodi and Instant Pot do not circulate the warm water like a circulator will. This doesn't make any difference and any of these appliances will work just fine.
The most critical part of making creme brulee is the cooking temperature, so you will need to have a sous vide appliance that is capable of being set at around 180℉/82℃. The sous vide water bath should maintain a temperature of between 178℉/80℃ and 182℉/82℃ to ensure that the internal temperature of the custard doesn't get too hot and curdle.
This is why you use a water bath (called a bain marie) when cooking creme brulee in the oven. Sous vide is the easiest way to create a foolproof water bath for cooking up the creamy custard without any worries of it curdling.
**If you are using the Ninja Foodi two lid model or the Instant Pot and using the sous vide function above 170℉/75℃, the steam built can cause the pin on the pressure lid (even though it's vented) to pop up and that will lock the lid. To avoid this, use a glass lid instead of the pressure lid or simply cover the top of the pot with foil or something else that will trap in the heat, but that you can easily remove to add and remove the jars.
Small Canning Jars
I used 4 ounce jelly jars in this recipe and I love the ease of using them in the sous vide bath, but you can also use larger jars or other airtight containers.
If you have 8 ounce canning jars, you can use them and you can even fill them all the way to the top and they will still be done in an hour. The difference will be the amount of surface area for the caramelized sugar compared to the amount of custard. If that doesn't bother you, then you can certainly use 3 of the 8 ounce jars. Or double the recipe and use 6 of the 8 ounce jars. You will need more water though to make sure the jars are covered.
If you want to sous vide in the jars, but serve the creme brulee in individual ramekins, you absolutely can do that. You will want to know how many liquid ounces the ramekins hold and use the same size jar or bigger. Pour the custard into the jars and sous vide as directed. Immediately after the sous vide time is up, remove the jar lids and pour the custard into the ramekin. Let sit at room temp or refrigerate for 15 minutes, then cover with plastic wrap so it doesn't develop a skin on top and refrigerate at least 4 hours or overnight. *Depending on the surface area of the ramekin, you may need more sugar to cover the top before caramelizing with the torch.
If you don't have any sealable jars, you can also try to put the custard mixture into a sealable plastic bag with as much air removed as possible and sous vide in the bag. I recommend decreasing the temperature of the water bath to around 175℉/80℃ to avoid the mixture getting too hot.
Kitchen Torch or Blow Torch
While you don't absolutely need a torch to caramelize the sugar on top of the custard, it sure does do the best job!
There are many different styles of torches and I've tried several of them. The one I'm using currently is from Amazon and it's relatively inexpensive. Here is the link if you are interested in looking into purchasing one: (affiliate link)Kitchen Torch on Amazon
You can also use the broiler on your oven. You will want the top of the custard to be about 3-4" away from the heating element. My experiment doing this during the YouTube video did not got that well and I think I know where I went wrong.
I left the broiler on for 10 minutes before I placed the jars under it. This allowed the entire oven to heat up which resulted in cooking my custard too much. It was visibly boiling in the little jars!
I also had the jars too close to the heating element, but there really wasn't much I could do about that. If I moved the rack down one level, they would have been too far away. The broil method would work better with ramekins over the small jars because of the height of the jars.
I DO NOT recommend trying to use the broil/grill function on the Ninja Foodi because it just doesn't get hot enough quick enough to do a good job and the fan blows the sugar around.
Mixing bowl, Whisk, & Thermometer
While you can use other types of equipment to mix up the custard, I find a simple whisk and 4 cup pourable measuring cup to be easiest.
The measuring cup acts as the mixing bowl, but makes it super easy to pour the custard into the jars. The one I use is from Pampered Chef: (affiliate link)Small Batter Bowl
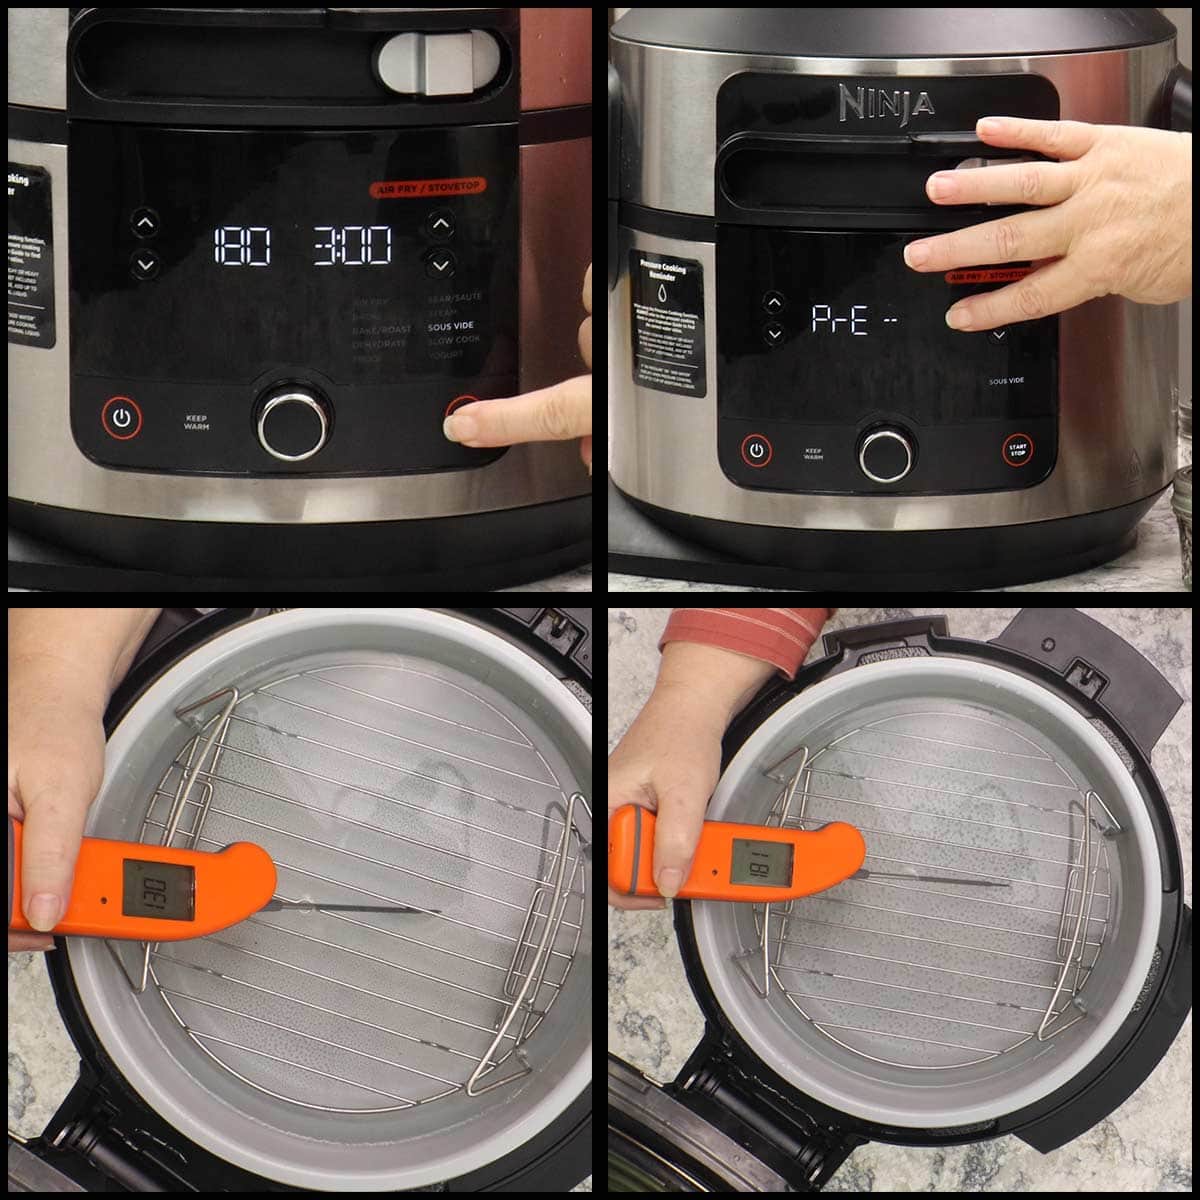
If you are using the Ninja Foodi or Instant Pot as your sous vide machine, you are going to want to test the water temperature with an (affiliate link)Instant Read thermometer. Often times it will say to "add food" and the temperature of the water hasn't reached the desired temperature. This is especially true when sous vide cooking at higher temperatures.
How to Sous Vide Crème Brûlée
Setting Up for Sous Vide Cooking
The setup will vary depending on what type of sous vide appliance you are using. I used the Ninja Foodi Pressure Cooker & Air Crisper to sous vide the creme brulee and this is how I set it up.
Place the rack in the low in the low position and set the empty jars (lids on) on the rack. Pour in enough water to just cover the jars. This took about 12-14 cups of water in the 6.5 qt Ninja Foodi.
Remove the jars and close the lid. If you are using the 2 lid Ninja Foodi with the pressure lid, I recommend not using the pressure lid and use a glass lid instead. If you don't have a glass lid, use some foil to cover the inner pot.
Even with the pressure lid vented, the pin can pop up when you sous vide on higher temperatures and then the lid is locked and you can't open the Foodi to put the jars in. You can also heat the water with the lid off and when it reaches the desired temperature (180℉ for this recipe), you can add the food and put on the pressure lid. Make sure the valve is to the seal position. If the lid is locked when the sous vide time is up, simply turn off the Ninja Foodi and wait for the pin to drop, then you can open the lid. This will not affect the outcome of the creme brulee.
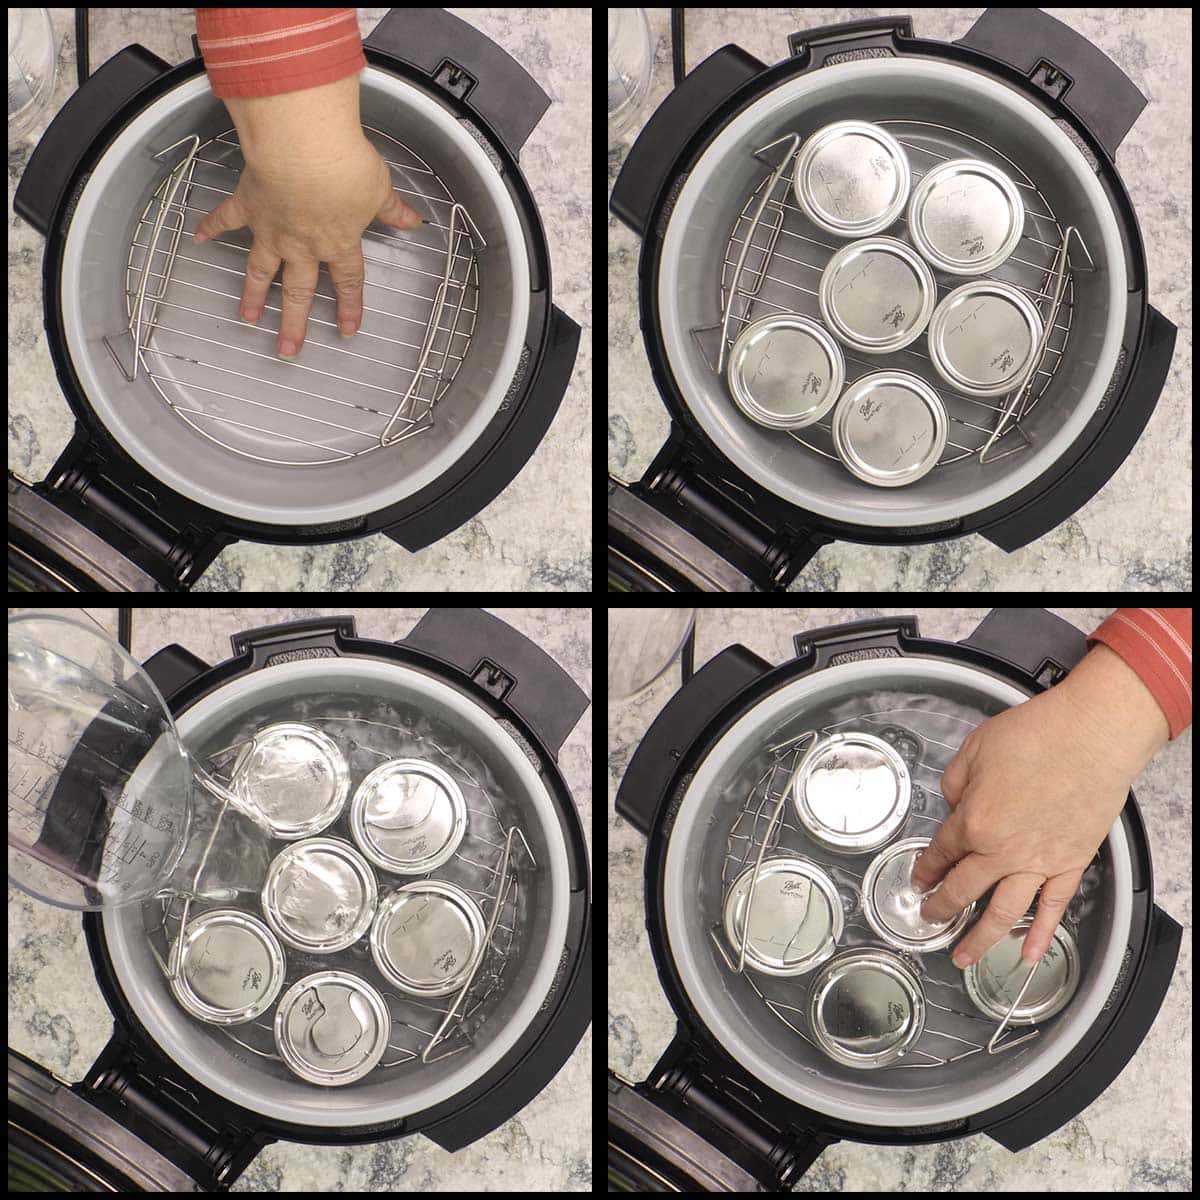
Close the SmartLid or cover the two the lid Ninja Foodi models with a glass lid or foil or leave uncovered while the water heats up. Leavening it uncovered will result in more evaporation of the water and it will take longer to heat up. I suggest starting out with 2 additional cups of water when leaving the Foodi uncovered.
Select the sous vide function and set the temperature to 180℉ and hit start. If your Foodi model has the sous vide function and is in Celsius, set it as close to 82℃ as you can. I don't have celsius on my Foodis, but I would guess your temp would be 80℃.
The "pre" will light up and you will see dashes or dots across the display. This means the Foodi is heating up. Once it goes to "add food," you will want to check a temperature of the water.
I have found that it takes a good 30 minutes for the 12-14 cups of water to reach 180℉, but the "add food" pops on the screen about 10 minutes after hitting start.
While I wait for the Foodi to heat up, I mix up the custard and get them into the jars.
Making the Custard for Crème Brûlée
Separate the egg yolks from the whites into two small bowls. You can freeze the egg whites for use later or use them to make a dreamy banana pudding with meringue topping!
Using a large bowl or (affiliate link)batter bowl (pictured below), lightly whisk the egg yolks to break them up.
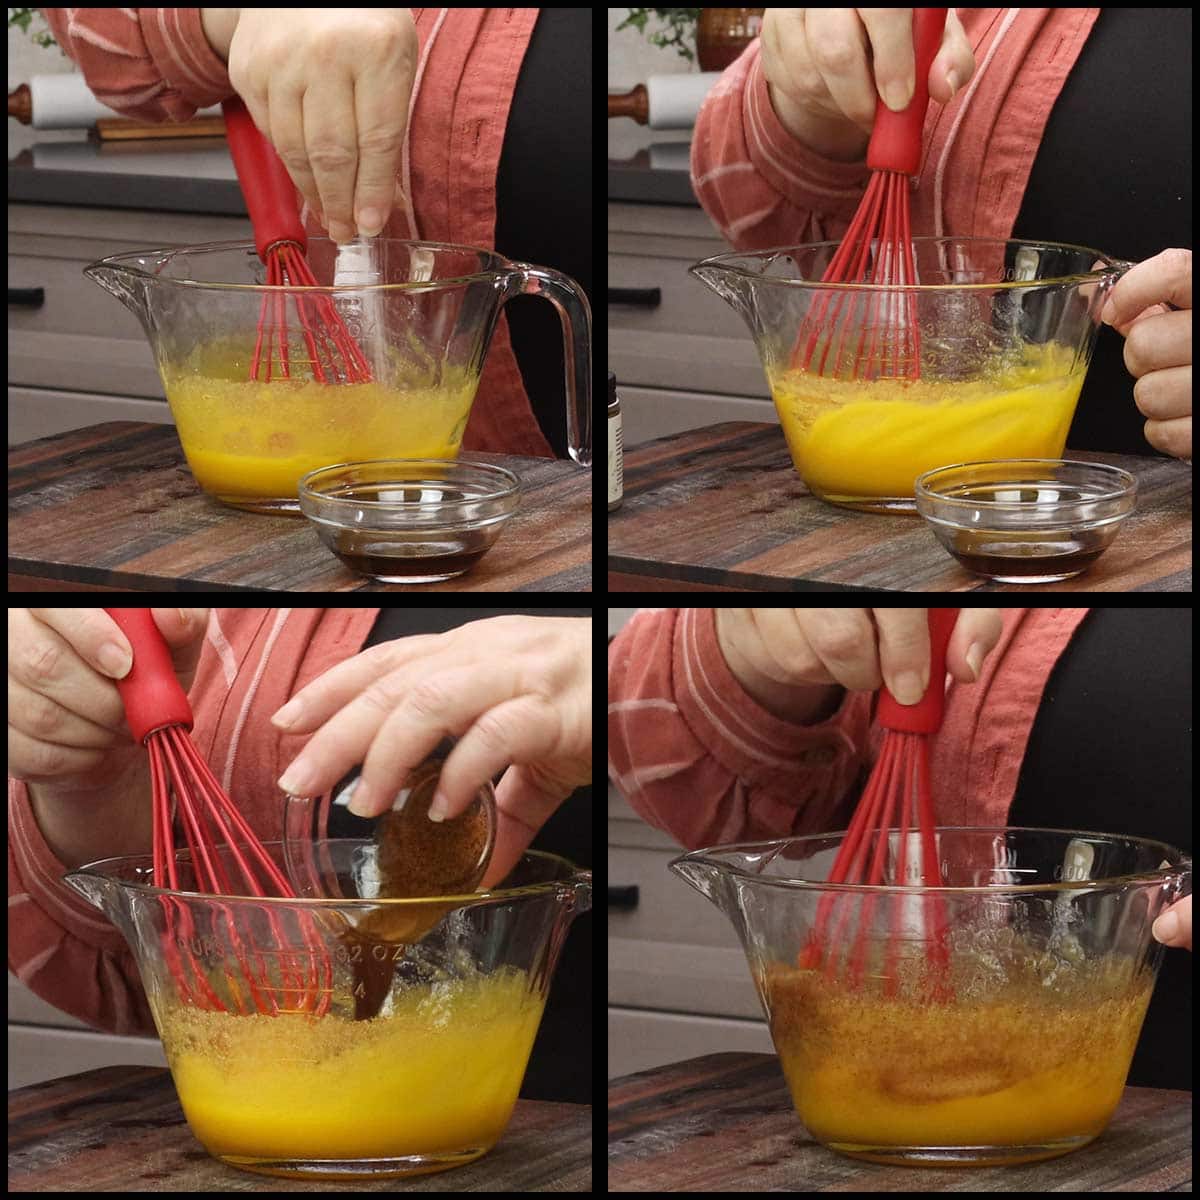
Add in the granulated sugar and whisk until well combined.
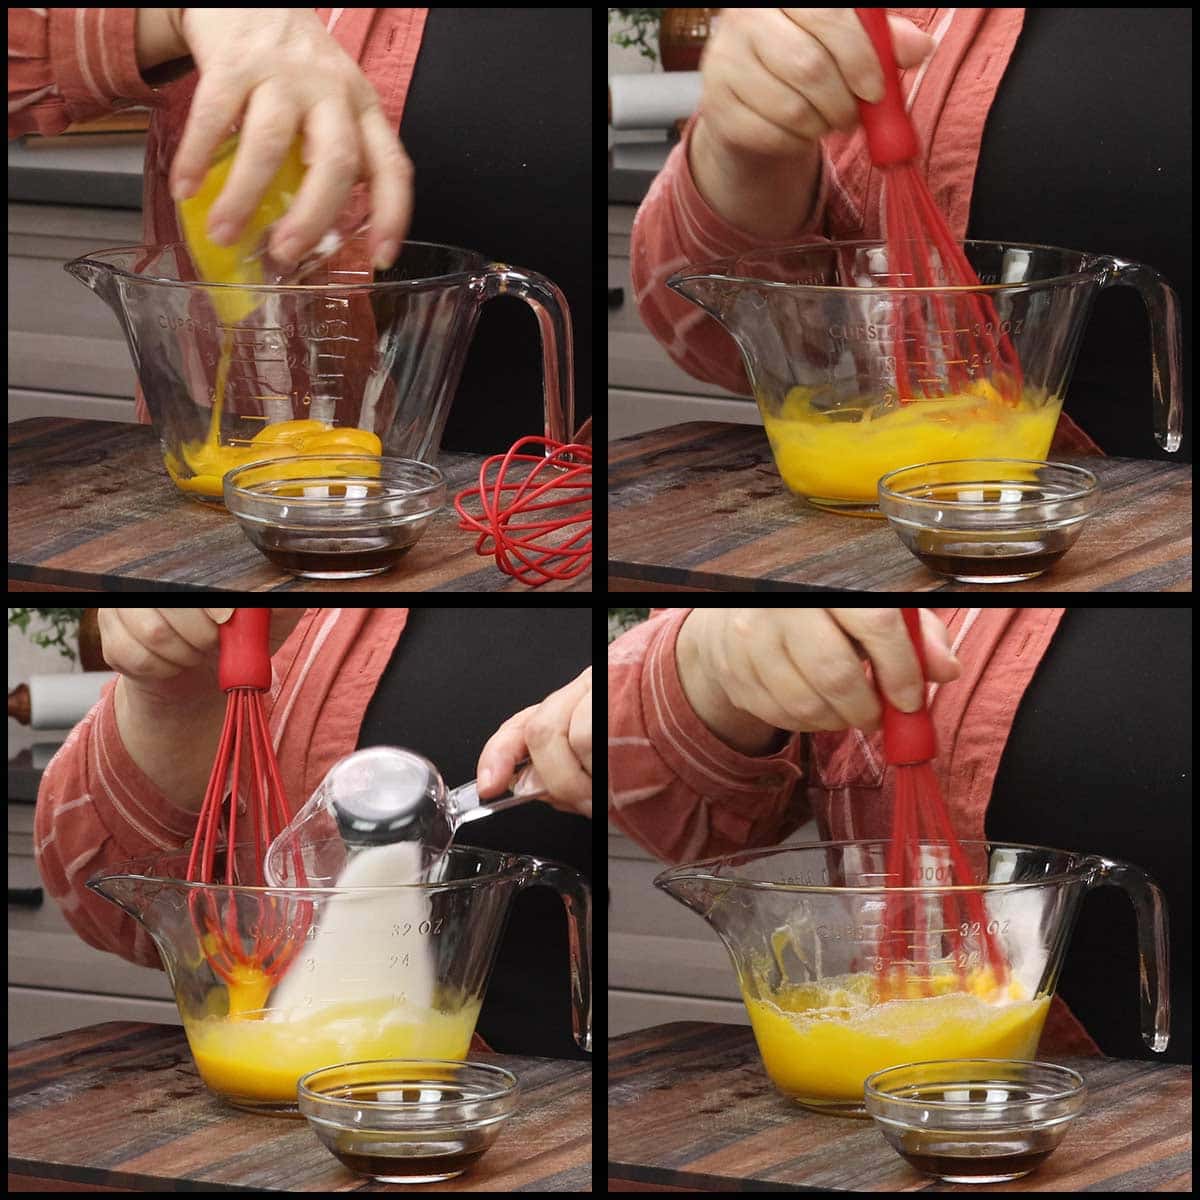
Add a pinch of salt and whisk. Add in the vanilla extract and the vanilla bean paste and whisk well. You can use all vanilla extract if you don't have the paste. If you want to use a vanilla bean pod see the Ingredients and Substitutions section at the top of this post.
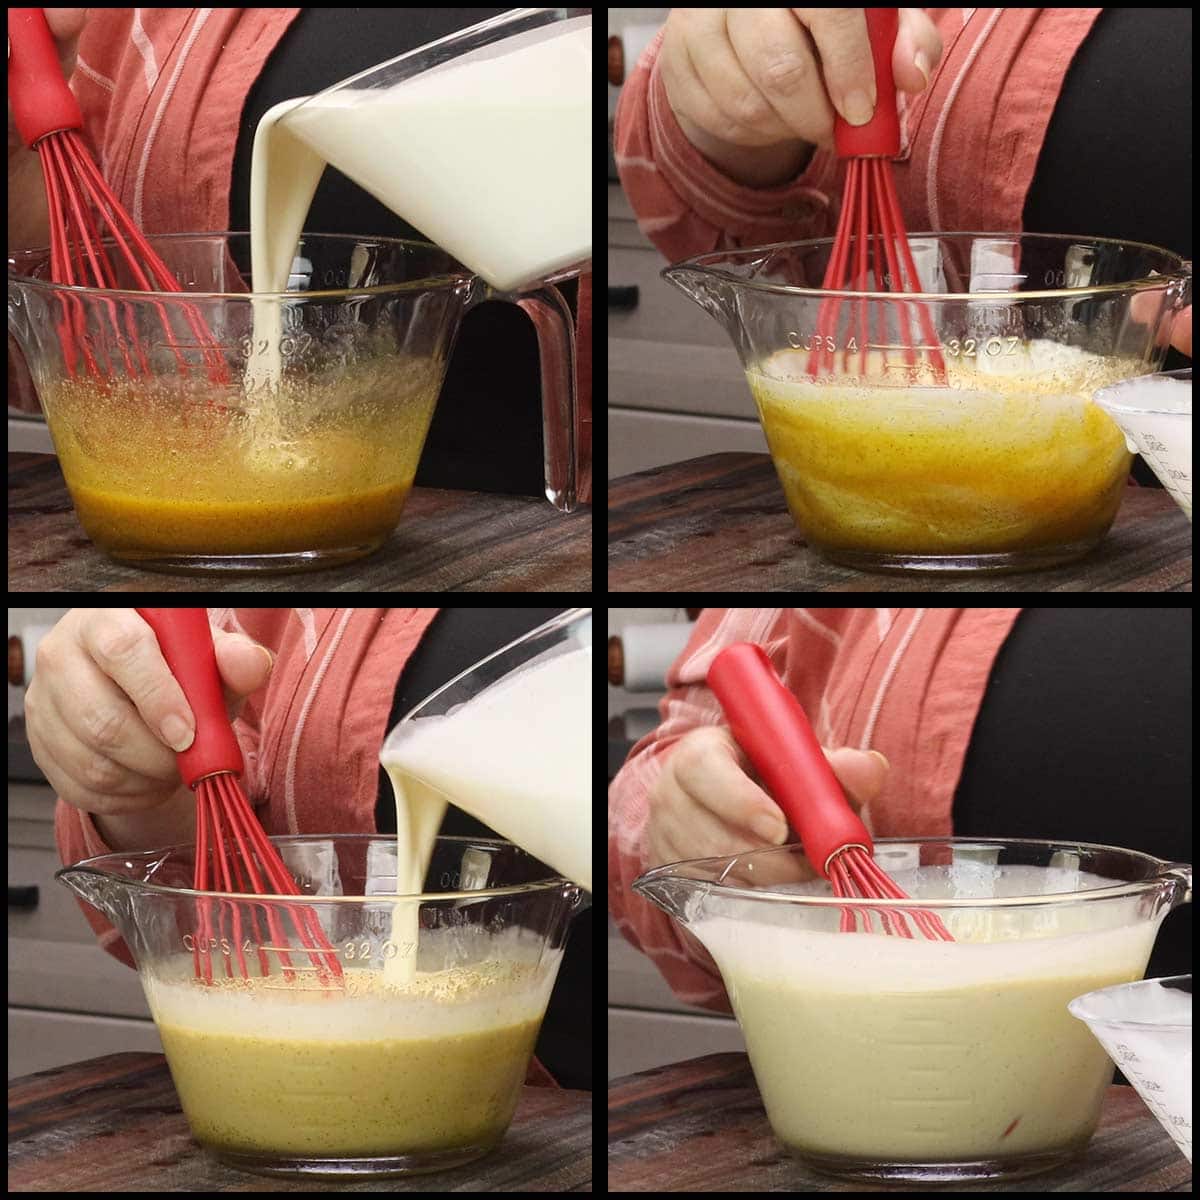
Add ⅓-½ of the heavy cream and gently whisk together. You don't want to whisk so quickly that the cream starts to thicken, just whisk enough that the cream is incorporated. Repeat with the remaining cream.
Sous Vide Cooking Creme Brulee
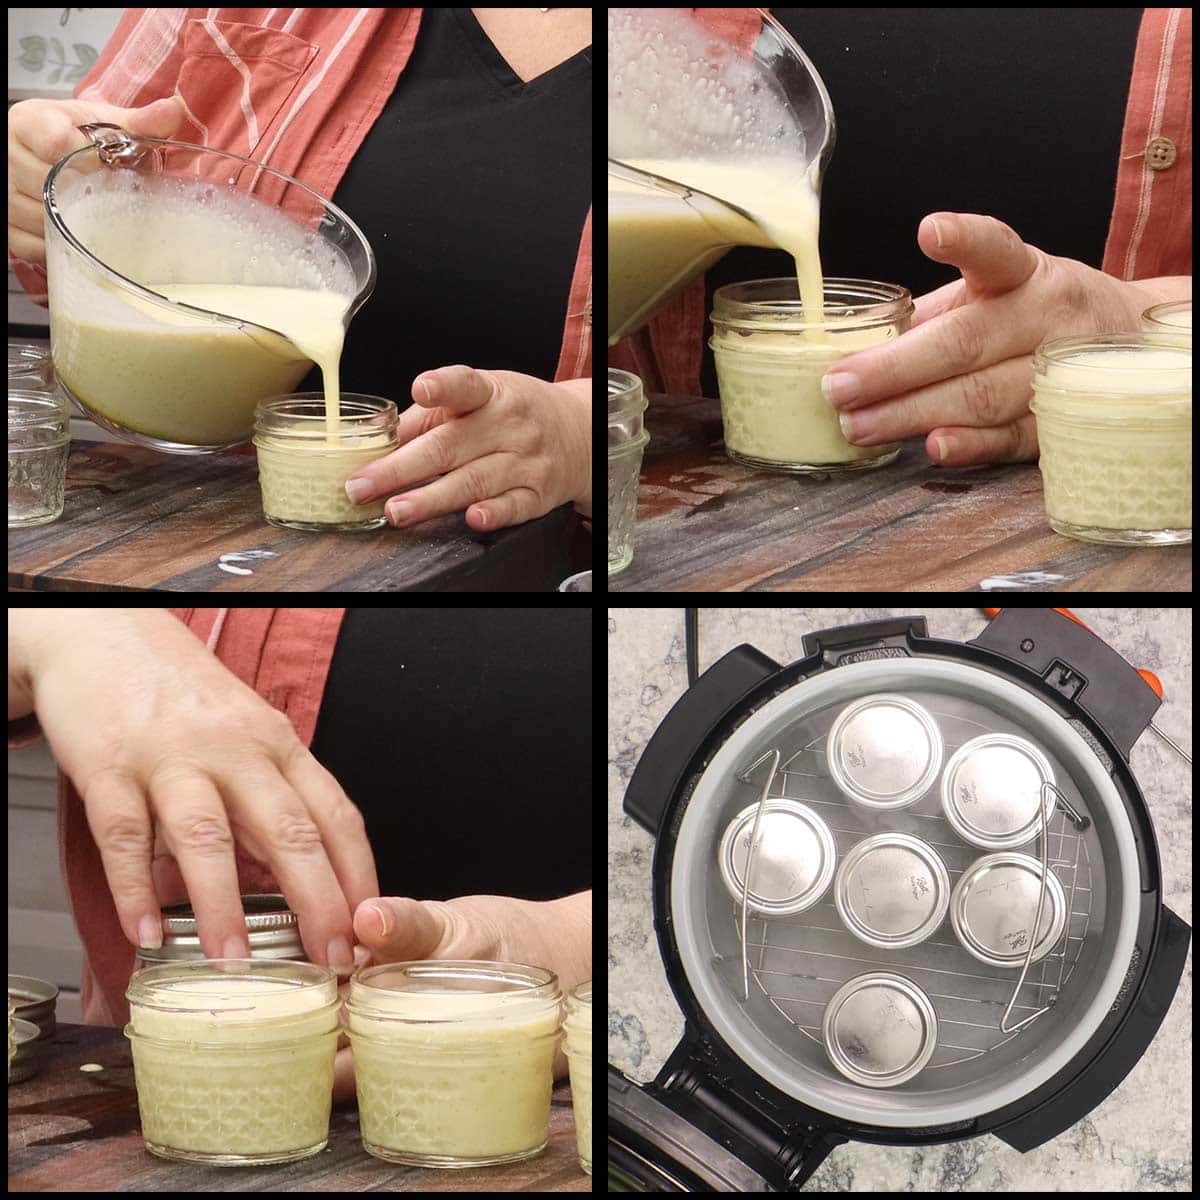
Pour the custard base into the jars, leaving about ¼" space at the top. You should just have enough of the custard mixture to fill 6 four-ounce jars.
Put the lids on and tighten them just finger tight. What I mean by that is don't use your wrist or any kind of strength to tighten them down, you want the air bubbles and steam to be able to escape while preventing water from getting in.
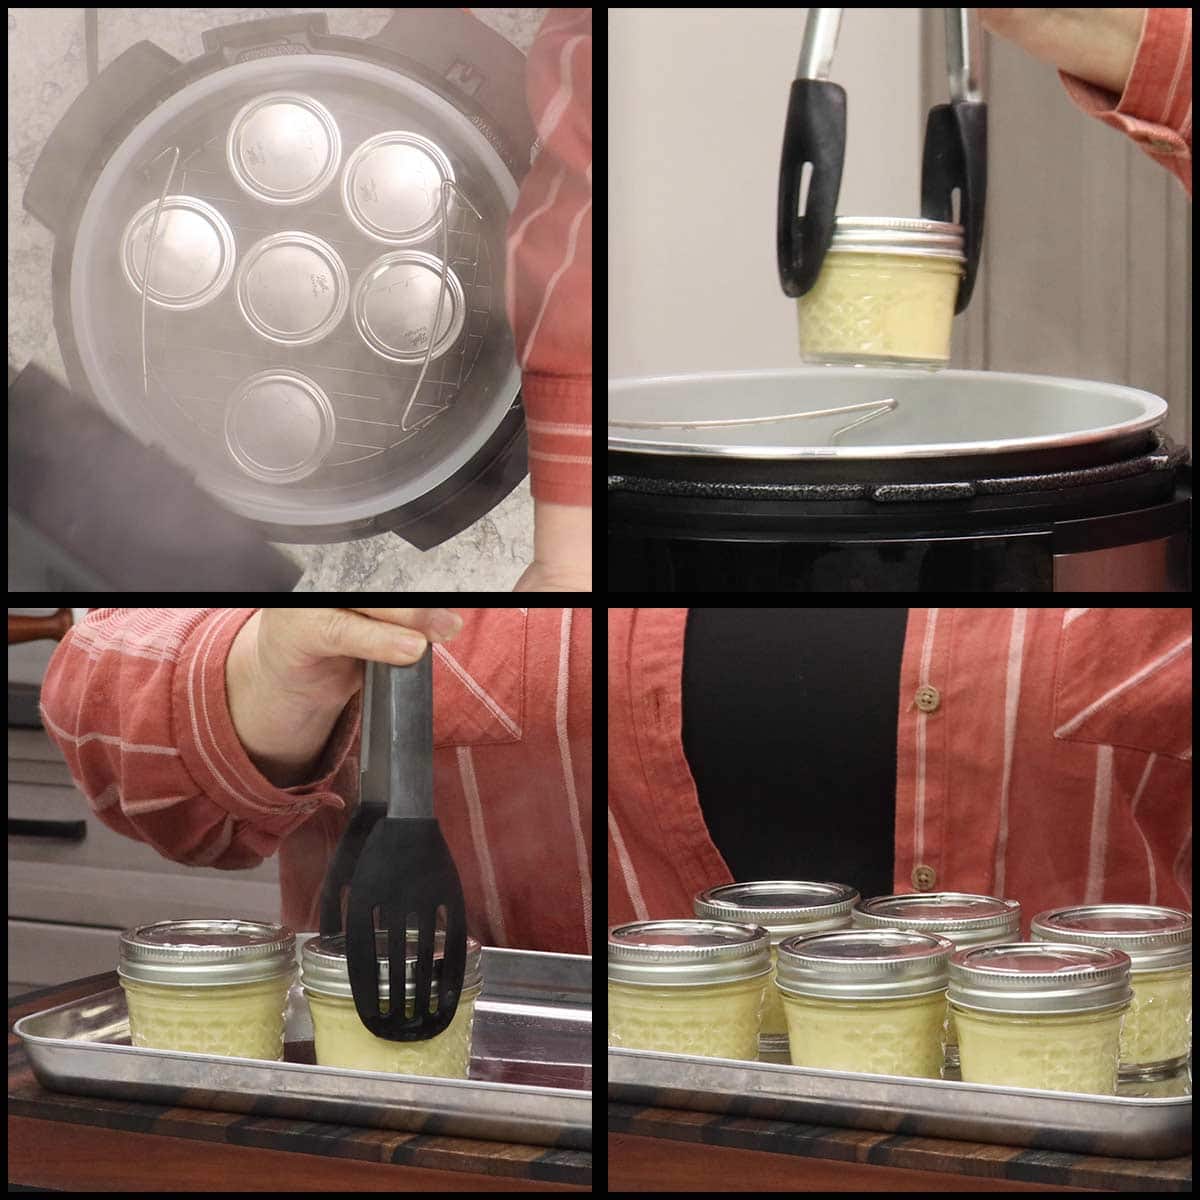
Place the jars on the rack in the Ninja Foodi once the water has reached between 178℉ and 181℉. Sous Vide for 1 hour.
When the time is up, use tongs to remove the jars and place them on a flat surface. I use a little tray so I can pop the whole thing in the fridge.
If you wanted to transfer the custard to individual ramekins, open the jars and gently pour the custard into your ramekins. Let the ramekins sit at room temp for 15 minutes and then cover with plastic wrap so they don't develop a skin while chilling in the fridge.
If you are going to serve them in the little jars, leave the lids on and pop them in the fridge for at least 4 hours. I like to leave mine overnight or at least 8 hours.
Bruleeing the Top of the Custard
About 30 minutes before you want to serve your creme brulee, remove the jars from the fridge and remove the lids. Let them sit at room temp for at least 15-20 minutes. This will allow the jars to warm up some and reduce the change of thermal shock when you go to caramelize the sugar on top.
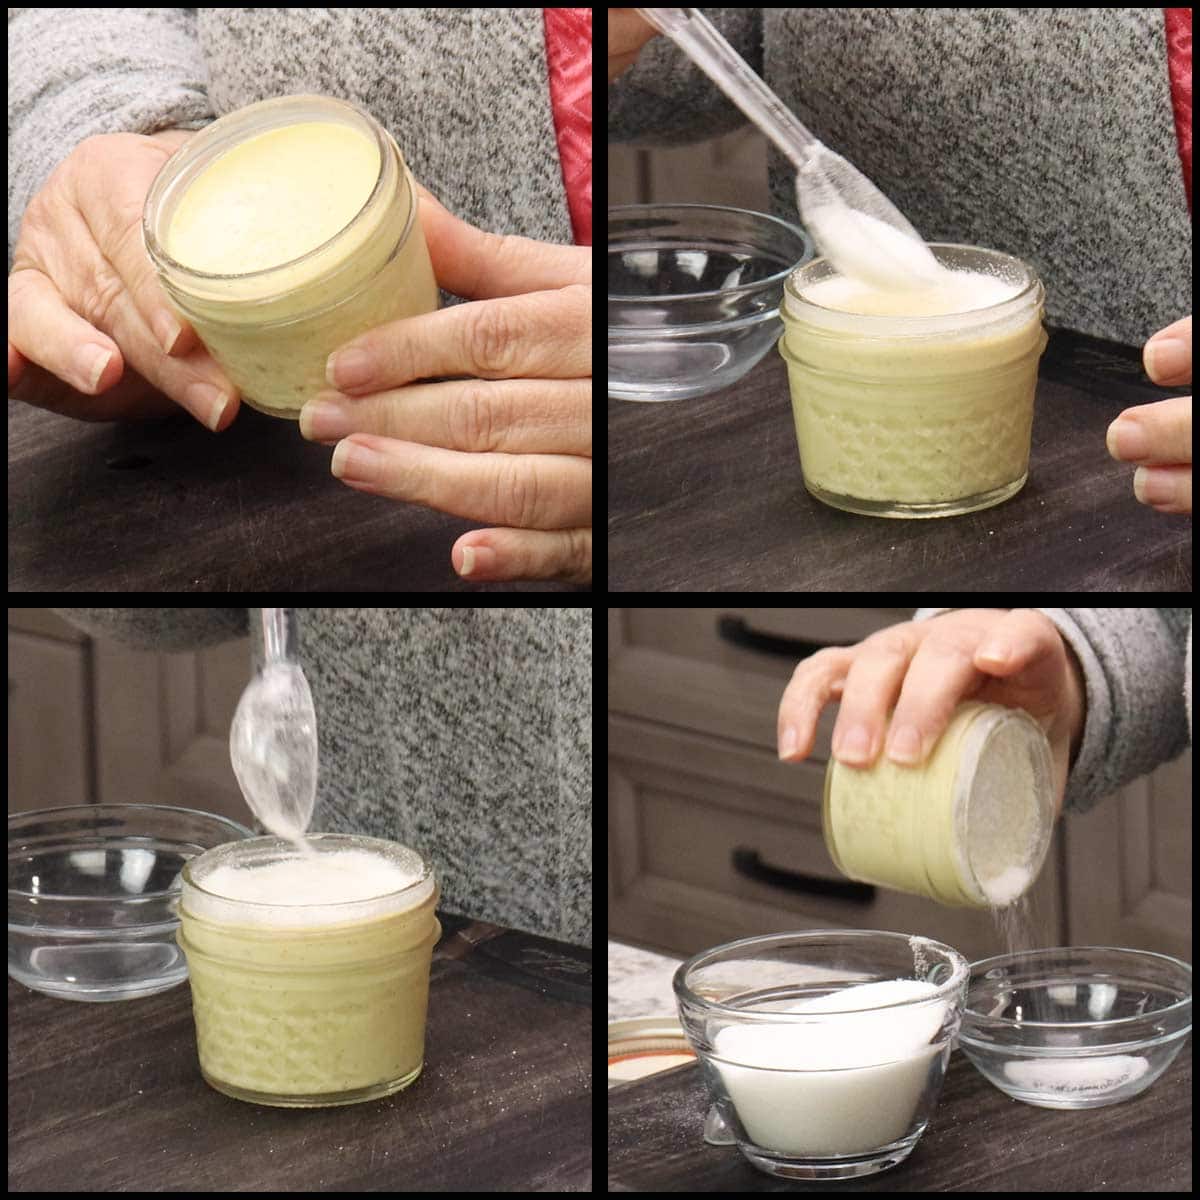
About 10 minutes before you want to serve the creme brulee, sprinkle ½ Tablespoon of granulated sugar over the entire surface. I like to start with the edges and work my way toward the middle. You want a thin, even coating on top. Shake the sugar around to ensure it's all over the top and then pour off the excess into a discard bowl. What remains is the PERFECT amount of sugar for a nice creme brulee topping!
Repeat this step for all the jars of creme brulee.
*If you are using individual ramekins, the surface area most likely will be greater and you will want to use about 1 Tablespoon or so of sugar on top.
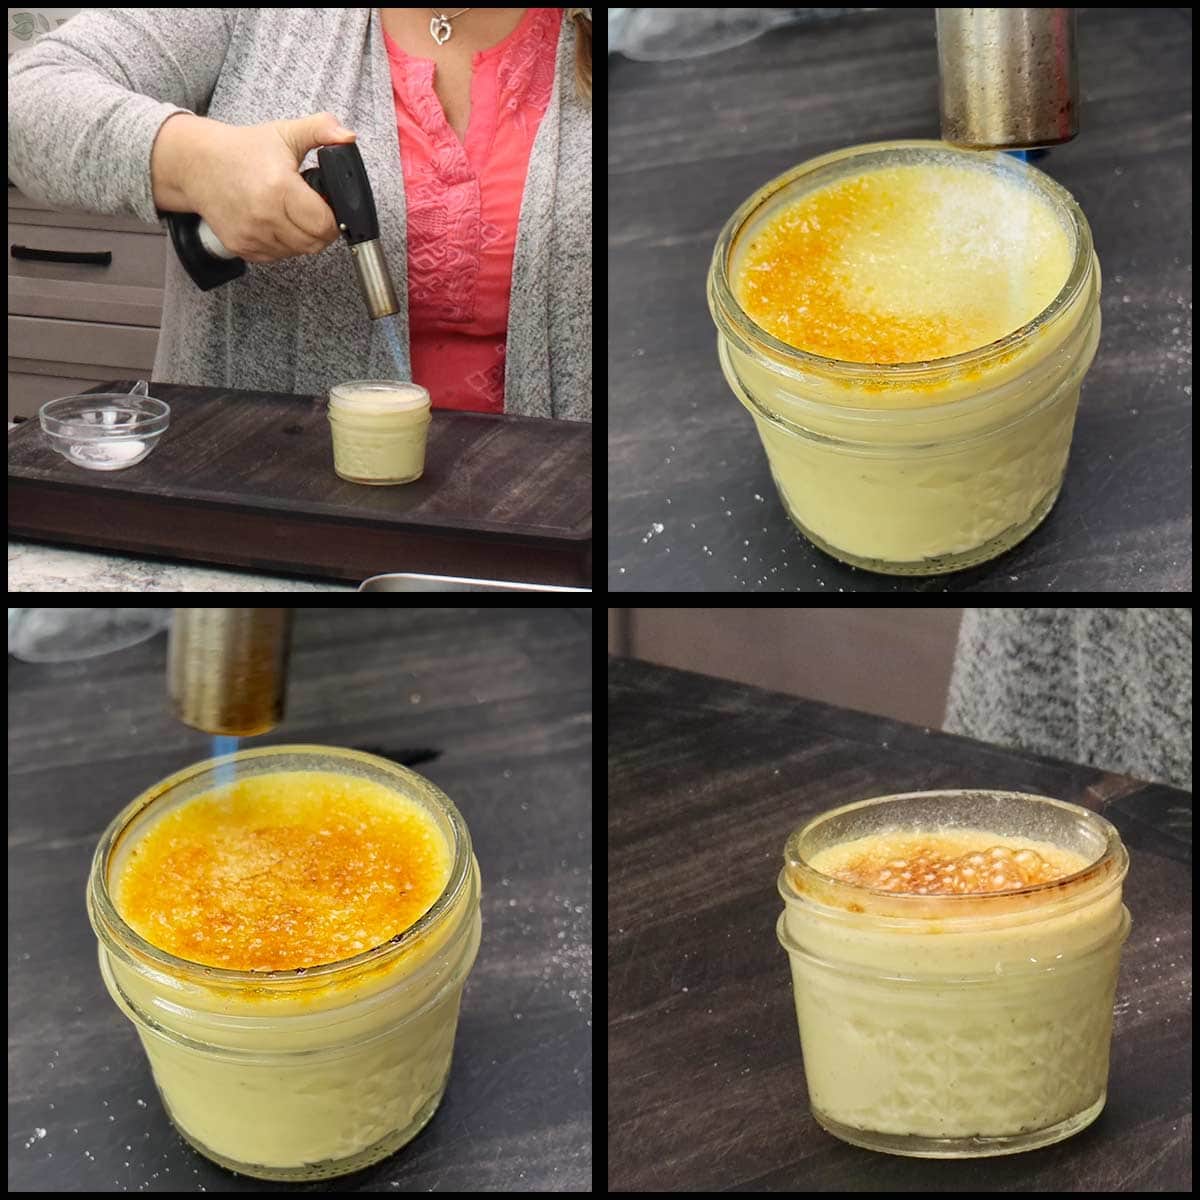
Place your kitchen torch about 3" away from the top of the custard and begin to heat the sugar while moving the torch back and forth or in a circular motion. Don't let the torch stay in one place too long or the sugar may burn.
Continue to do this until the sugar starts to brown and become bubbly. This whole process only takes about 30-45 seconds.
If your sugar isn't browning, lower the torch closer to the sugar. If it is browning too quickly or burning, raise the torch up. The real secret though is to keep the torch moving constantly.
Once the sugar is bubbly and brown, let it sit for another 5-10 minutes to harden.
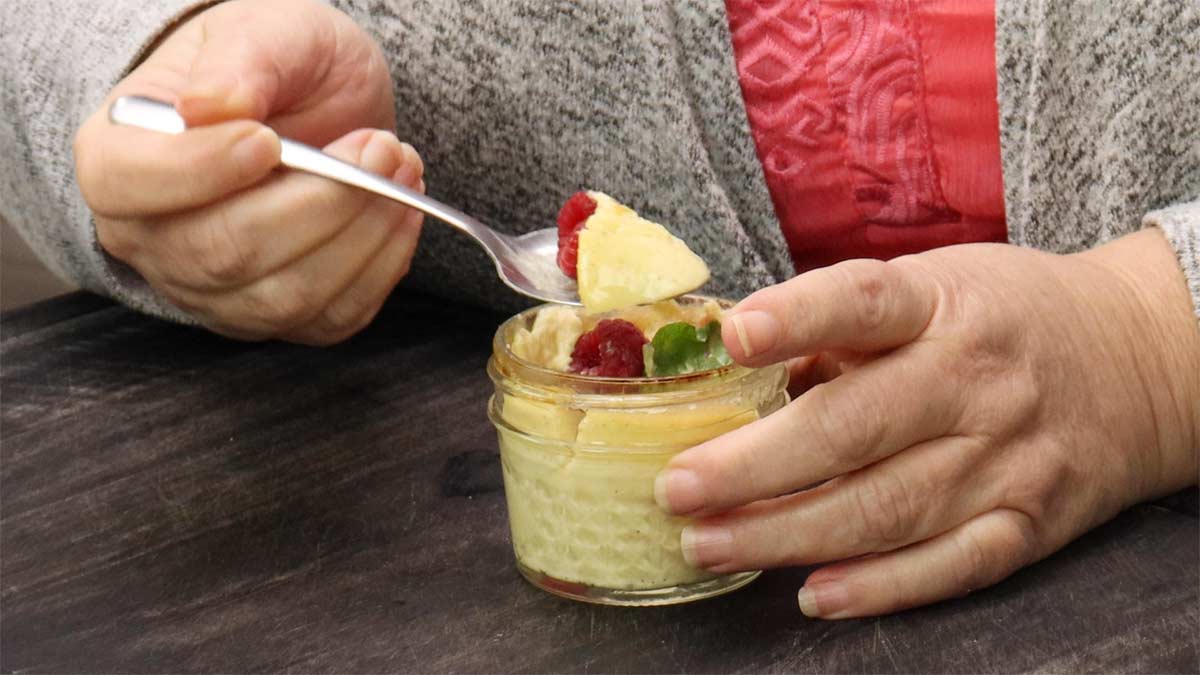
Place your garnishes on top if desired and dig in! It's unbelievably delicious!
Frequently Asked Questions
Absolutely! In fact, it's the perfect make ahead dessert! If you are using the sous vide technique and going to serve the creme brulee in the canning jars, then simply refrigerate them with the lids on for up to 3 days.
About 15-30 minutes before you want to serve them, bring them out of the refrigerator and sprinkle the sugar on top and caramelize it.
Yes. You can make as little or as much of the creme brulee mixture as you want. This recipe makes enough for 6 four-ounce canning jars. Simply adjust the ingredients for the number of servings you want to make.
If you aren't using the canning jars and want to pour the custard into individual ramekins after the sous vide, then make sure you know how much each ramekin holds so you make the correct amount of custard mixture.
You can put the ramekins into sealed bags, but I found it very difficult to keep the custard mixture from spilling over or keeping them flat during the sous vide process.
What I recommend instead is to find out how many liquid ounces your ramekins hold and use a sealable jar that will hold that much mixture. Sous Vide in the jar and then once it's done, immediately pour it into the ramekin while it is still very soft and liquidy. Place in the refrigerator to chill. I recommend covering the ramekins after about 15 minutes in the fridge so the top stays smooth and doesn't develop a skin on top.
Because the Sous Vide function holds the water at the temperature you set, it is difficult to replicate this without having the function on the Ninja Foodi.
However, with certain foods it is possible to use a different function, but it will be a hands-on process requiring the temperature of the water to be checked every 15-20 minutes and then make adjustments to either lower or raise the temperature as indicated. Short sous vide cook times are manageable, but longer ones will be very difficult to ensure proper cooking.
You can fill the pot with water and turn the sear/sauté on low and allow the water to heat up, check the temperature and see if it is within range for what you want to sous vide. Raise and lower the temperature on sear/sauté until it is where you want it and make sure to check a temperature every 15 minutes or so.
Another option is to see what temperature the slow cook functions hold the water on low.
My best advice is to invest in a sous vide immersion circulator if you want to get into sous vide cooking. They aren't expensive and it will save a lot of time.
Easy Dessert Recipes!
I'm all about dessert and I love when desserts are easy to throw together, but taste amazing! Here are some of my favorite recipes for you to try.
- Chocolate Pot De Crème in the Ninja Foodi
- Ninja Foodi Chocolate Cake Bites (Gluten Free)
- Easy Cherry Cobbler (Ninja Foodi or Instant Pot Recipe)
- EASY No-bake Key Lime Cheesecake
- Pumpkin Pie Custard Cups in the Ninja Foodi
- No-Bake Chocolate Mousse Pie
- No-Fuss Rocky Road Fudge in the Ninja Foodi
- Triple Chocolate Cheesecake ~ Pressure Cooker Recipe & Oven Directions Included
Sous Vide Crème Brûlée
Ingredients
- 5 large egg yolks
- ⅓ cup granulated white sugar plus a few Tablespoons for the brulee on top
- ½ tablespoon vanilla extract
- ½ tablespoon vanilla bean paste
- ¼ teaspoon fine grind sea salt or kosher salt
- 2 cups heavy whipping cream
Garnishes
- fresh raspberries and mint optional
Instructions
Prep/Mise En Place
- Fill the Ninja Foodi inner pot with 14 cups of water or fill your sous vide container with enough water to cover the jars.
- Turn the Ninja Foodi on and select the Sous Vide Function or place your circulator into the water bath container. Set the temperature to 180℉/80°C and hit start.
- Separate the egg yolks from the egg whites and set the yolks to the side. You can use the whites in another recipe or freeze them for later use.
- Measure out the remaining ingredients
Making the Custard
- In a 4-cup Measuring bowl or large bowl combine the egg yolks with the sugar and whisk to combine.5 large egg yolks, ⅓ cup granulated white sugar
- Add in the vanilla extract and the vanilla bean paste along with the salt and whisk to combine.½ tablespoon vanilla extract, ½ tablespoon vanilla bean paste, ¼ teaspoon fine grind sea salt or kosher salt
- Slowly add in the heavy cream about ¾ cup at a time and whisk between additions of the cream.2 cups heavy whipping cream
- Pour the custard into the 4 ounce jars until it just about reaches the top. I like to leave about ¼" at the top. Put the jar lids on and tighten just finger tight. Meaning don't use your wrist or any strength to tighten the jars. You want to keep the water out, but allow the air bubbles and steam to escape.
Sous Vide
- Once the water bath has reached 180°F, but is not higher than 182°F, lower your jars with the custard into the water bath. I like to use the rack in the low position when using the Ninja Foodi.
- Sous vide for 1 hour. When the time is up, remove the jars and refrigerate for a minimum of 4 hours. I like to make these the day before serving and refrigerate overnight.
Brûlée the Top
- About 30 minutes before serving, remove the jars from the refrigerator. This allows them to warm up slightly and the glass will acclimate to room temperature so it doesn't experience thermal shock and break when you use the torch.
- 5-10 minutes before serving, sprinkle ½ Tablespoon of sugar over the top of the custard and shake the jar to make sure it is equally distributed. Shake off any excess into a discard bowl. You only want a thin layer of sugar, but I found adding more and then getting rid of the excess insures equal coverage and makes it much easier to caramelize.
- Using a kitchen torch, being to caramelize the sugar. Keep the torch about 3" away from the sugar and go in a back and forth or circular motion all around the top of the custard until you start to see the sugar brown and bubble. Make sure not to leave the torch in any one spot more than a few seconds or the sugar can burn. Once the sugar is golden brown from edge to edge and slightly bubbling, turn the torch off and let the creme brulee sit for about 5 minutes. Repeat for the remaining jars.
- Top with your favorite fresh fruit and mint leaves. My favorite is fresh raspberries or blueberries. Serve & Enjoy!fresh raspberries and mint
Notes
- You can omit the vanilla bean paste and use 1 Tablespoon of vanilla extract
Nutrition
ABOUT THE RECIPE AUTHOR, LOUISE LONG
Louise is a full-time recipe creator and food blogger @ The Salted Pepper. She has over 30 years of experience with cooking and recipe development. She owned a restaurant for several years and was a full-time RN until retiring to blog full-time.

She published her first cookbook in the Fall of 2018 and is very interested in writing several more.
Louise is also the creator of an online Ninja Foodi Pressure Cooking Course with over 100 instructional step-by-step videos. People absolutely rave about the course and all the value they have received from it.
Louise has several very active Facebook groups that help people with the basics of cooking and getting the most out of the Ninja Foodi.
Louise is also a YouTube creator and you can find most of her recipes in video format on The Salted Pepper YouTube channel.
She is very responsive to messages and eager to help in any way she can. Get more Information about Louise & contact information
I WOULD LOVE TO SEE WHAT YOU ARE COOKING UP IN YOUR KITCHEN! TAG ME @THESALTEDPEPPER ON YOUR FAVORITE SOCIAL MEDIA PLATFORM WHEN YOU MAKE A DISH!
BE SURE TO FOLLOW THE SALTED PEPPER RIGHT HERE ⇓⇓⇓⇓⇓


Marcela
Hi Louise,
I just signed up for your ninja foodi course and I am super excited about it.. I want to try this recipe however I have the Ninja Foodi Max with the smartlid (not 2 lids) what would be the bet way to go about it...Thank you
Louise
I made this in the smartlid model. The issue will be if you have the sous vide function or not. Since you called it the Ninja Foodi Max, I'm guessing it's a European model and they don't usually have that function. In the article under frequently asked questions at the bottom, I talk about some things you can try, but without the sous vide function it is a pretty hands on process. I've had a lot of people ask me this same question, so next batch I make I'll try a few other functions and see if I can get one to work well.
Gina
Could you put lemon curd or cookie butter or other flavors in the bottom before adding the creme brulee mixture and cook in the sous vide for the same amount of time?
Louise
I really don't have any idea how that would work, but let me know if you try it!
Miranda
This sounds really good and I would love to try it but I dont have sous vide. If i do this in my ninja am i supposed to cover the pots with lid in the water or put them Just above? I dont really understand.
Louise
If you don't have the sous vide function it is going to be very hard to make this recipe. It relies on holding the temperature at around 180F.