

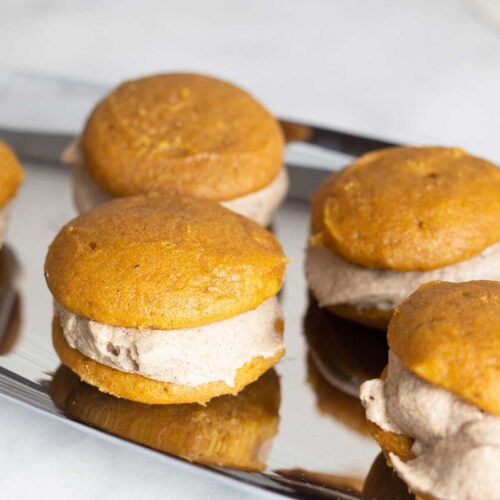
These apple cider whoopie pies are one of the best variations of the traditional whoopie pie that I've made!
I love my pumpkin whoopie pies and of course the traditional chocolate with cream filling whoopie pies, but there is something so unique about this version that it quickly became my favorite and I hope you love them too!

Would you like to save this recipe?
Once you try these apple cider cake-like cookies with a perfectly sweet filling that is also full of apple cider flavor, I think you will agree that they are unlike any other whoopie pie or apple dessert that you have ever had.
The cookies are extremely easy to make and the filling, while it has a few more steps is also easy to make and I will walk you through it step by step.
The only special ingredient you will need is dry apple cider packets. These can easily be found at most grocery stores, including Walmart. I have tested the recipe with different brands and that does not seem to make any difference, so use whatever brand you can find.

I have tried making this recipe using reduced concentrated liquid homemade apple cider, but I just couldn't get the flavors exactly how I wanted them which is sweet and a little tart with all those warm fall spices. The Apple Cider dry mix packet works perfectly!
Suggested Kitchen Tools for Apple Cider Whoopie Pies
- Electric Stand Mixer or Hand Mixer
- Baking Trays
- Parchment Paper
- 1 or 2 Tablespoon Cookie Scoop
- Double Boiler or a Mixing Bowl that fits on top of a pot
Ingredients & Substitutions
Instead of going through a list of Ingredients & Substitutions like I do in so many of my recipes, I encourage you to make this one exactly as written for the best outcome.
I tested this recipe so many different ways with various ingredients and this version is the best.
Here are a few substitutions that will not make a difference in the outcome either way.
- Vanilla paste can be substituted for vanilla extract 1:1
- Salted butter can be substituted with unsalted butter 1:1
- You can also skip making the Swiss buttercream filling and mix the apple cider packets in your favorite vanilla buttercream (I really hope you make the apple cider Swiss buttercream though, it's amazing!).
How to Make Apple Cider Whoopie Pies
This recipe has two components to it; the apple cider cookie and the apple cider Swiss buttercream. Many times I will make the buttercream while the cookies are baking, but if you are new to making Swiss buttercream, I recommend making it while the cookies are cooling so you aren't under any pressure.
Apple Cider Cookies
The first step in all recipes is gathering your ingredients and this is so important in baking. You want to have everything measured out and ready to go before you start mixing.
The very first thing is to preheat your oven to 350℉/175℃.
Then gather and measure out both the remaining cookie ingredients. Make sure your butter and eggs are room temperature.
Combine the Wet Ingredients
In a medium size mixing bowl, combine the room temperature butter and both packed brown sugar and white sugar.
You can use a stand mixer with the paddle attachment or a handheld electric mixer to cream the sugar and butter together. Start on low speed and increase to medium speed until ingredients are well combined.
In this recipe is not necessary to beat the mixture until it is super light and fluffy, so blending only takes about 1 minute.

Add the vanilla paste or vanilla extract and the large egg. Blend on medium speed just until incorporated which takes about 30-60 seconds.
Don't worry if your mixture looks a little curdled or lumpy, it will be fine.

Once combined, scrape down the sides of the bowl and set the mixing bowl to the side.
Whisk the Dry Ingredients
In a small to medium size mixing bowl or measuring cup like pictured below, add the flour, salt, baking powder, spices, and the apple cider packet.
Whisk to combine.

Finishing the Cookie Batter
Add the dry ingredients to the wet ingredients and mix on medium speed until combined. You can add all of the dry ingredients at one time.
The mixture will be thick like peanut butter.

Add 4-5 Tablespoons of unsweetened applesauce to the bowl and blend on low speed until incorporated. This will loosen the batter and increase the apple flavor in the cookie.
The reason I say 4-5 Tablespoons is because either is fine. If you are using a 4 ounce container of applesauce, use 4 Tablespoons and reserve the last Tablespoon for the filling so you don't have to open more than one container.
If you have a jar of applesauce, you can use up to 5 Tablespoons in the cookie and up to 3 Tablespoons in the filling. The consistency of the bater should be similar to a cake batter.

Line a cookie sheet or sheet pan with parchment. The size and color of your pan doesn't matter. Of course, the smaller the size, the less cookies you can bake at once. I'm using a half sheet pan which is roughly 18"x13" and I can fit 16 small cookies (1 Tablespoon each) on a tray.
Quick Tip
Use a cookie scoop so your cookies are uniform in size when making a filled cookie sandwich like whoopie pies.
Now it is time to decide which size of Whoopie pie you want to make. The larger one on the right is 2 Tablespoons of batter per cookie and the one on the left is 1 Tablespoon of batter per cookie.
This recipe will make 16 small whoopie pies (total of 32 cookies) and about 8 larger whoopie pies (total of 16 cookies)
If you are serving them for a party with other food and desserts, I'd definitely go with the smaller ones, but if you are gifting them, the bigger ones are more impressive.

Baking the Whoopie Pie Cookies
Scoop out 1 or 2 Tablespoons of the batter onto a parchment lined tray and space the cookies at least 1½" apart for the smaller ones and 2" apart for the larger ones.
Bake in a preheated oven (350℉/175℃) for 8-11 minutes. It takes exactly 10 minutes in my oven, but ovens will vary.

You want to remove them when they are fully set, but don't have any browning on top. You want them to be fully cooked, but pale in color. They will have a speckled appearance.
Quick Tip
If you see any browning on the bottom, take them out.
Once the cookies are done baking, remove the tray from the oven and transfer the cookies to a cooling rack to cool completely.
You do not want to fill them while they are warm or the filling will melt.

Making the Apple Cider Swiss Buttercream Filling
If you have not made Swiss buttercream before, you are in for a real treat! It is the best buttercream in my opinion because it isn't overly sweet like some buttercream icing can be. It is also very stable and doesn't melt as easily as an all butter buttercream in warmer temperatures.
I use it to decorate all of my cakes that I make for people and the flavor combinations are endless! You can use the base recipe and technique in this recipe and make any flavor you want!
My point is, take the time and learn how to make this buttercream and you will have the best tasting icing in town!
I realize that it may look complicated or intimidating, but it really isn't. Just follow me step-by-step and you will be a pro in not time!
PS: This meringue technique is the same for making delicious macaron cookies (Swiss Method).
Okay, let's jump in!
Prep for Making the Whoopie Pie Filling
Before you even get started, you will want to have all your ingredients measured out and ready to go.
- Separate the egg yolks from the egg whites (this is easier when they are cold)
- The eggs, butter and crisco should be at room temperature.
- Sift your powdered sugar and measure out ⅔ cup
- Make sure your mixing bowl and all utensils are very clean and free from any fat residue like oil or butter.
This recipe uses a double boiler, but no worries if you don't have one. I use a mixing bowl over a small saucepan and it works great. I have also used the metal bowl of my stand mixer and that works great too!
Just don't use a glass bowl of a stand mixer if you have one, the sudden change of temperture from heating the sugar and egg whites to whisking them on. high speed can cause the bowl to crack.
It is okay to use a glass mixing bowl on top of the saucepan and then transfer it to your stand mixer bowl (glass or metal), I do that all the time and have never had any issues.
Melting the Sugar into the Egg Whites
Fill a saucepan with about 1" of water. The amount of water will vary depending on the depth of your pot and how low the bowl sits in the pot.
You don't want the water to touch the bowl or it can overheat the egg whites. Brin the water to a low boil over medium-high heat and then reduce the heat to low-medium or low.
The water should be simmering and producing steam which is how the sugar melts and egg whites are pasteurized.
Place the bowl with the sugar over the water and add the egg whites. Whisk to combine.

You want to whisk frequently while the egg whites and sugar are heating so the egg whites don't cook. By moving the mixture around, you don't have direct heat in one spot long enough to cook the whites.
Because the apple cider buttercream is not cooked after this step, you want to bring the temperature of the mixture to 160℉/71℃ which will pasteurize the egg whites without cooking them. The sugar will be fully melted for a smooth filling.
The time it takes to reach 160℉/71℃ is usually between 5-10 minutes.

Once that temp is reached, turn the stove off and transfer the egg white and sugar mixture to the bowl of your stand mixer. Using the whisk attachment, whisk on high speed until stiff peaks form. It is normal to see steam as the mixture cools down.
If you are using a handheld mixer, you can beat the egg white/sugar mixture in the same bowl on high speed.
It can take anywhere from 5-15 minutes for stiff peaks to form. Stiff peaks means that when you pull the whisk attachment or beaters out of the meringue, it holds its shape.

Once the meringue has reached stiff peaks, add the sifted powdered sugar all at once and mix on low speed. With the mixer on low, add the apple cider packets and turn up the speed to high or medium high to incorporate everything.

Scrape down the sides of the bowl and add the butter and crisco. Whisk on medium speed until the buttercream is light and fluffy. This only takes about a minute.
I realize not everyone is a fan of using crisco and I get it. However, it does provide a stability to the buttercream and also cuts the butter flavor a bit. You can use all butter if you prefer.

Add 1-3 Tablespoons of unsweetened applesauce and mix on low for about 30 seconds to incorporate it. This is optional, but I love the look and flavor the applesauce brings to the filling.
It also keeps the filling softer in the fridge which I find to be a good thing.

Assembling the Apple Cider Whoopie Pies
You will want to use between 2 and 4 Tablespoons of the filling for each coking depending on what size you made.
Spread or scoop the apple cider buttercream onto the flat side of the cookie and top with a second cookie (flat side towards the filling) and press to form the whoopie pie. Repeat for all the whoopie pies.

Refrigerate for about 30 minutes before serving to firm up the filling.
Enjoy!
How to Store Apple Cider Whoopie Pies
You can either store the whoopie pies assembled, meaning 2 cookies with filling or unassembled where you store the buttercream filling and the cookies separately.
Either works fine, but if you are travelling with them, you may want to store them unassembled and quickly fill them before serving.
Assembled Whoopie Pies
Room Temperature: Assembled Apple Cider Whoopie Pies can be stored in an airtight container at room temperature for up to 2 days.
I recommend putting parchment in the bottom of the container and in between each layer of whoopie pies so they don't stick.
Refrigerator: Store in an airtight container with parchment on the bottom and in between layers for up to 7 days in the refrigerator.
Freezer: I recommend wrapping each whoopie pie in plastic wrap (it helps if they are cold) and freezing them in a single layer for 24 hours. Once fully frozen, you can store them in a freezer bag.
Unassembled Whoopie Pies
Room Temperature: Store the buttercream in a sealed container at room temperature and the cookies in a separate container separated with parchment paper so they don't stick together for up to 2 days.
Refrigerator: Store the buttercream in a sealed container or sealable bag and cookies in a separate container separated with parchment paper so they don't stick together for up to 7 days.
Freezer: Place the cookies on a sheet tray lined with parchment and freeze them in a single layer for 24 hours. Once fully frozen, you can store them in a freezer bag for up to 6 months. Remove them from the bag to thaw.
The buttercream can be frozen in any type of airtight container and will last up to 6 months. Thaw before filling cookies.
Frequently Asked Questions
You can cut the recipe in half, but make sure to use a hand mixer for the buttercream or the volume of egg whites may not be enough for a stand mixer to whisk into stiff peaks.
The cookies may be challenging to cut in half because of the egg, but you can whisk the egg, measure it and use half.
You can absolutely double or even triple the recipe by increasing all of the ingredients.
More Finger Dessert Recipes
When it comes to making desserts for a party, finger desserts are so convenient. You can put out an assortment of desserts that friends and family can grab and eat without needed a plate and fork, a simple napkin will do.
These dessert recipes fit that bill and they are all delicious!


Apple Cider Whoopie Pies Recipe
Equipment
- Oven
Ingredients
Whoopie PIe Cookies
- ½ cup salted butter Room Temperature
- ¼ cup granulated white sugar
- ¼ cup packed brown sugar
- 1 teaspoon vanilla paste or vanilla extract
- 1 large egg Room Temperature
- 1¼ cups all-purpose flour
- ½ teaspoon baking powder
- ½ teaspoon fine grind sea salt or kosher salt ¼ teaspoon if using table salt
- ½ teaspoon ground cinnamon
- ¼ teaspoon ground cloves
- ¼ teaspoon ground nutmeg
- 1 packet powdered apple cider mix (0.74 ounce packet)
- 4-5 Tablespoons unsweetened apple sauce
Whoopie Pie Filling
- 2 large egg whites
- 6 Tablespoons granulated sugar
- ⅔ cup sifted powdered sugar
- 2 packets powdered apple cider (0.74 ounce packet)
- ¼ cup Crisco vegetable shortening Room Temperature
- 10 Tablespoons salted butter Room Temperature
- 2 Tablespoons apple sauce unsweetened
Would you like to save this recipe?
Instructions
Make the Whoopie Pie Cookies
- Preheat the oven to 350℉/175℃
- In the bowl of a stand mixer (or in a medium size mixing bowl if using a hand held mixer), add the butter and sugars. Using the paddle attachment, mix on medium speed until creamed together. This takes about 1 minute or so.½ cup salted butter, ¼ cup granulated white sugar, ¼ cup packed brown sugar
- Add the egg and vanilla paste (or extract) and blend until incorporated. This takes about 30 seconds.1 large egg, 1 teaspoon vanilla paste or vanilla extract
- In a bowl combine the flour, apple cider powdered mix, baking powder, salt and seasonings.1¼ cups all-purpose flour, ½ teaspoon baking powder, ½ teaspoon ground cinnamon, ¼ teaspoon ground cloves, ¼ teaspoon ground nutmeg, 1 packet powdered apple cider mix, ½ teaspoon fine grind sea salt or kosher salt
- Add the flour to the butter and sugar mixture and blend on low speed until incorporated. Scrape down the sides of the bowl as needed. The batter will be thick like peanut butter, but the applesauce will loosen it up. Add the applesauce and blend until incorporated.4-5 Tablespoons unsweetened apple sauce
- Line a baking tray with parchment. Using a cookie scoop, scoop out about 1 Tablespoon for smaller whoopie pie or 2 Tablespoons for larger whoopie pies, and drop the batter onto the prepared cookie sheet about 2" apart. Bake in a preheated oven at 350F for 10 minutes. The time does not change for the smaller or bigger cookies. When done, remove the cookies from the boven and transfer to a cooling rack to cool completely. Repeat for the remaining batter. You can use the same cookie sheet and parchment if you like, but the baking time may need to be shortened since the pan will be warm.
Making the Whoopie Pie Filling
- Create a double boiler by filling a small pot with about 1" of water. Place a glass or metal mixing bowl on top of the pot so it is elevated above the water. Make sure the bottom of the bowl does not touch the water OR use a double boiler if you have one. *Make sure your mixing bowl is very clean and does not contain any fat residue or your egg whites won't whip up correctly.
- Heat the water on high until it begins to boil and then turn the heat down to low or medium low to maintain a simmer. Place the egg whites and sugar in the mixing bowl and whisk to combine. Whisk the mixture every minute or so until it reaches 160℉/71℃. This will melt the sugar and pasteurize the egg whites. If the egg whites start to look like they are cooking, your heat is too high or your bowl is touching the water or you aren't whisking enough.2 large egg whites, 6 Tablespoons granulated sugar
- Once the egg white mixture reaches 160℉/71℃, remove the mixing bowl from the pot and turn off the stove. Pour the sugar and egg white mixture into the bowl of your stand mixer or you can use an electric hand mixer and use the same mixing bowl. Use the whisk attachment on a stand mixer and the regular beaters on a hand held mixer and whisk/beat the warm sugar and egg white mixture On HIGH speed until it forms stiff peaks. This can take up to 10-15 minutes, but usually only takes 5 minutes or so.
- Once stiff peaks have formed, add the sifted powdered sugar and powdered apple cider mix to the bowl all at once and mix on low speed until incorporated. Then increase the speed to medium for about 30-60 seconds or until you have a smooth mixture.⅔ cup sifted powdered sugar, 2 packets powdered apple cider
- Add the Crisco and butter and whisk/beat on medium-high speed until you have a fluffy filling. Add the apple sauce and mix on low until combined.¼ cup Crisco vegetable shortening, 10 Tablespoons salted butter, 2 Tablespoons apple sauce
Assembling the Whoopie Pies
- Once the cookies have cooled, assemble them by spreading about 2 Tablespoons (use 4 Tablespoons if making the larger size) of the filling onto the bottom (flat side) of a cookie. Top with a second cookie. Repeat for all the whoopie pies.
- Refrigerate for about 30 minutes prior to serving to firm the filling up.
Notes
- 8 Large Whoopie Pies or
- 16 Small Whoopie Pies
- Room Temperature in a sealed container up to 2 days
- Refrigerated in a sealed container up to 7 days
- Freezer in a sealed container up to 6 months
Nutrition
About the Recipe Author, Louise Long
Louise is a full-time recipe creator and food blogger @ The Salted Pepper. She has over 30 years of experience with cooking and recipe development. She owned a restaurant for several years and was a full-time RN until retiring to blog full-time.

She published her first cookbook in the Fall of 2018 and is very interested in writing several more.
Louise is also the creator of an online Ninja Foodi Pressure Cooking Course with over 100 instructional step-by-step videos. People absolutely rave about the course and all the value they have received from it.
Louise has several very active Facebook groups that help people with the basics of cooking and learning more about the appliances they love.
Ninja Foodi Pressure Cooker & Air Crisper 101
Ninja Woodfire Outdoor Grill & Smoker
Louise is also a YouTube creator and you can find most of her recipes in video format on The Salted Pepper YouTube channel.
She is very responsive to messages and eager to help in any way she can. Get more Information about Louise & contact information
I WOULD LOVE TO SEE WHAT YOU ARE COOKING UP IN YOUR KITCHEN! TAG ME @THESALTEDPEPPER ON YOUR FAVORITE SOCIAL MEDIA PLATFORM WHEN YOU MAKE A DISH!
BE SURE TO FOLLOW THE SALTED PEPPER RIGHT HERE ⇓⇓⇓⇓⇓
Leave a Reply