These Brioche Slider Buns are so incredibly easy to make, even if you have never made bread or rolls before. Brioche dough is one of the easiest doughs to work with and I share all my tips and tricks so you can make perfect brioche sliders with just a few ingredients and a few hours!
I know that making bread and rolls can be intimidating and many people have told me that they don't make their own because it's too complicated or time-consuming. If you are being held back from making your own bread and rolls for these reasons or others, please read through this article, watch the video, and you'll see just how easy it is.
Would you like to save this recipe?
This recipe is a very basic brioche roll that uses simple, everyday ingredients. You don't need special flour or special equipment because the key to making any bread is in the feel of the dough and I'm going to walk you through step-by-step how to learn to feel the dough so you can master making brioche buns in one try!
There are many different kinds of dough that can be turned into bread and they all have a different feel to them. Brioche dough is really nice dough to work with because it is soft and pliable, but not too sticky. It's perfect for beginners.
Ingredients & Substitutions
Yeast
I'm going to start off with the yeast because, from what I understand, it is the one thing that people fear or don't want to use because they are afraid they will mess it up. The most important thing when working with yeast is knowing what kind of yeast you have.
There are four common types of yeast; fresh bakers yeast, instant yeast, active dry, and rapid rise. You may also be familiar with sourdough starters where we cultivate yeast from our environment and grow it in a jar with flour and water. Sourdough is a whole other type of bread making and since this recipe is designed for any level of bread maker I am not going to get into using a sourdough starter in this recipe, although you certainly can make a sourdough brioche and I bet it's delicious.
Fresh Baker's Yeast (also called Brewer's Yeast) usually comes in a block and is mostly used by experienced breadmakers. It's not a type of yeast that is found easily at grocery stores and, unless you are familiar with using it and know the substitution ratios, I do not recommend using it in this recipe.
Active Dry Yeast is what I used for years and years and it's the type of yeast that scares so many people away from bread making because it requires activation with warm water and then it sits for 5-10 minutes until it blooms and becomes bubbly. This is how we knew it was active and would work for rising our bread. The problem with Active Dry yeast is that it can be temperamental and its shelf life isn't as good as Instant yeast. Active dry yeast requires it to be "activated" by warm liquid, usually water or milk depending on the recipe, and if the liquid is too hot (greater than 104°F) it can kill the yeast. There isn't any problem using active dry yeast in this recipe, you will just need to proof or bloom it first. You will use the same amount of active dry yeast as instant yeast.
Instant Yeast is what I recommend using in this recipe because it is a no-fuss yeast that gets added directly to the dough ingredients. Instant Yeast (along with quick-rise yeast) has ascorbic acid added to it which helps to strengthen the wheat gluten and improves the dough rise and increases the bread volume so your bread isn't dense from shorter rise times. I've read articles where some people say that instant yeast and rapid-rise yeast are the same thing, but in my experience, Instant yeast can handle long periods of cold proofing and still have a nice rise for the final rise before baking. It's great for beginners because you don't have to worry about proofing or blooming it and you will get very consistent results with it. It's also a very economical yeast to buy in bulk and you can store it in your freezer for several years. I use it straight from the freezer in all my bread recipes and it works great!
Rapid-rise Yeast is a type of instant yeast that you can find in grocery stores marketed under various names. Rapid Rise or Fast Rising yeast are often used in bread machines and work fine for short proofing periods. You would not want to use this yeast in pizza dough that gets proofed in the fridge for several days or for no-knead dough that also proofs overnight in the fridge because you will use up the rising capabilities of the yeast and you won't get a good rise after you remove it from the fridge. This can lead to denser bread because it didn't rise correctly. You can use rapid rise, quick rise, or bread machine yeast in this recipe if that is what you have on hand. However, if you are buying yeast for this recipe, I recommend buying instant yeast.
Flour
Brioche dough can be made with either bread flour or all-purpose flour, which is known as plain flour in the UK. I've made this recipe with both bread flour and all-purpose flour and either results in great brioche slider buns.
Different kinds of flour will absorb more or less liquid and the humidity level will also play a role in how much liquid you use. This is why it is important to go by look and feel more than specific ingredient amounts. Or, you can weigh out your flour using a kitchen scale and that will give you an accurate weight no matter what the humidity is. If you wanted to make a whole wheat variety, you can. Simply replace up to half of the all-purpose flour with whole wheat flour and you will probably need more liquid. I don't recommend using more than 50% whole wheat flour in this recipe because it doesn't rise as well and your buns are going to be a little too dense if you use more than 50% whole wheat flour.
I don't weigh my flour when making most bread dough because I get better results from relying on the look and feel of the dough. For example, if you wanted to make brioche slider buns with whole wheat flour, you can absolutely substitute half of the white flour for whole wheat, but you may need to add a little extra liquid in the form of water or more milk.
Milk, Eggs, Butter, Sugar
Milk
You can either use all whole milk or a combination of heavy cream and water (⅓ cup cream and ⅓ cup water) or you can use half and half. I've made the recipe will all three combinations and it works perfectly with any of these ingredients. If all you have on hand is skim milk, you can also use that. You can also use water instead of milk in this recipe and while the dough won't be as rich in flavor, it will work just fine.
Sugar
I usually put a touch of sugar in my brioche dough, but I forgot when filming the video and the brioche rolls turned out just fine. While the sugar does help feed the yeast and it adds a touch of sweetness, it is optional. I also noticed that the buns with sugar browned a lot more than the ones without it.
Egg
The eggs in the brioche dough not only help emulsify (hold everything together) the dough, but it also provides the fat from the egg yolk which gives brioche bread its signature off-white to yellow bread color and adds richness to the bread. There is only one egg in this recipe so the color of the rolls is more white than yellow. I have not tried this recipe without the egg, but think it could be substituted for either more butter or more milk/cream. 3 tablespoons of liquid should be fine to add if you are omitting the egg.
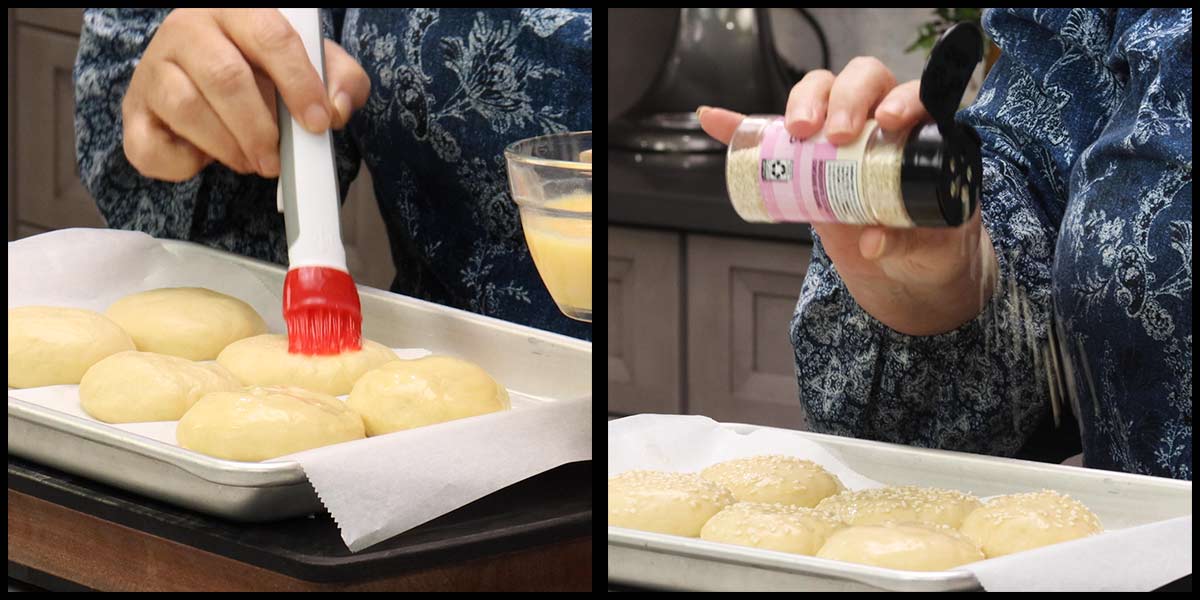
If you want to put sesame seeds on your brioche slider rolls, then you will want to also use an egg wash. This acts like glue to hold the seeds on the rolls. An egg wash can be just the egg white, the egg yolk, or the whole egg mixed with a small amount of water. In this recipe, I use the whole egg beaten with 1 Tablespoon of water.
Butter
I used salted melted butter that I melted in the microwave and then let it cool for a few minutes. It's important that the butter isn't too hot when you add it to the other ingredients because it could kill the yeast. Just to be safe, try to pour the melted butter over the flour in an area where the yeast isn't or mix the flour with the yeast before adding the butter. If you are using unsalted butter in the recipe, you may want to add a touch more salt to the dough.
How to Make Brioche Dough
This is a basic brioche dough that can be used to make brioche burger buns, bread, dinner rolls, slider buns, hot dog buns, and even sweet brioche braided bread. Here is my recipe for a sweet brioche bread: Sweet Cherry Brioche Bread.
This dough recipe makes about 1 pound of dough, so you can adjust the ingredients to make a double batch if you need to make more buns.
Please listen closely to what I am about to say. Use the measurements in the recipe as guidelines ONLY. It is very likely that you will need a Tablespoon or two of extra flour or perhaps an extra splash of milk or water. It's FINE! It's NORMAL. It's the BEST way to begin making dough because when you let the dough tell you what it needs you are 10 times more likely to be successful.
When making the dough, it's important to focus on the look and feel of the dough. Don't worry though, I will walk you through this step-by-step.
Stand Mixer Directions
In the bowl of a stand mixer, add the flour, salt, sugar, instant yeast, egg, and melted butter. Using the dough hook attachment, begin mixing at low speed. The dough hook will begin to combine the ingredients and you will start to see a crumbly mixture form. The dough hook and flour mixture will grab the excess flour from the sides of the bowl and incorporate it for you so you don't have to scrape the sides of the bowl.
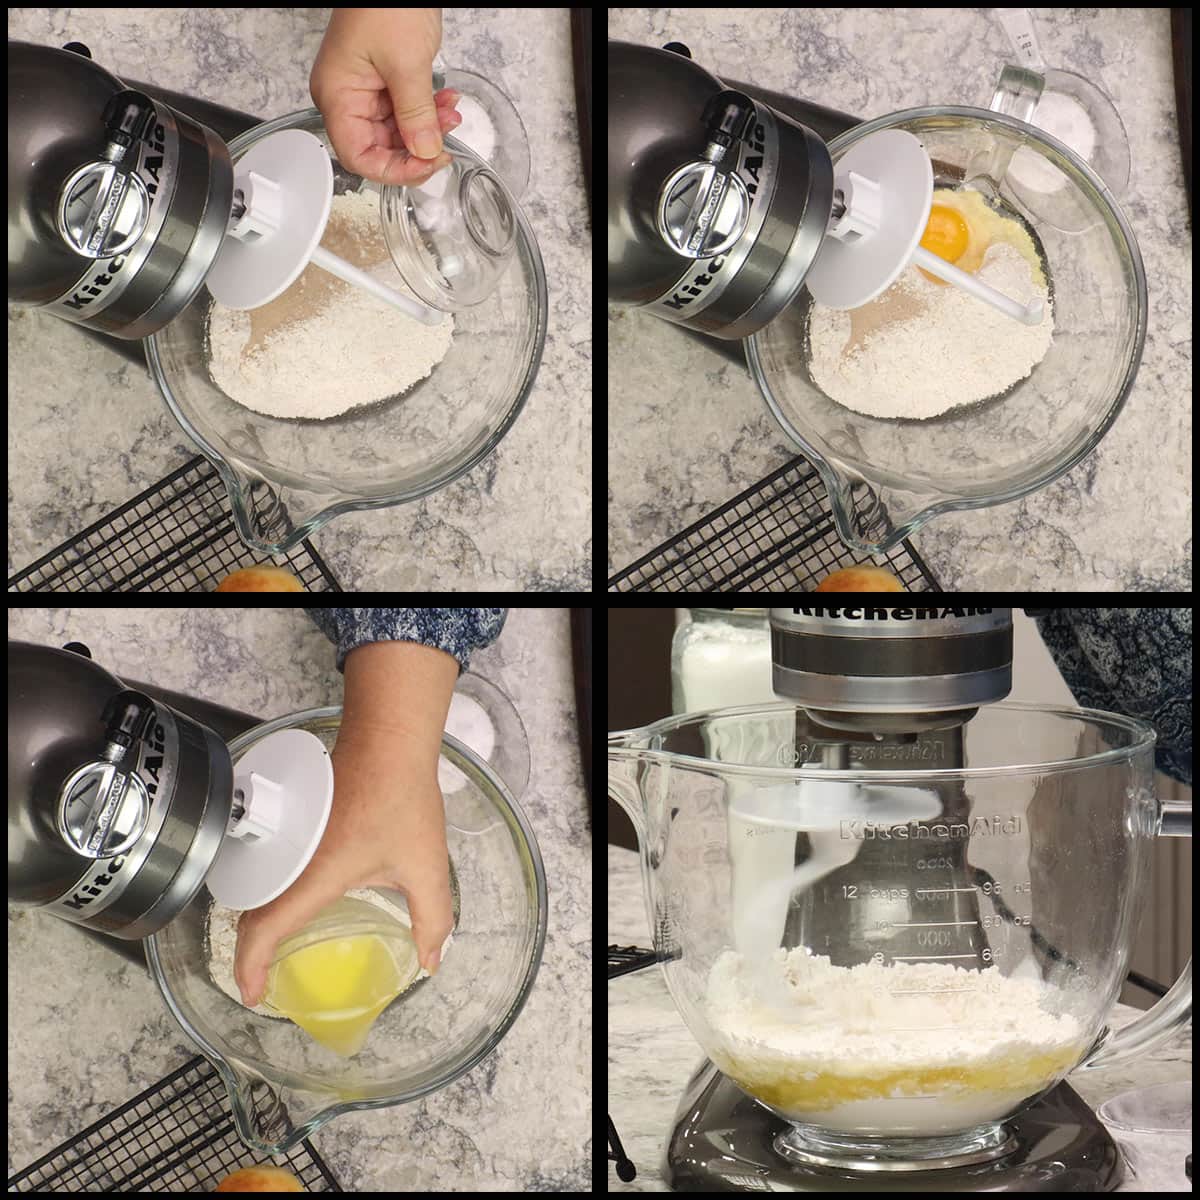
Add in half of the milk and continue to mix on low speed for about 3-5 minutes. Add in the remaining milk and mix on low speed for at least 5 minutes before you decide if you need more flour.
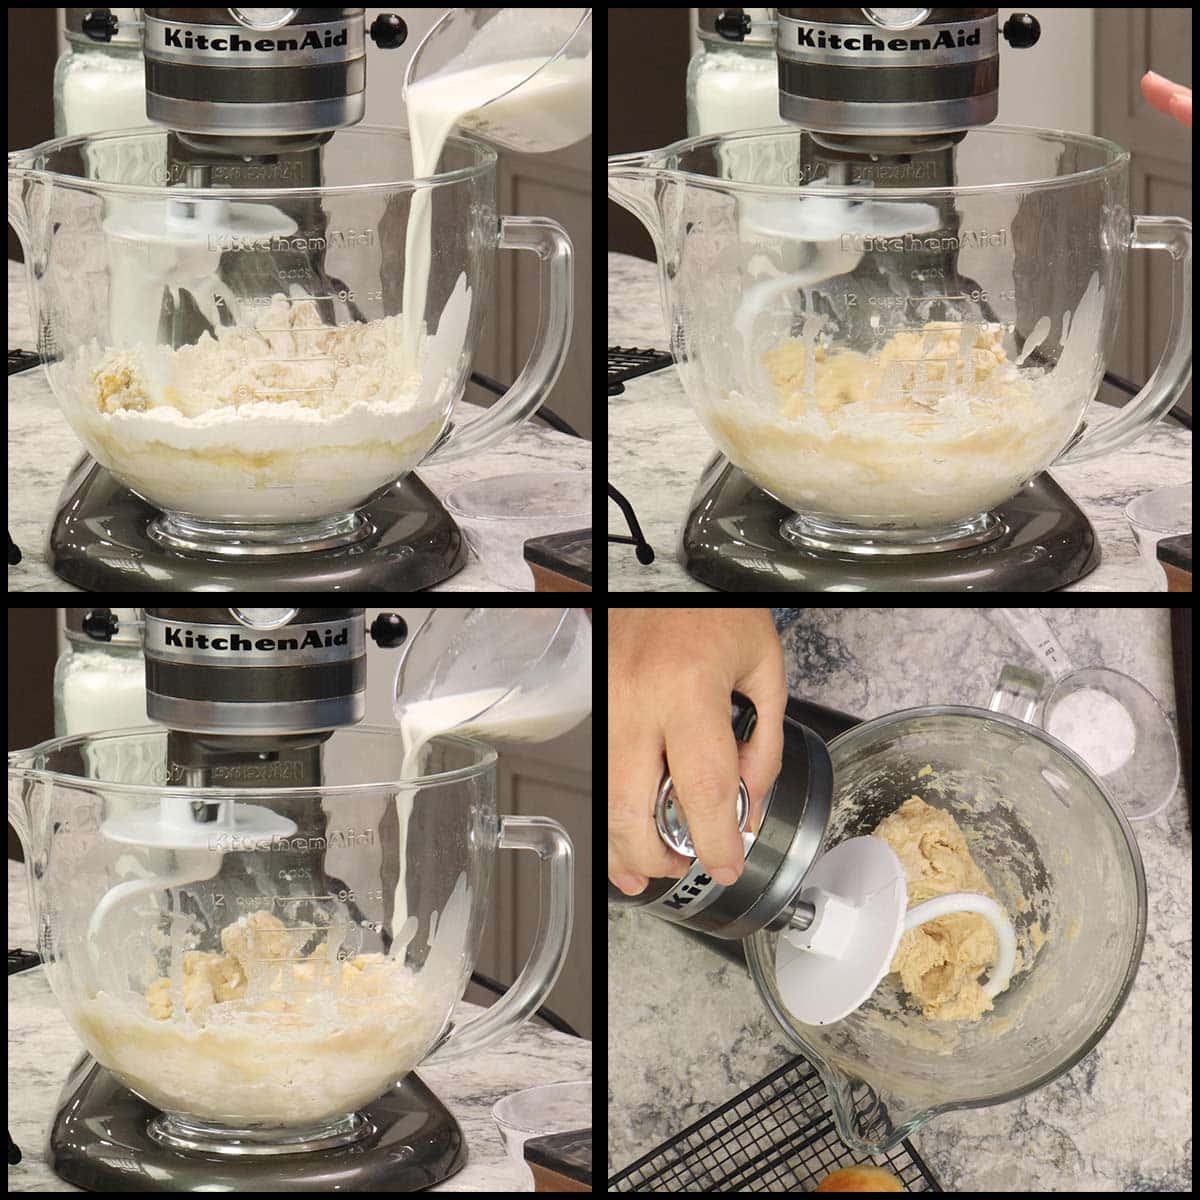
I ended up having to add about 2 additional Tablespoons of all-purpose flour to my dough, but this will vary depending on your flour, the humidity levels, and how accurate the measurements were, to begin with. Please do not stress over any of these things, this is why we use the amount of the ingredients as a guide and listen to what the dough tells us it needs.
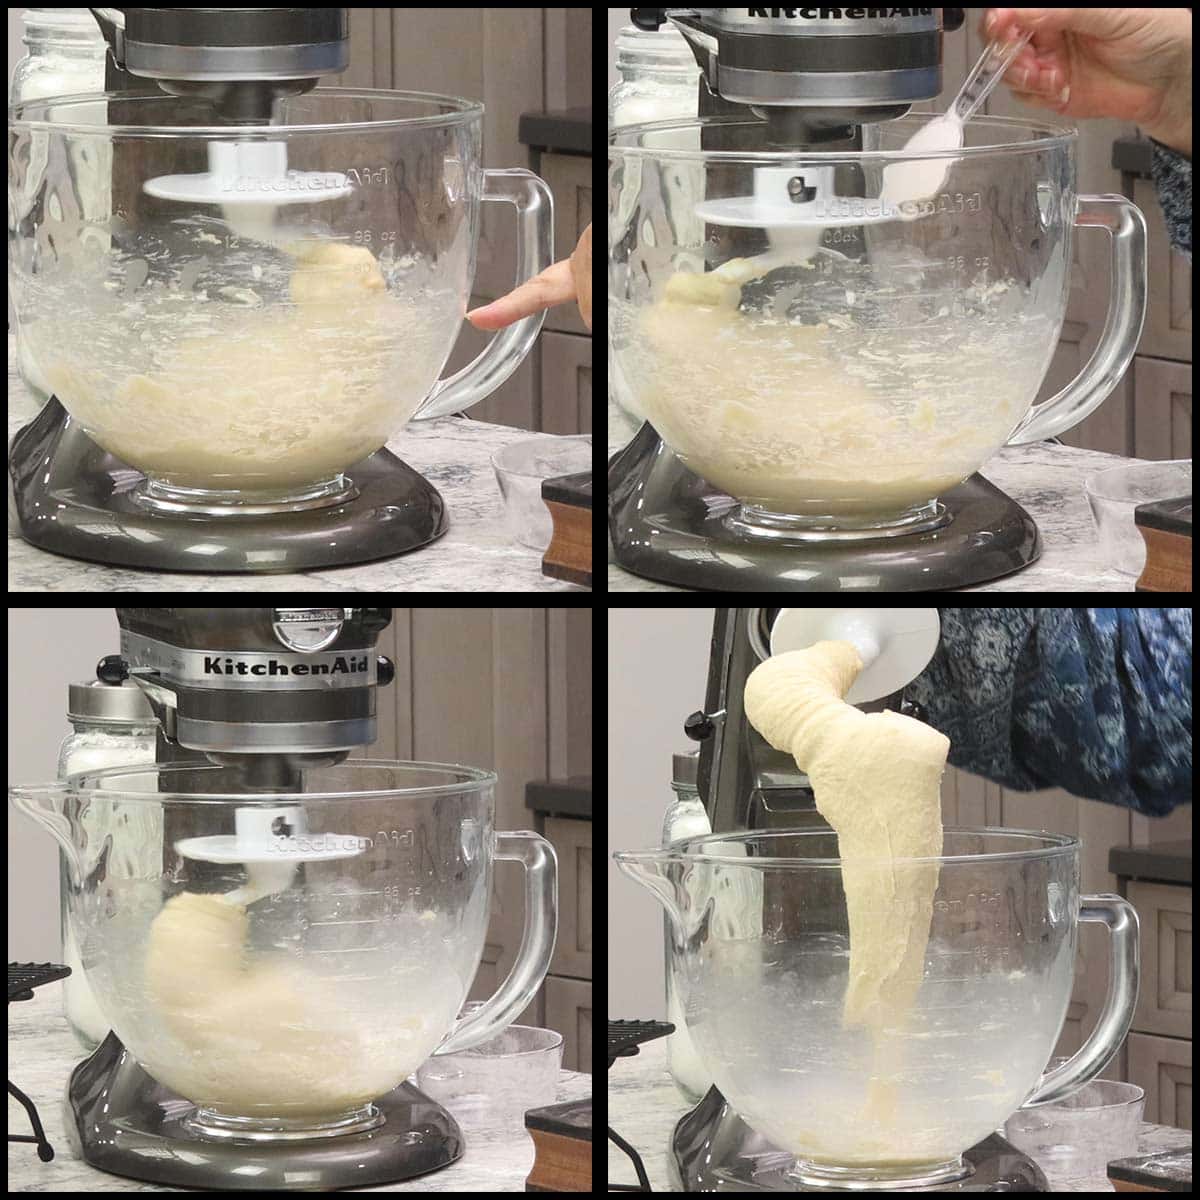
If the dough is sticking to your fingers when you touch it, it needs a little more flour. If it is cakey or crumbly or doesn't feel very soft, it needs more liquid. Make sure to add either flour or water in very small increments. I add them ½ Tablespoon at a time and allow a few minutes of kneading before adding more.
Once the dough is easily climbing up the dough hook and has pulled most of the dough from the sides of the bowl and you can see about a quarter size of the dough sticking at the very bottom of the stand mixer, your dough is ready.
It should feel soft, and tacky, but doesn't stick to your hands.
Bowl and Whisk Directions
In a large mixing bowl, add the flour, salt, sugar, and instant yeast. Whisk the ingredients together. Add in a lightly beaten egg, melted butter and half of the milk. Use a spatula to fold the ingredients together until they start to come together into a dry dough.
Begin adding the milk in increments of about 2 Tablespoons at a time and mix with clean hands until a dough ball begins to form. It is easier to add more flour once you begin kneading the dough, so I encourage you to use all of the liquid in the recipe if it is your first time making brioche dough.
The dough should be slightly tacky, but not sticking to your hands as you mix it. It should be soft and feel moist to the touch. Move the dough to a lightly floured work surface to begin the kneading process. You will want to have a few tablespoons of flour nearby to add as needed.
Knead the dough on the lightly floured surface and if it is sticking to your hands, it needs a little more flour. Knead the extra flour in in small increments of about ½ Tablespoon at a time and give the dough a good 2-3 minutes of kneading and resting to absorb the extra flour before adding more.
A little flour goes a long way in brioche dough and if you add too much your dough will be dry and not have really soft crumb of a brioche. If you think your dough is too dry, add a splash of water or milk and knead it for several minutes.
Once the dough is the right look and feel, which is soft and tacky but not sticky, then you will begin to knead it for at least 10 minutes. The dough will go from craggily (see the first picture below, it's kind of dented) to soft and smooth.
Or, if you don't want to knead it, you can certainly put it in a bowl covered with plastic wrap and let it sit in the fridge overnight. This will also develop the gluten and give your dough the elasticity and strength it needs. If you do refrigerate it, plan on a 1-2 hour proof time for the first rise because the dough will be cold.
First Rise of the Brioche Dough
After the dough is soft and smooth, it is time to allow it to rise. This can be done in a number of ways.
Using the Proof or Prove Function of the Ninja Foodi
Newer models of the Ninja Foodi have a proof function, which I really love for dough like this brioche because I can proof the dough in half the time it takes on the counter. Shortening the proofing time through warm environments does have an effect on the flavor development, but since brioche gets so much flavor from the milk, butter, and eggs, it really doesn't change the end result at all.
The Proof or Prove function doesn't use the fan so you don't have to worry about covering the dough.
I like to use about 1-2 teaspoons of olive oil in the bottom of the inner pot and rub the dough around in the oil and then flip it over. Close the lid on the Ninja Foodi and select the proof/prove function. Set the temp to 95℉/35℃ and the time to 45 minutes.
Usually, the dough has doubled in size in 30-40 minutes and that is the benchmark you want to go by. The amount of time does not matter when proofing dough, the size of the dough does and it needs to double in size before moving on to the next step.

Proofing on the Counter
If you don't have a Ninja Foodi with the Proof function or an oven with a proof function, then you can simply place a few teaspoons of olive oil in a large mixing bowl and move lightly coated the dough on both sides with the oil.
Cover the bowl with plastic wrap and leave it on your counter or warm spot in your kitchen until it doubles in size. This can take anywhere from 45 to 90 minutes and even longer if your house is cold. I recommend sitting the bowl on a cutting board or another surface that doesn't transfer heat as easily as marble, granite or quartz if your countertops are made of those materials.
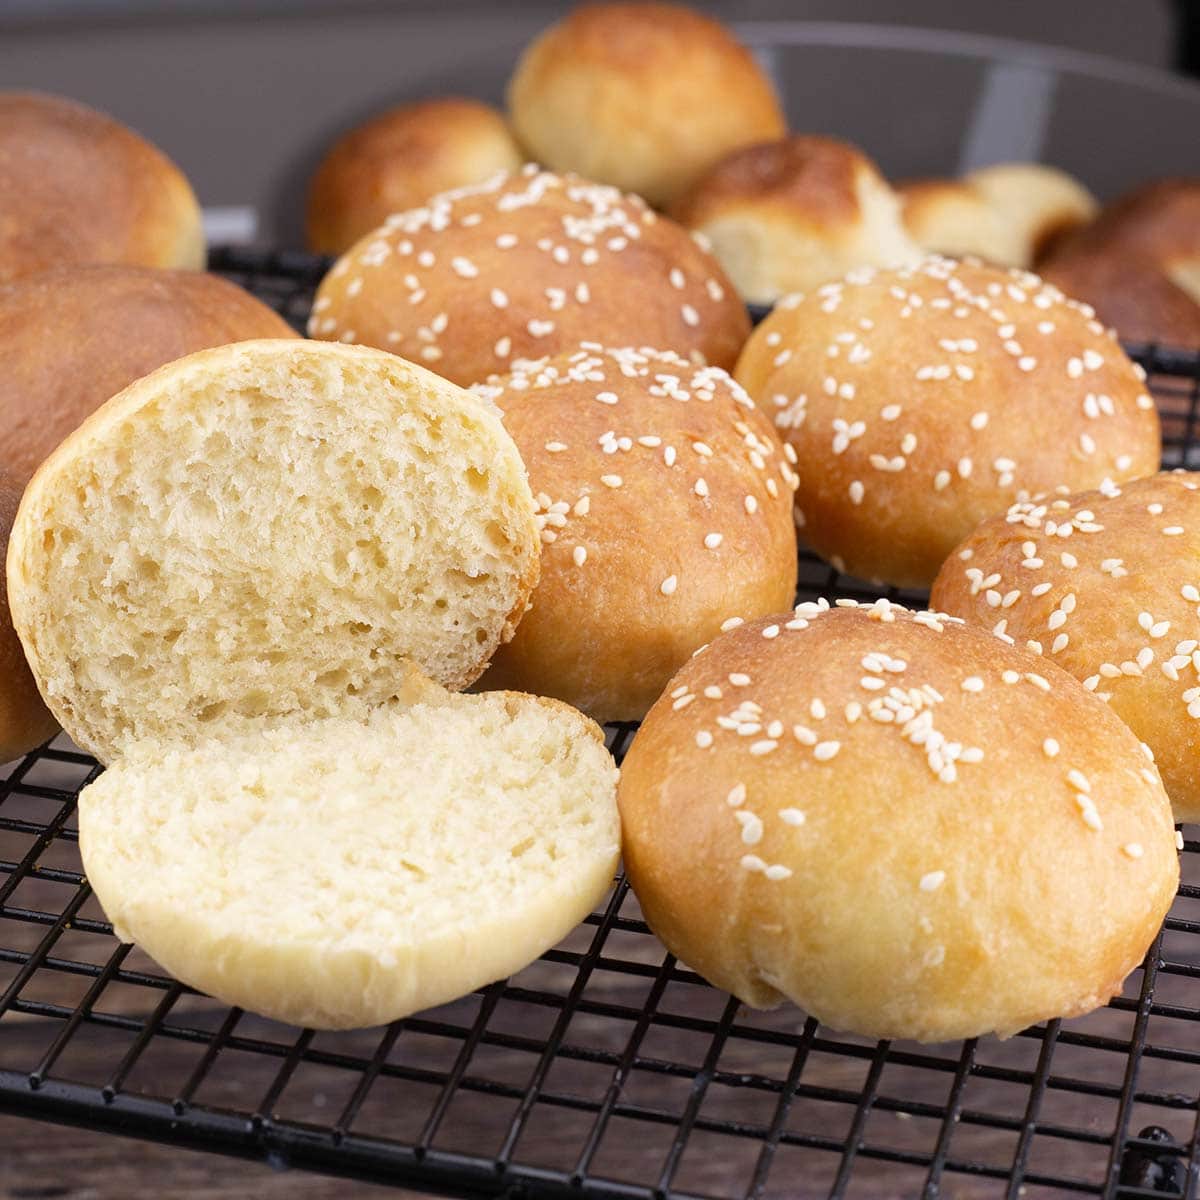
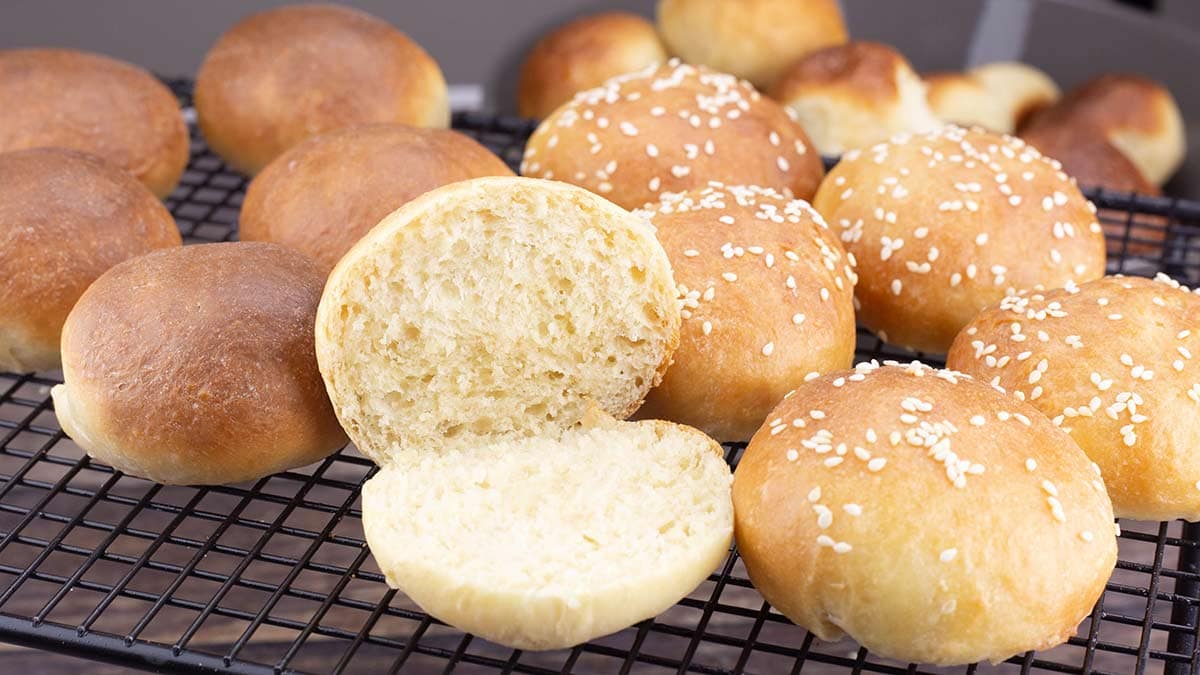
Once your dough has been proofed and doubled in size, you are ready to use it. This dough makes wonderful dinner rolls or a small loaf of bread or you can make the slider buns!
How to Make Brioche Slider Buns
Shaping the Brioche Buns
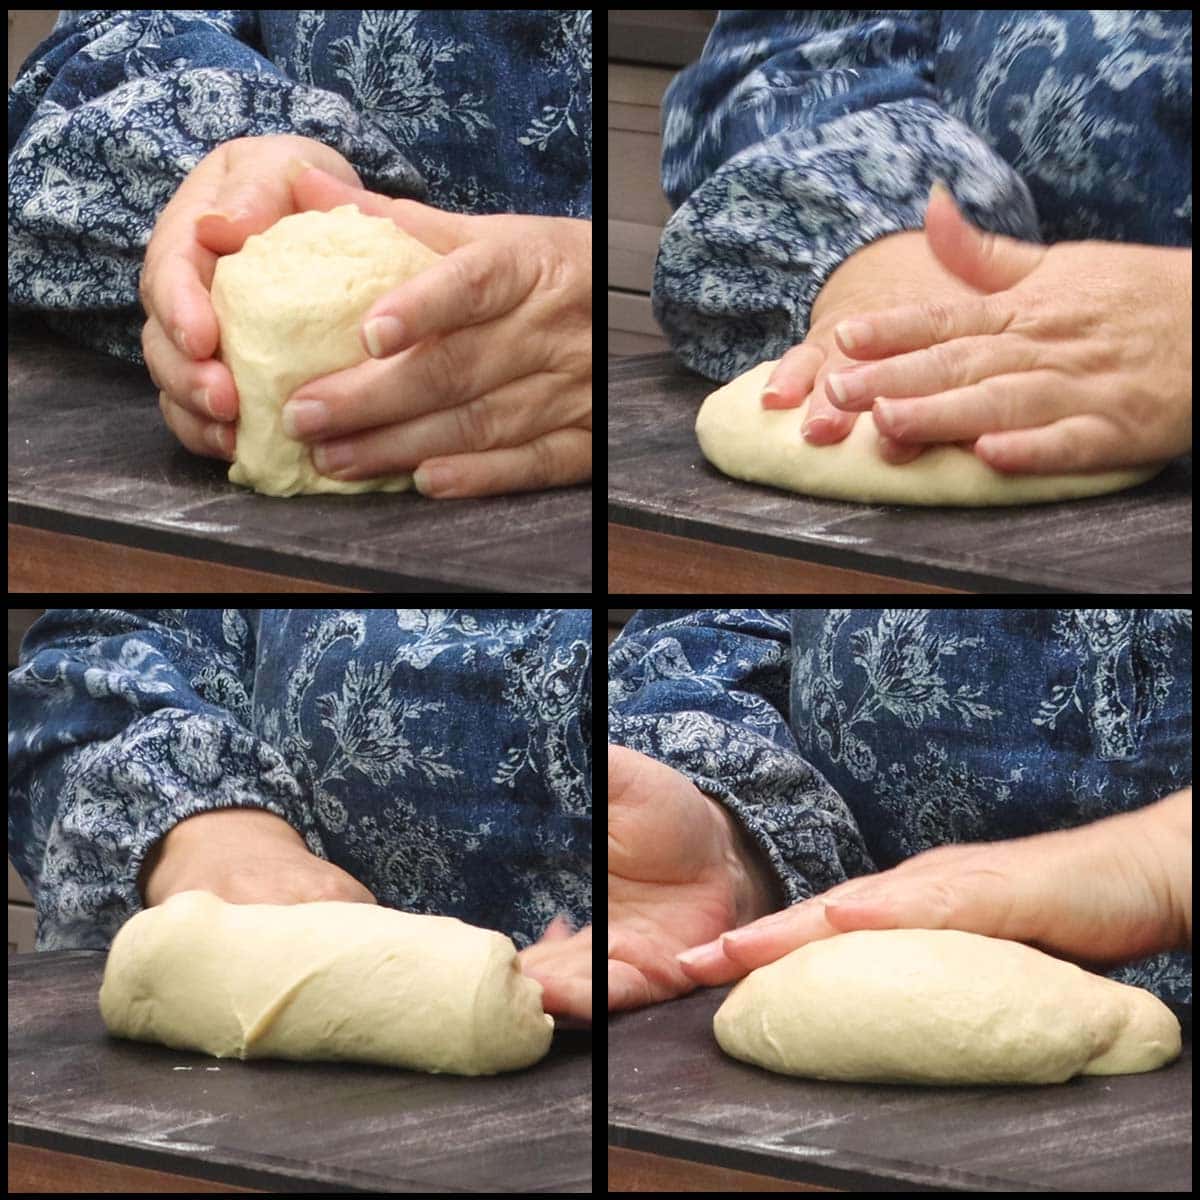
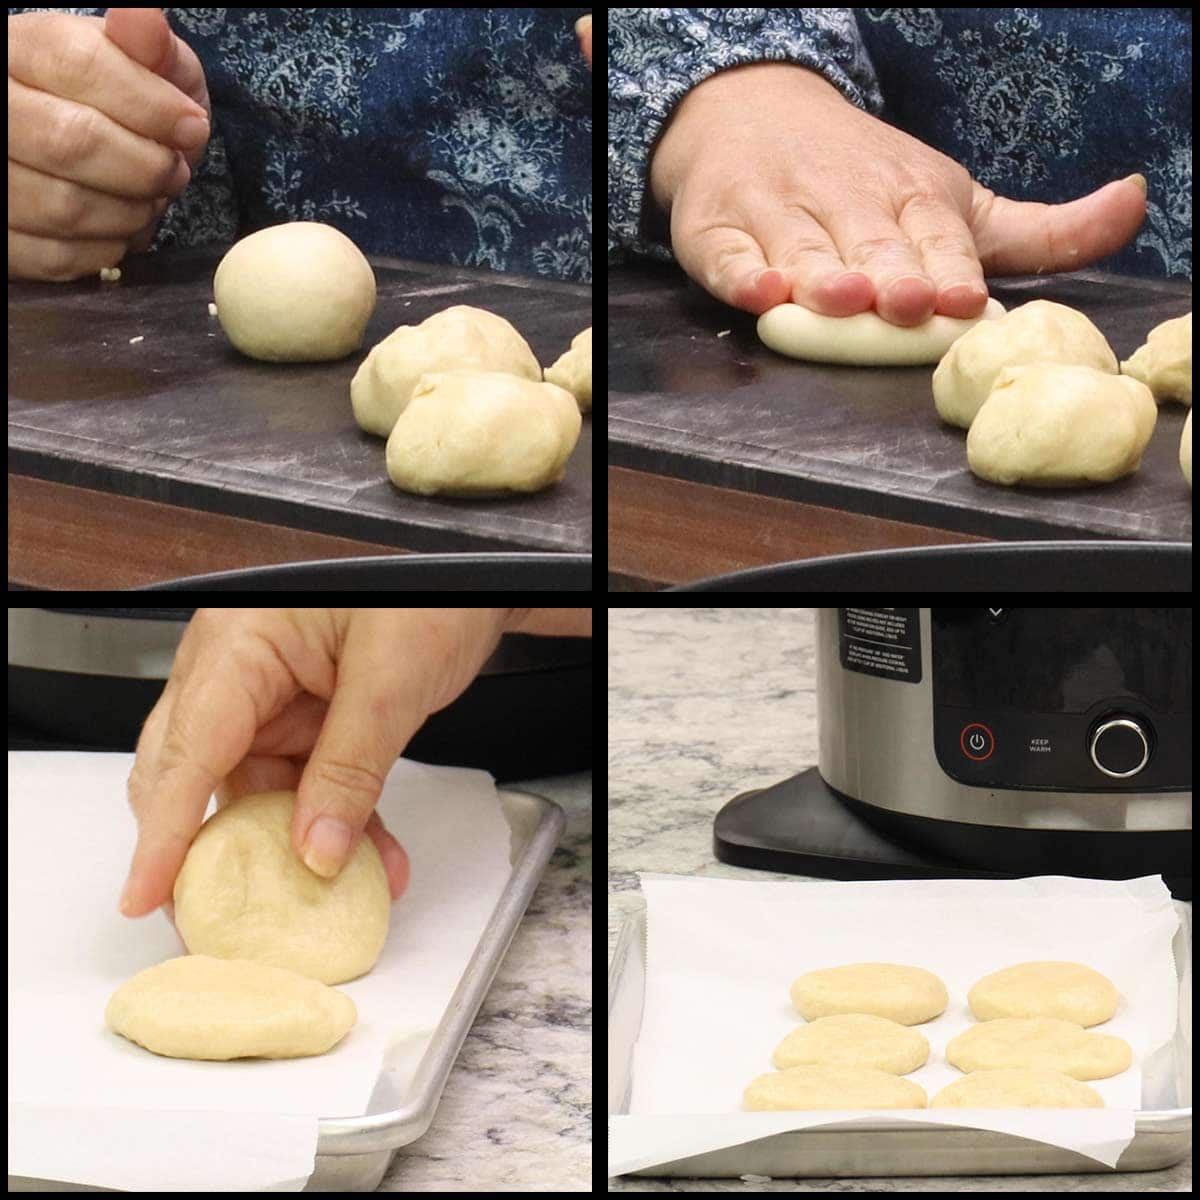
Each slider bun uses about 1½ ounces of brioche dough and you can certainly weigh them out if you like. I don't bother with that, I simply split the dough in half and take each half and split it again so I have 4 equal pieces.
Take each piece of dough and make a log with the dough and then split it into 3 equal portions. Do this for the remaining 3 larger pieces and you will end up with 12 equal pieces of dough that average 1½ ounces each.
You could also make mini buns (even smaller than sliders) by making them each 1 ounce in weight or larger sandwich or burger buns by making them 3 ounces in weight. You will get about 16 mini slider buns and 5 larger buns from one batch of dough. Feel free to double the recipe if needed.
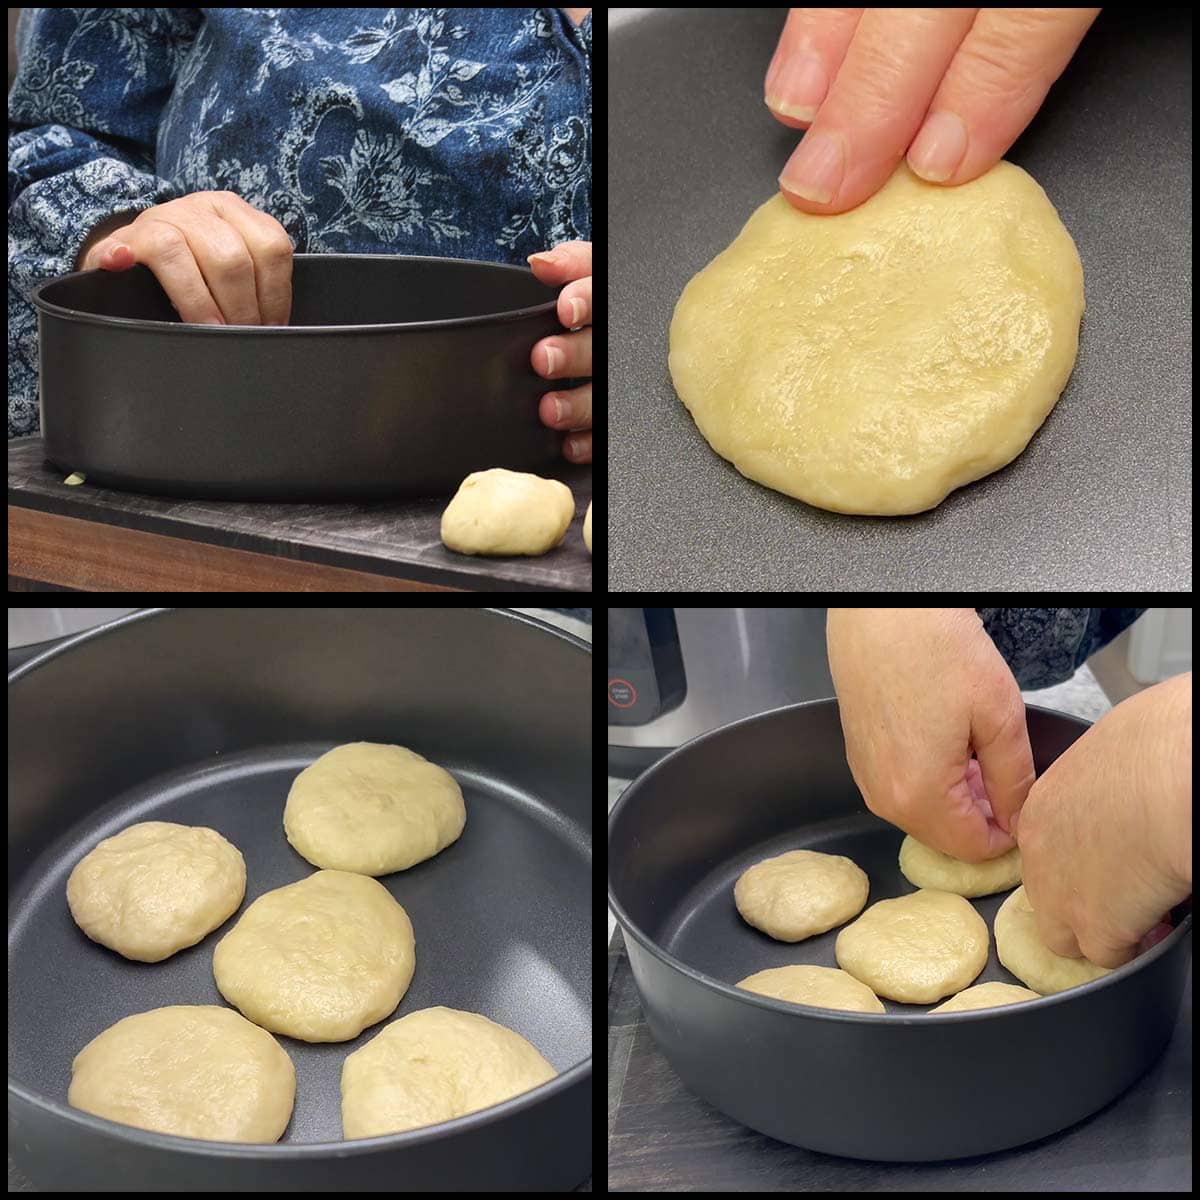
Once you have your dough balls, it's time to shape them and let them rise a second time. Line a baking sheet with parchment paper or if you want to make 6 at a time in the Ninja Foodi, use the Ninja (affiliate link)all-purpose pan or an (affiliate link)8X2 Fat Daddio Pan or another pan that is at least 8" in diameter.
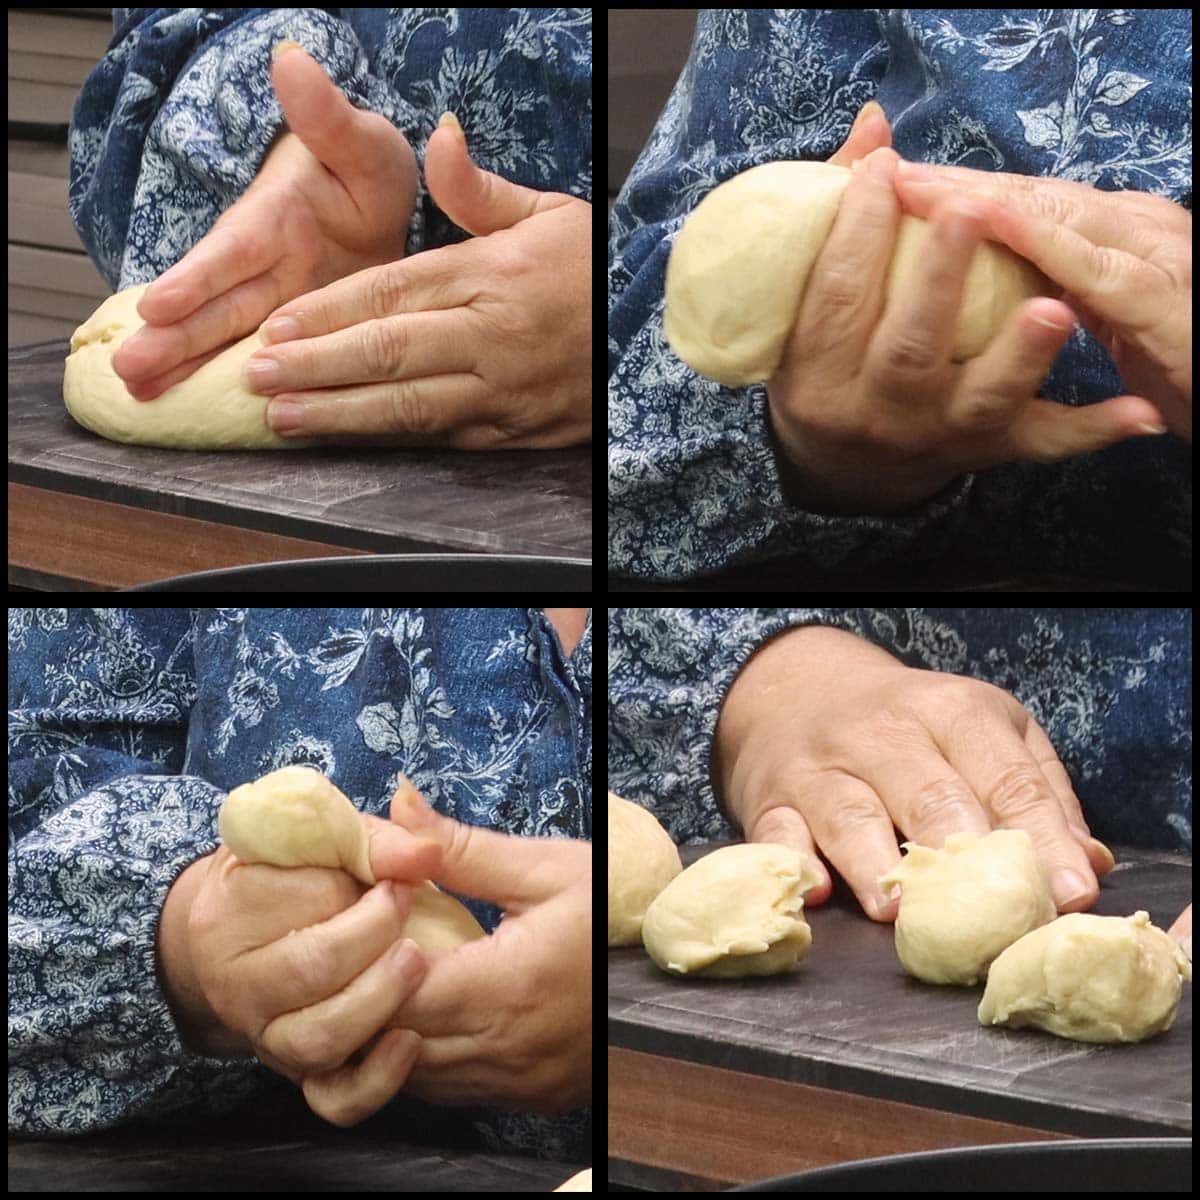
To shape the buns, you may think you just pull off some dough and flatten it into a disc shape and you're good to go, but that isn't quite enough. We need to stretch the dough and create some tension on top so that they rise correctly. This can be done in several ways, but the way I do it is to flatten the dough ball in the palm of my hand and grab the corners and put them into the middle. I do this a few times until the top of my dough ball is stretched and smooth. Then I place the dough ball on the baking sheet or pan I'm making the rolls in and flatten them out so they are about 3" in diameter.
This is one of those processes where pictures really don't tell a story, so here is a short video that shows me forming the slider buns.
This may seem like a strange process almost like we are forming tension and then undoing it, but don't worry, we aren't. The stretching of the dough and creating tension elongates the gluten fibers and helps provide structure to the dough and you get a better rise in the oven. Skipping this step may result in your slider buns not being soft and airy on the inside and instead slightly dense.
Once the dough ball is formed and flattened out to about 3" in diameter, place them on a parchment-lined tray or in a nonstick baking pan (doesn't need to be lined with parchment).
You want to place them about ½-1" apart so they are close, but not quite touching. As they rise the second time, you may see them touching, this is perfectly fine. This will keep the rolls soft as they bake because they absorb the steam from their neighboring rolls. If you wanted a harder exterior, place them further apart.
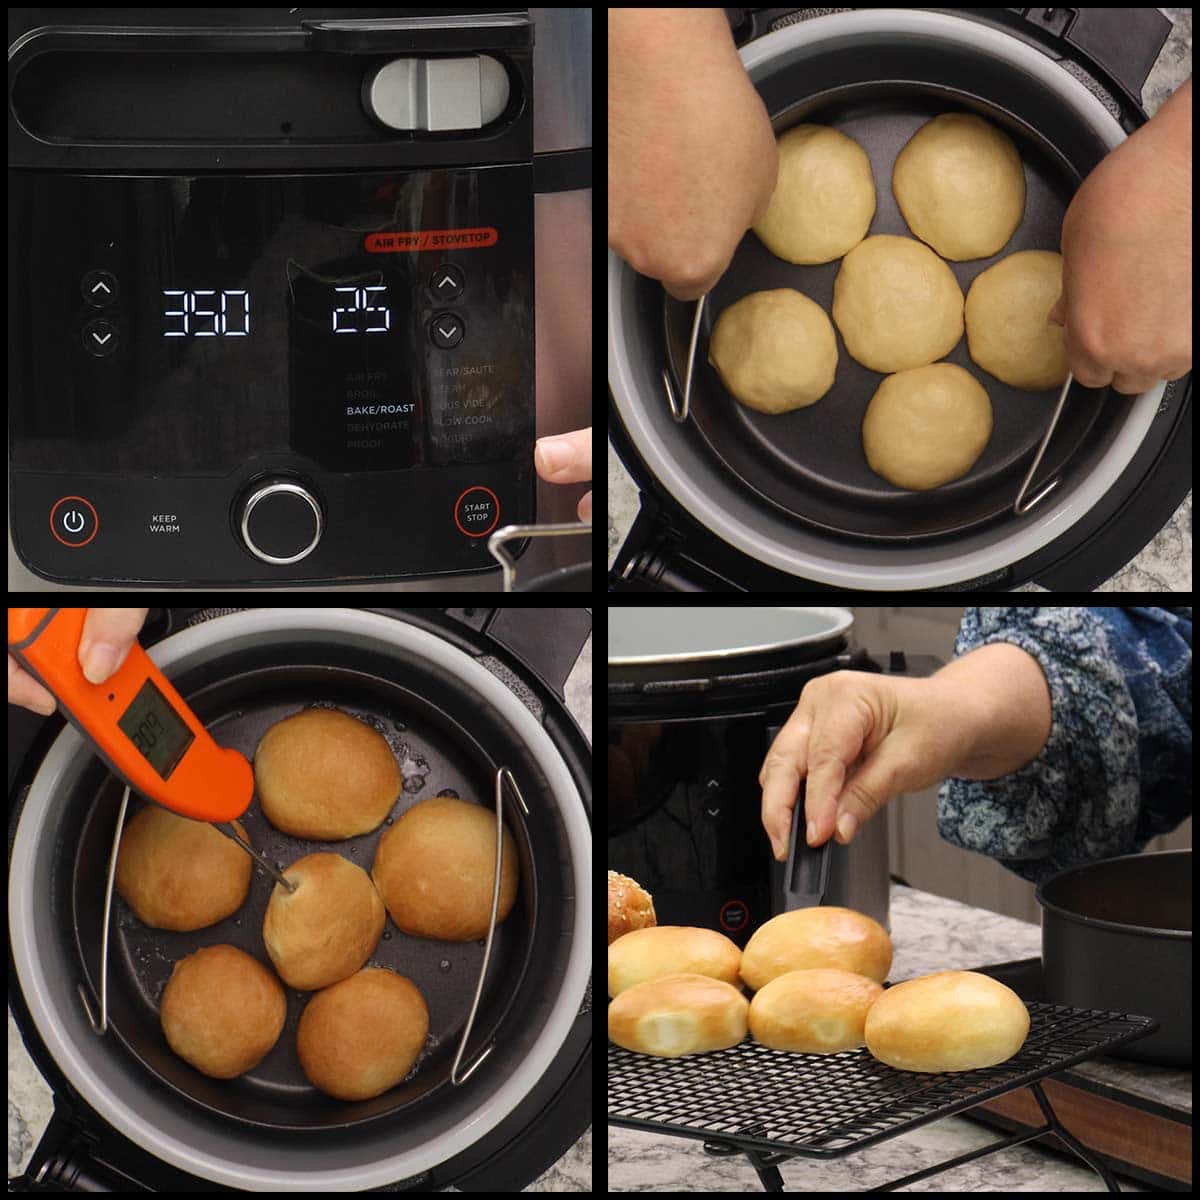
If you want to use the NInja Foodi to proof and bake your slider buns, put them in a pan that will fit in the Foodi. I used the all-purpose pan and set it on the rack in the low position.
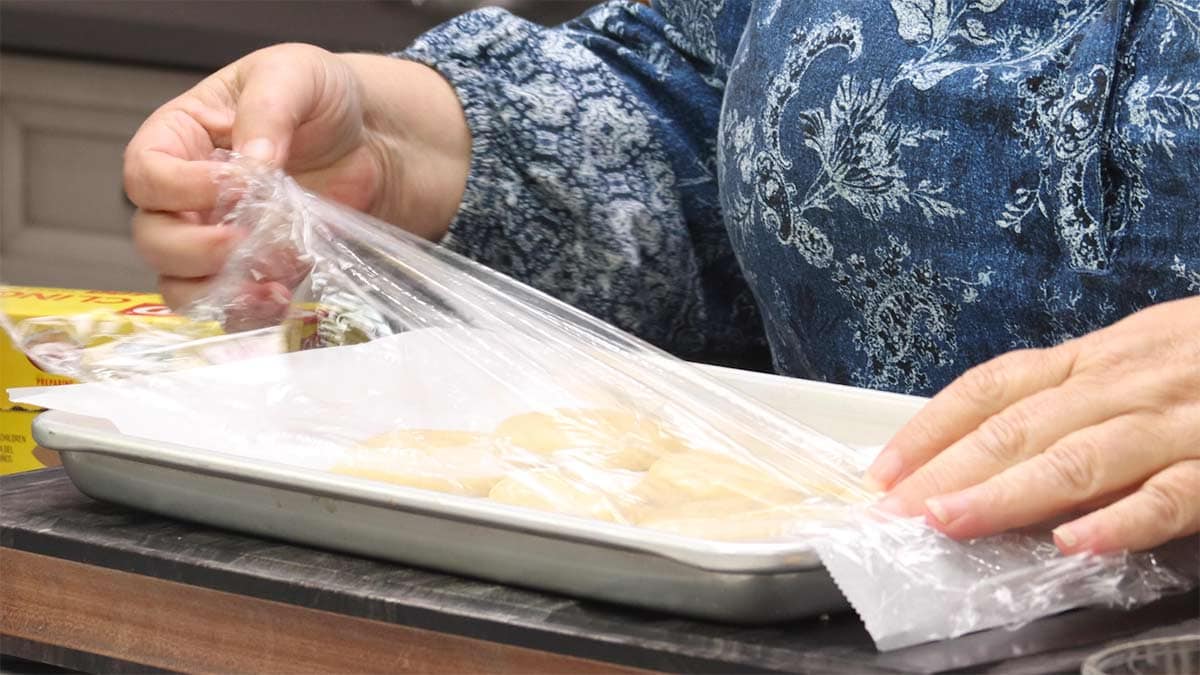
Second Rising of Formed Buns
Once the buns are formed and placed on your baking tray or pan, cover the tray loosely with plastic wrap. Now they need to rise a second time. It is not necessary for them to double in size, but you will see them start to get a little puffier and rise in height. This usually takes about 30 minutes on the counter and is a great time to start preheating your oven. Preheat it on 400℉/200℃.
You can also do the second rise in the Ninja Foodi using the proof function on 95℉/35℃ and it takes about 20 minutes or so for the to start puffing up a bit.
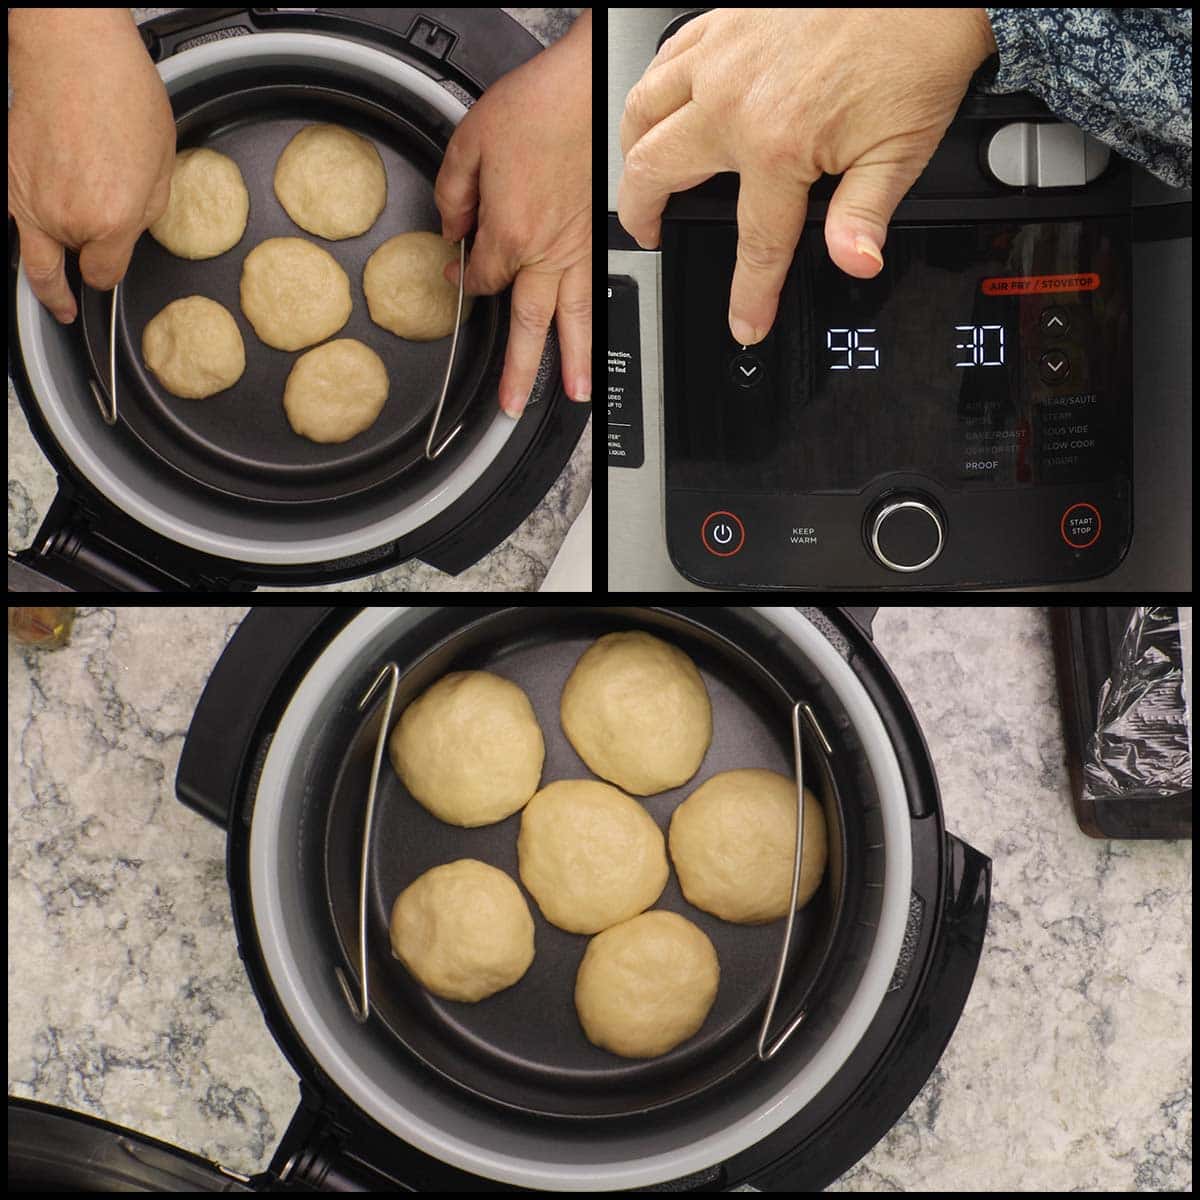
Remove them and let them sit on the counter for 10 minutes while you preheat the Ninja Foodi on the bake/roast setting at 350℉/175℃. Preheat for a full 10 minutes.
Baking the Brioche Buns
Prior to baking the brioche buns determine if you want sesame seeds on top or not. If you do, make an egg wash of 1 whole egg with 1 Tablespoon of water and whisk it until well combined. Brush the egg wash on top of each bun and sprinkle with plain (not roasted) sesame seeds.
Oven Directions
Place the tray of buns into the preheated oven on the middle rack. If you are doing multiple trays, you can use the top and middle racks, but you may want to switch them around halfway through the baking process.
Bake at 400℉/200℃ for 12-15 minutes or until the slider rolls are golden brown.
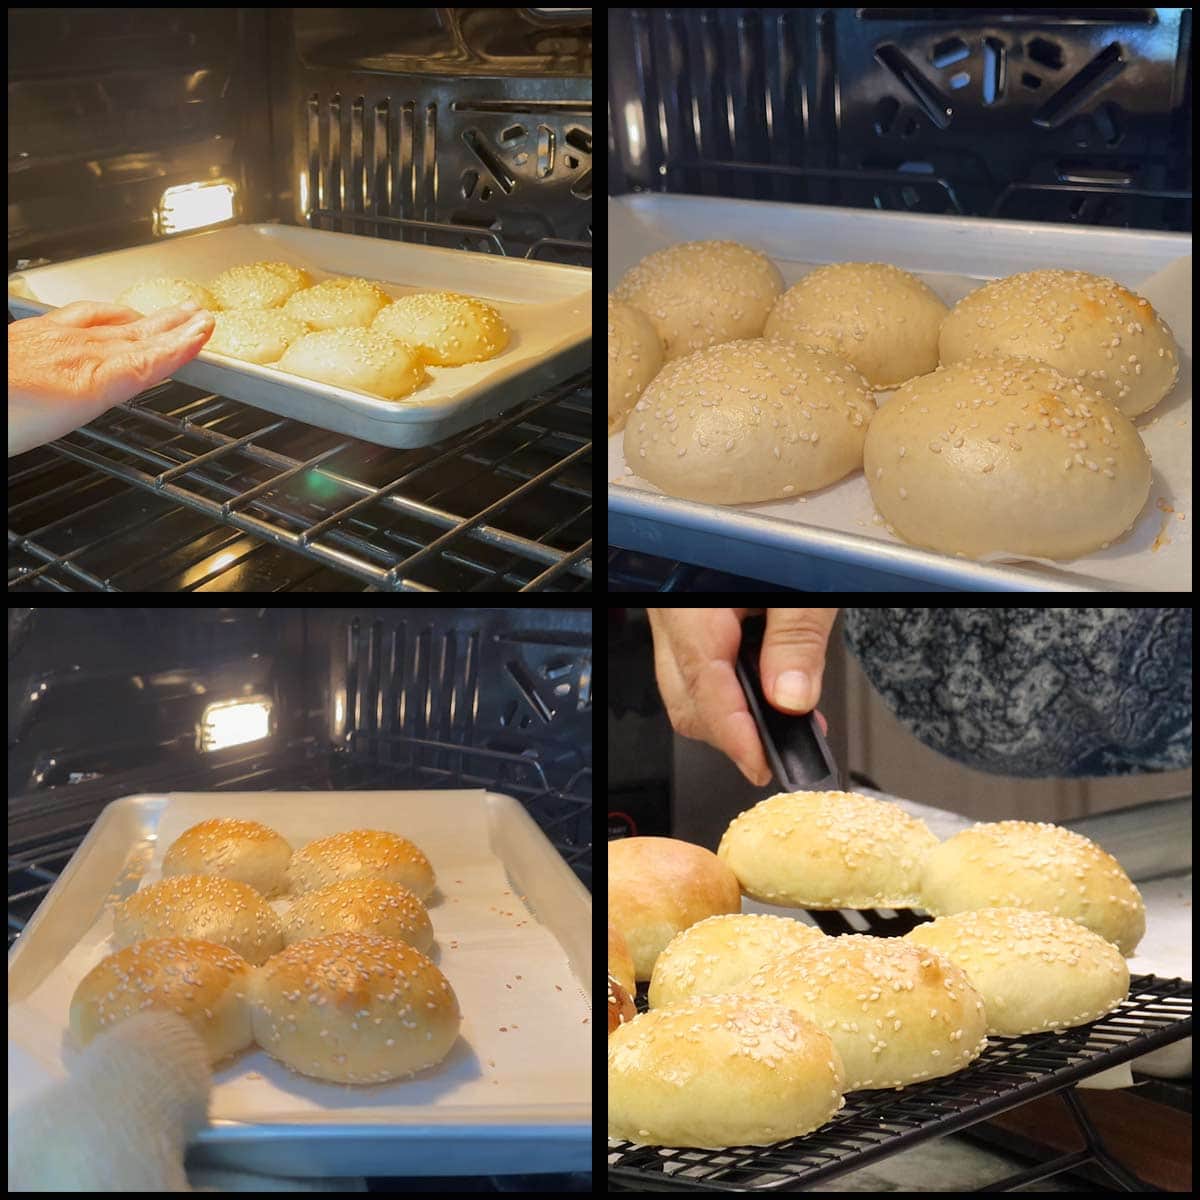
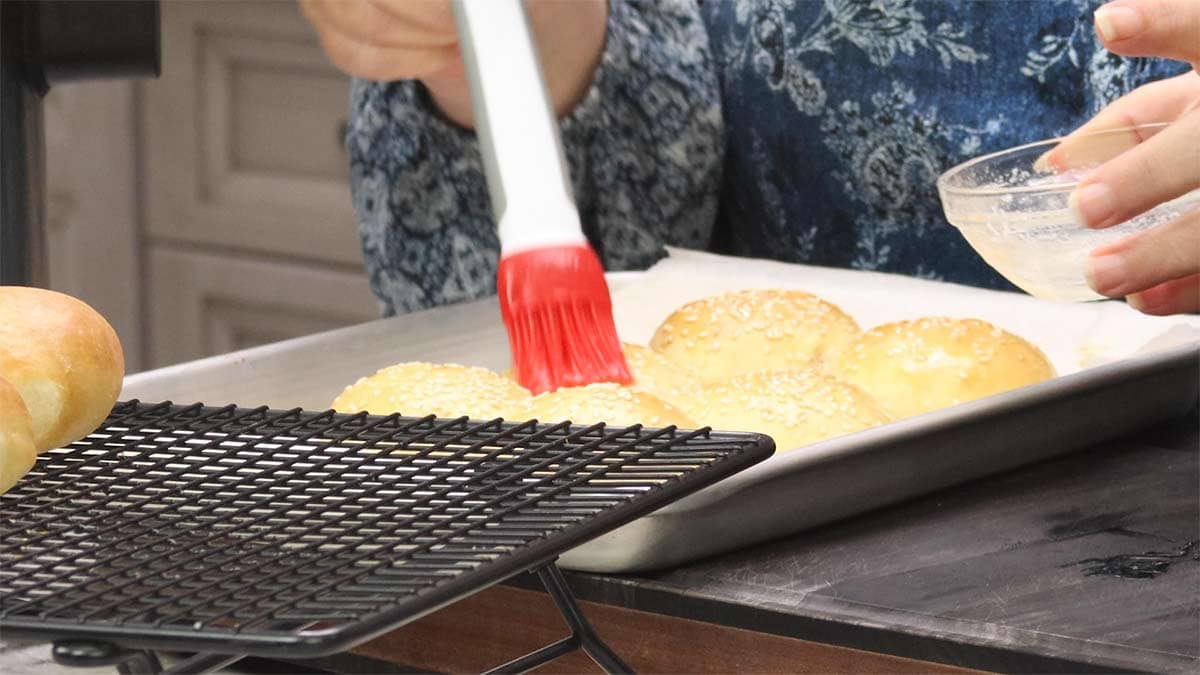
Remove from the oven and brush with melted butter if desired. The melted butter is optional but it helps to keep the buns soft and also gives a glorious shine to the rolls.
Ninja Foodi Directions
Once the Foodi has preheated at 350℉/175℃ for a full 10 minutes, place the pan of buns on the rack in the low position and into the Ninja Foodi.
Close the crisping lid and bake for 8-10 minutes or until the buns are golden brown. If you are unsure if they are done on the inside, use an instant-read thermometer, and as long as it reads over 200℉/95℃, they are done.
Remove them and brush the tops with butter if desired. Remove rolls from the pan and allow to cool on a cooling rack for at least 10 minutes before slicing them.
Now that you are all done making your slider buns, it's time to figure out what to put on them! The buttery taste of the rolls is so delicious they can be eaten plain, but they are also wonderful little sandwiches. Enjoy!
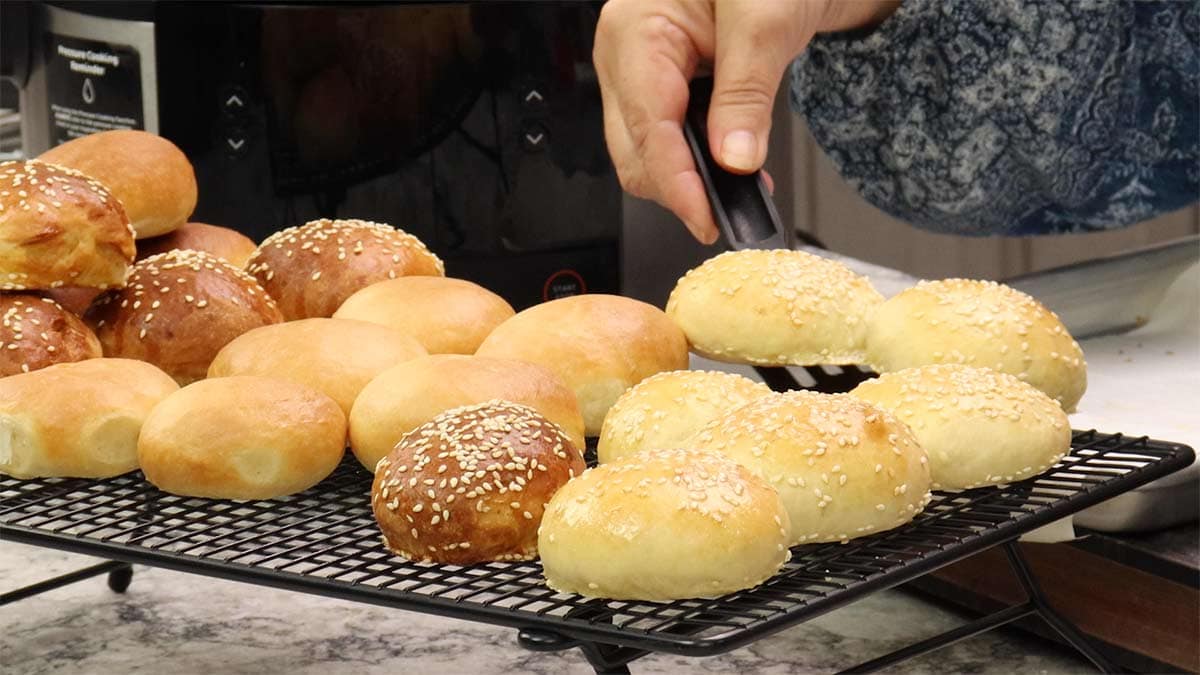
You may wonder why these buns are slightly different colors. The darker ones had sugar in the dough and the lighter ones didn't. That is the only difference between the two batches that I can think of. They were all made and baked on the same day using this recipe.
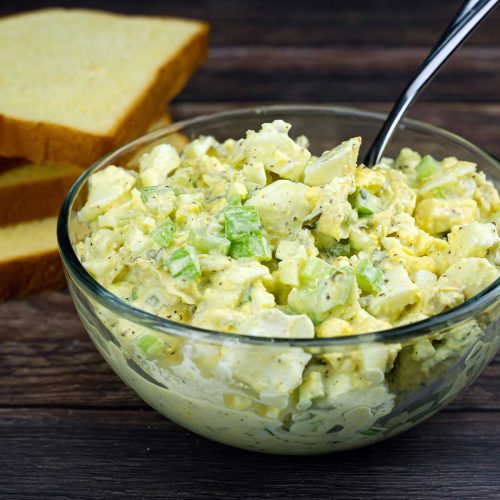
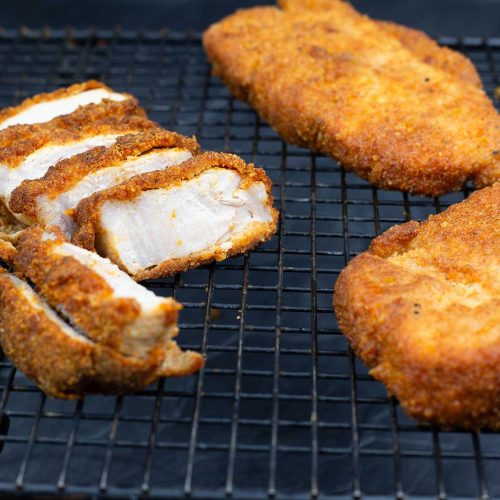
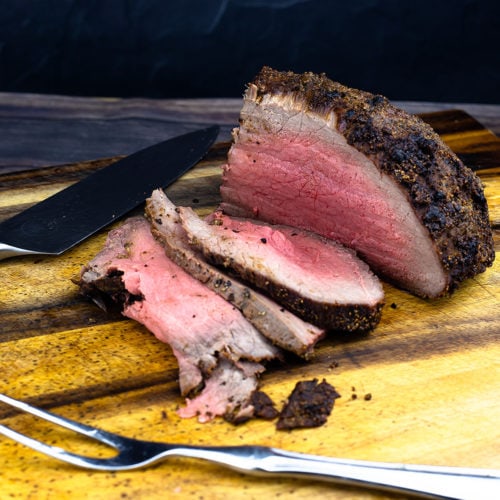
Delicious Fillings For Your Slider Rolls!
While mini burgers might come to mind first for slider rolls, there are so many different things you can use them for, and here are just a few ideas!
- Chicken Bacon Ranch Sliders
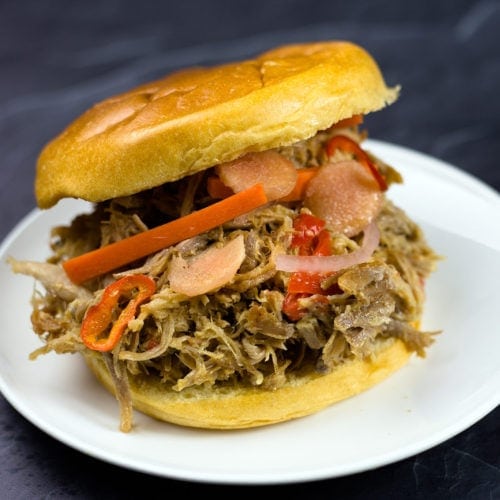
- Ninja Foodi Pulled Pork ~ Pressure Cooked & Air Crisped
- No Peel Egg Salad
- Shake 'N Bake Style Pork Chops in the Ninja Foodi
- The BEST Chicken Cheesesteak with a Twist!
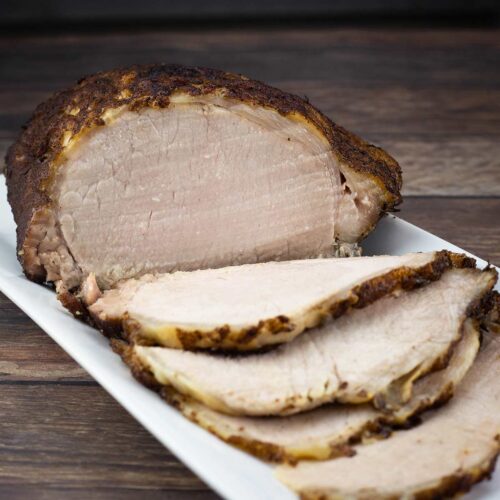
- Perfect Roast Beef in the Ninja Foodi
- Asian Pulled Pork ~ Ninja Foodi or Instant Pot Recipe
- Ninja Foodi Pork Roast


Frequently Asked Questions
Brioche is known for its beautifully buttery taste and it is an enriched dough which means eggs, butter, and milk are added to the dough. It's often softer than regular bread dough and has a very tender crumb.
This is very different from a French recipe for bread dough which is considered a lean dough and does not contain any fat. Italian bread doughs often have olive oil in them, but usually not butter or eggs.
Brioche also keeps fresh longer than other types of bread because the fat content in the bread slows down the drying out or "staleness" of bread.
Yes, you can freeze it. I recommend freezing it before the first rise and then allowing it to thaw on the counter and completing the first rise when you are ready to make it. Make sure that is wrapped well in plastic wrap and I would also put it into a freezer bag for freezing.
You can also make up the dough and put it in a plastic bag or wrap it in plastic wrap and let it sit in the refrigerator overnight if you wanted to make it the next day.
Buttery Brioche buns are best eaten the same day they are made in my opinion, but I have made them well in advance of a party and they are still delicious. They can be stored (wrapped in plastic or in an airtight container) at room temperature for up to 2 days or you can refrigerate them for 5-7 days. They can also be frozen for longer storage, but make sure they are completely cold and wrapped well and I recommend using them within 3 months for the best quality.

Brioche Slider Buns Recipe
Equipment
- Ninja Foodi Proof & Bake
- Oven
Ingredients
- 2 cups all-purpose flour Plus 1-2 Tablespoons if needed
- 2¼ teaspoons instant yeast
- ½ teaspoon fine grind sea salt or kosher salt
- 3 Tablespoons melted butter
- 1 Tablespoon sugar optional
- 1 large egg
- ⅔ cup whole milk
- 2 teaspoons olive oil for the first rise of the dough
Sesame Seed Topping
- 1 large egg
- 1 Tablespoon water
- 2 Tablespoons plain sesame seeds
Butter Wash
- 2-3 Tablespoons melted butter
Would you like to save this recipe?
Instructions
Mixing the Dough
- In the bowl of a stand mixer, add the flour, salt, sugar, instant yeast, egg, and melted butter. Using the dough hook attachment, begin mixing at low speed. The dough hook will begin to combine the ingredients and you will start to see a crumbly mixture form.2 cups all-purpose flour, 2¼ teaspoons instant yeast, ½ teaspoon fine grind sea salt or kosher salt, 3 Tablespoons melted butter, 1 Tablespoon sugar, 1 large egg
- Add in half of the milk and continue to mix on low speed for about 3-5 minutes. Add in the remaining milk and mix on low speed for at least 5 minutes before you decide if you need more flour.⅔ cup whole milk
- If the dough is sticking to your fingers when you touch it, it needs a little more flour. If it is cakey or crumbly or doesn't feel very soft, it needs more liquid. Make sure to add either flour or water in very small increments. I add them ½ Tablespoon at a time and allow a few minutes of kneading before adding more. Once the dough is easily climbing up the dough hook and has pulled most of the dough from the sides of the bowl and you can see about a quarter size of the dough sticking at the very bottom of the stand mixer, your dough is ready. It should feel soft, and tacky, but doesn't stick to your hands.
First Rise on the Counter
- Place about 2 teaspoons of olive oil in a large bowl and coat the dough on both sides with the oil. Cover the bowl with plastic wrap and place it in a warm spot in your kitchen. Allow the dough to double in size which usually takes 45-60 minutes, but can take longer in a cold kitchen.
First Rise in the Ninja Foodi OL Series with Proof Function
- Place about 2 teaspoons of olive oil in the inner pot of the Ninja Foodi and coat the dough on both sides. Close the lid and select the proof function on 95℉/35℃ and set the time for 45 minutes. It usually takes about 30-40 minutes for the dough to double in size.2 teaspoons olive oil
Shaping and Second Rise
- Separate the dough into 12 equal pieces. Form each piece of dough into a round disc and pull the edges toward the middle to form a dough ball that has a smooth top. Sometimes you have to shape it a few times to create the tension on top that is very smooth. See the recipe article for a video tutorial if needed.
- Place each dough ball on a parchment-lined baking tray or in a non-stick pan if you are baking in the Ninja Foodi. They should be placed about ½" apart. Loosely cover the tray with plastic wrap or you can set the pan on the Ninja Foodi rack in the low position and use the proof setting for the second rise.
- Let the formed slider bun dough rise a second time for about 20-30 minutes or until they puff up slightly.
Baking the Slider Buns
- Preheat the Oven to 400℉/200℃ or if you are baking in the Ninja Foodi preheat it on bake/roast at 350℉/175℃ for a full 10 minutes.
- If you want to add sesame seeds, whisk 1 large egg with 1 Tablespoon of water and brush over the tops of the buns. Sprinkle on the sesame seeds.1 large egg, 1 Tablespoon water , 2 Tablespoons plain sesame seeds
- Place the buns into the preheated oven or Ninja Foodi. Bake in the oven for about 12-15 minutes or until they are golden brown. Bake in the Ninja Foodi for 8-10 minutes or until they are golden brown.
Butter Wash
- Immediately after you remove the buns from the oven or Ninja Foodi, brush the tops of each bun with melted butter. This keeps the buns soft and shiny.2-3 Tablespoons melted butter
Storing of Slider Buns
- Allow the buns to cool on a cooling rack for at least 10 minutes before serving. Once completely cooled they can be stored in an airtight container (or ziplock bag) for up to 2 days at room temperature. Or, place them in the refrigerator for up to 7 days. The buns can also be frozen for longer storage.
Notes
Common Substitutions
Yeast
You can use active dry yeast and proof it first by combining it with warm water and letting it sit for 10 minutes until it becomes bubbly and then adding to the bread dough. You can also use bread machine or rapid-rise yeast in this recipe without any changes.Milk
You can use a combination of ⅓ cup heavy cream and ⅓ cup of water instead of whole milk. Or you can use ⅔ cup of half and half.Nutrition
About the Recipe Author, Louise Long
Louise is a full-time recipe creator and food blogger @ The Salted Pepper. She has over 30 years of experience with cooking and recipe development. She owned a restaurant for several years and was a full-time RN until retiring to blog full-time.

She published her first cookbook in the Fall of 2018 and is very interested in writing several more.
Louise is also the creator of an online Ninja Foodi Pressure Cooking Course with over 100 instructional step-by-step videos. People absolutely rave about the course and all the value they have received from it.
Louise has several very active Facebook groups that help people with the basics of cooking and learning more about the appliances they love.
Ninja Foodi Pressure Cooker & Air Crisper 101
Ninja Woodfire Outdoor Grill & Smoker
Louise is also a YouTube creator and you can find most of her recipes in video format on The Salted Pepper YouTube channel.
She is very responsive to messages and eager to help in any way she can. Get more Information about Louise & contact information
I WOULD LOVE TO SEE WHAT YOU ARE COOKING UP IN YOUR KITCHEN! TAG ME @THESALTEDPEPPER ON YOUR FAVORITE SOCIAL MEDIA PLATFORM WHEN YOU MAKE A DISH!
BE SURE TO FOLLOW THE SALTED PEPPER RIGHT HERE ⇓⇓⇓⇓⇓
Katie says
Can I make this into Hawaiian Rolls? If so what do I substitute or add?