

Clotted Cream, also known as Devonshire cream or Cornish cream is a staple in the UK, but not easy to find in the US. I've been wanting to make it for a long time, but honestly, it seemed a little daunting even though you only need one ingredient to make it.
I did tons of research and made batch after batch using different times and temperatures and different types of heavy cream and now I can share the BEST way to make homemade clotted cream with you!
Would you like to save this recipe?
I wasn't even sure what to expect when I made my first batch and the idea of baked cream didn't sound that great to me, but I was blown away by the texture and flavor. It's like nothing I've ever tasted before and definitely worth making at home if you can't easily purchase it where you live. Even then, I think it's worth making at home at least once!
While making clotted cream does take a while, it requires very little effort. You literally pour the cream into a baking dish and cook it at a low temperature for 10-12 hours and then refrigerate. It's mostly hands-off and this homemade clotted cream recipe will take all the guesswork out of it and the result is delicious clotted cream!
Ingredients & Substitutions
There is only one ingredient in authentic clotted cream and that is cream. However, don't rush out to the grocery store and buy heavy cream without reading this section because the type of heavy cream you buy will have an effect on the outcome.
Heavy Cream
While this is the only ingredient in clotted cream, there are some things to be aware of before you decided on which kind of heavy cream to purchase.
If possible, I recommend purchasing low-heat pasteurized (the label may just say pasteurized) non-homogenized heavy cream with at least a 36% fat content.
First, let's talk about fat content. Clotted cream is usually made from double cream which has a fat content of at least 48% and if you can find that where you live and it has not been ultra-pasteurized (more on that later), definitely use that. When you use double cream the resulting clotted cream is about 55% fat and that will be the most traditional clotted cream found in the UK.
In the US, double cream is not readily available, in fact, I've never found it anywhere. The closest we have usually is Heavy Cream and the food and drug administration mandates that anything labeled heavy cream in the United States be at least 36% fat, this would include heavy whipping cream as well.
If the label says regular whipping cream or light cream, it is going to have at least 30% fat and would not be the best option for making clotted cream at home.
It's important to read the labels and get the highest-fat cream you can for the best results. Fat content isn't the only thing to look for, though. Most heavy cream in the US has been ultra-pasteurized for longer shelf life. I recommend using heavy cream that has not been ultra-pasteurized for the best yield and flavor.
Ultra pasteurization is not to be confused with pasteurization.
Almost all milk and cream have been pasteurized before it is sold to the public in grocery stores. Ultra pasteurization takes things a step further and uses higher heat to kill more bacteria which increases the shelf life of the cream until it is open. Unfortunately, ultra pasteurization does affect the yield and flavor of the clotted cream.
What does homogenized mean? It's the process of breaking down the fat particles through a high pressured system that allows the fat to mix with the milk uniformly so it does not separate. Most dairy products we buy in regular grocery stores have been homogenized. This will be noted on the label.
Since homogenized cream is processed with the specific intention of it not separating, it makes sense that it has a harder time developing into clotted cream. This is why the yield is less when using homogenized ultra-pasteurized cream.
There is a difference between raw milk and low-heat pasteurized milk and cream. You can absolutely use raw cream if it is legal to purchase or you can get it in your state. Most states in the United States don't allow the sale of raw milk products or, at the very least, they are regulated to some degree. Raw dairy products have not been heat treated to pasteurize them.
The good news is you can usually find low-heat pasteurized non-homogenized cream at specialty stores in the US. Look for a Whole Foods, Trader Joe's, or a local creamery near you.
Below, I will go over my experiment using ultra-pasteurized heavy cream to make clotted cream.
Can You Use Ultra Pasteurized Cream to Make Clotted Cream?
I have read articles online saying you can't make clotted cream from ultra-pasteurized heavy cream and articles that say you can. So, I tried it and this is what I found.
It worked, but the yield was less and the flavor was slightly different. For 1 cup of ultra-pasteurized heavy cream, I got about ½ cup of clotted cream compared with low-heat pasteurized non-homogenized heavy cream which resulted in about ¾ cup of clotted cream per 1 cup of cream.
The flavor was good and the consistency was good, but it didn't have the depth of flavor that I got from using low-heat pasteurized non-homogenized cream. To best describe the difference in flavor would be that it doesn't have as much of a nutty flavor. Think clarified butter versus Ghee.
When I first pulled the ultra-pasteurized batch out of the Ninja Foodi, I was convinced it wasn't going to work. It looked really runny and not set at all. However, once I refrigerated it, it firmed up quite nicely.
I ended up refrigerating it for 2 days because I got busy, so I'm not sure if that had anything to do with it setting up so nicely. I would recommend refrigerating for at least 12 hours and then checking it. If it seems a little runny still, don't give up. Put it back in the fridge for another day or so and it should be just fine.
Here is the top of my clotted cream after 48 hours of refrigeration using ultra-pasteurized heavy cream and following the same dehydrating instructions listed in the recipe card below.
It looks very similar to the batch I made using low-heat pasteurized heavy cream, but the "clotted" part wasn't quite as thick.

There was quite a bit more of the thin cream in the bottom resulting in less yield of clotted cream.
The bottom line is you can go to the store in the US and buy a carton of Heavy Cream that has been homogenized and ultra-pasteurized and make clotted cream. It just gives you less yield and the depth of flavor is slightly different.
It is absolutely worth making clotted cream even if you can't find low-heat pasteurized heavy cream where you live!
Now that that barrier has been removed and you can use regular old store-bought heavy cream to make your clotted cream. What will you do with it once you make it? Read on to see all the different uses for clotted cream!
What is Clotted Cream Used For?
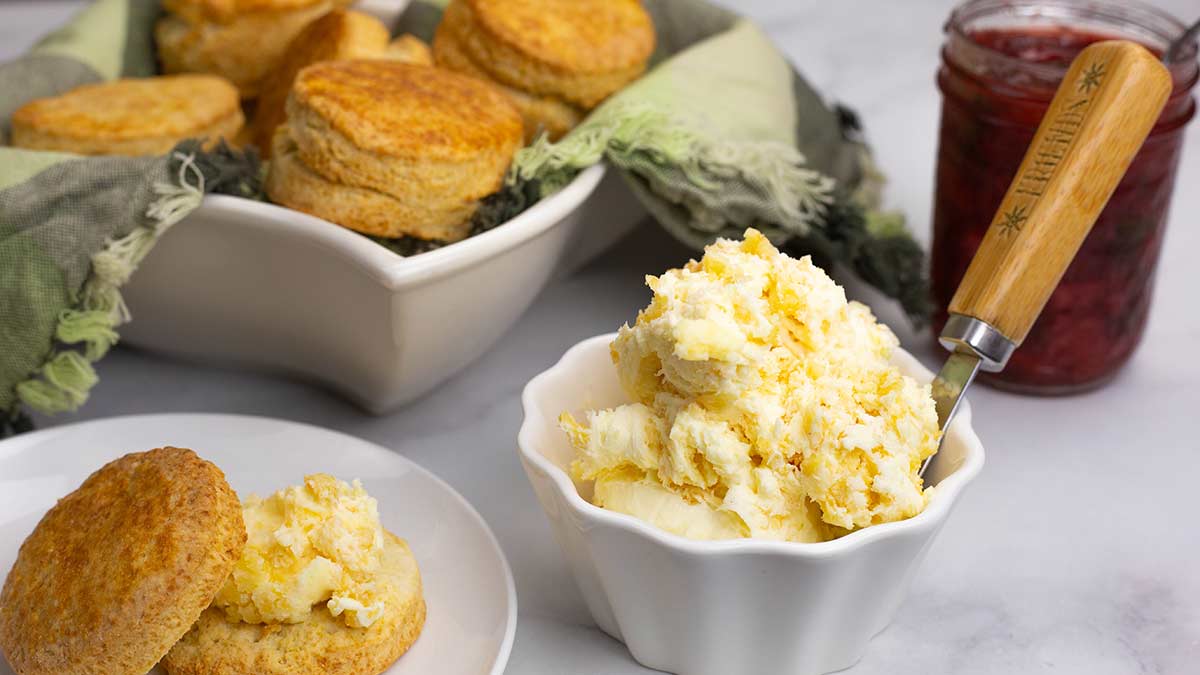
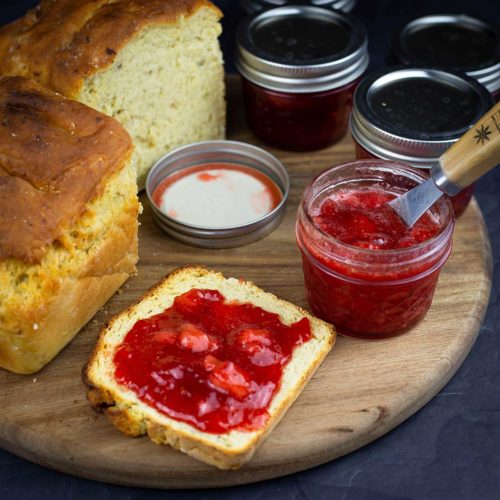
The most popular use for this thick cream is to slather it on homemade scones with some strawberry jam and, let me tell you, it's delicious! However, there are many other uses for it and, although it doesn't taste like butter exactly, it can be used whenever you would put butter on something.
You can also use English clotted cream on:
- warm cornbread
- toast or English muffins
- muffins
- Irish Soda Bread
- quick bread like banana bread or zucchini bread
- as a fruit topping
- in fudge recipes
- ice cream recipes and more!
Basically, you can use this decadent cream on anything you would use butter on. Now, I know you want to make it, so let's get to it!
How to Make Clotted Cream at Home
When deciding to make clotted cream, it's a slow process and an investment in time, so purchase the best quality cream you can (low heat pasteurized, non-homogenized heavy cream) and choose a cooking method that is feasible for you AND results in a delicious clotted cream.
99% of the time it is completely hands-off, but it's going to take about 24 hours to make from start to finish. I usually start the process of cooking the clotted cream before I go to bed and then refrigerate in the morning and don't plan on using it until the next day.
Making clotted cream is all about time and temperature and there are numerous cooking methods to choose from. I will go over all the ones I know of and give you my opinion on the results they will deliver.
Choose Your Cooking Method
The first step is to choose your cooking method. After trying several, my preferred method is using the Ninja Foodi Pressure Cooker & Air Crisper or the Ninja Speedi which can also be considered the dehydration method. So, if you have an appliance that dehydrates, that would be my first choice.
There are tons of recipes online for making clotted cream in different ways and I can't say if they work or don't work because I haven't tried them all. What I can do is give you my opinion based on many years of cooking which ones will work best and give you the best results.
This is not to say that other methods won't work and if you want to try any of them, I'd love to hear your outcome!
In order to make this a little simpler, let's divide the cooking methods into two categories; wet cooking methods and dry cooking methods.
Wet cooking methods
- Slow Cooker Clotted Cream
- Instant Pot Clotted Cream
- Sous Vide Clotted Cream
- Double Boiler Clotted Cream
- Stovetop Clotted Cream
You can find recipes for all of the above on the internet, but I don't think the results will be as good as using a dry cooking method. A wet cooking environment like all of these methods are, is not going to give you the crusty golden color on top like with dry cooking methods. This golden skin is full of flavor and for me personally is what makes clotted cream so delicious.
If you look at photos online using these wet cooking methods, you will see exactly what I'm talking about. As time permits, I will try these different methods and update this post with my findings. Who knows, I might be pleasantly surprised and change my mind.
For now, though, I recommend using one of the dry cooking methods below.
Dry cooking methods
Oven Method for Clotted Cream- Whether or not the oven will work for making clotted cream really depends on your oven. Most modern ovens have different settings and can achieve and hold a temperature of between 170-180F/ 76-82℃ for 12 hours and, if yours does, this method will work great.
Some older ovens don't have a temperature setting low enough and I tried to make clotted cream using a setting of 200°F and it became too dark on top and didn't have the right flavor or texture. I stopped the process before it was done because I knew it wasn't going to work. So, if you want to use the oven, make sure you have a temperature setting between 170°F-180°F.
Pros: You can make a larger amount of clotted cream at once
Cons: The oven is on for 12 hours straight which can be a bit uncomfortable in the hot weather and it ties up the oven.
Dehydrator Clotted Cream- This is how I made my clotted cream and I've tested the recipe in the Ninja Foodi Pressure Cooker & Air Crisper and the Ninja Speedi. Both worked perfectly.
My first batch was done on 180℉/80℃ and I thought it was a little too brown on top. It was delicious, but I think you will have better results using 170℉/75℃ IF you are using a small dehydrator like the Ninja Foodi PC & AC, Ninja Speedi, Ninja Indoor Grill, Instant Pot Duo Crisp or Pro Crisp, or any small appliance that has a dehydration function.
If you are using a larger dehydrator with more heat loss because of its size, I would increase the temperature to 180℉/80℃.
Pros: Very reliable outcome. Doesn't tie up the oven. Lower heat in the kitchen.
Cons: Smaller batches are usually necessary unless you have a large dehydrator.
Choose Your Cooking Container
Once you choose your preferred cooking method, you will need to find something to put the cream into to cook it. The container you choose is critical in the outcome and will determine how much cream you can use per batch.
It could also affect the temperature you set to cook the clotted cream on. Different materials conduct heat differently, but any container that fits in the appliance you baking your cream in AND is safe to cook in will be fine.
Just follow these guidelines and you will be fine using whatever pan you have on hand.
No matter what material the pan is made out of, you only want to have 1-1½" of cream in the bottom. So, for the most yield, pick the largest pan you have that will fit into the appliance you are using. You want as much surface area of the cream exposed to the heat as possible.
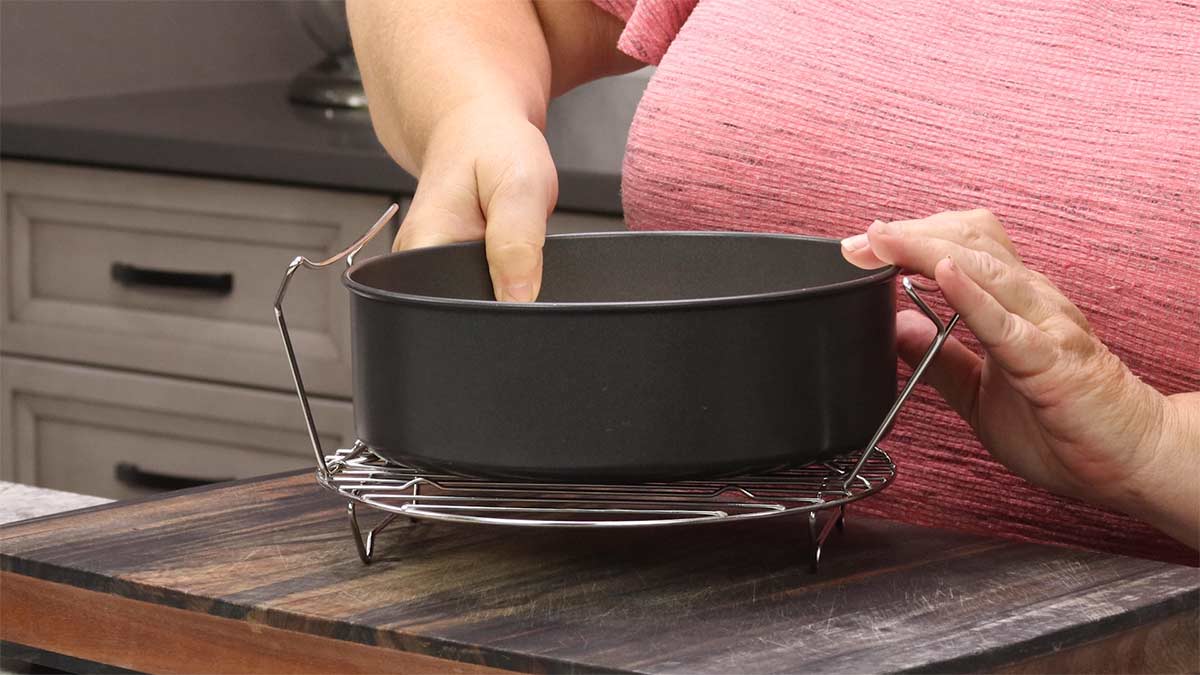
I used the Ninja Foodi All Purpose Pan which is about 9" in diameter and was able to make 2 cups of heavy cream which yielded about 1½ cups of clotted cream.
You will also want to make sure the pan you are using fits on the rack or trivet with enough room to close the crisping lid.
If you have an 8" Fat Daddio cake pan or another cake pan, it will work fine in the Ninja Foodi, Instant Pot Duo Crisp, or Ninja Speedi. You might want to reduce the cream to 1½ cups instead of 2.
You can use a shallow glass casserole dish if you are using a larger appliance and increase the cream so that it is 1-1½" in the casserole dish.
If you are using a dark-colored pan or an aluminum pan, they conduct heat more than glass, so keep your temperatures at 170℉/75℃.
When using glass containers, you can increase the temp to 180℉/80℃.
Oven Baking or Dehydrating Methods for Making Clotted Cream
The steps are going to be exactly the same no matter which method you use to make your clotted cream.
You do not need to preheat prior to putting your cream in the oven or the dehydrator. It is such a slow process that it won't make a difference.
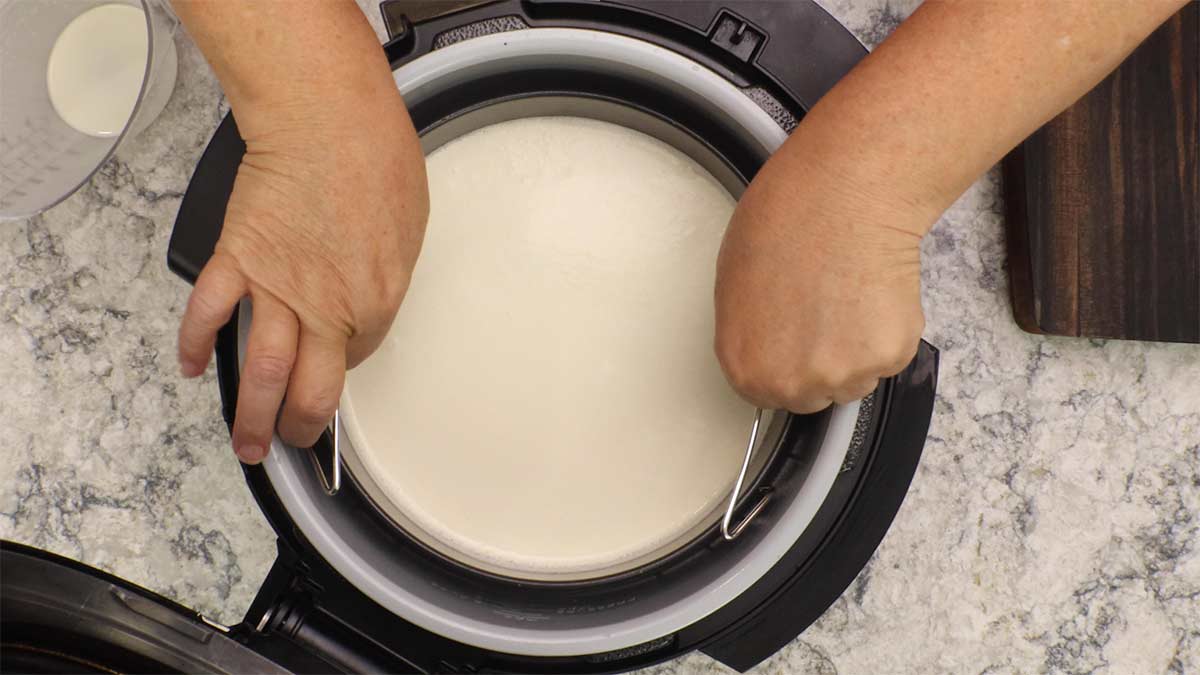
Fill your cooking container with the cream, making sure it doesn't extend more than 1½" up the sides of the container.
Place the dish into the oven or into the Ninja Foodi, Ninja Speedi, or Instant Pot Duo Crisp or any small appliance that has the dehydration function. Do not cover the pan of cream.
If you want to use the Ninja Indoor Grill, you can use the inner cooking pan, but you will need to make sure that you have room to put the entire inner pan into the refrigerator.
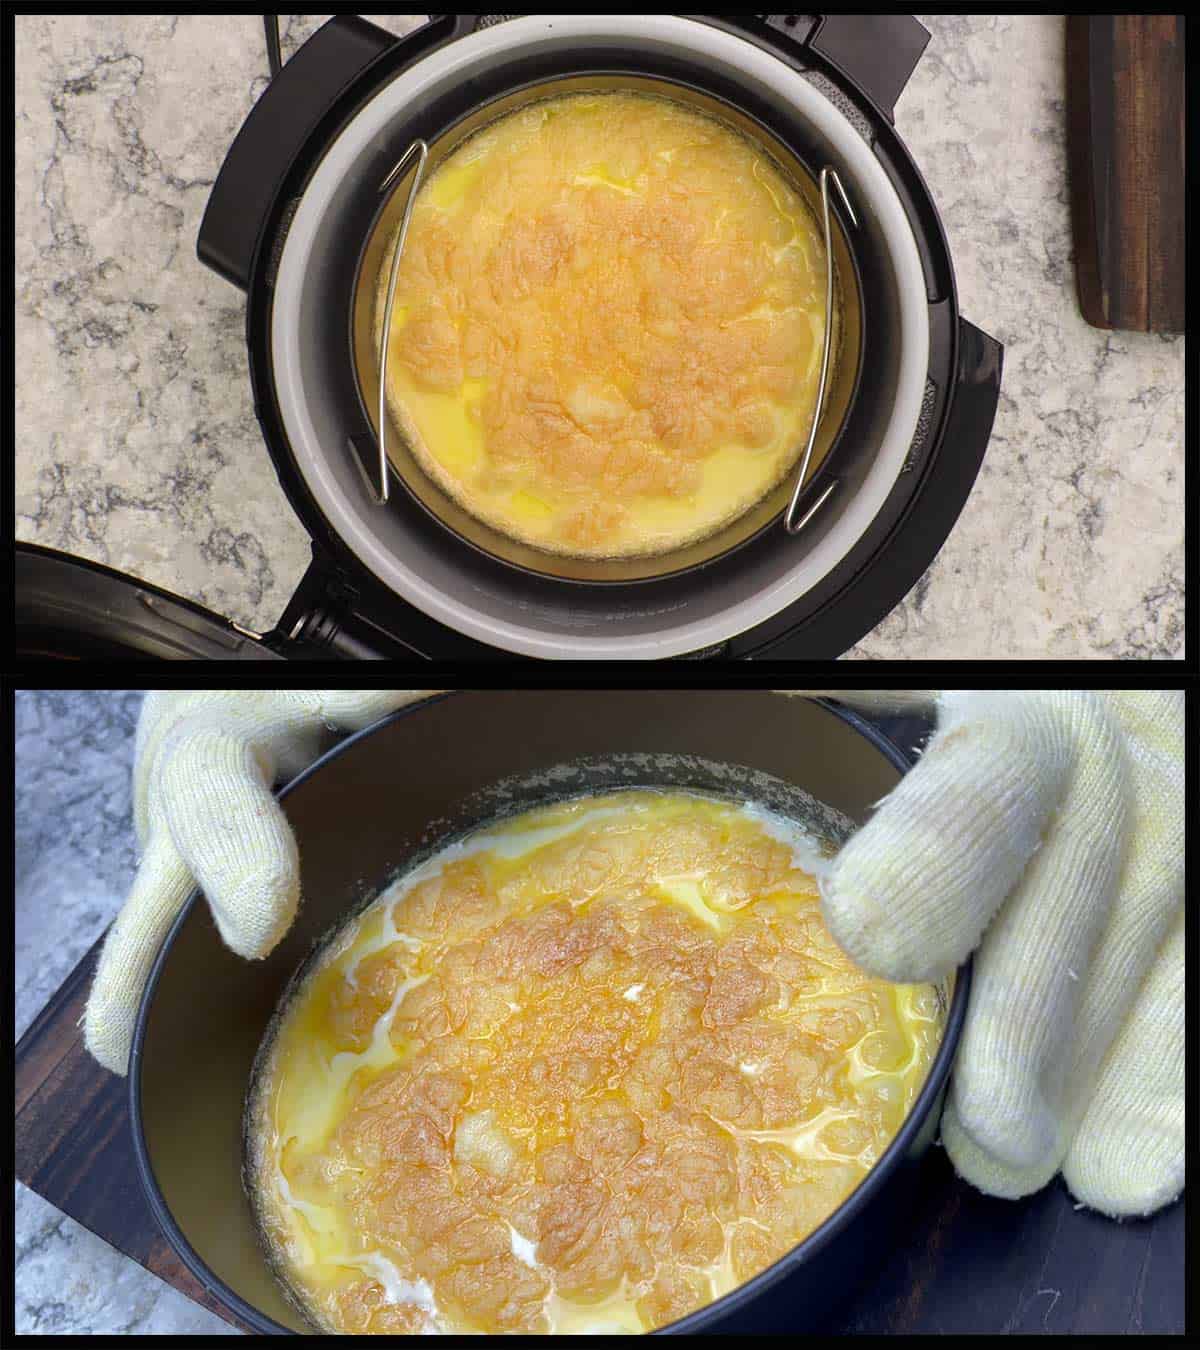
Set the oven temperature to 180℉/85℃ or the dehydrator to 170℉/75℃ and let the cream cook for at least 10 hours. I found that I preferred the flavor and texture of the clotted cream if it baked for a full 12 hours, but that is a personal preference. If you want a thinner clotted cream, take it out after 10 hours.
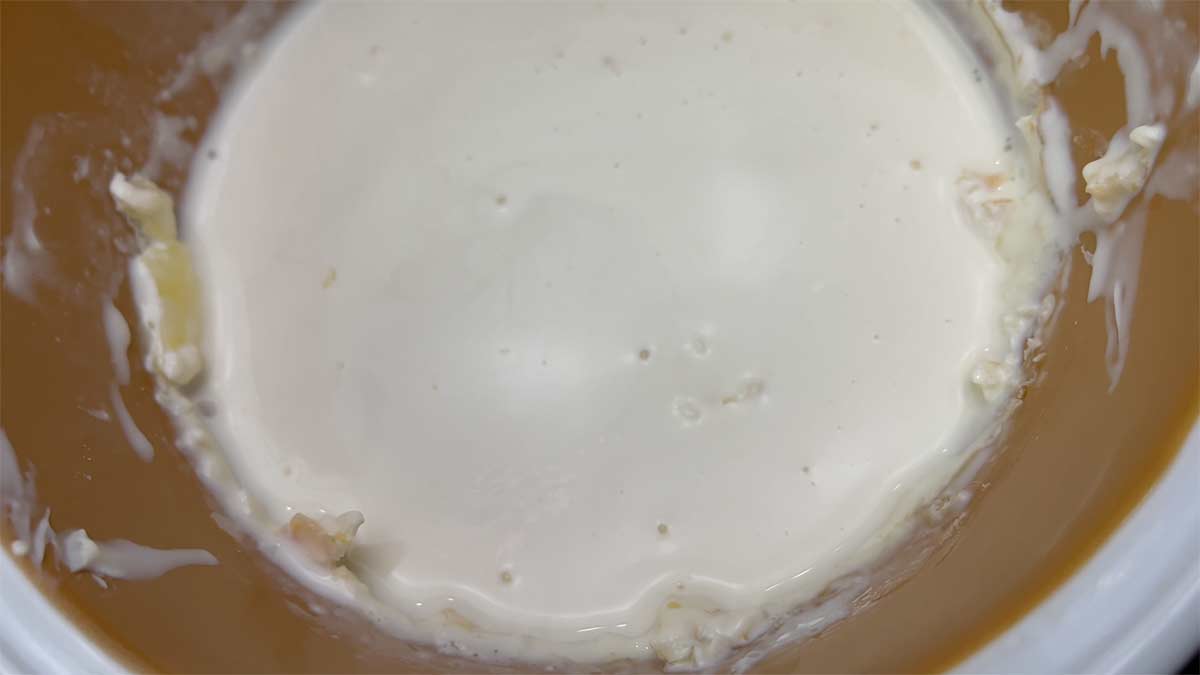
What you want to see is a golden color on top of the cream and it's perfectly normal to see some liquid underneath.
Let the cream cool on the counter for 30-60 minutes and then refrigerate it for at least 8 hours, but 12-24 hours is even better. I don't cover mine, but you could put some plastic wrap loosely on top if desired.
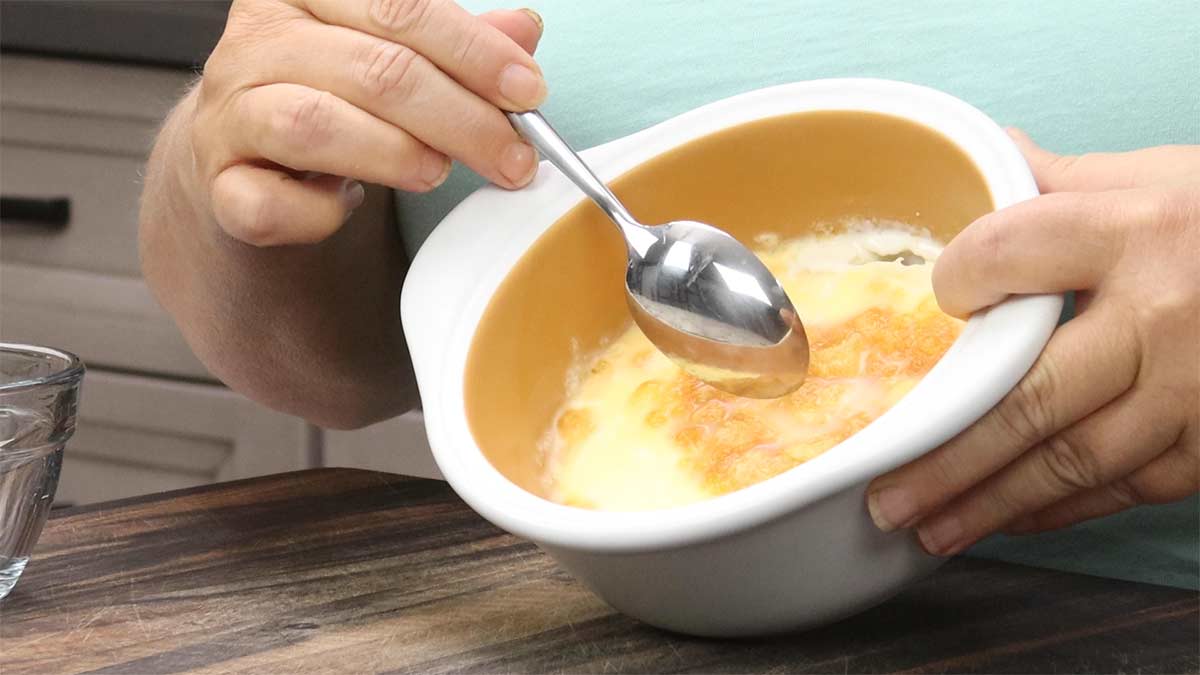
Remove the pan of clotted cream from the fridge and you will see the thick layer of cream on the top. It is completely normal for it to be a light golden brown and flaky on top.
With a spoon, gently scrape the top layer of thick cream and put it into a bowl. There will be some thinner liquid in the bottom of the pan and you want to leave this behind. You can use the leftover liquid to make scones or use it in your coffee.
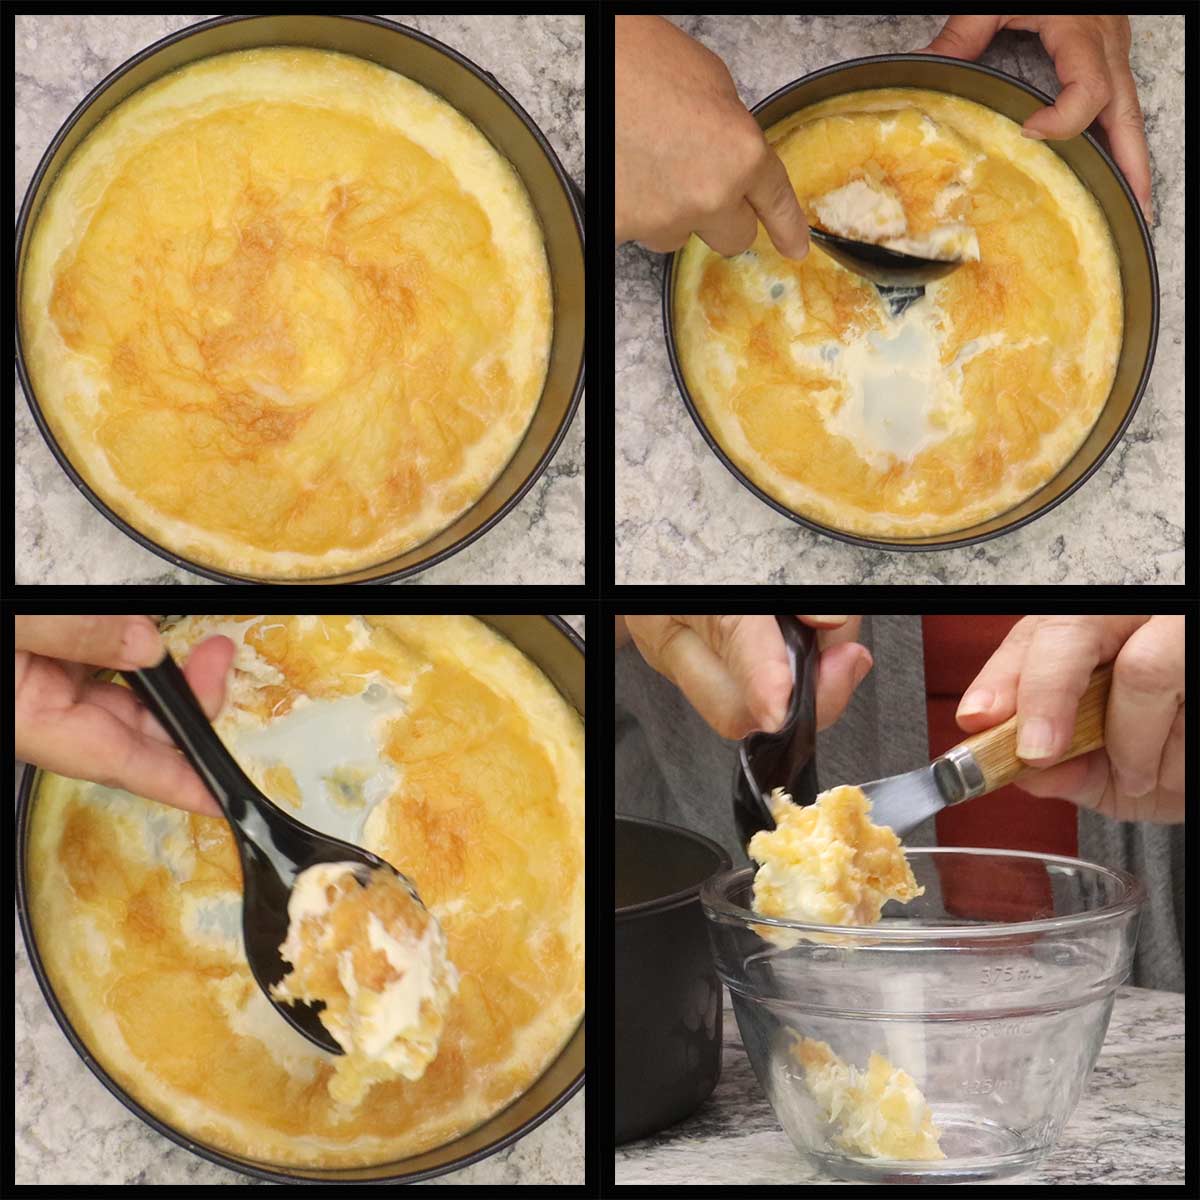
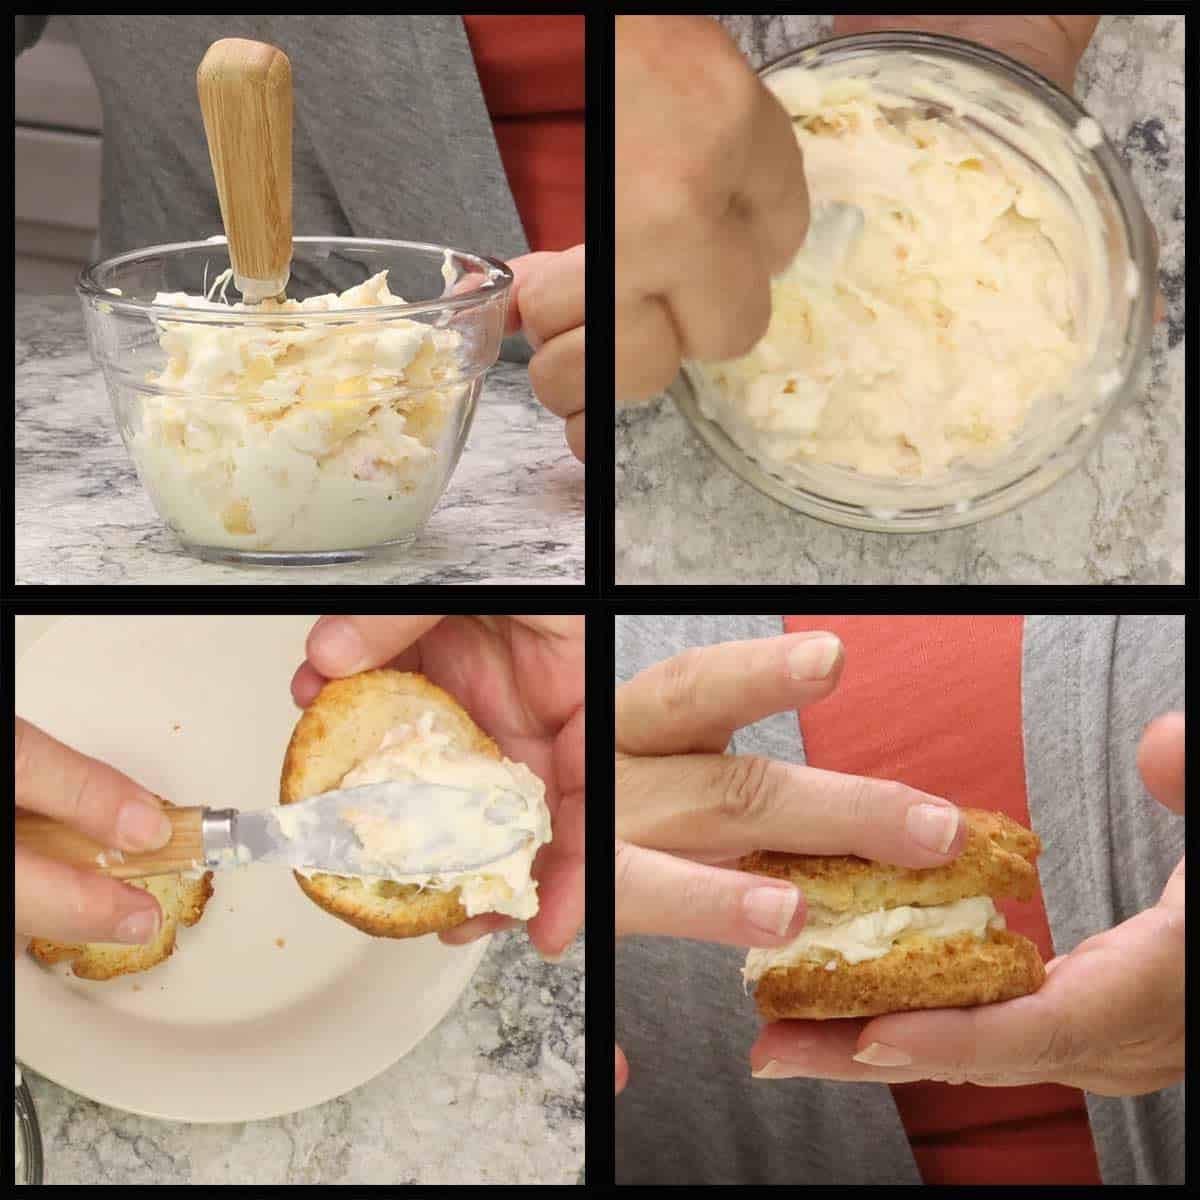
You can mix it with a hand mixer if you want to break it up and incorporate the flaky golden pieces, but I like the rustic look and the texture of it just as it is.
Slather the clotted cream onto a freshly baked scone and put some raspberry jam or strawberry preserves on it. Enjoy!
Store the clotted cream in an airtight container in the refrigerator and it will keep for at least a week IF the cream was fresh when you made it.
Frequently Asked Questions
In my experience, if it is stored in an airtight container in the fridge, the clotted cream will last about 2 weeks. This really depends on the freshness of the cream used to make clotted cream. I recommend using unopened cream that has been recently purchased for the best longevity in the fridge.
You can not leave clotted cream out on the counter like you can with butter, it will turn rancid quickly. Make sure to only leave it out for up to two hours, any longer than that and it should be thrown away.
You can make as little or as much clotted cream as you want, just keep in mind the cooking method, the type of baking dish you want to use, and the yield you want.
If you are using ultra-pasteurized cream, plan on a 50% yield. You want to have at least 1" of cream in the bottom of your baking dish, but not more than 1½" for the best results. Always make sure your baking dish will fit in the appliance you are planning on making it in.
Yes! It freezes beautifully when stored correctly. The best way to freeze it is to vacuum seal it or use a freezer bag and squeeze as much air out as possible. You can also freeze it in silicone molds if you want to portion it out and when they are frozen solid, transfer the clotted cream molds to a freezer bag or vacuum seal it.
It will last at least 6 months in the freezer.
This is somewhat of a hard question to answer because it doesn't taste like anything else, in my opinion. If I had to describe it, I would say it tastes like whipping cream meets butter meets Ghee.
It has a slightly nutty flavor with just a hint of sweetness. What I can say with absolute certainty is that it is magical in its flavors and something everyone should taste at least once!
Homemade Condiment Recipes
If you landed on this recipe for making clotted cream at home, chances are you like to make recipes from scratch. So do I! I love making my own jams, jellies, candy, relishes, and so much more.
Here are some homemade recipes you are sure to love!
- How to make Strawberry Preserves with Frozen Strawberries
- Banana Jam
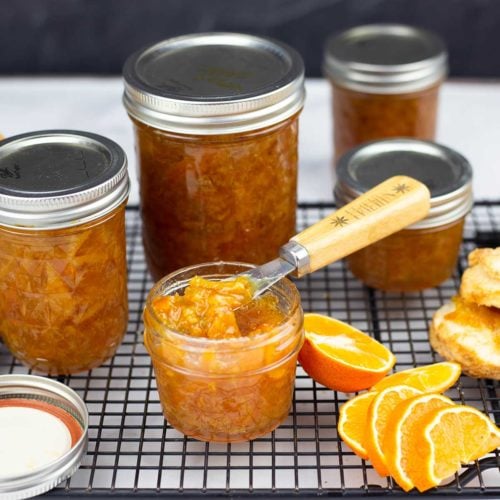
- Quick & Easy Orange Marmalade ~ Pressure Cooker Recipe
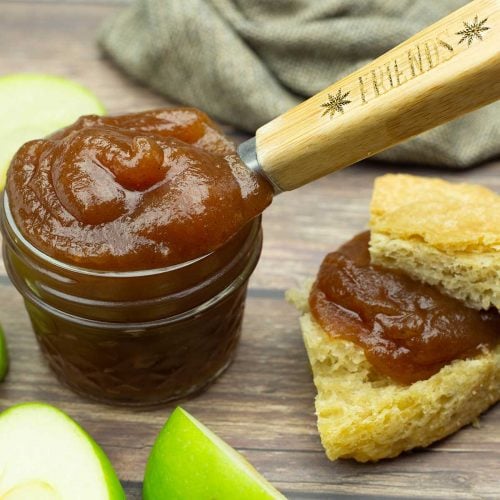
- Pressure Cooker Apple Butter ~ Ninja Foodi or Instant Pot Recipe
- Honey Mustard Sauce (salad dressing or dip)
- Pepper & Onion Relish
- Jalapeno Pepper Jelly
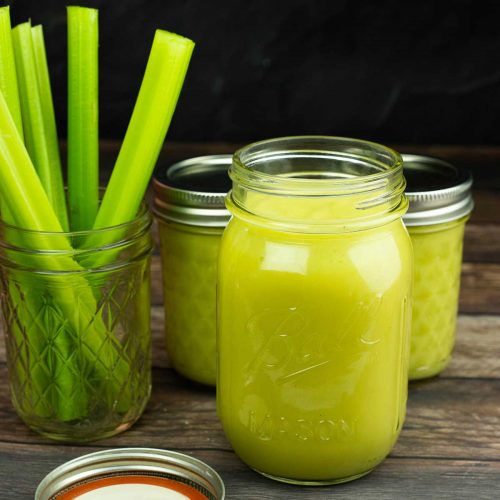
- Condensed Cream of Celery Soup


Homemade Clotted Cream Recipe
Equipment
- oven or
- Dehydrator or
Ingredients
- 2 cups low heat pasteurized non homogenized heavy cream
Would you like to save this recipe?
Instructions
- Place the cream into the casserole dish or all purpose pan you are using to cook it in. Make sure the cream doesn't go up the sides more than 1½". You can use more or less cream depending on the size of your pan.
Oven Directions
- Place the pan of cream uncovered into the oven and set the temperature for 180℉/80℃℃. Let it bake for 10-12 hours. 12 hours will give you a nuttier and thicker clotted cream.
Dehydrate Directions
- Place the pan of cream uncovered into the dehydrator. If you are using the Ninja Foodi or Ninja Speedi use the rack in the low position to hold the container of cream.
- Select the dehyration function and the temperature of 170℉/75℃. Dehydrate for 10-12 hours. 12 hours will give you a nuttier and thicker clotted cream.
Refrigeration
- Remove the pan of cream from the oven or dehydrator and let cool on the counter for 30-60 minutes. Refrigerate uncovered for at least 8 hours, but 12-24 is better.
Serving
- Gently scrape the thick layer of clotted cream along with the golden flaky pieces off of the top of the pan. There will be some thin liquid in the bottom. Leave that behind and transfer the thicker cream to a container or bowl for serving. Serve & Enjoy!
Notes
Nutrition
About the Recipe Author, Louise Long
Louise is a full-time recipe creator and food blogger @ The Salted Pepper. She has over 30 years of experience with cooking and recipe development. She owned a restaurant for several years and was a full-time RN until retiring to blog full-time.

She published her first cookbook in the Fall of 2018 and is very interested in writing several more.
Louise is also the creator of an online Ninja Foodi Pressure Cooking Course with over 100 instructional step-by-step videos. People absolutely rave about the course and all the value they have received from it.
Louise has several very active Facebook groups that help people with the basics of cooking and learning more about the appliances they love.
Ninja Foodi Pressure Cooker & Air Crisper 101
Ninja Woodfire Outdoor Grill & Smoker
Louise is also a YouTube creator and you can find most of her recipes in video format on The Salted Pepper YouTube channel.
She is very responsive to messages and eager to help in any way she can. Get more Information about Louise & contact information
I WOULD LOVE TO SEE WHAT YOU ARE COOKING UP IN YOUR KITCHEN! TAG ME @THESALTEDPEPPER ON YOUR FAVORITE SOCIAL MEDIA PLATFORM WHEN YOU MAKE A DISH!
BE SURE TO FOLLOW THE SALTED PEPPER RIGHT HERE ⇓⇓⇓⇓⇓
The Crunchbird says
Simply add some butter to American ultra paturised cream to increse the fat content. This method works fine.
Louise says
I'll have to try that! Thanks for the tip!
Stan L. says
Had a half pint of organic heavy cream (homogenized) that had unintentionally froze and clumped when defrosted.
Cooked it in my air fryer this round. Got very toasted and golden but after chilling 18 hours there was no liquid!?
I don't understand that, but it's all tasty. Maybe it's an air fryer thing(?) When I tried my oven with my previous try at this, the temperature was too erratic.
I kept it from getting too hot but after 16 hours it never toasted (but did make a good double Devon cream).
I think next time I'll try my oven again, but not freak out when it peaks at 190+ as long as it averages 180.
Kathleen Dean says
Better than Clotted Cream I get in Britain!!!!! However I like to add1- 2teaspoons of siftedpowedered sugar after I remove it from the fridge and beat it a bit
Louise says
I'm so glad to hear that! I bett a little powdered sugar is really good!